Studio Improvements: Part 2 – Near Silence Is Bliss
In the second part of his blog, Liam O’Mullane reconfigures his set-up for optimum performance… ‘I’m off to attend a straw-bale building course as I build my own studio in my garden‘ Since my first blog I’ve been happily working with my newly configured laptop setup. This is placed outside my studio room to […]

In the second part of his blog, Liam O’Mullane reconfigures his set-up for optimum performance…
‘I’m off to attend a straw-bale building course as I build my own studio in my garden‘
Since my first blog I’ve been happily working with my newly configured laptop setup. This is placed outside my studio room to reduce the noise from the MacBook Pro and Thunderbolt chassis I’m running with a UAD-2 Octo PCI-E card. Now there are two issues I need to address. The first is that I’m currently using both of my USB ports – one for an audio interface and the other for my keyboard, mouse and a few other bits.
This seems to be pushing things to the extreme as the moment I add a hard drive or two via a passive USB hub, devices start to appear and disappear sporadically. The second issue is that I haven’t yet connected up any of my USB MIDI controllers – and I have quite a few to hook up.
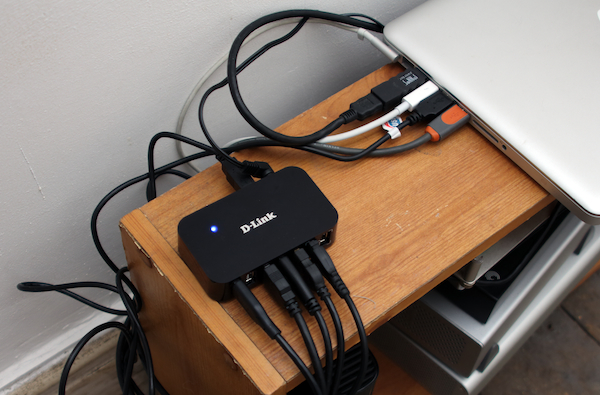
With this in mind, I’ve been thinking of ways to free up my precious USB connectivity to get everything playing together nicely. Our resident Mac and technology expert, Hollin Jones, recommended the D-Link DUB-H7 powered USB hub for a solid connection of multiple devices. I’ve now bought one of these and can connect up all my hard drives without any issues.
For audio, I’ve decided to switch to a FireWire-based interface and have chosen the Focusrite Saffire Pro 40. I have a dedicated FireWire port on my MacBook so it reserves a dedicated connection type for audio, which is important given all the USB connectivity I’m using.
Everything is wired up now and staying happily connected. Next I need to do another cable tidy, by bunching things together with velcro straps and labelling the USB leads in case I need to move things around in the future.
An interesting note here is that I did speak to Apple Support about my options for using a FireWire-to-Thunderbolt adaptor. The audio interface I’ve chosen supports this, but the problem is that these adaptors are terminating, so they have to be placed at the end of a chain. Sadly, I already have a display port-to-DVI adaptor terminating the end of my chain for my LCD screen, so this is something to bear in mind if you buy the latest generation of Macs without FireWire ports and intend to connect your FireWire interface to Thunderbolt and a third-party display.
 Success! All hard drives now seem to stay connected so they can be used easily for tasks like backing up and storing my samples, etc.
I’ve previously used this FireWire interface so I know it’s solid in terms of performance and sound quality. Because I’m using FireWire, I now have a free direct USB connection to my MacBook (on the left), I’ll use this for Ableton Push to start with.
Again, I’ll be testing this setup over the next few weeks, but so far everything seems to work very well. For now, though, I’m off to attend a straw bale-building course as I’m about to embark on building my own detached studio in my garden, and straw buildings seem the best bet in terms of cost-versus-acoustic performance. I’ll explain more in part 3…

I’ll do some more soak testing soon, but for now I’m off on a straw bale building course to prepare for my new studio build.