Studio Improvements: Part 3 – Learning To Build With Straw
Liam O’Mullane begins work on his dedicated studio building… “I now have the option to set-up something more permanent“ Part three of my blog onwards is going to be quite different to the previous entries which discussed my computer’s connectivity issues. Since then I’ve been taking major steps towards building a detached studio in […]

Liam O’Mullane begins work on his dedicated studio building…
“I now have the option to set-up something more permanent“
Part three of my blog onwards is going to be quite different to the previous entries which discussed my computer’s connectivity issues. Since then I’ve been taking major steps towards building a detached studio in the garden.
But before I go through the details of my recent activities, I want to give you a little background on why I’m choosing to build a dedicated studio space.
Throughout many years of house renting, I’ve always run my home studio set-up out of makeshift spaces. I’ll treat the space acoustically to improve my monitoring, but in terms of sound proofing, I’ve just been very careful to choose the best location in each house to work from. But as I’ve finally bought my own property this year, I now have the option to set-up something more permanent. I live in a terraced house which has a private road running down the back for access. I don’t have issues with disturbing my neighbours as I work at very low levels, it’s more that the road is quite noisy with children, bike bells, power tools and infrequent car traffic.
This makes recording and critical listening very difficult unless I choose to work during the night time. The room count in the house is limited, so I’ve decided to bite the bullet and commit to building a space of my own, away from the house and road at the top of the garden. The building needs to be sound proof enough that I can work at any time during the day or night. But the real challenge is money as I’m spending most of my earnings on house renovation. So although my budget is slightly flexible, it needs to be a cost effective as possible. This means I need to do the labour myself to keep costs low and choose materials that are the cheapest they can be while also being effective for my needs.
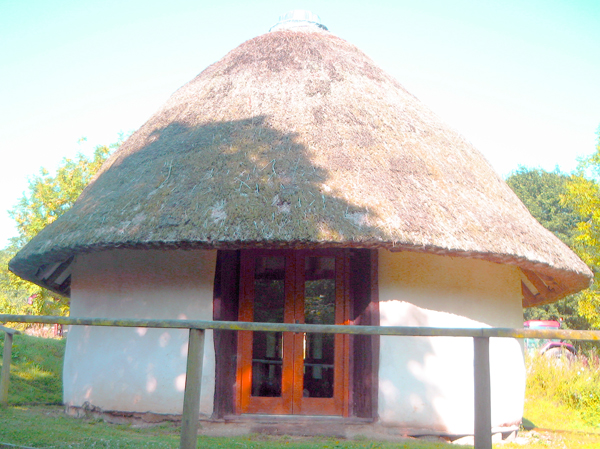 Of all building materials, straw bales seem to offer the best performance versus cost for a soundproof building, especially if you want to do-it-yourself. This round house on the Magdalen farm site (where I attended the course) had a tall internal ceiling space with great live room acoustics.
In part two of this blog, I briefly mentioned that I intended to build my studio out of straw bales because it makes sense in terms of cost, ease of construction and acoustic performance. If you buy building grade bales, straw is a very dense material, creating a good amount of mass to stop sound passing through it.
It’s also fibrous so a lot of sonic energy that does get absorbed by the bales is dissipated as it tries to travel through the many strands of straw. Sound transmission class (STC) is a reading used to measure the acoustic properties of a material. I’m not sure of the STC readings for a bale, but I have visited various straw bale buildings over the years and noticed how acoustically pleasant they are to be in and how well they reject external noise. To take things to the next step I decided to attend a course dedicated to building with straw.
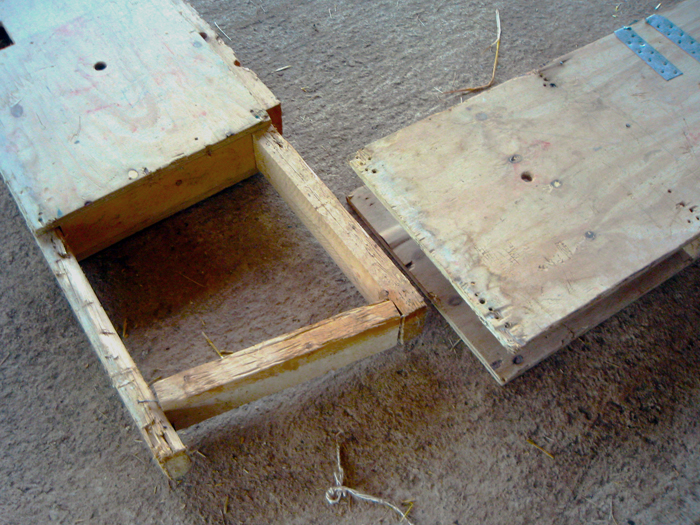
The build starts with a wooden frame called the bottom ring which sits on the foundations. This supports the straw bale walls and raises the whole building above ground level to avoid damp issues to the bottom of the bales and allow airflow underneath. This ring is pre-built in sections, so if your carpentry skills are lacking, you could pay someone to do it for you and put it together yourself on-site.
I chose to attend a two day course with the Dorset Centre for Rural Skills as it’s local to my house in the south west of England. Other courses are available and are worth exploring depending on your location. As the studio will be the first construction I’ve attempted of this scale, my main reason for attending the course was to get hands-on with the materials and have a clear guide to how I need to approach my build.
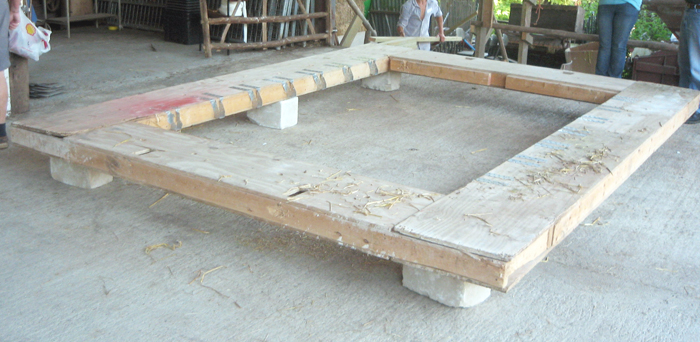
We laid our bottom ring on some make-shift blocks during the course, but various types of foundations can be used. I will be going for car tyres filled with sharp gravel. You can see this method underneath the right hand side of the round house picture above.
I’ve read quite a few books on straw bale building over the years, but like learning any new skill, the wealth of information available can be a bit bewildering to a new comer. So I made the most of my tutor Rob Buckley and asked as many questions as possible about the best materials to use for my requirements. We decided that I will clad the outside of the building with a wood like cedar because the more traditional lime render finish may weather too much as I don’t have much room for a a lot of roof overhang. The inside finish is still undecided but it will either be a wood sheet finish but this may be quite expensive.
The other option is to finish the inside with cob which is effectively mud mixed with other materials to give it a renderable form. This should be fairly cheap and acoustically pleasing as it won’t produce perfectly parallel wall surfaces. I’ve already looked into types of acoustic glass for the windows and the first choice for the roof is a living roof. This involves various layers of materials, but ultimately is a garden with soil etc above your head. It should dampen rain noise quite well but I’m not quite sure yet on its acoustic performance versus the bale walls. The floor construction also needs a bit more thought for the same reasons.
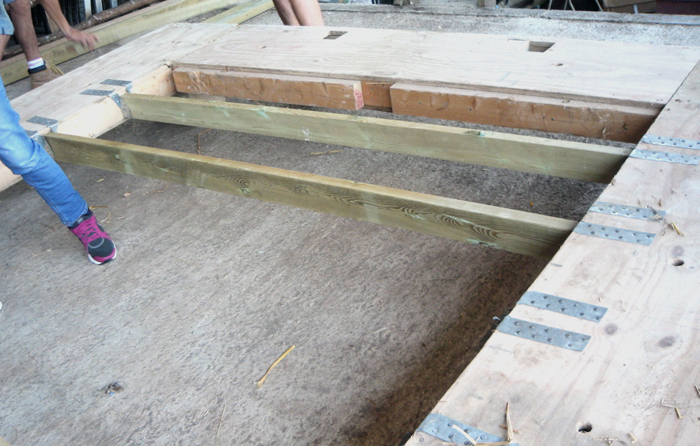
We used brackets and beams to create a basic floor, this area poses a problem as like the roof, it may not have the same sound-proofing properties as the bale based walls.
The course covered building a load bearing construction where the roof sits directly on top of the bale walls. I was a bit skeptical about this approach when compared to a hybrid (which includes wooden frame support) or an infill build that starts with a load bearing frame which is then filled with bales that take none of the roof weight. But once we’d constructed the walls and top ring to sandwich it all together and support the roof, the whole thing was very solid. At this stage the construction was already sounding very isolated from inside, even without a roof. In light of this, I will also go for a load bearing build, but the wood cladding I will add to the outside will help to make the construction even more rigid.
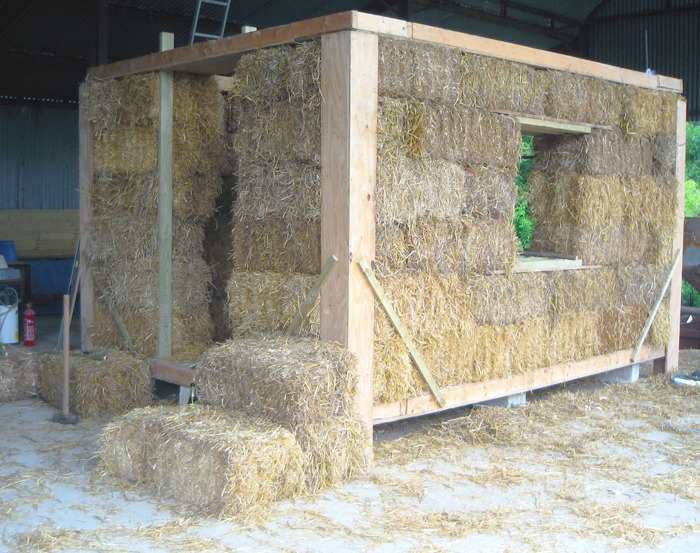
Here we’d adding corner guides, built up the walls and placed a second ring frame on top which supports the roof. It was interesting to stand inside as it gave you a true sence of the space after the deep straw walls are in place. I soon realised my own build needed to be at least twice as deep as this.
Now the course is completed, I feel like I’m ready to commit to a build date. By the time I’m writing part four I hope to have to drawn my building’s design, then calculate materials and costs. I’ve pencilled in the last weekend of October for the build which should motivate me to do the tedious task of taking down the existing shed. Then I need to lay my tyres, order my bails and get stuck in, let’s just hope the weather holds out for me as rain and untreated bales don’t mix.
Web links: Straw bale building course: www.dorsetruralskills.co.uk
Recommended source for building grade bales: www.abbottwessex.co.uk
Over the next few weeks I need to dismantle this shed and fully clear the ground area so I can lay my tyre foundations. I’ll then build both my bottom and top ring frames in my workshop to be in a position to immediately build when my bales arrive later in October.