From Studio To Release: How To Record A Band – Drums
In this brand new series we look at the entire process of recording, mixing and mastering a band – surely the essential skills that any engineer needs. In the first part, let’s start with the drums. Mike Hillier is at the console… Here at MusicTech, we often look at the specific parts of the recording […]
In this brand new series we look at the entire process of recording, mixing and mastering a band – surely the essential skills that any engineer needs. In the first part, let’s start with the drums. Mike Hillier is at the console…
Here at MusicTech, we often look at the specific parts of the recording process in isolation: providing you with all the assistance we can muster for each section, whether that’s recording guitars, programming synths, editing vocals, or mastering.
However, by looking at each process in isolation, it can be difficult to see how the whole fits together to result in a finished song. In this new series, we’re going to follow the development of two songs – both very different in terms of style and instrumentation – from their start in the tracking studio, through editing and mixing, to their final mastering, ready for release.
The first of these songs is Fade by Lock, a modern-sounding electro-rock track combining electronic and acoustic drums with synths and guitars. The other track we will be looking at is Shore by Reptile.
This track will have a looser feel and a more traditional rock sound, driven by acoustic drums, electric guitars, electric bass and an organ.
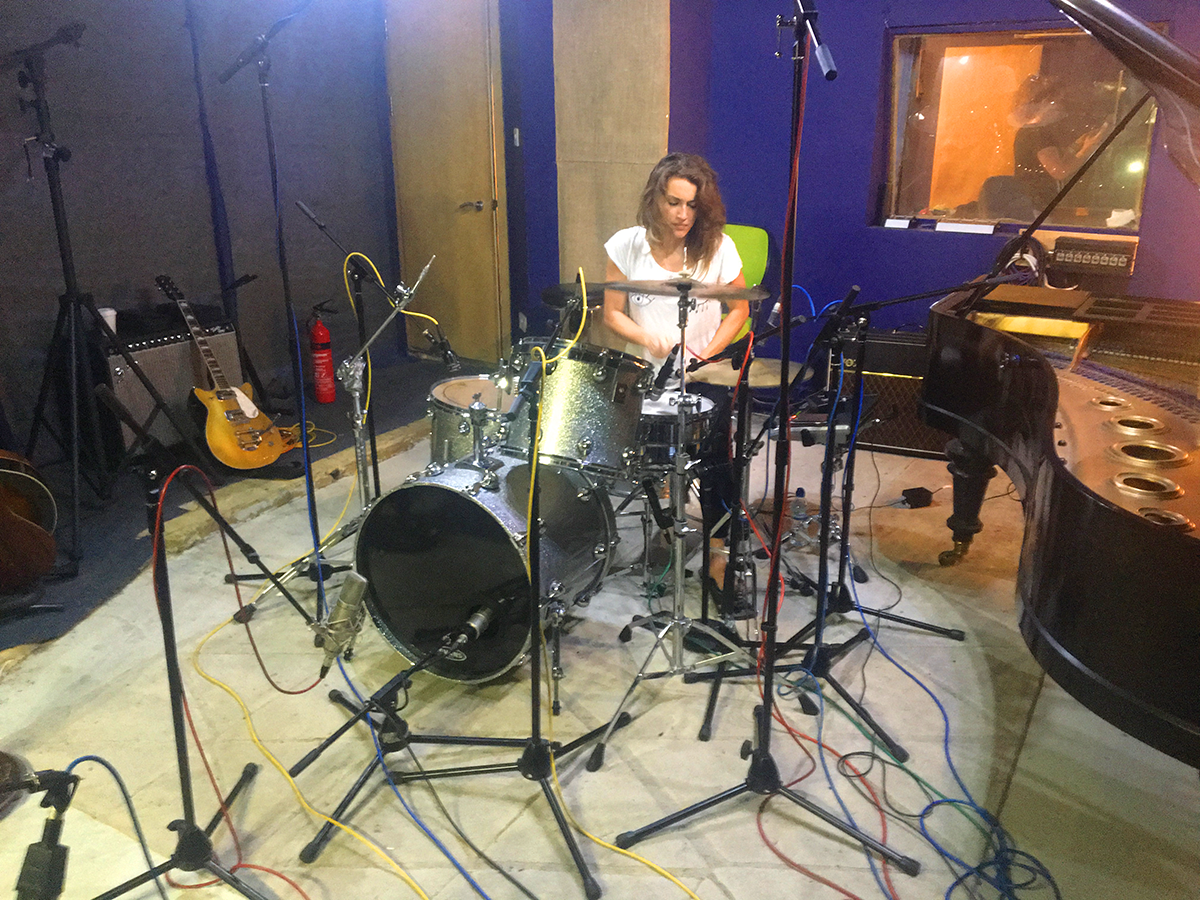
The engineering for both recordings was done in the SSL room at Hackney Road Studios, London, with assistance from Indi Brodley. In this opening part of the series, we’re going to look at the first stage in most modern recordings: recording the drum kit. Whether acoustic or electronic, getting the drum groove right from the start is the bedrock that the rest of the song is going to be built on top of.
Be Prepared
Before you start setting up the drum kit, it’s good to have a plan. You should have an idea in advance of the kind of sound you want to achieve. This will help you choose where to set up the drums, and what microphone choices you want to make.
If the room is big enough, you can probably get a number of different sounds simply by moving the kit into different locations, but even in small rooms, moving the snare a foot or two can change the reflection pattern and, if you’re lucky, you’ll be able to get close to the sounds you need.
The simplest way to test a room is to walk around clapping and listening to the resulting room sound, but I usually take a snare out and walk around hitting the snare – remember to hold it out flat in front of you, as you’re not going to be setting the kit up with the snare at 90 degrees to the floor. The reflections off the floor and ceiling are just as important as those off the walls.
When I’ve found a spot I’m happy with, I then set the snare up there, and start setting up the rest of the kit around that. I will then get the drummer to hit the snare while I walk around the room again, to find a good spot for the room mics.
In the live room at Hackney Road, the room is setup with a ‘dead’ end and a ‘live’ end. Setting the drums up at the live end produces a lot of very close reflections, which can ring a little if not dealt with. Setting up at the dead end produces a much cleaner, crisp sound, and leaves you the option of setting up room mics in the live end, to capture a more distant and dense room sound. This is my preferred setup, with the kit in the dry end and room mics at the far side of the live end of the room, right up into the corners.
The dead end has a ceiling absorption panel along the middle and I like to set the snare up right under this acoustic absorber, facing towards the live end. Sadly, this means the drummer is facing away from the window to the control room, but we can’t have everything.

Tuning
Once you’ve found the optimum position to place the drum kit, it’s time to set up and then, most importantly, tune the kit. In an ideal world, the drummer you’ve got in for the session will be a professional and will be able to tune their own kit, or if you’re on a big-budget session, you’ll have a dedicated drum tech to do this. But in all likelihood, at some point, you’ll be required to do this yourself, so it’s worth learning the basics.
I like to start by hitting the shell of the drum to listen to the overtone of the instrument itself, and then tune the skin to match the overtones of the shell. When tuning the skin, you want to have equal tension all around, and not have one lug tighter than the others.
To get this, start with the lug nearest you and give it a quarter-turn, then move to the one on the opposite side of the drum head, and give that a quarter-turn. Hit the drum; if more tightening is required, move around one lug clockwise and give that a quarter-turn before giving the one opposite that a quarter-turn. Continue until the skin is tuned as you want it.
With a new skin, you may find you need to repeat this action on each lug several times.
Once you’ve done the top skin, or the beater skin on the kick drum, it’s time to go and do exactly the same on the resonant head. Spending this extra time at the start of the session is going to save you a lot of work later on in the mix. In addition, we like to have more than one snare to hand on a session, so we might even tune a couple of options before deciding on which snare to use for the track.
That’s Gone Right Over My Head
You’ll note we haven’t yet set up a single microphone. The importance of getting the acoustics right at the source outweighs anything that comes later. If your kit sounds great in the room, then you have a chance of crafting a great-sounding drum mix.
Anything less than a great-sounding kit won’t sound great in the mix, even with the world’s best mics, preamps, EQs and compressors. You can still ruin a great-sounding kit, but you’ve at least given yourself a chance of crafting a great sound by the end of the mix.
With that done, then, it’s time to look at the mic options available to you. The most important mics of all when mic’ing a drum kit are the overheads. Get these right and you get the overall sound of your kit.
As a rule of thumb, small-diaphragm condenser microphones will produce the most honest sound of the kit, with plenty of top-end snap from the snare. They are also easy to place and can be quickly positioned for a number of different stereo mic’ing techniques. They do, however, tend to sound a little bright, which can work well on some modern pop, metal and hip-hop drum sounds, but is often a bit much for more retro-rock-based styles.
Ribbon microphones are the polar opposite, tending toward a darker sound, with very little of the air frequencies around the kit. Instead, they do a fantastic job of focusing on the important bottom and mid-range frequencies. Many ribbon mics are quite heavy, making them harder to position without high-quality stands. Large-diaphragm condensers strike a sonic compromise. They aren’t as bright or clinical as small-diaphragm condensers, but aren’t as dark and ‘vintage’-sounding as ribbon mics.
It’s good to keep an open mind about which microphones you prefer. It can be easy to step into a pattern of always using the same microphones, but this is something to be avoided. What’s right for one song may not work on the next. Approach each song with a fresh mind.
It’s also important to bear in mind that this is a guide only. The sE RNR1 ribbon microphone, for example, has a fairly smooth top-end all the way up past 20kHz, and so doesn’t sound at all dark like many other ribbons, while the Ear Trumpet Labs Edwina has become a favourite of mine as an alternative to ribbon overheads, because despite being a large-diaphragm condenser, it has a distinctive high-end roll-off.
Once you’ve picked your overheads, you can still further manipulate the sound by positioning them, and on some mics, selecting the polar pattern you wish to use. In most cases, this is going to be cardioid or figure-of-eight, but there are times when omni can come in useful.
Most beginner engineers will go for a simple spaced pair for overheads, placing the mics as high as they can above the kit. But there are plenty of other options, and furthermore, moving the mics a little lower will also have an effect on the stereo field that the mic’ing technique produces, usually producing a wider image as the mics are closer to the kit, but with a less focused centre and often with too much of certain sources.
Placing the mics too high can also have a negative impact on the phase relationships between sources, while lower overheads will increase the distance ratio between the sources on each side, making closer sources considerably louder, and thus reducing the impact of any phase-smearing when summed to mono.
Spaced pairs are easy to set up, and produce a solid, wide stereo image. Some care should be taken to make sure the two mics are equidistant from the snare. You will occasionally hear of an engineer who tries to make them equidistant from the kick, and even more occasionally, someone who will attempt both.
I almost always end up high-passing the overheads. While getting the kick equidistant will ensure it sits in the middle of the image (and in-phase should the mix be played in mono), I don’t tend to leave any subs in the overheads during mixdown, so don’t see much benefit to this technique – not to mention that the maths involved in getting two mics equidistant to two sources is tough.
I usually use a spare mic cable holding one end to the centre of the snare and then position the two mics so that they are the same arbitrary length of cable from the snare. This technique ensures the signal from the snare, arguably the most important sound in the drum kit, hits the capsule of both microphones at the same time, placing it dead centre in the mix, and with no latency induced smearing, or phase cancellation.
The biggest weakness of a spaced pair is that it tends to produce a wide stereo image with a hole in the centre. This can, however, be used to our advantage as it leaves more room in the centre for the vocal.
Coincident pairs produce a more solid centre image, with less width than a spaced pair, and as a result, aren’t used for overheads all that often. But there are still plenty of opportunities to use this technique on drums, where a sparse mix (for instance) isn’t otherwise filling the centre image.
One of my own favourites for overheads is the ORTF technique, which places two mics 17cm apart at 120 degrees to each other. This technique produces a fairly solid centre image, but still has a fair amount of width, and can be achieved quite easily using a single mic stand and stereo bar.
The Glyn Johns and Recorderman Techniques
use a spaced-pair technique with very specific placement of the two microphones. The first overhead in both techniques is placed directly above the snare, while the second is placed above the floor tom – pointing at the hi-hat in the Glyn Johns technique and above the drummer’s right shoulder pointing at the centre of the snare in the Recorderman technique.
Both of these techniques have some diehard fans, but I find the imaging to be a little off using these techniques, particularly when it comes to kits with more than two toms.
The Mid-Side (M/S) techinique isn’t all that common on drum kits, but it can produce some excellent results. This technique uses a mono cardioid microphone as the centre mic, and a figure-of-eight microphone at 90 degrees to the centre mic, to pick up the sides.
This approach has a strong centre image, and lets you dial in as much width as you want, which has definite advantages. Decoding the M/S signal to stereo isn’t all that hard, but isn’t as simple as plugging it into the channel and bringing it up.
It’s best done in software after the fact, by just doubling the side signal and flipping the polarity of one of the duplicates, panning each of the two sides hard left and hard right.
The last stereo technique we want to consider is Blumlein, which places two figure-of-eight microphones at 90 degrees to each other. This technique can be easy to set up with ribbon mics, or some large-diaphragm condensers, and some stereo microphones use a Blumlein pair of ribbons built in. The resulting sound can be quite balanced, but will capture more of the room than a cardioid-based mic’ing technique.
Unlocking The Mic Cabinet
Lock provided me with a copy of the track as a rough demo in advance of the studio session. The demo track has synth parts, drum loops and a piano recording. The band had also provided these as multi-tracks for me to drag into the session to use. As it is built around a loop, the track already has a well-determined rhythm, and our goal here was to record an acoustic drum part that would push and pull with the loops to create the groove.
We were going to need everything nice and tight sounding and we were going to want a lot of control over the individual sounds, so I opted for a pair of Neumann KM 84 overheads set up as a spaced pair. This gives us the overall tone of the kit, with plenty of stereo width. My preference with panning is for audience perspective, so the hi-hat side is panned right and the floor-tom side of the kit panned left. If you prefer drummer perspective, you can easily flip these mics around.
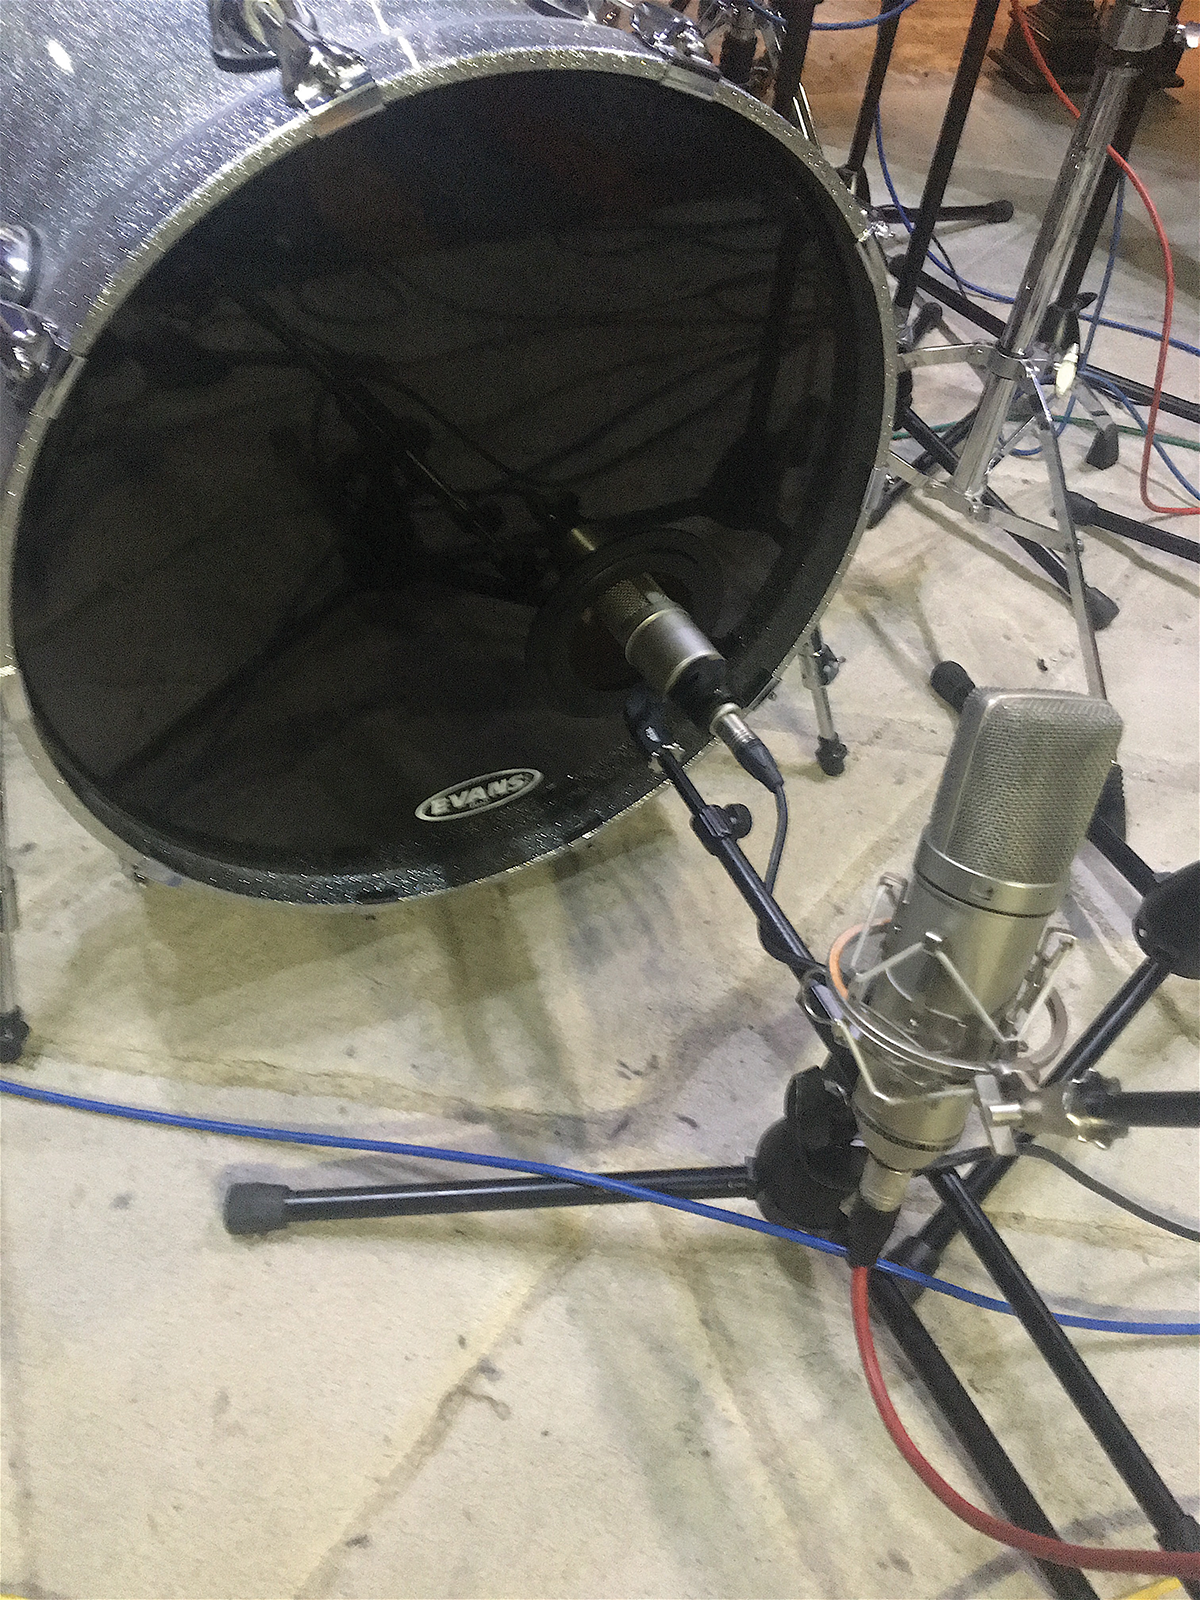
To get as much control as possible, we set up a selection of close mics, including a Heil PR 40 inside the kick, and Neumann U87 outside the kick. I positioned the U87 about 15 inches from the resonant head and about six inches from the floor, in figure-of-eight mode.
I also set up a Sennheiser e 901 boundary microphone just in front of the kick. This mic is specifically tuned for kick drums, and is meant to be placed inside the kick – but as we already had the Heil set up, I decided to experiment with placement outside the kick where, in theory, the boundary effect should be magnified. However, this was an experiment and may well be muted later on in the mix.
On the snare, I opted for a Heil PR 20 on top, with a Shure SM57 underneath. This is a pretty standard selection: the PR20 brings a little more weight to the snare top than an SM57. However, I also decided to add an additional microphone at the side of the snare near the air vent. For this, I used an AKG C414 in cardioid mode, with the pad engaged at -20dB. I tend to prefer the side-snare mic to an under-snare mic, with most songs never requiring an under-snare mic at all.
The toms were mic’d with a pair of Audix mics: an Audix D2 on rack tom, and Audix D6 on floor tom. Both of these mics are dynamics, with slightly different frequency responses. The D6 has a strong smile curve, boosting the lows, which should help the floor tom to carry some of the low-end energy, while the D2 on the rack tom is a little flatter in its response.
Finally, I setup another Neumann KM 84 on the hi-hat. I’m not all that fond of hi-hat microphones, finding that I almost always mute them when it comes to the mix. But every now and then, a song comes along which needs it, and as I was looking to gain as much control as possible in this mix, it seemed only natural to set one up.
For room mics, I used a pair of Coles 4040 ribbon microphones set up as a spaced pair at the back of the room, placed high up into the corners. I also set up a single mono room mic about six feet from the kit. For this, I used another AKG C414, in omni mode.
This is a lot of open channels, and is almost certainly overkill. However, just because we’ve tracked 15 different mics, doesn’t mean that come the finished mix, we have to use all 15. When capturing drums for two or more songs in one day,
I‘ll often take this approach, capturing as much as possible, often with two or three different sets of room mics, but then mute different sets in each mix. This provides me with more tonal flexibility without requiring that I set up the mics independently for each song.
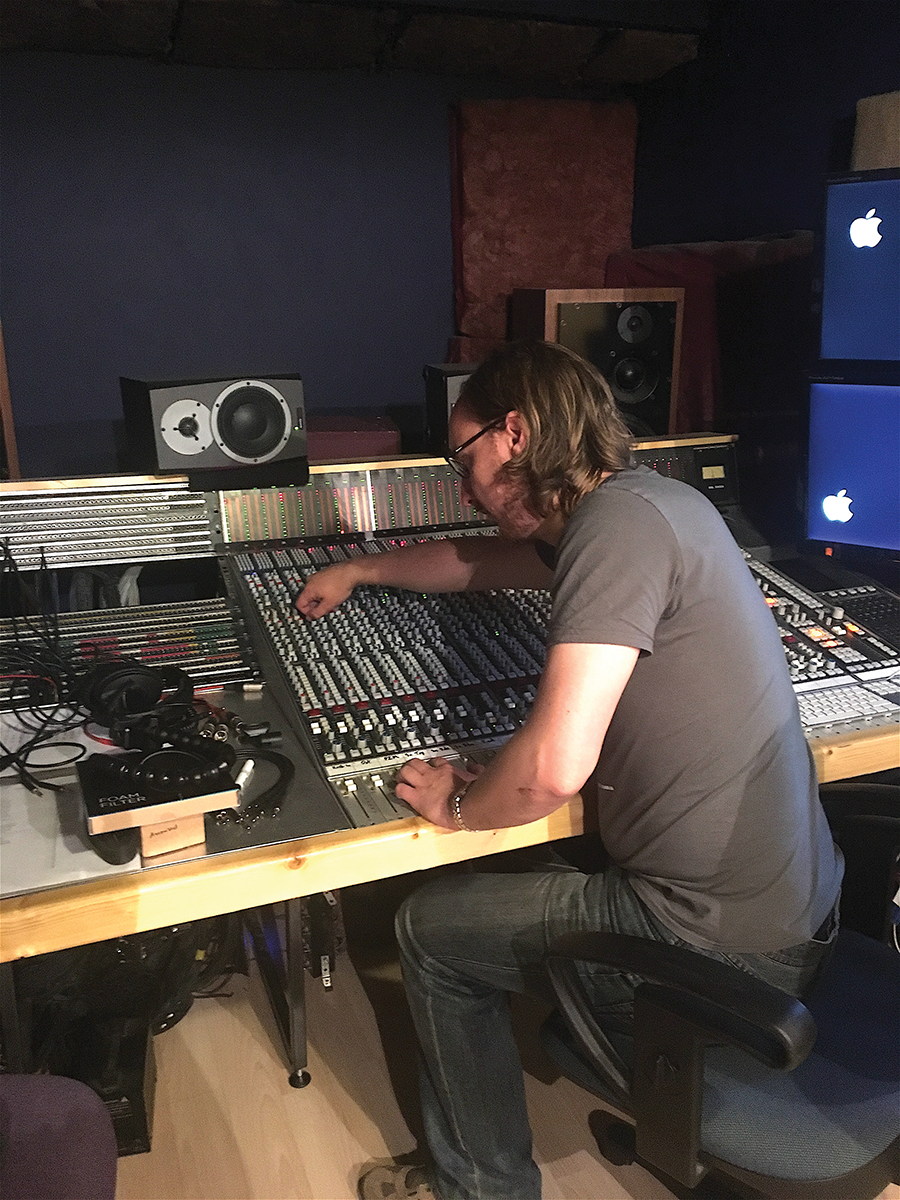
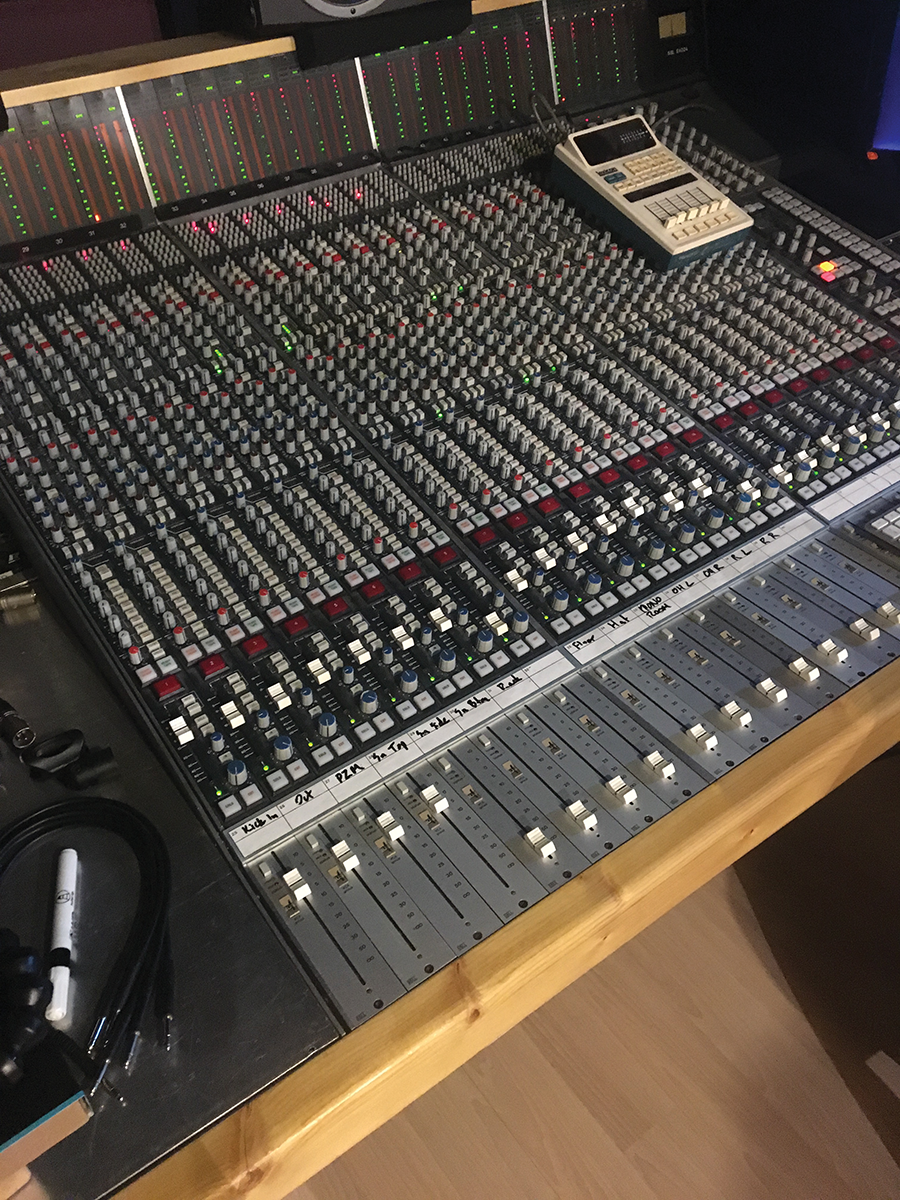
All the mics were then run direct into the SSL 4048E console for the first pass, before patching them into any outboard. For the second pass, I patched in outboard onto several of the channels. Audio examples of the first pass are available on the cover disc, so you can hear the difference in the sounds we achieved with the outboard compared to using only the SSL.
Breaking Out Of The Desk
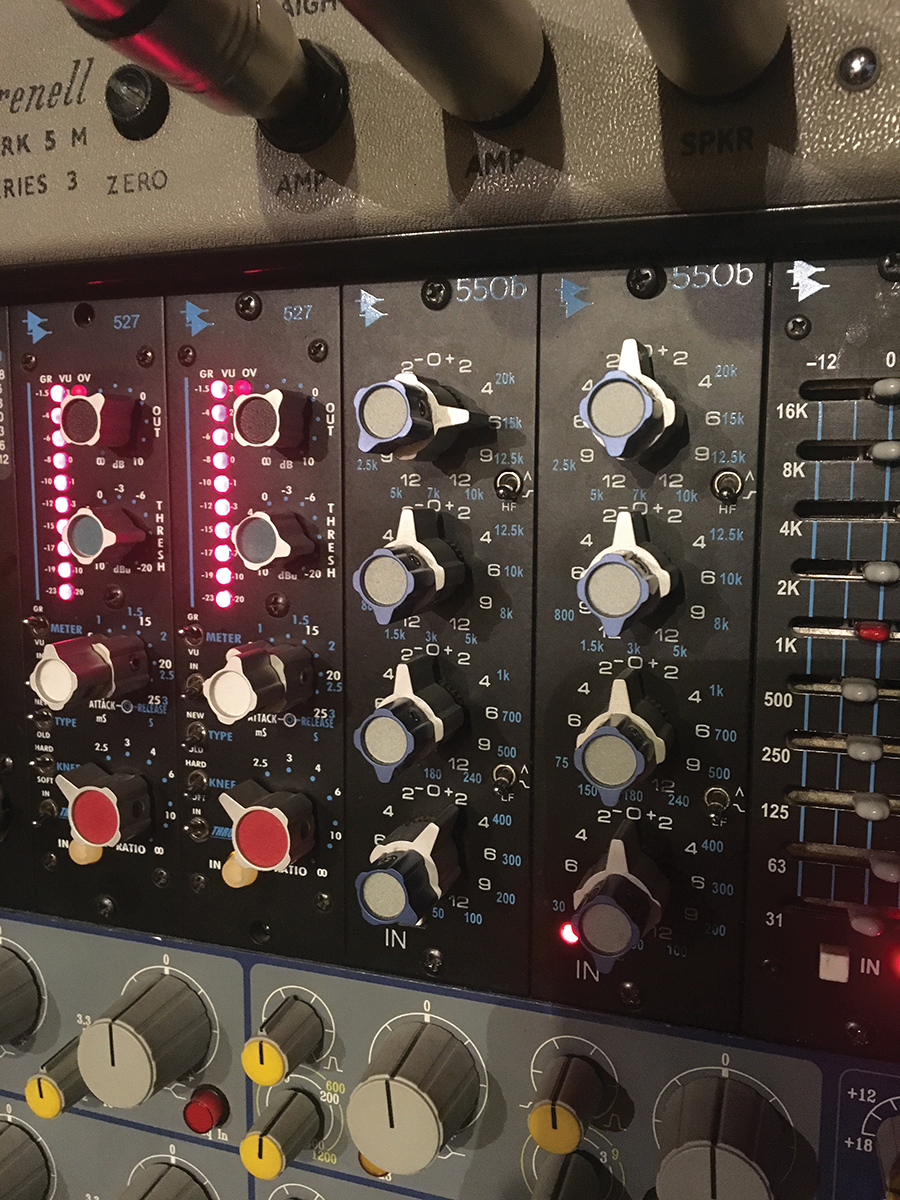
The preamps, EQ and compression on an SSL 4048E console are nothing to be sniffed at, and I often find myself using the console EQ in particular a lot during tracking. However, with so many preamps, EQs and compressors available to use, it’s only natural to want to use some outboard to bring the most out of individual kit pieces, particularly the kick, snare and overheads.
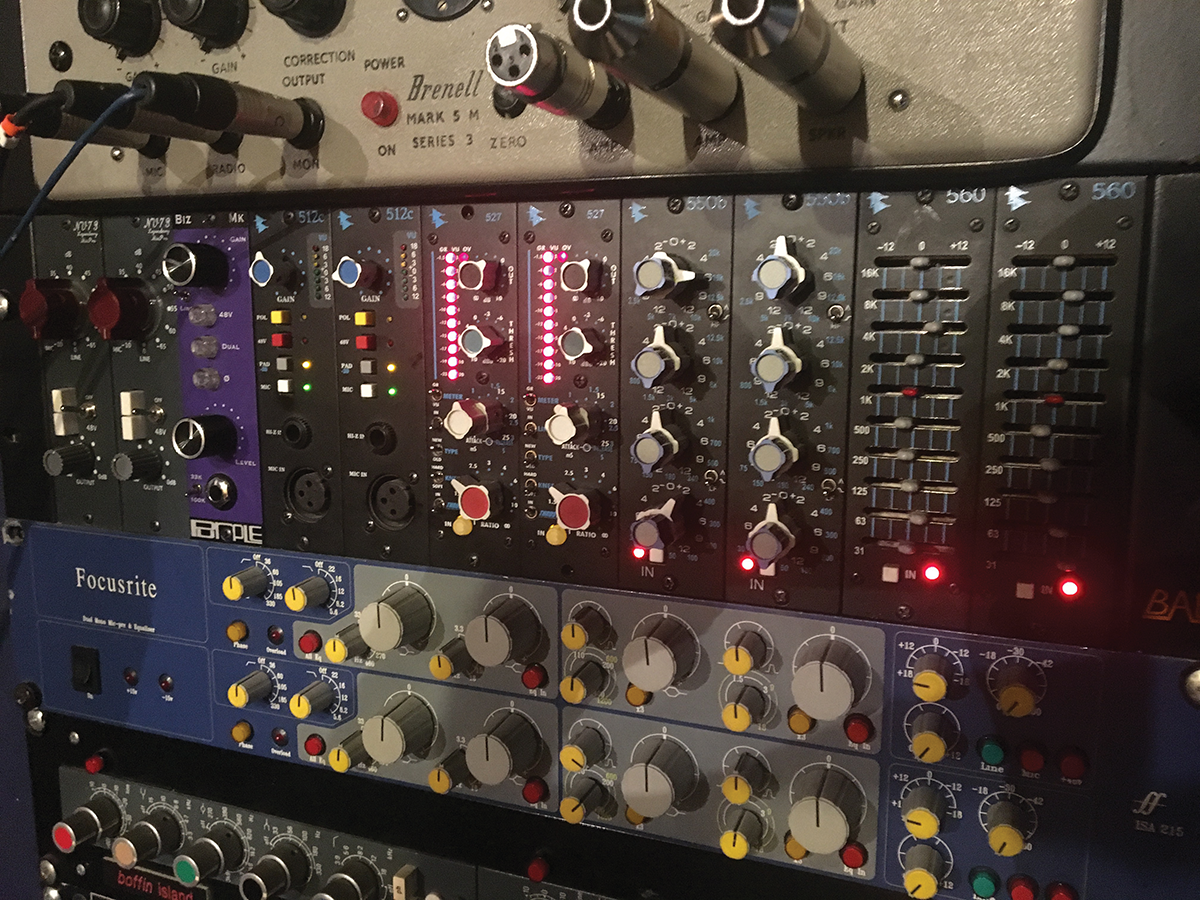
I love the API sound on drums: they’re big and punchy, and if I had enough of them, or an API console, I’d probably only use those. However, the studio only has two 512c preamps in the rack, so I opted to put the most important kick and snare mics through those and the overheads through a pair of Neve 1073 clones. I also used the Purple Biz Mk for the Kick Out mic, leaving everything else for the console to handle.
I also like to track EQ and compression ‘to tape’, so I had several EQ and compressors also patched in on the channel inserts. Using the channel inserts (rather than patching directly) enables me to more easily compare the effect of the EQ and compression on and off.
Most EQ will be basic – I’m just looking to shape the sounds towards the final mix and not commit extreme settings at this stage. It’s more about subtle tone shaping and keeping track of levels. That said, I did end up filtering the top and bottom of the mono room mic quite heavily and then smashing it into an 1176 with all buttons in, for a big, pumping, smashed room sound.
Normally, at this stage, I would then go through checking the polarity of each channel against the overheads. To do this, I solo the overheads on the console and then solo each channel in turn, flipping the polarity, listening to see which has more punch, more bottom end, and more focus. It’s usually very, very easy to hear the difference, and doesn’t take long at all to do. I would normally do this on the console, but in order to show this in this instance,
I have done all the polarity inversion with the Trim plug-in in Pro Tools. This will enable you to bypass these plug-ins to hear what effect flipping the polarity has. In this particular example, I ended up flipping all the kick mics, the snare top and side, and – oddly – one of the room mics.
With everything set up and patched, I set up a click and checked the headphone mix with Holly Madge, Lock’s drummer. Rather than approach the song in one take, we attacked each section of the song separately. This let Holly focus on the rhythm of each section and gave me an opportunity to learn each section and to provide tips after each pass. It also enabled us to experiment more freely with slightly different patterns and fills.
In the second verse, Holly wanted to add an additional tapping rhythm over the top of the drum pattern. We experimented a little with different tapping methods before ending up with a pattern hit out on the legs of the snare stand. I duplicated all the open drum channels and recorded this pattern. While I’ve only got one copy of this pattern at this point, it would be very easy to copy onto other sections of the song come the final mix.
It’s also important to keep in mind that while I duplicated all of the mics for this, there’s a very good chance most of these will be thrown away come mixdown. But it is much faster to quickly duplicate everything and keep the session running smoothly than to ask the drummer to wait while you mess around picking and choosing the sound you want.
Approach Everything Individually
Unlike Lock, Reptile’s track is not built on top of a pre-programmed performance. Furthermore, the song has more of a loose live-band feel to it, so we decided to record the drums without a click, and to track the bass and organ part at the same time. There was no risk of bleed, as the bass was being DI’d, and the organ was simply a MIDI performance.
Since the drum tracks were going to be live, I didn’t want to replicate the multi-mic setup I’d used with Lock. Instead, I wanted to treat the drum kit almost as a single instrument. For this, I wanted a simpler setup, with just overheads, rooms and one or two spot mics.
I opted to use the same room mics as for the Lock track, in the same position. But this time, I put them through a Focusrite ISA 215 preamp. For overheads, though, I wasn’t going to need the clinical precision and detail of the Neumann KM 84s: instead, I wanted something darker, and more rock ’n’ roll. So I set up a pair of Coles 4038s as a spaced pair, again going through the 1073 clones, and then into an API 550b EQ for a little extra top-end, to make up for the darkness of the mics.
In addition to the drums, bass and organ (more on the instrumental recordings next month), I gave Luke Cloherty, the vocalist, an SM58 in the control room to sing along and provide vocal cues to the musicians as they played along. This also helped me to get a better feeling for the song, and to provide feedback to the musicians to play to the song.
The first few takes were used to try and get a sense of the tempo. Having the vocals there meant I could get a better sense for when Luke was rushing his part and the song needed to be slowed, and after a few aborted attempts, we were able to capture a full take with all of the basic instrument parts captured simultaneously.
Capturing the track with this method relies on the band being well practiced, but should hopefully enable the key rhythm section of drums and bass to lock into a groove together more quickly. Additionally, it allows the tempo to subtly shift.
Drummers will often pick up the pace a little into a chorus, which has the result of giving the chorus more energy. Even though I was using a DI on the bass, I put Sheridan Graham (drums) and Jordan Tozer (bass) in the live room together. This way, they could respond to visual cues from each other as much as the performance itself, a lot like they will have been doing in rehearsals.
In a larger studio, I might have added rhythm guitar and even a bass amp to the mix, with some gobos set up to try and isolate the signals a little. Adding the rhythm guitar would have filled out the rhythm section, and kept all three parts tightly in the groove.
However, this would also have introduced some bleed. If the musicians are tight, and well rehearsed, a little bleed is actually more of a benefit than a hindrance, as it can produce an ambience that is difficult to capture after the event.
The compression on individual close mics pushes and pulls the ambience of the other instruments. The drum overheads, for instance, will capture an ambient guitar-cab sound, which will pump as any compression on the overheads responds to the drums, bring the guitars up between drum hits. Of course, this method does mean spending more time getting the sounds right in the room, and any editing is going to be much more complicated, but I find it to be a great antidote to the everything-on-the-grid-and-tuned-to-perfection style of modern production, which I find leads to stale finished mixes.
Conclusions
Even with the space available to us, we did end up capturing the bass at the same time as the drums via DI, and the keys via MIDI for Reptile’s session. For Lock, the bass and keys were pre-recorded and in both cases, we added the guitars as a later overdub, once the drums had been captured and edited. More on that next month.
The final drum recordings for both sessions should give us everything we need for the two songs. We’ve captured a lot of microphones for the Lock recordings, and may end up removing several from the final mix, or automating certain parts up and down, or even muting them for sections of the track, but having the various options there should give us some great sounds.
These will need to be tidied up quite tightly against the programmed drums, but not so tight as to sound electronic themselves – we want the natural swing of the drummer to play against the metronomic electronic sounds.
As for Reptile, these drums will most likely be left alone. There’s only a few channels to mix with, and the sound is already most of the way towards what we’re going to want in the final mix, with only a little additional processing necessary.
Next time, we’ll be discussing the addition of instruments to the recordings. For Lock, this will be a variety of electric-guitar parts, as the programmed instruments already fill out much of the spectrum. Reptile will need more work. The demo has an organ, electric guitars and a bass part, so lots to talk about next time.