Making the Most of Mastering
In this essential guide, we walk you through the process of mastering, highlighting the processes and approaches to give you a great-sounding final product.
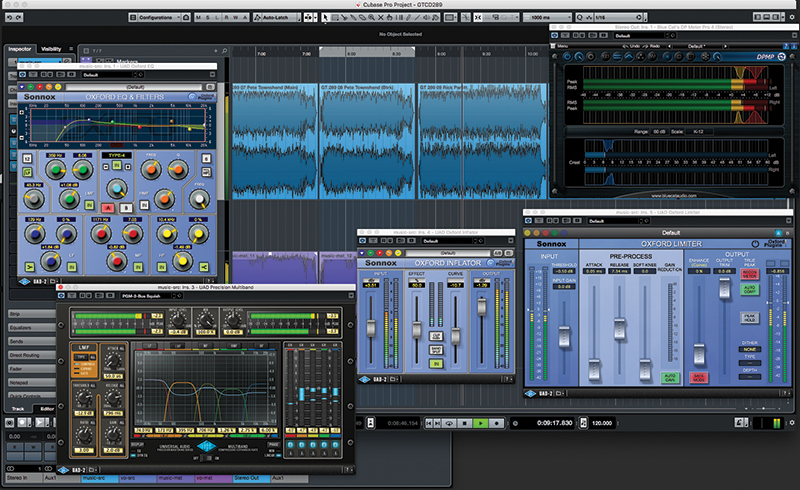
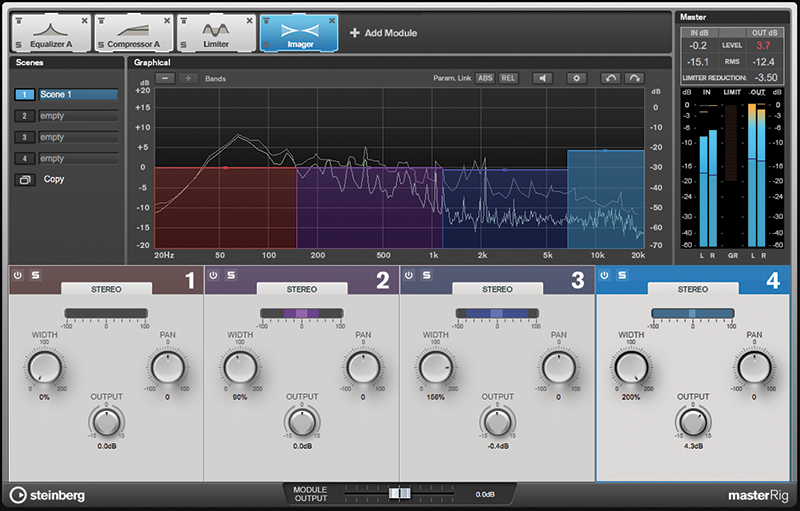
Cubase offers some impressive tools for mastering your tracks
Mastering has often been perceived as something of a dark art, with mastering engineers attaining near-mythical status for their ability to optimise sound in post-production. Here, Adam Crute, who has extensive experience of mastering, outlines everything you need to know about the process…
I have been mastering music and recordings for more than 21 years. Many of those years have been spent working for and contracting to magazine publishers who produce cover-mount discs of audio content every month. I’ve learned a thing or two about mastering over the years. I’ve learned that no two recordings or pieces of music are the same, and so every piece that comes across your desk will need its own bespoke treatment and settings.
I’ve learned that you can’t polish a turd, but that you can sugar-coat one so that it’s not quite so unpalatable. I’ve learned that, conversely, you can easily turn something sweet into something nasty if you don’t handle it right or if you use the wrong processors. I’ve also learned that there’s no hard-and-fast definition of exactly what mastering is. Sometimes it’s nothing at all, other times it requires wholesale reworking of the material in question.
What is Mastering?
The difficulty in defining mastering can make it seem like something of a dark art, but really it’s all a question of perspective: From the point of view of the songwriter/producer, mastering is perceived as a final stage of spit-and-polish that gives solidity and coherence to a mix, as well as being a process that balances and unifies the perceived volume and tonality of the individual components in an album – or montage, as we’ll be calling them – of recordings.
If you look at things from the perspective of a disc pressing plant, then mastering is the process of turning supplied audio content, often referred to as the pre-master, into a final glass (or wax) master disc from which CDs or vinyl records can be mass produced. By contrast, a film or television audio post-production engineer will have a very different take on things, seeing mastering as a process of creating correctly formatted output soundtracks that are required for distribution: mono, stereo, Dolby Digital 5.1, DTS Master HD and so-on. In generic terms, however, mastering can be thought of as preparing material for the next stage in the production process.
Of course, MusicTech is all about music production and technology, so we’re going to come at mastering from the songwriter/producer standpoint, focusing on the tools and techniques that can be brought to bear to polish your mixes to a deep and pleasing lustre.
I’ll also touch on how to process montages of songs so that they sound like they belong together. So from here on, I’ll be using the word ‘mastering’ to refer to the procedures involved in applying a final stage of processing to a mix, and to processing and creating balanced, coherent montages of recordings ready for duplication and/or distribution.
Where Does Mixing End and Mastering Begin?
The line between mixing and mastering can be a blurry one. In general, when discussing mastering processing, what we’re talking about is full-mix processing involving principally gain adjustment, EQ and dynamics. That can also incorporate sonic enhancers/exciters, stereo field adjusters, analogue saturation emulators and so on. Such processing can be applied during mixing, or can be applied separately to an otherwise finished mix, with pros and cons on both sides.
The former approach – what I think of as ‘the classic approach’ – makes a lot of sense, because full-mix processing can impact on the balance and overall sound of the mix. Consequently, applying such processing at mixdown maximises the flexibility and control that the producer has over the sound of the finished product.
This classic approach can be fraught with impracticalities. Firstly, if the music being mixed is to be part of a montage then it may need further processing when the montage is compiled and mastered. However, if each mix has been performed in isolation, the mastering processing used across a given mix may not produce a sound consistent with the other mixed tracks within the montage (especially true if compiling a montage of recordings from different producers or studios).
Secondly, the intended methods of distribution have an impact on how the music should be mastered, and differently mastered versions may be needed for different distribution channels and methods. However, the producer may not know exactly what distribution channels will be used for a given production, nor what new methods may become available that they may want to release the music through in the future.
As a result, the classic approach can lead to the producer having to reconstitute and recreate an entire mix simply to run out a version suitable for a different distribution channel.
Another significant issue with applying mastering processing at mixdown is that there’s less chance that shortcomings in the studio’s monitoring system will be noticed and corrected. I’ll come on to the importance and impact of monitoring later, but the point here is that correcting the results of monitor deficiencies can be an important function of mastering, but one that’s only really possible when the mastering is being tackled as a separate stage – and often in a separate studio – to the mixing.
K System Metering
Over the last two decades, recorded music has been getting louder as increasingly capable processors have enabled ever higher levels of compression. The problem is that heavy compression can absolutely kill audio quality.
In response, Grammy-winning mastering engineer Bob Katz proposed the K System, a metering scale in which the point marked as 0dB is moved downwards by 12db (K-12), 14dB (K-14) or 20dB (K-20), leaving headroom above 0dB where no clipping will occur.
When mastering with K System scaling, then, we choose the variation that suits the material (typically K-12 for contemporary music), and then aim for an RMS level that sits on or around the 0dB mark, and peaks that do not exceed the remaining 12dB headroom. This results in much better sounding music and masters.
Mix First, Master Later
Whilst all of these shortcomings can be overcome with sufficient resources, they can be sidestepped by mixing first and mastering later. Here the idea is to mix in the normal way but to focus entirely on the sound and balance of the mix itself whilst avoiding the use of full mix processing.
The mix is run-out to an audio file – referred to as a ‘pre-master mix’ – that can then be re-imported into a DAW for subsequent mastering. If using this approach you can still use full mix processing if you need to, but be sure to run out a version of the mix that has any such processors bypassed too.
Creating a pre-master mix in this way gives you maximum flexibility without losing much in the process. You can master the mix time and again, with the mastering processing and settings set up specifically for the intended use or distribution channel. Or, when including the mix in a montage, you can master the montage and its contents as a whole, creating consistency across the montage, rather than being locked in to processing decisions made in isolation during mixdown.
Separating mixing and mastering is also ideal if you want to use a separate, specialist, mastering studio, because a pre-master mix is the best source material for that studio (which is why I recommend it to most of my clients). And – ultimately – if the producer deems that the mastering processing is affecting the balance of the music in an undesirable way, they can revisit the mix, make the necessary adjustments, and produce a new pre-master mix.
Topping and Tailing
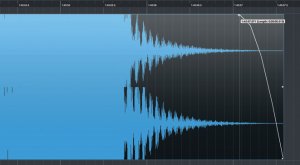
Mastering is the place to define the start and end points of an audio file, by ‘topping and tailing’ excess noise or silence. Never trim audio right up to the moment sound starts and/or ends. Always leave around 50ms before the music starts, and apply a fade up across this span. If the music has an abrupt finish then do the same at the end, but leave a longer tail (100ms perhaps). If the music has a natural fade out, adjust this with your own fade, ending where you feel the track should end. Alternatively, to retain the natural fade, start a fade-out of up to 500ms starting at the point that the music is barely audible.
Choice of DAW
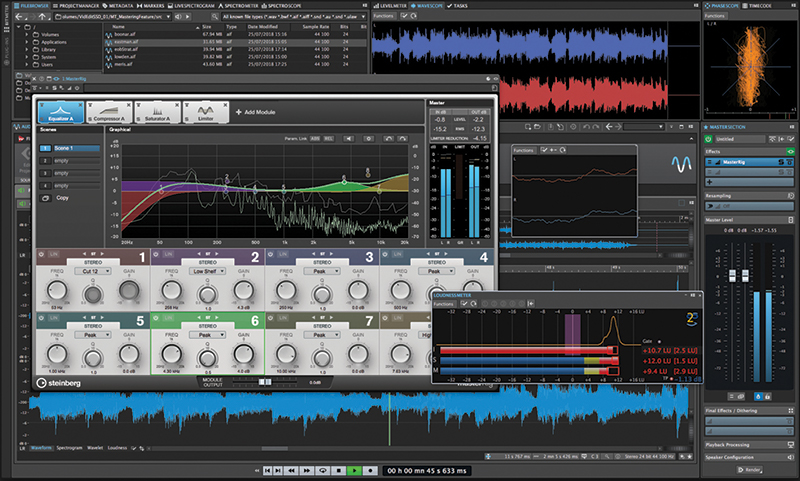
While there are one or two DAWs that are designed principally for mastering work, most notably Steinberg’s Wavelab, it’s possible to master with any DAW. There are a few ways to do this, but my preferred method involves having a ‘source’ track on which I place the pre-master mix and apply mastering processors. I then feed this internally to a ‘mastered’ track where I record the processed result (you could also offline-bounce items on the source track and add bounces to the mastered track).
This approach works particularly well when working on a montage: you lay out all of the pre-mastered components on the source track in the desired order, and then work through applying suitable mastering processing to each component before moving on to the next.
Any further volume-matching of the montage can then be done directly on the mastered track by adjusting the gain of the components before each is exported to a finished, mastered audio file.
Wavelab really excels with this sort of work, as it makes it extremely easy to re-visit and then adjust any processing that is being applied to each component of the montage. This is something that’s certainly a bit fiddlier when you are using a conventional DAW.
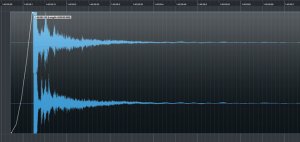
Reading Waveforms
The waveforms drawn by your DAW convey a lot of useful information for mastering. The solid core of the waveform indicates with the average, or RMS, signal level, whilst the spikes above and below the waveform show the peaks. Once you know this you can judge the music’s crest factor without separate metering. If the peaks extend a long way above the core of the waveform then you have a high crest factor, whereas peaks that only extend a short amount above the core would have a low crest factor. Waveforms where the peaks barely extend – if at all – are heavily compressed and limited.
You can also identify and judge longer term dynamic changes by studying the waveform. To do this look at the core of the waveform. Sections that are narrow vertically are quieter than sections that have a wider waveform core.
Ear’ere
Once ready to start mastering there are a number of different tools that we reach for – some familiar, some less-so – and some that are familiar but that may be used in a different way to what you’re used to. Let’s run through those tools now, starting with the most important: Your ears.
To master successfully you need to learn how to trust your ears, and understand what they’re telling you. Much like when mixing, as well as being able to hear the material you are working on as a single entity and to make judgements in that context, you also need to learn to focus your attention on specific frequencies and frequency ranges, and become sensitive to changes in volume. You may already have well-tuned ‘studio ears’, but if not then practice is the key.
Monitor Accuracy
Monitor accuracy is important throughout the music production process, but is absolutely critical in mastering, especially as it’s normally the last chance to catch and fix any problems in a recording.
This isn’t to say that you need a pair of £20,000 Genelecs, but what you do need is monitoring that has been calibrated and flattened, and whose sound you – or the mastering engineer – is intimately familiar with.
It’s also good practice to use more than one pair of monitors when mastering (as it is when mixing too). Typically, this would be a larger pair – perhaps including a subwoofer – that is intended for accuracy across as wide a frequency range as possible, and a smaller pair that is akin to the sorts of speakers people will use when listening to the finished recording (Yamaha’s NS-10 being a classic example of this).
See Hear
Your ears and monitors allow you to hear the material you’re mastering, but being able to see details of the material is also extremely helpful. For this, you need good metering. The meters built in to most DAWs are not adequate for this sort of work, as they tend to only show peak level whereas, when mastering, we need to consider average – or RMS (Root-Mean-Squared) – level too (I’ll explain why when we get to dynamics). Additionally, in-built meters tend to only show a simple -∞ [minus infinity] to 0dB scale, whereas other scales are more useful in mastering.
Thankfully, there are some very good metering plug-ins available. At the very least you need one that will show peak and RMS levels together on the same graph and which will support different metering scales, such as Brainworx BX-Meter.
Needle-style VU meters are also very useful, especially when matching volume levels within a montage. The peculiarly named Klanghelm VUMT Deluxe is an excellent and inexpensive choice here. Note that VU is measured differently to both peak and RMS, and aims to more accurately reflect the way the human ear perceives volume and loudness.
Spectrum analysers are another visualisation tool that some people use when mastering. They can be particularly useful when you need a better understanding of the frequency make-up of a track in order to identify problem frequencies, and when trying to match the overall tonality of one recording to another. Personally, though, I much prefer to rely on my ears for such things, and I can honestly count on my fingers the number of times I’ve been compelled to fire up a spectrum analyser to help with a mastering job!
Three Tasks for EQ
When it comes to the actual processing of audio, then the first item in many mastering processing chains is EQ (although it doesn’t necessarily have to be first, of course!). There are three distinct tasks that we use EQ for in mastering: frequency range control, broad-brushed modifications, and focused corrections. Which tasks you perform, if any, will depend upon what you judge the material to require.
Controlling the range of frequencies within a recording is done with high-pass and low-pass filters, and serves two purposes. First and foremost, it is very common for producers to overcook the very bottom end of a mix, and not uncommon for the same to happen at the high end.
This is often the result of the producer over-compensating for the shortcomings in the monitoring system that they used when mixing, but it can also be related to the use of shelving EQ on channels during mixing, which boost everything above or below the EQ frequency. This can put too much energy into the very low or high end, and can increase low or high end noise.
Cutting Frequencies
Controlling noise in non-musical recordings is another reason to control the frequency range. For example, if working on material that features just a human voice, then any frequencies that are outside the range of that voice are just noise, so cutting away those frequencies with a filter will reduce the noise.
The next task for EQ is to make broad, gentle corrections to the tone and timbre of the material being worked on (something that can also be achieved with dynamics, as I’ll explain in a moment). This requires an EQ processor that can deliver a wide Q width and that doesn’t sound too focused on a specific frequency, what I think of as a ‘broad-brush’ EQ. This sort of EQ-ing is best for correcting problems arising from monitor inaccuracies, and for setting a good balance between low, mid and high ends of the audio spectrum.
The channel-style parametric EQ that comes with your DAW is unlikely to be suitable for such broad-brush work, but should be effective for performing focused corrections, just as they are when used in mixing. Indeed, the principle here is the same as when performing the same task during mixing. For example, using the EQ to focus on a problem frequency that you can then cut or boost as required without impacting too much on the frequencies around it.
There are only a few EQs (plug-in and hardware) that can turn their hands to all three of these tasks, but it’s generally OK to stack up multiple EQs in order to get the desired results.
A Dynamic Process
Dynamics and dynamic range are vital concepts in audio mastering, but have a few different facets. The most important is the difference between the peak and average – or RMS – level at any given point in an audio signal. This difference is often referred to as the ‘slope factor’ or ‘crest factor’ of the signal, and in most contemporary musical styles this will be fairly consistent throughout a piece.
The reason that crest factor is important is down to how our ears perceive sound and how digital audio works. In a digital audio system, if we want something to sound louder we can increase the gain, but can only do so up to the point where a signal’s peaks reach 0dB-FS (zero decibels full-scale), otherwise digital clipping occurs. Therefore, the loudest peak(s) in a signal will determine how much gain can be applied. However, the human ear is not directly sensitive to these peaks. Rather, we are sensitive to the average level, and perceive the crest factor as loudness. So, if the crest factor is high – meaning that there is a large difference between peak and RMS signal level – then the resultant digital recording will sound weak when compared to a recording with the same peak level but a higher RMS level, and therefore a smaller crest factor. Because of this – and because most producers want their music to sound loud and punchy – controlling the crest factor is an extremely important part of mastering.
The most common tool for doing this is a compressor, but beware: a channel-style ‘broadband’ compressor is unlikely to give satisfactory results. This is because any peak at any frequency could exceed the compressor’s threshold, but the resultant compression will be applied across the whole mix. Given that bass frequencies tend to be more energetic than higher frequencies, and so more likely to exceed the threshold, a broadband compressor will tend to create a pumping effect if applied across an entire mix.
Multiband Dynamics
The solution to this problem is multiband dynamic processing. Here, the incoming signal is split into multiple frequency bands, each of which is processed separately before being mixed back together at the output. This allows us to apply more compression to the low end, which gives the music body and solidity, whilst using lighter compression settings at higher frequencies, so that the music retains some dynamic variance and ‘space’.
Multiband compressors can act as very effective broad-brush EQs, as each band will have its own independent make-up gain parameter. Changing the relative amounts of make-up gain will create very broad adjustments to a wide band of frequencies without that change being centered around a specific frequency.
A variant of multiband processing is mid-side processing. Here, the signal is separated so that sounds that appear in the centre of the stereo field are split into a single mono ‘mid’ channel, whilst the remaining signal – the stereo information, if you like – is split into the ‘side’ channel. The idea here is to apply heavier compression to the mid channel, giving the music a solid central core, whilst allowing much more dynamic variance in the side channels, giving the impression of more ‘space’ in the sound.
Having worked with both conventional multiband dynamics and with mid-side dynamics, my view is that the former is much more effective and flexible across a larger range of material than the latter. However, for a more in-your-face sound – as favoured by EDM artists and those in the heavier end of metal – mid-side dynamics can work exceptionally well.
The ideal is a combination of mid-side and multiband processing, where the mid and side bands are themselves split into frequency bands for processing. This is possible with enough hardware and/or software, and can give brilliant results if done well, but I am not aware of any single unit or plug-in that can provide such a combination of techniques.
Reducing Bass to Boost the Bottom End
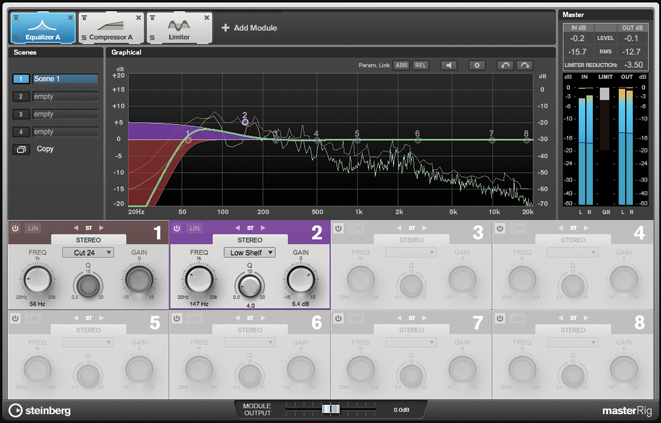
If you want to fatten the bottom end you may just reach for a low shelving EQ, set it to between 80 and 120Hz, and crank on a bit of boost. However, this can also end up adding way too much in the very low end; if you have a very good monitoring system, or play the track out on a club PA, you will hear this very clearly as an overpowering woolliness down low.
The solution is to use a high pass filter alongside the shelving EQ. With the filter cutoff set to between 50Hz and 60Hz, and with a slope of 12dB/octave, you will gently and progressively remove the very low frequencies. Then use a shelving EQ to boost anywhere between 100Hz and 250Hz. The result is a fuller, fatter bottom end that is not overpowering on systems with good very low frequency reproduction.
Other Dynamics Processors
Along with compressors, limiters are vital dynamics processors when it comes to mastering. Normally placed at the end of the mastering processing chain, the limiter is used to catch and control the very loudest peaks in the audio. Whether you use broadband or multiband is less important for limiting than for compression, because it should only kick in to catch the odd peak, and should be near-instantaneous, so too fast for your ears to notice. The one caveat to this is if you’re trying to create the aforementioned in-your-face sound, where you would tend to push the signal hard into the limiter. Here, multiband limiting is the best option.
Expansion can also have a place in mastering, but a less common one. The primary use is to reduce noise in silent or quieter passages, where multiband expansion is most effective. But it can also be used a bit more creatively to help accentuate changes from quiet to loud passages in the material.
Dynamics Over Longer Timescales
Another facet of dynamics in mastering relates to how volume level fluctuates between quieter and louder passages in a recording, as well as across the different components within a montage. One aim of mastering is to achieve consistency in these dynamics, and to control those differences in level that occur over a longer span of time. This often involves identifying such quiet and loud passages, and flipping back-and-forth between them while making adjustments to the gain or processor settings.
A similar technique works when mastering a montage. The trick is to identify one of the components of the montage that you will use as a reference, and to adjust the other components to match the reference component. The reference component should always be the one that sounds the quietest when normalised to peak at 0dB-FS. This is because you cannot increase the gain of this component to match louder components, so you must reduce the gain of louder components to match the reference.
Dithering
Looking at dynamics from a technical viewpoint, it’s all about the range of signal levels that a digital audio system can represent, which means the difference between the quietest and loudest sound that can be recorded and reproduced by the system. This is determined by the sample bit depth: 16-bit gives a dynamic range of 96dB, whereas 24-bit allows a much greater 144dB of range.
The practical upshot of this is that when converting from a higher to a lower bit depth, dynamic range will be lost. This is where a dither processor comes in, as it ensures the digital samples are scaled correctly so that relative dynamics within the track remain consistent. Without dithering, any depth reduction could simply see data bits removed from each sample, with a loss of signal accuracy and fidelity.
So, if your pre-master has a higher bit depth than the target bit depth you are mastering for – as determined by the target distribution media or method – then perform your mastering processing at the same sample format as the pre-master but include a dither plugin set to output the target bit depth as the very last and final process you apply during mastering.