Mastering: The Guide – Part Two
Mike Hillier continues his exploration of the art of mastering… The First Pass We like to make any M/S alterations early in the signal chain, and so we have opted to add the Brainworx bx-digital V2 plugin first in our chain (we actually add it in Insert position two, for reasons that will become apparent). […]
Mike Hillier continues his exploration of the art of mastering…
The First Pass
We like to make any M/S alterations early in the signal chain, and so we have opted to add the Brainworx bx-digital V2 plugin first in our chain (we actually add it in Insert position two, for reasons that will become apparent).
This EQ is a clear favourite of ours for this task, as it not only has five bands on each channel, plus high- and low-pass filters, but also clear controls over the M/S matrix, including a stereo width knob, L/R balance, and separate M and S pan controls.
Placing the M/S EQ before the first dynamics module in our chain enables us to control how the dynamics module will respond to the width elements of our track.
In the next position, we add an instance of the UBK Clariphonic DSP. This is a parallel EQ, with two high-frequency shelves (and so can be used only to add level, not as a subtractive EQ). The controls on the Clariphonic are a little esoteric, but in short the Focus engine adds midrange, while the Clarity engine adds high-end – with shelves as high as 37kHz.
Again, we want to place this before the first dynamics module; this is to improve our signal-to-noise ratio when using a compressor, and to compensate for any loss of high-end that the compressor may introduce.
The final EQ we’re going to add is the UAD Manley Massive Passive Mastering Edition. This EQ has four parametric bands, in addition to high- and low-pass filters, and is to our ears one of the sweetest-sounding EQs we’ve worked with.
It isn’t great at detailed precision EQing, but it can transform a track with only a few boosts or cuts, and its control over the midrange is among the best we’ve ever heard.
Unlike the previous two effects, the Massive Passive is going to be positioned after any dynamics processing, so we generally leave a few spaces clear for adding additional compressors, expanders, de-essers, multiband processors, etc – even when we think we know we want to use only one of these.
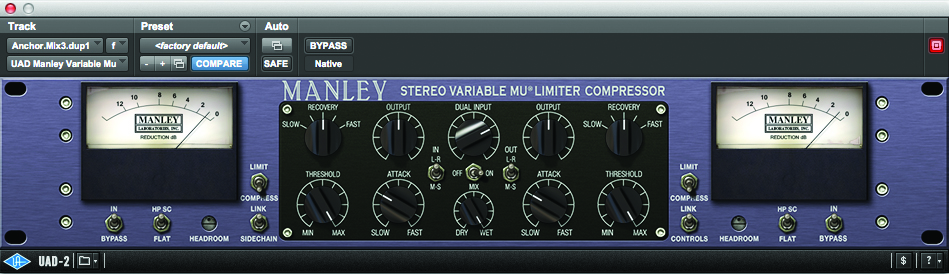
For the compressor, we’re going to use the much-venerated UAD Shadow Hills Mastering Compressor. But not before passing the mix through a variety of alternatives to see which brings out the right character in the mix.
Determining this is tough, and over time we have developed an intuition that has helped us to move quickly towards the right compressor for the job; but we still find ourselves duplicating the track over several channels in our DAW and testing it with a selection of compressors.
In this example, we’re also testing the UAD Neve 33609, and our own hardware quad VCA compressor – a clone of the classic SSL 4000 G buss compressor, with additional side-chain options and improved stereo handling.
It is important not to get caught up in a hardware versus software debate, or any initial preferences for certain GUIs here, and blind A/B testing yourself after a short break can often result in an unexpected conclusion – as here where we might have been tempted to go with the hardware out of preference for breaking out of the box.
When comparing compressors like this, it can be tempting to try to match the effect of the first with all subsequent models, but this will give an inherent advantage to the first, which is allowed to do the best it can, while all others are simply cloning it. Instead, we like to ignore all previous settings and simply try to set the compressor to work its magic the best it can each time, comparing the – occasionally quite different – results to determine our preference.
Finally, we have added a brick-wall limiter; this is going to serve a dual purpose – to add a small amount of level to the track if necessary, and secondly to ensure peaks are controlled. As with the compressor, it can be useful to set up two or more limiters to see which works best for the track in question, especially if you have several high-quality ones.
In this instance, we’re using the UAD Precision Limiter, which has been a staple of our mastering chain for some while, beating all our own alternatives every time.
Further Changes
With these tools in place, we can start to make all the changes we feel are necessary to bring our mix to sounding more like a finished master. During this process, you will undoubtedly find new changes you want to make: a boost in the low-end, intended to add weight to the kick, might reveal additional energy in the bass, which will in turn spoil the kick.
These almost circular problems can sometimes be adjusted with slight alterations to the EQ curves, and at other times can require additional processing to be added.
It’s not uncommon for our final master to gain and lose two or three processors as we settle on the final sound of the track. Sometimes, a high-end boost can bring just the right polish to most of the track, while revealing a problem with the hi-hat or cymbals, which may be fixed with a multiband compressor or de-esser.
Compression can reveal a muddiness in the reverb, which is tough to fix in mastering, but there are tools, such as iZotope RX, UAD Precision K-Stereo and Zynaptiq Unveil, as well as M/S processing, if the sides don’t contain too much other information.
It is important to constantly be comparing your initial unmastered mix with the master in its current state, as well as each individual change. To this end, it is useful to have a system set up to quickly bypass all your processors.
The simplest method is to duplicate the track in your DAW, one with the processors, and one without, and switch between each one using solos. You can adjust for any gain changes by adjusting the level of the louder (usually, but not always the master) down, so that any comparison is being done at relatively similar levels.
We prefer to use Meterplugs Perception to achieve this with a single channel. You’ll note that earlier we left the first Insert slot free; this was so we can place an instance of Perception Source, with Perception Control added at the end of our Master channel fader. Perception handles not only switching from pre- to post-processing, but also level matching and sample-accurate sync.
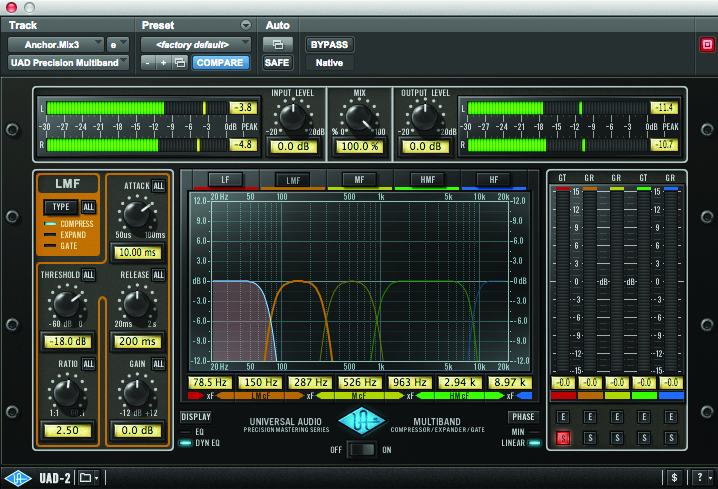
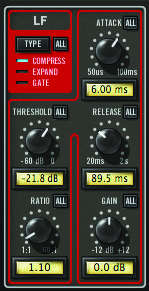
With Anchor, after our first pass with the processing, we still aren’t happy with what’s happening in the low-end. We’re using more EQ than we would like to try to shape the bottom-end, and while we’re getting enough weight on the kick, things are starting to sound a little murky between each beat of the kick drum. To compensate for this, we’re going to add an instance of UAD Precision Multiband and engage the LF band, leaving all the other bands off.
Then we set this band to the Gate mode with a very low ratio (1.1:1), and tune the frequency and envelope to pull out some low-end between each beat of the kick. This will give us the freedom to add in as much weight to the kick as we want, without also adding mud between kicks; in fact, on the contrary, between kicks the sub-frequencies will be pulled back, giving the bass elements more room to shine.
By this point, the mix is beginning to take on the sound we were hoping for; however, with so many synthetic elements in the track, and having opted for in-the-box processors at every stage, we’ll also add a little extra warmth with the UAD ATR-102 tape simulator.
This also gives us a little bit more level, both through subtle compression, and additional harmonics – as well as softening off any harsh transients, which means we don’t have to push the final brick-wall limiter so hard to get the track as loud as we want it.
Finally, all our processing has brought the stereo image in a little. This is a common consequence of compression and limiting on the master buss, as well as with cutting frequencies on the sides with an M/S EQ, so we return to the Brainworx bx_digital V2 and dialled the stereo width knob up a little. This essentially turns up the difference channel in the matrix before it is all summed back together.
Bouncing Down The Master
In the previous part of this feature, we looked at creating a number of different versions of the mix. With the master of the basic mix done, we now import these additional mixes to different playlists within our DAW, and pass each one through the same processing. This takes very little time, and means the versions will all have the same polish as the final mix.
All bounces are done at the original sample rate and bit depth of the mix, which should be at least 44.1kHz/24-bit. We then produce a dithered 44.1kHz/16-bit “CD quality” version, as well as any other files the artist wants.
The exact signal chain we’ve used here on Anchor is something that will almost certainly not work on any other track, but the process by which we came to the decision to apply that processing is something that can easily be applied to any song. While each time it may produce a different signal chain, you can be confident that the signal chain it results in is one that has been specifically engineered for that one track.
When working with albums or EPs, you will need to reference all of the other tracks on the EP/album as you work through, trying to give each a sense of being part of the whole work. It is often useful to employ similar signal chains; however, this does not mean that each has to be identical, simply that as each processor has its own colour, you can quickly get a similar colour on another track by using a similar processor.
We often use the same compressor, limiter and at least one EQ on every track, but will also allow ourselves freedom to apply other processing as necessary, as well as to remove any of these processors as they are no longer required.