Mastering: The Guide
Mastering is your final chance to make your song shine and sit comfortably alongside the other tracks on an EP or album. Mike Hillier explains everything you need to know… In this feature we’ll be reffering to the project files for Anchor by HART (www.facebook.com/hart.musica) – Download the mixing files here and the mastered files […]

Mastering is your final chance to make your song shine and sit comfortably alongside the other tracks on an EP or album. Mike Hillier explains everything you need to know…

In this feature we’ll be reffering to the project files for Anchor by HART (www.facebook.com/hart.musica) – Download the mixing files here and the mastered files here
Mixing and mastering require two very different mindsets. In the mix, your focus should be jumping constantly from the minutiae to the big picture and back again.
Does the attack on the kick drum compressor let enough through? Is the release letting go before the next hit? Does this extra compression on the kick mean it is now masking the bass guitar?
You have hundreds, perhaps thousands of parameters at your control, each capable of making tiny changes that could cascade down to fundamentally change the whole mix. However, if you want to make a change to any one channel you can jump quickly into the mix and alter that one sound.
If the vocal needs something more to help it punch through, you can quickly grab a saturation tool, a parallel compressor, a delay or even an EQ. Any of these different tools could be the right one to help the vocal punch through.
However, in mastering your focus is almost always on the big picture; you should be thinking not only about this one song, but how this song sits next to other songs, both on the album it is being released on, and also others by artists in a similar genre.
Your tools are broader in spectrum. Any compressor you add will be applied to the whole mix; there are ways of narrowing the focus, mid-side or multiband techniques; but should you want the vocal to punch through, the tools you have are likely to impact on considerably more of the mix than were you to make a similar change in the mix. For this reason, it can be very difficult to master your own mixes.
If you think the vocal needs to punch through more, that decision should have been made in the mix. Any attempt to decide what in your own mix needs to change begs the question, ‘was the mix really finished?’ Getting another perspective on your mix is the one reason we recommend you find an accomplished mastering engineer whose work you enjoy, to build a relationship with.
Alternatively, why not find a friend to share mastering duties with? You can master their mixes, while they master yours. If you hope to one day become a seasoned pro at mastering, this is a great way to get your first few masters under your belt.
Listen, Listen, Listen
When you receive a new song to master, it can be very tempting to simply revert to a sort of ‘mastering by numbers’ approach. Boosting the low-end and the top in a basic ‘smile’ curve, adding width to the top-end, and mono-ing the subs, adding your favourite stereo compressor and colour tools and then bashing on a mastering limiter at the end – maybe even a multiband limiter with a mastering preset in place.
This primitive approach to mastering has become all too common, and not only among inexperienced producers mastering their own tracks, but also among a few seasoned pros who ought to know better. But mastering a track will require far more consideration of the specifics of the individual mix than any presets or even rough ‘go-to’ selections could possibly allow.
The golden rule of mastering is to ‘do no harm’. The goal is to bring the most out of the mix, not to change it, nor to impose your own mark on it, simply because you can. You don’t need to push the mix through all of your most expensive processors, as tempting as that can be. The best mastering engineers in the world know when to throw the kitchen sink at a mix, and when to do nothing at all.
So before you reach for even a single processor, take the time to listen to the mix several times. Listen closely and determine what needs to be done, then set about doing that, and only that. Ask yourself what you do and do not like about the mix. Is there anything in the mix that pulls your attention out of the song?
A click, a sibilant vocal, or piercing cymbals for example. Are any frequencies too present? Are any frequencies lacking? Are these problems constant, or things that occur only at certain moments?
If they’re constant, you should be thinking about which EQ to use to change that, and if they’re only at certain moments, do you automate the EQ, or use a dynamic EQ, or a multiband compressor? Do all the elements of the mix sit together well? Or could it use a little extra glue from a compressor.
Compare the mix to other similar songs, most importantly the other songs on the album or EP your are mastering, if that is applicable, but also to other songs in the genre. Compared to these songs, how does the frequency content in this one compare? How wide does this song sound compared to the others? Does the vocal sit above the instrumental bed by a similar amount? How loud does this mix sound compared to the others?
Once you have answers to all of these questions, you are ready to start processing the song.
With this in mind, you may find that 90 per cent of your masters still end up using the same chain. You may even find that you use the same settings within this chain a lot of the time, but you will be doing it for the right reasons; and you will also know, most importantly, when not to use these tools, and when to break out some other tools that you may use infrequently.
What will make you stand out from a machine, or a poor mastering engineer, is your ability to critically analyse a track and bring only what is needed to improve on the mix.
Plan Your Actions
In the Final Mixdown feature, we looked at getting a mix ready for mastering, focusing on a mix of Anchor by HART. In this article, we’re going to focus on the same track as we pass it through the mastering. The song was mixed by Mario Leal, who did an excellent job, not only getting the mix right, but focusing just enough attention on the master buss to make the master a fairly easy job.
Alongside the mix, Mario provided a couple of Coldplay tracks as references – Up In Flames, from Mylo Xyloto, and Magic, from Ghost Stories. So we loaded copies of these into our session alongside the final mix.
It is a good rule to always open up a good line of communication with the artist, the mixer, producer and anyone else who might have a say in the finished master at this stage, as this will help you to get an idea of what they each feel needs to be brought out in the master.
It can also be helpful to provide some mix feedback, especially if the mixer is inexperienced; this may even give you an opportunity to have the mixer correct any issues you might have spotted in the mix and send a new mix, preventing you from having to find a way to “fix it in mastering” – a task (and phrase) that should always be avoided, where possible.
With Anchor, our first thoughts are that a little more excitement could be brought to the mix with the help of a little more top-end, especially if we’re to try to match the tonality of the two reference tracks, while the bass needs a little more energy – but not so much as to become overbearing. In the low midrange, we want to bring some separation between the kick and bass, while a little higher we need to try to bring power to the guitars and vocals. This frequency range can be particularly troublesome.
Too much energy and you risk the mix sounding muddy, too little and it will sound thin. Getting everything just right, then, is the key to a great master.
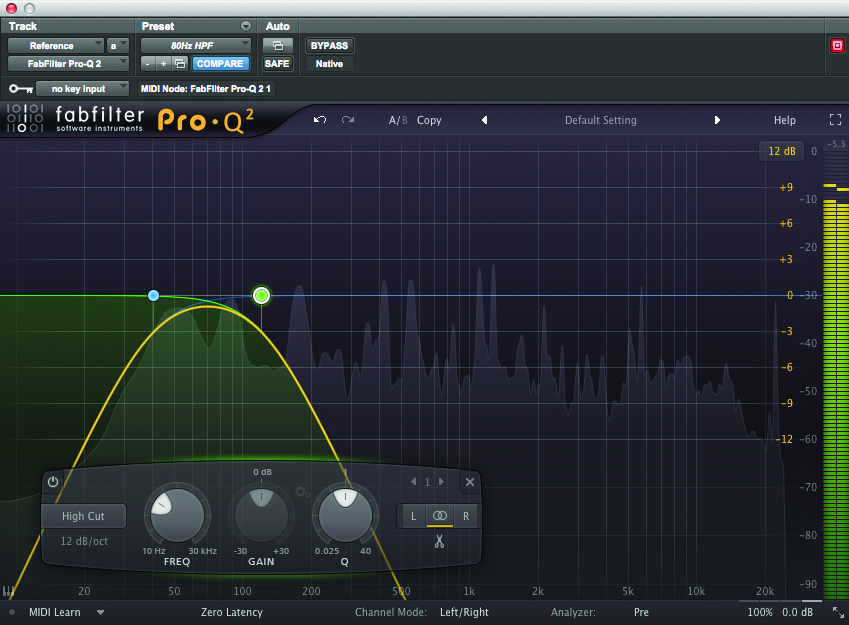
Using an M/S matrix, we can listen to the sides (the difference portion of the matrix), to hear only those parts of the mix that are panned out from the centre. The sides of Anchor are mostly reverbs and delays, with an electric piano-type sound fairly prominently mixed wide. There is also a little guitar, some violin and BVs.
So, any compression or EQ we add to the sides is going to affect only these elements. The primary bass elements, the kick and bass are mono, although a small amount of both of these is feeding a stereo reverb. However, there is still a fair amount of sub-frequency energy in the sides, which we’d prefer to see sitting more squarely in the centre of the mix.
With so much of the mix in the centre, bringing up the sides is mostly going to add additional reverb to the mix, which is often also a consequence of bringing up the levels; so for now at least, we probably don’t need to be bringing any additional width. But we can safely EQ the mid (or mono sum) portion of the signal to alter the beat, bass and vocal without too much effect on the sides.
The reference tracks are both quite loud masters, so we know we’re going to have to try to get some extra level out of the mix. Some of this perceived extra level will come from the added brightness – a trick frequently overused by mastering engineers, but one that does need some care, as too much can spoil the mix. The rest of the extra level has to come from dynamics processing.
With all this decided before we’ve added a single plugin, we now have a road map for the track. This means any plugins we add, at least initially, should be ones that will help us approach directly the issues we’ve already discovered; so, as one would expect, we are going to reach for an EQ, a mid-side EQ, a compressor and a limiter.