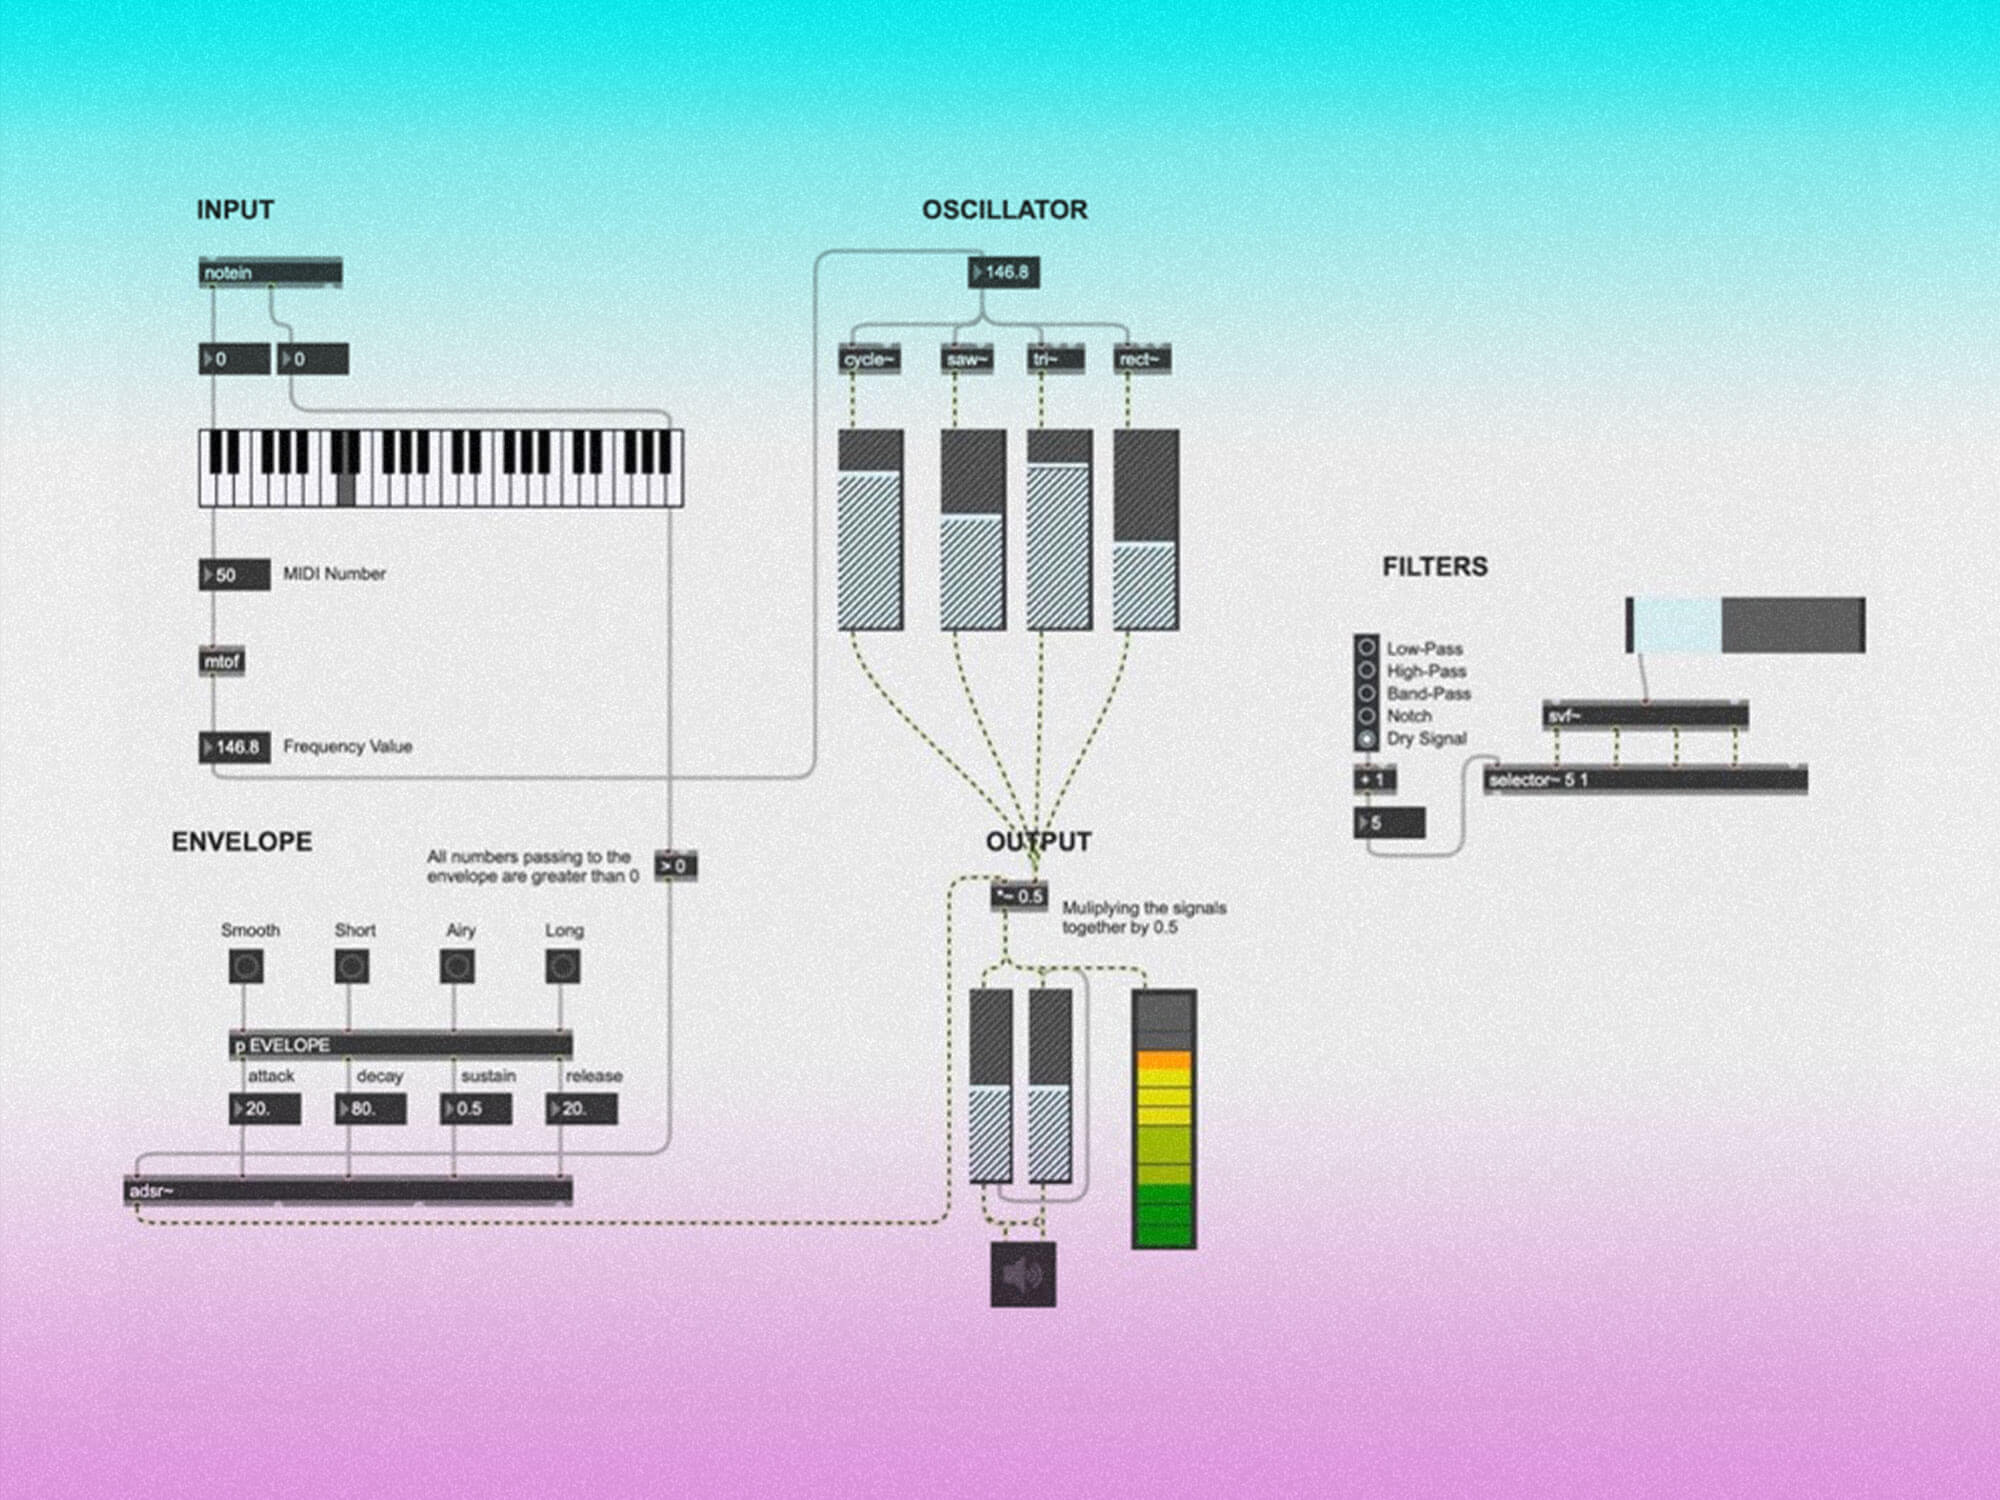
Ever considered building your own synthesizer? It might sound like tough work, but you’d be surprised how achievable it is with programming software Max by Cycling74, a touch of imagination, and a bit of guidance. This tutorial will give you all the information and knowledge to build your own monophonic soft synth.
- READ MORE: The 12 best Max for Live devices in 2023
In preparation for this first tutorial, we recommend getting your favourite MIDI keyboard and downloading Max. There’s a free trial that lasts four weeks, giving you plenty of time to follow along and tinker with all of the components.
What is Max?
Max (or Max MSP) is a visual programming language for music and multimedia. You can use it to build plugins, visual performance effects, synthesizers and more. Max acts as a giant circuit board (known as a Patch), where you can build objects such as an oscillator or looper and connect them using ‘wires’ to create a signal chain.
These can then be exported and downloaded as applications that can be used independently with a MIDI keyboard or controller, and even via Ableton Live – Max4Live, anyone?
Understanding the basics
Before you get started, you should know some key functions used in Max MSP to access basic tools. Understanding these from the get-go will make your building journey a lot easier.
These three basic key functions are Object (N), Message (M), and Comment (C).
Object (N)
The Object key (N) allows you to search for objects to use from the Max MSP database. An example of this, and something you’ll use in the first tutorial is ‘notein’. This creates an input that will connect your MIDI keyboard/controller to the Max patch so that you can control all of the from your MIDI device.
Message (M)
Message (M) tells your objects what to do. For example, if you want to control your filter’s cutoff frequency, you can do so by sending a message to your filter, and it will set the cutoff to that number. Don’t worry if this is confusing right now – it’ll make a lot more sense when you start to build your synthesiser.
Comment (C)
Lastly, Comment (C). This is probably the most simple function. It allows you to write comments in your patch. The most common use for this is to plan out and explain what everything is doing in your synthesiser. You might find this tool useful when it comes to labelling objects in your patch to make things clearer.
Objects to make patching easier
You’ll want to note these hotkeys for commonly used objects, which can be found below:
Button (B)
This object is mainly referred to as a Bang and is used to trigger messages that tells objects what to do – whether that is setting a frequency for example.
Toggle (T)
This is used to toggle on or off, and can be used to turn certain functions, such as filter, on or off, and can even be programmed to turn an entire patch on and off.
Number (I)
This tool has two functions. Firstly, it can be used to set a number for an object, such as frequency. However, as that is mainly the function of a Message, it’s much more commonly used just to see that an object is actually doing its job and is outputting a number. As if it’s outputting a number, it means it is outputting a signal.
Floating Number (F)
This object is pretty much identical to Number, but the difference is that the number has a decimal in it, meaning it is useful for tracking smaller changes in signal (e.g. 4.5/4.6). Therefore, it’s a useful visual indication of how dials and sliders work to change certain aspects of your synthesizer such as an envelope.
If you need any reminders of these useful objects, they can be found at the top of a patch in Max MSP. However, it’s always quicker to use the hotkeys.
Laying out the patch
There are also some useful settings that will make your patching experience easier and ensure that everything is kept nice and neat.
Clicking “show grid” which is found at the bottom of the screen to the left makes it easier to layout where everything needs to be, as the dotted patch is quite hard to see.
Also, turning on “Snap To Grid” (alt ctrl G), ensures that all of your objects, messages, and comments can be laid out in an orderly fashion. We recommend this as when things get messy it is easy to make mistakes, and also hard to find where the mistake is.
Max also gives you the option to “lock” and “unlock your patch”. This gives you the ability to test out what you’re building without accidentally moving or deleting anything. This is turned on or off by ctrl/command + E, or by simply holding down ctrl/command.
To download a free trial of Max, head to Cycling74.com