The Final Mixdown – The Tutorials Part Two & Key Terms
We continue our Final Mixdown tutorials by looking at backing up and highlighting some key terms you’ll need to use when mixing… Backing Up 1: One of the advantages of digital media is the ease of bringing a mix back for recall, but it is still a good idea to prepare your sessions for backup […]
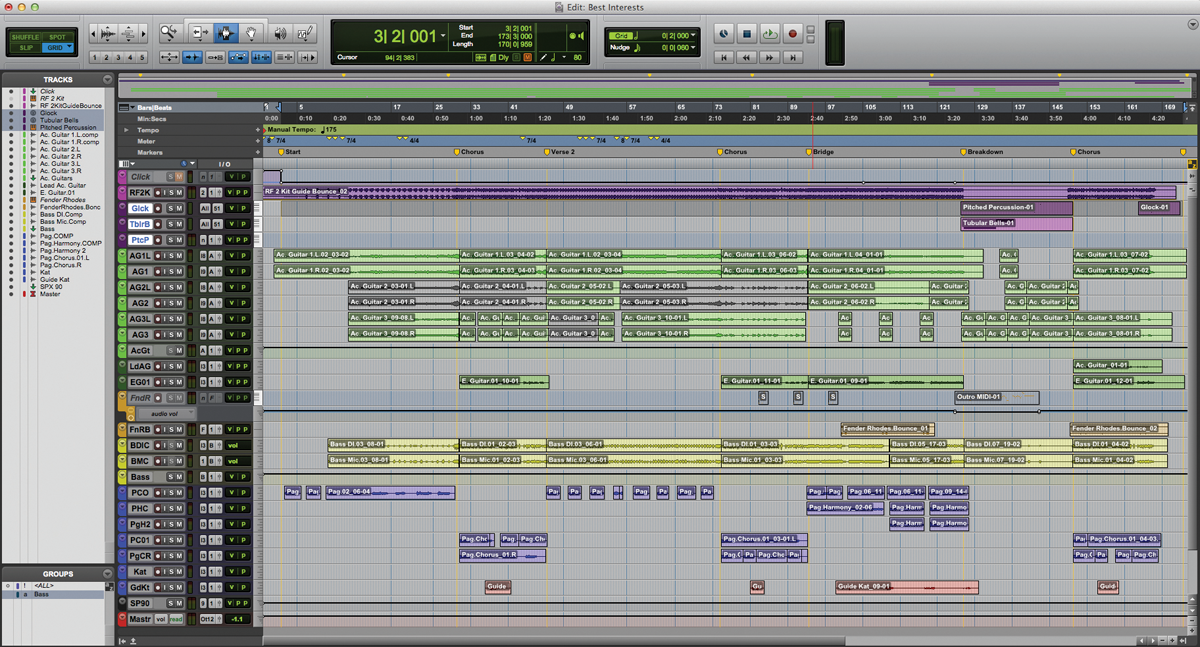
We continue our Final Mixdown tutorials by looking at backing up and highlighting some key terms you’ll need to use when mixing…

Backing Up
1: One of the advantages of digital media is the ease of bringing a mix back for recall, but it is still a good idea to prepare your sessions for backup when you’ve finished a mix.
2: Start by taking any MIDI or virtual instrument tracks and bouncing them down as audio. This way, should you ever lose or sell the instrument you still have all the audio available to recall this mix. Remember to leave a little extra time after the last MIDI note for the audio to decay naturally.
3: Take detailed notes and even photos of any outboard hardware you are using and save this with the session folder. Photos are much quicker than recall sheets, but sometimes a mix of both is necessary.
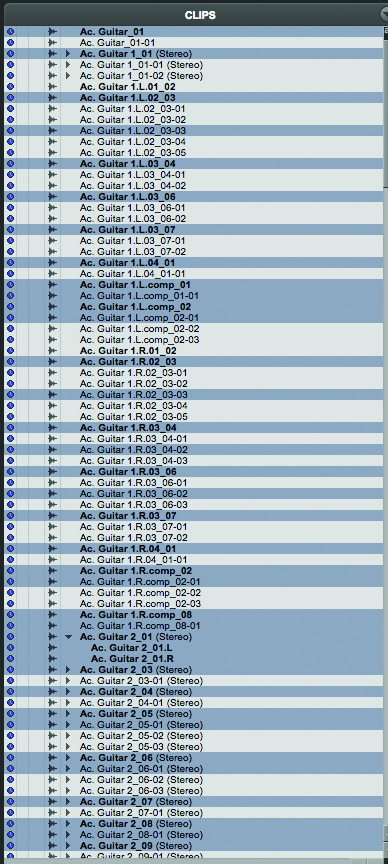
4: In the clip store select all Unused clips (Shift+Ctrl+U (PC) or Shift+Cmd+U (Mac) to select all the audio files in your session that aren’t being used in the mix.
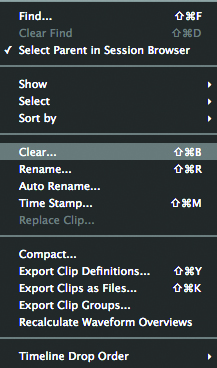
5: With all the unused media selected, remove it from the session (Shift-Ctrl+B (PC) or Shift+Cmd+B (Mac)). You don’t have to delete it completely, but removing it from the session will save space when you backup the project.
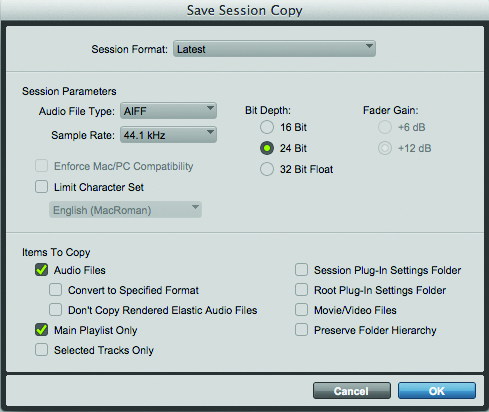
6: Finally save a duplicate of the project to your backup drive using the File > Save Copy In command. Include all the audio files, and the main playlist only. This will save your project and all of the necessary audio files to your backup drive.
Key Terms
Expanders
Compression across the mix buss can sometimes leave your mix sounding a little flat. Expanders placed just before the compressor can help to provide a little extra punch where it’s needed. By expanding the transients before a compressor, the transients should make it out of the compressor without being too squashed, while the rest of the track benefits from the compression.
This technique can sometimes save a track, but can just as often result in the transients sounding too spikey and the mix sounding less glued together. Keep it up your sleeve for the mix that just won’t sit and it may save the day, but this isn’t a trick to rely on.
Corrective EQ
EQ across your stereo mix doesn’t have to be used to just improve the mix itself; it can also be used to correct your listening environment, or even your mixing style. For instance, if your room has too much of any particular frequency then you can dip this frequency a little when mixing. This should give you a more accurate representation of your mix, and help you set that frequency in your mix. Then as you are ready to bounce the final mix, remove this EQ from the mixbuss to get the well balanced mix.
Similarly, if you find you usually produce mixes with too much or too little of a frequency, you can counteract that by adding an EQ. For example, if you usually mix with too much bottom end, try adding an EQ which boosts the bottom end before you start. That way when the EQ is removed, the mix will have less bass, and be more translatable on other systems. Ideally, this type of EQ should be added to the monitor chain, rather than the mix buss.
Magic AB
One of the quickest ways of comparing your mix against another is using the Magic AB plug-in from Sample Magic. This plug-in sits on your mix buss and enables you to quickly switch between your mix and up to nine reference tracks at the push of a button.
Magic AB lets you loop any section of the reference track against any section of your own mix, quickly and easily, which can be a great way of checking each section of your track against the corresponding section of the reference without having to constantly shuffle through the tracks in your DAW. The plug-in includes metering, and independent level settings for each reference track, enabling you to match the loudness of each track.
Tape Mastering
Some engineers still like to bounce their finished versions to half-inch, or quarter-inch tape and deliver them to mastering like this. If you’re going to do this make sure that your tape machine has been properly biased before the final bounce, and include test tones at the start of the reel, so that your mastering engineer can align their tape machine for playback.
It’s a good idea to record the bounce off the tape machine into your DAW – as it’s recording if your tape machine allows – in order to keep a digital backup of the mix, with all the extra warmth of the tape on it. This will also provide additional assistance for the mastering engineer to check the two machines are aligned.
Labelling
One of the most common mistakes mastering engineers will receive on tracks is poor labelling. Ensure all your files are clearly labelled with the artist name, track title, version and revision number. For example, our example track Anchor would be titled “HART-Anchor-mix-03.wav” for the third revision of the main mix. Any communications can then reference exactly which file you are both working on.
If you’re sending a full album or EP to mastering, rather than just a single, consider including a .txt file with the audio indicating the running order, and revision number that each track should be so that the mastering engineer can check each track off as it’s done. You can also include any notes here about gaps/fades/crossfades, and possible mastering notes.
Analogue Summing
Analogue summing mixers are a popular studio choice now, adding a variety of colour and depth to a mix. Emulations of analogue summing, such as the Slate Digital Virtual Console Collection can get you much of the warmth of analogue summing in the box.
However, there are several advantages to true analogue summing, not least that by summing multiple 24-bit streams in analogue you can improve your signal-to-noise ratio. If you’re using analogue hardware in your mix, you can also benefit from summing the signals without having to first convert the signal back to digital.
The Template
Using the Pro Tools template method to bounce multiple stems simultaneously is convenient if most of your buss processing is placed across the sub-mixes. However, if you want to use buss processing across the stereo buss you have to duplicate the processing across each of the output busses. This is easy with plug-in compressors, so long as you have enough DSP spare.
But it usually isn’t an option with hardware processors. So you’d have to bounce each version separately. However, any dynamics processors will respond differently on an instrumental compared to the mix, so you wouldn’t get a 100% copy anyway. This usually isn’t an issue though, although it can be on the a capella and vocal mixes, which will have very different dynamics to the mix.
Click Here for our Final Mixdown Feature
