Modular Synth Masterclass: From Cables To Oscillators
Having kicked off our tutorial on how to build your own Eurorack system, Dave Gale turns his attention to the basic modules that you will need to make a palatable noise Having given some consideration to your case or cabinet and the power that is installed within, it’s now time to turn your attention to […]
Having kicked off our tutorial on how to build your own Eurorack system, Dave Gale turns his attention to the basic modules that you will need to make a palatable noise
Having given some consideration to your case or cabinet and the power that is installed within, it’s now time to turn your attention to making bleepy noises. It’s probably fair to say that most modular users will want to start by building some form of basic synthesizer, which can be played from a keyboard or sequencer, whether the latter is something step-like or DAW-based. So a suggested starting place for a basic system will include an oscillator, a filter, an amplifier and an envelope.
Within modular synths, there can be lots of signals sent in several directions. However, there are two signals that will be more predominant than any other, and they are control voltage (CV) and gate.
The CV part of the equation relates to a small DC voltage being sent down a cable. Imagine that as the voltage increases, it’s the equivalent of turning a pot from left to right, on a module. In the case of pitch, turning the coarse tuning pot on an oscillator as described, the pitch would rise in a long glissando.
Hence, if the voltage rises smoothly, the same effect would be heard, so it stands to reason that if you were to step the voltage of the pitch CV, you would start to hear the incremental notes of a scale.
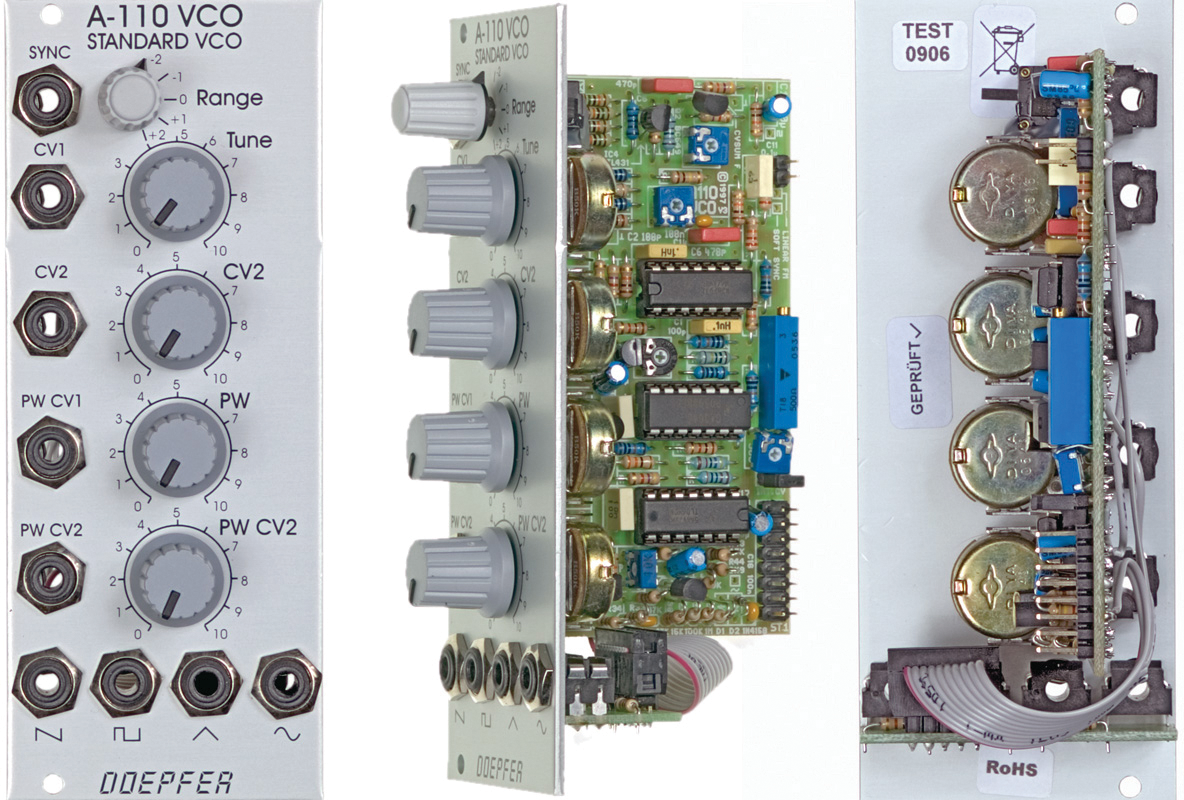
The Doepher A-110 is a good starting point oscillator: basic, cheaper than most, and excellent sounding, especially given the price
The Eurorack format is in tune with the most common CV to pitch format, and uses a principal of 1v per octave, so playing two notes, one after another, consisting of 1v and 2v, would result in notes that are one octave apart. Step them equally in between, and you would get
a scale.
Music and synthesizer keyboards are quite simple beasts. You can almost consider basic synth keyboards to be very similar to a regular on/off light switch. In the early days of synth production, some keyboards made no bones about the fact that when you pressed down a key on a keyboard, one piece of wire would make contact with another piece of wire to create a circuit, thus producing a note.
If you ever get your hands on a Sequential Circuits Pro One synth, just have a look at the underside of the keyboard – you will even see the wires and how they connect!
In the tradition of good old-fashioned electronics, this completion of a circuit is described as a gate, which turns on and off. When it’s ‘on’, the circuit is completed and a note is produced! When it is off, well you can work that one out!
The principal of ‘gating’ is simple, but extended by the notion that as the circuit completes, a pulse can be sent in the direction of an envelope, which will then allow the user to contour some aspect of the timbre that you are creating. The most obvious part of this is the amplitude, also described as volume, but envelopes can also be sent in other directions to create changes in tonal colour.
Sequential Triggering
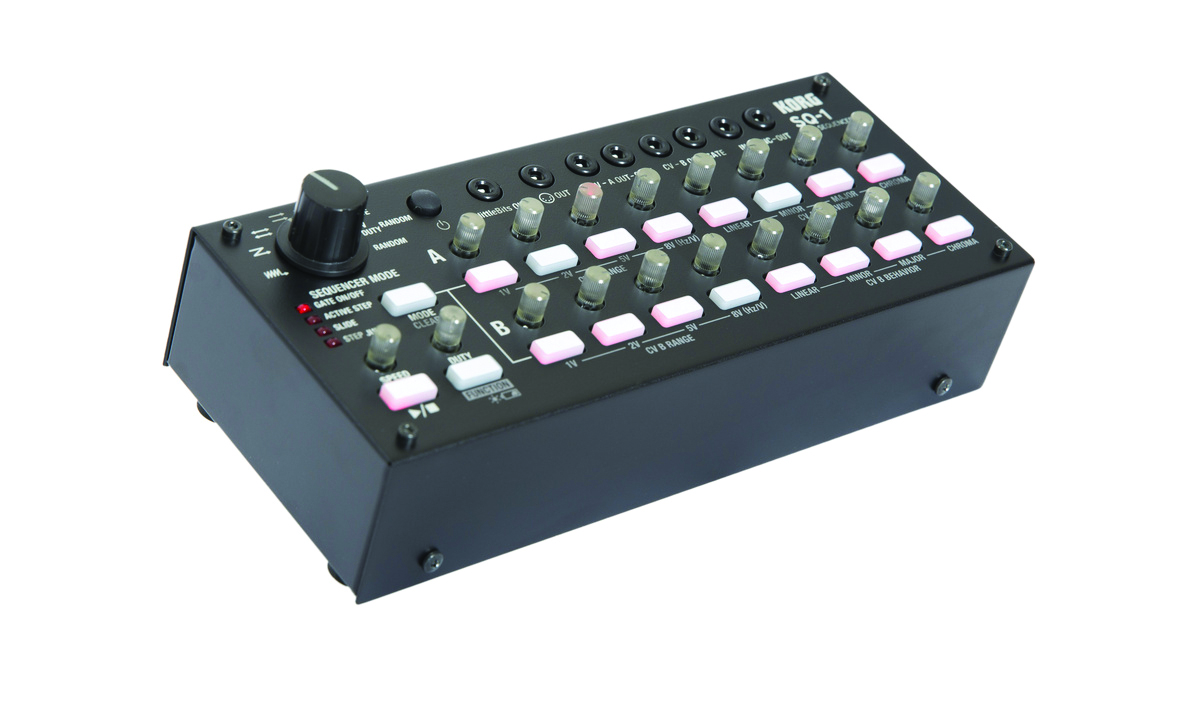
Having invested in your new Eurorack, funds might be running a little tight, so another cheap CV/gate sequencer to consider is the Korg SQ-1. This little brick is an excellent ‘old skool’ 16-step design, that will do the trick brilliantly, and allow for syncing to other devices via a dedicated Clock In and Out, which the Arturia Beatstep doesn’t have in its standalone form.
1. Making Waves – The Oscillator
The oscillator is the component on a synthesizer that produces the initial tone and timbre. Oscillators that come from the most common stable of synthesis, described as subtractive synthesis, employ waveforms, which are mostly rich in harmonic content.
The tone you select will normally be depicted by a waveform, which is a visual representation of what the timbre would look like if viewed on an oscilloscope. For the most part, the usual suspects – such as saw tooth and square wave – will be there, but others – such as triangle and sine – might equally appear, the latter being less rich in harmonics.
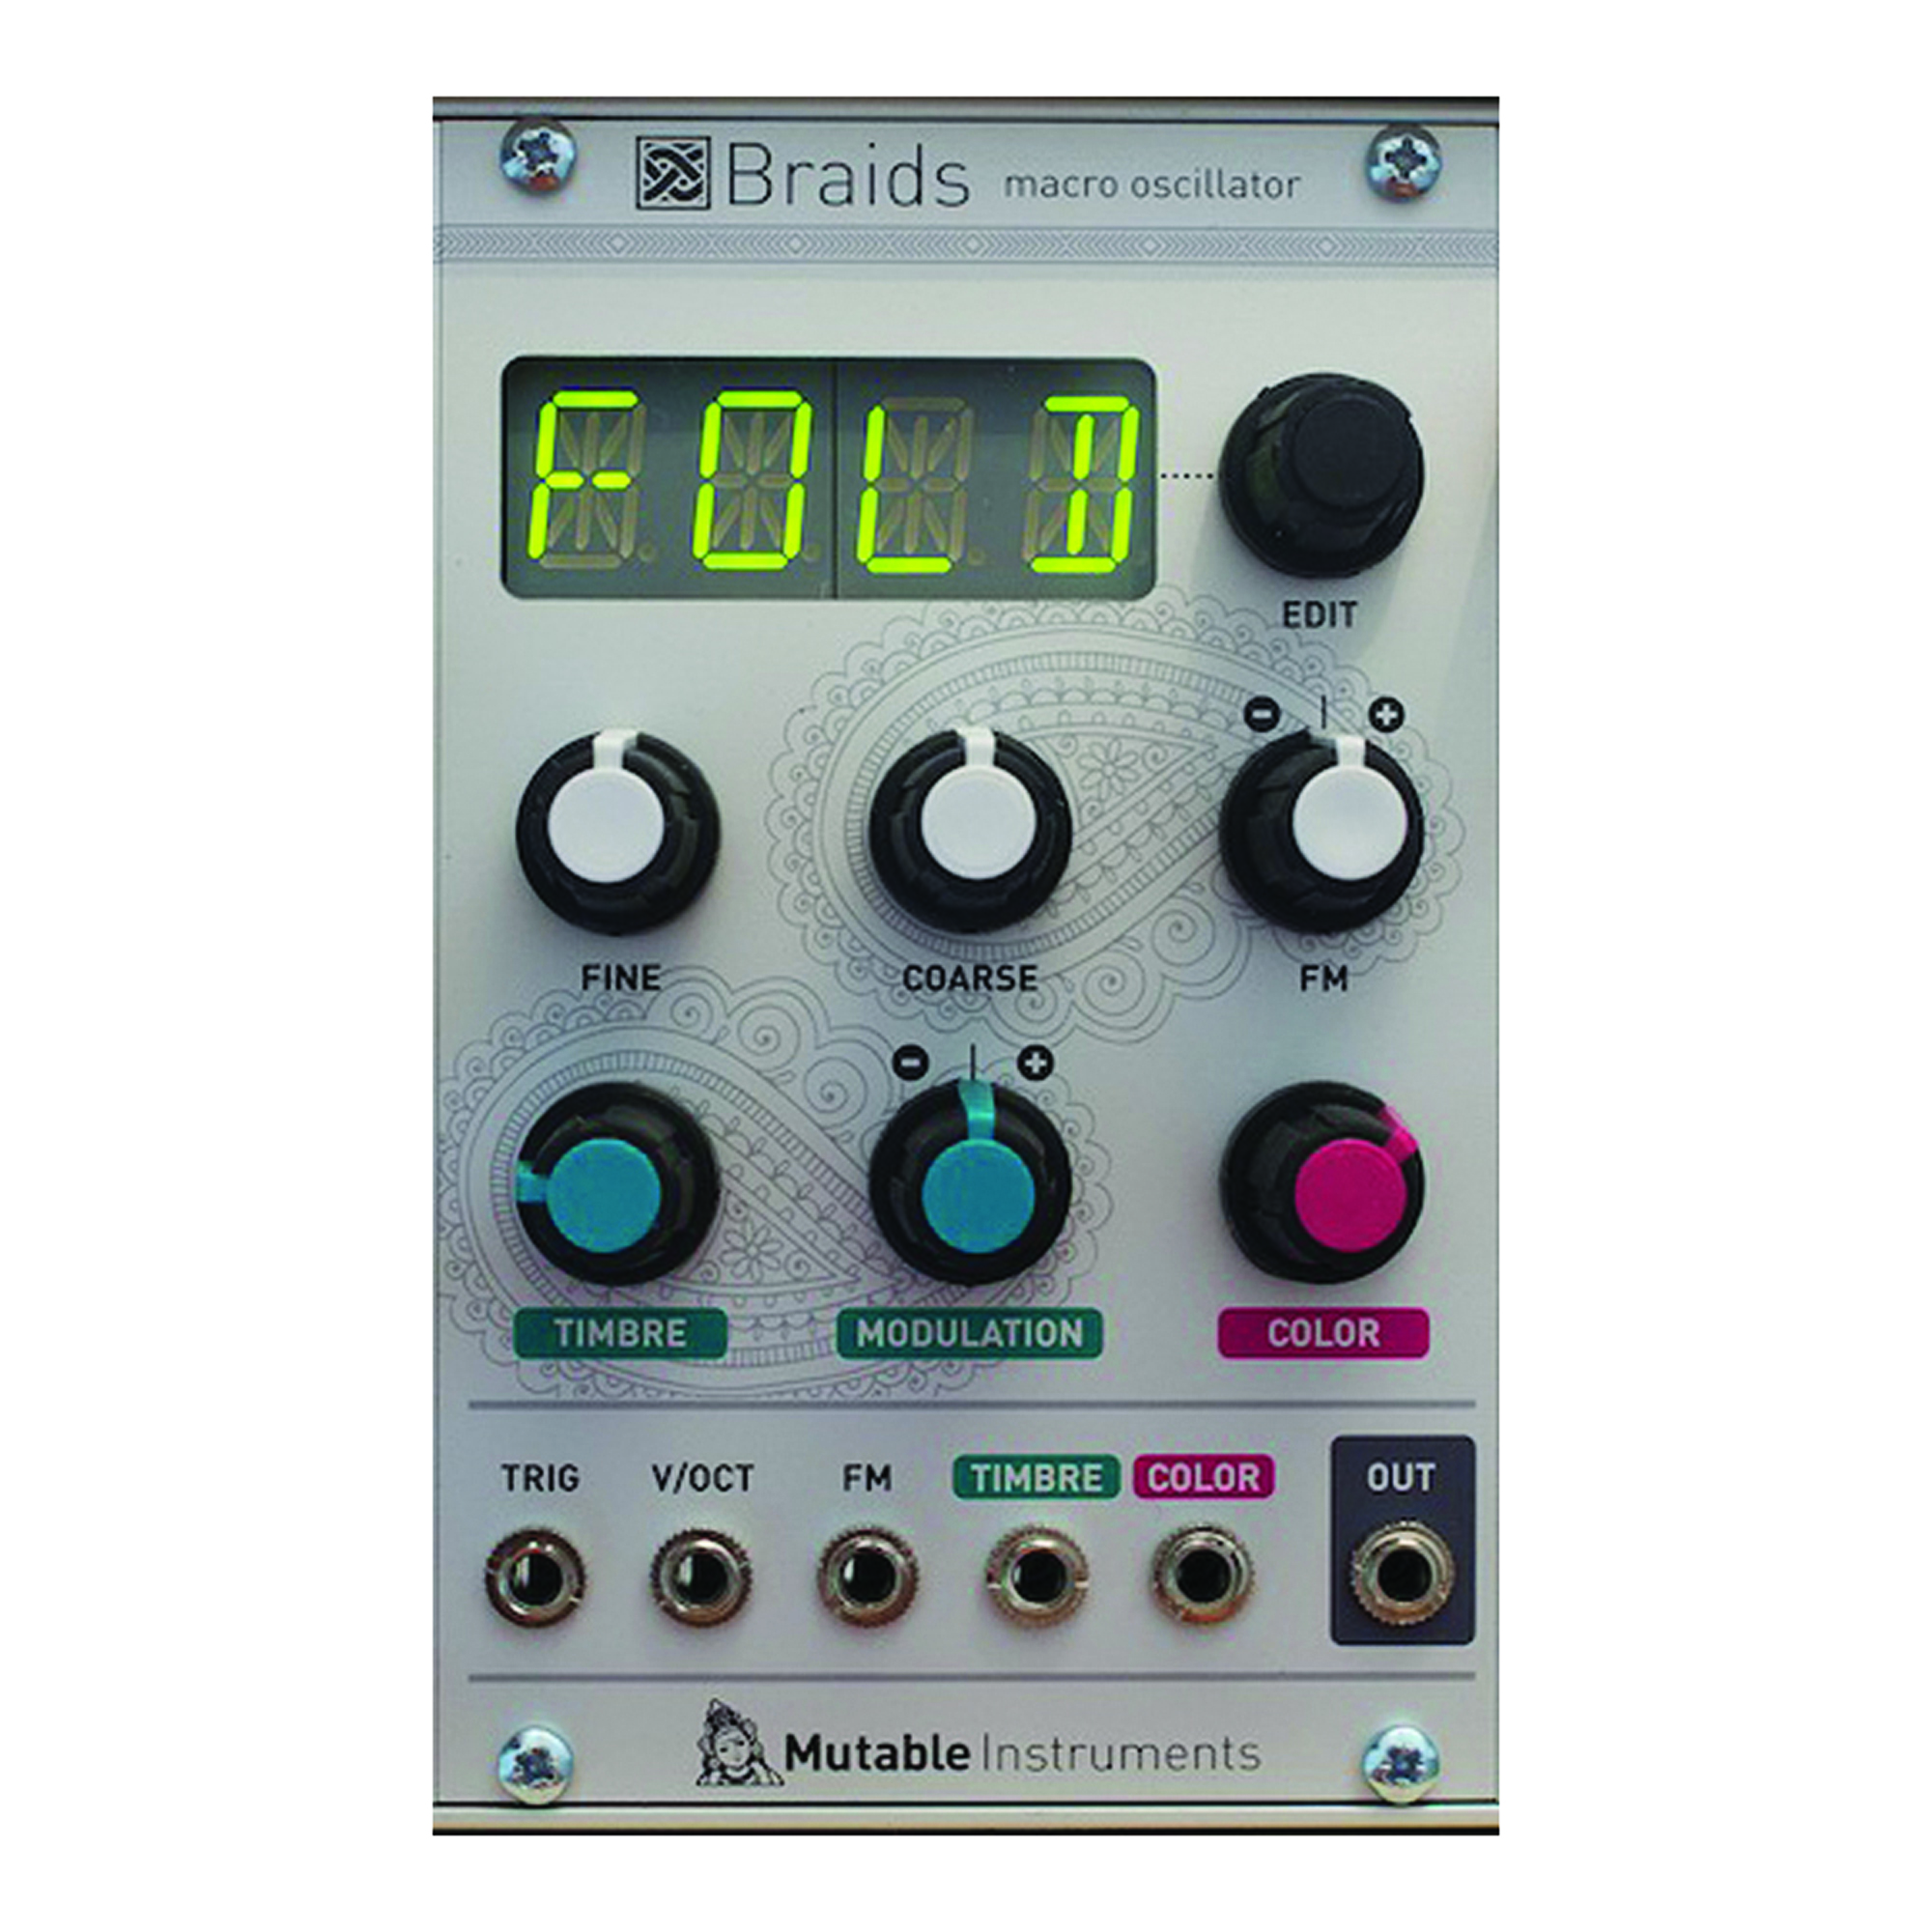
The Mutable Instruments Braids is an incredibly versatile digital oscillator, equipped with the ability to ‘fold’ waveforms and far more!
There are so many oscillators on the market, it would be impossible to mention them all, but they extend from the basic single-waveform-at-a-time designs, up to modules with sub-oscillators in-built, or even modules that allow you to add harmonics to create your own waveforms. For the more ‘classic’ sound, you will want to start with an analogue oscillator, but don’t dismiss pure digital oscillators on the basis of the ‘D’ word. They can sound huge, and very characterful as well.
If you are working to a budget, a good starting point with all things Eurorack is Doepfer, the company that arguably started it all. It has produced various analogue oscillators over the years, and the Standard Oscillator A-110 is well built, good sounding for the money, and will set you back just under £100. For this princely sum, you will get four waveforms, with CV control of pitch and CV control of the pulse width modulation (PWM) of your square wave. Moving up the price bracket, and for the pure analogue head, the AJH MiniMod VCO is exceptional.
Based on the classic Moog Transistor Core design, as found in the MiniMoog Model D, this faithful recreation is rich in tonal colour, and very stable. All the main players will have their own take on the traditional oscillator, and although analogue is more predominant, there are variants on the analogue theme. Digitally Controlled Oscillators (DCOs) are often analogue circuits under some form of digital control, so as well as the beauty of the analogue tone, you will also find stability in tuning.
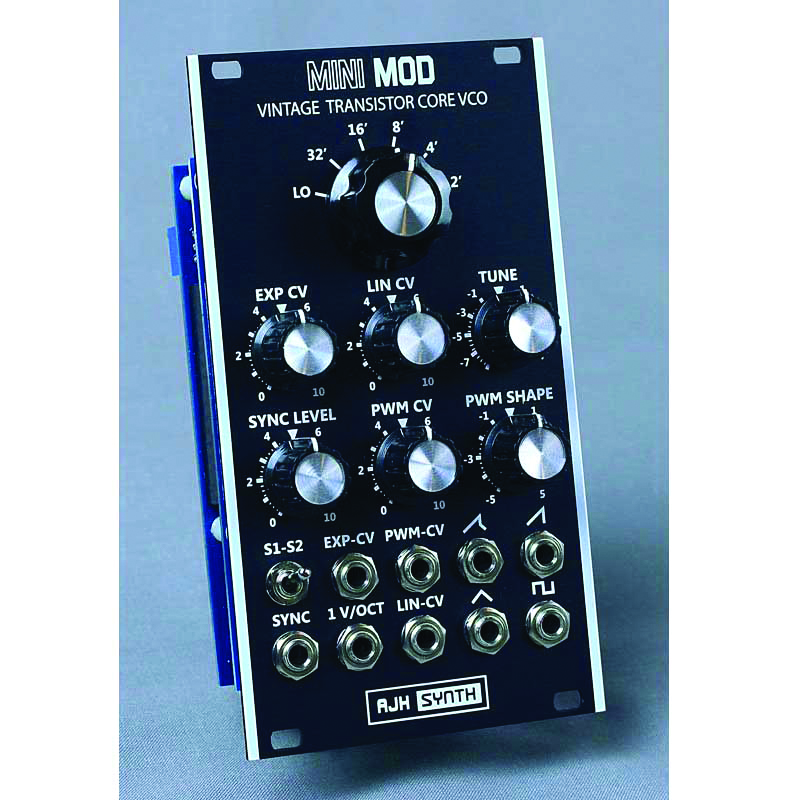
The AJH MiniMod VCO is a is an exceptional oscillator based on the one found in the MiniMoog Model D
Many companies also offer other forms of synthesis, such as wavetable or granular. The Studio Electronics Grainy Clamp-It and Harvestman Piston Honda Mk II are both digital oscillators that offer forms of wavetable synthesis.
These modules can often be exploited without the use of a filter, as the rich tonal content is under full control, meaning that waveforms/wavetables can be brightened or filtered at source. Added to which, Wavetable modules are often capable of producing overtones that are way beyond the possibility of the humble VCO, as lovely as VCOs are. But then, this is the beauty of a Eurorack system; try things out and merge signals together.
A good example of an oscillator that is capable of many forms of waveform creation is the Mutable Instruments Braids. This module is something of a beast, offering everything from saw tooth right up to incredibly complex ‘models’ that combine oscillators for modulation and hard syncing. This could only really be possible in a digital unit, and the complexity of what can be achieved sonically is way beyond the realms of subtractive synthesis. However, you really do get the best of both worlds, as the basic and complex coexist within the same unit.
The chances are, you will eventually want to buy more than one oscillator. The more you have, the bigger the sound you can make; and of course, just like classic guitars, they all have their own sound and timbre. Start simple and build upwards, that way you will learn what works for you, without spending and wasting money.
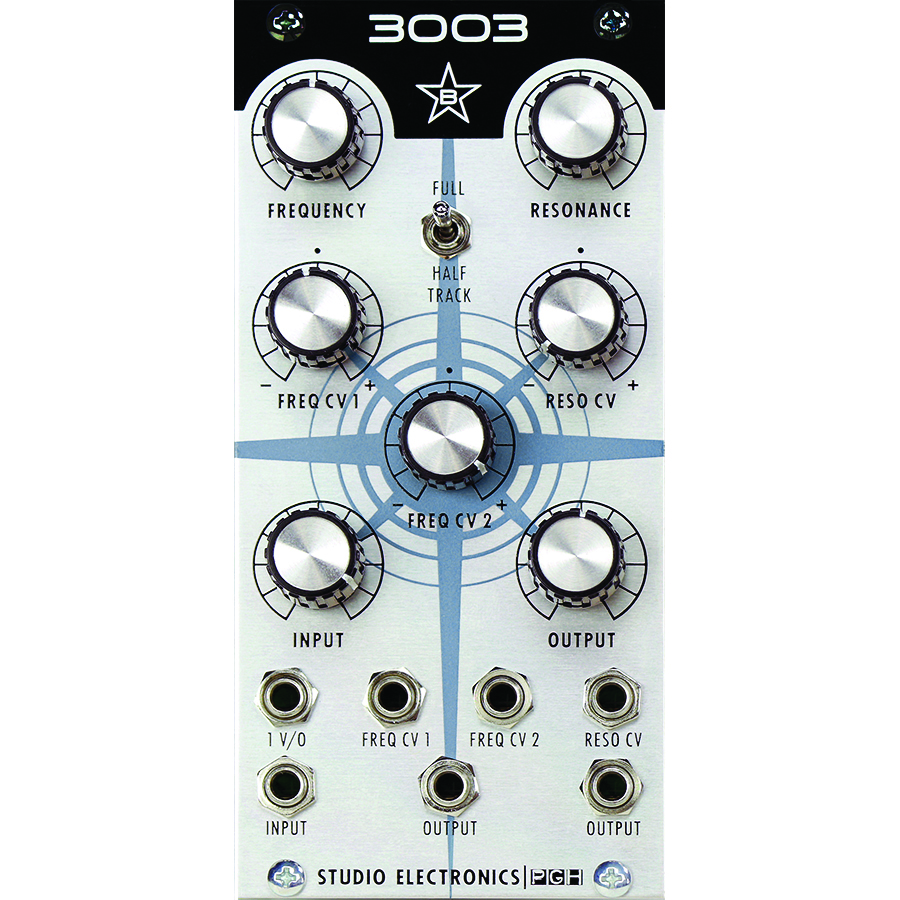
The Studio Electronics Modstar 3003. Can you see any clues as to which classic filter this might be based upon
Midi To CV Converters
If you are pretty sure that you wish to use your DAW as a means to trigger your Eurorack, it is worth considering a number of MIDI to CV/gate devices.
Apart from Kenton, which almost invented the idea of MIDI to CV conversion, Doepfer makes some very cost-effective solutions for under £100. However, for more advanced use, the Pittsburgh MIDI 3 or Mutable Instruments Yarns allow for two or four CV/gate streams respectively, controlled from your DAW. The Pittsburgh also offers clock division in the same module, which could kill two birds with one stone!
2. Classic Sweeps – The Filter
Next on the list is the filter. Again, there are many designs out there, the most basic of which is the classic low-pass filter. This device will filter out frequencies from your harmonically rich waveform, produced by your oscillator, and allow you to sweep through the frequencies, removing harmonics from the top down.
In the case of the LPF, think of this as a lumberjack cutting down the main trunk of a tree, starting at the top and chopping sections as they go, leaving the stump at the bottom. The only difference with your LPF is that you can put the frequencies and harmonics back in, which is a tad more difficult to do with a tree!
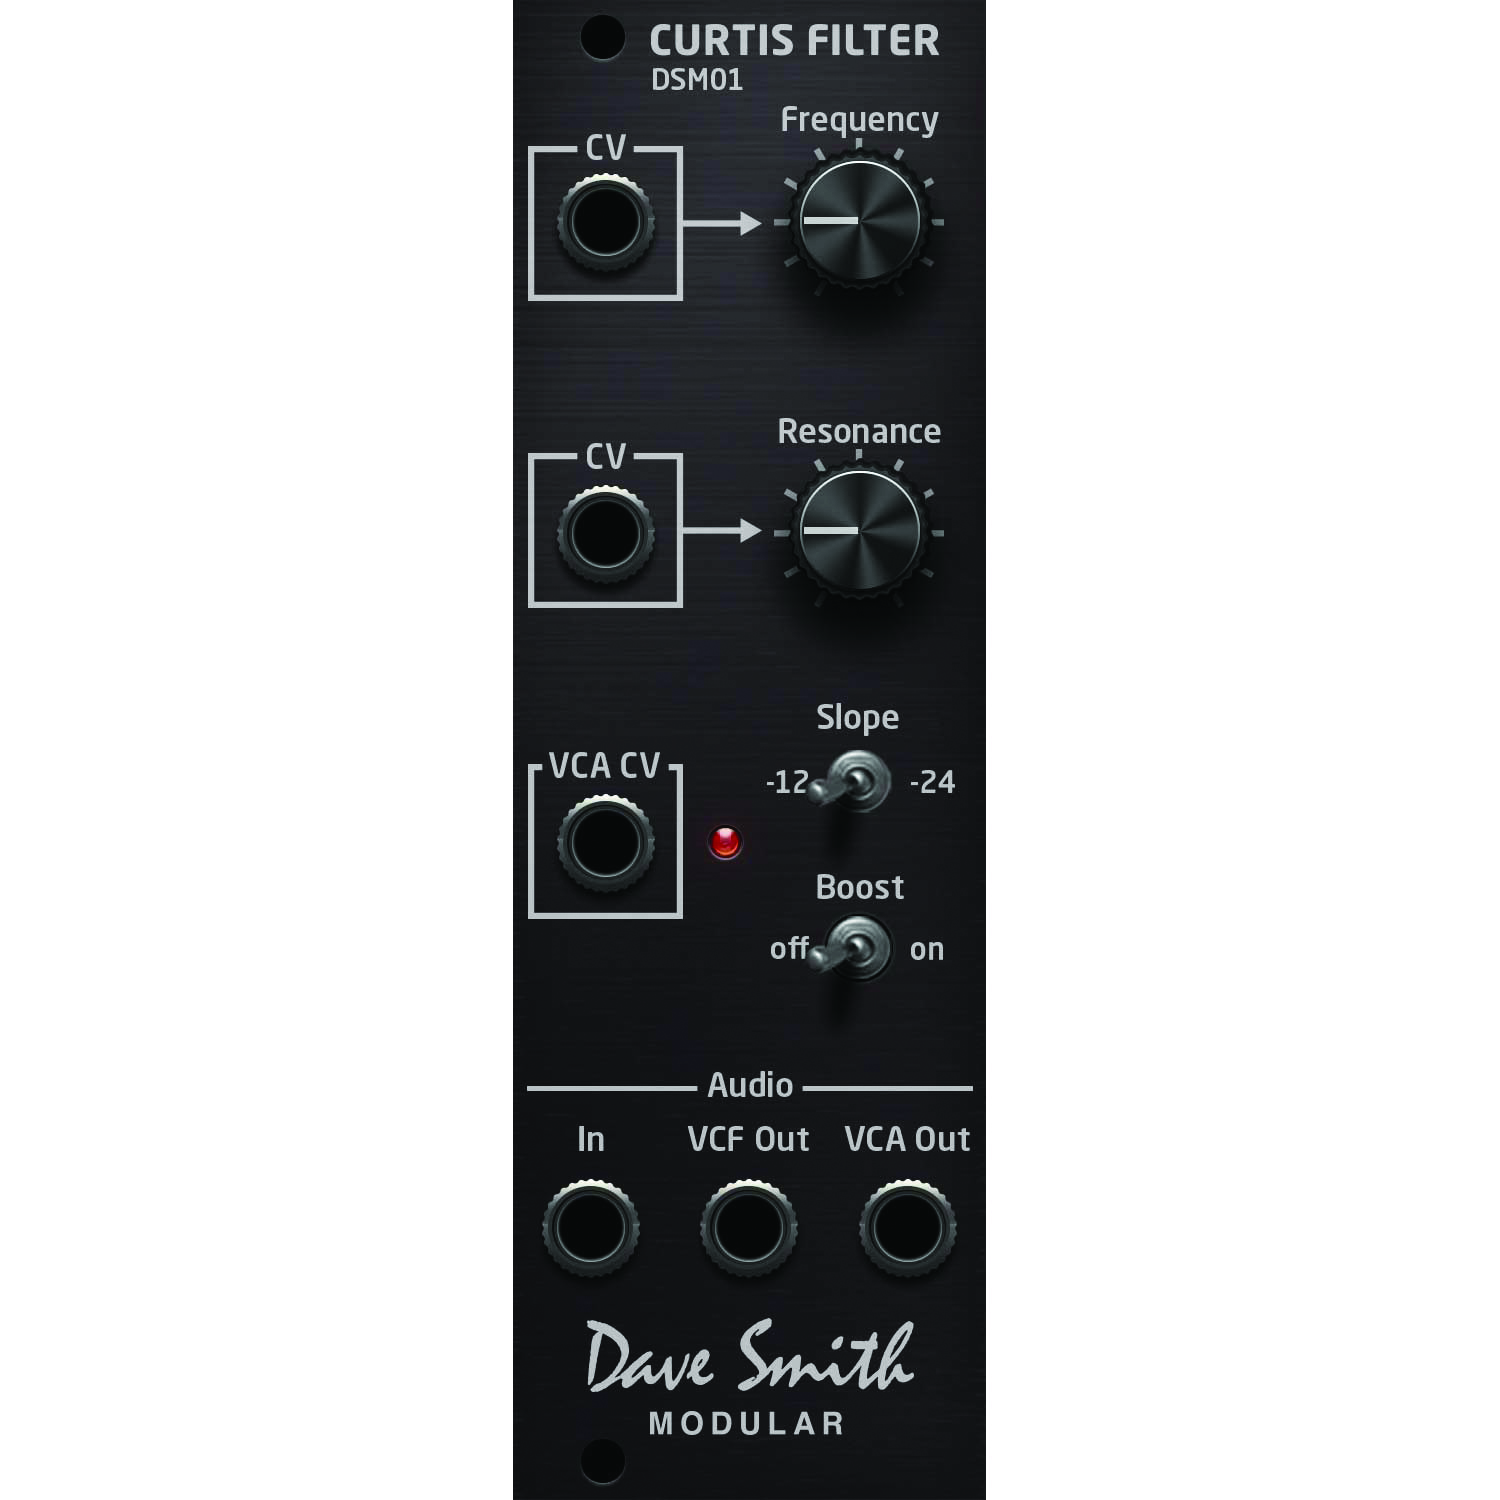
DSI is one of MT’s favourite synth companies and has entered the Eurorack market with the DSM-01
Most filters are based on designs that first appeared on the classic synthesizers of yesteryear, so filter modules can contain the same circuitry as the MiniMoog, Arp 2600, SCI Prophet 5, Oberheim SEM, Roland TB-303, and even more obscure machines such as the EDP Wasp or the Polivoks. They all sound unique and have character, so you might want to consider what sort of music you might be producing and buy accordingly. If you like EDM, a classic 303-type filter will be sharp and resonant, whereas an ARP or Moog-style filter might be more forgiving, but stunning in other ways – it’s all down to personal taste!
Studio Electronics has been on something of a crusade of late to bring classic filters to the market. Originally with the Boomstar Series, where all five modules were the same, except for the filter, these circuits are now available as separate modules.
The names are largely self explanatory, but the 4075 and 5089 filters might need a little more explanation, making reference to the original circuits on which they were based. The 4075 is the classic ARP 2600 filter, whereas the 5089 is based on the original Moog filter.
Once again, Doepfer offers a broad and comprehensive palate within the filter market, but at a budget price point, with recreations of many of the classics. To the discerning ear, it is fair to say that you might notice a difference in quality, based on something which is twice the price, but they certainly do the job well enough.

The TipTop Audio Z4000 has a huge amount of control available with every phase and CV control
Dave Smith Instruments surprised many last year by entering the Eurorack market with its first module, the DSM01. Built around the Curtis chip, this module offers the same sound that had been found in most of the synths that Smith has worked on, from the SCI Prophets up to his present-day machines, offering a Low Pass Resonant design.
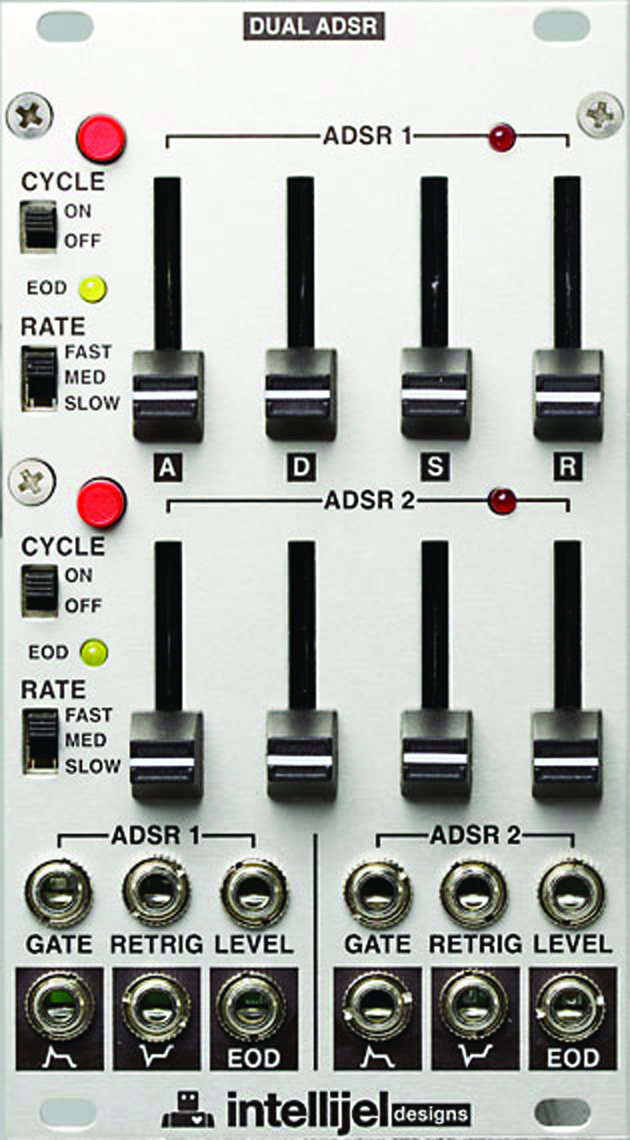
The intellijel Dual ADSR, has two envelopes on one panel, but with a look that’s reminiscent of Roland equipment, being slider-based, rather than rotary-pot based
All of the filters discussed so far have been very much of the low pass variety, but there are plenty of other filters available that will offer different options. The Pittsburgh Modular Filter has four different filter types in one module. Low pass, high pass, band pass and a variable filter are all available, and you can even use more than one at the same time, although cut-off and resonance controls will be mirrored through all four filters, if used simultaneously. This level of flexibility in one module is highly appealing, especially if your Eurorack space is at a premium.
3. Gating the Amp – Amplifiers and Envelope Generators
In many respects, the final two essential components in our quadruplet of modules are linked, as they are used mostly in conjunction. The Voltage Controlled Amplifier (VCA) is what one might expect; an amplification module that allows the signal to be increased to a level that will be usable with your other studio equipment, such as a mixer or audio interface, although there is an argument that it is not essential, depending on how you propose to use your modular.
If you are intending to make only drones, you could get away without one, but in reality you will want to use your VCA in conjunction with an envelope, the purpose of this being to shape your sound dynamically.
Many VCAs have a ‘playthrough’ function, which is there purely to allow the signal to flow through without gating from the envelope, and is a useful starting point to check that you have an audio source available.
The envelope, or contour generator as Moog used to call it, can be deployed for a number of purposes, but by far the most common task is to shape the amplitude (volume) of a sound. This is done by connecting the CV output from the envelope to the CV input on your VCA, so in many respects you could consider this concept as an automated volume control, triggered every time a note is played.
The most traditional concept is a four stage envelope, consisting of four phases that occur one after another, these being attack, decay, sustain and release, which gives rise to the acronym ADSR. There have been many variations on this theme over the years. Early synths often used less stages, and some synths from the eighties employed up to nine, but the humble ADSR envelope is certainly the most predominant at the present time.
So given that the vast majority of envelopes are ADSR-based, what’s the difference between brands and models? For many users, it’s all down to how ‘snappy’ the envelope is, and this normally refers to the attack and decay phases, and the way that they interact at the front of a note. For percussive sounds, it is pretty essential to have a very quick attack phase with an equally quick decay phase, allowing the percussive timbres to be tight and very firmly on the front of the pulse or clock.
If it is too snappy, the phases can be extended, but it is better to have this option than not. Of course, the same rationale can be applied to other sounds, but it is debatably more noticeable with percussive tones.
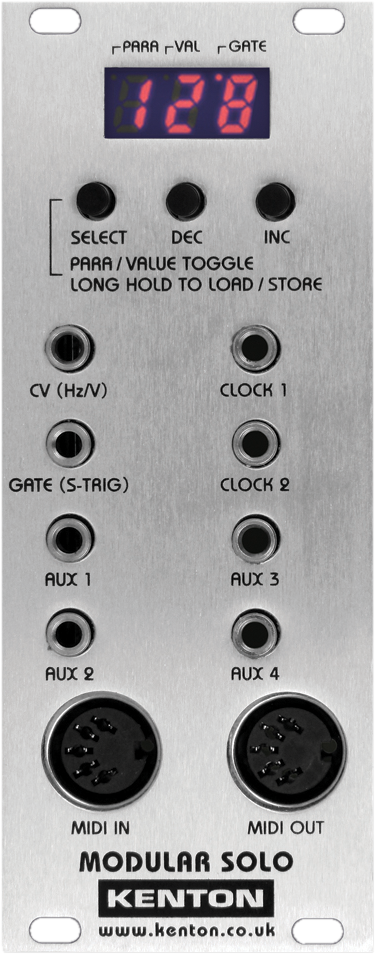
The Kenton Electronics Modular Solo is equipped with the basic MIDI to CV/gate conversion, and the ability to route further CVs to other units, for automated control of parameters such as filter cut off
The Tiptop Audio Z4000 voltage-controlled envelope generator is renowned for its snappy sound, and also offers CV control of the four phases. It also takes the form of four very clear pots, which is something it shares with the Doepfer A-140 – a perfect module if you’re on a budget.
If you fancy a different aesthetic form factor, then the Intellijel Dual ADSR boasts two envelopes on one panel, but with a look which is reminiscent of some Roland equipment, being slider-based rather than rotary-pot based.
Different again is the Pittsburgh Modular Envelope, which is switchable from a two-stage AD envelope to a three-stage ASR envelope, and also has triggering options that allow it to perform in a ‘cycle’ or repeat mode, meaning that it will produce multiple pulses and can be used in a similar way to an LFO (more on LFOs next month!).
Ultimately, and with all things Eurorack, you will be forced to make your own decisions on what works best for you – and in doing so, the voyage of discovery into Eurorack will continue!
Cables To Impress
You would think that there would be very little to get excited about with cables, but thanks to UTOpb, you can now purchase cables with LEDs built in, so every time a gate trigger occurs, the cable illuminates! Very cool! For further information, see www.utopb.com
4. Note Sources and Triggering
As previously mentioned, Eurorack systems work on a principal of control voltages (CV) to control pitch, and gate triggers to signify the beginning of every note. This very simple system is pretty infallible, and in the view of many all the better for it when it comes to timings.
But there is a need, for many, to be able to interface with contemporary equipment. This essentially means either triggering from a computer-based DAW, or from a dedicated hardware sequencer. Whichever route is best for you will be dictated largely by how you want to use your system, and how you wish to integrate it into your studio setup.
If you wish to use it through a computer-based system, you will need a MIDI to CV/gate interface, many of which are available from all the main modular players. However, you could also consider Kenton Electronics, a company long established at providing MIDI to CV solutions, in both external and Eurorack modular formats.
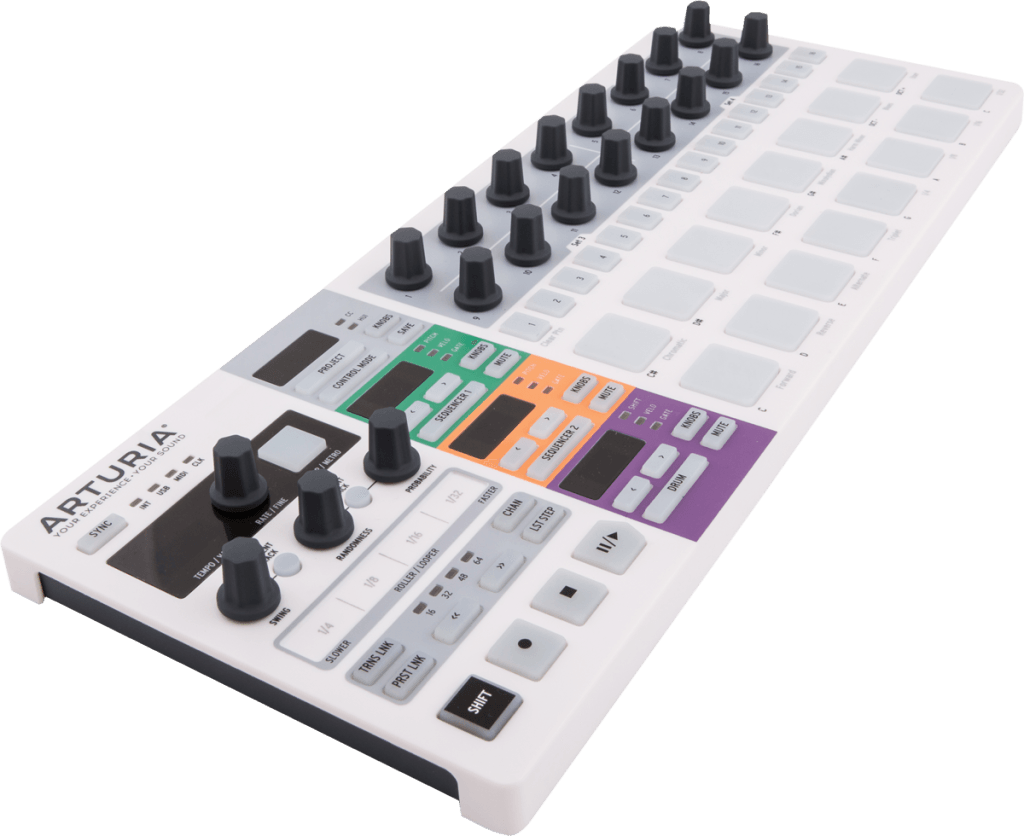
There are some great modern solutions to triggering CV/gate, the Beatstep Pro from Arturia being one of them.
If you would prefer a cost-effective option, which can be used as a sequencer and keyboard, the Arturia Beatstep is ideal. You can trigger notes from pads, and also set up basic 16-note sequences, directly from a dedicated piece of hardware.
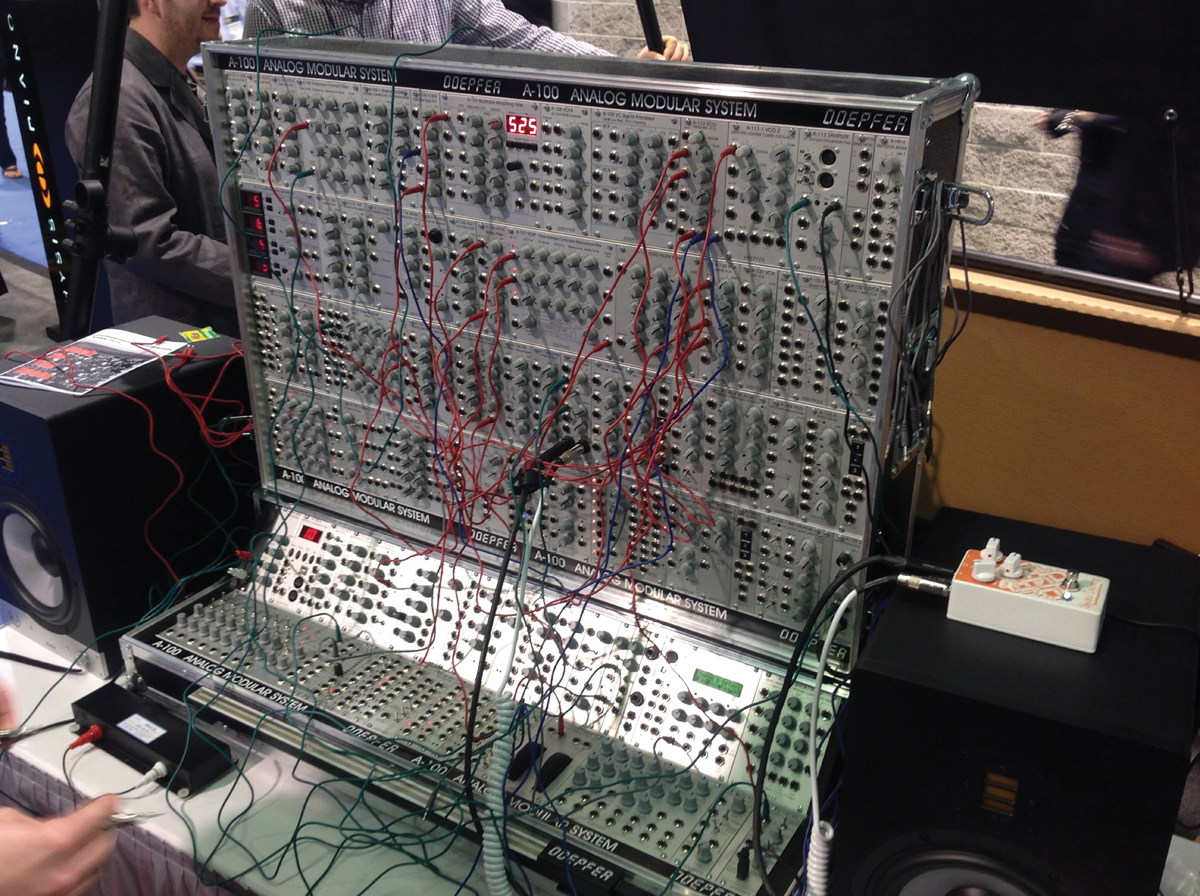
5. Patch Time – Cabling
The one further aspect of Eurorack that cannot be overlooked is that of cabling. The Eurorack form works on a principal of connecting units using 3.5mm mono-jack based cables, and not the stereo variety, as you might find on your mini-jack based headphones.
Many companies make their own branded version of cable, and a particular favourite of mine are the Nacza cables from Pittsburgh Modular, which are pretty tough and hard wearing, thanks to an exterior braid. You may also like to consider cables with plugs that are known as ‘stackable’.
This immediately allows a signal to move in more than one direction, by simply inserting a second cable on top of the first; very clever, but predictably stackable cables are more expensive, as the manufacturing costs are higher.
Armed with your four units and a handful of cables, it is now time to consider creating your first patch, so we will start at the front of the signal chain, with the oscillator. Despite what you might think initially, every oscillator is generally in a state where it is producing a tone at all times! If it is switched on, it is producing a tone.

The only point that prevents you from hearing it is whether it is switched on and plugged into a mixer or similar. So if you were to take your oscillator output (probably indicated by one of the little waveform icons on most modules) and plug it into the audio in on the VCA, you would hear a noise, providing of course that your VCA has the playthrough function mentioned earlier, in which case there should be a pot which will act as a volume control somewhere on the VCA. It’s worth mentioning that the VCA output must in turn be connected to an input on your mixer or audio interface.
Keep the volume low to start with, to prevent any damage to your equipment.
At this point, you will notice that the tone you are hearing will probably sound quite raw, and certainly if it is a saw or square wave tone, it should do – and this is where the next stage enters the equation, in the shape of the filter.
The tone being generated will also most likely be quite low in pitch (frequency), because at this stage we are yet to connect the oscillator to a pitch CV source, and by default oscillators will produce a low tone. If the tone produced is not low in frequency, don’t worry! It probably means that the pitch/frequency pot on the oscillator is set in a high position, in which case turn it and you should hear the tone move in pitch.
It’s now time to reach for another cable, as we will insert the filter into the signal path (fig.2). By disconnecting the cable that is currently inputting to the VCA, this can be re-routed to the filter input.
The additional cable can now run from the filter output to the VCA input, as before. Some filters do not have an output labelled as such, instead naming the filter output as the flavour of filter, so you might see ‘low pass’ instead of ‘output’.
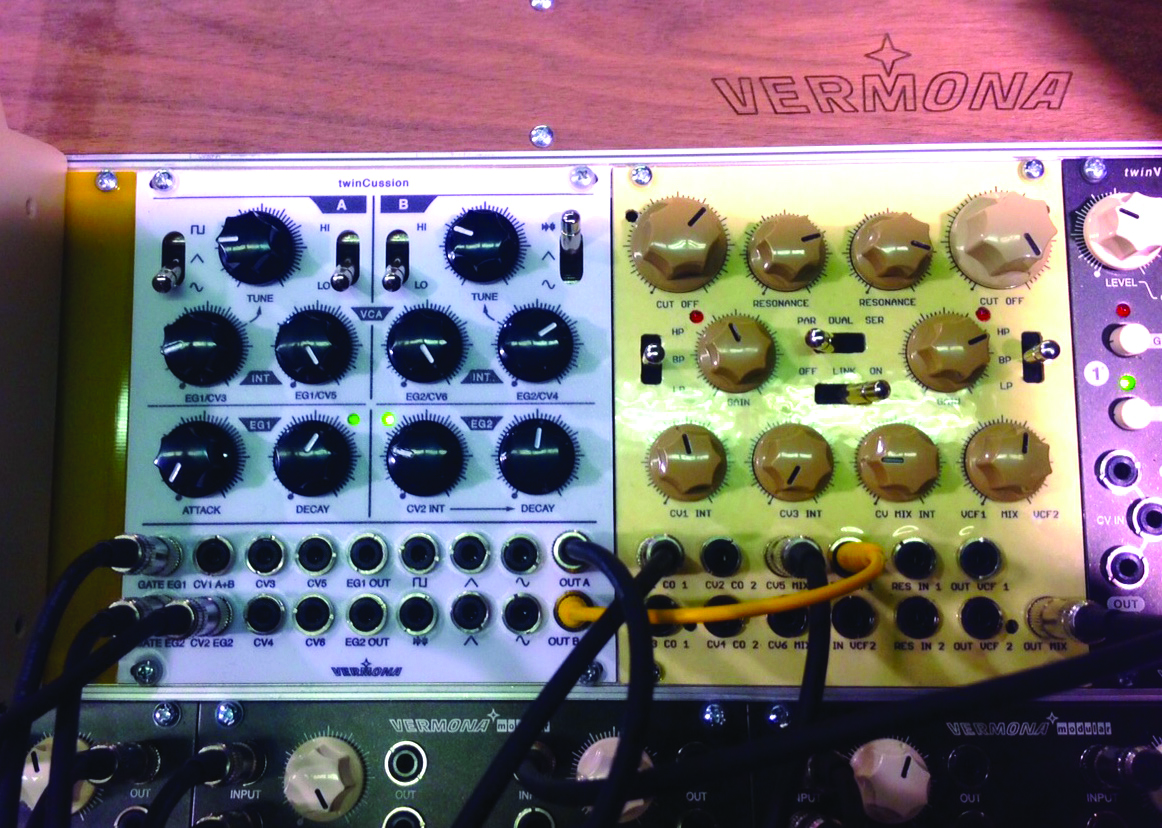
Cabling can be simple – as shown here with two new Vermona modules – but it’s important and often overlooked
If you are not hearing noise at this point, the chances are your filter is filtering out the entire range of the oscillator tone, so give the cut-off control a tweak and you should hear something. If the resonance is turned up, you won’t be able to resist wildly turning the cut-off frequency, but it’s best to refrain from shouting ‘aceeeed’ at this point (if you are too young to know what we are talking about here, ask your parents).
So far, we have produced something drone-like, but now it’s time to connect the envelope to the VCA, in order to gate the sound and create a dynamic shape .
Take the envelope output and connect it to the CV input on the VCA. In order to hear any change in your sound at this point, bearing in mind that you are probably still hearing a drone, you will need to decrease your ‘playthough’ volume on the VCA completely. This should take your volume down to silence.
Before you are able to start triggering notes, you will also need to connect the gate output on whatever your chosen sequencer or MIDI to CV interface is to the Gate Input on your envelope. The CV and Gate outputs on sequencers and MIDI to CV convertor modules often reside next to each other, so you shouldn’t have to stray too far to locate them.
You will also probably find a CV input amount control on the VCA, which you will need to increase, and doing so should result in you hearing your note in its full amplitude contoured sense, every time you trigger it from your source keyboard or sequencer. Adjust your ADSR envelope settings, and you should start to hear a change in the various phases of the amplitude of the note. Now, you’re ready to play something musical, whether it be automated or manually played.
Beyond basics
Armed with these four modules, you have the very essence of a basic subtractive synthesizer, and what comes next is all about modulating sources to create even more interesting tonal colours. However, for the moment, you could consider sending your envelope output to the cut-off CV control of your filter, as well as the VCA.
In order to ‘split’ this signal, you will need either stackable cables or a small Eurorack patchbay, such as the Pittsburgh Modular Multiple, which is a very cheap and incredibly useful unit.
Once split, you can send your envelope to the filter as well, and create that classic snappy filter effect that you often want on a great bass sound.
Other than this, you may well have other mysterious jack sockets on your modules. Have a go and plug them up and see what they do! It’s highly unlikely that you will damage anything, so just noodle around and see what comes out! That’s what it’s all about!
Next Time
Next time, we will explore more modules with a view to modulating or effecting the basic sounds you have created here. This is where the fun really starts, so reach for a clutch of cables, and get ready to make that unique killer patch!