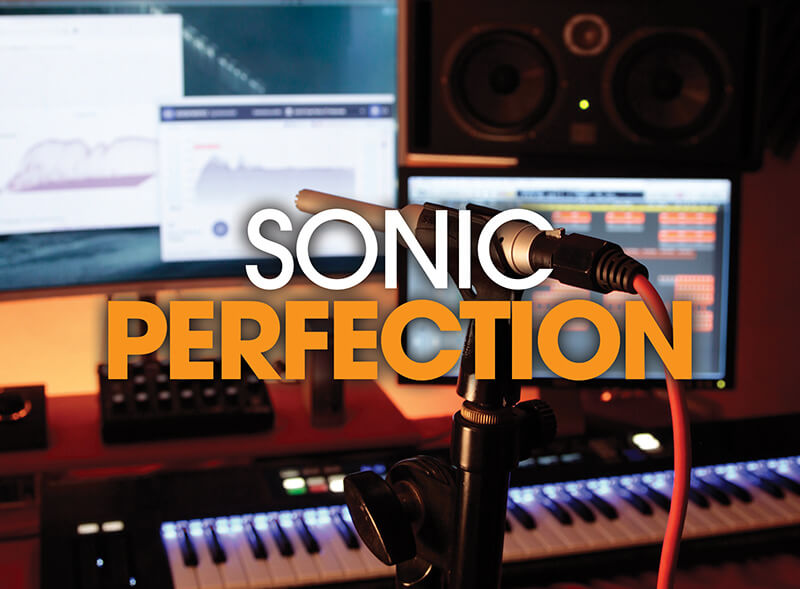
Sonic Perfection: A Guide to Room Calibration
Despite advances in design, no speakers or headphones have a completely flat response. But what if we could use technology to help reduce the imperfections and colourations created by our rooms?
Sound is a funny thing. It leaves the speaker at different speeds across the spectrum, then bounces off every surface in sight, losing varying amounts of energy depending on the materials it hits. It then bounces back and hits other sound waves coming the other way, either cancelling or boosting certain frequencies.
When you hit play on your system, this merry dance is happening thousands of times a second. All that money you spent on fancy monitors, synths and software might mean the equipment sounds great itself, but there’s no getting around the fact that trying to EQ a bassline in an unbalanced room is a frustrating experience often based on guesswork, referencing and trial and error.
Sound is such a delicate, complicated beast, that even in the best-treated rooms, the frequency response is never truly flat. Likewise, if we were to take the room out of the equation and just listen through high-quality headphones, there’s still a massive variation from manufacturer to manufacturer, and headset to headset.
It’s no surprise then, that we’ve turned to technology to give a helping hand. By measuring the unwanted peaks and troughs in a system, clever software can create an inverse EQ curve to compensate.
Over the last 15 to 20 years, this type of room calibration has started to creep into more and more studios, as computers have become powerful enough to run our audio through high-grade correctional filters that help flatten out any audio issues caused by our speakers, room or headphones.
In this feature, we’re going to take a look at the various monitoring issues often faced by producers and engineers that cause them to pull their hair out. Then we’ll look at how we can use affordable solutions to improve the situation and fine-tune your studio space to achieve sonic perfection.
Perception of sound
Have you ever been at a really loud gig and put in your earplugs, and thought, “Argh, I’m losing a bunch of high frequencies here and I’ll struggle to enjoy this.” Then, lo and behold, 10 minutes later you’re toe-tapping away and have nearly forgotten they’re not there? The brain is pretty spectacular at controlling our perception of sound volume and frequency distribution. What at first sounded a little quiet and muffled, is eventually flattened out by the mind as it recalibrates to the new norm.
Technically, we can do this with any situation, including our studios, and, in theory, as long as you learn your system well by listening to lots of references, you can create decent mixes. We’ve all felt slightly sickened by stories of producer “X” who made hit song “Y” on computer speakers in their bedroom.
However, the reality for most of us when attempting to mix on lesser systems in untuned rooms, is an experience of frustration as we struggle to make our mixes translate. It’s a rite of passage that all producers must face, when they excitedly take their new track (on CD or USB or Soundcloud etc) to listen in a car or on a friend’s stereo, only to realise the mix sounds like a drunken drum machine wading through a swamp! But maybe it’s not totally your fault.
Rogue frequencies
RØDETest’s FuzzMeasure 4.0 is Mac only… for the moment!
Specific problems in the studio can manifest themselves in very real ways in your mixes. As a case in point, I was working on a house track a couple of years ago, and was lucky enough to test out the mix on the Fabric sound system during a packed club night.
Thankfully it sounded (mostly) good through the big speakers, but it was apparent that the booming kick drum was lacking in punch around the 100-200Hz region. When I checked the frequency balance of my room several months later, I could see that there was a big bump around that region, which in turn had lead me to dial down those particular frequencies to compensate.
Ultimately, it’s much easier to achieve a good mix, to analyse reference material, and to trust your ears when you’re not battling against acoustic imperfections.
So what are the main issues we face? Well, if you think about your entire system, it starts with your audio interface and cables. In the grand scheme of things, the differences here will be minimal, although better interfaces with better converters will give a more open sound.
We then have the monitors, whose frequency distribution will vary massively based on the design and size, and can even vary in speakers of the same model as they wear over time, giving a slightly different sound in the left and right sides.
You’ll also need to think about speaker placement including how close they are to the walls/ceiling/floor, creating an equilateral triangle between yourself and the speakers, and we’d definitely recommend some sort of speaker isolators or stands.
Next, and most importantly, we have the room itself. The shape, size and furnishings will affect how different frequencies bounce around, build up and decay over time.
We’re not going to go into great depth on room acoustics as it’s been covered elsewhere (see myriad features on www.musictech.net), but room modes can create a series of peaks and troughs, making the volume higher or lower at different points around the room.
This means that if you’re sat in a peak position, you’ll hear certain bass frequencies several dB higher, which can make the bass sound lumpy and uneven. Ideally, you want to avoid sitting in the centre of the room as this is where the sound waves cross and interact the most.
On top of that, you have things like comb-filtering and flutter echoes that affect the mids and highs. All of these things combine to make the sound that you’re hearing when sat at the listening position different to what’s actually coming out of your DAW.
Linear, Minimum or Mixed Phase
Aside from improvements in measurement techniques, the reason we’re now getting more transparent results is largely due to increasing CPU power and the accuracy of well-designed filters.
Different companies may take slightly different approaches, but you’ll tend to find they use a mix of Linear Phase, Minimum Phase and Mixed Phase FIR and IIR filters, each with its own benefits and drawbacks.
On a basic level, minimum phase gives much lower latency, but will exhibit increasing shifts in phase the harder the EQ has to work, whereas Linear Phase will maintain phase coherence, but at the cost of increased latency and possible subtle pre-ringing artefacts. Unsurprisingly, Mixed Phase sits somewhere between the two.
You might consider using Minimum Phase for low-latency tracking, and Linear Phase when mixing, but the best bet is to see what works for you. Luckily, most filters these days are high-quality so any audio issues should be very subtle.
I need to see some identification
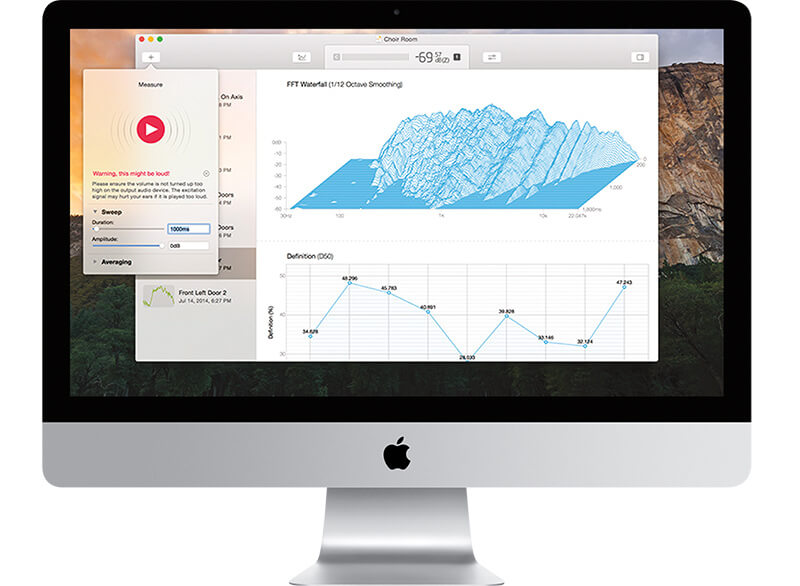
The first challenge is to identify the problems so that you know what you’re dealing with, and the best way to do this is with some acoustic measuring software that can display frequency graphs, waterfall graphs, and reverb decay times. There are a couple of options here, but probably your best bet for PC and Mac is to go with Room EQ Wizard (www.roomeqwizard.com), as it’s free and included on this month’s cover disc!
Alternatively, there’s FuzzMeasure 4 ($99.99, www.rodetest.com), which is easy to use and generates beautiful looking graphs. FYI, FuzzMeasure was formally owned by SuperMegaUltraGroovy, but is now part of RØDE Microphones’ new RØDETest division, which will see the mic manufacturer move into the realms of acoustic measurement mics and software later in 2018. It’s currently Mac only, but a PC version is in the works.
From here you’ll need a full-range, omni-directional pencil mic to capture the room measurements. We’ve included a round-up of several microphone options for your perusal in the Product Highlights section.
As we’re going in deep on the precision here, you’ll ideally want a unique calibration file that captures the subtle variances of the mics themselves, so that this can be taken out of the equation.
Luckily, most measurement mics come with these files, and you can simply load them into the measurement software before you begin.
If you’re looking to be extra precise, then you can also set up a feedback loop on your audio interface, which will allow the software to measure any inconsistencies to help take the interface out of the picture too.
The software will then generate a sound such as a sinewave sweep lasting a second, which will ‘excite’ the room, then spit out the required graphs. As you’ll need to use a fair bit of volume to get decent results, we definitely recommend using ear plugs for this; There’s no use in perfecting your room if you damage your ears and can’t hear it!
Hardware options
Hardware options can be more expensive, but often feature high-quality components and converters, and also don’t require any extra computing power.
It might be a good option for higher-end studios, particularly those that have setups using tape-machines that aren’t processed via a computer.
If you’re after something simple and affordable, then you might want to check out miniDSP’s DDRC-24 ($399), which has analogue, digital and USB audio inputs, four outputs, and Dirac Live room correction powered by an onboard SHARC processor. You’ll need a mic though.
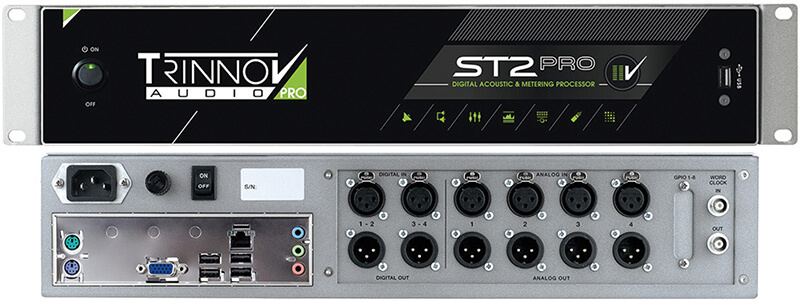
At the top end, there’s Trinnov with a range of systems for different speaker configurations, which are complete monitor controllers with their own processor in a 2U rack.
These are fancy pieces of kit that can do multi-speaker setups with analogue and digital IOs, can be controlled via ethernet or a DAW plug-in, and work with Trinnov’s own 3D microphone.
The ST2 model goes for £4,800+ though so it’s quite an investment. Trinnov’s ST2 is a complete monitoring and calibration system packed in a 2U rack with its own built-in processor.
A perfect response
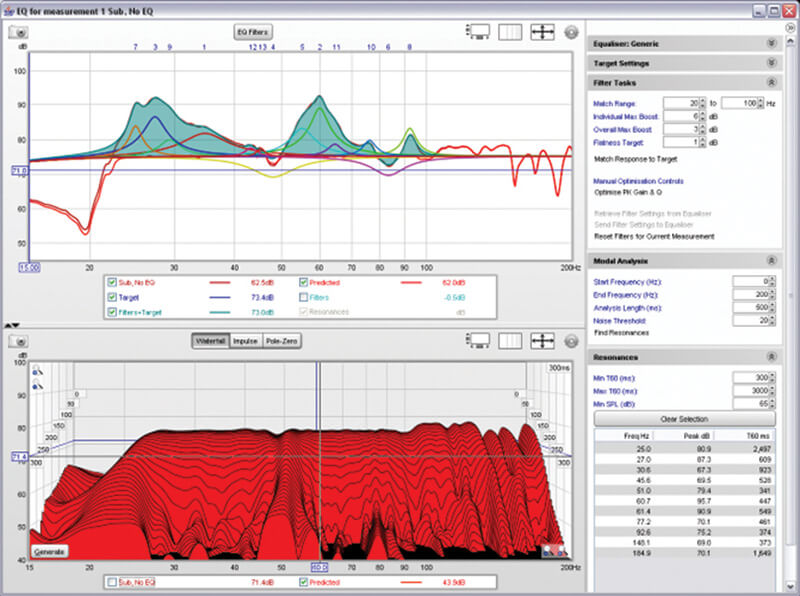
Once you have your initial measurements, there are a number of different types of graph that display different things, but we’re interested in three in particular; the frequency response graph shows a familiar spectrum curve of the full range of your system.
It’s likely that there will be many peaks and troughs in the lows and low mids, then more subtle variances in the upper frequencies, but it should be fairly obvious where you have issues in your setup.
The second type of graph is reverb decay times, which show how long the sound takes to decay at certain frequencies. In an ideal world, the shorter the better here, but given a choice, it’s better to have the values at a similar level across the spectrum to give an even decay spread, rather than several values really low but with wider variation.
Finally, there’s the Waterfall graph, which is arguably a little harder to read, but actually gives the most information.
Here you can see the frequency distribution and decay times all in one, which helps to pinpoint where you might have modal build-ups that cause specific frequencies to ring out longer.
Before we get to the calibration side of things, your next port of call should be to tweak your room to get the best sounding results, with the shortest and most even decay times, and the flattest frequency response.
This involves a game I like to call “Test, Tweak, Test”, which involves doing a sinesweep, then making a tiny adjustment to an element in the room, then doing another sinesweep to see if it’s made things better or worse.
Try moving your speakers, your listening position, and especially your sub if you have one. Once you find the best possible results, then you’ll want to look at adding some acoustic treatment to the room.
Again, we’ve covered treatment techniques in depth elsewhere, but the more you can spend the better here. Unfortunately, you can’t tame crazy bass peaks with acoustic foam or egg cartons, so you’ll need to invest in some proper bass traps and acoustic panels to get the best results (or go DIY and make some!).
In my studio I have some GIK Acoustics panels and traps (www.gikacoustics.co.uk), but Advanced Acoustics (www.advancedacoustics-uk.com), and Primacoustic (www.primacoustic.com) are other options to look into. The reason you want to do all this first, is that although calibration can work wonders, you are essentially putting a plaster on other, solvable room issues, and a calibrated room that has been treated first will sound way better.
You also have to consider that if you have a dip of -20dB at a certain frequency, then you’ll need to use a 20dB EQ boost to compensate, which will then reduce your overall headroom by 20dB! It’s much better to try and use treatment to get the variances down to a more manageable level, ideally at least near to +/- 5dB, then the correction won’t have to work as hard.
Adding some decent acoustic panels to control and refine room issues will give a much better foundation for room calibration.
Calibrated cans
It’s surprising that more hasn’t been done to balance headphone sound between manufacturers, as it’s more consistently measurable than working with speakers in a room.
With minor tweaks aside, headphone design hasn’t dramatically changed over the last 50 years, and frequency distribution and sound between sets varies wildly.
Having tested several sets with calibrated profiles myself, it’s a weird but satisfying feeling to switch between cans that you know sound different, only to have them provide essentially the same response.
The freedom you can get from being able to mix with confidence using headphones away from the studio is also incredibly gratifying.
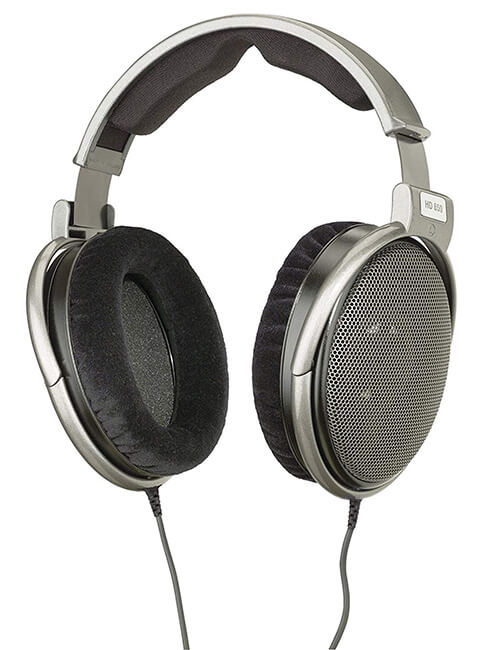
You can get generic profiles for your model, but to get the most even playback, you’ll ideally want your specific set to be measured.
That way it can take into account the unique details, and also the subtle variations between the left and right ears. Sennheiser’s HD650s are just one of the many profiles that have been captured. As headphone calibration becomes more popular, more obscure sets are also being measured.
Time to calibrate
Ok. Your room is set up, you’ve tweaked your speaker positions to perfection, you’ve added a few decent acoustic traps, and your studio biscuit tin is full of tasty biscuits. We’re now ready to take things further and calibrate the room. We’ve rounded up a bunch of potential software and hardware options, including monitors with built-in calibration and measurement microphones to get you started (see product highlights at the end of this feature).
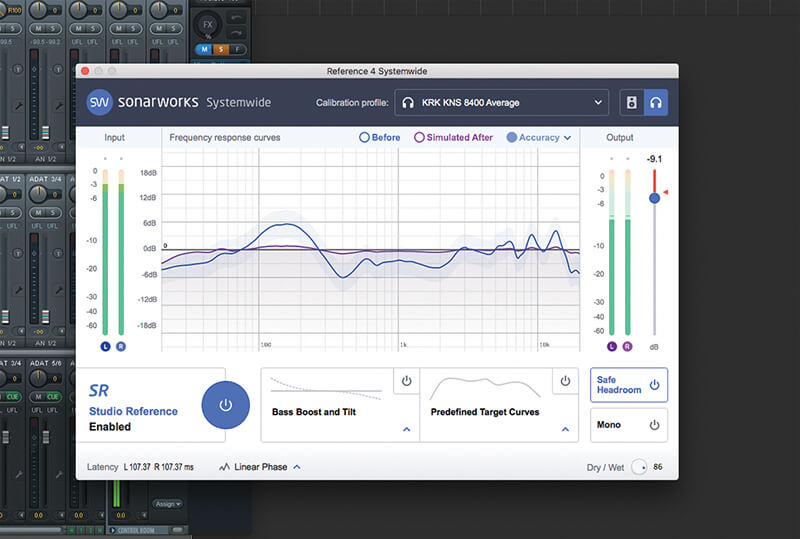
Popular and affordable choices include IK Multimedia’s ARC system, and Sonarworks’ Reference 4, which we’ve used as an example in the step-by-step guide. If you’re just looking to calibrate your headphones, then you can essentially skip the first half of this feature as the signal arrives direct to your ears and takes the room out of the equation.
Like speakers though, the drivers in headphones can massively vary in quality and design, and also between the left and right sides. You could stick with Reference 4 here, as it has a library of over 120 different headphone models, and can be seamlessly switched from your speaker calibration.
Or you can get the streamlined Headphone Edition for €99. For supreme accuracy, you can even send your specific cans to Sonarworks HQ in Riga for testing, which will give separate curves for the left and right ears.
If you want something a little more affordable, then ToneBoosters have a plug-in called Morphit that features an eye-watering 207 headphone profiles for the paltry sum of €30.
Finally, there’s also the Waves NX plug-in, which takes a slightly different approach and allows you to mix in a number of ‘virtual rooms’ using headphones, and even has an option to use a head tracking camera. Unfortunately there are only 12 models supported for the built-in EQ calibration.
Room calibrating using Reference 4
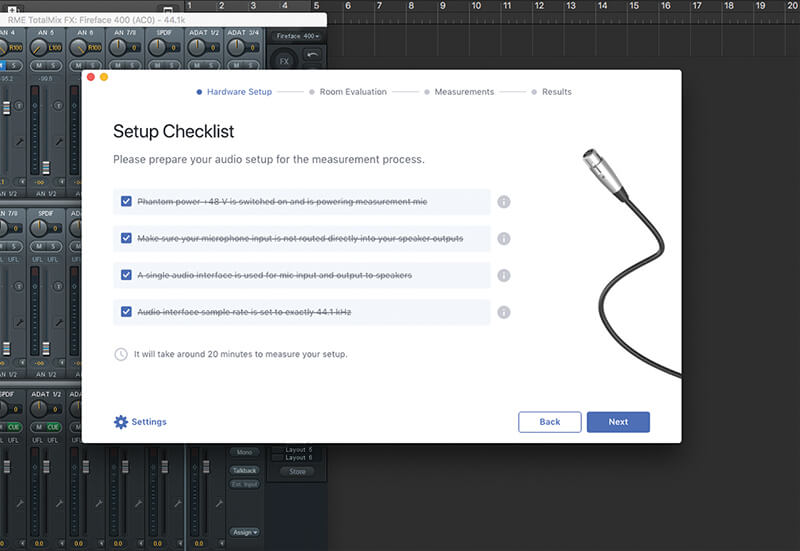
1. Let’s run through calibrating our room using Reference 4. The first step is to work through the setup checklist, which includes ensuring your mic is receiving phantom power, making sure no direct mic sound is reaching the speakers and that you’re using a single interface.
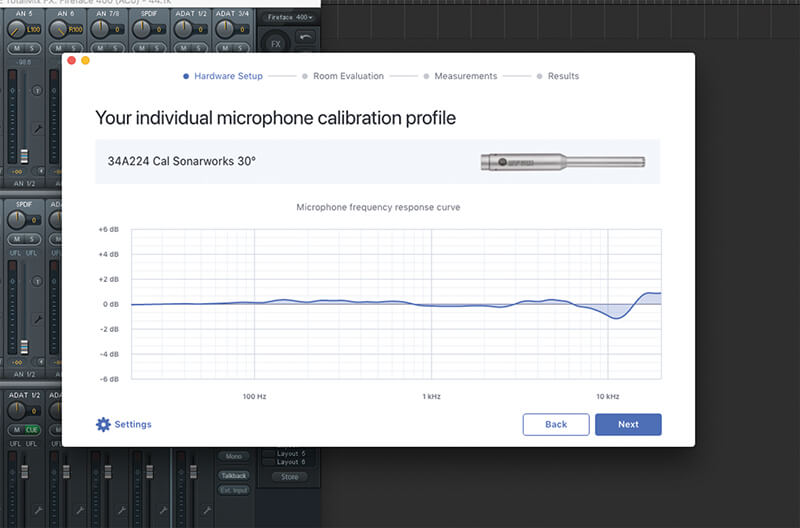
2. Next, we need to load a specific mic calibration file. Sonarworks mics come with a code on the side that can be input to download the relevant calibration curve, or you can navigate to an alternative file location on your HD if you’re using a different mic.
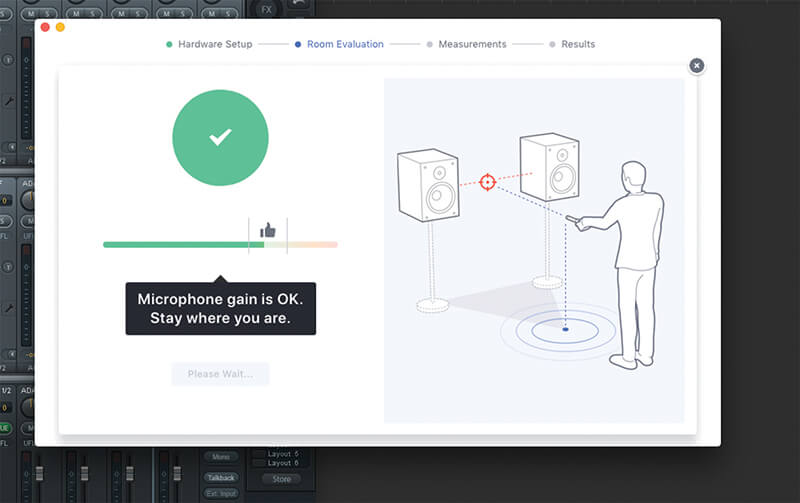
3. We now set the volume of the system by increasing the level until it’s just right. You can turn up the recording level on your interface too, but don’t rely on this, as it’s important that the speakers are loud enough to properly excite the room.

4. The final part of the setup involves pointing the mic at the left and then right speaker’s mid-range drivers to help the system work out how far apart they are. You can then use a tape measure to double check, and tweak the value to get make sure it’s accurate.
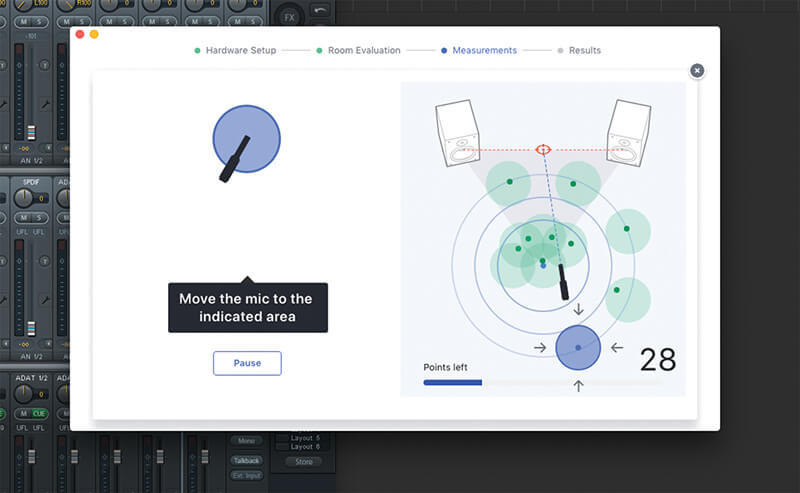
5. Now we measure! Reference 4 uses clicking sounds to locate the position of the mic, which is represented in the GUI. You move it to 37 positions in and around the listening position, and it measures a short, full-range sine sweep at each one.
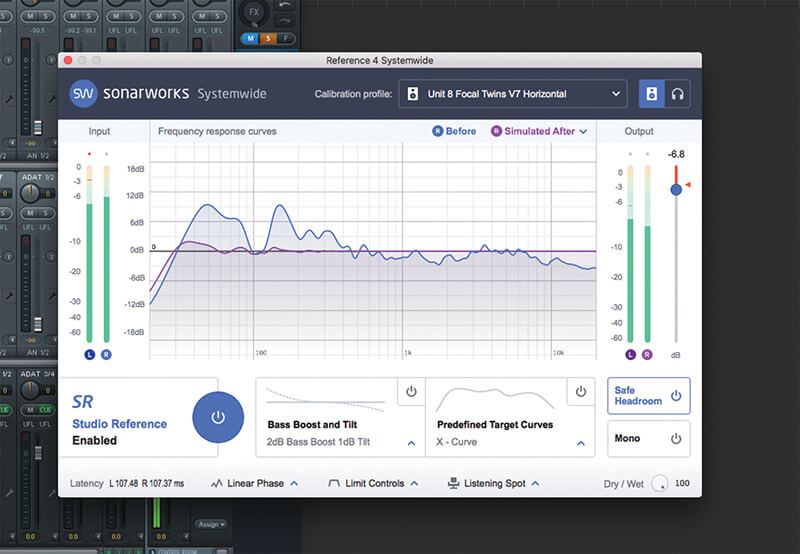
6. The software has now created a profile for your speakers and room. Make sure you save the file with a useful name, as you may end up trying several calibrations. This can then be loaded into the Reference 4 plug-in inside your DAW, or into Systemwide to affect all the system audio.
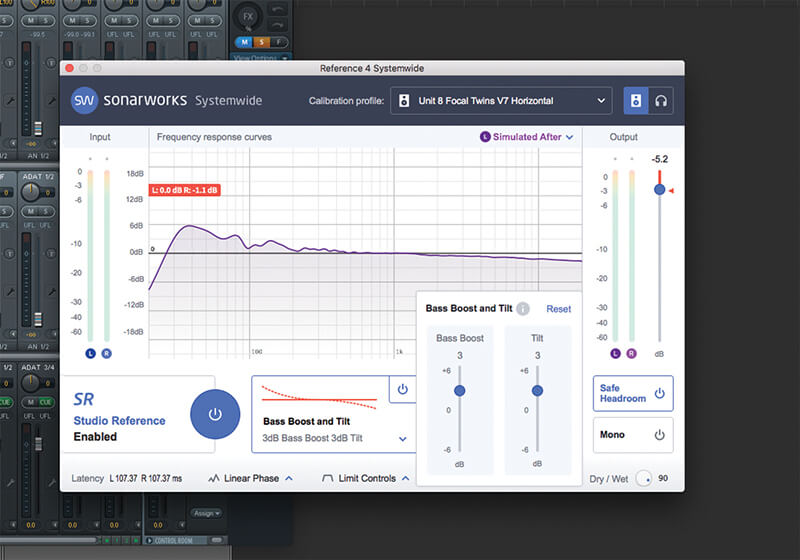
7. Have a listen to your favourite reference tracks and consider tweaking the dry/wet dial a little to taste. You can also use the Bass Boost and Tilt EQ to skew the overall balance, and choose between Linear Phase or low-latency, minimum phase mode if you want to use it for tracking.
8. You now have a calibrated speaker setup. If you find yourself in the middle of a mix and want to check it on headphones, you can simply hit the headphone icon in the top right and load one of the averaged presets, then switch back again once you’re done.
A whole new world
Your room and headphones are now calibrated. Happy days and stress-free mixing are on the horizon! It’s important that the first thing you do is re-learn the sound of the system itself.
Load up some mixes that you’re intimately familiar with, along with any high-quality reference tracks that you know sound good on other speakers.
Listen to the tracks for at least 30 seconds or more so that you get used to them, then bypass the calibration and try to pinpoint the parts of the spectrum that have changed.
Hopefully there will be an improvement and the audio will sound more even. Don’t be put off if it sounds unusual at first though.
If you’ve got used to hearing your speakers or headphones in a certain way over several years, then a flat response can often sound a little hollow in places, or too dull or bright depending on the setup. You need to be patient and allow some time for the new flat sound to sink in.
I started sharing my studio with a drum and bass producer a few months back and I was excitedly showing him the difference between the calibrated and uncalibrated sound.
Particularly, how the overemphasised 100-200Hz kick drums were smoothed out by the corrective EQ. However, he actually ended up preferring the uncalibrated room, despite me insisting that he just had to live with the EQ on for a while longer!
Another way to think of it is like a hifi or consumer set of headphones. These are often hyped in a certain way, sometimes with some sort of a smile EQ, and listening to tracks on these systems may actually be more pleasurable than on flat speakers or studio cans.
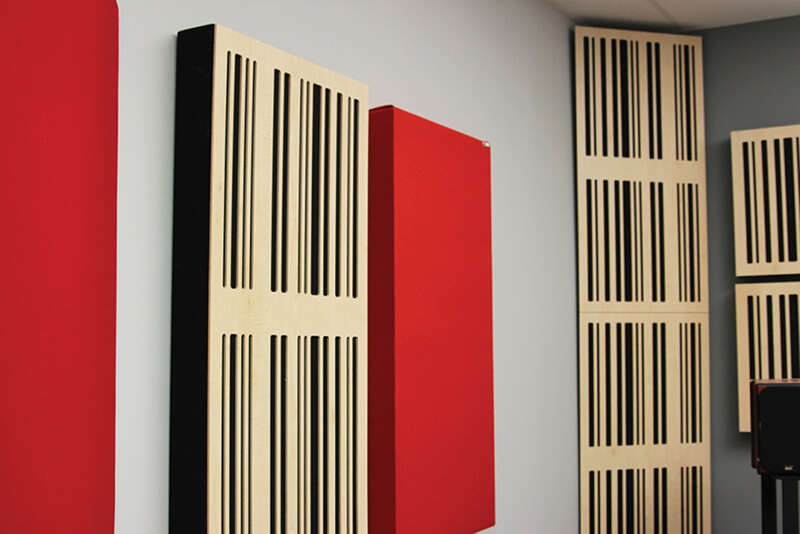
Some of GIK’s super-chic acoustic panels
However, it’s important to keep your eyes (or ears?) on the prize, as the goal here is to have a system you can trust and create effective mixes on.
As we mentioned earlier, the brain is very clever at adjusting, and once you’ve fully recalibrated your ears to the new setup, then switching it off should sound noticeably worse as all the imperfect bumps come back.
With all that said, it’s important to keep vibe in the equation, as mixing and writing are two different things, and you want to feel inspired by sound when you’re writing.
As such, you might consider dialling back the percentage of correction to allow a little of the original EQ shape of the room and speakers (or headphones) into the mix.
I currently have my correction set at 75%, as it gives back a little of that kick drum bump, which is especially useful when writing dance music.
Ultimately, you’ll find a balance over time, you just need to settle and stick to it, and make sure that all your listening is done through that setup.
As a side tip here, we also recommend getting to know how your room sounds when stood in different positions, even if it’s away from the sweet spot.
You might have a corner that traps all the bass making it swamp the mix, but this could be a good test of how your track might sound on a sub-heavy PA or club system. Some calibration options allow you to store more than one measurement spot, so that could prove useful for this.
DIY room correction
If you’re on a zero budget and just want to try and test out what EQ-ing your room might be able to do for you, then you could try using the free Room EQ Wizard alongside an EQ plug-in, although you’ll still need some sort of measurement microphone.
REW is a comprehensive suite of acoustic analysis tools that can be used to give you detailed feedback on your room, with audio test signals, frequency, impulse response and distortion measurement graphs, waterfalls, spectrograms, reverb decay times and more.
If you make a measurement of the room, then go to the EQ section and set a target curve, you can then ask REW to generate a series of EQ settings that you can then feed into your EQ of choice.
It’s a very rough and ready approach, and you will likely run into phase issues and the usual problem of it only being relevant to the specific position you initially measured, but it might help give you an insight into how your room sounds.
The results are in
Now that you’ve fine-tuned everything and your ears have adjusted, what can you actually expect to get out of calibrating your setup? As we’ve discussed, the main take away is a flatter frequency response across the board.
This is especially noticeable in the low frequencies, where room modes and speaker/headphone designs cause certain notes to sound louder or quieter than others.
Once you’ve done the calibration, try playing a descending scale on a sub bass patch and listen to how all the notes have the same energy.
This means that the next time you come to EQ a bass line because a particular note is sticking out, you can trust that the decisions made will translate on to other systems.
Similarly, where the top end may have previously sounded brittle, or too dull, you should hear a smoother roll off as you go up the spectrum.
For this, you could try sweeping a bandpass filter up through some white noise to hear how the upper frequencies fade out.
It’s possible that your monitors will have a slightly different sound coming from each speaker (through natural design variances and wear), and even when fine-tuning the volumes using an SPL meter, you may find that one speaker is a tiny bit louder than the other.
As the resulting calibration works in stereo, it can help to balance these subtle differences, which can result in better stereo imaging and the ability to place instruments more accurately in the stereo field.
Most software can also make tiny timing adjustments to make sure that the signals arrive at the listening position in phase.
Due to the overall response being smoother with a lack of overly dominant frequencies, you should be able to hear issues in your mix better as they will stand out more, allowing you to work faster and with less ear fatigue.
Also, if you’re collaborating with someone who also has calibrated monitors or headphones, then you can trust that you’re both hearing the same thing.
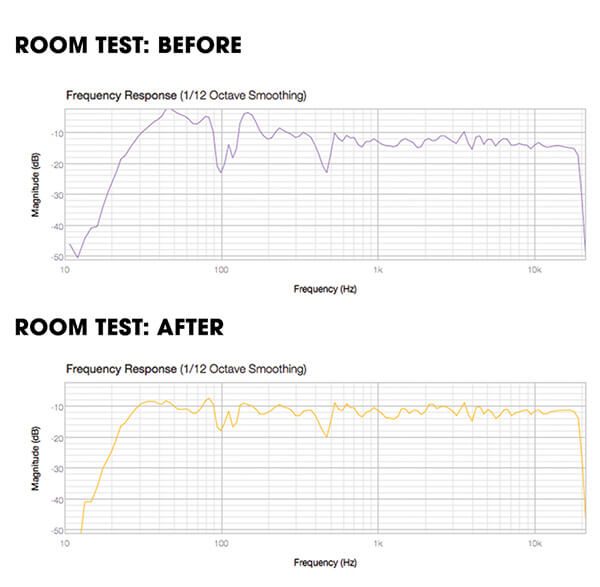
It’s also worth noting that calibration can be especially useful if you’re a travelling engineer and need to set up a temporary studio somewhere, or if you’re writing music on a plane (for example) and want to trust that the mix in your headphones will translate once you get back to the studio. Below are the real-world before and after results recorded using FuzzMeasure. Whilst not perfect, it’s a great improvement.
Know your limits
We’re big fans of calibration, but we should also make a mention of the potential issues. First, although it can help flatten the frequency response, the software can’t (yet) help to reduce the reverb times and frequencies that ring out. For that, you’ll need to use acoustic treatment that can control and balance the decay times.
Second, you can take multiple mic readings at different room positions, but most systems will only sound their best in the listening position.
Thirdly, it’s not ideal to have any EQ on the master output, as it will still be affecting the overall sound quality, and although Linear Phase EQs can keep phase issues in check, they produce a significant increase in latency.
And finally, if you’re using a software plug-in version that’s placed at the end of the chain, then you’ll have to remember to bypass it each time you do a bounce, which can be a pain.
The future
It’s certainly an exciting time. Now that technology has caught up and we have extremely detailed measurement systems and highly transparent filters, we can expect to see calibration systems seeping into more products.
There are already plenty of innovations happening in different areas, such as car stereos that have in-built microphones to measure the ambient noise and adjust the sound of the speakers accordingly.
Obviously when you’re cruising on the motorway the ambient noise will be different to when you’re stuck in traffic, so the stereo can make adjustments to boost the frequencies that are being masked by the engine and road noise.
Another example that takes a slightly different angle, are Nura headphones that started life as a Kickstarter campaign. These clever cans have a tiny microphone that listens for the faint sounds created by your inner ear when it interprets sound vibrations.
They can then fine-tune the playback to match your unique hearing profile, giving you a smooth, calibrated sound. There’s also Here Active Listening, another Kickstarter, that uses wireless earbuds and an iPhone app to let you control how you hear the world.
It has specific settings to reduce things like babies crying, or subway noise, and you can even change the EQ of a live gig should you so desire. It’s hard to know to what extent these things will catch on, and how long it will take, but it’s not impossible to see these technologies combining at some point in the future.
On a more immediate level though, we’re likely to see a standardisation of calibrated sound emerge over the next couple of years. Sonarworks’ recently announced SR (Studio Reference) is one example of this, which aims to set up a standard for both calibrated studio sound, and pro and consumer headphone use.
People listen to music on so many different devices that it’s nearly impossible to mix and master to sound good on them all.
However, if each device has a form of calibration to help overcome (at least some of) its deficiencies, then more people will be able to enjoy music as the artist and engineer intended.
It’s also less stressful for the engineer as it reduces the need to spend so much time checking on multiple playback systems, and it also means they can work in different studios, or on headphones, and mix with confidence.
It will be interesting to see how these technologies are incorporated into our DAWs, audio interfaces and smartphones over the coming years, ultimately becoming an invisible part of our setups as we move from one playback system to another.
As someone that’s done my fair share of playing tracks to friends on pretty bad sounding speakers, I for one can’t wait to see what the future holds in store.