20 Vocal Production Tips
Achieving the perfect vocal recording is a complex business. Hollin Jones explains how to get the best out of your recording and your kit… 1: Keep It Dry It’s a good idea to always record your vocals dry unless you have a specific reason to do otherwise. While the character of a guitar sound might […]

Achieving the perfect vocal recording is a complex business. Hollin Jones explains how to get the best out of your recording and your kit…

1: Keep It Dry
It’s a good idea to always record your vocals dry unless you have a specific reason to do otherwise. While the character of a guitar sound might come from the amp and pedals, in 99 per cent of cases you’ll be better served by recording a completely clean, dry vocal and then adding effects afterwards. There are several reasons for this.
Recording reverb or delay as part of the take can make comping and other edits much harder because you introduce effect tails to the signal which sound odd when cut and joined together. And although you may end up EQ’ing a lot of the frequencies in a vocal up or down, it’s best to start with everything present then cut frequencies surgically, rather than starting with a top-heavy take and having to try to add mid and low end back in afterwards.
2: Create Space Pockets
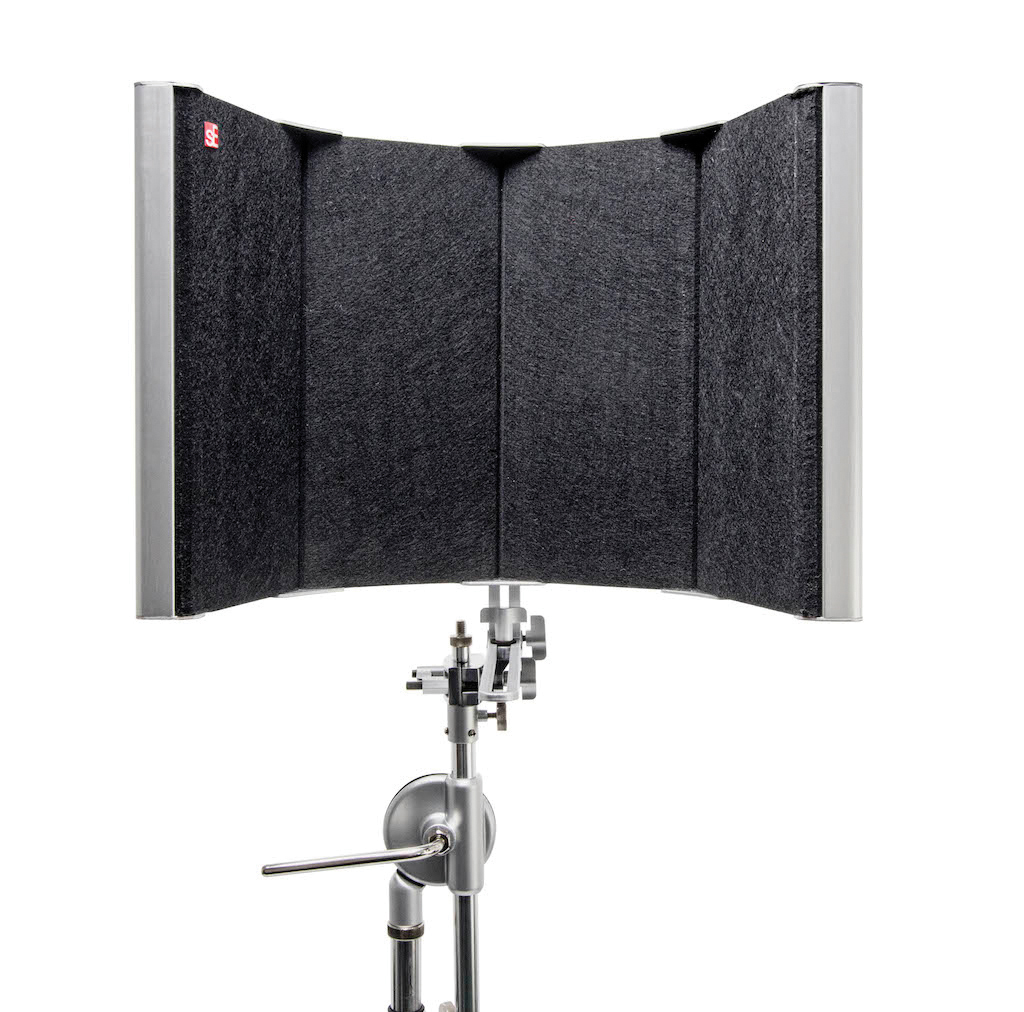
Wherever you record vocals, be it in a spare room at home or in a studio, it’s crucial to create a contained space for your vocal performance. Most people won’t be recording in an optimum space so there can be a lot of reflections from walls and other surfaces that will colour your recording, and these can be time consuming to remove afterwards using EQ and other tools.
To avoid all of that, a great technique is to use a portable vocal isolation booth such as sE’s Space or a similar product. These create a pocket of dead space for your recording which leads to a much cleaner take and also has the added benefit of helping the performer focus on the task at hand, blocking out the view of the room. They can also be used for recording guitars and other sounds, so they’re not just for vocals.

3: Consider Mic Emulation
It’s common sense that you should use the best mic you can lay your hands on for vocal recording, but not everyone will have a top-end model to call on. The best mics cost thousands but this is beyond the scope of most people’s budgets. A good solution is to get a solid all-round performer that doesn’t cost the earth: perhaps a Rode NT1 or NT2 or one of sE’s many condenser mics or something similar, that has a fairly clean, neutral sound.
After recording you can then try using mic modelling to emulate the characteristics of different mic models without incurring quite so much cost. Waves makes a range of mic modeling plug-ins, and there’s Antares’ Mic Mod EFX, Universal Audio’s Ocean Way plugin and more. You probably won’t get exactly the same sound as using a £5000 mic but with some care and attention you can get a great effect.
4: Aim for DSP Powered Monitor Effects
One of the best ways to help a vocalist give a more confident and natural performance is to provide them with some reverb in their headphones. The contrast with trying to sing completely dry can be quite startling when you actually do it. However it’s not always quite as easy as it sounds. The problem with using insert reverb for this task is that you will almost always incur at least a small amount of latency as the vocal is processed live through your DAW and sent back to the singer’s headphones.
This can be incredibly off-putting for the vocalist, and the fiddling with audio buffer sizes to minimize it can be a hassle too. Some audio interfaces – typically medium or larger sized ones – have onboard DSP-powered effects that can be applied to the monitored signal and provide reverb in the headphones but not incur any latency along the way, as it’s processed inside the interface and not the computer.
If you record a lot of vocals this is an important consideration when you’re choosing an interface.

5: De-ess with Care
Sibilance is an issue with any vocal recording and although it can be mitigated with a popshield it’s harder to block out than plosives. One solution is to use a de-esser plug-in after recording. These are specialised compressors that work on a very specific frequency range to rein in the ‘s’ sounds in vocals – used correctly, they can be very effective at cleaning up your vocal track.
However it’s vital not to overuse them because they can quickly start to suck the life and energy out of a vocal. If you dial in too much de-essing or set your processor to pull back too wide a range of frequencies you’ll find that the vocal starts to sound artificial and overly restrained. The key is to find a happy medium of frequency, de-essing amount and the aggressiveness of the attack and decay, and take out the harshest of the ‘s’ sounds without dulling the sound too much overall.
6: Record Everything
One trick that some producers use is to record everything a singer does, sometimes without telling them it’s being captured. A good example is recording warm-up or test takes, when a vocalist feels less pressured and more relaxed because they don’t think this one is ‘it’ and may give a different kind of performance to the one they give when they think they are centre stage.
This doesn’t just apply to amateur vocalists, it has been known to work with professionals as well. Sometimes after the session is over you go back to the warm ups or the tests and find whole takes or parts of takes that work better than the ‘real’ ones, and then splice them in. Tracks and storage space are plentiful on modern systems so there’s no reason not to do this.

7: Sweet Harmonies
Harmonies and backing vocals can add a lot to the overall fullness of a track and it’s possible to create these after the fact if you’re not able to do it on the same day. Obviously the ideal situation is to get your singer to perform as many of them as possible at the time and then you have more to work with afterwards. But even if all you have is a single lead vocal you still have options.
The simplest trick is to double or triple track the vocal and then mix, pan and EQ the copied versions to enhance the main track. You can also process the duplicates differently, perhaps adding chorus or unison, or other kinds of effects. Some DAWs let you generate harmonies from existing tracks: Cubase is able to do this, and there are plug-ins that can help too. It’s also possible to pitch shift duplicated tracks to create harmonies, though this requires more care and effort since not every note will sit properly with the original take.

8: Loop and Comp
When it comes to getting the perfect take it’s rare to find a singer who can do a whole song perfectly in one go. That’s not a reflection on their talent, just that with modern production techniques there’s no reason to settle for anything less than total perfection. You can set up loops to record over different sections of a track and your performer can have several goes at it without stopping, or indeed try variations as the track loops.
You can then use the comping tools that your DAW most probably has to find the best takes or best parts of takes and splice them together – with care – to get the perfect take. This may involve changing the levels of different takes if the singer has moved a little in relation to the mic at different times. You can also overdub of course, punching a singer in only at the specific point they need to replace a line or word, then punching them out.

9: Gate Post-Recording
Gating can be a useful tool in the producer’s arsenal but it should be used carefully. Although it might be tempting to use a noise gate during recording, it’s not often a good idea. Gates work by cutting off the signal – closing – when the signal falls beneath a specified threshold. They open again when the signal rises above that threshold, with accompanying attack and release settings to govern how quickly they open and shut.
The problem with this is that since a live vocal performance is an organic thing, with your vocalist moving around a little and varying their volume without you necessarily realising, having a preset gate can result in words or parts of lines being completely missed if the thresholds that have been set don’t respond to the actual performance.
A closed gate lets absolutely nothing through. A much better idea is to record everything, including any stray sounds or breaths between vocal lines, and then either apply the gate as an insert so you can tweak it after the recording, or physically cut the sections of silence out from the timeline
10: Pan Backing Vocals
Your lead vocal should always be front and centre, but you can get much more creative with your harmonies, backing vocals or hip hop ad libs. Think about placing them creatively, maybe using panning to send them a little off to the left or right. This makes the track sound much fuller and it also ensures that they complement rather than compete with the lead vocal in the centre.
It’s quite rare to hard pan vocal sounds as this can sound a little odd especially on headphones, but with things such as hip hop ad libs it’s common to send them off to 45 degrees left or right. To get even more creative, consider automating their pan settings so perhaps one backing line appears off to the left, and the next line off to the right, and so on.