Ableton Live Tutorial: Become a Power User Part 5 – Using Audio and Instrument Racks
Many people will recognise a Rack as they are used extensively in Live’s library content, but learning to build your own is essential for fluid workflow. Liam O’Mullane shows you how. Ableton Live has quite a few features not found in other DAWs, and Racks is one of them. At the most basic level, Racks […]
Many people will recognise a Rack as they are used extensively in Live’s library content, but learning to build your own is essential for fluid workflow. Liam O’Mullane shows you how.
Ableton Live has quite a few features not found in other DAWs, and Racks is one of them. At the most basic level, Racks are containers that enable you to ‘rack’ together MIDI, instrument and audio devices. A Rack containing internal/external instruments is called an Instrument Rack; a Rack of standalone audio processing devices is an Audio Rack.
However, Racks are more than an easy way to bundle multiple elements into one easily saveable – and therefore recallable – package. Racks give you the option to run their internal signal paths in parallel or in series, which offers a huge range of options. In fact, the only real restriction you may encounter will be maxing-out either your CPU or RAM, but this isn’t anything that any computer user hasn’t had to factor into their workflow before.
In this tutorial we’ll be using Live-only devices that are quite economical in terms of CPU requirements. It’s only when you start stacking large numbers of third-party, resource-hungry instruments and effects that you’ll perhaps need to be a bit more conscious about what you use and why. If processing power does become an issue, make use of Live’s Freeze feature to render the live processing as temporary audio. When you’re ready to commit to ideas, we encourage you to then Flatten them into newly rendered audio files. You can then perform any additional editing in these audio files while freeing up computer resources (both of these functions are accessed from the Edit menu).
Racks can be used at any point throughout the production process, and typical uses include stacking layers of synths for huge, epic sounds, applying go-to parallel processing such as compression and distortion, mid-and-side processing, and building interesting musical tools for new ideas or exploring intricate audio-processing chains for sound-design tasks.
As you can see, there are multiple uses for these tools and we’ll now go on to explain some of the most important aspects of Rack design. If at any point you get lost or are stuck for inspiration, we recommend that you have a look through the Live library for Audio, Instrument and MIDI Racks. From here it’s easy to explore and modify an existing Rack.
Audio Racks: Advanced Control

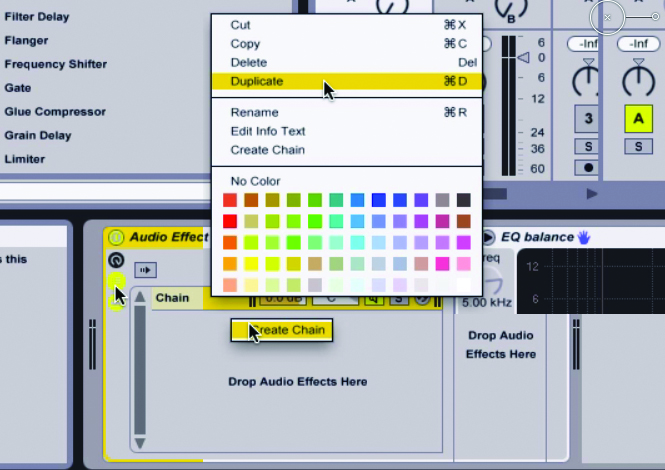
1: Create a Rack by either dragging a preset from the Live Browser or using Group from the Edit menu when an existing instrument or effect(s) is highlighted. Each internal audio channel – called Chains – will now be visible. There will be only one by default, but more Chains can be created by clicking in the empty space below and choosing Create Chain or Duplicate a Chain from the Edit menu.
2: There are two reasons for parallel processing, the first being to audition various approaches for processing audio. This approach lets you try out different techniques/processors and generally explore the possibilities for each element in your mix. Use Solo to move between each Chain; when you’ve decided which treatment to go for, delete the other Chains to avoid unnecessary processing.
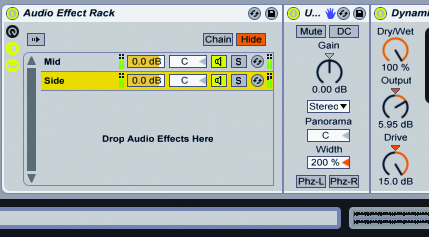
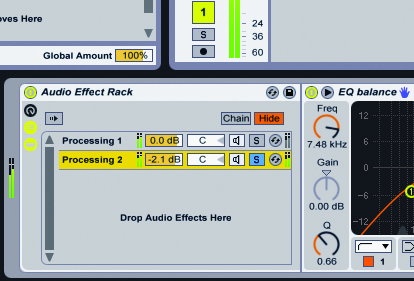
3: Reason two is for parallel processing, with typical uses being for compression/saturation. This is set up by keeping the first Chain as-is and adding a second Chain to process in parallel. Chains can also be used to split a signal into its components: by frequencies using multiple Multiband Dynamics devices; by mid-and-side components using the Utility device’s Width control at 0% and 200% respectively.
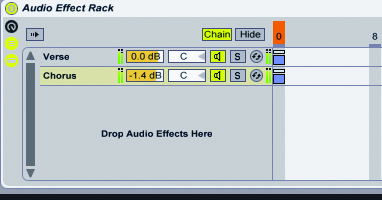
4: Chains can also be used to create different sonic states to move between, such as a lighter verse and heavier chorus treatments. Create the two treatments, using Solo to focus on each one like before, then open the Chain Selector Editor by clicking on the box labelled Chain. Looking like a sampler’s key-range editor, this allows you to move the assignment of each Chain to a different area horizontally.
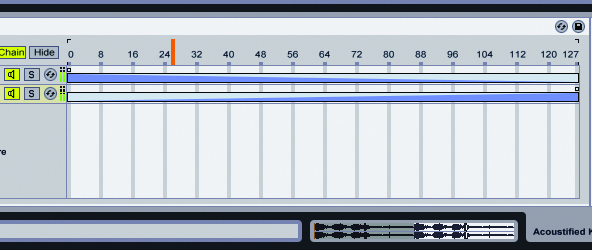
5: If you move the Zone Blocks for each Chain so they aren’t overlapping, the Chain Select Ruler above them (in orange) can be moved from one sound to the next. When using Zones in this way, effects with tails – like reverb or delays – will die out naturally. To blend between the two, drag the Zone Blocks across the full range, then drag the Fade Range shapes so they oppose each other to create the fade.
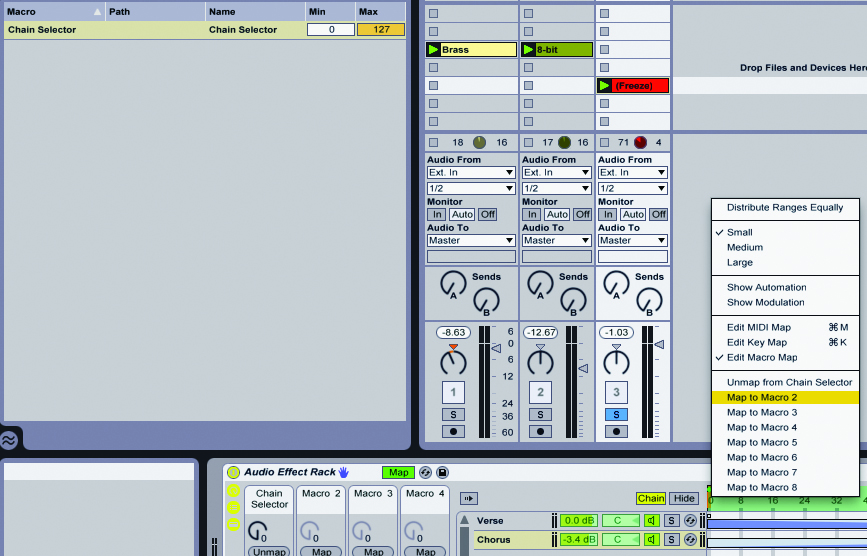
6: All Racks have Macro controls that you can assign most parameters within a Rack to. If you right/[Ctrl]-click (PC/Mac) on the Chain Selector Ruler it can be assigned to a Macro and then assigned to a MIDI controller. Multiple assignments can be made to one Macro, so explore different combinations of assignments, ranges and the directions in which they move.
Instrument and Drum Racks
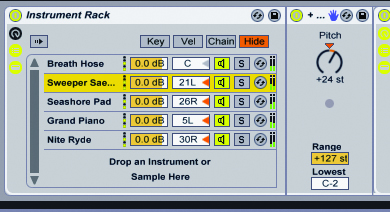
1: Instrument Racks work in a similar way to Audio Racks and are useful for stacking sounds for density and depth, or setting up different sounds to move between dynamically. To create something big, take the same approach of using multiple Chains and layering contrasting sounds. The MIDI Pitch device is useful here for quickly finding the best octave or harmony for each new Chain.
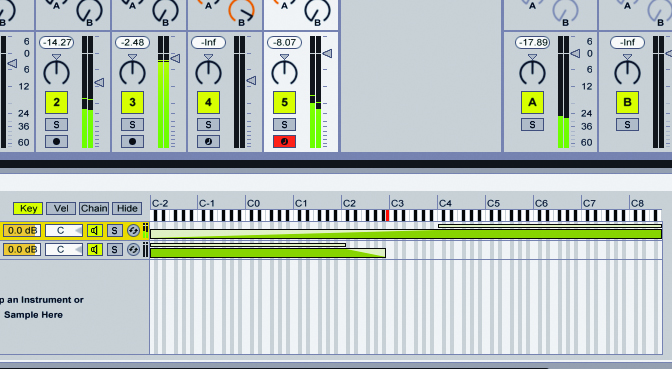
2: Instrument Racks have more options than Audio Racks when it comes to using Zone Blocks and fades. Use Velocity to create layers with expressive control from a MIDI keyboard, or Key to create tonal changes up and down the keyboard. Here we’ve added a bass layer to the lower keys of a melody line; the fade enables it to blend in at the bottom of a descending passage.
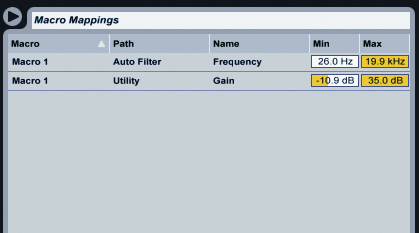
3: Macros can be very useful for creating consistency in an instrument performance. For instance, if you want to use drastic effects such as a high-pass filter that removes the bulk of the body from a sound, you can offset any loss in presence by increasing the volume of a Utility device as the filter cutoff is increased.
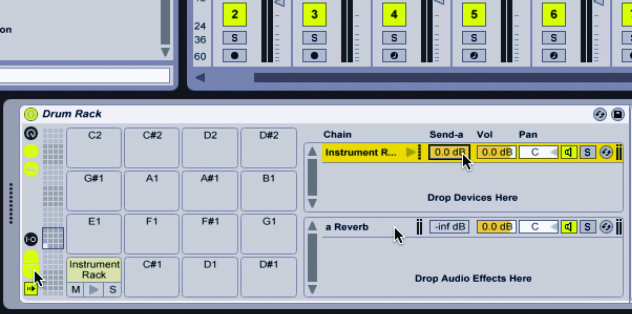
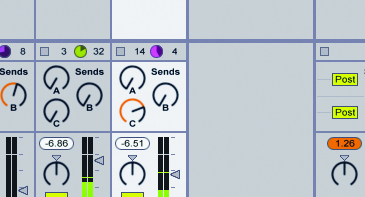
4: Drum Racks have the added bonus of an internal Sends and Returns setup. This is great for achieving polished production sounds within your Rack. First enable the Show buttons for Sends and Returns (at the very left of the Rack). Drag the required effect to the area labelled Drop Audio Effects Here – a Send amount will appear on the Chain List that can be used to feed the effect.
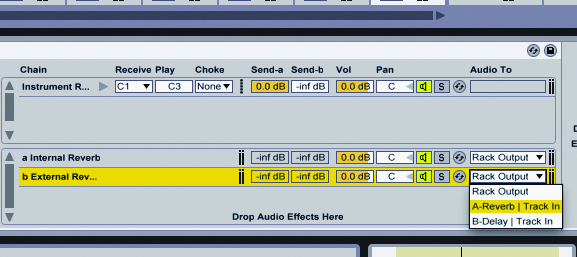
5: As these effects are internal, you can sub-process all your drums as one, helping you to achieve a cohesive sound by processing both the drums and reverb with tools like compression. If you want to drive an effect that’s already set up in Live’s main Return Tracks, right/[Ctrl]-click in an empty Chain area and select Create Return Chain. This can then be routed to the relevant Return Track.
6: A hybrid approach can be used to combine steps 4 and 5 by initially using Return Chains within the Drum Rack. When you’ve decided on your choices, drag-and-drop the internal Return Chains to the main Return Track area in Live. This won’t carry across the Send amounts, which you’ll have to reapply from the main Sends section of the Drum Rack’s channel in Live’s mixer.