Ableton Live Tutorial: Mastering In Live
Getting your tracks ready for playing to the public is something we all need to do from time to time. Liam O’Mullane shares his tips on making the best-sounding master possible in this Ableton Live tutorial Love it or hate it, but in the world of club music it’s a necessity to give […]
Getting your tracks ready for playing to the public is something we all need to do from time to time. Liam O’Mullane shares his tips on making the best-sounding master possible in this Ableton Live tutorial

Love it or hate it, but in the world of club music it’s a necessity to give tracks a certain degree of loudness. For many, professional mastering isn’t an option as you may not be signed to a label yet, but if you want to get exposure, you still need to get your tracks to club and radio DJs for a possible lucky break. This month we’ll show you how to use specific mastering techniques on your mix buss to get a polished, loud track for promotional use.
You can also apply these to pre-mixed audio files, but working while the mix is still live can be an education in how your mix changes when mastered and how it can be shaped to work better with your mastering chain. But before any processing begins, let’s look at using reference material to help keep you on track.
Reference Material
A/B referencing between released material and your own work is useful both at the mastering stage and during the song-creation process. It provides you with constant goals to aim for and helps you stay on course for completing your track. We’ve all lost perspective on a mix after listening to a hi-hat in solo mode for too long, so alongside regular breaks, reference material is essential. Drag two or more reference tracks into Live on their own audio tracks, Warp them to fit Live’s tempo, then highlight the tracks and select Group from the Edit menu. Mute the tracks in this group so nothing but your own track can be heard.
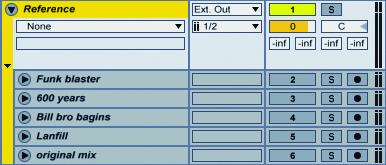
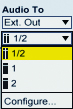
You need to route these tracks directly to your audio interface so that any master buss processing isn’t affecting them. In Session View, select your soundcard output from the Audio To menu after first selecting Ext Out.
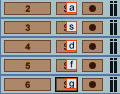
Finally, assigning key commands to each solo button lets you jump from your work to any reference point for immediate feedback. Use Edit Key Map from the Options menu to assign these keys.
EQ Work
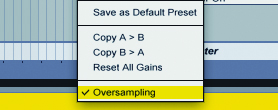
Before applying any dynamic processing, start with an EQ Eight for surgical work to knock things into better shape. As a general rule, select Oversampling by right/[Ctrl]-clicking (PC/Mac) on the device’s title bar. This allows for a higher internal sampling rate and reduces the chance of aliasing being introduced as you work.
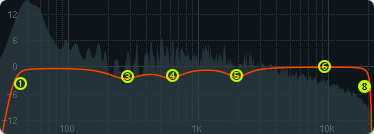
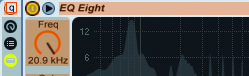
The first task with surgical EQ work is to reduce/ remove any non-musical resonances. These may not be immediately obvious, so an additive sweeping technique is usually required. EQ bands 3–6 are parametric by default, so start with one of these. Increase the gain to around 10dB, the Q (width) to 2–3 for a narrow band, and sweep the Freq dial until a specific frequency starts to sing out in a nasty manner when boosted.

Now explore either direction for the Q amount so only the nasty area is being boosted. The Q needs to be as narrow as it can be without being so narrow that it doesn’t boost the whole problem area.

To reset your ears, click on the Gain control and hit backspace to return it to zero. Apply sufficient gain reduction to reduce the problem area as much as possible without leaving a hole in the overall sound.

You can repeat this process as required, but if you’re applying more than three or so cuts it may be worth looking at your mix elements to find the sound that is responsible for the problem and apply this technique to that sound directly so the whole mix isn’t EQ’ed as much. Bracketing your song’s frequency range with low- and high-cut filtering is the next step with EQ Eight. Sit a filter just below and above the visible energy of the track to remove any content that doesn’t aid the sound of the track. This is especially important in the low end as bass eats up headroom, which in turn makes it hard to get a tight, loud mix.
Try both the normal and the x4 filters to determine which suits the content best.
You should audition all treatments to your mix buss by turning the processing chain on and off at regular intervals. This also makes it easier to set your output level by ear so you’re auditioning changes even-handedly. The simplest way to set this up is by Grouping devices via the Edit menu and assigning the newly created Audio Rack’s Activator button to a key for immediate auditioning at any point.
Dynamic Shaping
The next step is to process the dynamic range of your track to firm it up and give it more impact. The first device can be used for average signal level-based compression, pulling the level of the track’s body and the higher peaks closer together. A second device can then be used for more rhythm-based peak compression to add punch to the drums as the whole track is compressed in response to them.
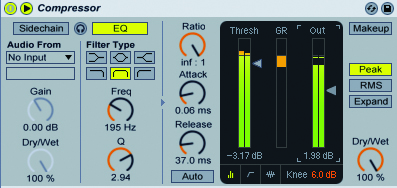
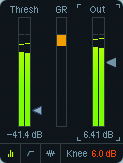
Either a Compressor or Glue device can be used for average-based work, and it pays to try them both as they do sound different. This technique requires a fairly deep threshold setting but light ratio from 1.01:1 upwards. Compressor needs to be set to RMS for an averaging behaviour and Makeup Gain should be disabled so you can use the Out fader for manual level matching.
This prevents you from being fooled into thinking your changes are better simply because they are louder! There’s no rule for the amount of gain reduction to apply here and the attack and release settings are also content-specific – explore them until you can hear backing sounds coming further forwards in the mix while avoiding any pumping artefacts.
For peak-based compression, Compressor set to Peak mode is your best bet. To have only the main, louder drums trigger the compression, set the ratio quite high, with the threshold low enough to let only the highest drum peaks trigger the compressor.
Dial in fast attack and release times so the track gets slightly squashed with each louder drum hit. This will give the drums a feeling of being heavier as the mix gets slightly squashed in response to them. If necessary, mix your drums a little too loud to take this effect a bit further. Alternatively, if the drums aren’t loud enough use the EQ on the left-hand side to help Compressor ‘hear’ the frequencies specific to the kick and snare.
Mid and Side
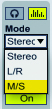
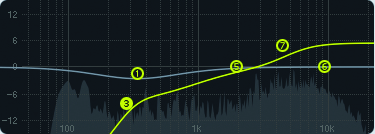
Another way to tighten up a mix is to EQ the mid and side elements separately. High-passing the side from around 200Hz or higher will help focus the bottom end as you’re forcing it to be mono through the mid signal only. Boosting the top end on the sides at this point can also give a wider sense of stereo (don’t overdo it or it may become less mono-compatible). To do this, switch an instance of EQ Eight from stereo mode to M/S via the Mode menu.
Use the Edit toggle button to change the EQ controls from adjusting the mid or side signal. After working on the sides, try an additive sweeping technique on the mid to find and then reduce any muddy lower-mid frequencies. This can be anywhere between 250–800Hz and you’ll generally need a broad Q setting as the area can be quite wide. If you haven’t removed too much bottom-to-mid frequency information on your side signal, try this on the sides as well.
Peak Limiting
Peak limiting is the final element in the processing chain. This limits the range of any momentary peaks, which enables more volume to be squeezed out of your master. Although the Limiter might be the most obvious choice for this task, we often opt for Saturator or Glue instead. These often have a more musical sound than the Limiter, which can pump when pushed hard. For both Glue and Saturator you need to enable soft clipping and increase Drive until the signal starts to break up. Once there, simply back off a little (or a lot, depending on how ‘in your face’ you want the mix to sound).
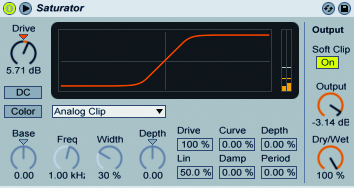
Saturator’s output level can be set to keep everything in check, but Glue needs a Utility device adding afterwards as it can be quite loud at its output. At this point you should have a polished-sounding track that you can export and distribute. If you have time, though, come back to it with fresh ears and apply any minor tweaks that perhaps didn’t seem so obvious during the previous session.
