Back to basics: Introducing Keyboards to Ableton Live
A keyboard part can be anything from a one-finger piano riff to a complex, evolving pad, but utilising keyboards can be a bit daunting for the uninitiated, so let’s find some ways to make them more approachable.
Sometimes a keyboard part is about performance, sometimes it’s about using other techniques to make an interesting sound and then a musical part from a less-than-exciting source sample. It really doesn’t matter if you’re not one of the all-time great keyboard players. Fortunately Live has many tools that can help to build interesting parts from a single note, and the most important one is racks.
Keep it Simpler
We’re using a very straightforward sample loaded into Simpler for this exercise – mainly chosen because Simpler is in every version of Live – Intro/Standard/Suite. We made this sample in the first place, which is an advantage because it means we know what the original pitch was. We’re making a pad sound, using long sustained notes, so we can better enjoy the sound as it develops. Building a preset for a busier, snappier, part with more notes might be quite different.
In this case we want to make a sound that works with a MIDI clip, but also with live keyboard input, which is why we’re not using automation that requires a clip to be running. Simpler’s easy to use, and even if you don’t have any of Live’s other instruments installed, it’ll combine with racks and effects to give you excellent sound design options.
Once you have a rack under way, the fun begins. In the example here we’ve used two chains, but there’s no limit to how many chains you can have, especially remembering that racks can contain other racks! We applied EQ to each chain to avoid building up too many clashing frequencies; too much low end and mid can make everything sound very mushy. If working on a sound for a particular project, you should EQ it in relation to the other parts, as an abstract concept, it’s hard to tell how much bass you might want.
Reverbs and delays are great for adding spacey effects to a rack. We added a reverb after the rack, so it applies to the whole thing, and put a delay on the upper chain containing the high frequencies only. If you like, you can create a new rack that contains the original rack plus any MIDI/audio effects before/after it, so the entire structure can be saved as a single preset and recalled from other projects.
Finding your filter
As well as separate audio and MIDI effects there are powerful sculpting tools inside Simpler itself. The filter is the same one found throughout Live’s audio effects, and is ever-present along the bottom of the Simpler display, and in more detail under the Controls tab. It’s possible to choose from several different filter types, as well as circuits modelled on individual real-world filters. Time spent with these is never wasted – they can produce a wide range of results.
Then we have the LFO. Live is absolutely dripping with LFOs: they’re everywhere, in instruments and audio effects. An LFO is a great way to add rhythm to a preset, and especially useful if you want a groove but you’re not working with drums and beats. They’re especially powerful if you mix different rates with different parameters, so they cross over and diverge at various points; in the tutorial we use an LFO set to 1/16th for volume, and another set to 8 beats for filter frequency. You can never have too many LFOs, and if you use Max For Live, there are separate audio and MIDI LFOs so you can use even more of them.
Back on the chain gang
If you’re working with a project that does have drums, especially MIDI drums where each part of the kit can be isolated, sidechaining is another way of adding rhythm. Live’s Compressor can handle this, and again, you might think about sidechaining individual chains instead of the whole rack.
A rack is a great way to split an incoming MIDI signal from a clip or keyboard into several paths, that’s what the chains are. Adding different chord effects to each chain, or even arpeggiators, takes our simple ‘one sound, one finger’ premise even further, especially for live performance.
As soon as you’re stacking up instruments, volume management becomes an issue. It can be that there’s too much, and levels need to be reduced, and maybe a Limiter should be applied to the rack, or it can be that there’s not enough volume and you need to compensate at various points.
A computer, a sample, a copy of Live, you don’t need much more to get going with keyboard parts. Whether you actually use a keyboard, or mouse, or pads, or qwerty, to input the notes is up to you – they all work!
Download the project file here.
Introducing keyboards in Ableton Live: step-by-step
1. Make sure you start with our example Live set – called ‘basic keyboards project’. This one contains a sample of a synth playing a C2 note over 4 bars (at the original tempo). Live 10 is required for this, otherwise substitute your own sound or preset.
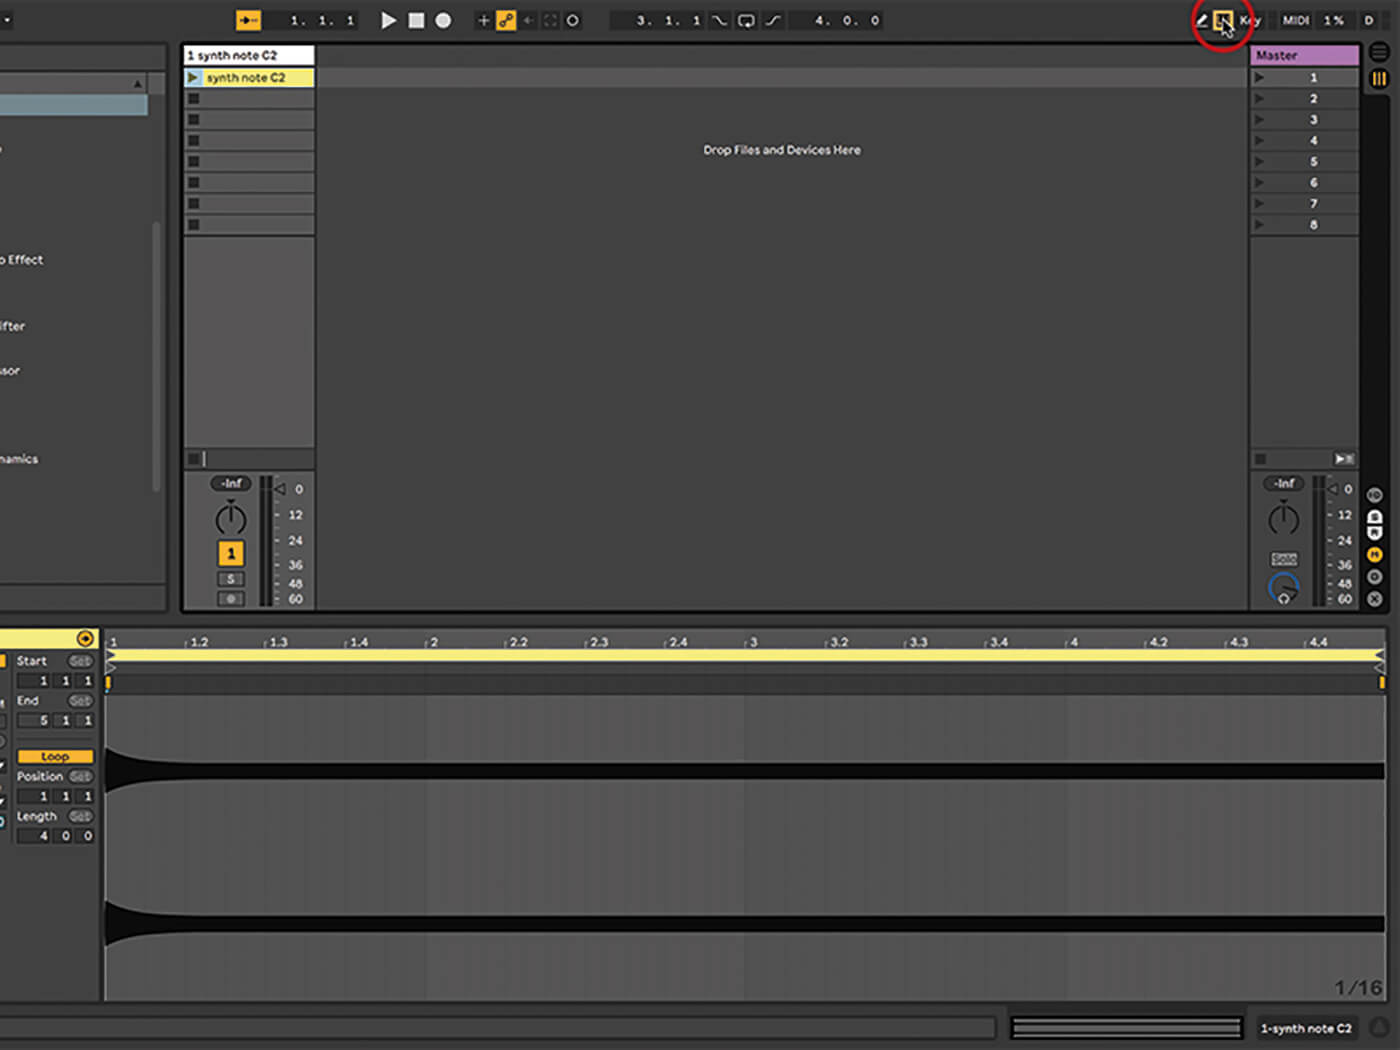
2. There’s more than one way to scratch a keyboard itch. Use a MIDI keyboard, use Push, or use Live’s Virtual MIDI Keyboard (tap ‘m’ to enable it). Use z and x to transpose up and down in octaves, use c and v to change velocity.
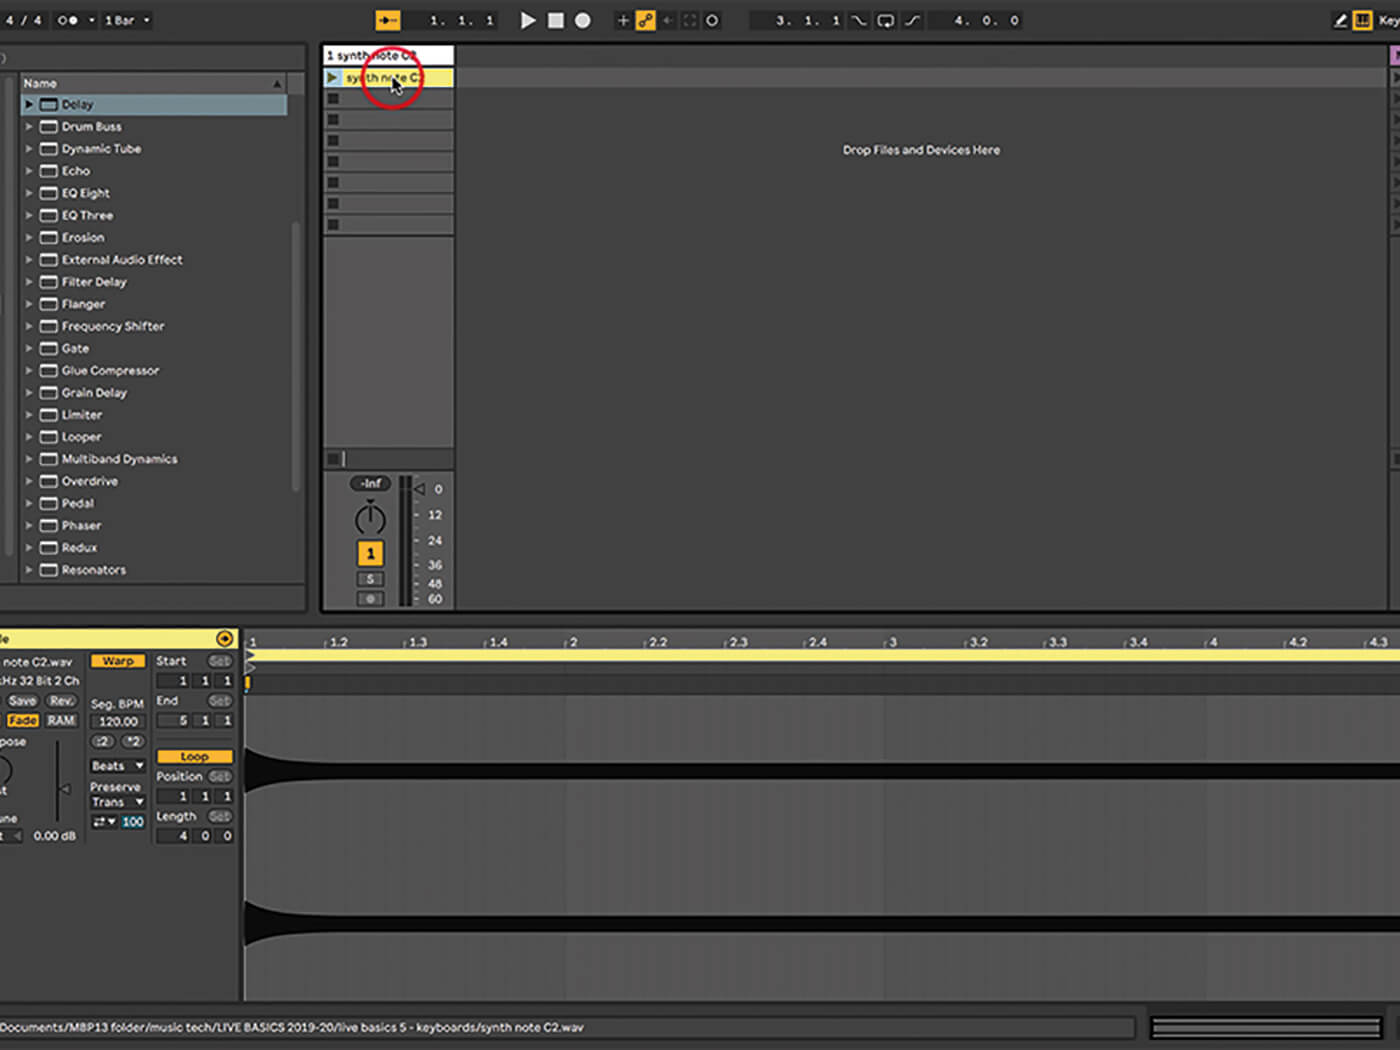
3. Drag Live’s Simpler instrument into the Session View drop area and it’ll create a new MIDI track as it loads the instrument. Then drag the sample ‘synth note C2’ into the Simpler drop area and you’ll see the waveform for the sample appear.
4. Make sure the MIDI track is armed, so the red button is enabled in the mixer section. Now, play your keyboard or pads and you should hear the sample straight away, and be able to play it in transposed form right up and down the keyboard.
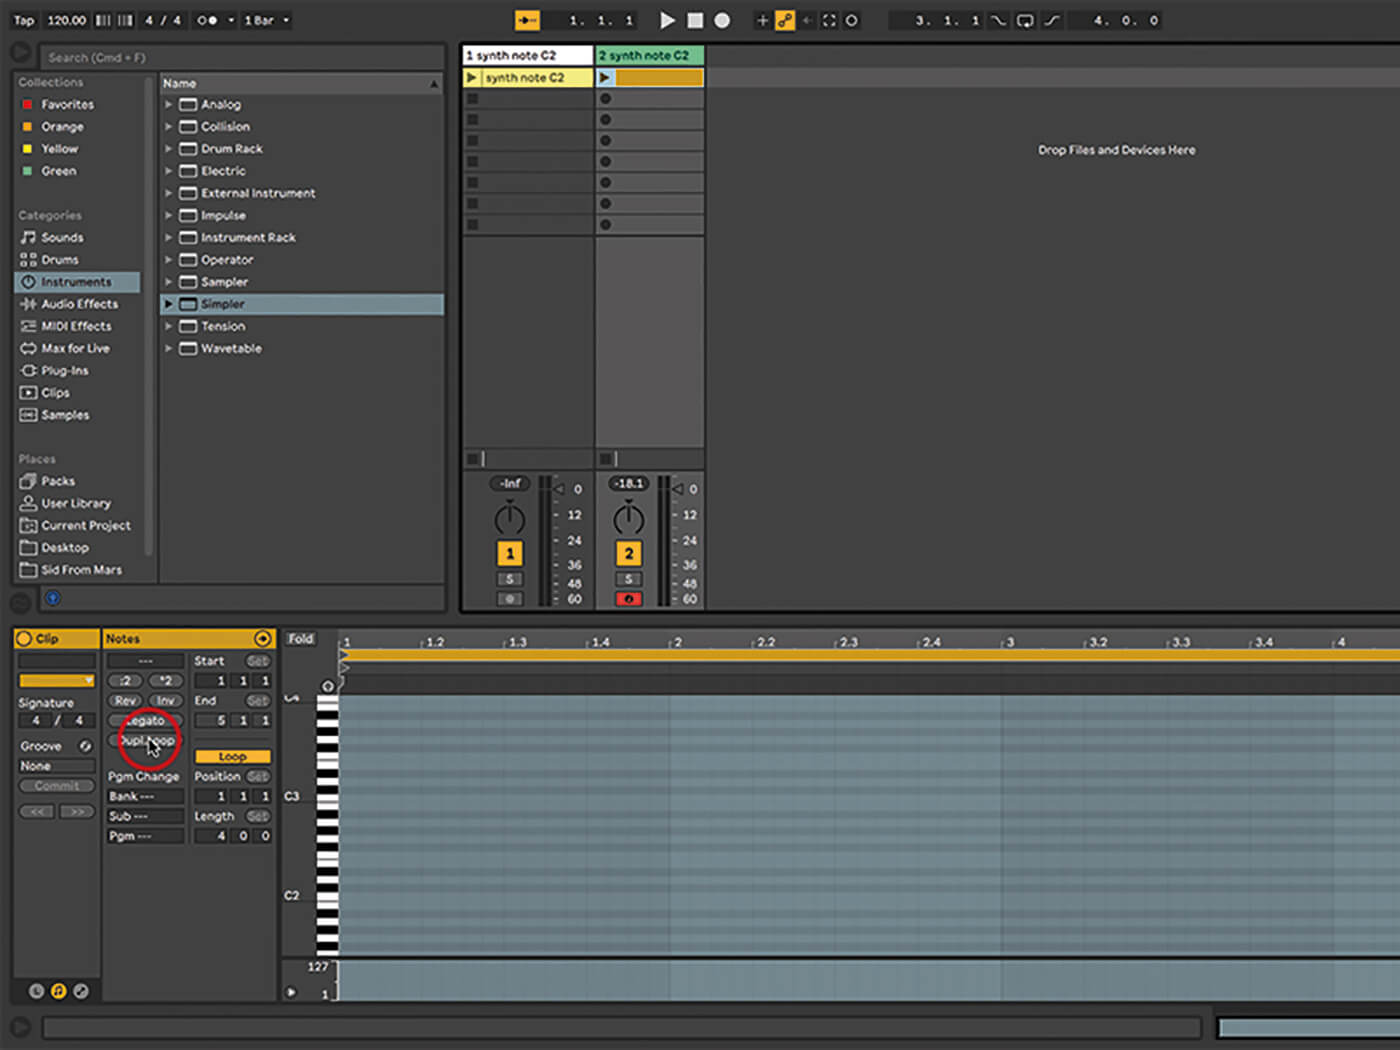
5. Double-click the top empty clip slot in the track to make an empty 1-bar clip. Click the Dupl.Loop button at the left twice to multiply the length of the clip to 4 bars. By default this clip should be set to Loop.
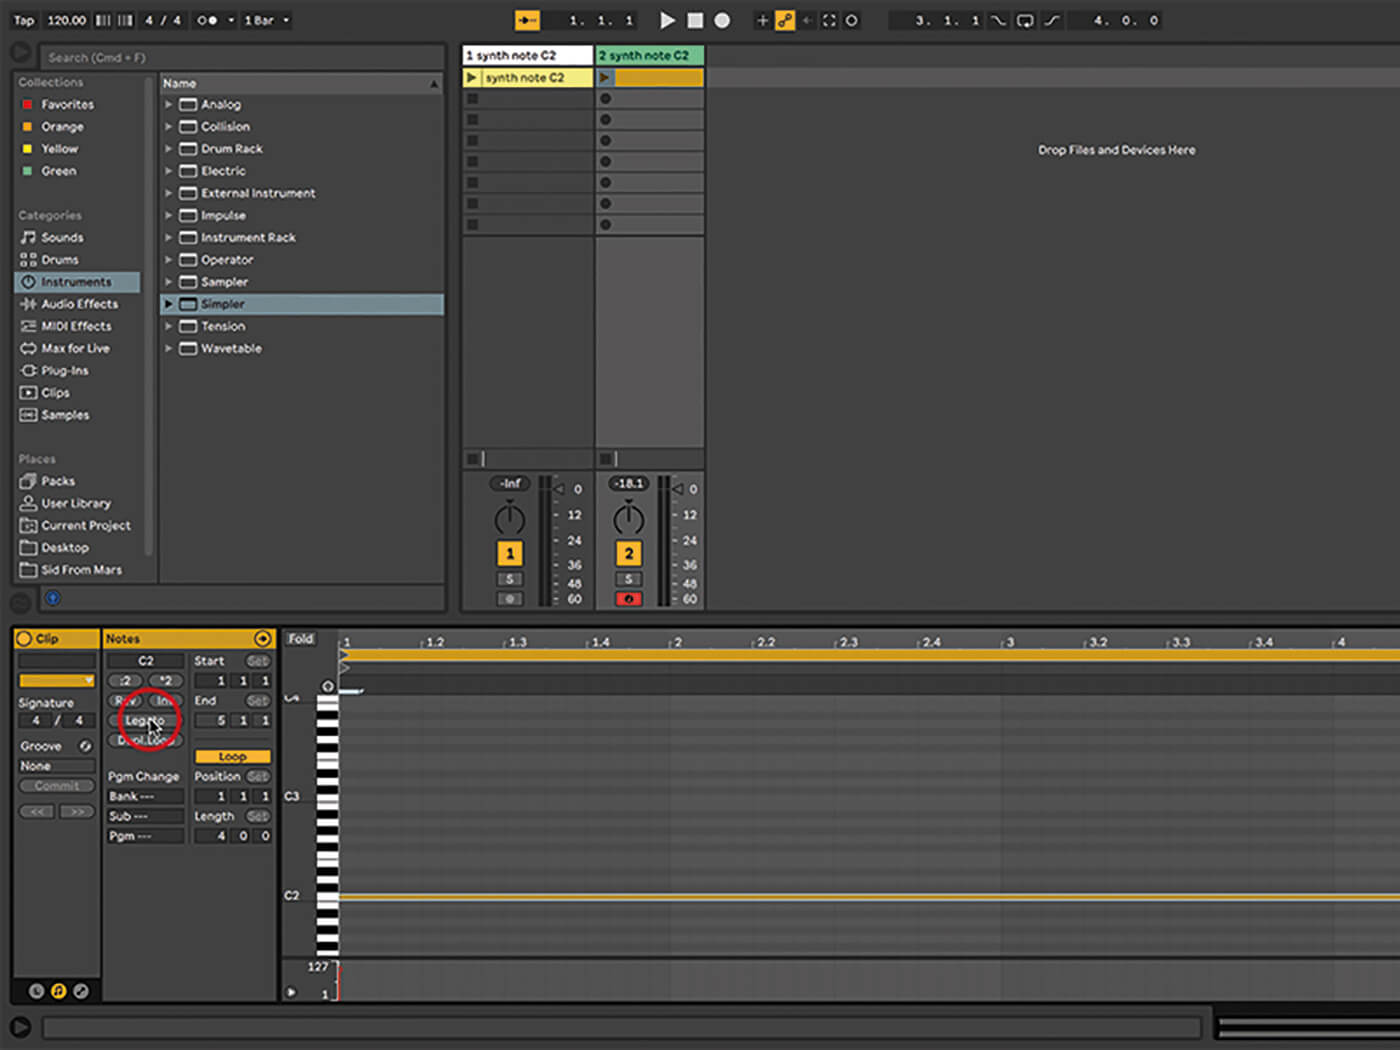
6. Draw note C2 at the beginning of the clip. We want this to go the full length of the clip. Grab the right edge until you see a bracket and drag it, or just click on the note and then click Legato at the left.
![]()
PUSH TIP 1 Ableton Push users have got it made in the keyboard department, there’s almost too much choice! Firstly, Push has those tasty velocity sensitive pads, which can capture the nuances of your playing. Then there’s the ability to choose different scales and layouts and root notes, so you can customise to your own needs, and genres of music.
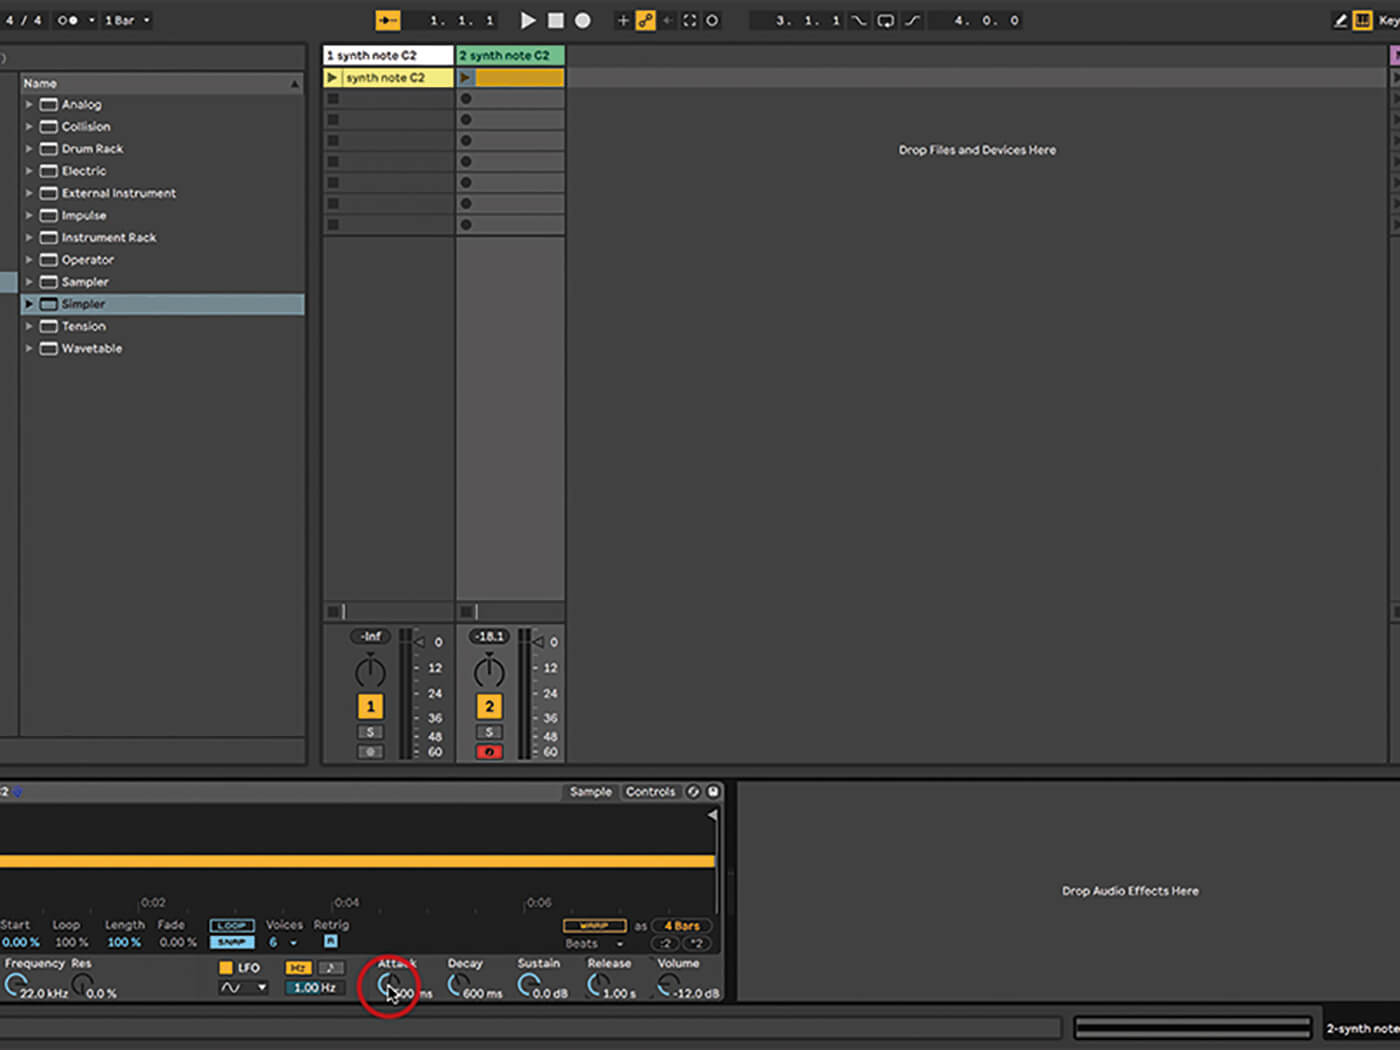
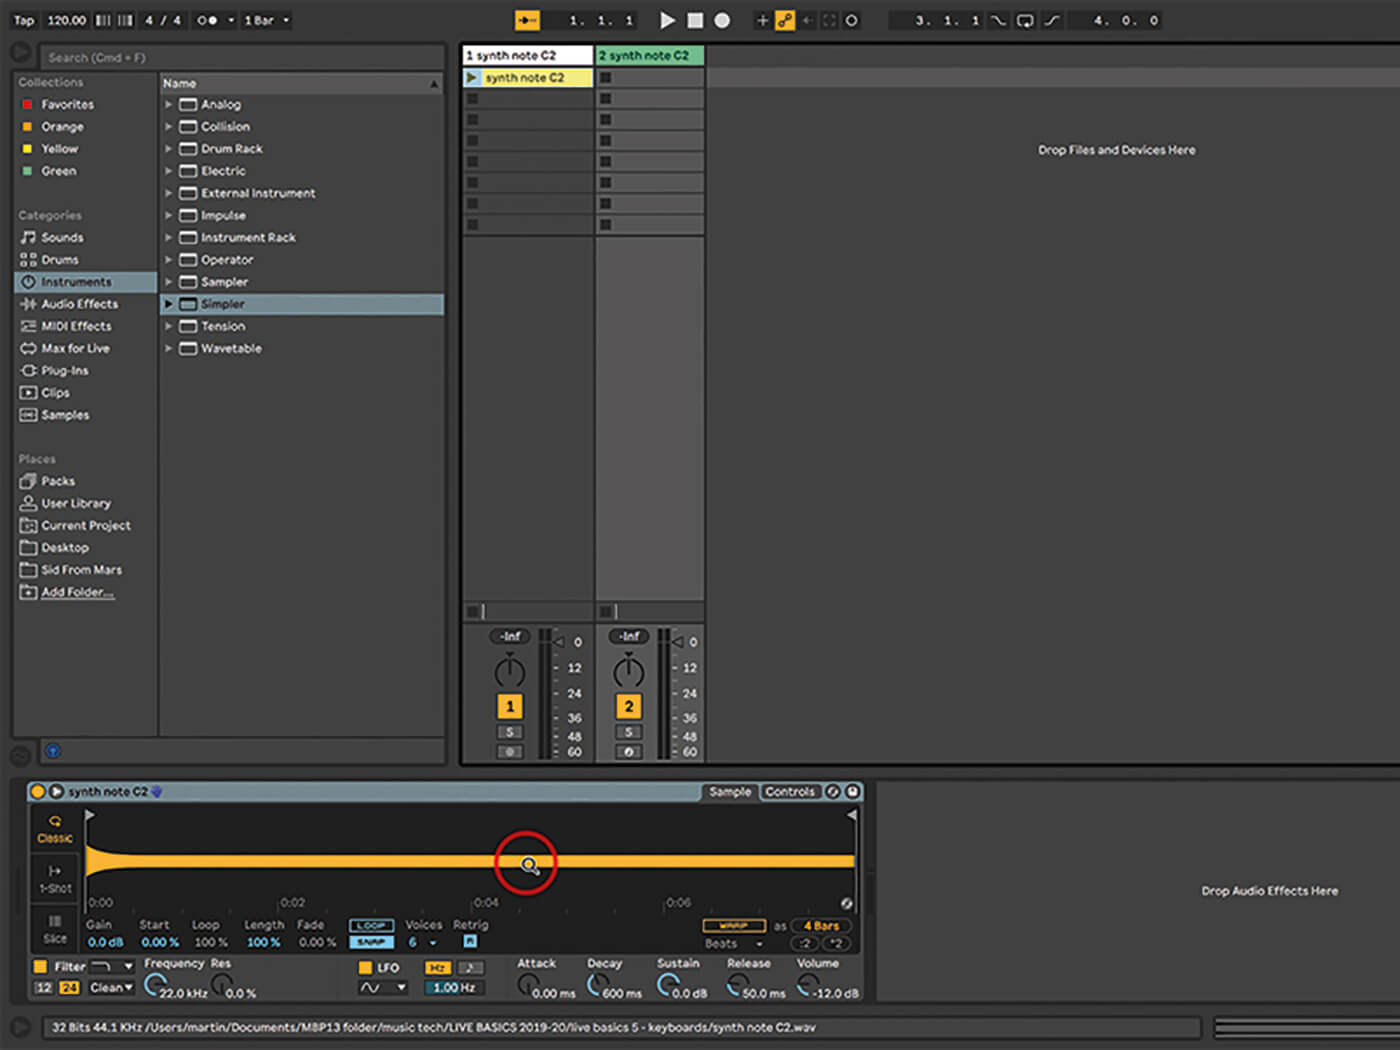
7. The sample plays okay already, but let’s edit it a bit. It begins with a bit of a ‘honky’ sound, so take the edge off that by setting Attack to 500ms. While we’re at it, set Release to 1.00s for a soft fade.
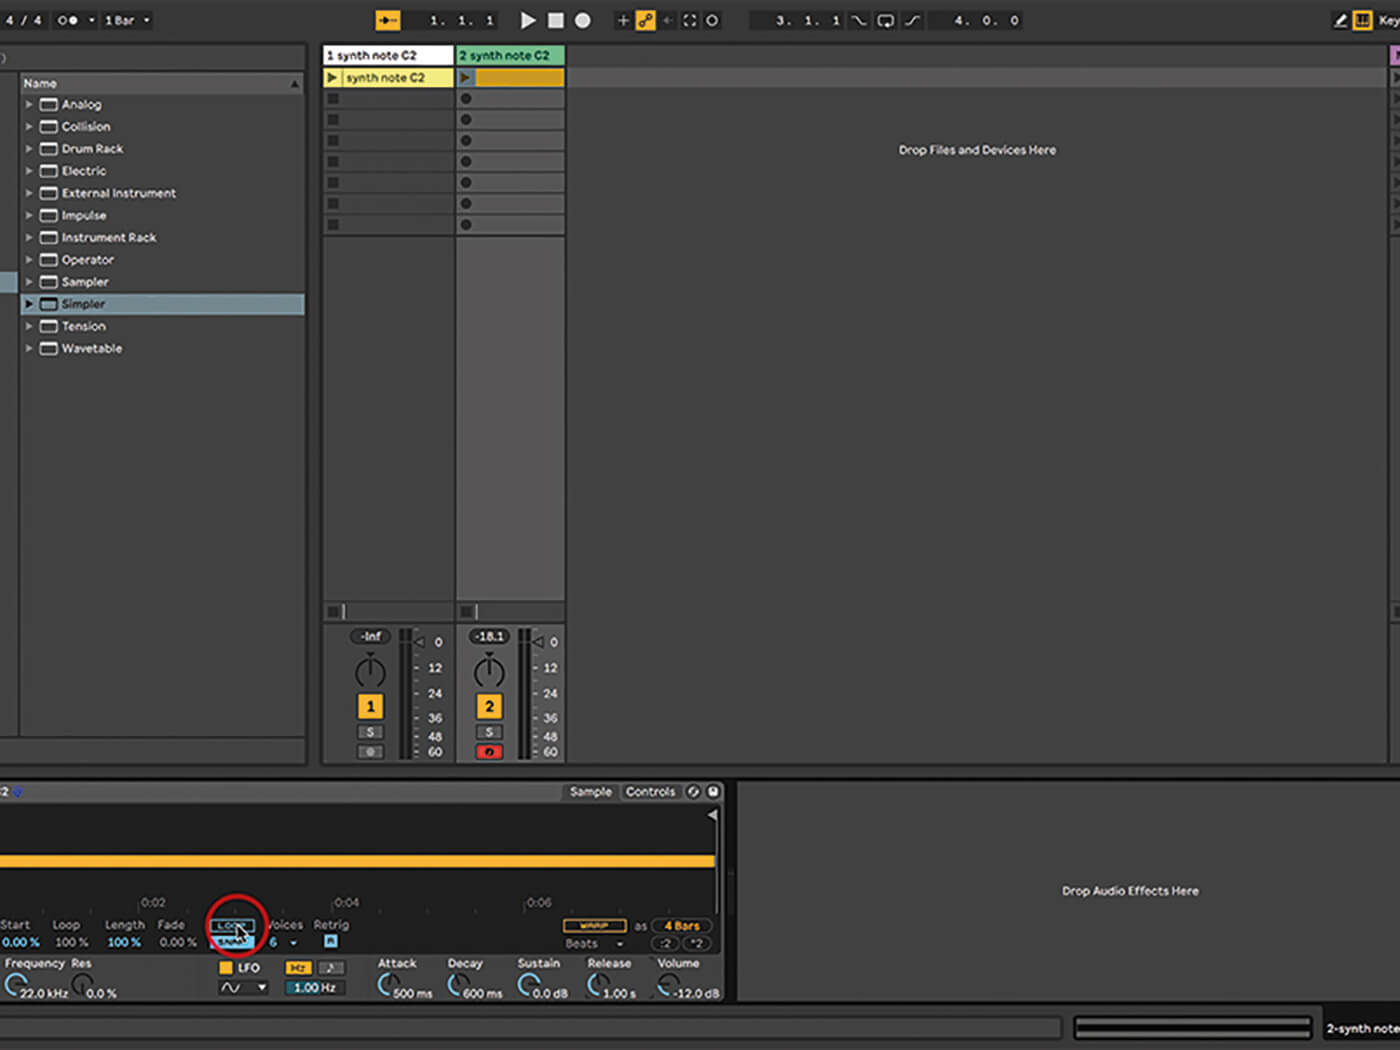
8. Because it’s a long sample with a fade-in and fade-out, we’re heading into pad territory so we won’t need to loop this, but if you do happen to enable Loop, it won’t make much difference unless your note length exceeds 4 bars.
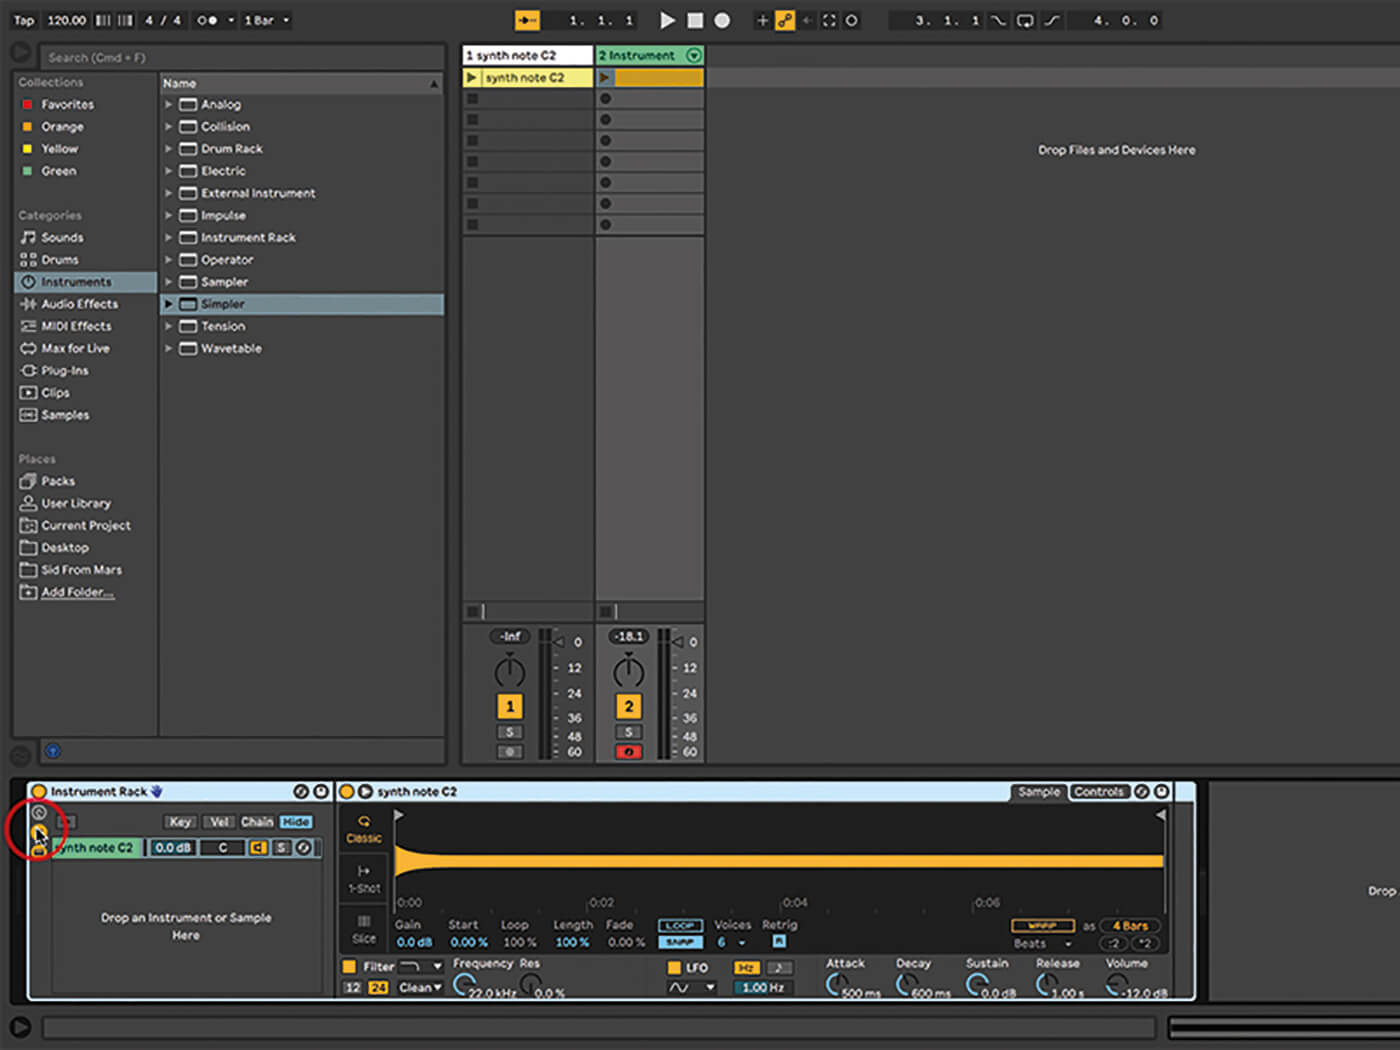
9. So far so good, but pads can have a lot more going on. Let’s rack it. Click on the Simpler instrument to highlight it, then type cmd-g to rack it. Unfold the black buttons at the left of the rack to view the chains.
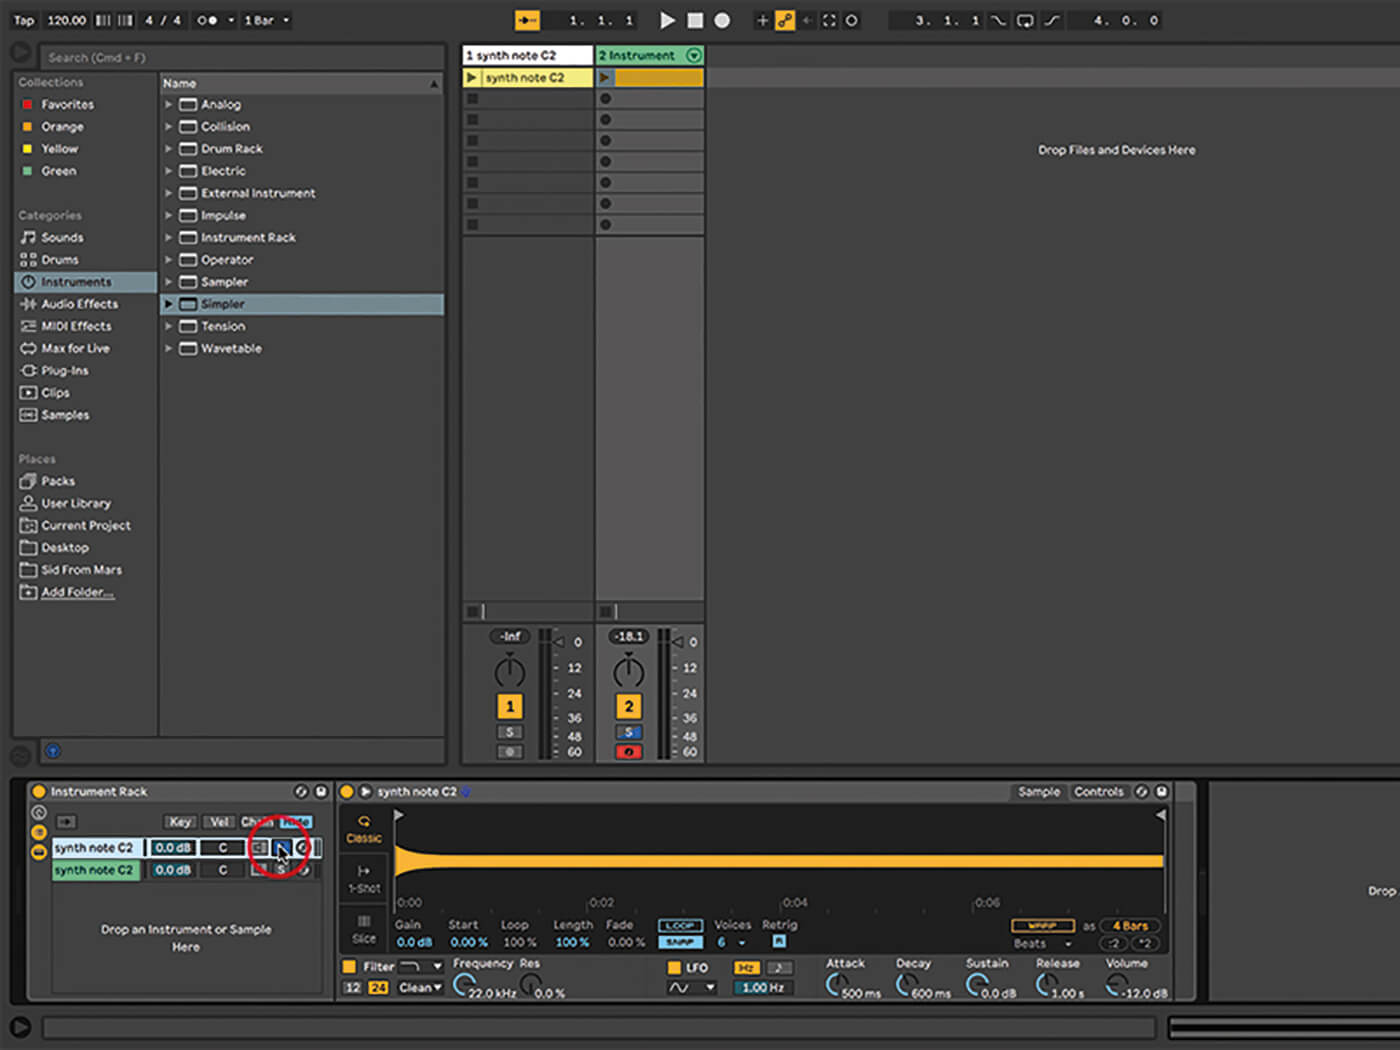
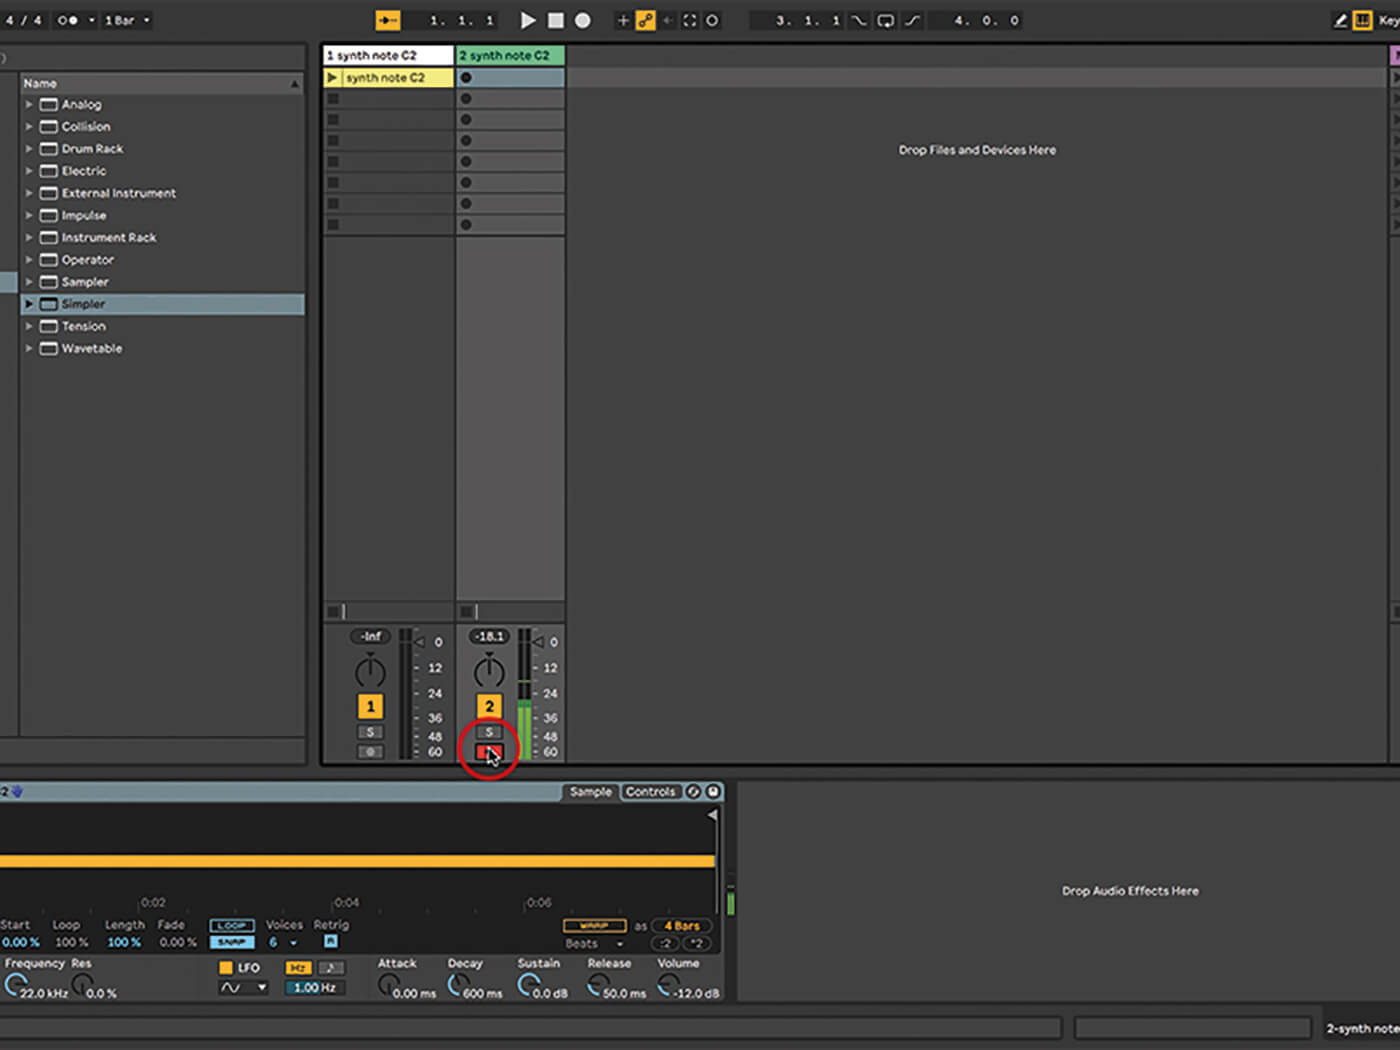
10. Select the chain and type cmd-d to duplicate it. Now we’re working with two chains so make sure you’re working on the right one at any time! Make use of the rack’s mixer controls to solo individual chains as required.

11. Add EQ Three to the lower chain in the rack, just drag it in and it’ll go after Simpler. Now click the L switch in EQ Three to completely kill the low frequencies in that specific chain so only the mids and highs get through.
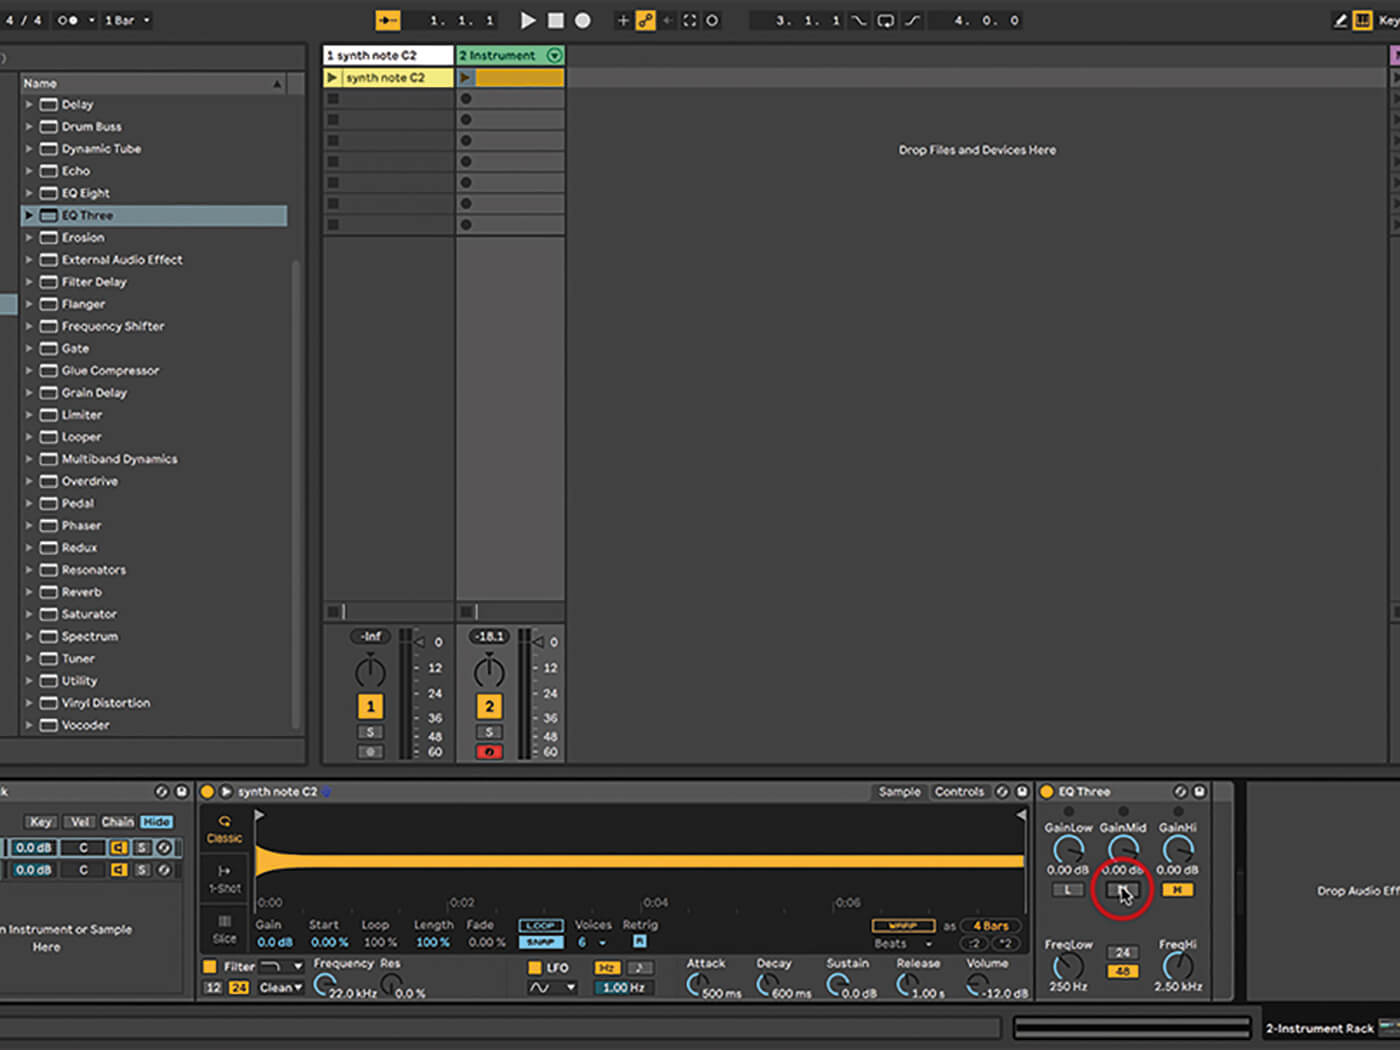
12. Keep the clip playing as you work, to review the changes in real-time. Add EQ Three to the upper chain in the rack, like before, but this time we’re going to click and turn off L and M so we only get the highs.
![]()
PUSH TIP 2 What’s also great about Push from using it as a customisable keyboard point of view is that when you open a previous Live project, Push will remember the layouts you used last time, and this works on a per-track basis, which is even better.
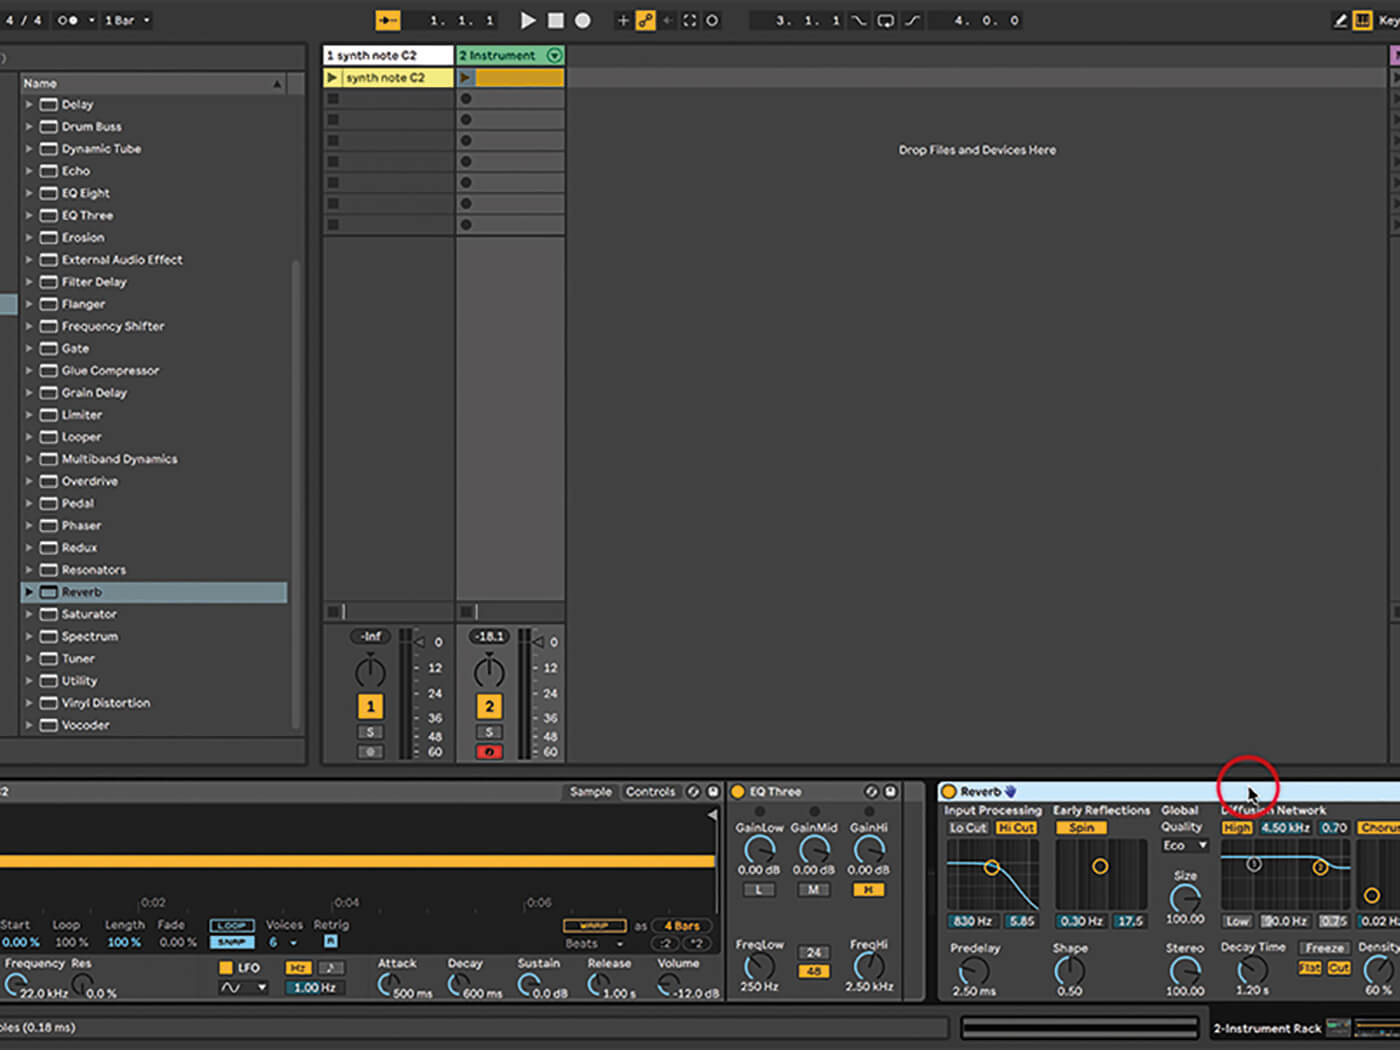
13. Add the Reverb audio effect with default settings after the rack – make sure it is after and not in one of the chains. Then add the Delay effect to the top chain only, once again using the default, but turn on Ping Pong.
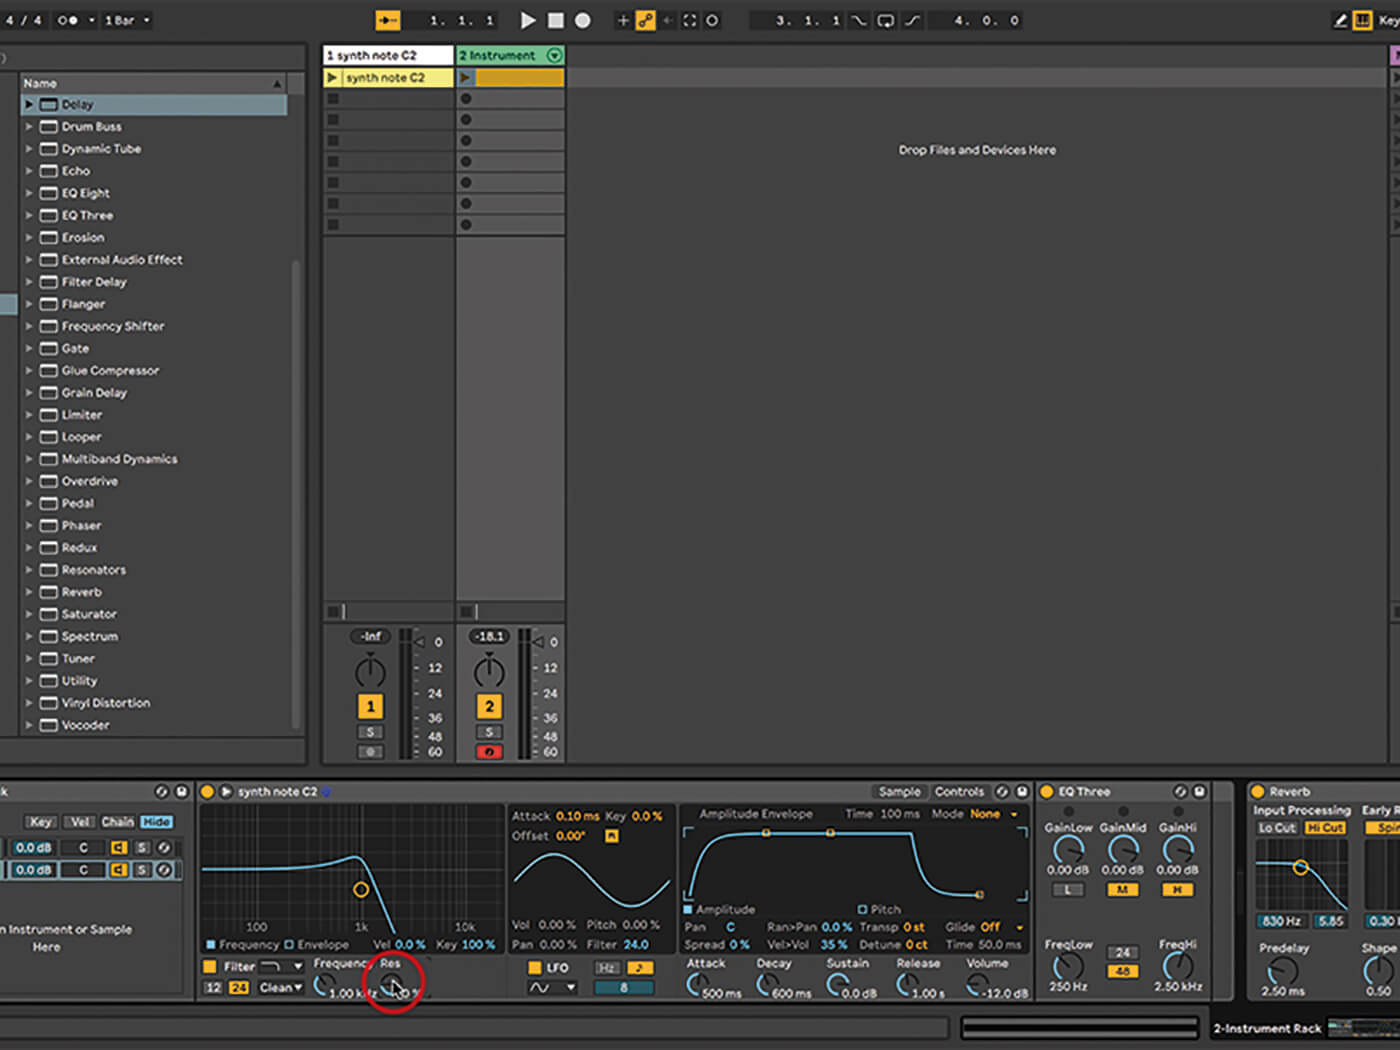
14. In the upper chain’s Simpler, set LFO to 1/16ths, and apply it 100% to Vol. Then in the lower chain’s Simpler, set LFO to 8 and apply it 100% to Filter. Set filter Frequency to 1.00kHz and Resonance to 40%.
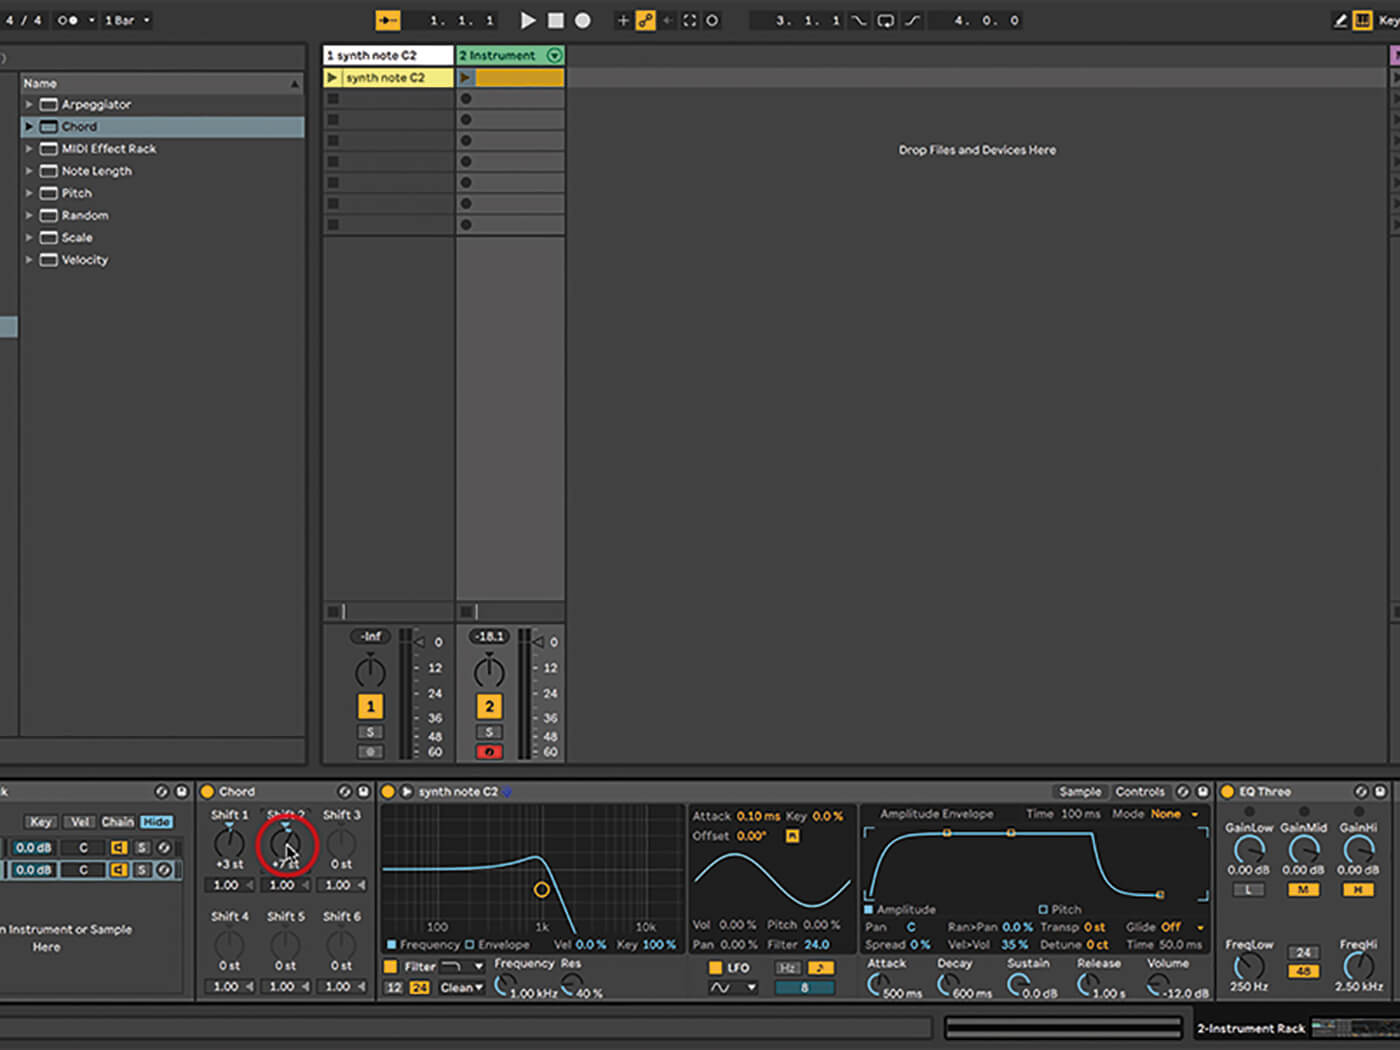
15. On the lower chain, drop in the Chord MIDI effect device and set Shift 1 to +3 st and Shift 2 to +7st. Now when a note passes through from the clip or your keyboard, you get a chord every time.

16. Using different audio and MIDI effects on each chain adds more depth and movement to a very simple original part. If you put effects before and after the entire rack, the results are quite different. Not wrong, just different – it depends what you’re trying to do.
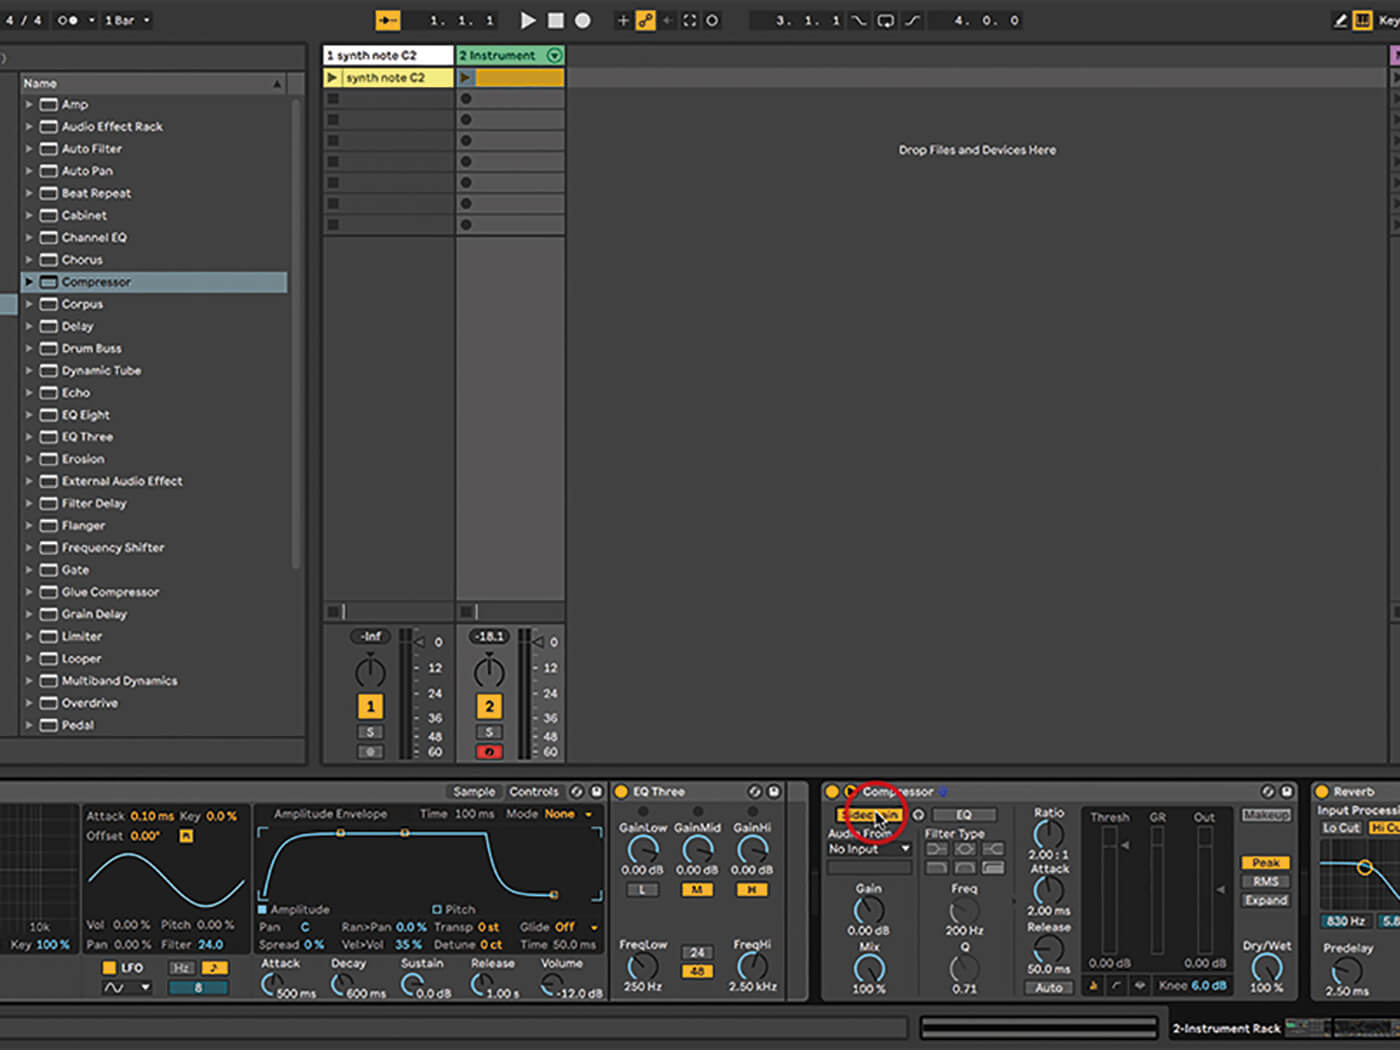
17. We’ve used LFOs to impart some rhythmic movement to the keyboard part, which is useful, especially when using material that isn’t overly beat-based. You could also try loading a Compressor after the rack and sidechaining from a drum part instead.
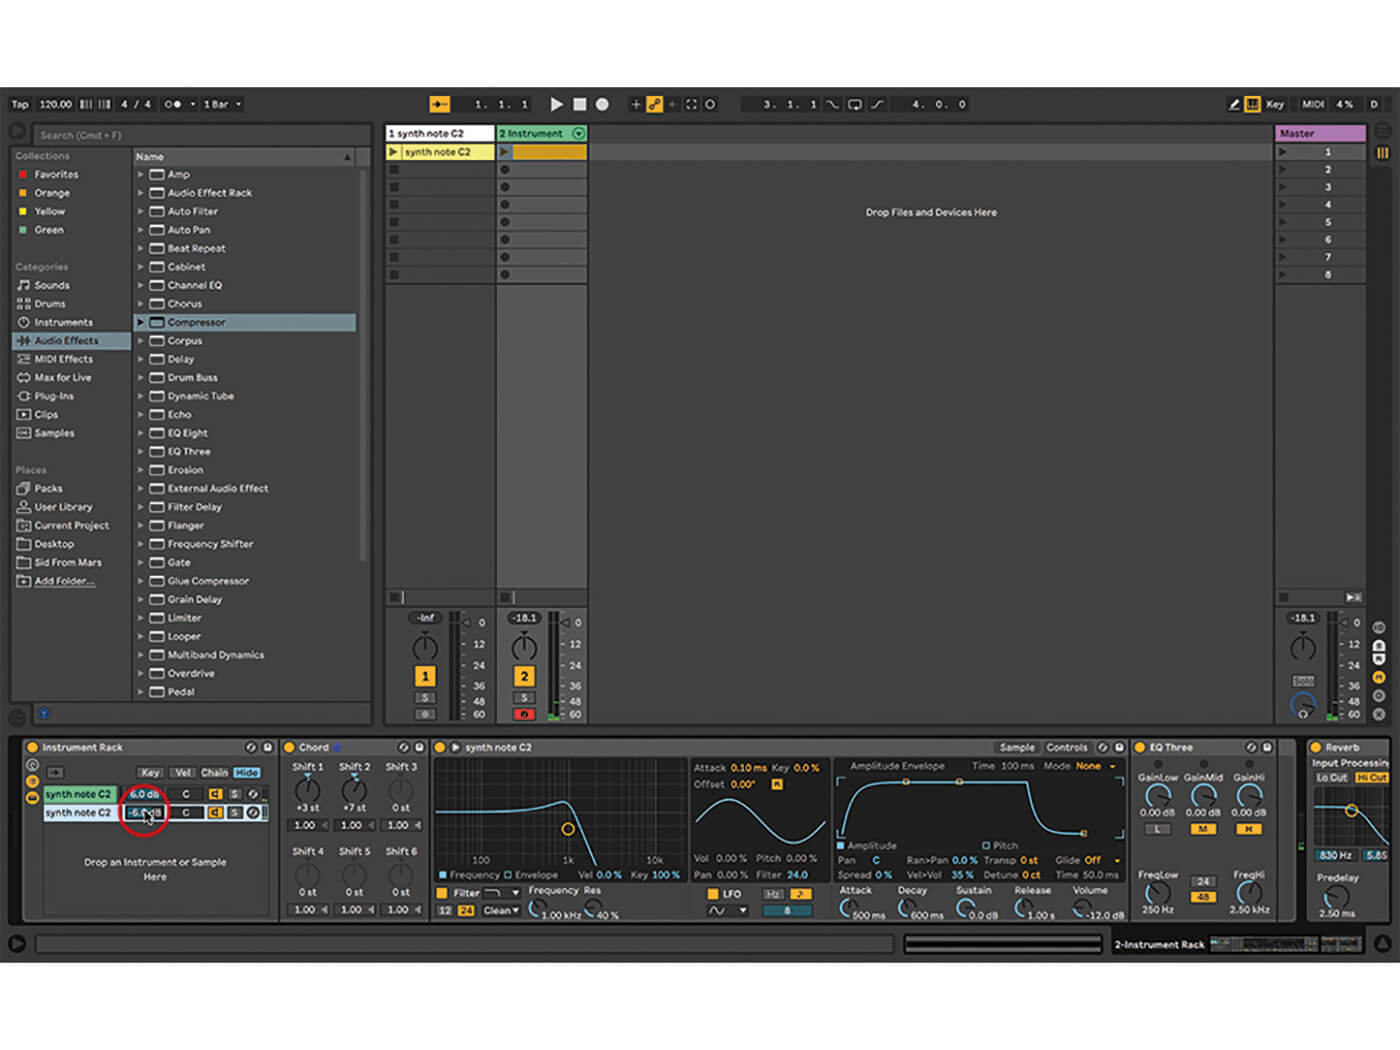
18. Our effect processing has altered the overall volume. There are various ways to deal with this. Boost the top chain +6 in the rack’s mixer, and cut the lower by -6. Increase the overall volume by setting the volume of each Simpler to -6dB.