Creative Sidechaining Tutorial
Love it or hate it, its iconic role in mainstream dance music over the past five or so years has led to sidechaining becoming a production buzz-word for the genre. But sidechaining itself is nothing new – it has been used in the hardware realm for decades to help mix down music and control music […]
Featured in this article

Love it or hate it, its iconic role in mainstream dance music over the past five or so years has led to sidechaining becoming a production buzz-word for the genre. But sidechaining itself is nothing new – it has been used in the hardware realm for decades to help mix down music and control music levels for DJ voiceovers.
Like many other effects and techniques previously found only in hardware form, nowadays all major DAWs natively support the process. This not only makes setup much easier, it also encourages us to explore the creative possibilities of more advanced sidechain setups. Logic, Reason, Live, Cubase and Pro Tools all come with at least sidechainable compression; other options include gates, filters and modulation effects.
But before we get into more creative (and complicated) sidechain setups, let’s make sure we understand exactly what sidechaining is and which type in particular we will be referring to.

Sidechain templates can also be composition tools. This setup opens a gate of loops that each drum triggers.
Sidechaining Basics
When using a sidechained compressor, the signal you want to process at the input section is split into two. One copy passes through to the output with the desired gain reduction applied to it. The other copy is sent as the internal sidechain – or key input – which goes into the gain detection section. This section listens to the key signal, then applies gain reduction to the main signal passing from the input to the output.
A common point of confusion is the inclusion of filters for this internal sidechain section on some plug-ins. This is designed to make the gain detection react to the dynamics of specific frequency areas of an audio signal. For instance: by filtering the key signal with a low-pass, you can focus on just the bass drum of a busy drum mix, which in turn will eliminate gain reduction being triggered from other sounds in the signal (like the snare drum, for example). This lets you choose which rhythmic element makes the compression kick in, or pump, rather than reacting to all elements present in the signal. This section is called the sidechain, which is technically correct – but it’s an internal sidechain, not an external one.
It’s external sidechaining that is responsible for the popular effect heard on so many records today. This enables you to feed any external audio signal you want to the key input, so that it’s a different signal controlling the amount of gain reduction from the signal present at the processing input. Classic uses of this setup include compressing a bass line when a bass drum plays by feeding the compressor that processes the bass line with a copy of the bass drum as its key input. This pulls down the bass line volume when the bass drum plays, which enables you to have consistent bass energy without the usual volume bump as two bass-orientated sounds play at the same time. The parameters for this are the same as normal compression, with threshold and ratio dictating how severe the gain reduction is. Using very low attack and a low-to-medium release value will make the dip in volume so fast that it is almost unnoticeable.
Feeding a copy of a bass drum to the key input of other sounds being compressed is responsible for the famous rhythmic pumping effect used on Call On Me by Eric Prydz. The two main differences are that the processed signal at the compressor’s input is a pad sound, and that the compression release time is carefully set for a musically pleasing rise time of the pad volume after gain reduction, before the next bass drum pushes its volume back down again. Audio example 01 on the DVD demonstrates this with the compression initially turned off and then with it on.
Gates can also use an external key input, which enables them to open and close in response to a signal other than the one being processed. A classic technique is to process a pad sound with an external key input from a hi-hat pattern, making the pad take on the same rhythmic qualities. Audio example 04 demonstrates this technique.
A key input doesn’t have to be audible in the mix, either: it can be what’s called a ‘dummy track’. This can still be a bass drum or hi-hat pattern, but one used purely as a control track for the key input, as an independent compositional tool. A simple dummy clip trick is to use a drum sound at the start of each bar so the compressor it triggers can be set to instantly dip, then slowly return to normal volume towards the end of each bar. This helps to pull the listener across towards the next bar by adding a slight drop-and-build effect from one bar to the next.

Mid and side plug-ins are the easiest way to create one channel for the centre of your mix and another for the side
DAW Control
How you go about setting up sidechaining will vary depending on what DAW you’re using, so let’s look quickly at the most popular DAWs and see how the process is handled in each.
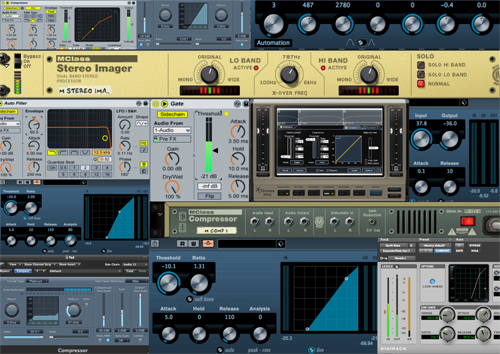
Reason’s MClass compressor simply has a mono sidechain input alongside its inputs and outputs. This can be fed from an instrument directly, fed a copy via a Spider Splitter, or fed an auxiliary send from the main mixer for flexibility. A dummy signal is best sent directly to the sidechain input to ensure that you won’t ever hear the signal.
Cubase and Pro Tools use an auxiliary send system to send from the key audio channel to the desired plug-in on another. Logic and Live can take signals directly from an audio channel or buss as a key input from a sidechainable plug-in itself, and Live offers the choice of multiple points within the mixer and instrument/effect chains. When setting up sends, make sure that they are pre-fader, so that adjustments to the channel output fader do not affect your (sometimes very painstakingly set) sidechain settings.
It’s not just single audio channels that can be used as key sources. Groups are useful for using all drums to imprint change onto another sound. Grouping all instrument parts is also a very effective way of creating an overloaded effect as a single drum or a drum group pushes everything else back in the mix via a compressor. This can be by a few decibels to make the two elements slightly interact, or it can be heavy-handed, with a low threshold and high ratio. This is when longer release times can add groove to the feel of a track, as the volume slowly increases before it’s triggered again by the key. Audio example 04 uses this technique to duck all sounds when the ride cymbal is present. This example demonstrates the severity of the effect with no finesse! Example 08 uses the same technique for the vocal stabs to push other instruments back in the mix as the vocal jumps in.
Frequency Control
All of the sidechain examples discussed so far are broadband, as they alter the full frequency range of a signal. When the sounds being altered have a broad frequency range they can sound quite odd if you’re ducking the entire frequency range to avoid only the low end from clashing with a bass drum. By creating two copies of the signal on different channels, you can use a low-pass filter on one and a high-pass on the other to divide the frequency range so that only the low end receives sidechained compression. It’s important to keep the resonance down on the cutoff for both filters and test the overall balance against the filters in bypass mode so you don’t change the original frequency balance.
Audio example 02 demonstrates this for a bass lead. First it plays in full with drums but without compression. Then the low end channel plays in
solo with compression triggered by the kick, then with the higher frequencies from the second channel; finally, with all elements present.
There are third-party plug-ins that make setting this up a lot easier by internally splitting the frequency into two or more frequency ranges and allowing external sidechaining for a single frequency band. The Multiband Sidechain from Vengeance enables sidechaining from an external audio signal, a MIDI note or even tempo-sync from the project tempo, which can replace the need for dummy triggers. Alloy, by iZotope, allows for an external audio sidechain; it doesn’t offer as many sidechain source types as the Vengeance plug-in, but it does allow for multiple instances to be keyed from as many sources as you like.
Some DAW filter plug-ins permit their envelope followers to be sidechained to follow another signal in the same fashion as compressors and gates. Attack and release controls work in the same way as usual, but the envelope can be set to respond in a positive or negative manner.
Setting the envelope to negative will pull down a low-pass filter with a high cutoff on a bass line when a kick plays into the key input, creating an off-beat rise in frequency content. Alternatively, you might accent the kick by lowering the filter’s cutoff and setting the envelope to positive so that the bass gets brighter when the kick plays.
The last technique is also very effective on hi-hat patterns with the kick present as the key input. A low-/band-pass can be set to just below the highest frequencies so that the kick accents them and gives them a dynamic feel without the need for any programming. Audio example 03 goes through hi-hat filtering with various filter types, then off-beat and on-beat bass line filtering, too.

Audio-to-parameter modulation is the next step in sidechain creativity. Both Blue Cat plug-ins and Max for Live can do this, with the former being suitable for all major DAW’s

Dynamic EQ
A dynamic EQ device enables you to control the gain amount for an EQ in real time in relation to the key input signal’s dynamics. This enables you to push back specific frequencies with a sidechain that another sound occupies when it plays. It could be that a snare drum pushes back a busy-sounding percussion part’s midrange or a vocal scoops out the midrange of a wall of guitars slightly to make more room in the mix. This is an alternative to simply choosing sounds that don’t occupy the same areas and results in a unique sound.
Currently, most dynamic EQs work only with internal sidechains. The TC Electronic Dynamic EQ allows for external sidechaining but requires a PowerCore DSP system to run it, so this is quite a pricy option. Another option is to use Blue Cat’s audio plug-ins, as they can control each other’s parameters via internal MIDI routing. The Digital Peak Meter Pro can analyse an audio signal and turn it into MIDI CC data to then route to an EQ (like the freeware Triple EQ) to control its gain.
It is possible to mock up your own dynamic EQ with some phase-reversal plug-ins and a filter or two. First make two copies of the signal to process, then position a low-pass and high-pass filter on one of them in solo mode to narrow down the frequency range to be dipped out – you should just hear the frequency band you wish to remove at this stage. Now reverse the phase on this channel and play it alongside the other copy. This can be done on the channel strip of some DAWs and via utility/tools plug-ins on others.
You should hear that frequency range now being dipped from the sum of these two signals. Finally, add a gate to the phase-reversed channel and have the sound you want to trigger the frequency dip sent to the key input. When the gate opens, the phase-reversed frequencies will dip while key input plays, then the frequency balance will return back to normal as the gate closes again. This technique can give a lot of movement to sounds that sit behind other instruments, such as loops, reverbs, delays and general noise.
Audio example 06 runs through a few dynamic EQ setups set to different frequencies. They are triggered by the bass drum, snare and hi-hat, with the EQ set to dip the frequencies they occupy when playing. First white noise is filtered, then a large-sounding synth part; finally, a huge-sounding drum break. Each sound is played with drums and without EQ, on its own with dynamic EQ, then with the whole mix.
Structure And Creativity
A lot of creative sidechaining involves a mental visualisation of a concept that you then try out in practice to see if it actually sounds any good. By thinking of a sidechaining structure and designing it at the start of a project, you can ensure that all your practical sidechaining is taken care of for an efficient workflow. These are things like bass drums pushing back bass parts, bass drums and snares pushing back cymbal work or vocals pushing back most instruments in the mix for extra space and presence.
Experimenting with the more creative elements can produce unique sonic characteristics. Dynamic EQ and multi-band work, in a busy mix, is very effective if you want clear definition at the same time as a loud mix. This is due to each sound or group pushing back competing frequencies in other elements. It is also a very simple way to add a lot of movement to elements in the mix while the drums play by sending all other sounds to a separate group and treating it.
Another effective dynamic setup is heavy use of delays and reverb, which can be lifted when the mix gets busy by adding a high-pass filter to the effect channels so the low-to-midrange is lifted when drums and the bass are present, but when they stop playing for a breakdown, the mix is swamped with full-range reverb and delays to keep it sounding full.
Sidechaining can also help by providing random starting points for tunes, using certain elements to open gates on channels that can contain any type of audio. By setting up a template with a kick, snare and hi-hat pattern in place, you can set them to open a gate on three other audio channels. When you want to
get creative you can drag random audio to these tracks and let the drum pattern create random results. As with all experimentation, some of what comes out will be trash, but among that trash could be the golden nugget needed for the hook in your next track.
We hope that after reading this you will understand the difference between purely functional sidechaining and the endless possibilities opened up by creative sidechaining. Don’t be afraid to get too complicated and don’t worry about being to brash – it’s the trial and error of your imagination that will produce the most unique results.
This video has some very handy hints and tips for house/disco/electronic producers: