Cubase Tutorial: Making The Most Of The New MixConsole
Cubase 7 boasts a radically redesigned mixer section that streamlines and powers up your workflow. Hollin Jones explores MixConsole in this Cubase Tutorial With Cubase 7, Steinberg has overhauled the mixer in a number of ways. In fact, it’s undergone so many changes that it even has a new name. MixConsole – as […]
Cubase 7 boasts a radically redesigned mixer section that streamlines and powers up your workflow. Hollin Jones explores MixConsole in this Cubase Tutorial
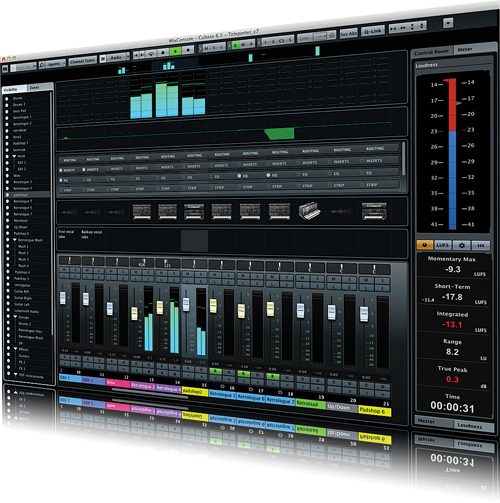
With Cubase 7, Steinberg has overhauled the mixer in a number of ways. In fact, it’s undergone so many changes that it even has a new name. MixConsole – as it is now known – incorporates many existing tools into a single window, dramatically streamlining and improving workflow.
As well as meaning much less juggling of windows, it makes it easier to manage larger projects, with clever view customisation options and instant text-based search for tracks and plug-ins being just two of the new features that help you take your productions to the next level.
All of the good stuff – automation and metering, for example – is still there of course, but there’s a wealth of new tools and tricks that make mixing in Cubase 7 more powerful than ever. This Cubase 7 Tutorial will explore those:
Mix It Up
You will need to start with a project that already contains some tracks, but if you don’t happen to have one of your own to hand you can use the demo projects that come with Cubase 7. Call up the MixConsole from the Devices menu or by pressing [F3]. You will see that there are options for two further instances of MixConsole, but in fact – as in previous versions of Cubase – these are simply differently configured views of the same mixer.

If a project contains lots of information and track types it can be useful to be able to see only certain types of track. Imagine, for example, you have audio and instrument tracks but want to view only the audio tracks, or you’ve finished recording and you want to hide the input channels. From the top of MixConsole, go to the Channel Types menu and click on it. From the resulting window you can choose to show or hide any type of track.

Within the MixConsole window it’s possible to save up to four snapshots and flip between them rather than having to keep manually changing individual settings. These can be managed using the Channel and Rack Configurations section at the top left of the window.

There’s a lot to explore, but let’s begin with the faders. These have been made larger and graphically simpler, although they actually now have more features than before. Uniform buttons above and below a fader now control mute, solo and listen as well as automation read/write, record-enable and monitor. There’s an Edit Settings button, too, that will open the new Channel Settings window; click and hold it and it will open the GUI of any VST instrument loaded on the track. There’s a panner on each channel and tracks can be renamed by double-clicking on their names.

If you [Ctrl]-click on a fader you access the contextual menu, which contains a submenu named Channel Controls. This displays the key commands currently assigned to various tasks, such as performing incremental or bigger step changes to faders and panners and activating solo, mute and other buttons.

These are handy to know about because they let you do things such as nudge faders slightly up or down with the keyboard, which can be more accurate than using the mouse. Of course, you can manually assign key commands to these and almost any other tasks in Cubase using the Key Commands setup window, which is found under the File menu.
Linked In
There are now much more advanced options for linking faders in Cubase, which is incredibly useful for changing the levels of multiple tracks by the same amount, either relatively or absolutely. Select two or more channels by holding down [Cmd] (Mac) or [Ctrl] (PC) and clicking on them so they are highlighted. Select tracks using their faders or from the new track list on the left, with its text-based search function, then go to the Link button at the top of MixConsole and click Link. You will see a window that enables you to link specific elements of the channels.
 You may, for example, want to link only volume, so that moving one fader also moves the others by the same amount. Even better, you can link other sections, too. Let’s say you linked the dynamics sections on several channels. Now, any changes that you make to the compressor or gate on one channel will be replicated on the others. If you link inserts, adding an effect to a channel and loading a preset will mean that the same insert and preset are loaded on all linked channels. Cubase differentiates between channel types, so it won’t try to add an audio plug-in to a MIDI track. You can even link routing, so you can quickly change the input routing for groups of tracks.
This is clearly is a hugely powerful new tool, but its abilities go even further. Select a different set of channels and then repeat the linking process, and this time your preferences are saved as a new group. So the first set of channels remain grouped using the first set of criteria, but the second set use the second lot of parameters. Use the Link dropdown menu to switch between sets of linked faders, and the Edit button to change any group at any point. Using this new system it’s much easier to change parameters en masse with just a couple of clicks.

On The Rack
MixConsole employs a new system of Racks to manage a multitude of processing and monitoring tasks. These can be shown by clicking on the Racks button, and from within its menu you can select which are shown and which are hidden.

Racks are particularly useful since they enable access to an individual channel’s channel strip controls – comprising dynamics, EQ and saturation tools among a few others – as well as inserts and sends, EQ complete with pop-up editor right inside MixConsole, as well as Quick Controls that provide instant access to the parameters of any instrument loaded on a track or any track parameter that you choose to assign by clicking on a slot.

Moving down, you can assign a picture to a track to make it easier to identify at a glance, and also add text notes. If you go to the Set Up Window Layout button at the top left of MixConsole you can turn on the notes option and also meter bridge and EQ section.

Notes might sound like something of a novelty but they’re actually very useful for adding information to tracks that can be seen at a glance, especially when you’re working on larger, more complex projects.

Further Improvements
When you’re mixing you can spend a lot of time tweaking the EQ of channels, and while it’s still possible to do this the old way – using a plug-in or via the channel settings window for a track – it’s now possible in MixConsole as well. With EQ visible, click in any EQ box to zoom in and reveal a full EQ editor that can be used directly in MixConsole. Add and drag points with the mouse, or right-click to access settings including invert, load or save preset, and toggle between A and B settings. This is really handy since it means you don’t have to keep going to different windows to edit your tracks’ EQ settings.

Another excellent new tool for managing mix sessions is found in the track list over to the left of MixConsole’s window. Here you will see a list of all the tracks in a project, and you will appreciate the importance of naming tracks properly when you discover that there’s now a text-based filter system for instantly finding tracks based on their name. Simply start typing in the box at the top to start searching.

In the Visibility column you can select one or more tracks and then right-click to reveal the contextual menu. Here you have a number of options, such as showing or hiding only the selected tracks, showing only tracks that contain data or that contain data at the current playhead position, or moving the selected channels to a new folder.

There’s tons more that’s new in MixConsole, such as the loudness metering system, scalable meter bridge and the ability to add all kinds of tracks to a project directly from the main window by right-clicking. Crucially, it’s designed to be less reliant on the mouse than the previous mixer, so with a little practice you should be able to get much more hands-on. Thanks to the new features, setting up, controlling and processing a mix has never been easier than it is in Cubase 7, and after a while you’ll wonder how you ever managed without them.