Cubase Tutorial: Easy Vocal Editing
Thanks to the introduction of VariAudio 2.0, vocal editing in Cubase is now far easier and more flexible than ever. Hollin Jones sings its praises in this Cubase Tutorial Let’s begin this Cubase 7 Tutorial, Enjoy! VariAudio debuted in Cubase 5 and was something of a revelation for anyone working with vocals and other […]
Thanks to the introduction of VariAudio 2.0, vocal editing in Cubase is now far easier and more flexible than ever. Hollin Jones sings its praises in this Cubase Tutorial
Let’s begin this Cubase 7 Tutorial, Enjoy!
VariAudio debuted in Cubase 5 and was something of a revelation for anyone working with vocals and other monophonic audio. For the first time you could edit notes within a waveform inside Cubase without using a third-party plug-in such as Melodyne, rendering audio truly elastic and letting you alter pitch and timing nondestructively. The implications were huge: a vocal take was no longer set in stone, nor were you at the mercy of Auto-Tune to sort out problems. In short, audio became a lot more like MIDI.
In Cubase 7, VariAudio 2.0 takes things to the next level. The two biggest changes are the ability to create harmonies quickly and easily, and to edit multiple VariAudio parts in the same editor window. Let’s see why these could be important to your productions.
What is VariAudio?
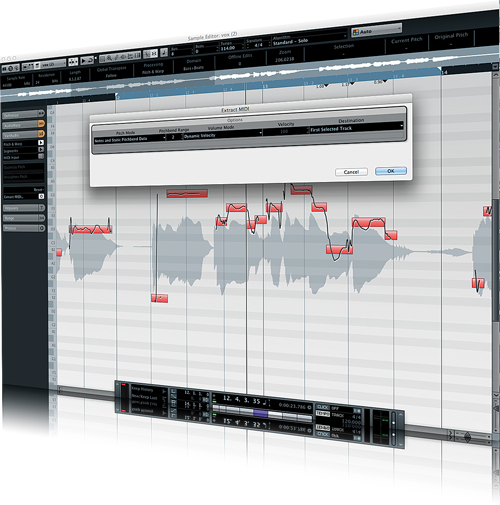
VariAudio works best on monophonic vocals or other single sounds, and in this example we’ll be using a female lead vocal part. We have selected a part of a take, since although you can work on long segments, it’s easier to use a shorter clip. The first thing you will need to do is double-click on the clip to open it in the Sample Editor, then, from the tool panel on the left, go to the VariAudio tab and click on the Pitch and Warp section. Cubase will analyse the audio and show its pitch and micropitch values graphically.
It makes sense at this point to set up a loop around the section you are working with and activate looping in the transport, since you will need to listen to the same clip repeatedly.
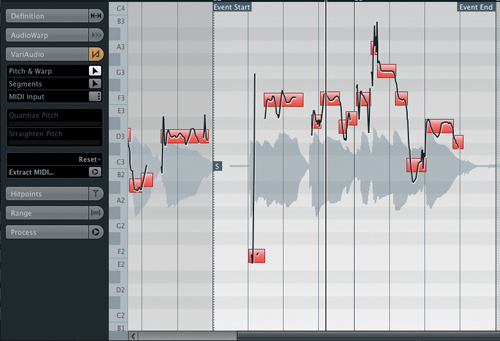
The first thing to experiment with is altering some of the notes, which you can do simply by picking up any of the red blocks – each one of which represents a note
– and moving it up or down on the grid as desired. If you look to the left you will see that the notes correspond to a piano keyboard, so you can trace the grid to see at a glance what each note is. Try picking up one or more notes and moving them around; for example, to change a minor part to a major one. Already you can see how useful this could be, but moving notes around is only the beginning.
Making a Pitch
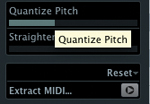
The VariAudio Editor has more tricks up its sleeve. Auto-tuning is useful in some situations, but less so in others. If only one or two notes are out in a take, applying auto-tuning to the whole phrase can be problematic as it can adversely affect other notes, so you can find yourself automating the effect on and off repeatedly. With VariAudio, however, this is less of a problem. If you select one or more notes inside the clip and go to the VariAudio tab you will notice an option labelled Quantize Pitch.
Raising the slider here will do just that: quantize the pitch of the note (or notes) to make them snap more accurately into the pre-defined pitch slots displayed in the grid.It may be hard to tell at a glance,but even well-sung parts can deviate slightly from these precise slots. Often this is fine and indeed desirable, in the same way that a MIDI part can sound better when left ever so slightly loose instead of being rigidly snapped to gridmarkers. However,it can also be useful to have the facility to pull one or more notes into tune, and by using the Quantize Pitch slider you can apply a variable amount of pitch-correction to specific notes, which can be a huge time-saver in some situations.

There’s a similar control called Straighten Pitch, and this has a different effect.
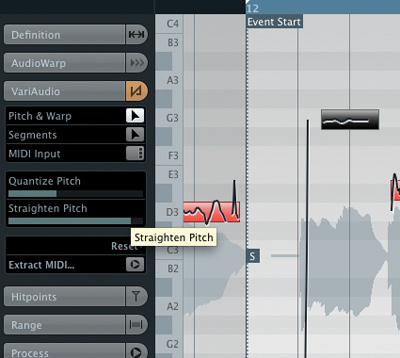
Raising this slider will iron out the micropitch within a note. When people sing, the sounds they make are rarely completely even, usually containing a small amount of wavering or vibrato. This is what gives singing its character and makes it sound human, but again, sometimes someone can bend a note a little too much, or apply too much vibrato.
Micropitch is something that is too subtle for most auto-tune effects to access in much detail, but VariAudio can deal with it. If you start to raise the Straighten Pitch slider you will observe a note become more uniform and ‘straight’. Raise it all the way to the top and you will achieve a robotic effect as the note’s pitch becomes completely even. This may be too much, but between zero and 100% straightening you can get the effect you want.
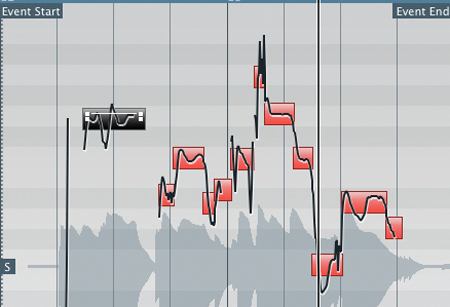
It’s also possible to edit micropitch directly by zooming in a little on a segment. You will see that the squiggly black lines represent the variations in pitch within a note, and that frequently the pitch moves considerably up and down while staying broadly within the note.
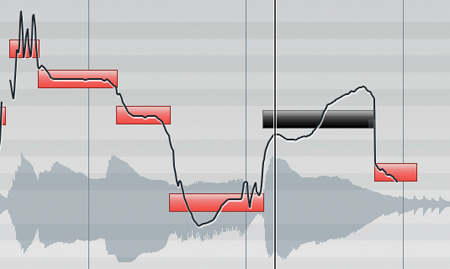
If you mouse over either end of the segment you will see the pointer change to an up/down icon. Using this you can drag the micropitch up or down, changing the pitch of a note with great precision and correcting even the smallest mistakes while leaving other notes untouched. You can repeat the mouse-over trick at either end of a segment to drag it left or right and thus shorten or lengthen it. Cubase will stretch the previous notes to adapt, so changing the timing of a phrase is easy as well.
