Cubase Tutorial: Better Synths
The synths in Cubase sound great right out-of-the-box, but there are plenty of ways to make them even better. Tim Hallas gets creative in this Cubase Tutorial Synths are one of my favourite topics, and Cubase certainly comes bundled with enough of them to keep me talking for hours. However, in Cubase 7 […]

The synths in Cubase sound great right out-of-the-box, but there are plenty of ways to make them even better. Tim Hallas gets creative in this Cubase Tutorial
Synths are one of my favourite topics, and Cubase certainly comes bundled with enough of them to keep me talking for hours. However, in Cubase 7 Steinberg didn’t introduce any major upgrades to the instrument line-up; the last new synths were added in version 6.5, and I have written in-depth tutorials on both of them recently.
It’s time, therefore, to take a look at some of the slightly more convoluted ways of treating synths in Cubase and how these can be transformed into new instruments and sounds. The purpose of this article is to develop a wider arsenal of tools for sound design – manipulating synth sounds in new ways to create previously unachievable sounds. For those of us who grew up in hardware studios and learned how to operate the synths of the day it is easy to forget the need to physically patch instruments in the age of software synths. For those who also use Reason, the ability to patch will be nothing unusual, but within Cubase, sending a synth via some of the effects and plug-ins greatly increases the capabilities of the instruments.
Let’s begin by creating a synth track and getting a sound loaded (choose Project>Add Track>Instrument). Select the instrument you want to work with and click on Add Track. I have chosen Retrologue as it gives the basic lead sounds that I want to work with, ready for further manipulation.
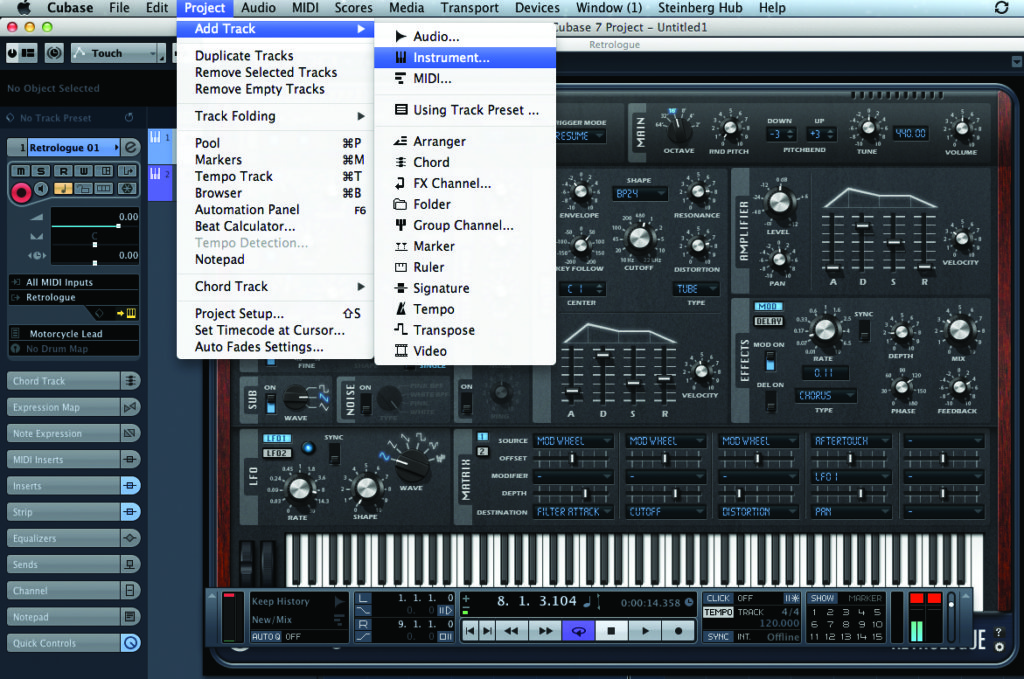
When the track is loaded, find a suitable sound as your starting point. For the purposes of learning about patching and sound design in general there is no harm in choosing a preset, particularly if you are still getting to grips with basic synth programming. Once you’ve settled on something we can start recording or inputting our part manually so we have some notes in the Arrange window to work with
Parts of the Process
When adding effects and additional processors to a synth sound we need to access the Edit window for the appropriate track. That is achieved by clicking on the E (for Edit) in the Inspector panel on the left-hand side of the screen or via each channel in the mixer.

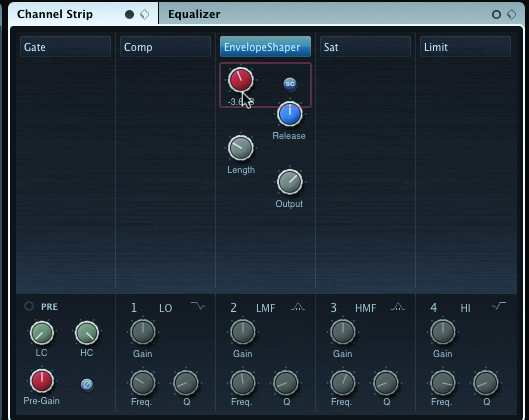
The introduction of the Channel Strip in Cubase 7 greatly increased the ease with which basic dynamics processors can be added to a track, so these can be quickly applied to any synth sound that you create and simply turned on when needed. The processors on offer per track include a compressor for smoothing out dynamic variations and an Envelope Shaper for additional sound-shaping. They can be accessed in several ways: by selecting the Channel Strip tab within the Edit window or from the mixer window directly. This, of course, gives every synth you add an extra envelope on the output for creating other effects with the envelopes built-in to the synths.
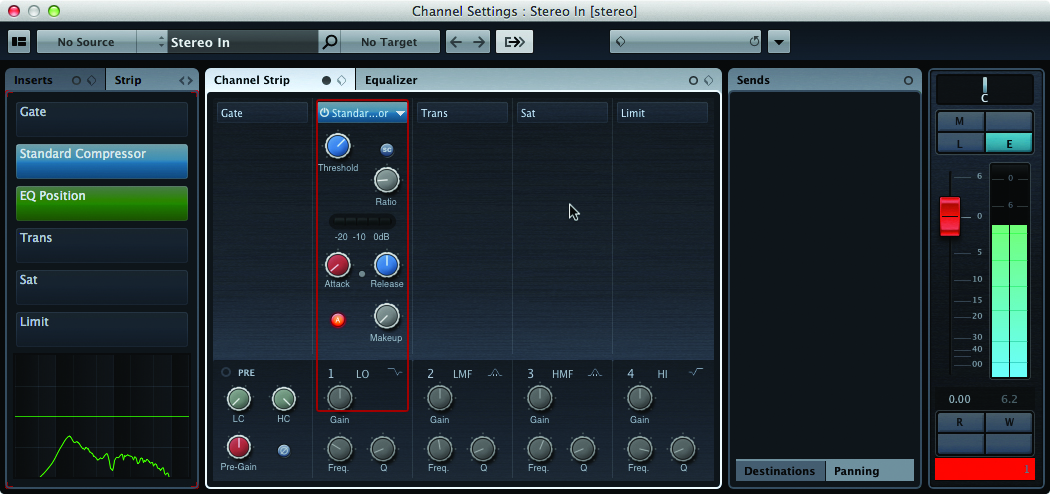
With the routing matrix available within the synthesizers, the Amp Envelope can be routed to a filter and then the additional envelope shaper will subsequently affect the overall output. To activate the Envelope Shaper simply click on the appropriate box within the Edit window or mixer window and it will spring into life. At this point you are presented with basic Attack and Release controls that will provide greater control over the overall shape of each note.
We have looked at some of the basic things that can be done via the new Channel Strip settings, so let’s now look at some of the additional plug-ins and effects within Cubase. The inserts are not much different from version 6.5, but the way in which they appear in the dropdown menu has changed, so they may take a little longer to find as third-party plug-ins are mixed in among the standard Cubase ones.
Let’s start with a basic effect on a synth lead, such as a filter. Now, it might seem a bit superfluous to add a filter to a synthesizer, but the StepFilter and MorphFilter do provide some movement in a sound which can be synchronised with a track to create some totally different textures. To add a StepFilter, open the Edit window or the mixer and in one of the insert slots select Filter>StepFilter (or MorphFilter if you prefer) and it will add the effect to your signal chain.
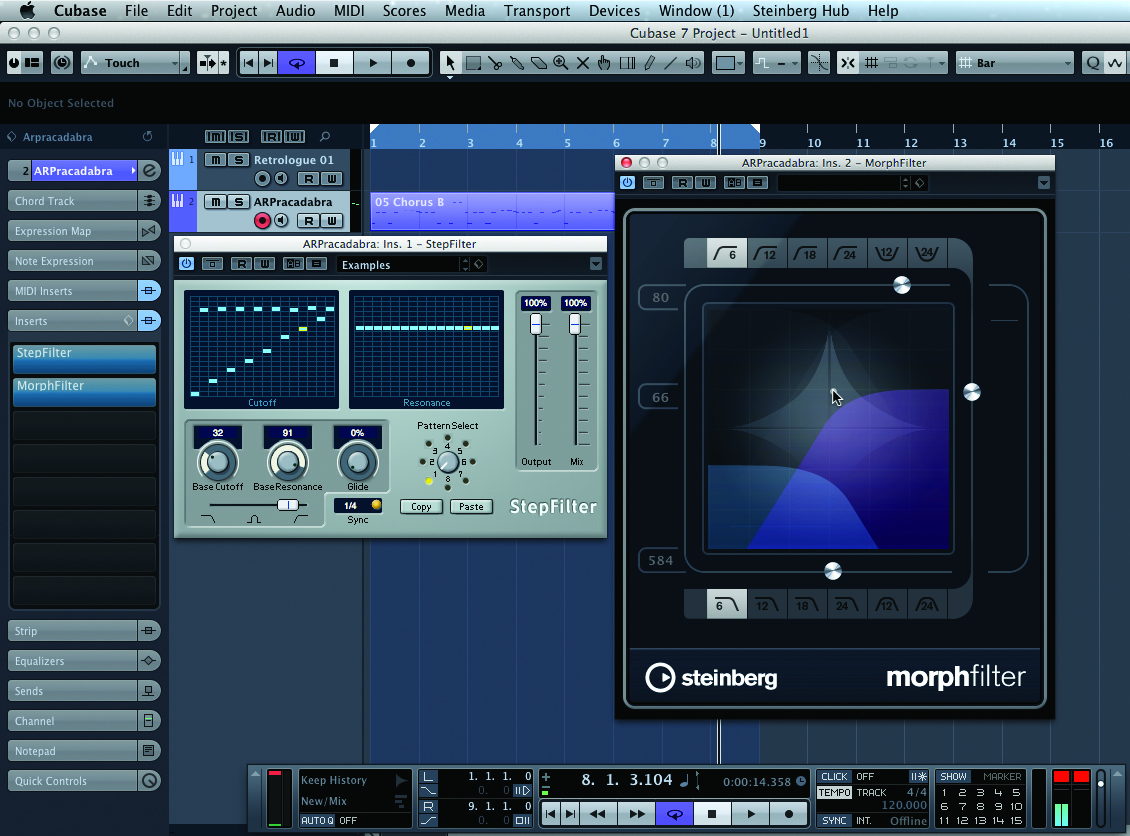
The StepFilter creates two 16×18 grids that enable rhythmic changes of filter settings with each beat, allowing for a depth change of both frequency cutoff and resonance. The MorphFilter allows for movement to be created and automated between two different filters, with a range of low-, high- and band-pass filters available to choose from.
For those of you thinking that adding a filter to an existing synth seems a little pointless, if you’re working with some of the older synths within Cubase the filters are a little different from what you might expect, so the addition of a regular filter is useful when programming.
Amp it Up
Another technique that can make a real difference to the sound of a synthesizer is putting it through guitar stompboxes and amplifiers. Cubase has two amplifier simulators including the excellent VST Amp Rack, which can be added to the signal chain by clicking another slot on the inserts and selecting Distortion>VST Amp Rack. From within the plug-in you can then select preamplifier stompboxes, amp type, cabinet type and post-amplifier stompboxes, including reverb and EQ.

This is a perfect way of creating screaming lead lines that, in my opinion, when played using the right synth actually sound closer to a high-gain guitar than some of the alleged guitar sounds in the HALion sampler!
Everything we’ve looked at so far might seem pretty obvious to a lot of you; however, it is easy to think about the sound we make with our synthesizers as a finished article rather than using inserts and other effects as part of the sound-design process – I’m trying to encourage you to experiment with sound. Don’t worry too much about trying to get everything as you want it within the synth plug-in itself; it’s more about using all of the tools that are available in different ways. These are some of the more basic things that Cubase can do using the internal effects that come with the software, but how about external plug-ins that can manipulate the sound in totally different ways?
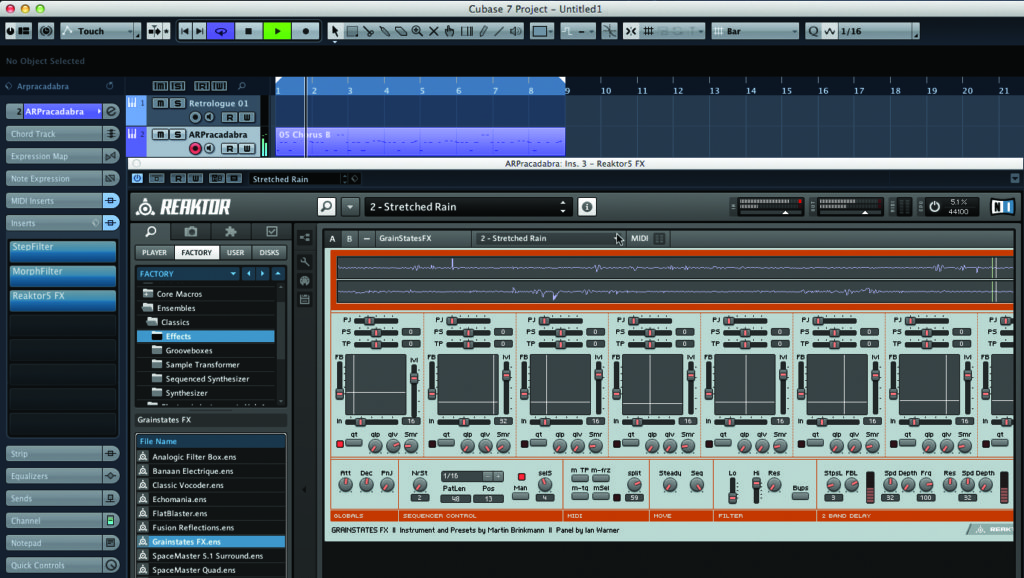
Now, it might seem slightly odd to talk about external effects in a Cubase tutorial, but bear with me – we can create some very interesting sounds. I’m going to start with a simple free effect iZotope calls Vinyl that lends everything a scratchy, lo-fi sound which, when paired with some of the pad sounds from PadShop, yields some beautifully dirty sounds that are ideal for filling out the middle of a track. I have also taken to using some of the effects in Native Instruments’ Reaktor to give all my sounds a little lift. My particular favourite is the Granulator effect, which chops the sound into tiny pieces (you can also download Max Runtime for free-to-run Max 6 Patches that include an excellent granulator if you don’t have the money to splash out on extra plug-ins).
Again, you need to start thinking about these as individual elements of the creative sound-design process. It is now possible to re-record these sounds and load the adjusted sound into HALion or another external sampler such as Kontakt and then start the whole process over again.
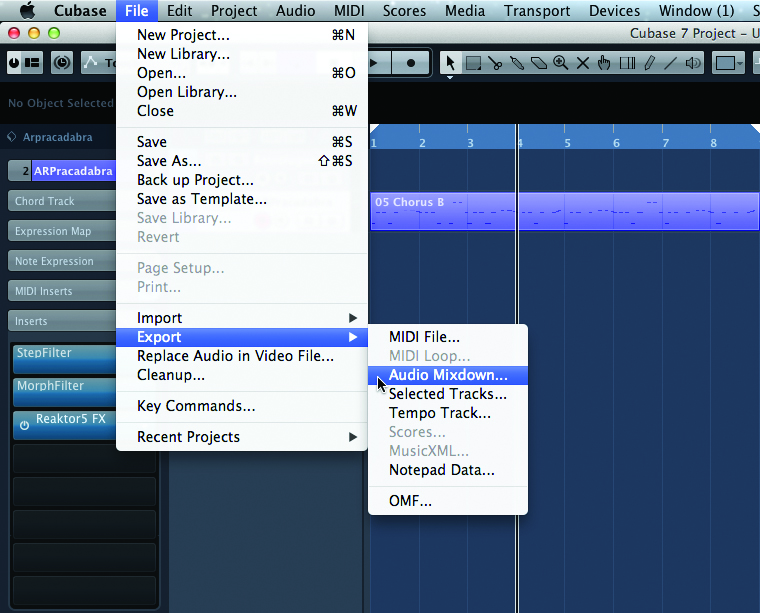
To load your sound into HALion you need to create a small audio sample. Record at least a single note (C3 is sensible) and hold it for as long as you see fit (the longer the better, if you can afford the space on your hard drive). Export the sound by soloing the appropriate channel, selecting the relevant block in the Arrange window, setting the L&R markers [P] and then clicking on File>Export>Audio Mixdown.
This can then be loaded into HALion (or your sampler of choice) and be treated as a new instrument and added to your MediaBay window. To do this, drag and drop the audio file onto an empty slot within HALion and save the patch, remembering to fill in the ID tags to make finding it again as easy as possible.

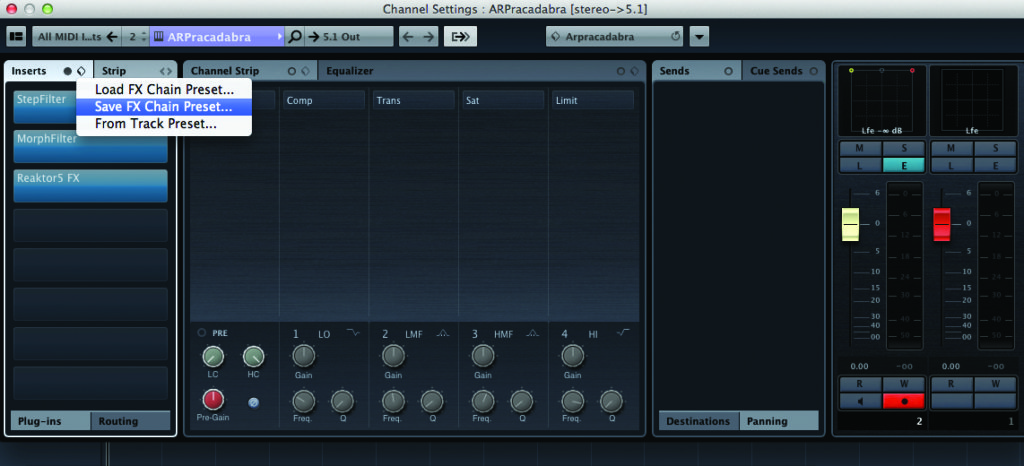
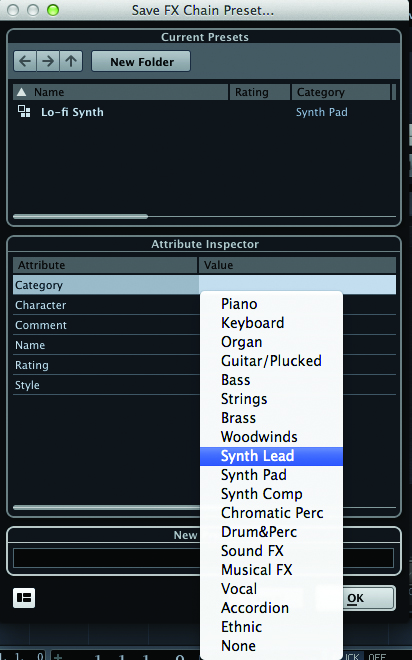
If this all seems a bit much, you can, of course, save track presets in Cubase and just load all the effects and dynamics processors after your instrument for use in other projects, saving them to the MediaBay if you don’t want or need to create a new sampler instrument. To do this, open the Edit window, and in the Inserts tab you’ll see a small cube labelled Preset Management. Click on it and select Save FX Chain Preset.
You will then be asked to add appropriate ID tags for finding it in the MediaBay page later.
Hopefully you’ll have found some of this useful and can see the benefits for sound design in using additional effects to change the sound of your synth patches, which can then in turn be transformed into new instruments themselves. Remember: the only limit is your processing power, so I encourage you to give expansive signal chains a go and create some outlandish, otherworldly sounds.