For more Cubase tutorials and workshops, check here.
How to add space to your mix with Cubase 10’s reverbs
Reverb is a vital weapon in a producer’s arsenal, and can play a key role in honing the sound and placement of parts within a mix, so it’s good that Cubase Pro comes with four different varieties…
by Adam Crute
When you purchase through affiliate links on MusicTech.com, you may contribute to our site through commissions. Learn more
Reverb is one of those effects that it’s hard to avoid. It pulls things together in a mix, giving a sense of coherence and space, and even if you’re creating a very dry, close-sounding mix, a touch of reverb is still almost unavoidable.
Once upon a time, and not all that long ago really, if you wanted to add some reverb to a recording there was no option but to use a naturally reverberant space: Either you could perform the original recording within that space, or you could set up speakers to play a previously recorded sound into the space and microphones to capture the results.
Thankfully, adding a bit of ’verb to a sound these days is a much less protracted affair, but not all reverb plugins work in the same way, and this has an impact on their relative strengths and weaknesses. Cubase tries to offer the best of all worlds, with three different approaches to reverb generation spread across four different plug-ins that come preloaded with the DAW.
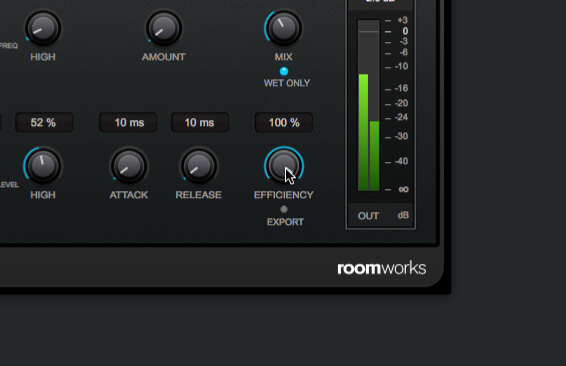
Roomworks
The first of these is RoomWorks, which is included in Cubase Pro and available to buy from Steinberg’s store. This uses the conventional digital reverb generation technique of creating a large number of repetitions of the input signal, and sculpting these repetitions to create a natural tone and decay. RoomWorks doesn’t attempt to model any particular original circuitry, but does allow for detailed and intricate control over the generator, and gives a very clean sound that works well on a wide range of material, but that can be a bit lacking in character.
Reverb can be very resource hungry, and has a particular appetite for RAM, but RoomWorks’ comparatively straight-forward reverb model and adjustable efficiency setting helps keep its hunger in check. As the efficiency is increased the complexity and density of the reverb effect is reduced, thereby saving those resources, and there’s an option that forces things back to full quality during offline exporting. The efficiency dial can also give interesting low-fi reverb effects.
RoomWorks has various reverb-sculpting features, such as an envelope that can control the attack and release of the reverb, and both high and low filters on the input and reverb damping stages. One of its best tricks, though, is that it fully supports surround sound, adding controls to set the reverb’s distance when assigned to a surround track.
All versions of Cubase also come with RoomWorks SE, a cut-down version of the full RoomWorks plugin. This uses the same algorithms as RoomWorks, but exposes fewer parameters and doesn’t support surround configurations. It is very resource-efficient, though, and is a good choice for adding a little bit of space to individual parts and sounds without excessive impact on resource usage.
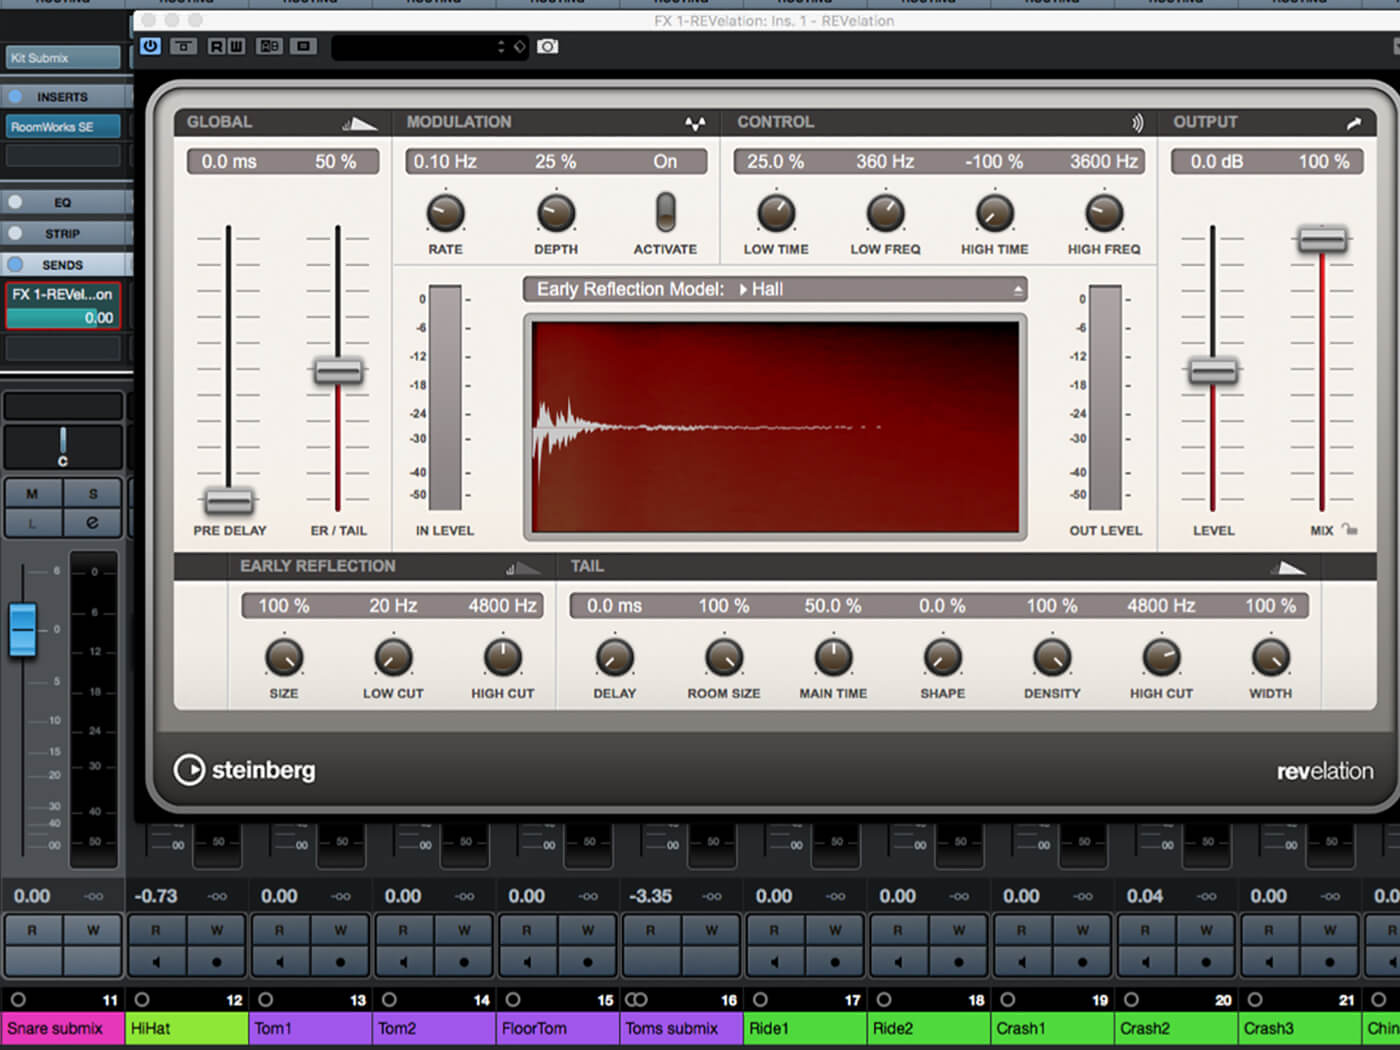
REVelation
REVelation, which comes bundled with both Cubase Pro and Cubase Artist, uses a similar technique as RoomWorks to generate its reverb effect. However, REVelation has been designed to give a sound more like that of a high-end outboard reverb, and tends to produce a more nuanced and characterful sound than RoomWorks.
Where REVelation does a particularly good job is with longer reverb times, which tend to be smoother and less ‘fluttery’ than those produced by RoomWorks, and so it’s particularly good for simulating large acoustic spaces, or for use in sparse mixes where the reverb will be particularly noticeable. The processor also produces ‘early reflections’ (ER), which simulate the initial direct echoes that can stand out above the wash of the reverb, and this too adds to the depth and subtlety of the sound the plugin produces.
All of this niceness comes at the cost of system resources, as REVelation is generally hungrier of those resources than is RoomWorks, but a modern computer with a good stack of RAM isn’t going to struggle. All in all, REVelation makes for an excellent go-to reverb for many different situations.
Reverance
Cubase Pro’s final bundled reverb plugin, REVerence, uses an entirely different method to produce its sound: convolution. This type of reverb is based on impulse recordings, these being recordings of the reverb created in a real-world acoustic space, or by a classic plate, spring or digital reverb. By analysing this impulse recording, a convolution reverb can generate the echoes and reverb that would result from any sound played within that space or via that hardware. As you would imagine, all of this requires a healthy slice of processing power, but the results are exceptionally natural, detailed and realistic. REVelation can also load up-to 36 patches simultaneously, and then switch or morph between these patches.
Let’s take a look at how to use these reverbs to add a bit of body and interest to individual sounds, to give space and depth to a mix, and to create some esoteric off-the-wall effects.
Exploring Cubase 10’s Reverbs: step-by-step
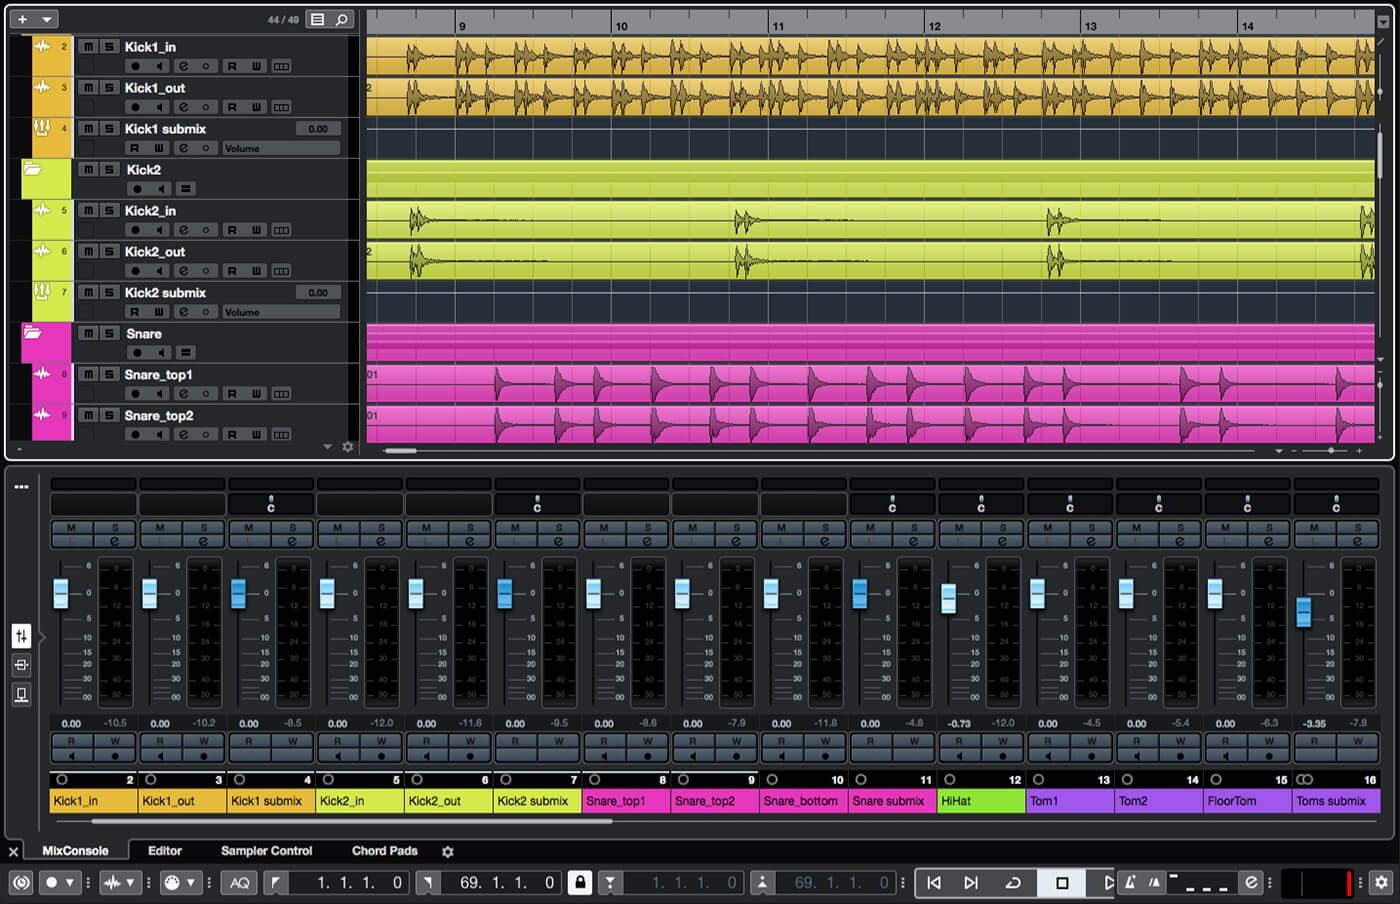
1. For the first couple of examples you’ll need a project with multi-tracked (or in some other way splittable) drum parts – find a suitable project and open it in Cubase. (Multitracked drum recordings can be found online if you don’t have any to-hand).
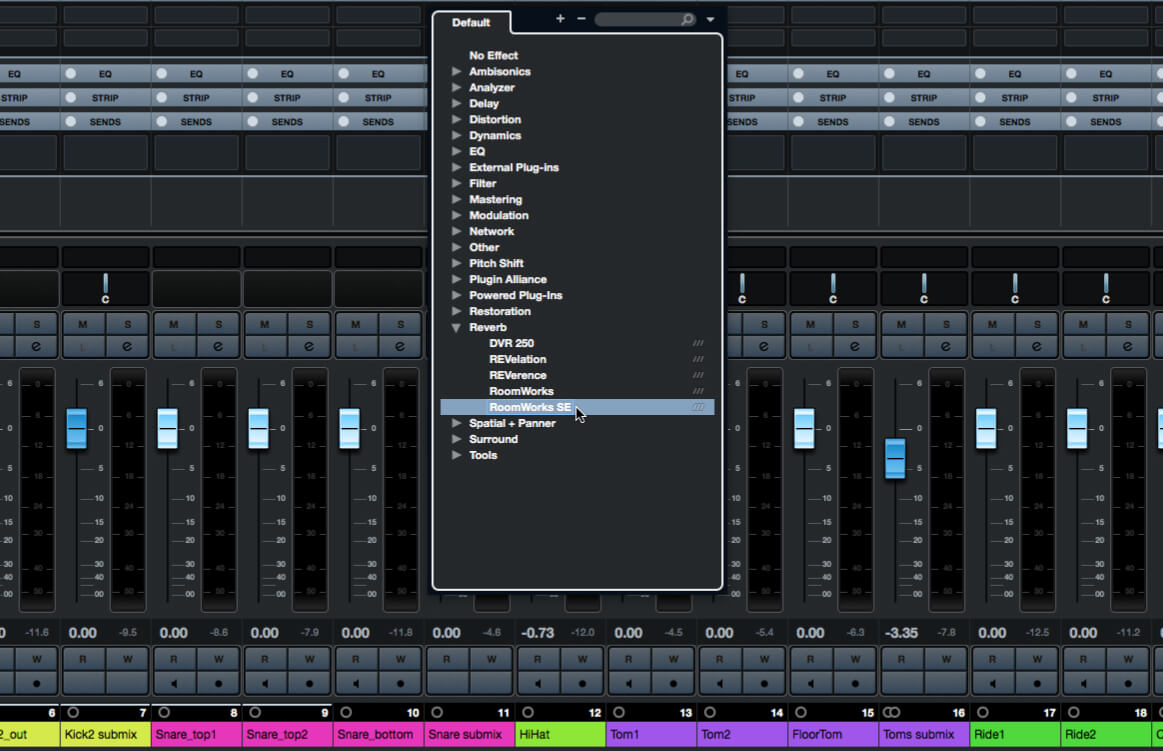
2. It’s common to use a short reverb to give a bit of extra life to a snare drum. We only want this on one track, and it can be a simple reverb too, so insert an instance of RoomWorks SE on your snare track/group.
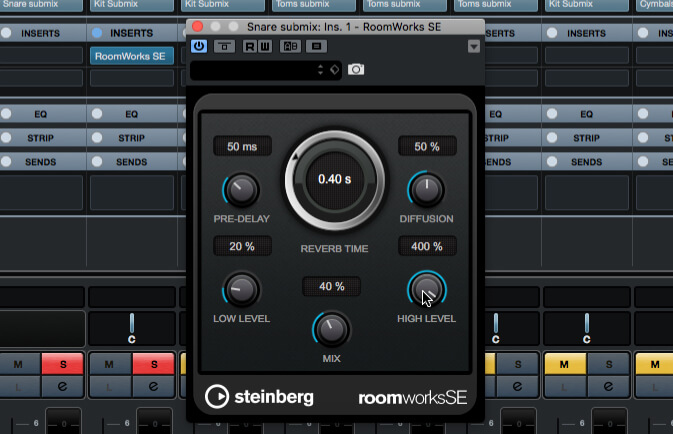
3. In the RoomWorks SE window, set a short reverb time of around 0.40s. We want a bright ‘zing’ for the snare, so turn the High Level up all the way, and the Low Level down to around 20%.
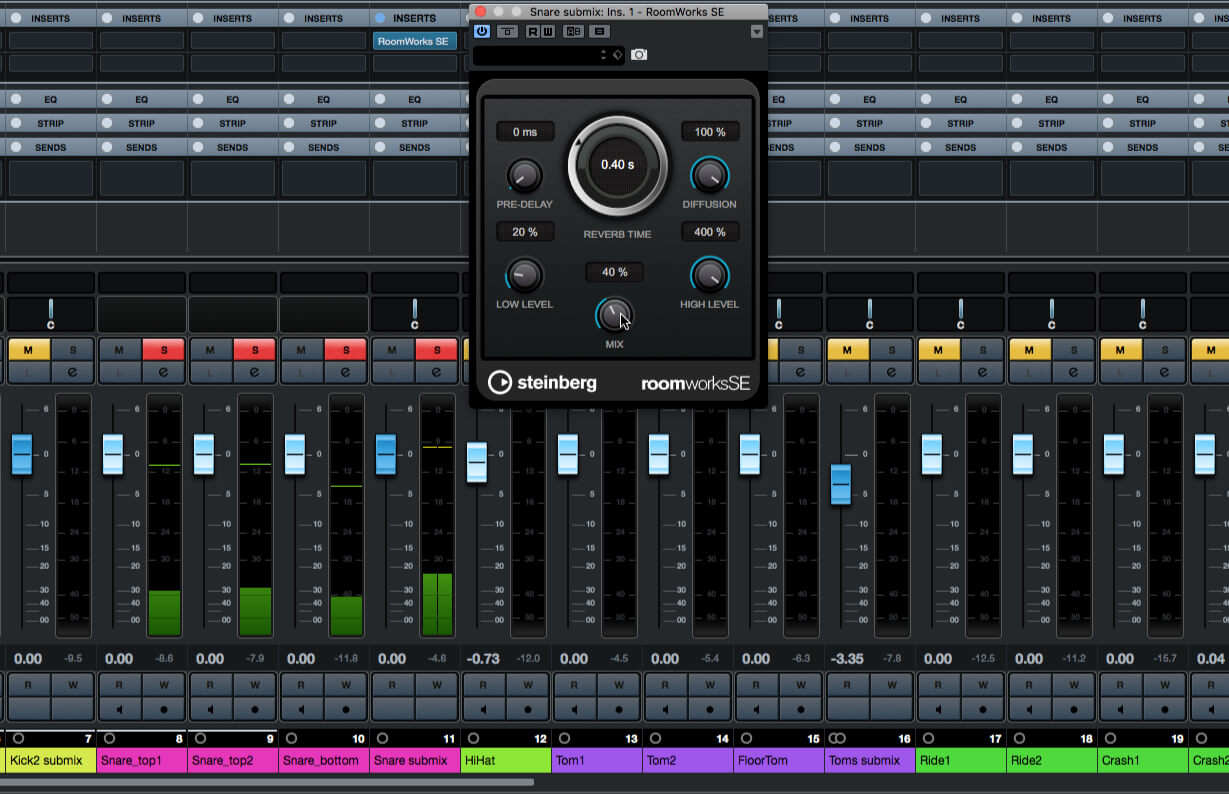
4. Set the pre-delay to zero so that there’s no gap between the snare sound and the associated. Set the diffusion to 100% for a spacious sound, and then, with the track playing and snare soloed, set a mix level that sounds good.

5. Similar short reverbs also sound good on toms and snappy-sounding percussion, so go ahead and set some up some more instances of RoomWorks SE. Use settings that match the source sound, in particular tuning the high and low levels to suit.
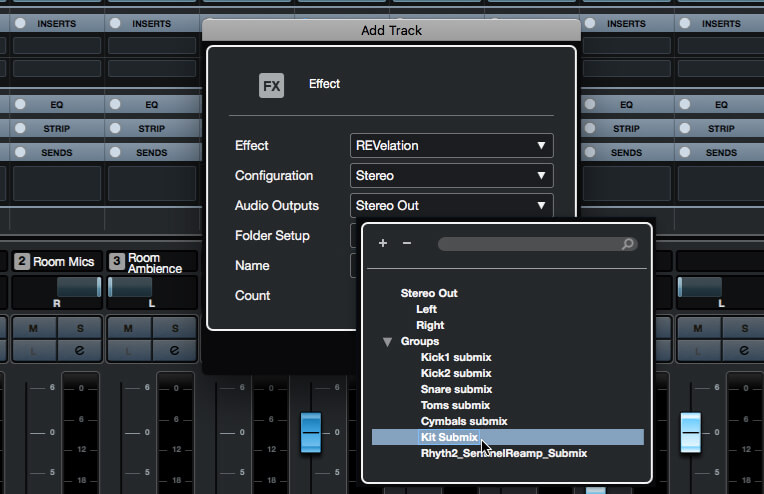
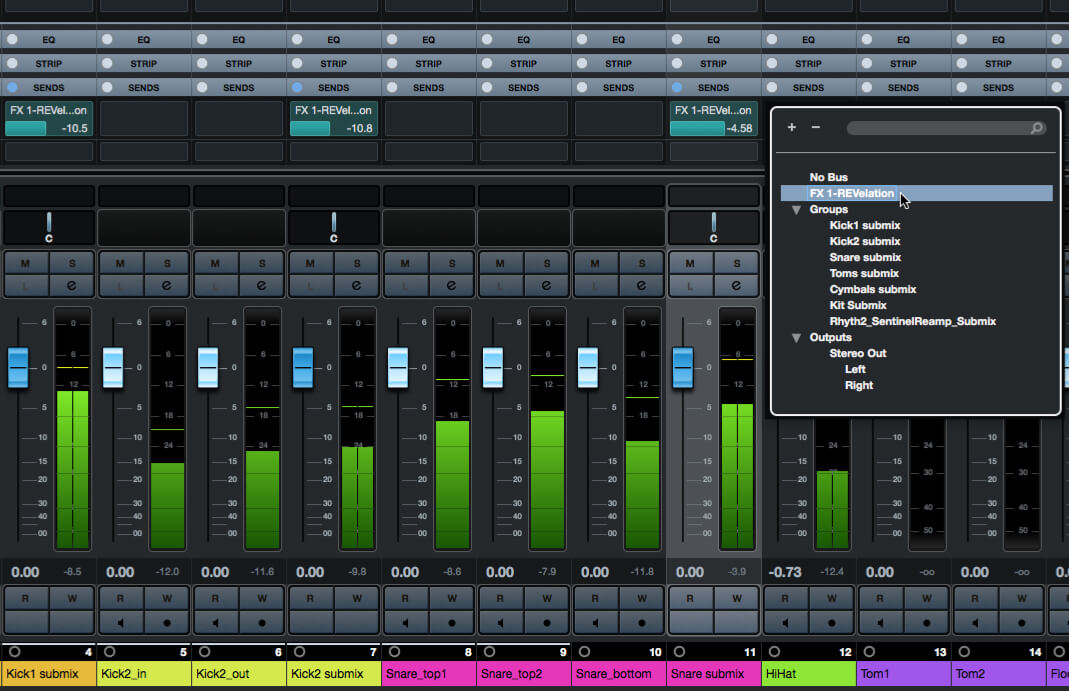
6. Using the same reverb across multiple parts allows them to exist in the same acoustic space, thereby improving cohesiveness. Create an Effect track using an instance of REVelation. If your kit is submixed then be sure to route the effect track into the kit’s submix.
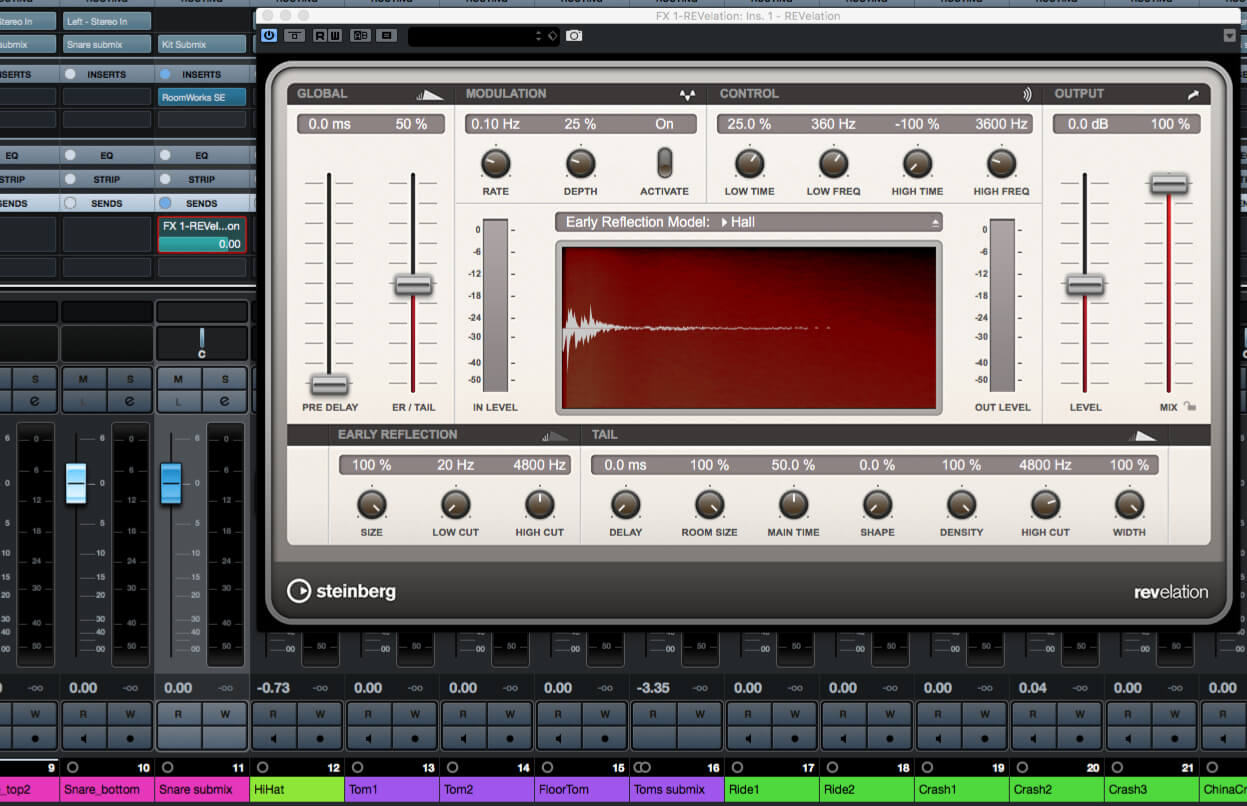
7. Add a post-fade send to the snare’s track or, if you have used multiple snare mics and have these routed to a subgroup, add the send to the subgroup instead. Enable the send and open the REVelation control panel.
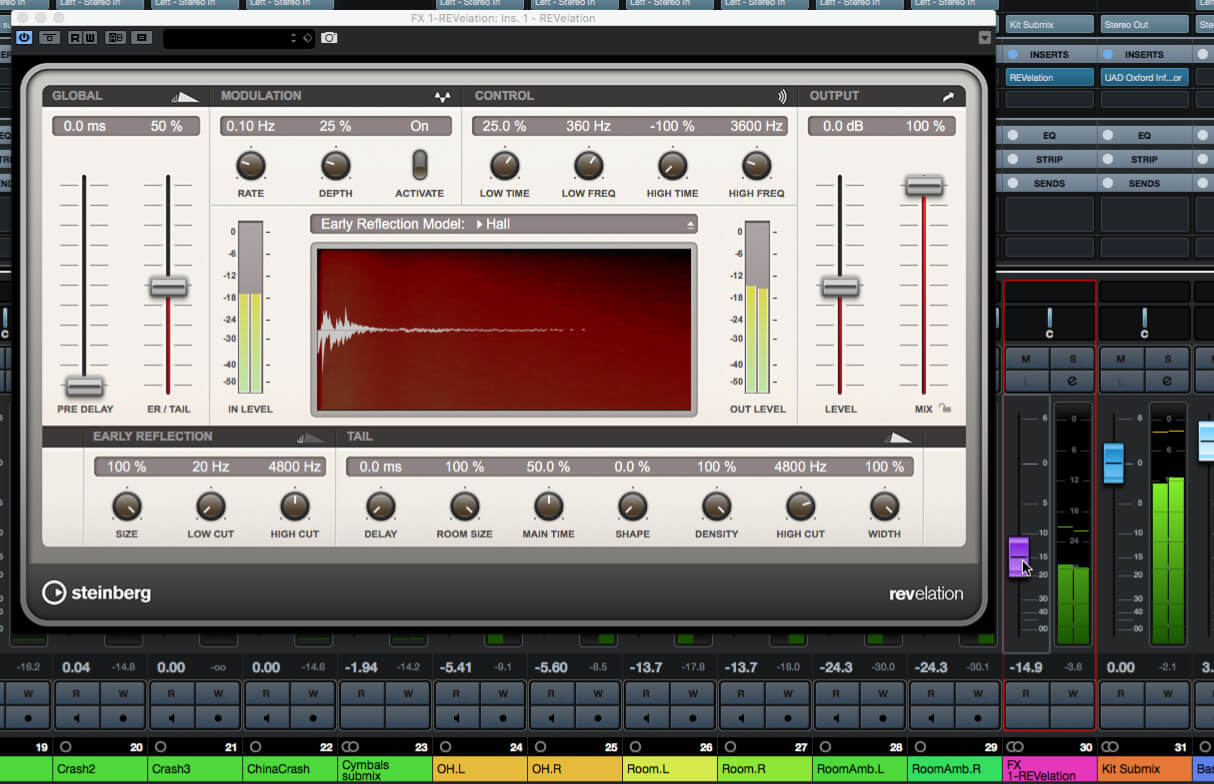
8. Because we’re using this as a send effect, set REVelation’s mix parameter to 100% wet. Start playback and use the Cubase mixer to adjust the REVelation track’s level to a suitable point (it may help to solo the snare track/submix).
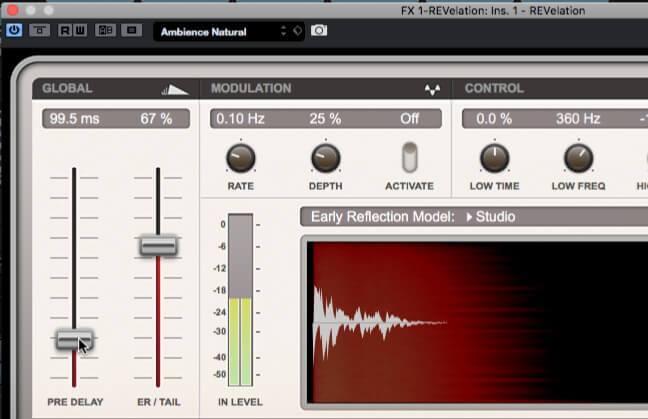
9. Use REVelation’s preset browser to load a patch that you like – we’ve gone for Ambience Natural. We don’t want the kit to become lost in this reverb, so dial in some pre-delay until you hear a bit of separation between source and ’verb.
10. Go through the rest of the drum instrument tracks/subgroups, adding sends to the REVelation effect. Use the send levels to control how much reverb a particular instrument will get, for example sending less from the kick than the snare.
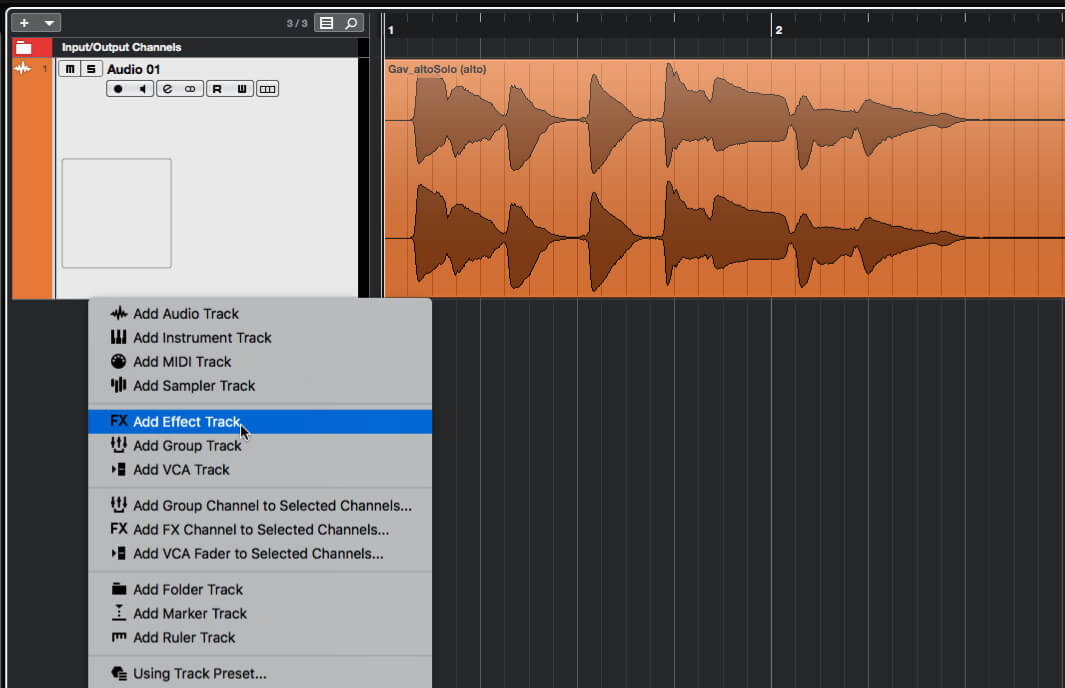
11. Save and close your project. Create a new empty project and import a vocal, guitar or lead line recording to a new track, which we’ll use for the following examples. Also create an effect track using the REVerence convolution reverb.
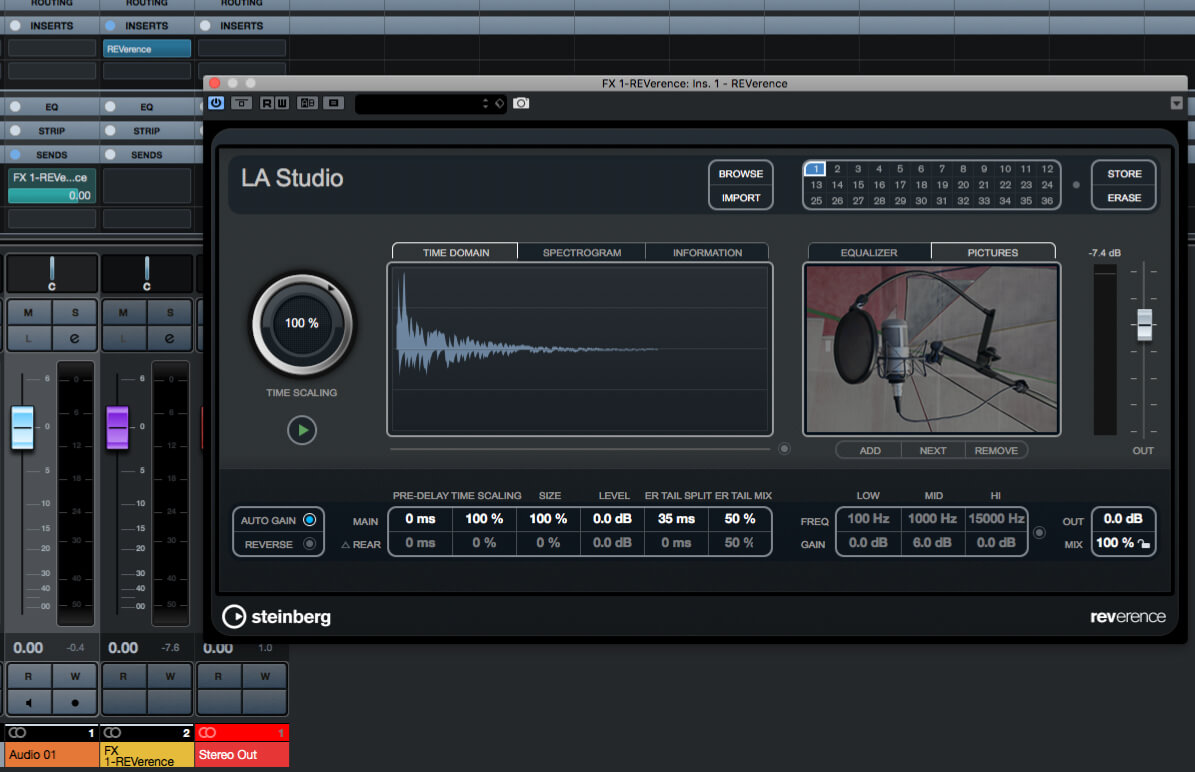
12. Create a post-fade send from the audio track to the effect track and open the REVerence control panel. The currently-loaded impulse is shown at the top of the panel – audition it by clicking the green arrow below the Time Scaling dial.
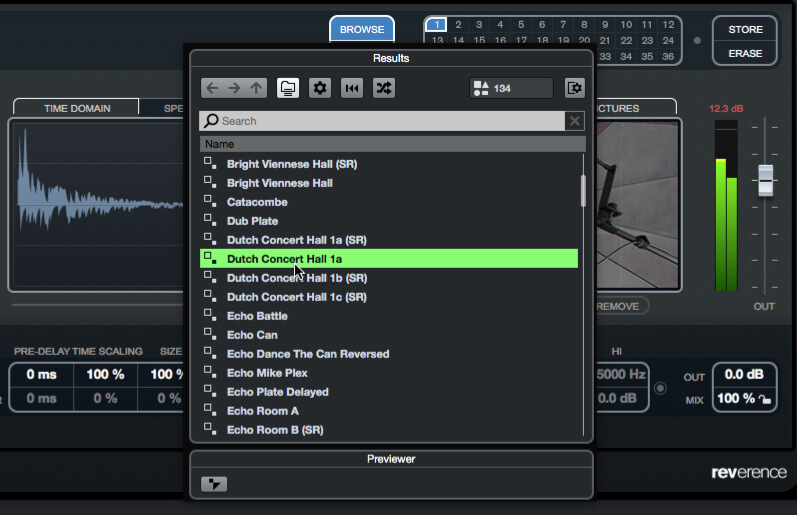
13. Click the Browse button alongside the impulse name to load a new impulse. Take a moment to listen to some impulses, before settling on one that will compliment your example audio. Ensure REVerence’s mix is 100%, then set the effect tracks level to suit.
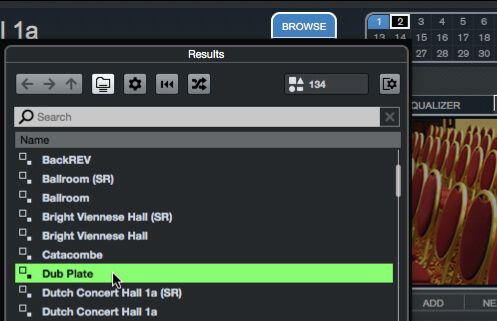
14. The bank of numbered buttons at the top-right of REVerence’s window represent slots into which patches or parameter adjustments (including impulse choice) are stored. Click the 2 button so that its border flashes, then use the impulse browser to select another impulse.
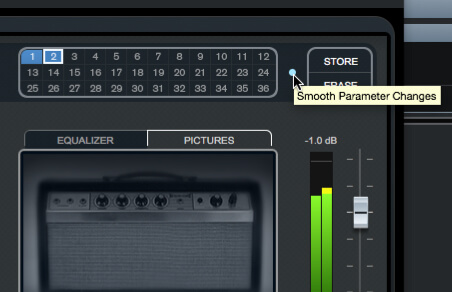
15. The 2 button will turn blue. Play your example audio and click between the 1 and 2 buttons, noticing how the reverb changes. Select the Smooth Parameter Changes button (small dot alongside the number buttons) and note how the reverb now morphs smoothly between settings.
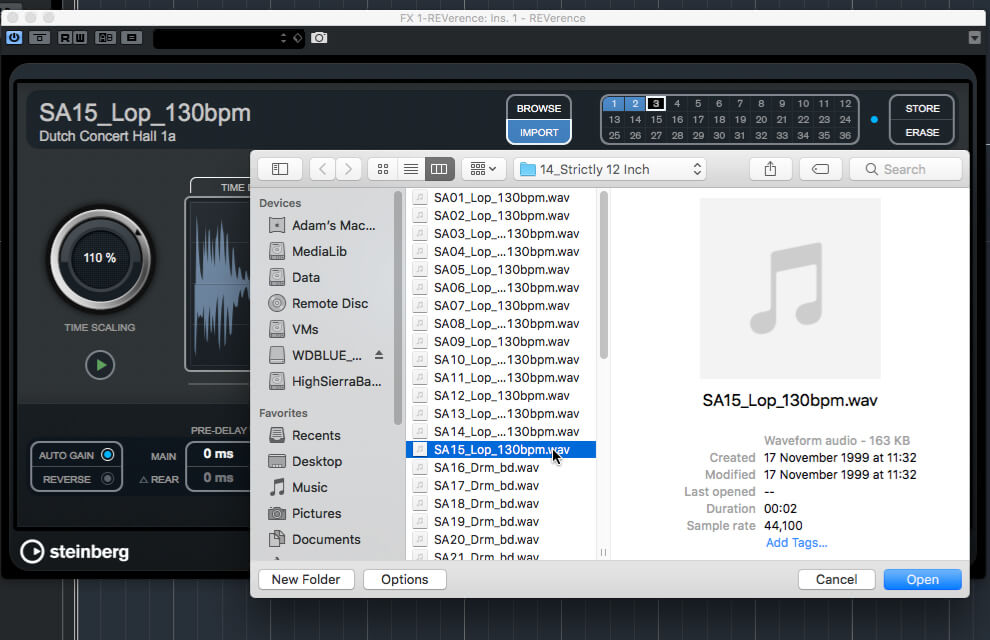
16. Let’s make a rhythmic, resonant echo sound: Select slot 3 in REVerence and then click the Import button – a file browser window will open. Browse to and load a short (1-2 bar) drum loop, then hit play. Experiment with importing other loops and sounds.

17. Disable the audio track’s send to the REVerence effect track. Add a new effect track using RoomWorks, and create a post-fade send from your audio track to the RoomWorks track. In Cubase’s mixer, set the new effect track’s mix level to around -10dB.
18. Use RoomWorks’ patch browser to load a medium-length reverb that compliments your audio example. Then start turning up the Efficiency dial, and note how the reverb’s repetitions become increasingly sparse. This can be a cool effect in its own right, particularly on guitars.