Getting creative with LoopMash in Cubase
Over the past few issues, we’ve looked closely at Cubase’s in-built groove and beat tools. Here, we’re covering an even more exciting feature: LoopMash.
Looped patterns lie at the heart of many kinds of classical and contemporary and music. In the case of contemporary electronic music, loops and the counter-rhythmic interplays between different loops are fundamental to the art form. The ability to create compelling original loops has therefore become one of the most important skills to master should you want your music to catch an audience’s attention.
Loops are easy to come by, of course, with thousands upon thousands of commercial and home-grown sample libraries available via a quick web search. These are fantastic for building your own tracks around but creative control over this most fundamental aspect of your music is then restricted by your abilities as a sound editor, not to mention the time you’re able to or want to invest in performing that editing. However, there are tools that can aid that process. Cue LoopMash 2, an instrument included in Cubase’s Pro and Artist editions, and which can be purchased for use in other VST-compatible DAWs.
Racked and stacked
The idea behind LoopMash is that it replaces sounds in one loop with sounds from another. That may sound mundane, little more than the loop slicing we looked at in the last tutorial. But there’s so much more to LoopMash than this.
Up to eight loops can be added to the instrument, one of which is designated as the master loop. The loops are analysed for tempo, rhythm, spectrum and timbre before being sliced into the eighth-note segments that are displayed in the LoopMash window.
Each loop channel has a similarity-gain setting, controlled by the horizontal slider on each loop channel. When LoopMash plays, it looks at each slice of the master loop in turn, and searches for similar slices within the other loops. It then uses the similarity-gain settings of each loop to determine whether or not to replace the master-loop slice and, if so, which slice to replace it with.
You can influence the way this similarity is judged but the default is to find slices that are similar to the master slice across all metrics. For example, if the sound in the master slice is an on-the-beat kick drum, LoopMash will identify in the other loops similar kick drums and low-frequency sounds (including pitched notes) that are on the beat. The slice with the highest similarity score is then chosen as the replacement slice but you can influence this to some extent using the similarity-gain control, which can boost or reduce the similarity score of slices within a loop, thereby making it more or less likely that that loop’s slices will be used as replacements.
Playable loops
There are other ways the similarity between slices can be evaluated, and other ways of influencing LoopMash’s choices. Overall though, the result is that you end up with a new loop that shares characteristics with the source loops but that is completely new and original.
It’s easy to alter the results too, creating variations and alternatives, and to manage all of this you can assign the current scene to a keyboard note and then recall it later by playing that note. You can specify whether scenes should be recalled at the next step, the next beat, the next bar or at the end of the current loop. There’s also a performance-controls section of the plug-in that lets you assign to the keyboard effects and modifiers such as mutes, reverses, stutters and repeats.
Triggering loops via a keyboard is not a new development but, with LoopMash, you’re generating loops on the fly, and have real-time control over how those loops sound. With the right set of source loops and some judicious settings, it can feel like playing a performance synth, only with loops.
More modifiers
Most of the modifiers available in the performance-controls section can also be assigned to individual slices on a per-slice basis. You can, for example, reverse a slice, make it stutter and repeat, and apply scratch and backspin effects. These modifiers can’t be applied in real time but they are included as part of any stored scenes you create, so you can easily switch to them as variations on your main loop. Slice modifiers also allow you to exclude a slice so that LoopMash will always ignore it, making it possible to hone LoopMash’s output in fine detail.
Settle in for some hands-on LoopMash loop creation and consider how to use it to create awesome original parts for your own music.
Building loops with LoopMash in Cubase: step-by-step
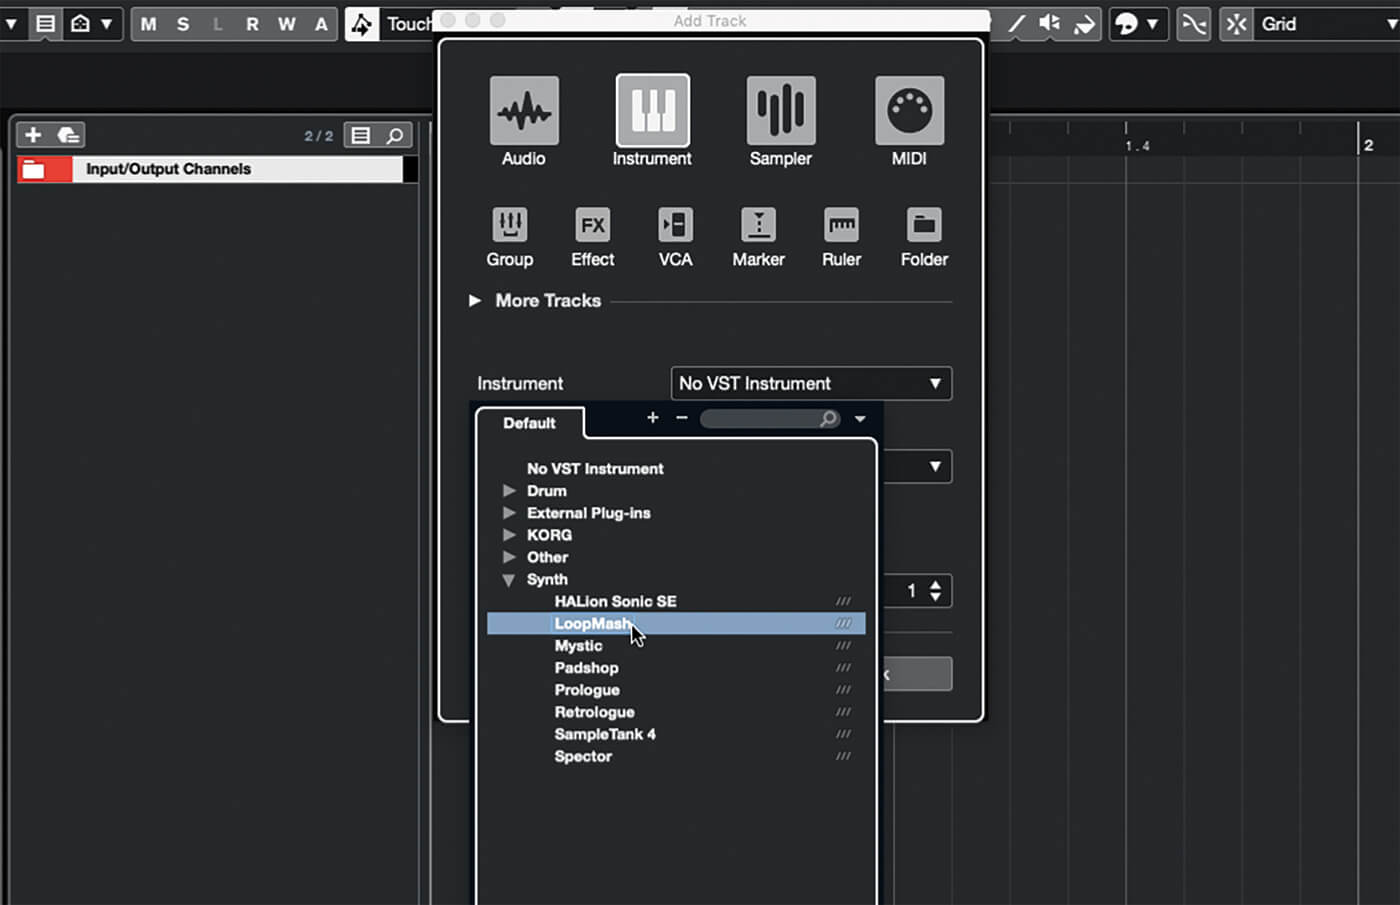
1. Load Cubase and create a new project. Click + at the top of the tracklist to open the Add Track panel. Select Instrument as the track type, then select LoopMash as the source. Click Add Track.
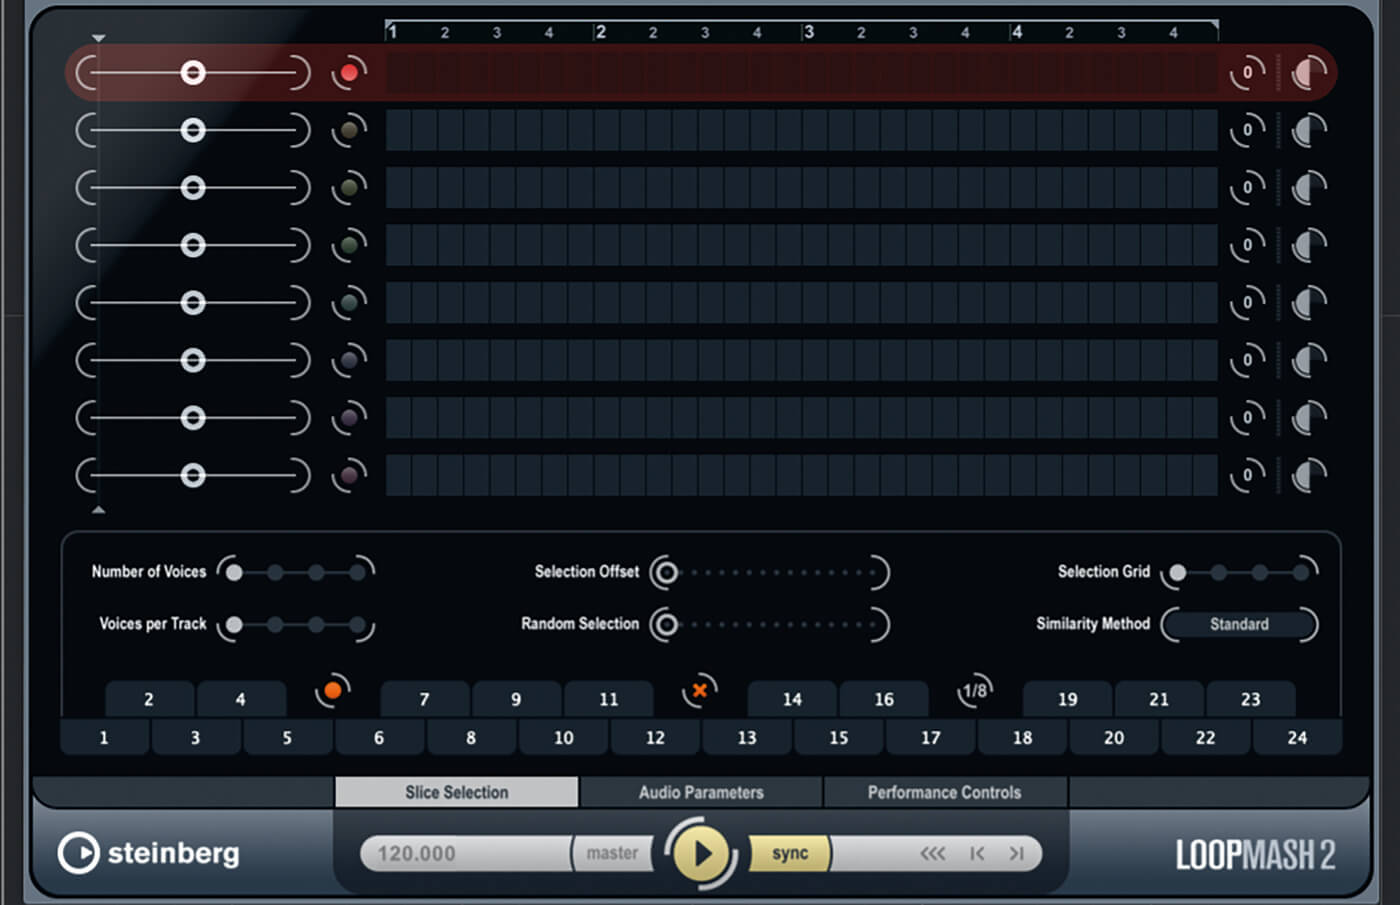
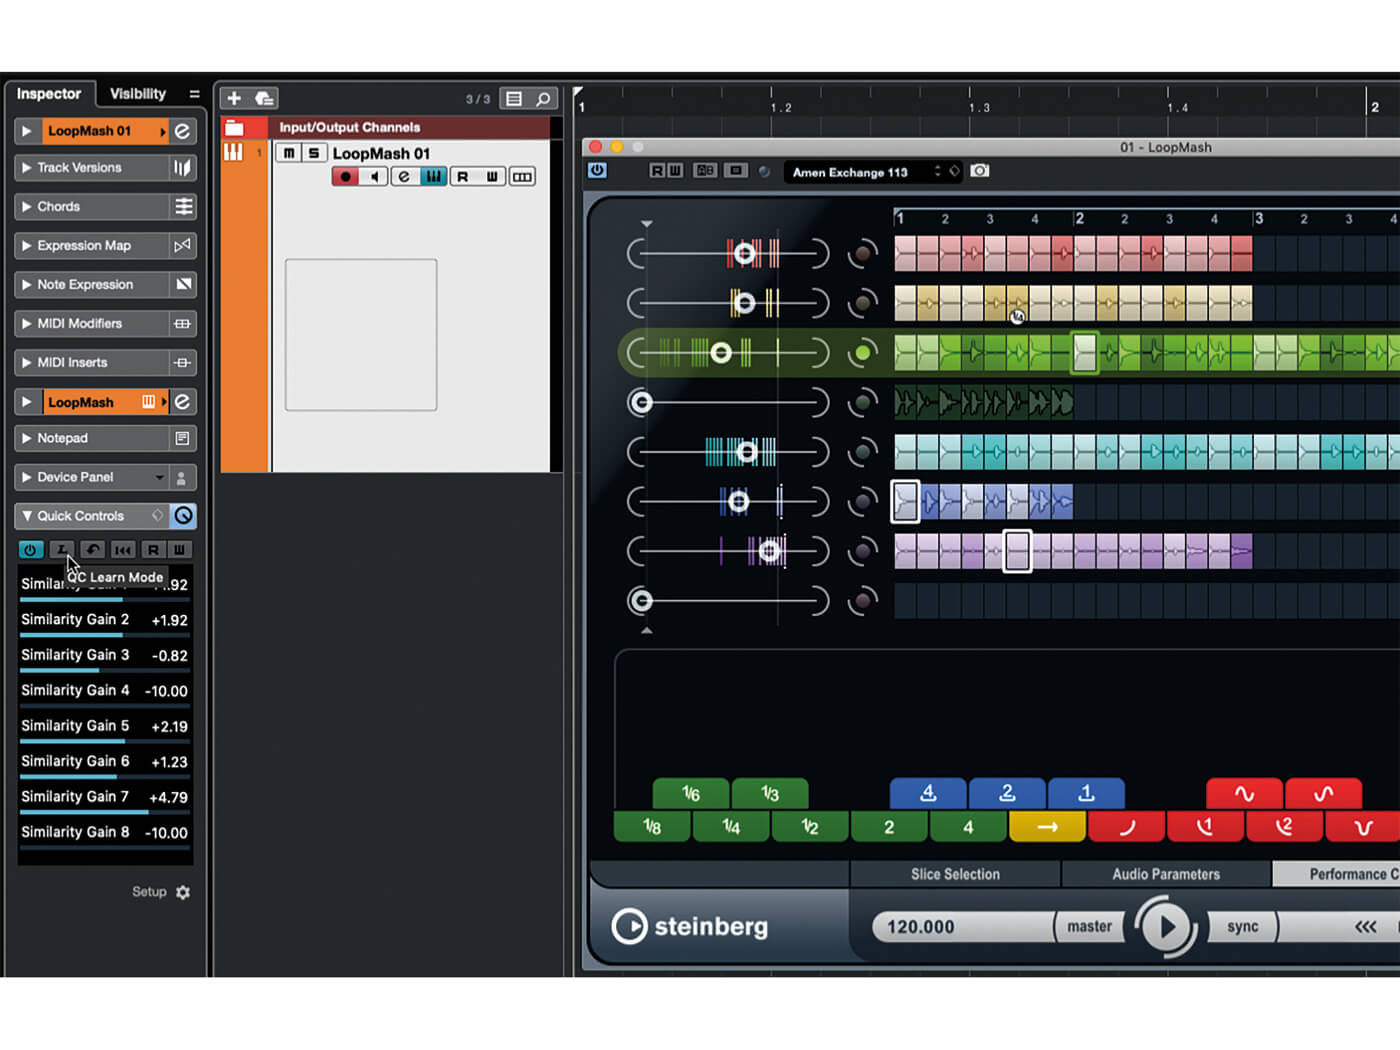
2. Examine the LoopMash window. Each of the eight lanes starts with a similarity-gain (SG) slider, the timeline is split into an eighth-note grid, and the lower control panel has three views for different functions.
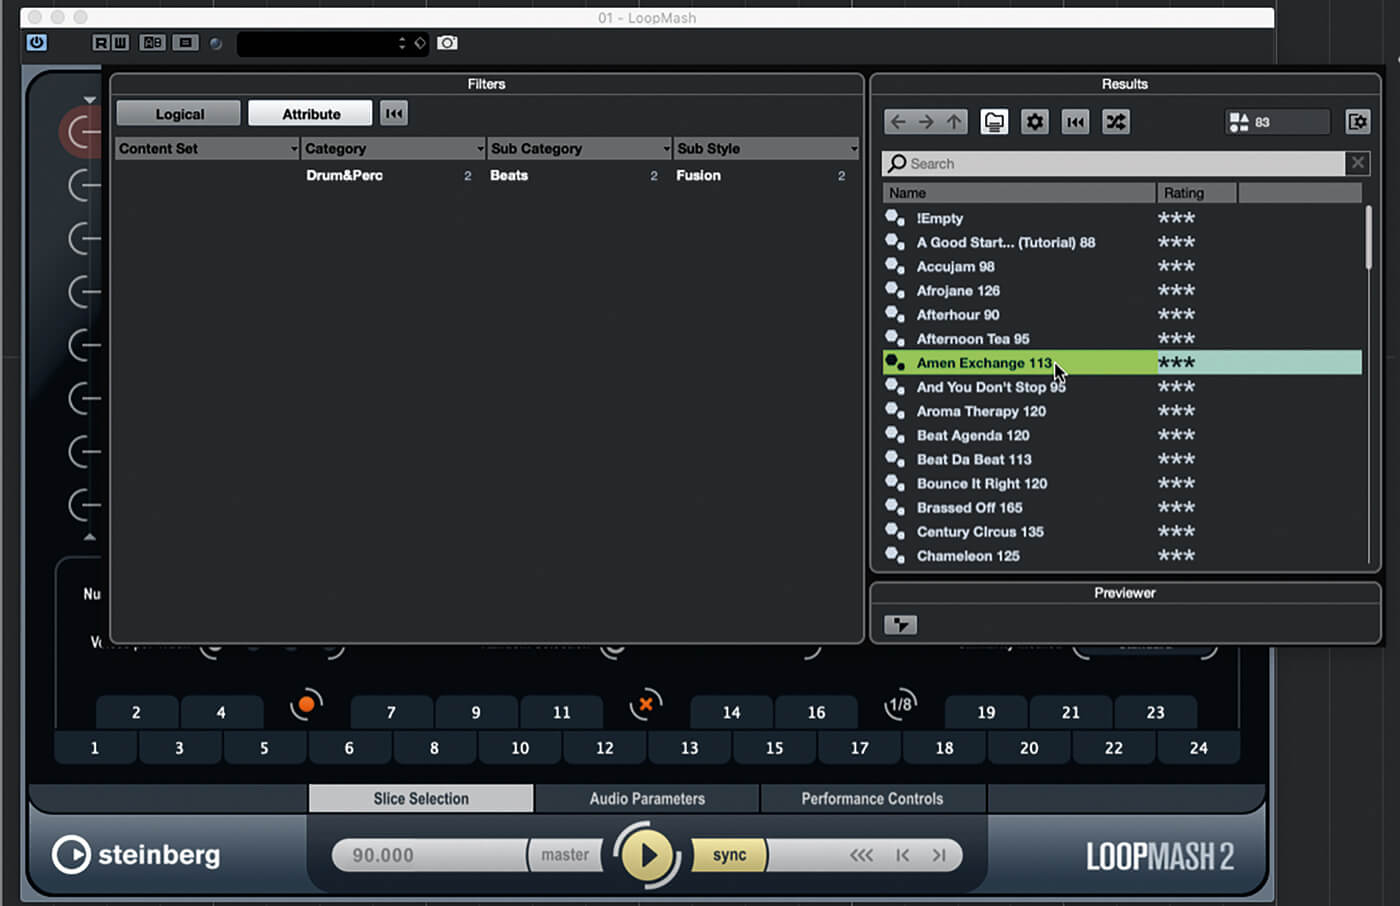
3. Open LoopMash’s preset browser. Locate and load the Amen Exchange 113 preset. Disable LoopMash’s sync button, which syncs playback to Cubase, and click the plug-in’s play button if it doesn’t start playing automatically.
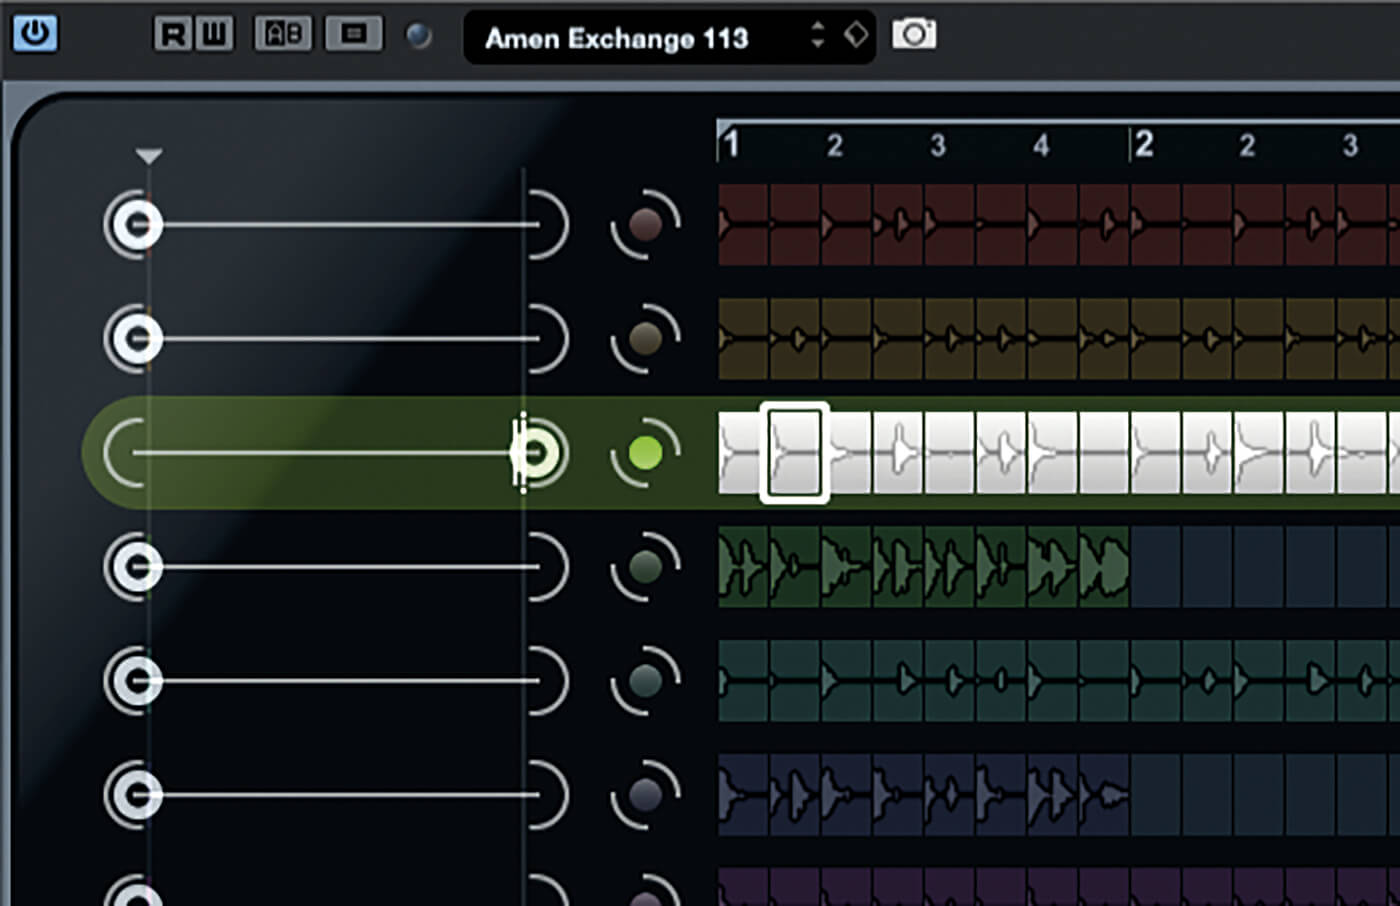
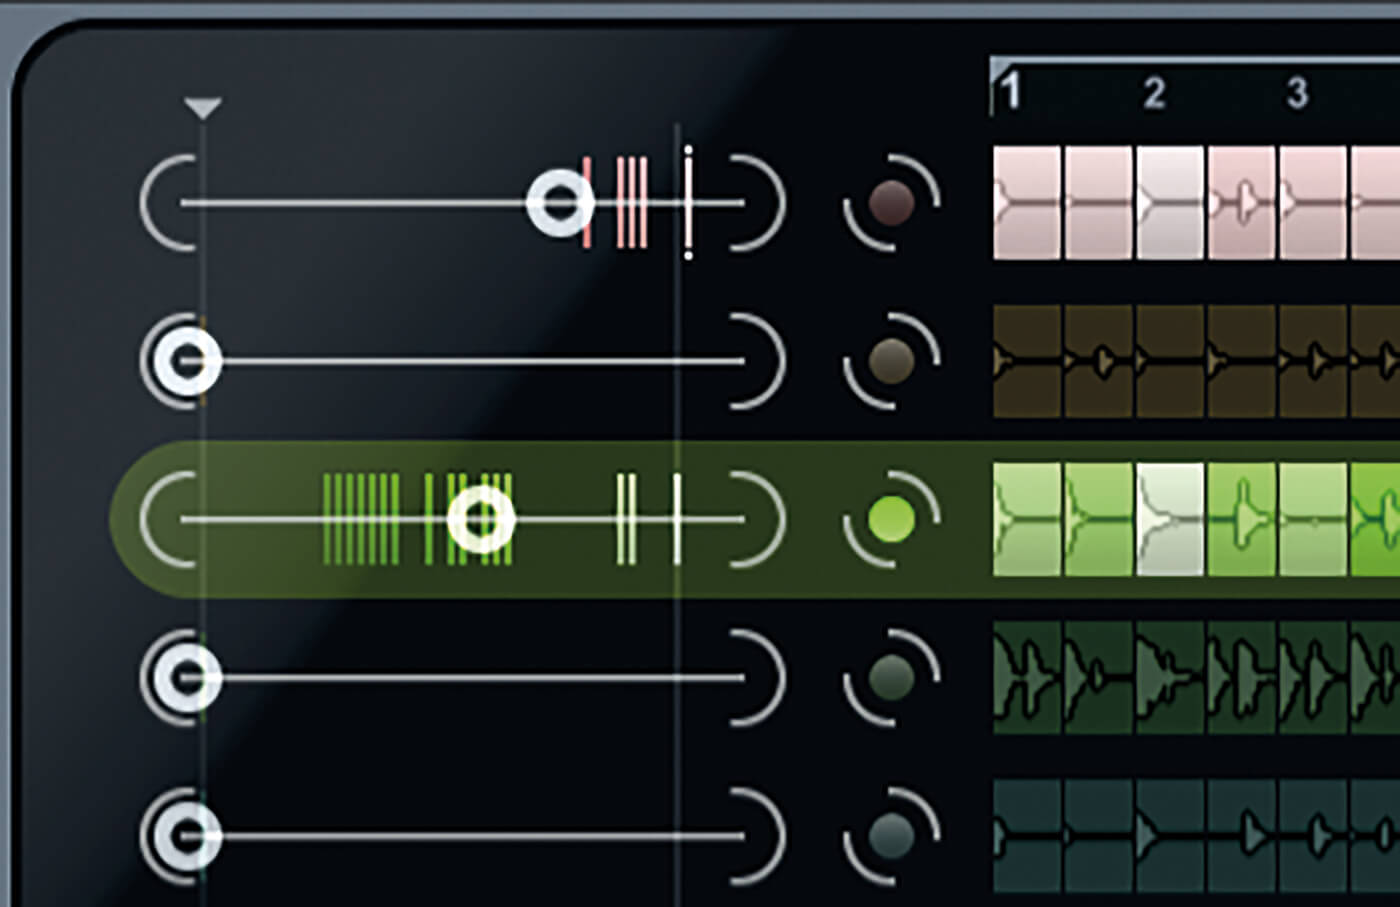
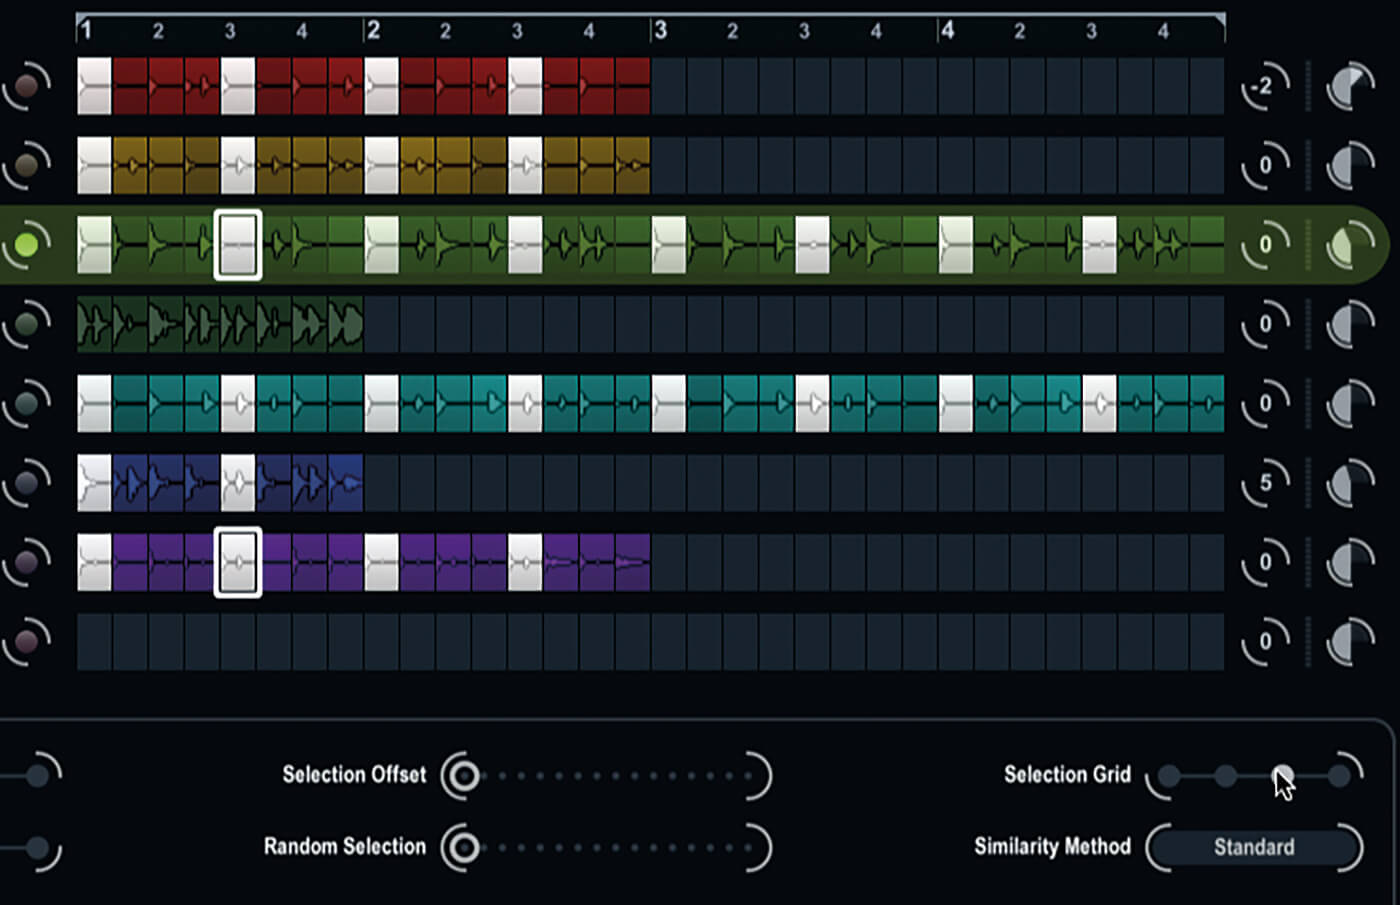
4. The filled dot in the third lane denotes this as the master loop. Aside from the third, master and loop, all the SG controls are at zero. The currently playing slice is highlighted with a white marker that steps across the source loop.
5. Reduce the master loop’s SG to about 50 per cent. Slowly bring up lane one’s SG until you start to hear some replacements. Slices are shaded with varying brightness: the brighter the slice, the more similar it is to the current master slice.
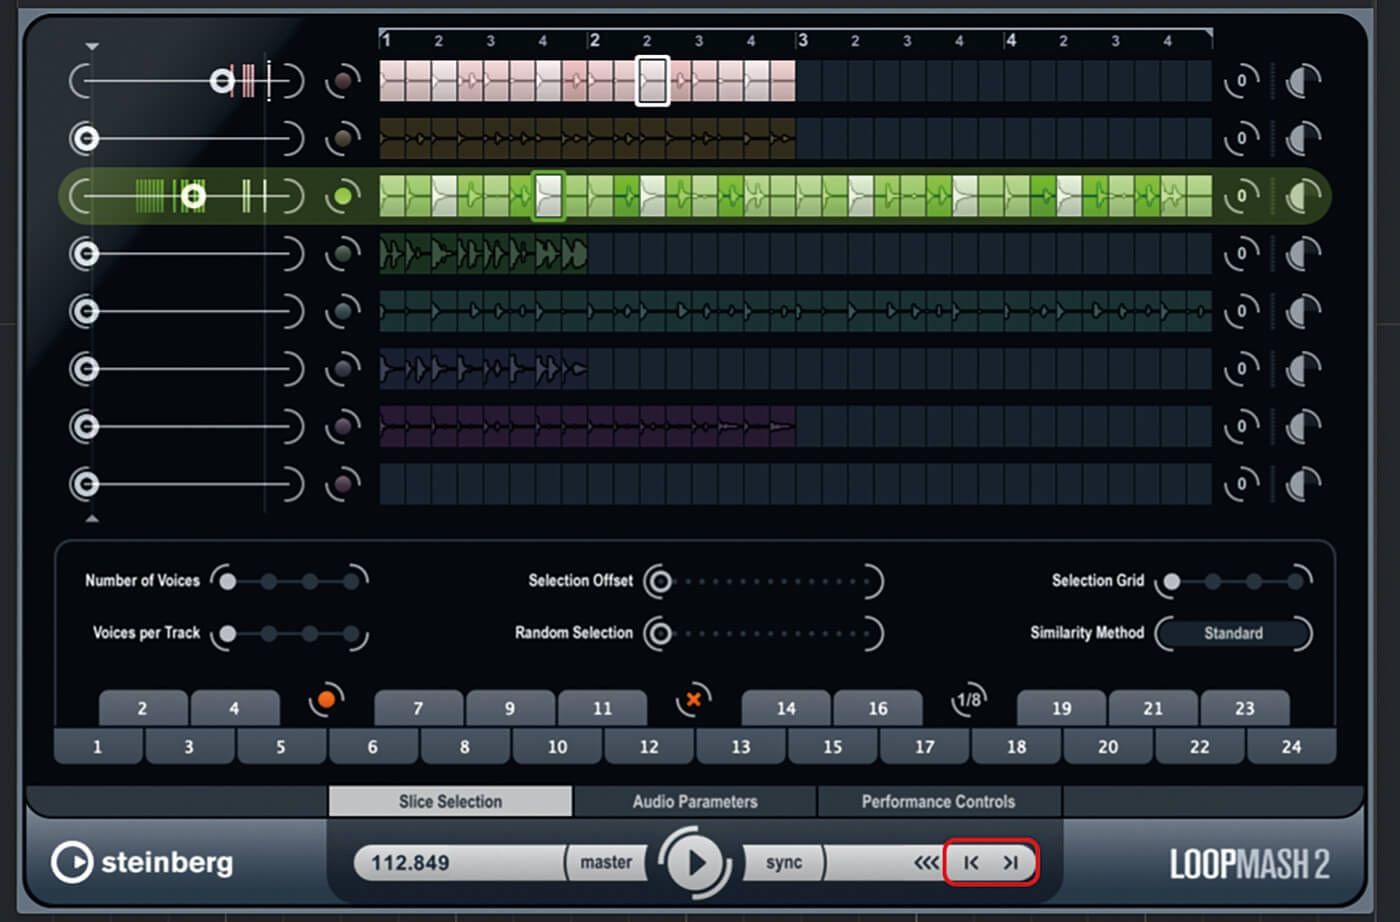
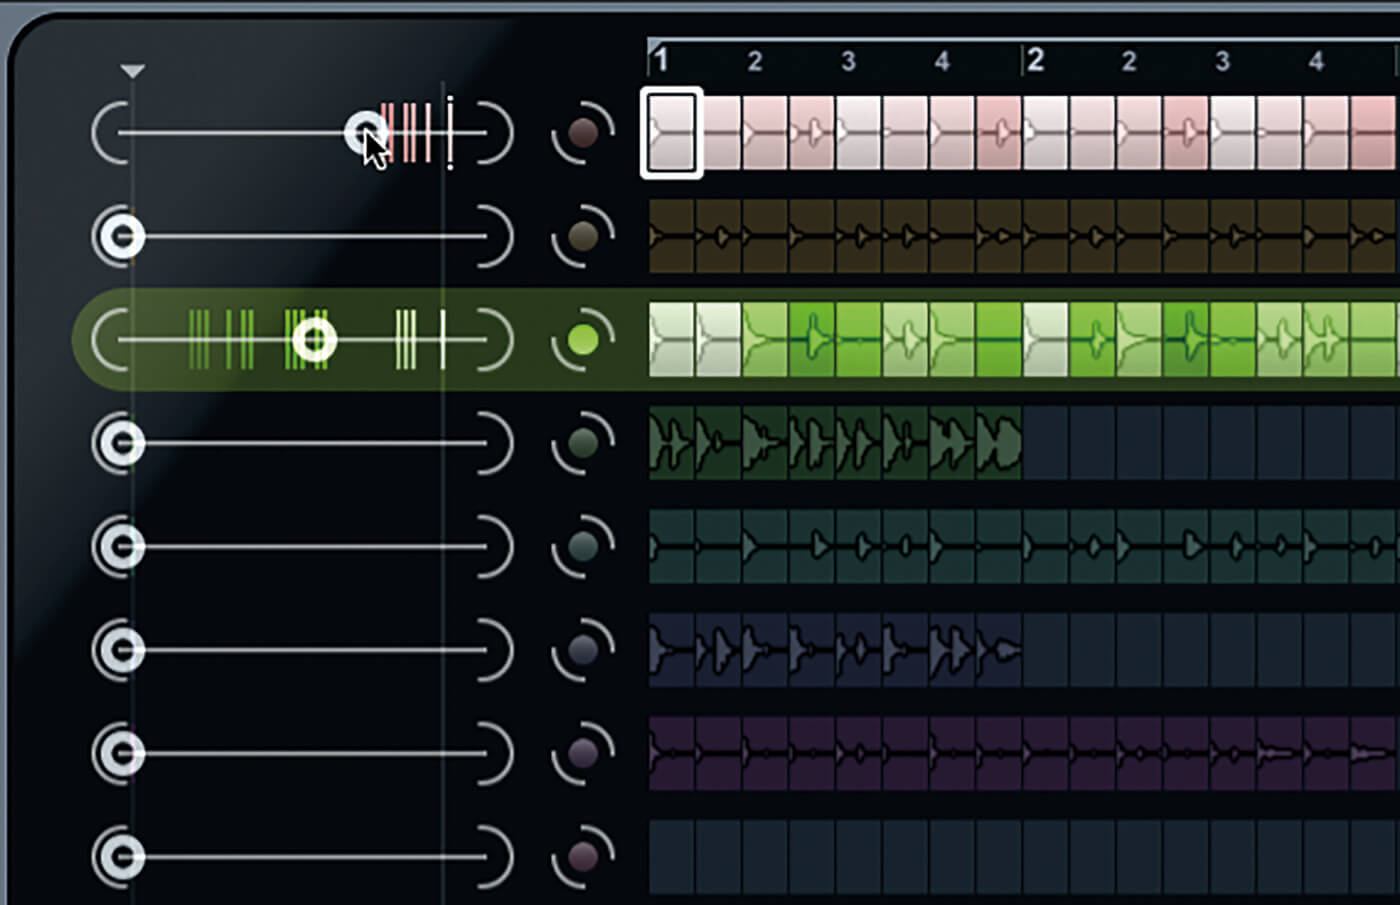
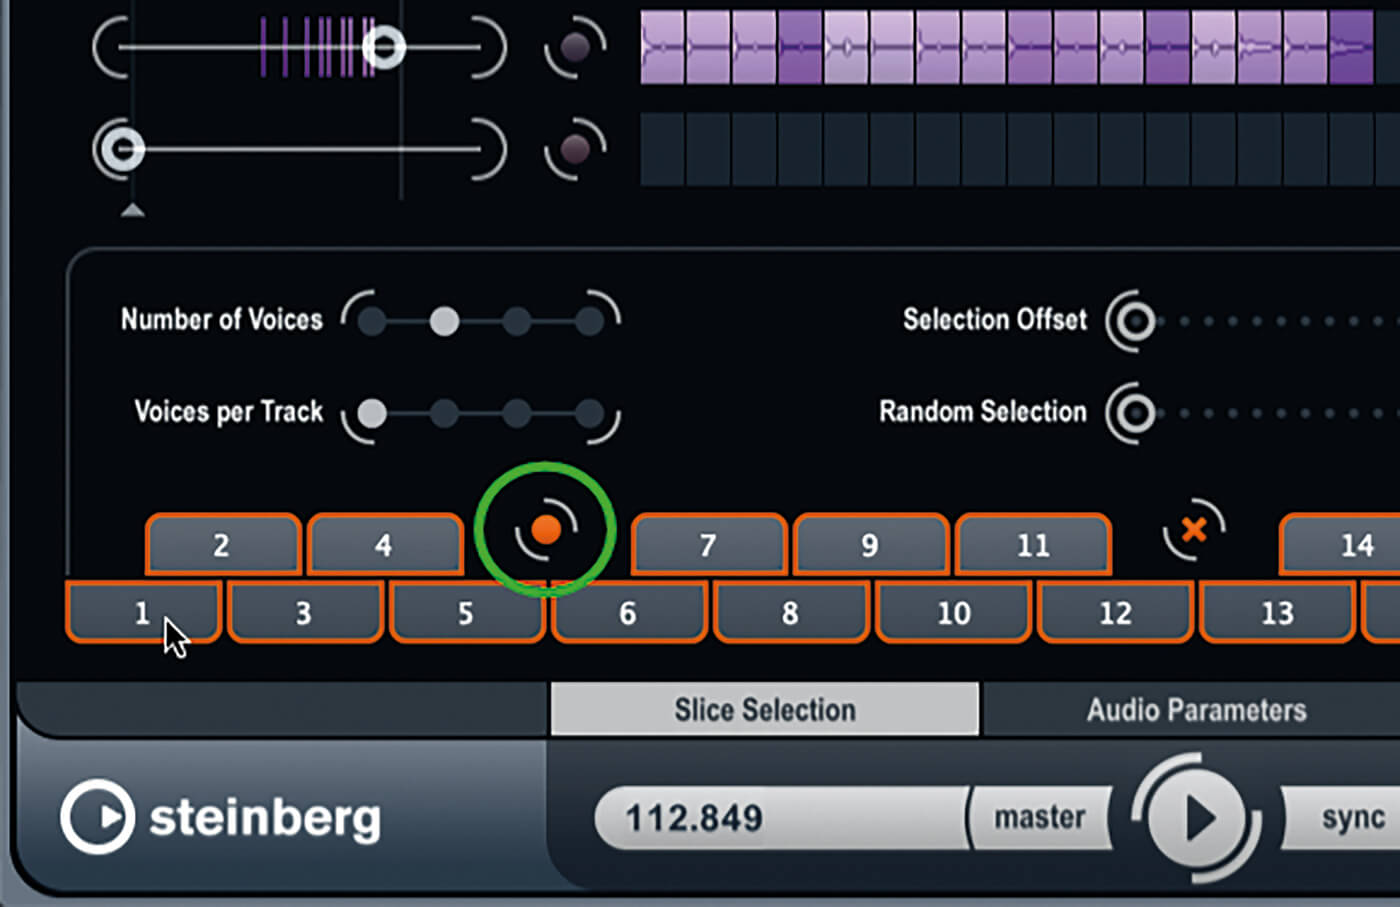
6. Stop playback. Use the step buttons (highlighted) to move the active slice of the master loop back and forth. When you reach a slice that’s being replaced, the marker will turn green, while a white marker will be drawn on the lane-one loop.
![]()
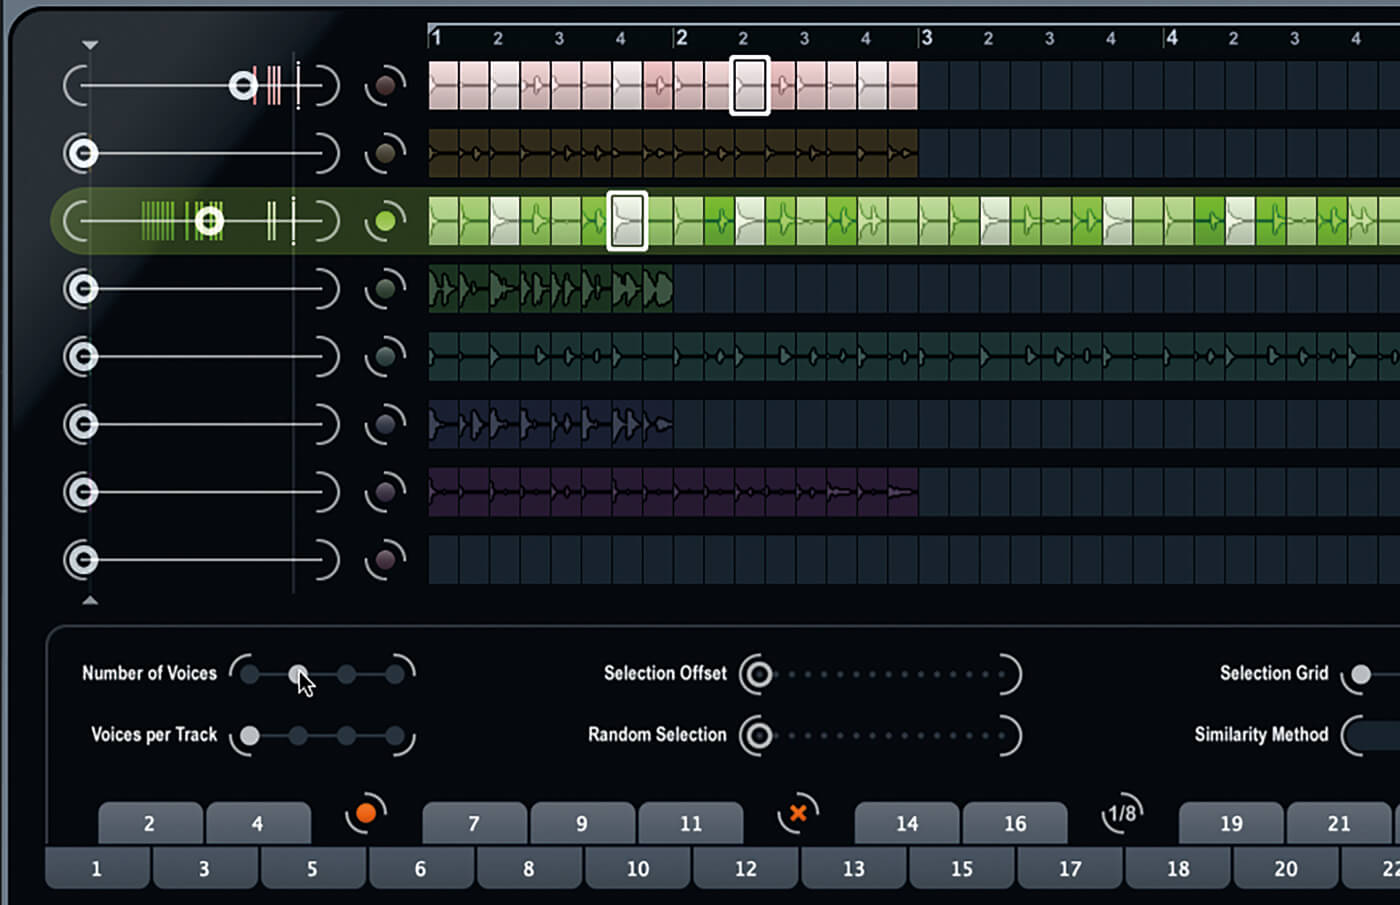
NUMBER OF VOICES LoopMash can play up to four replacement slices at any time. The slices are still chosen based on similarity but you get the second, third and fourth most similar slices too. Try to keep the number of voices lower than the number of lanes.
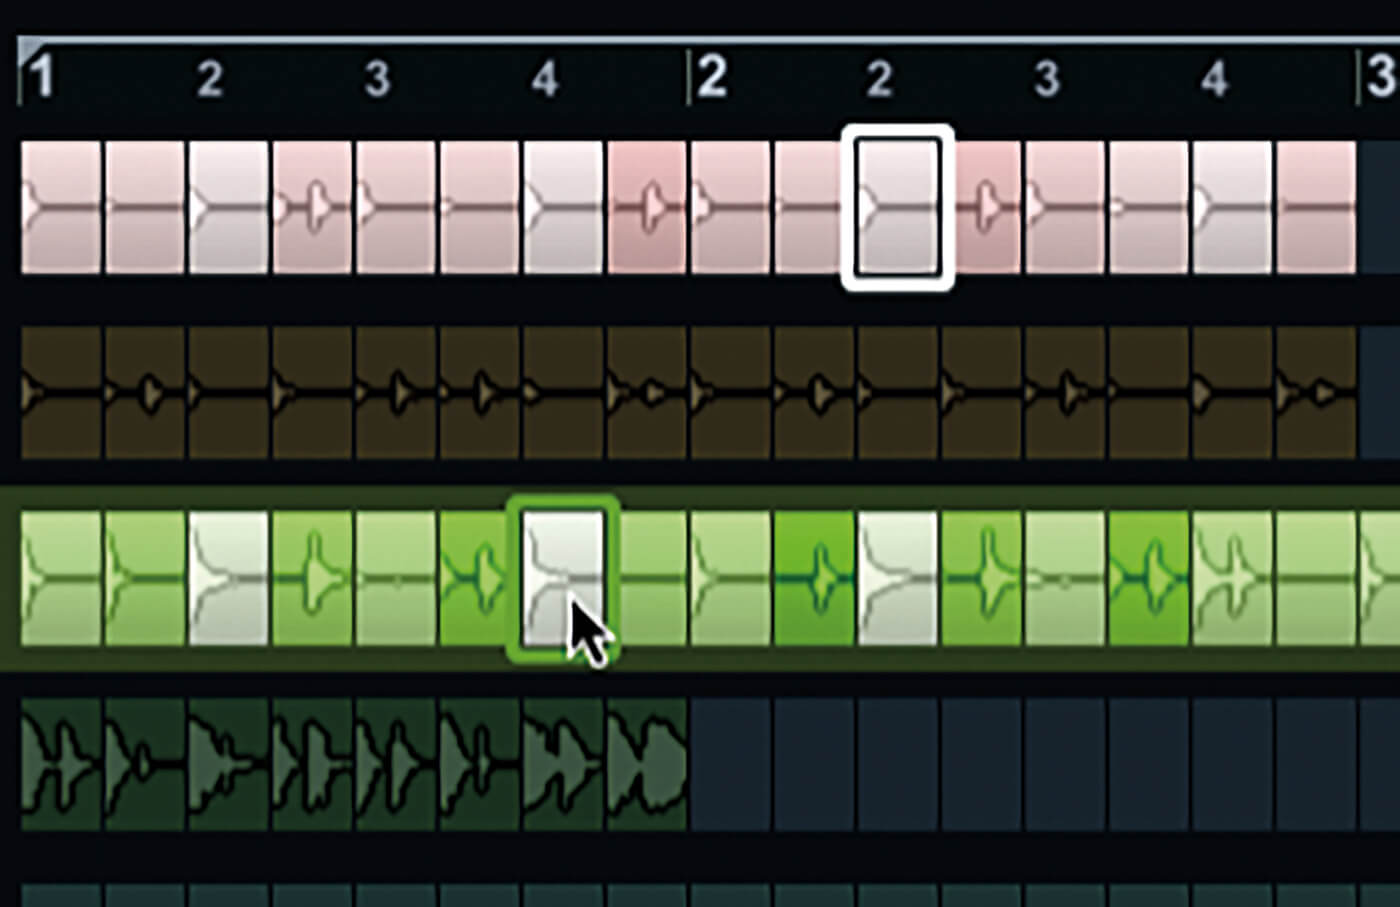
7. A white slice border denotes a currently sounding slice. If that slice isn’t in the master loop, the current play position within that loop will be bordered in the lane’s colour. Click both bordered slices to audition them and compare their similarities.
8. Vertical markers will be drawn across the SG sliders. There’s a marker for each similar slice in a loop. If a line exceeds the similarity threshold denoted by the current slice of the master loop, the corresponding slice will be used.
9. The vertical markers give an indication as to which slice will sound at each step of the loop. Click the second stop of the Number of Voices control to enable another voice. Lane three will now sound too, as shown by the indicators.
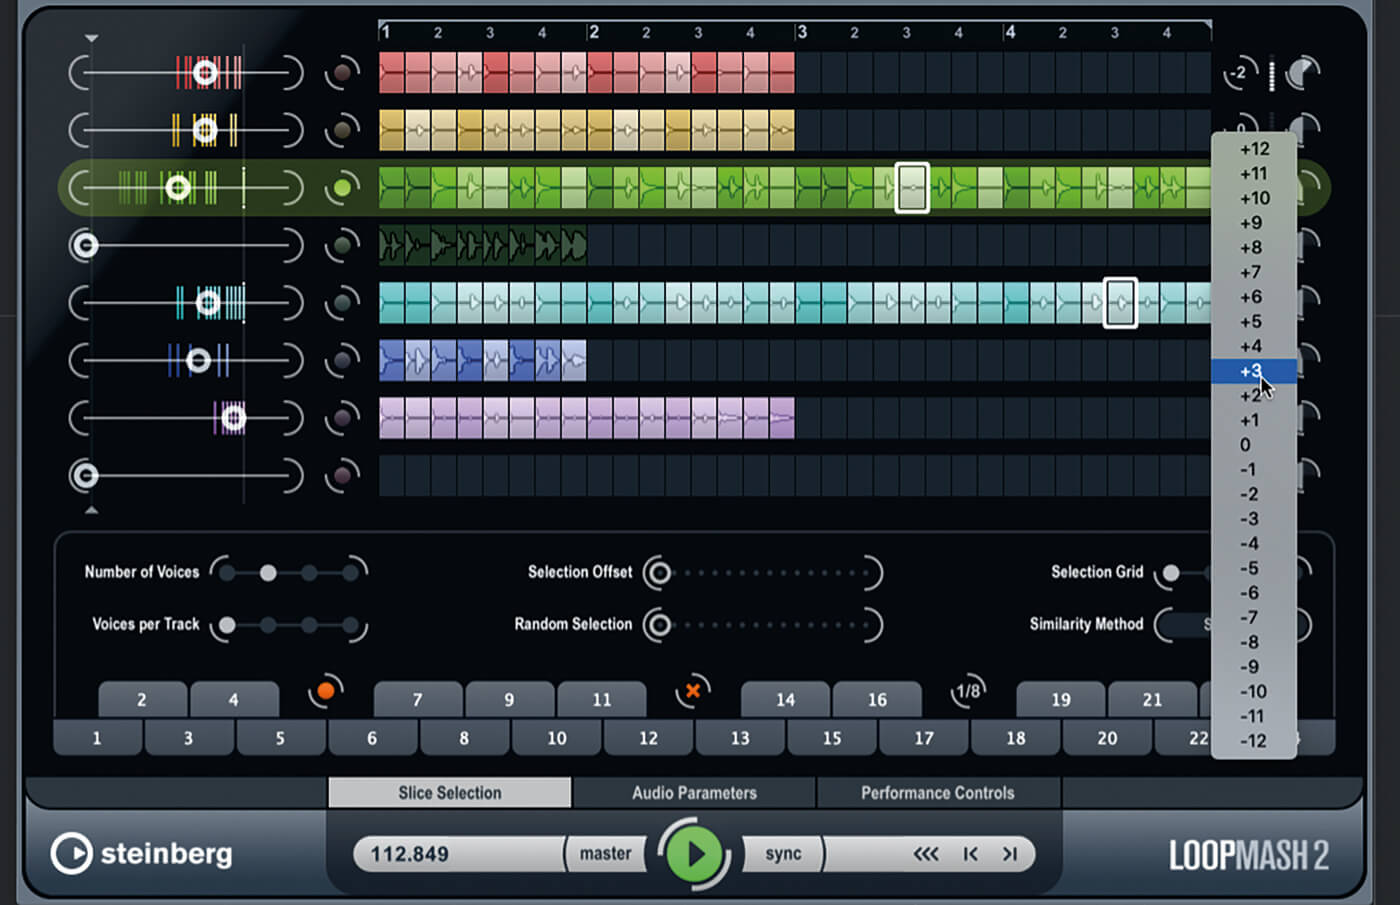
10. Play around with all the SG sliders until you get something you like the sound of. Use the lane transpose and volume controls, on the right of the timeline, to balance things to your satisfaction.
11. To store a scene, click the orange circle button among the scene-select buttons, then click the scene-select button you wish to assign the scene to. You can name the scene buttons.
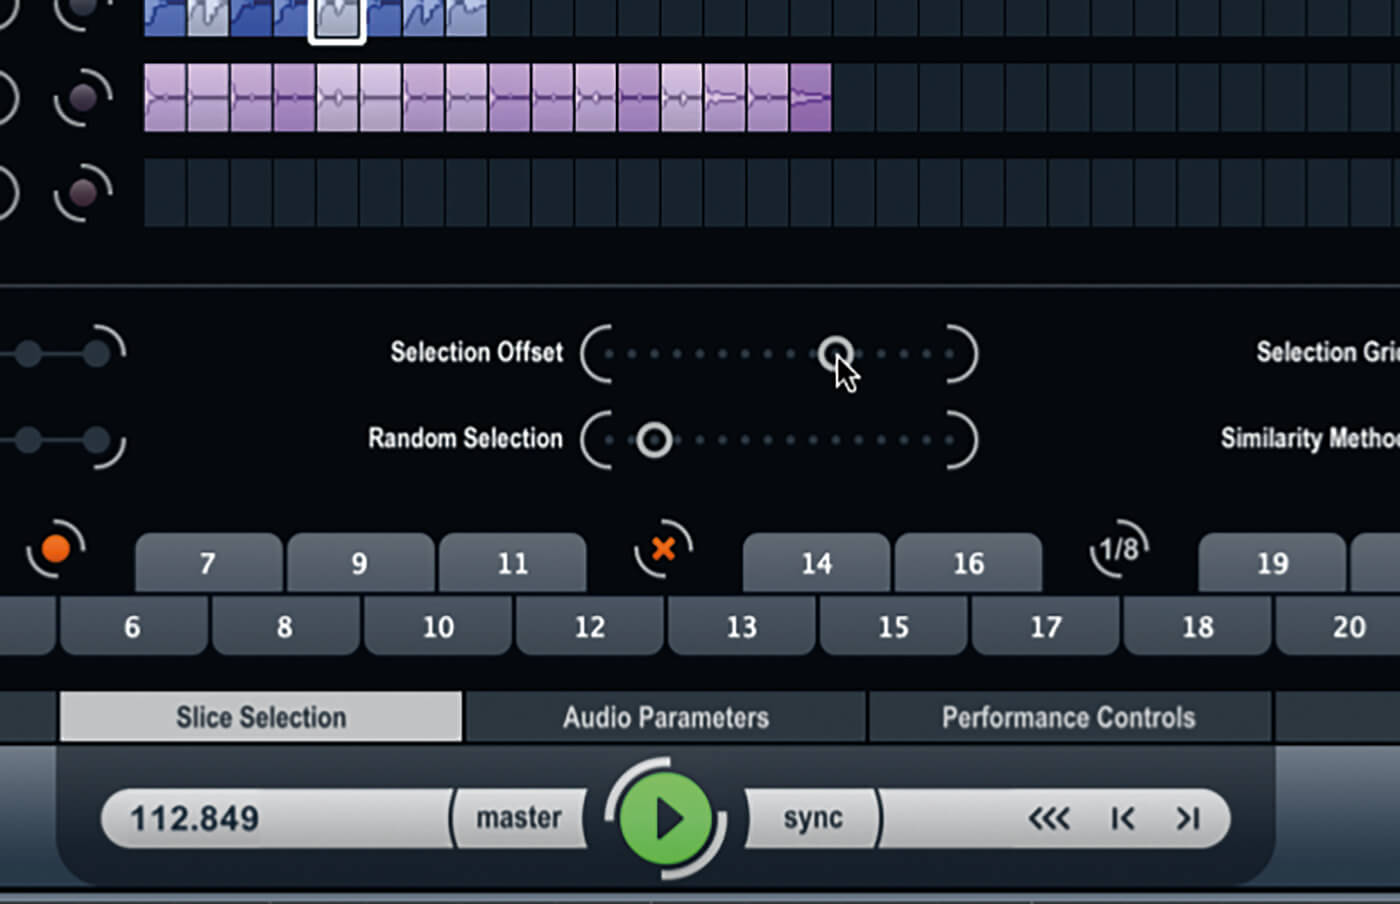
12. Increase the Select Offset control to tell LoopMash to select slices that are less similar to the current master slice – the higher the offset, the more dissimilar the replacement slice will be. Use random selection to introduce a random element to how slices are chosen.
![]()
SIMILARITY METHOD LoopMash can use different methods of matching the similarity of a source slice with the other slices that are loaded: the Standard method takes all metrics into account; Relative also takes a slice’s similarity to its own track into account; and Harmonic uses only tonal metrics.
13. The Selection Grid determines how frequently LoopMash checks for a replacement slice. At minimum, replacements are chosen on every step, and then every second, fourth or eighth step as you increase the setting. The most recently chosen lanes stay active between each check for replacements.
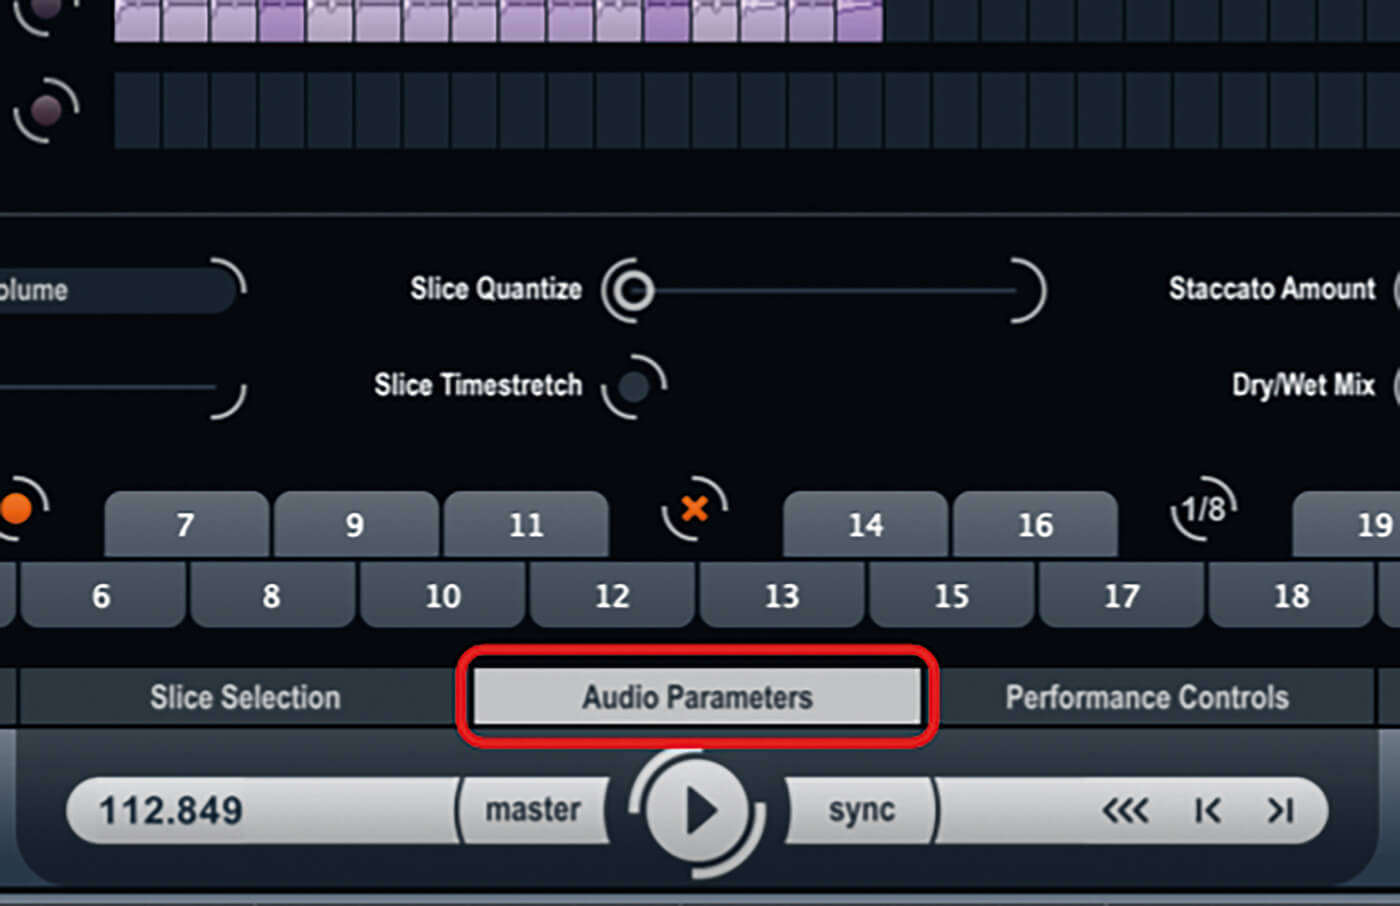
14. Play with all the settings and SG sliders, creating scenes as you go. Switch to the audio-parameters panel and play with the settings here – all but the adapt settings are self-explanatory.

15. The adapt settings specify how and by how much LoopMash will attempt to match the sound of a replacement slice with the sound of the master slice. The spectrum options match EQ, while the others are self-explanatory. Experiment to hear the differences.
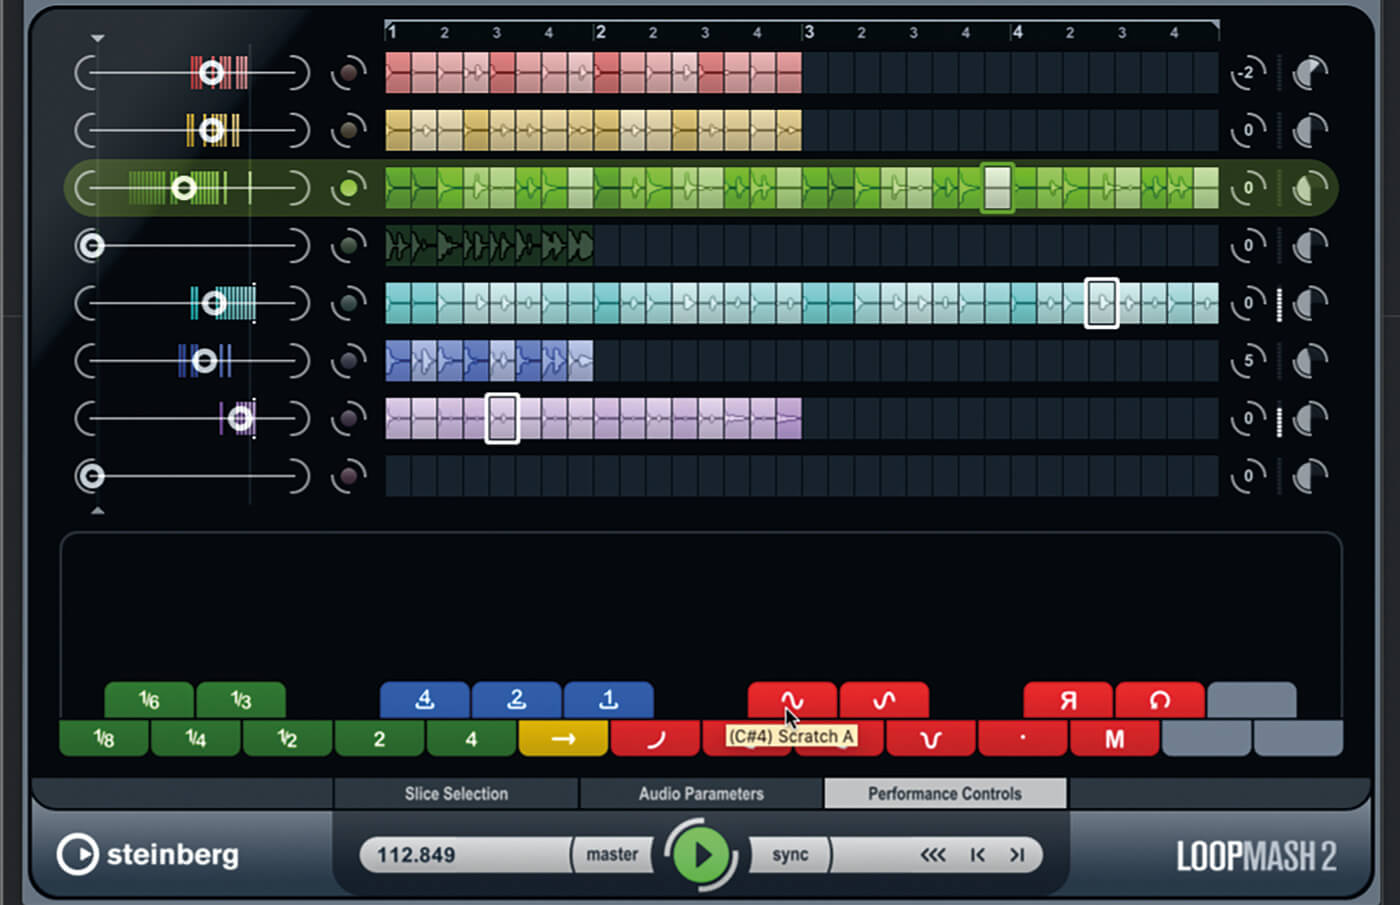
16. Switch to the performance-controls panel. The scene-select buttons are replaced with coloured buttons adorned with odd symbols. Hold the mouse over the buttons for a tip that tells you what they do. Click the buttons to apply their effects.
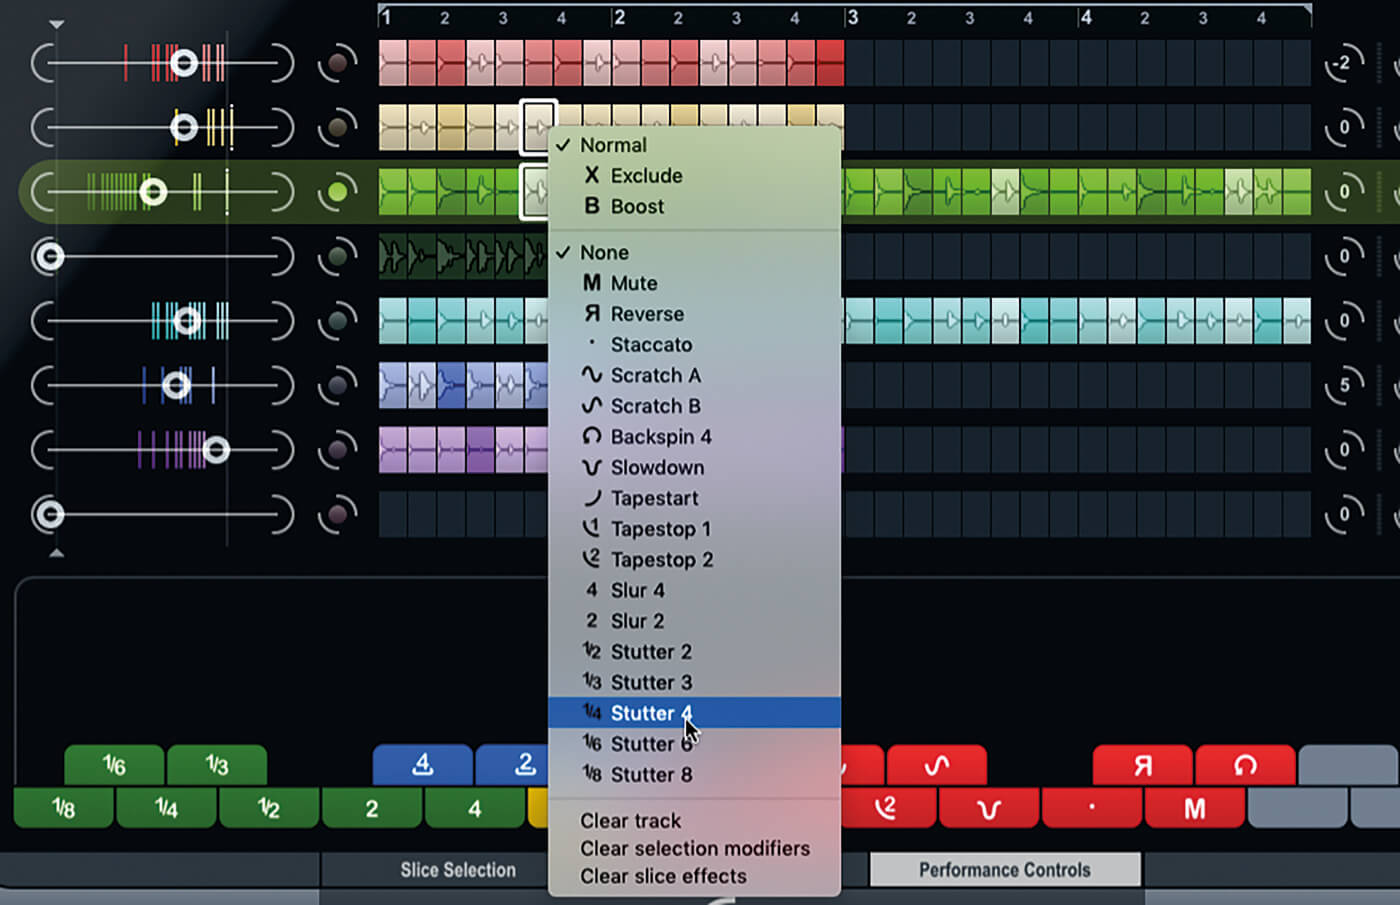
17. Right-click a slice that is included in the current loop and a pop-up effects menu will appear, much the same as the performance controls. These effects are applied per slice, and can be used to create cool variations.
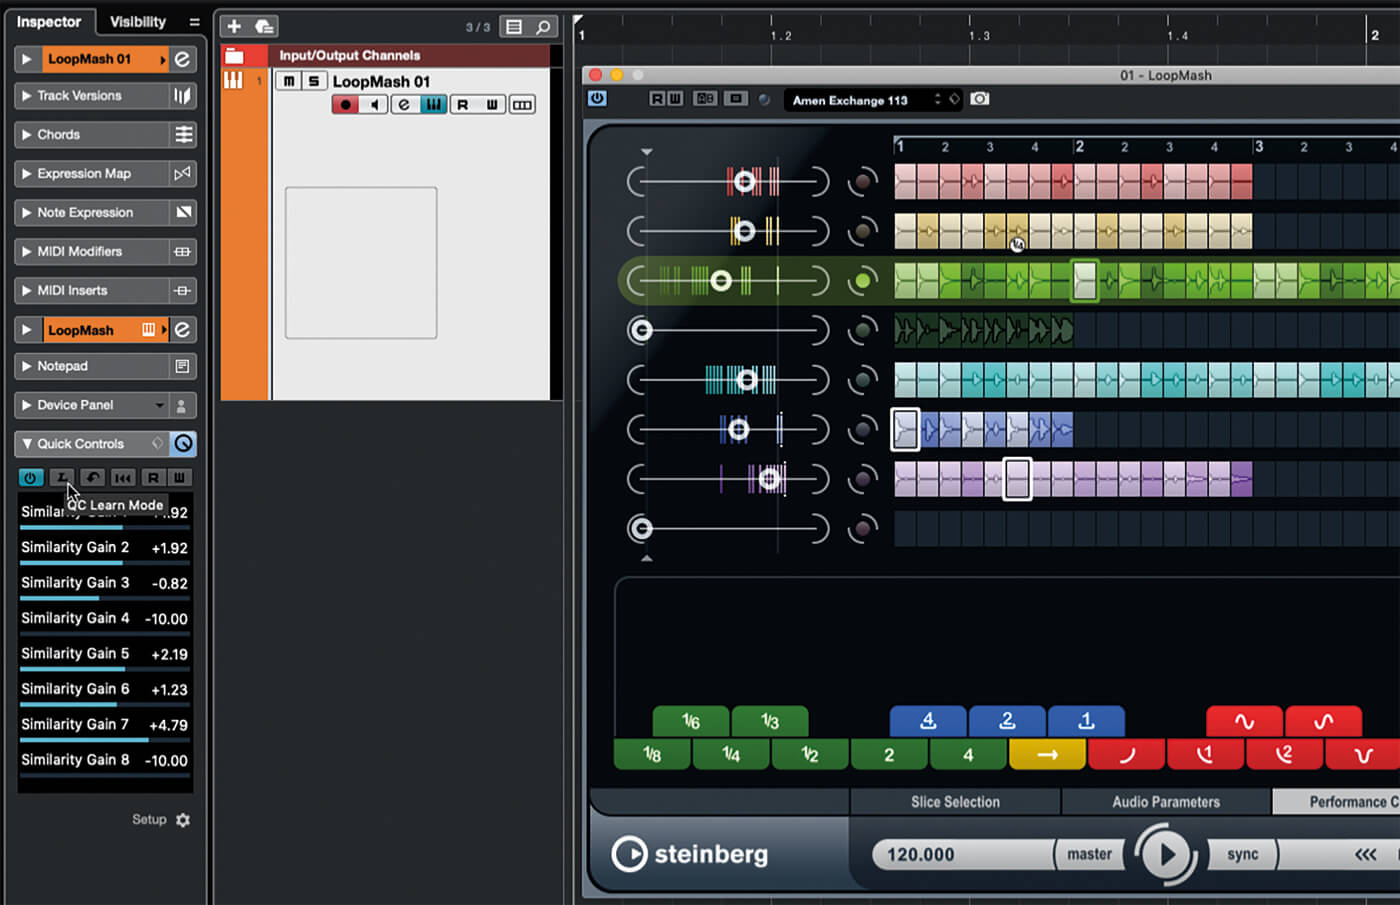
18. Experiment with more of LoopMash’s presets and your own loops combinations. If you have a hardware controller, map the SG sliders to the instrument’s quick-controls slots, then map these to your hardware controller for hands-on loop mangling.
For more Cubase tutorials and workshops, click here.