Managing workspaces, shortcuts and macros in Cubase
Cubase is packed with tools to help you turn your musical ideas into recorded reality, but it can also be extensively customised, which can speed up your workflow and increase your productivity.
It’s not an original notion, but it must be said that the best recording system would be one that can record sounds and ideas from directly inside your brain. Given that this is not yet possible (although is the sort of thing that may be found on Elon Musk’s to-do list), the next best thing is to set up your working environment so that your most frequently used tools are easily to hand, and those you use less often are tucked away. This applies to your DAW environment as much as your physical one, and as a Cubase user you have a huge amount of scope for customising that environment.
Taskmaster
With so many windows and panels available, many of which have particular usefulness in certain situations, a lot of session time can end up being wasted on opening, closing, resizing and positioning those windows and panels. Cubase’s Workspaces feature is the answer, as this allows you to store particular sets, layouts and configurations of Cubase’s many windows.
Recalling that layout is then simply a case of selecting an option from the Workspaces menu, or typing the associated keyboard shortcut if one is assigned. Workspaces can be stored globally, so that they are always available to you, or at the project level, so that they exist only in the currently loaded project.
When setting up workspaces, think about the different tasks you perform regularly and consider what the ideal layout and toolset would be for each task. In some cases you may want to be able to see a window from a different program, for example your audio hardware’s mixer panel, or an edit/cue list that you are working from. Cubase can’t position the windows of these external programs for you, but you can position its windows to leave gaps and spaces for those windows to show through.
Command and conquer
One obvious way to improve your productivity with any software is to make a point of learning the keyboard shortcuts for the commands and functions you use most frequently. Cubase takes this a big step further by allowing you to fully customise every keyboard shortcut to suit your own preferences. This isn’t simply a case of changing the shortcuts for commands that already have them: Cubase has loads of commands that are either buried deep within some menu-or-other, or that by default are not exposed to the user at all, and all of these commands can have a keyboard shortcut assigned to them to make them easily accessible.
Invariably, some of these hidden commands will prove to be spectacularly useful to your particular way of working, so it’s a great idea to look through them all, identifying those that are useful and assigning shortcuts to them. With so many commands to choose from, though, it can be challenging to create a key shortcut that isn’t already used. Thankfully, Cubase can help here too, identifying if a proposed shortcut is already in use and making it easy to then find and modify that existing assignment.
Macro minded
Often the tasks we perform most regularly are multi-step affairs, and so there is no single command that can take care of the entire task. This is where macros come in. A macro in Cubase is a series of commands that can be triggered as though they were a single command, with each constituent command being triggered when the previous one has completed. The currently available macros can be accessed and triggered from the Macros submenu of Cubase’s main Edit menu but – very pleasingly – you can also assign a keyboard shortcut to a macro just as you can to individual commands.
Macros can be incredibly powerful, especially when used to trigger Logical Editor presets as part of their sequence. To state just one example, you could define a Logical Editor preset that selects the portion of a MIDI part that contains events, and use this within a macro that tops-and-tails parts in the project window.
Custom made
Hunting through lists of plug-ins can be distracting. Third party plugins don’t always get installed into the named subfolders that Cubase uses, and although it’s easy enough to search for a plugin by name, that only works if you know exactly what plugin you’re looking for – what if you’re pondering which is the best available compressor to use in a given situation, for example?
The best way of streamlining this bit of Cubase is to create your own custom plugin collections. You can easily switch the collection that is shown within plugin selection lists, and so at the very least you should create a ‘My Favourites’ collection to hold the plugins you use most regularly, categorised in a way that make the most sense to you.
Let’s take a look at exactly how to perform these various streamlining tasks…
Managing workspaces, shortcuts and macros: step-by-step
1. Create a new project or, better still, open an existing one. Think about the different tasks you perform regularly, and how you like Cubase’s windows and panels arranged when performing each task. Here we’re going to look at the common tasks of tracking and mixing.
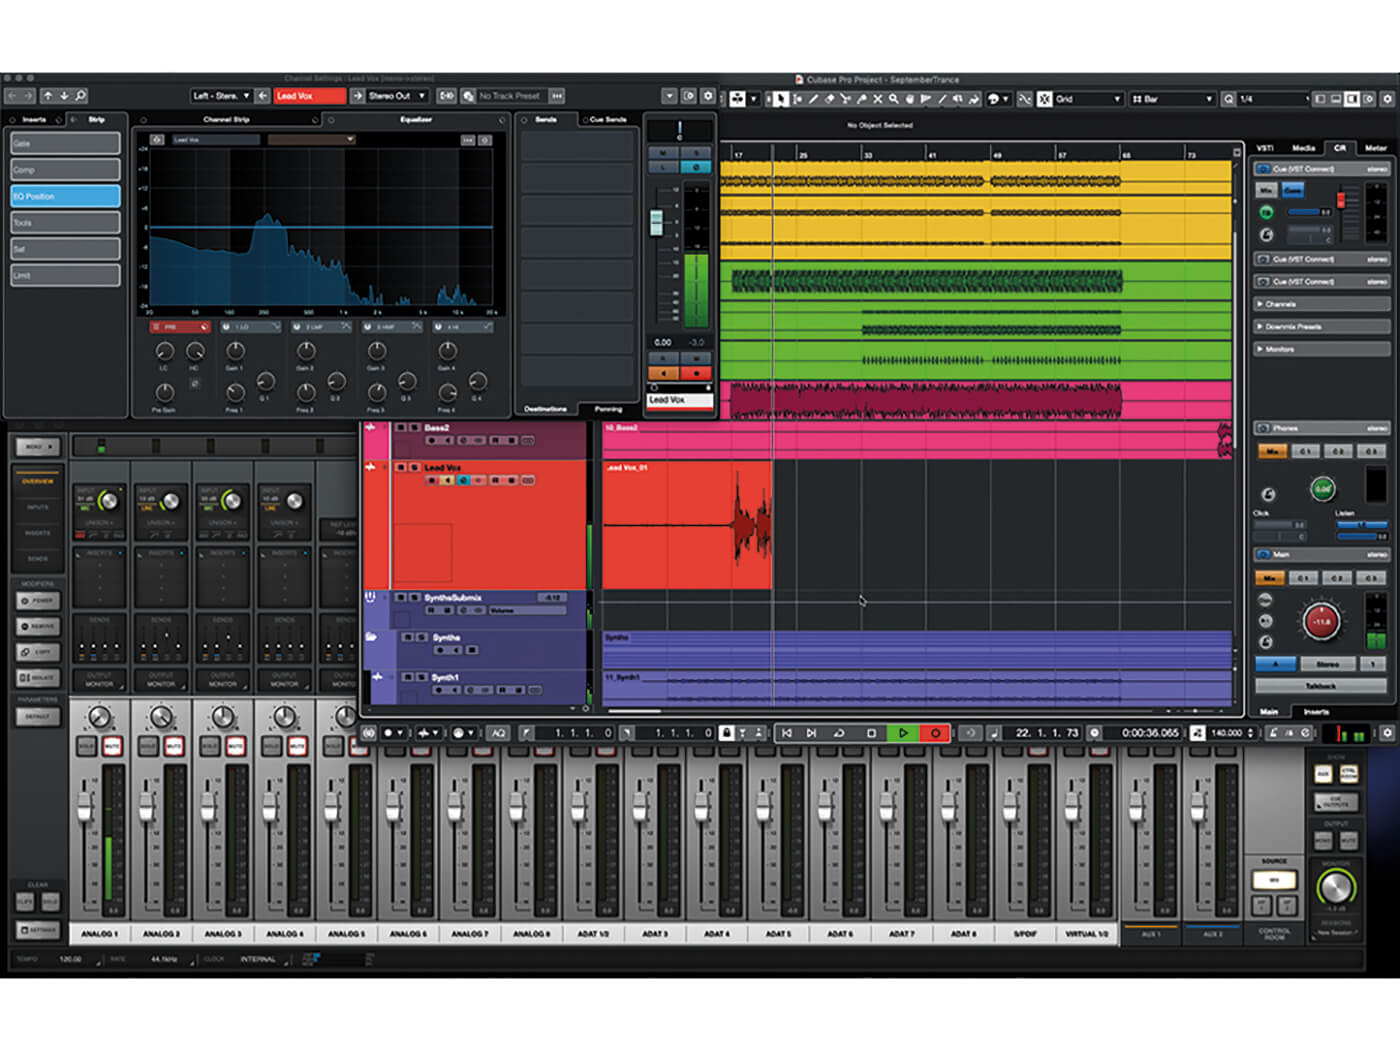
2. Open the windows and panels that you use during tracking. This may include Cubase’s Channel Strip panel and, if you’re using it, the Control Room panel. Arrange the windows on your screen, perhaps leaving room for your hardware’s mixer to be visible too.
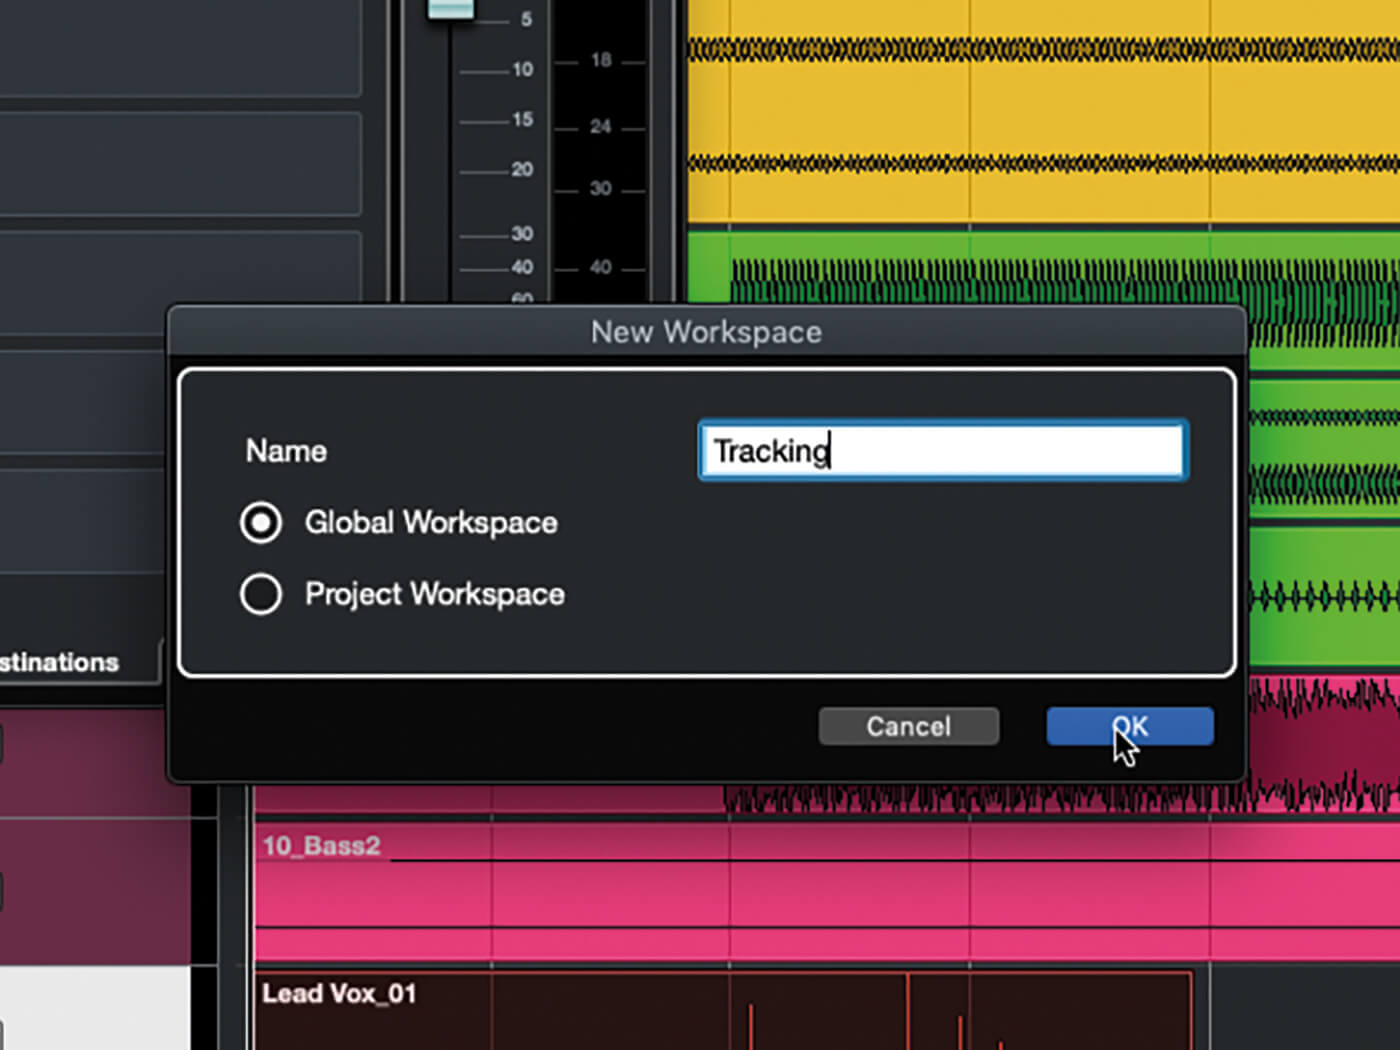
3. Open the Workspaces menu and select Add Workspace. In the panel that opens select whether to create a Global workspace, available to all projects, or a Project workspace that will be exclusive to the current project. Enter a name for the workspace and click OK.
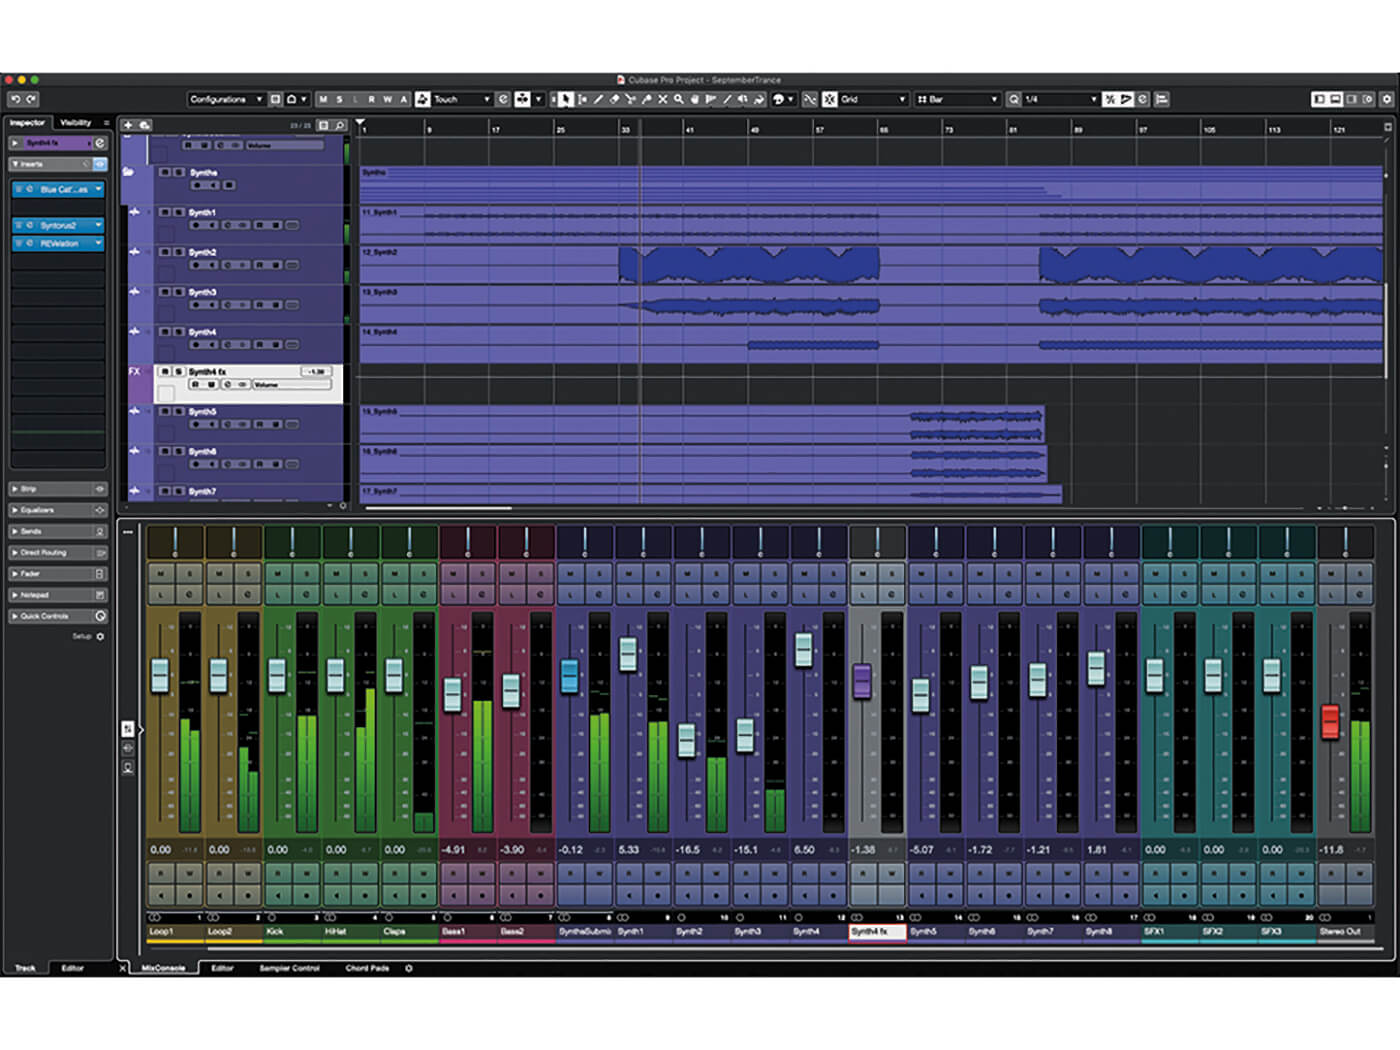
4. Modify your windows and panels to give yourself a good layout for mixing. For example, you could show the mix console in the project window’s lower zone, with the track inspector’s Inserts panel visible in the left zone.
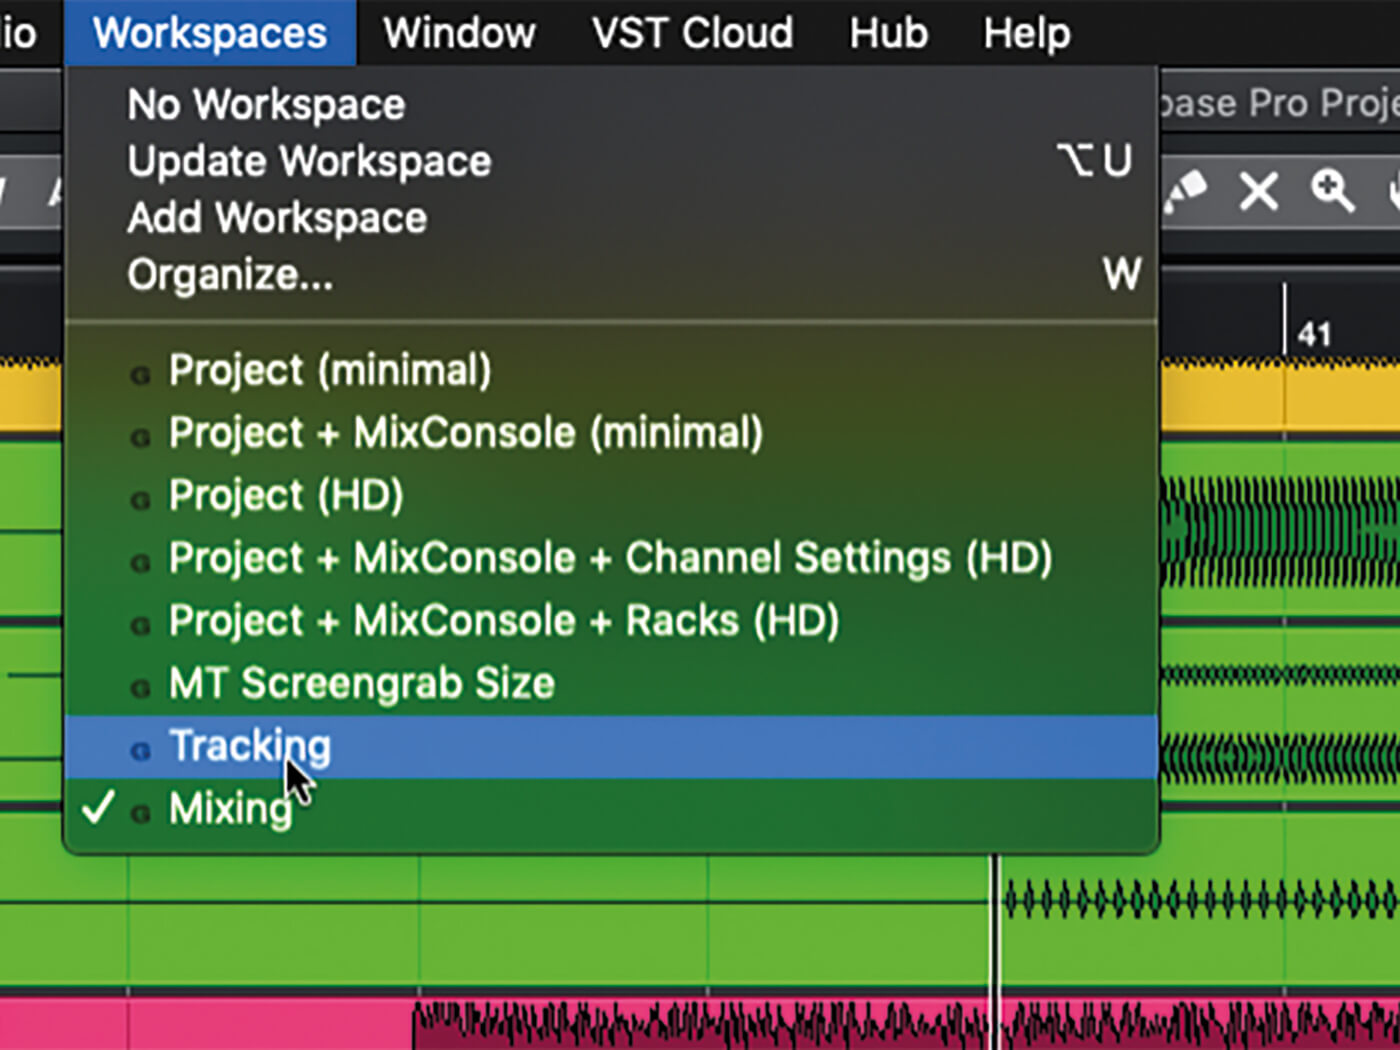
5. Use the Workspaces menu to add the new workspace, just as you did in Step 3. All you now have to do to switch between the different screen layouts is open the Workspaces menu and select the workspace you want to use.
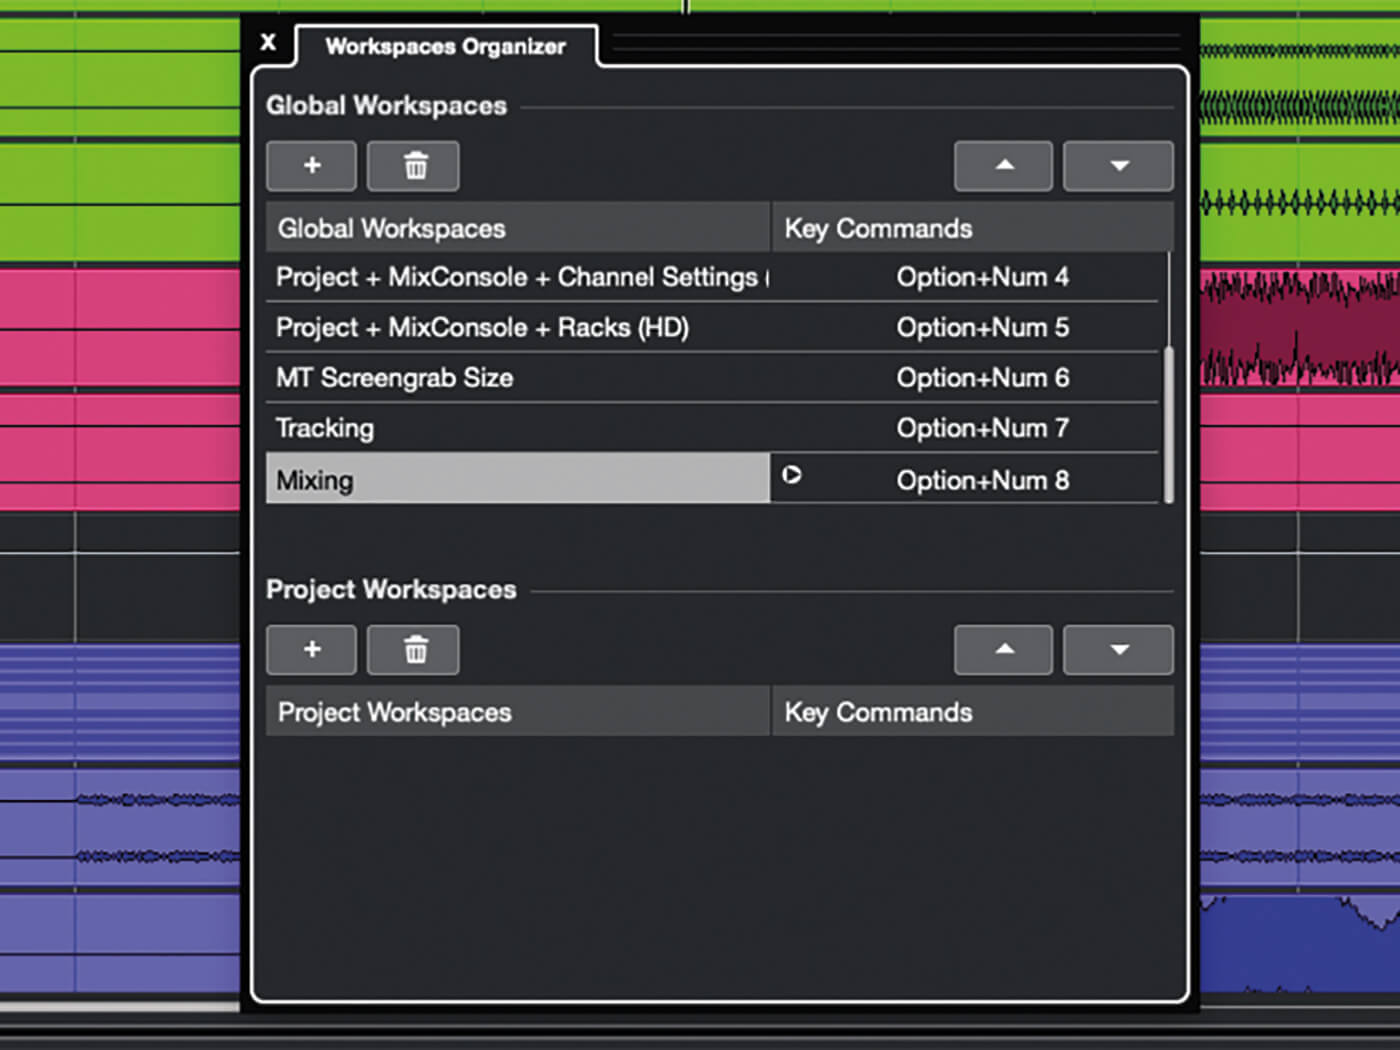
6. If you make changes to a workspace and you want to retain those changes, simply open the Workspaces menu and select Update Workspace. To reorder, delete and manage your workspaces, select Organise… from the Workspace menu, which will open the Workspace Organizer panel.
![]()
USER PROFILES Cubase keeps a track on all of your workspaces, keyboard shortcuts, macros and plug-in collections, and refers to these as a Profile. A great feature of Cubase Pro is that it can manage more than one profile, as well as export and import profiles.
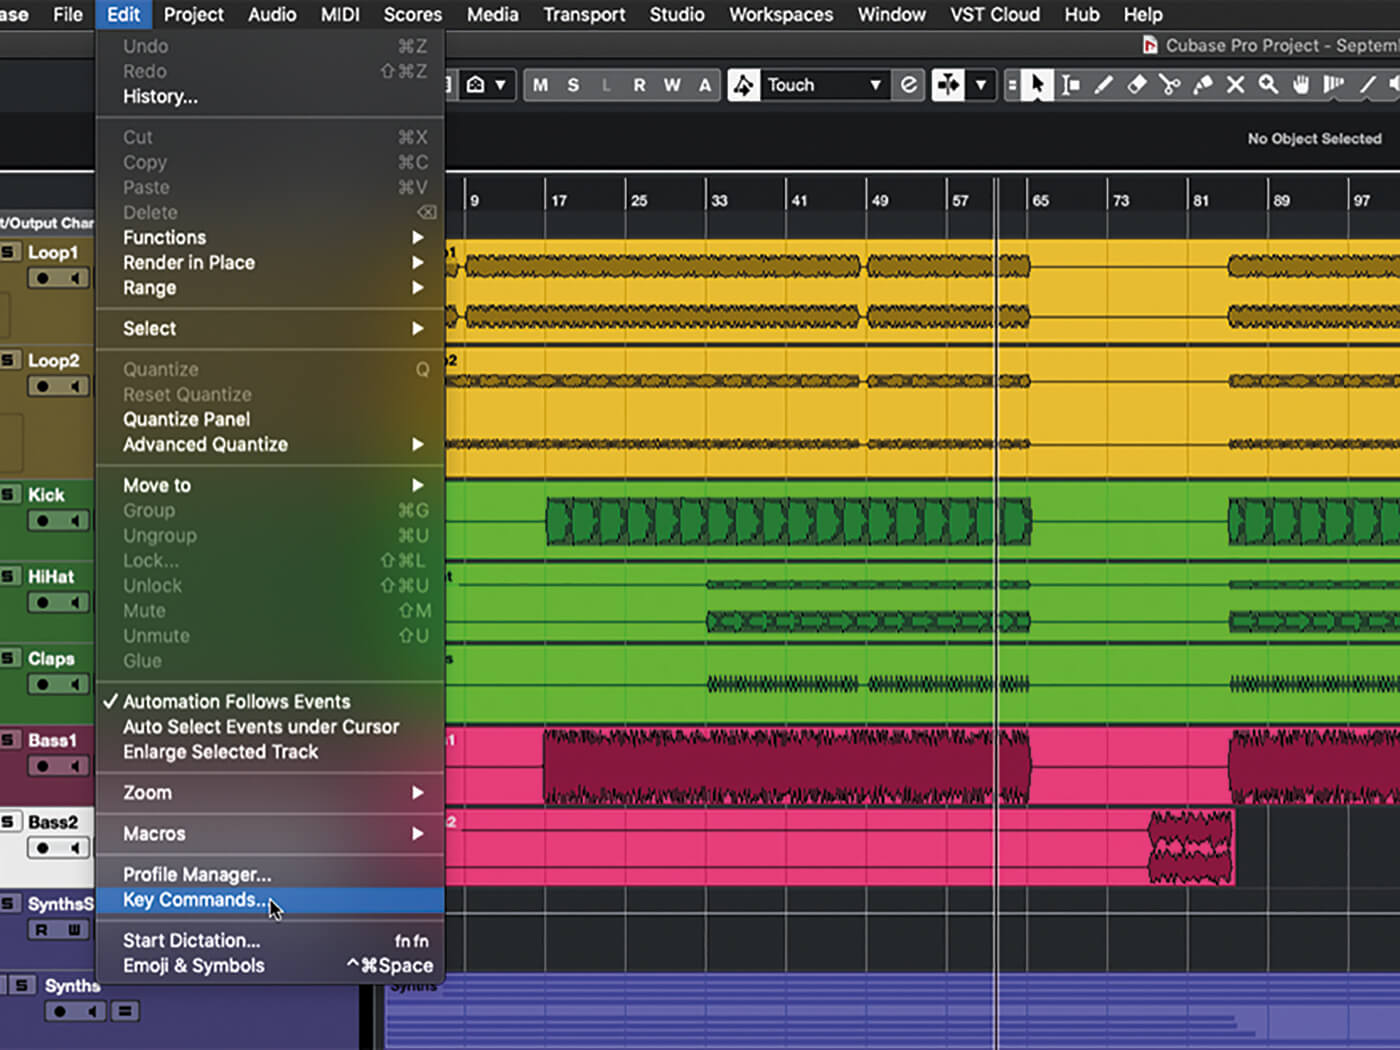
7. The Workspace Organizer shows you keyboard shortcuts assigned to each workspace, and clicking on one of these opens the Key Commands window. Rather than do it that way, though, close the Organizer then select Key Commands… from the Edit menu.
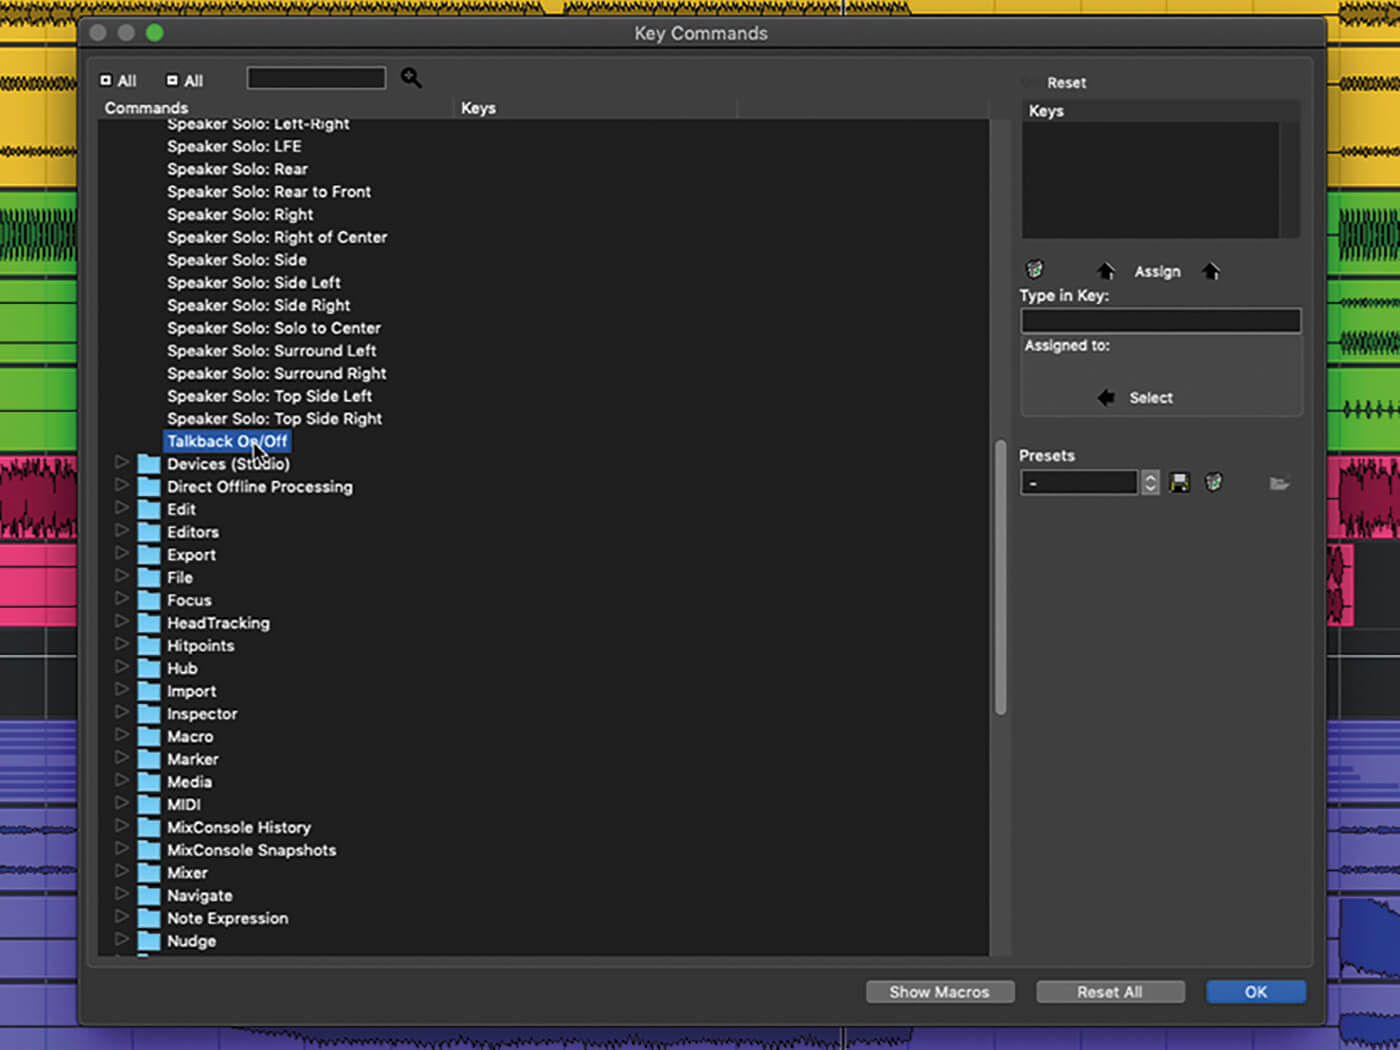
8. The many different commands that are available are organised into folders. Browse through the list, opening folders to see what they contain, and familiarise yourself with what’s available. Find a command that you wish to bind to a shortcut and click it to select it.
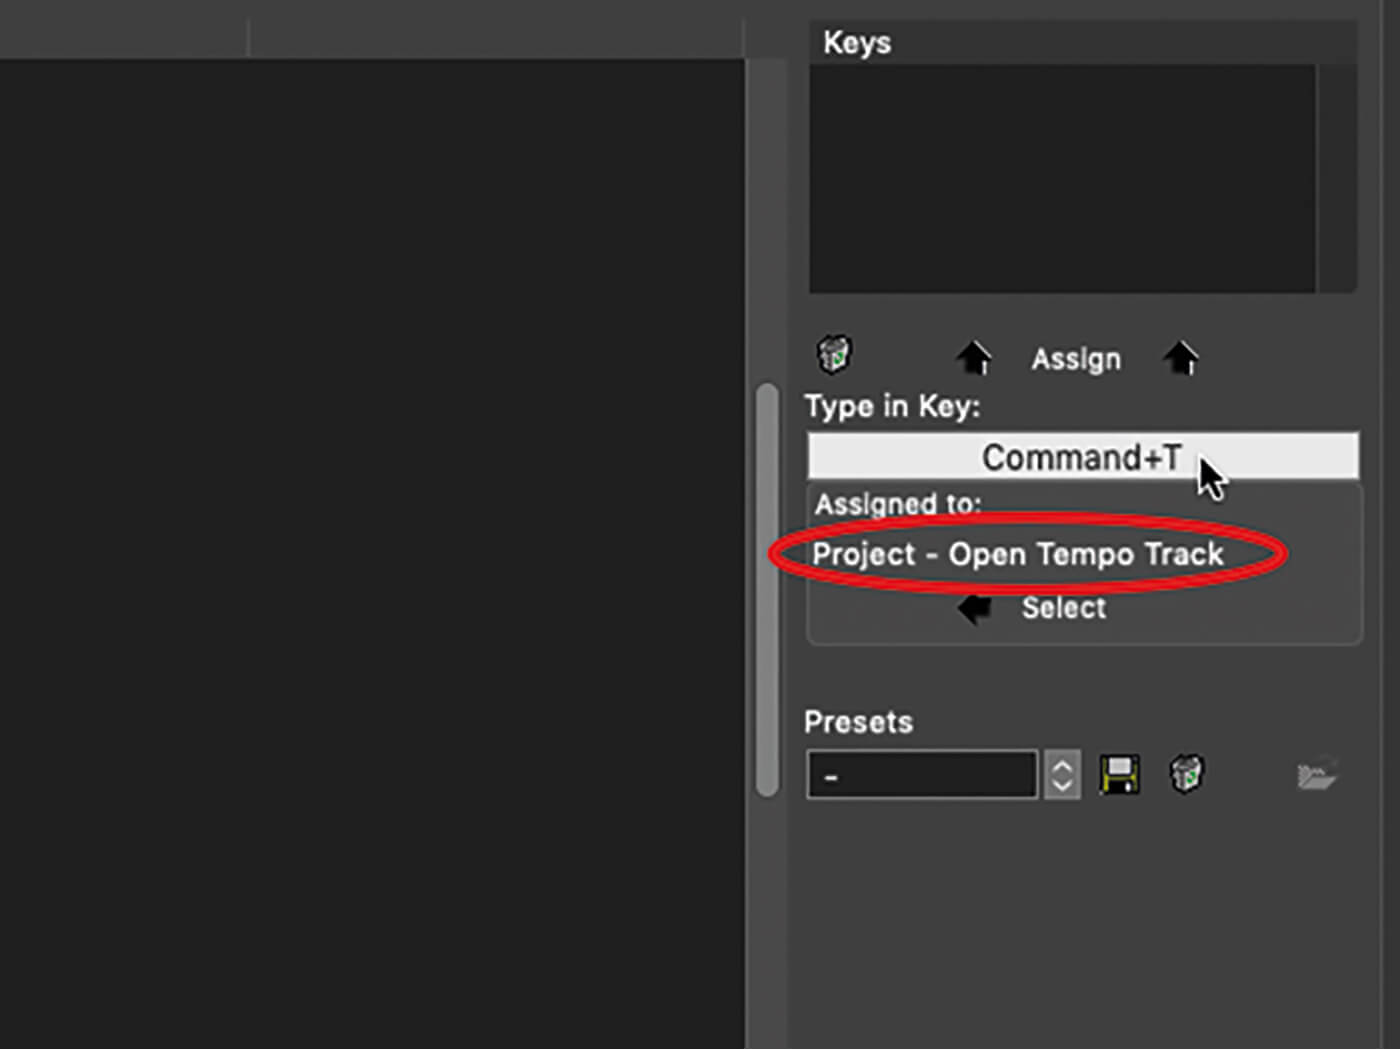
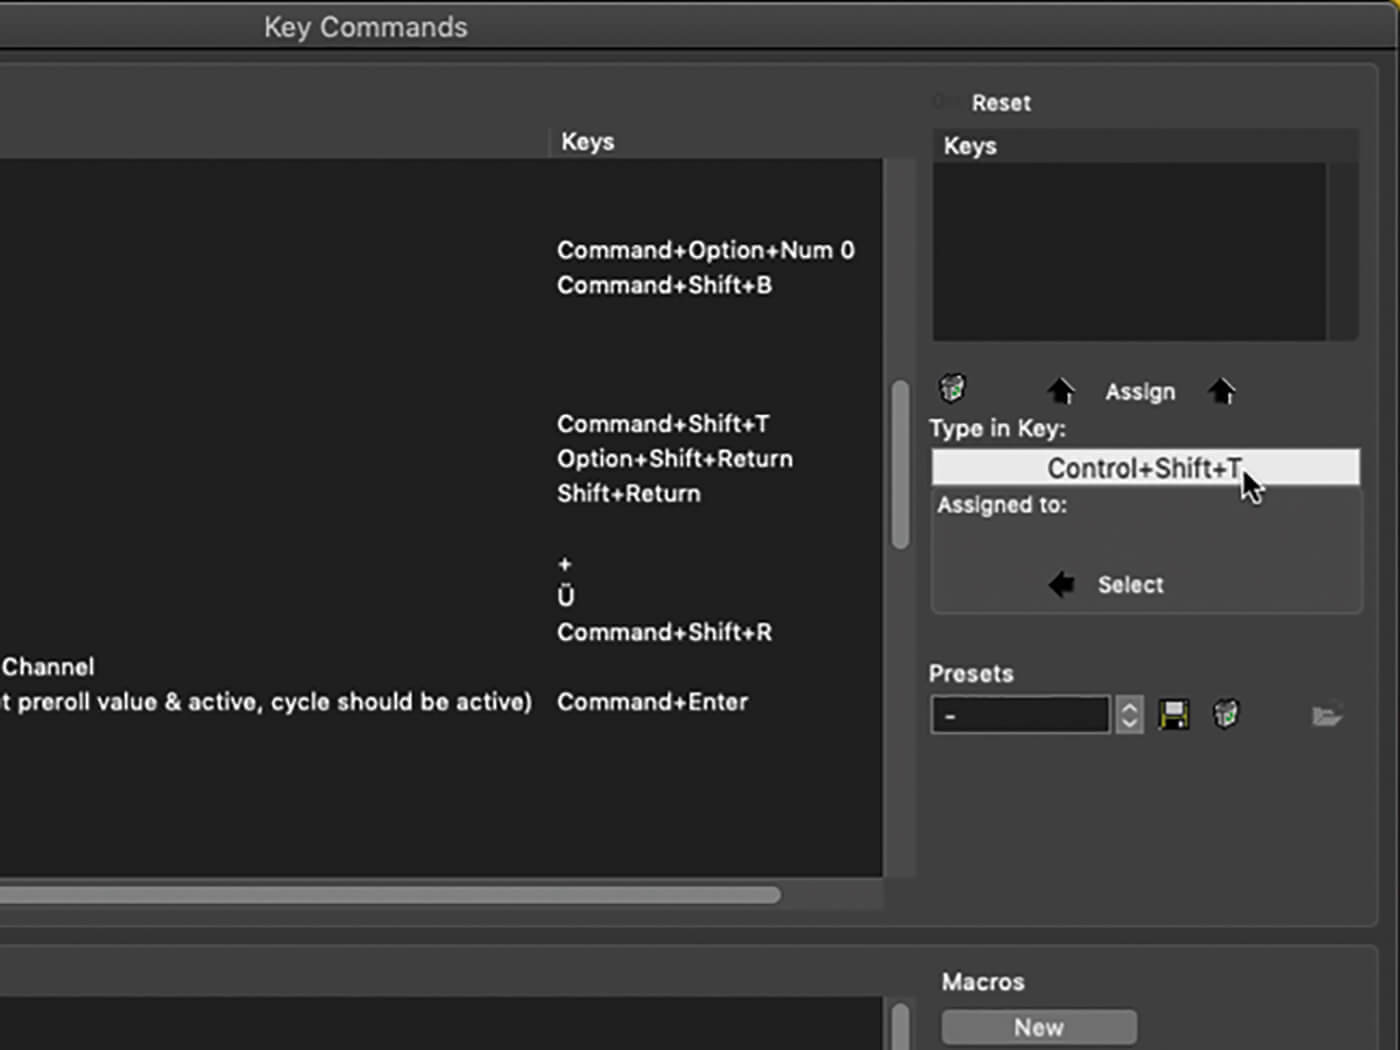
9. Click the Type in Key field, located to the right of the command list, and then press the key or key combination that you want to assign to the command. If the key combo is already used the existing assignment will be shown.
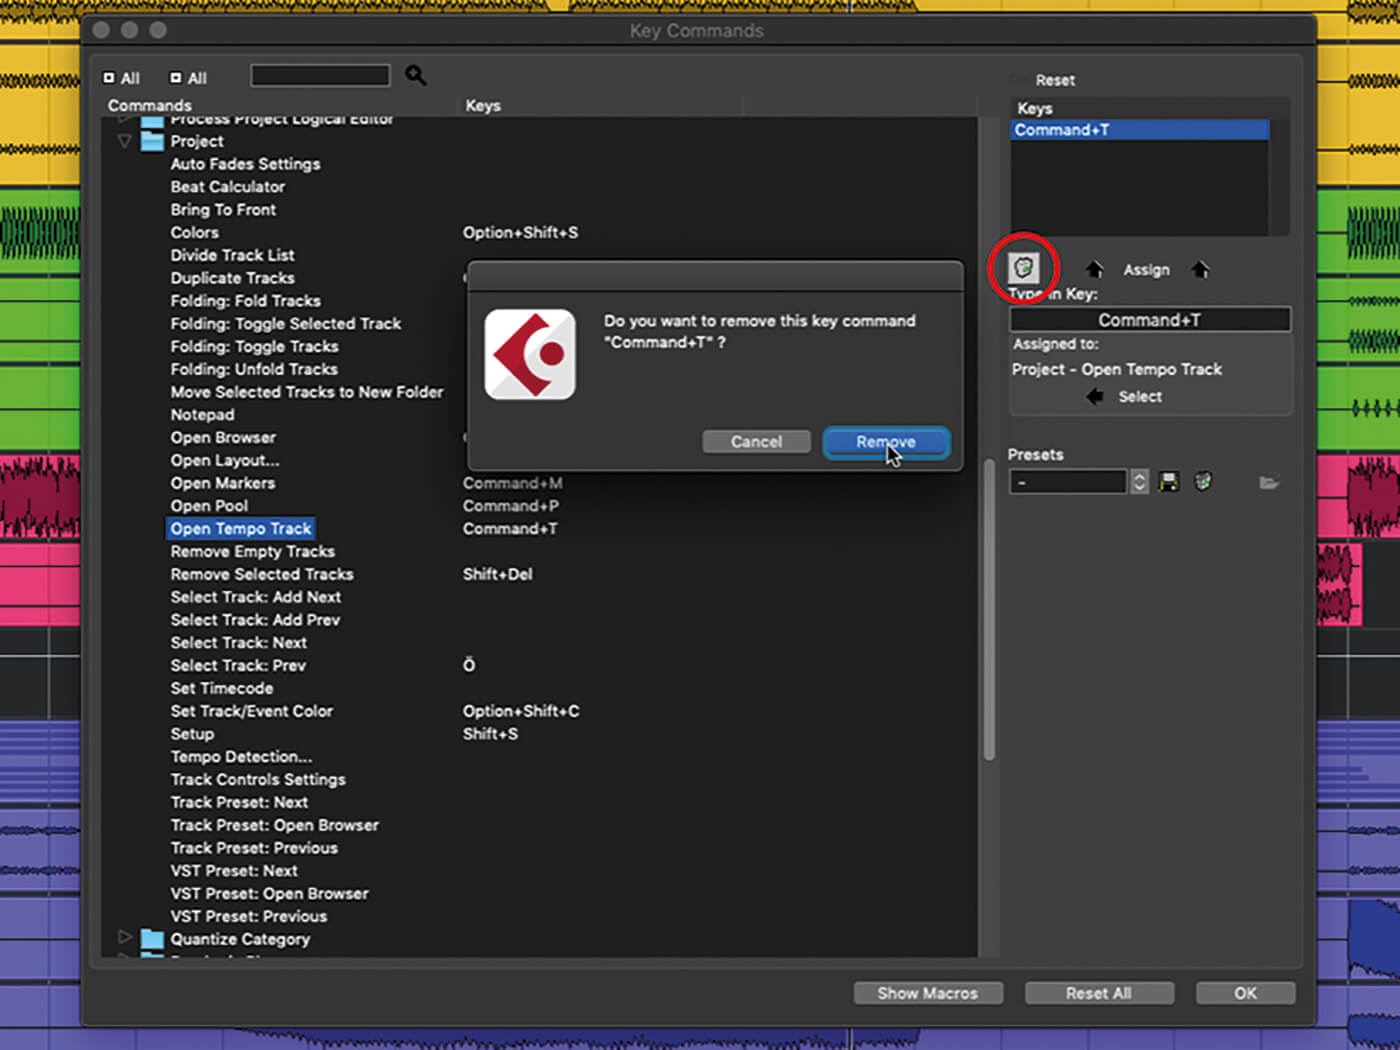
10. If there is an existing assignment, click the Select button below the notification to jump to the assigned command in the command list. Then, with the shortcut selected in the Keys list, click the dustbin icon to remove the assignment.
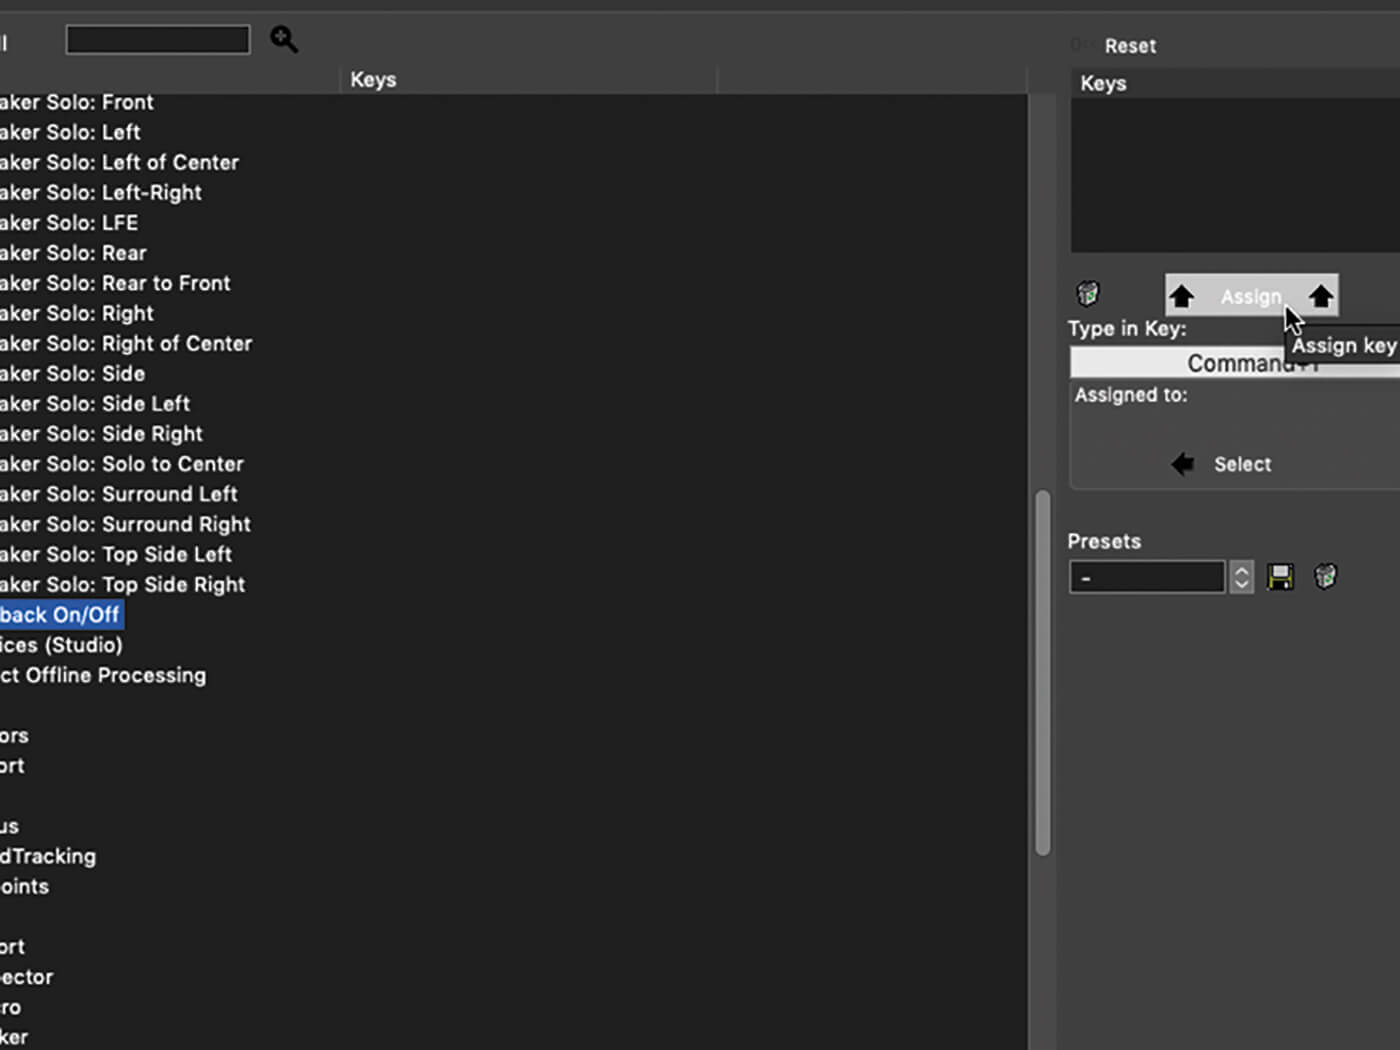
11. Return to the command that you originally wished to assign a shortcut, select it, and once again use the Type in Key field to define the desired key combo. Now click the Assign button to assign the key shortcut to the command.
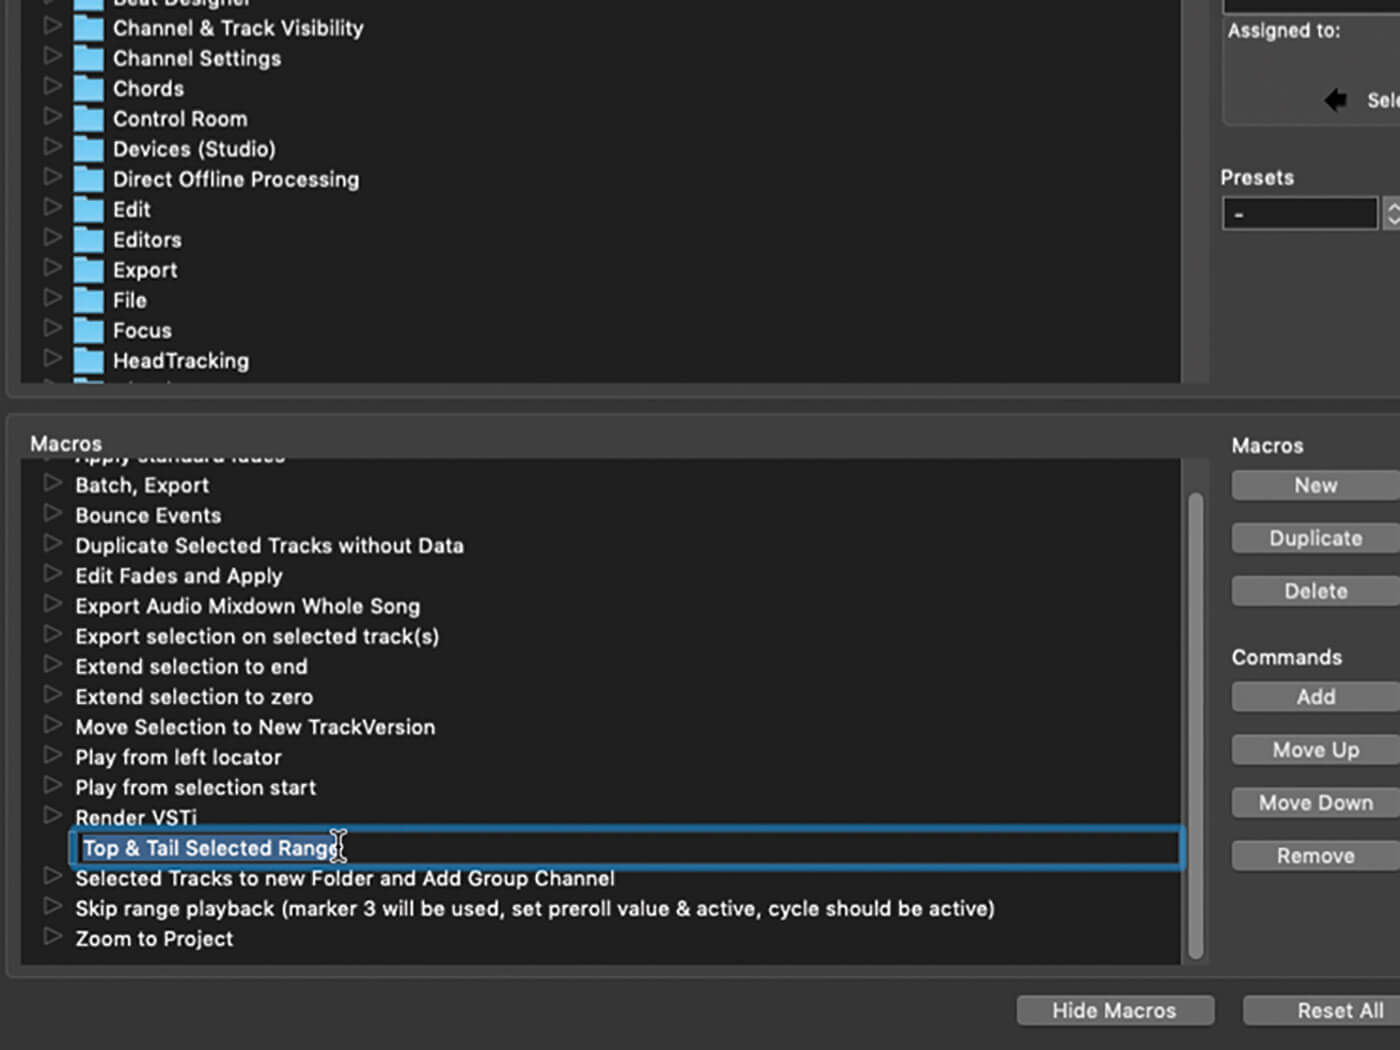
12. Click the Show Macros button, located at the bottom of the Key Commands panel. We’ll create a macro that tops-and-tails a range selection in the project window. Click Add in the Macros panel, then name the new macro that appears in the list.
![]()
INSTRUMENT COLLECTIONS As well as allowing you to create custom plug-in collections, Cubase also allows you to do the same with your instruments. Open the VST Plug-in Manager panel, click the VST Instruments tab, and then use the same procedure as for custom plugin collections.
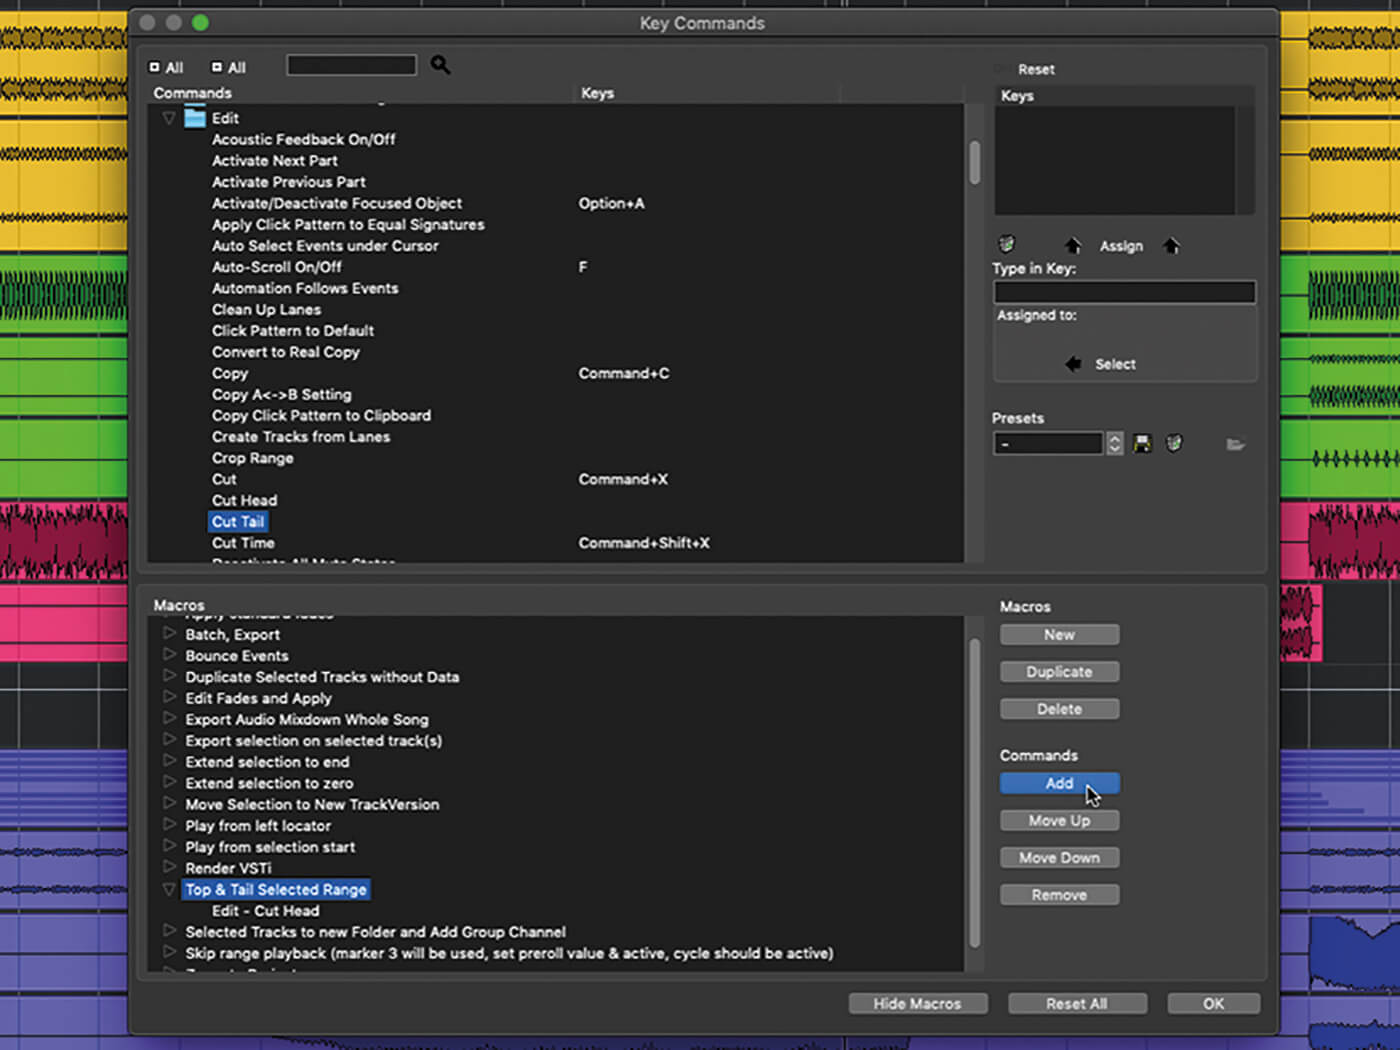
13. Open the Edit folder in the commands list, then locate and select Cut Head. Click the Add button located in the Macros section of the panel. Repeat the process to also add the Cut Tail command to your macro.
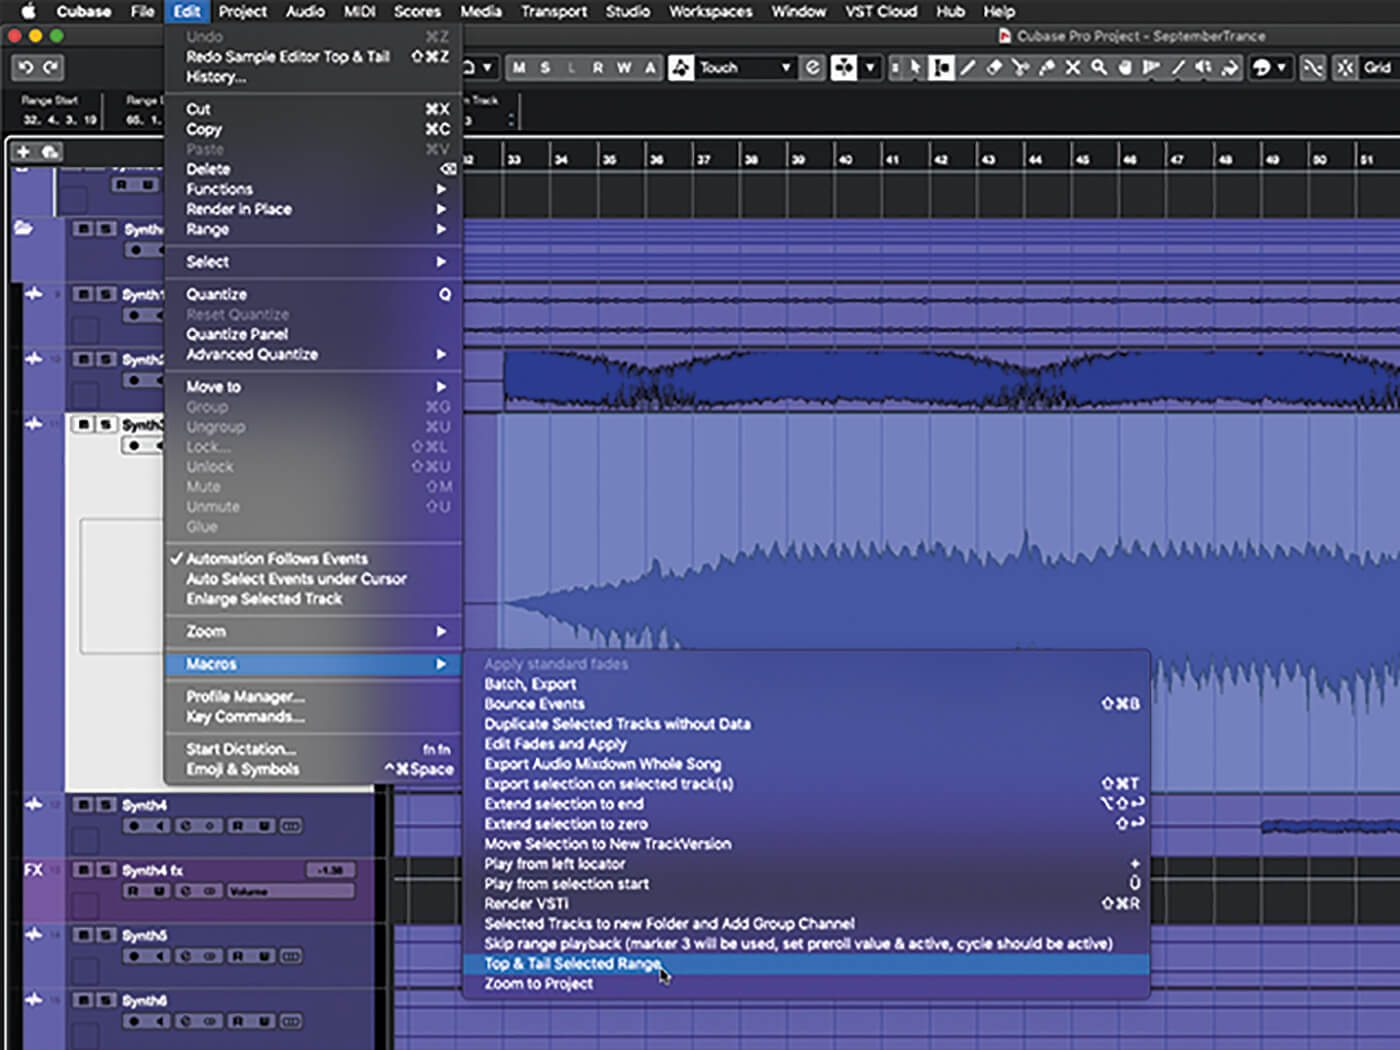
14. Click the Key Commands panel’s OK button to close it. Switch to the range selection tool and drag out a selection on a section of audio. Open the Edit menu and select your macro from the Macros submenu. Ta-da! Quick topping-and-tailing!
15. Re-open the Key Commands panel. In the commands list, locate and open the Macro folder. Your newly minted macro will be shown, and you can add a keyboard shortcut to it just as you would any other command. Close the panel when done.
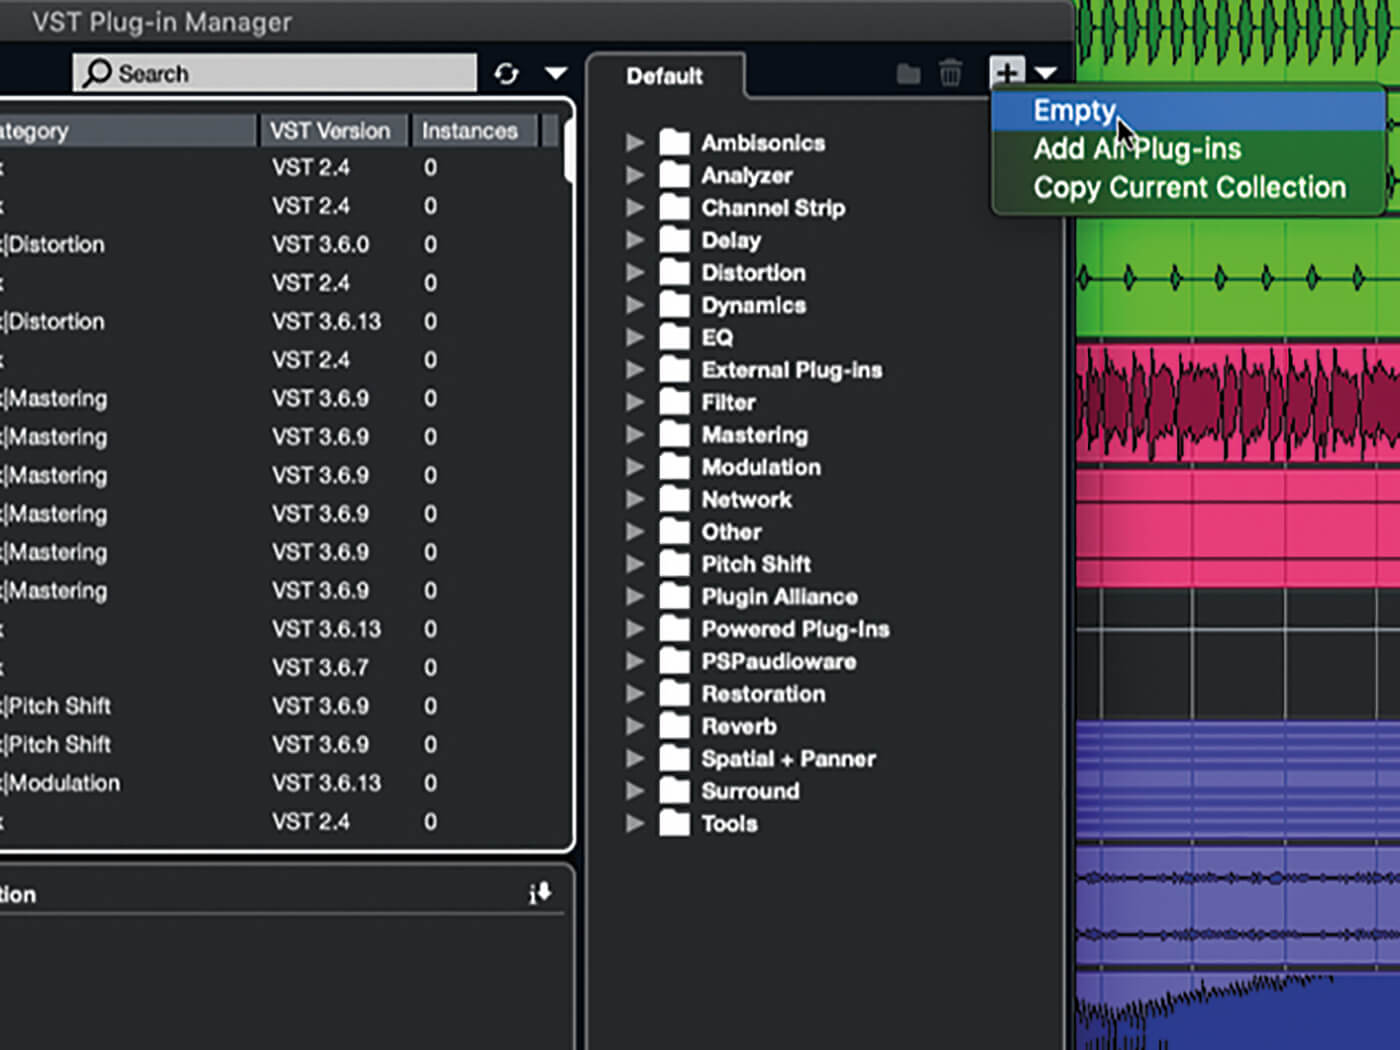
16. Open the Studio menu and select VST Plug-in Manager. Click the ‘+’ button located at the top-right of the window then select Empty from the popup. Enter a name for the new plug-in collection in the dialog that opens, then click OK.
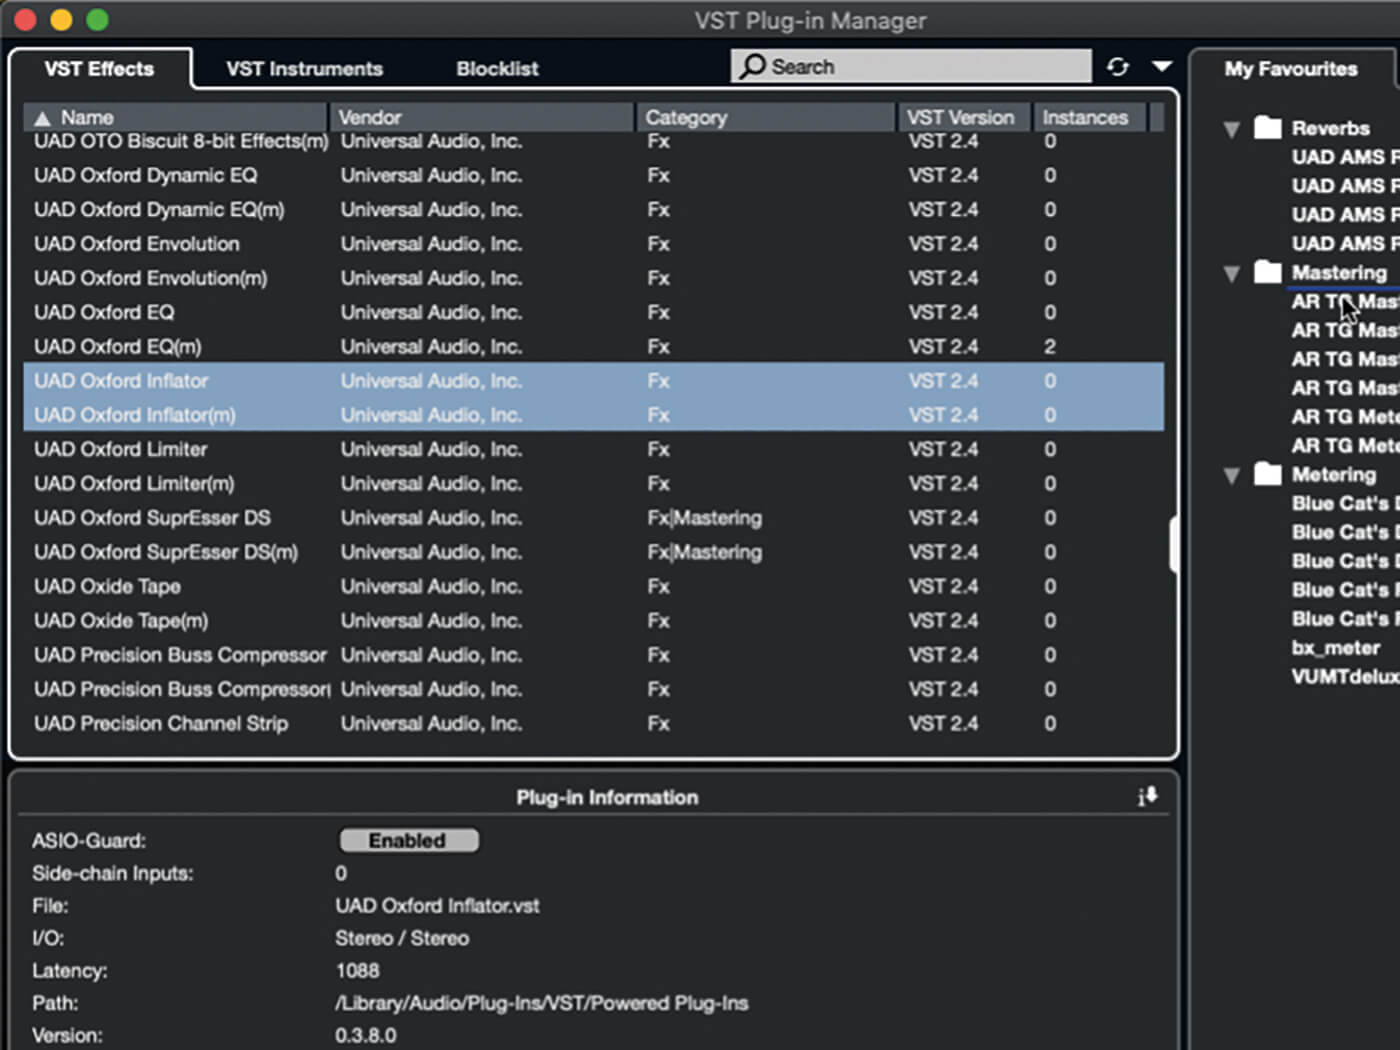
17. Click the folder button to add folders to your collection. In the plug-in list, locate the plugins you want to add to the collection, and drag each to the collection or one of its folders. The same plug-in can be included more than once.
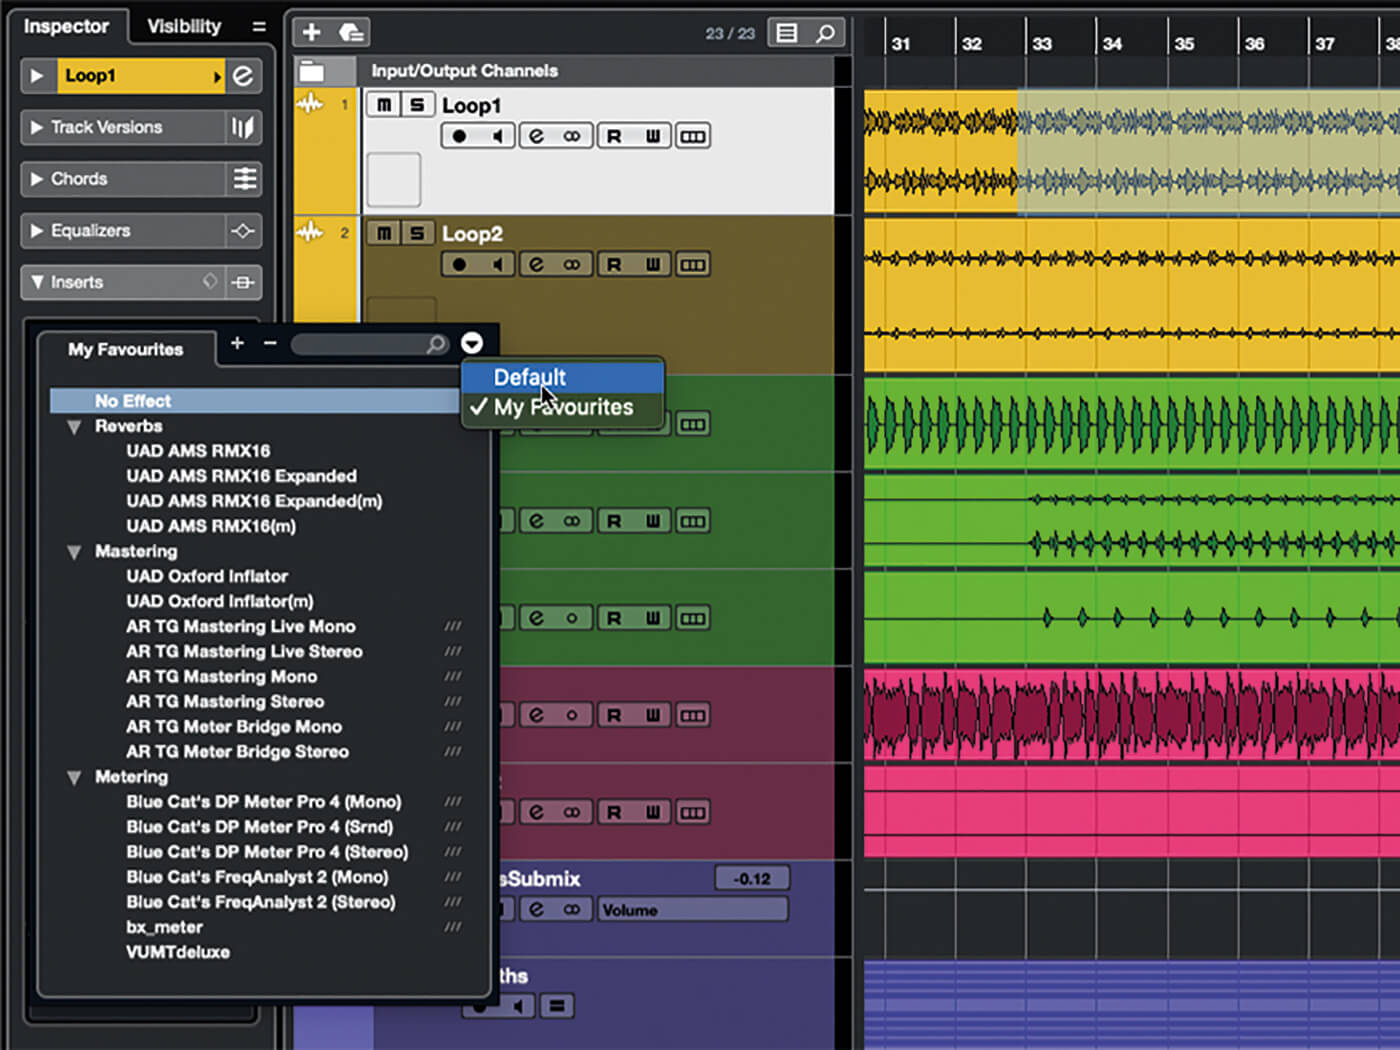
18. Close the panel, then open the Inserts section of an audio track’s inspector. Click an empty insert slot and notice that your new plugin collection is now showing. You can change between collections using the button at the top-right of the plug-in selector.
For more Cubase tutorials and workshops, click here.