For more Cubase tutorials and workshops, check here.
Mastering in Cubase 10
Cubase’s stablemate, WaveLab, is designed specifically with mastering in mind, with many tools and workflows dedicated to the task. But Cubase itself is far from incapable when it comes to giving mixes a final polish.
by Adam Crute
When you purchase through affiliate links on MusicTech.com, you may contribute to our site through commissions. Learn more
Although most often thought of as a DAW dedicated to the art of creating music, Cubase has for a long time enjoyed the power and flexibility to turn its hand to all sorts of other audio duties: idea sketching, audio editing, sound design, film and broadcast post-production, scoring and publishing and pretty much anything else you can think of.
When it comes to audio mastering, where audio quality and fidelity are vitally important, Cubase’s super-accurate sound engine and versatile editing and routing are a perfect match for the job’s requirements. What’s more, thanks to Steinberg’s ongoing efforts to increase the number, quality and utility of bundled plug-ins, modern Cubase contains everything you need to perform excellent audio mastering right out of the box.
The most obvious approach to mastering with Cubase may be to apply mastering-type processing during mixdown across the main left-right bus; you could also apply such processing to submixes for a stem mastering-like approach. However, it’s often preferable to approach mastering from the point of view of a whole album or montage of mixes, which allows that montage to be honed into a cohesive whole as opposed to a bunch of mismatched individual mixes.
This being the case, best practice tends to be to leave mastering processing out of a mix so that it can be applied later when the music is being compiled into an album/montage.
Track and mix layout
Once you’ve perfected your mixes and have created a collection of unmastered files for your montage, Cubase offers a few different approaches, but all start by importing your unmastered mixes into a new project and laying them out on the timeline. Generally, you would put all of the mixes onto the same track, but if creating a montage from a small number of mixes, there can be some advantages to giving each its own track/channel in Cubase (for reasons that should become apparent in a moment). This is also a good opportunity to play around with the running order and flow of your montage.
Typically, with this setup, you would add mastering processing as inserts on the channel(s) carrying the unmastered mixes. It’s common to use specialised processors from third-party developers for performing this mastering processing and these can bring a certain depth and character to the table, but Cubase’s built-in processors are more than capable of creating excellent results without you needing to splash out on expensive models of boutique hardware. And if you happen to have a nice hardware compressor, EQ or whatever in your studio, you can set these up as external plug-ins that can then be included in your mastering processing chain.
Once satisfied with the montage’s layout, you then work through each mix, setting up the processors and bouncing the results to a new, mastered mix. This bouncing can be done using an internal auxiliary audio bus if your sound hardware provides such, playing from the ‘unmastered’ track whilst recording on the ‘mastered’ track.
Doing this has the advantage of allowing you to monitor proceedings for peaks or artefacts that you hadn’t noticed while setting up. Alternatively, if your hardware doesn’t provide internal audio busses, you can simply export each mix to a new mastered version and then reimport this to a ‘mastered’ track.
Drawbacks and workarounds
At this point, you can apply any final level trimming on the mastered mixes, either by adjusting the gain of each mastered mix individually, or via channel-level automation. This is the stage where you may encounter the biggest drawback with this approach: it prevents you from easily tweaking the mastering processor setup for any individual mix. This matters because, as you work through your montage’s mixes, you may decide that settings used on an earlier mix need to be modified in view of the mix you’re currently mastering, but the processor settings you used are likely lost.
A workaround here is to save the processors and settings for each individual mix as an effects-chain preset that you can recall and tweak later if needed. Another is to apply mastering processors directly to each mix using Cubase’s Direct Offline Processing functionality, thereby allowing you to come back and tweak those settings later in a very WaveLab-esque way, but this can become somewhat fiddly.
Whichever method you use, you should end up with a finished montage of songs whose sound has been optimised and fortified using mastering techniques – and that have been EQ’d, levelled and balanced to sound like a cohesive whole. All that remains is to perform a final export of the montage, either as individual files (one for each component of the montage) or, for montages where the components flow into each other, as a single monolithic file.
Mastering with Cubase: step-by-step
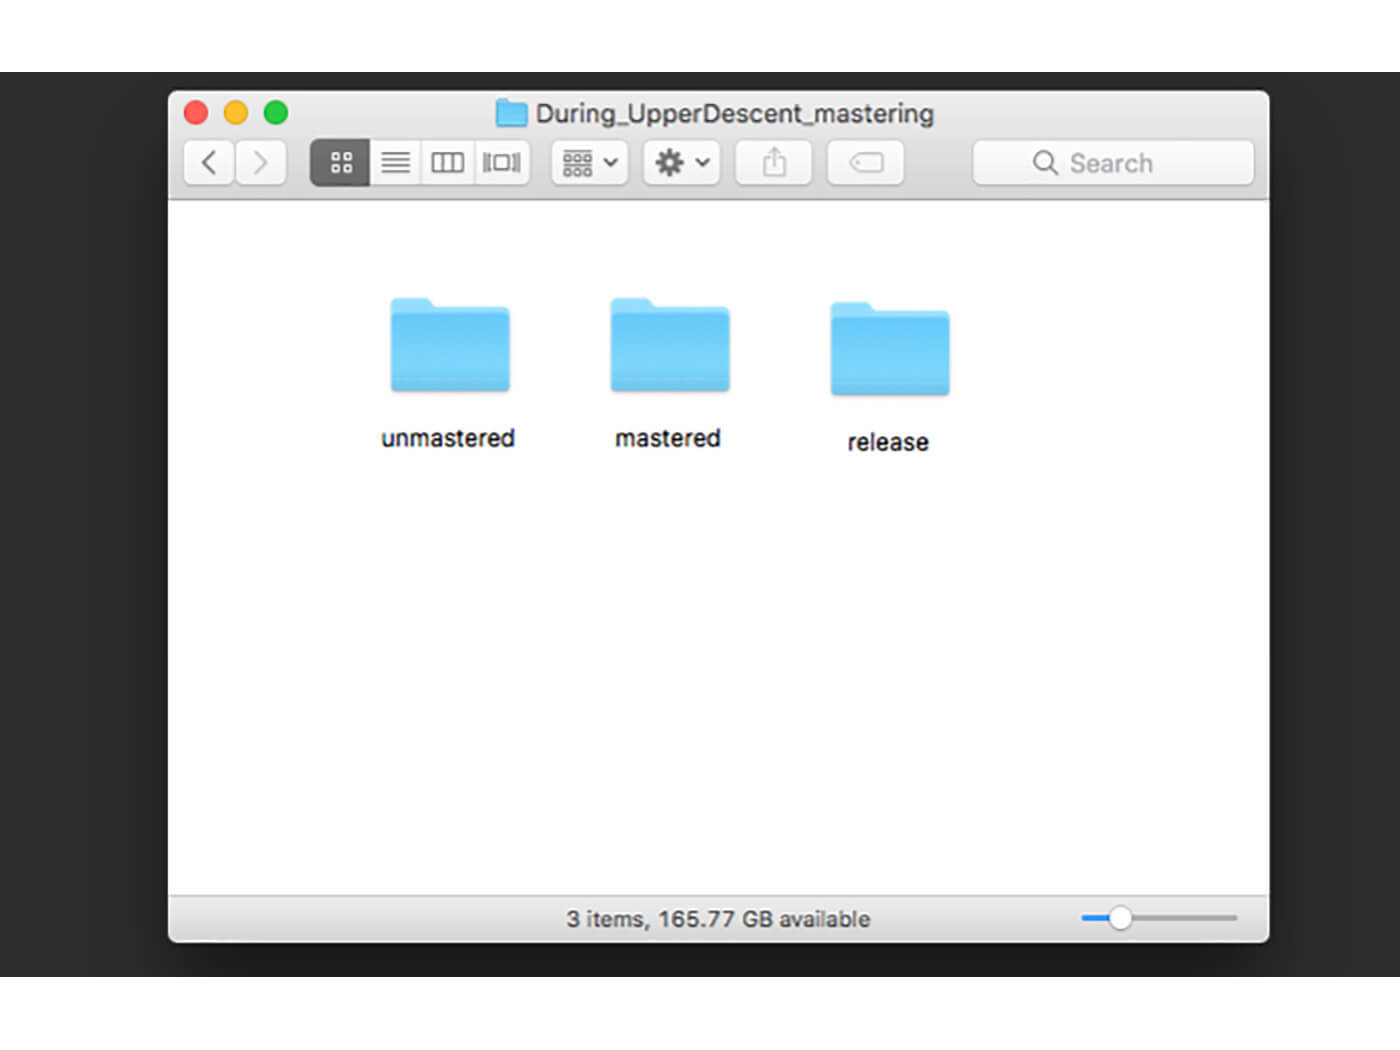
1. Start off by organising your files. Create a new folder for your mastering project, and create three subfolders within it named ‘unmastered’, ‘mastered’ and ‘release’. Copy your unmastered mixes into the ‘unmastered’ subfolder.
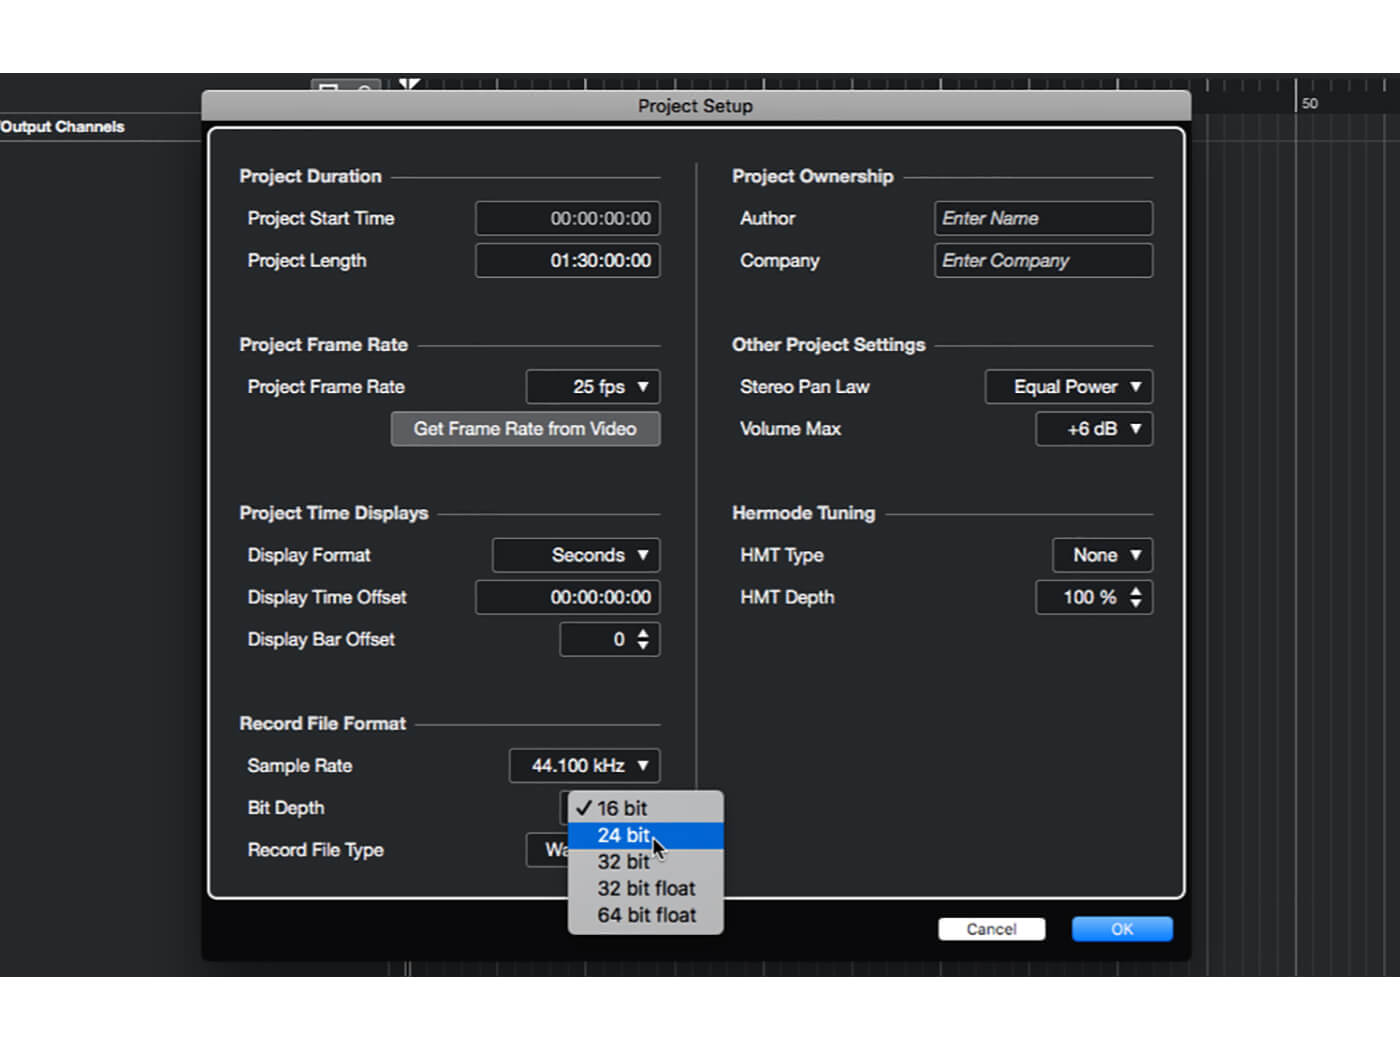
2. Create a new Cubase project and save it within your newly created folder. Open the Project Setup panel (Project -> Project Setup…) and set the project sample rate and bit depth to match that of your unmastered mixes.
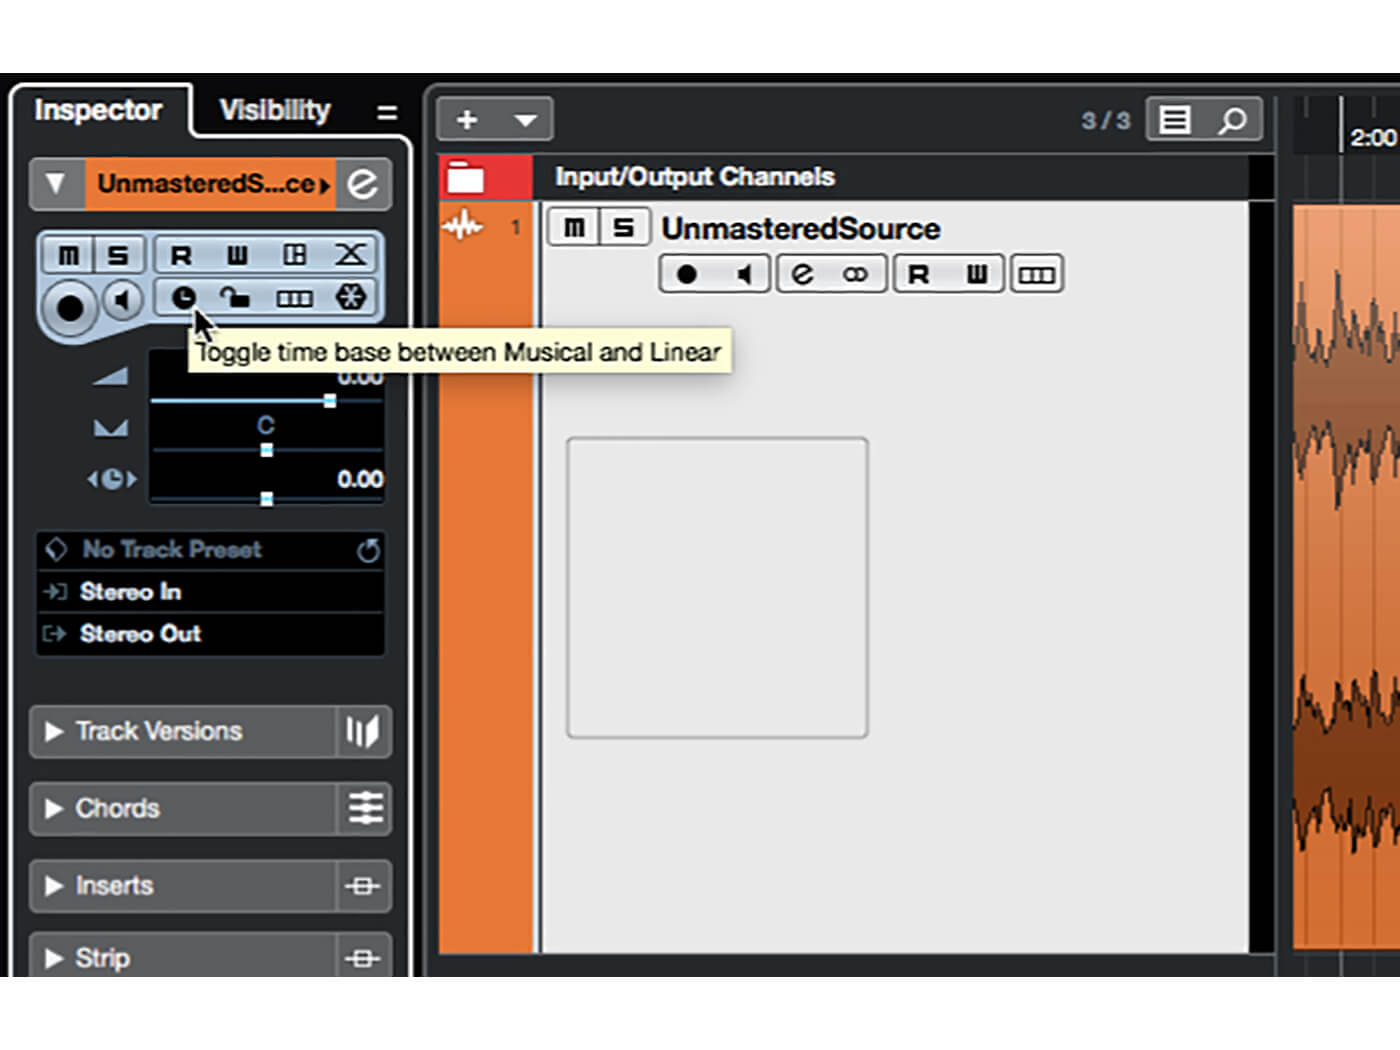
3. Create a new audio track and call it ‘UnmasteredSource’. Ensure the track is set to use a linear time base (track inspector will show a clock face). Drag your unmastered mixes onto the UnmasteredSource track, opting not to copy the files to the working directory.
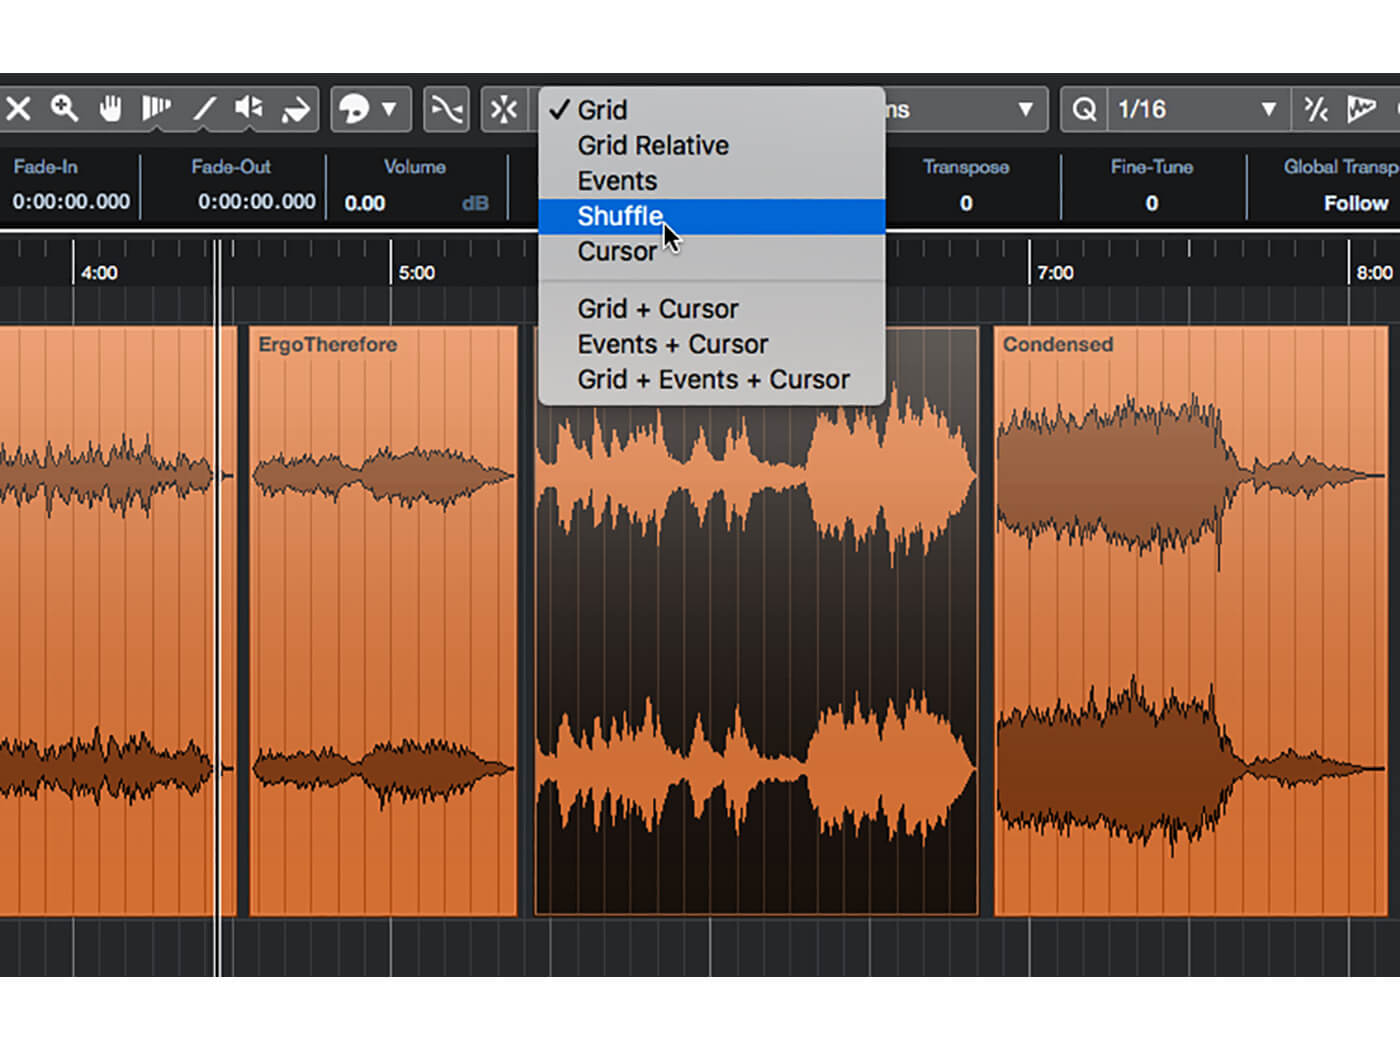
4. Play around with the running order and spacing of your mixes. Enabling Shuffle snapping mode can help a little here, as it creates and removes gaps in the timeline when you move things around; disable snapping when making fine position adjustments, though.
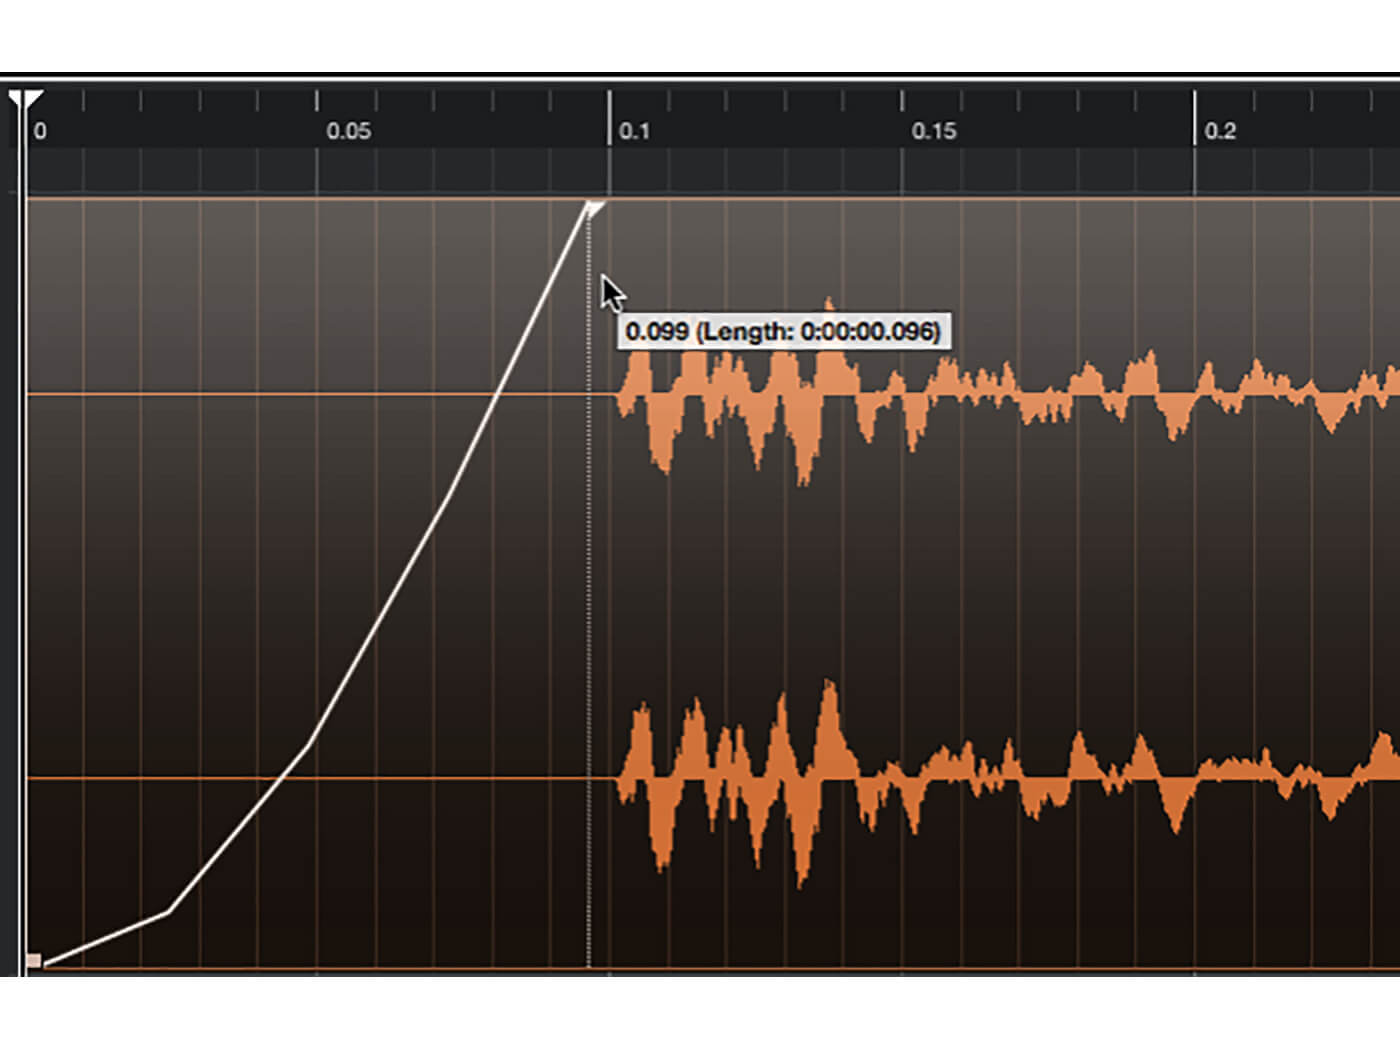
5. Select the first mix and zoom in on its start point. We want 50-100ms of silence at the beginning of the mix, so trim it down if there’s more than this (add silence in step 8 otherwise). Also apply a short fade over this silence.
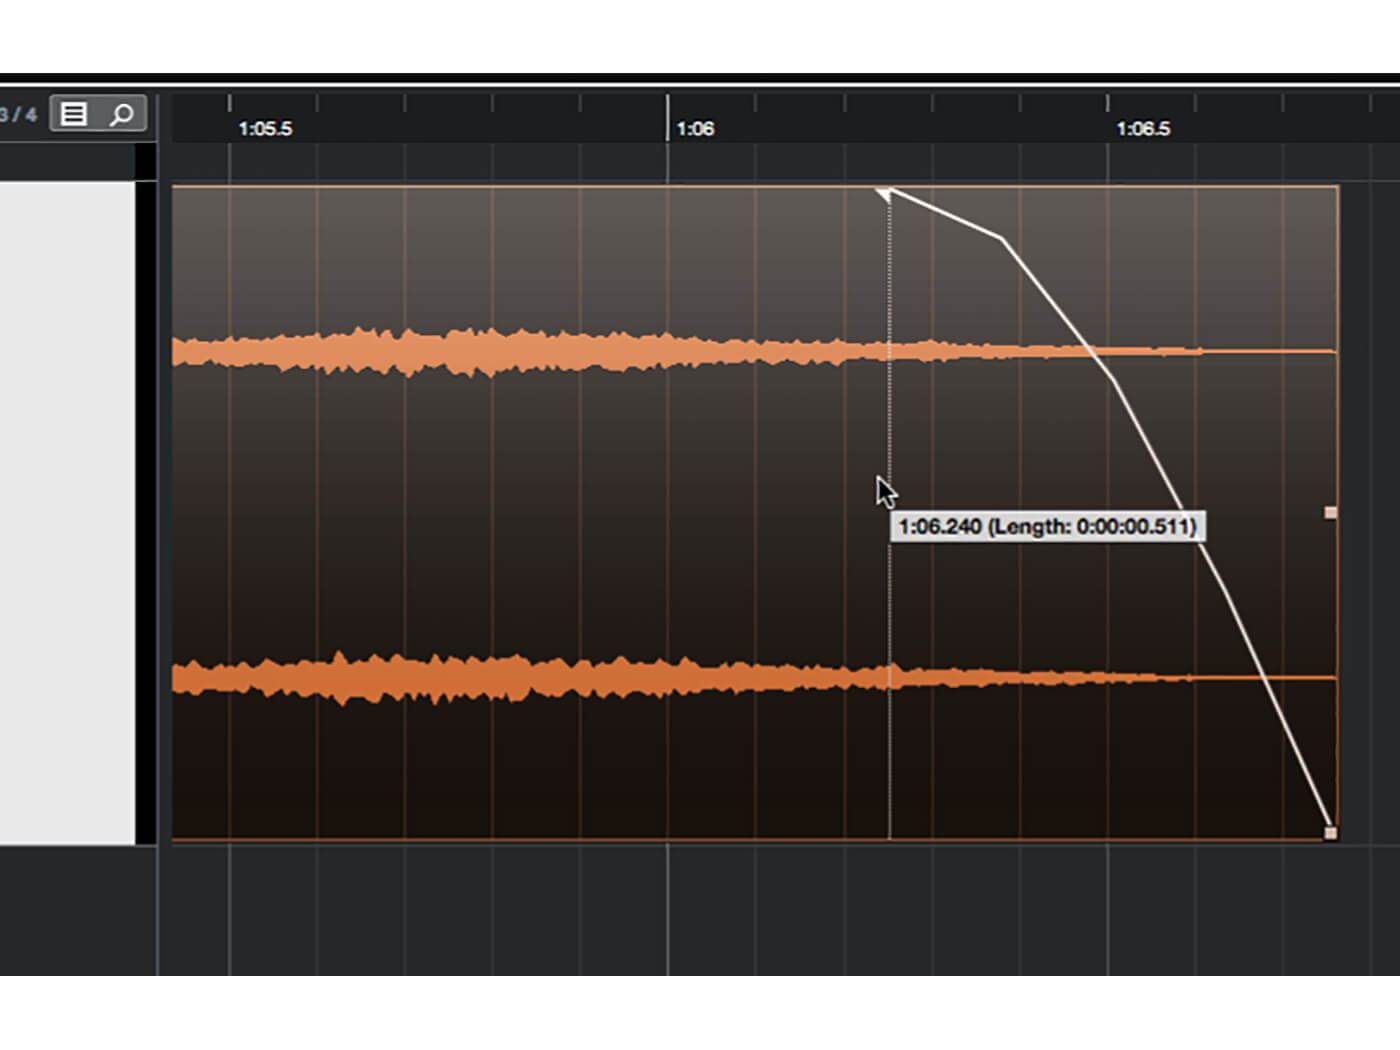
6. Move to the end of the mix and examine its ‘tail’. Work out where the sound drops below an audible level, then trim to 100-200ms beyond this point. Add a fade out that includes some of the audible sound – perhaps 500ms-or-so.
![]()
CYCLE MARKERS When mastering with Cubase, cycle markers give a handy visual guide when navigating around within your montage. They also simplify the final export process and serve to ensure that all of the various unmastered and mastered mixes you create are of a consistent length.
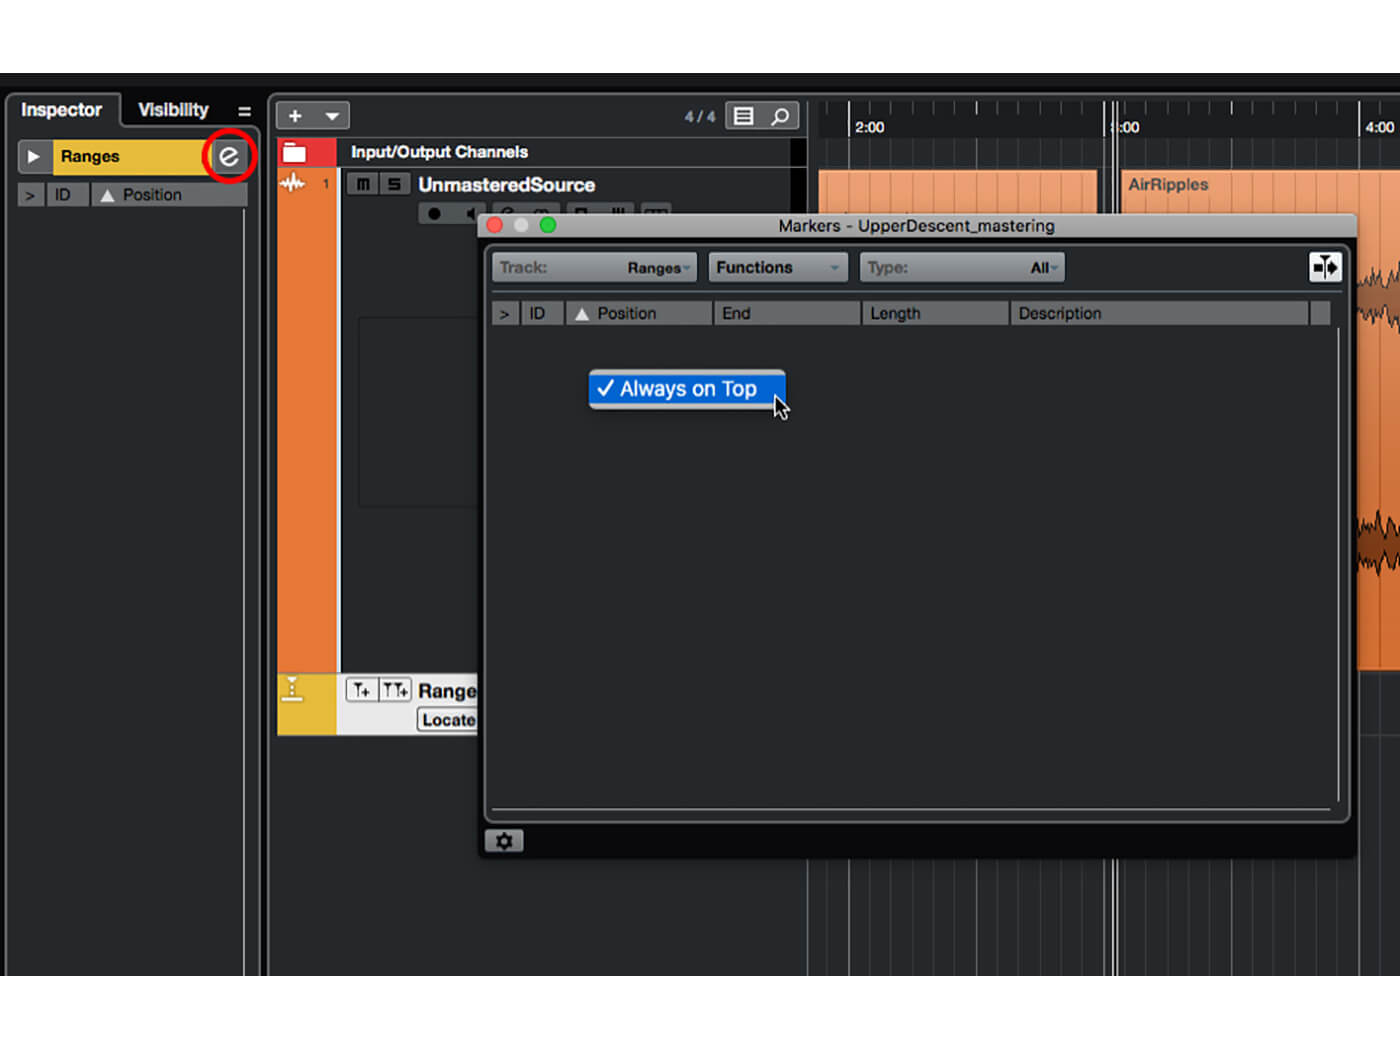
7. Create a new marker track and name it ‘Ranges’. With this track selected, click the ‘e’ edit button in the track inspector to open the markers panel. Right-click the panel and ensure Always on Top is ticked.
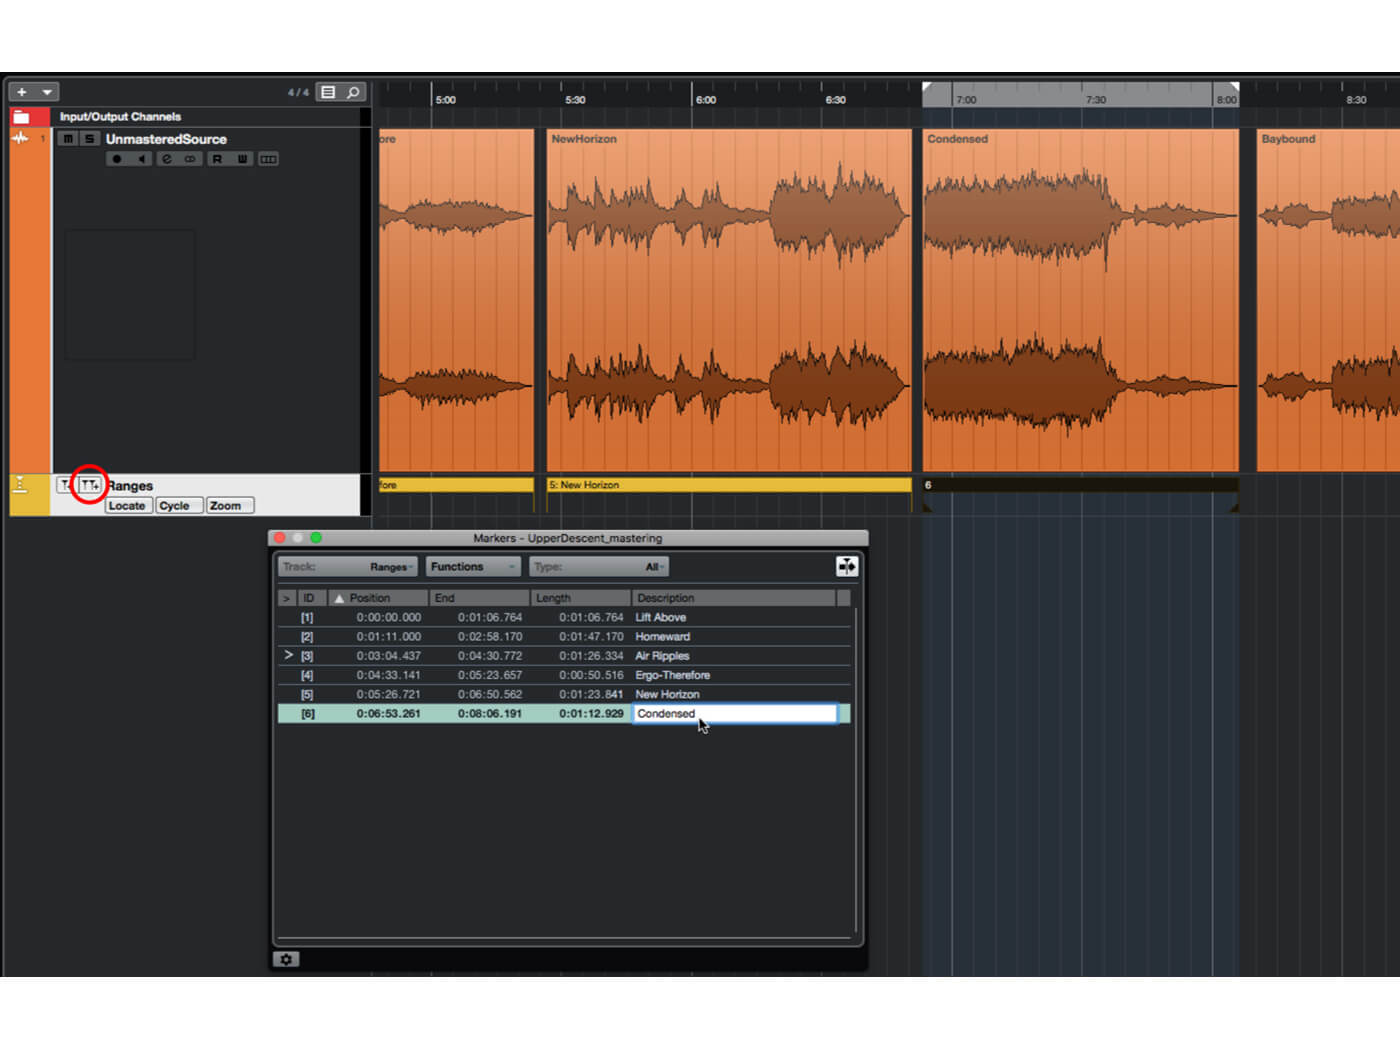
8. With the first mix still selected, press the P key so the locator positions match the selection. Move the locators outwards if If you need to add a bit of top and/or tail silence. Add a cycle marker and give it a name.
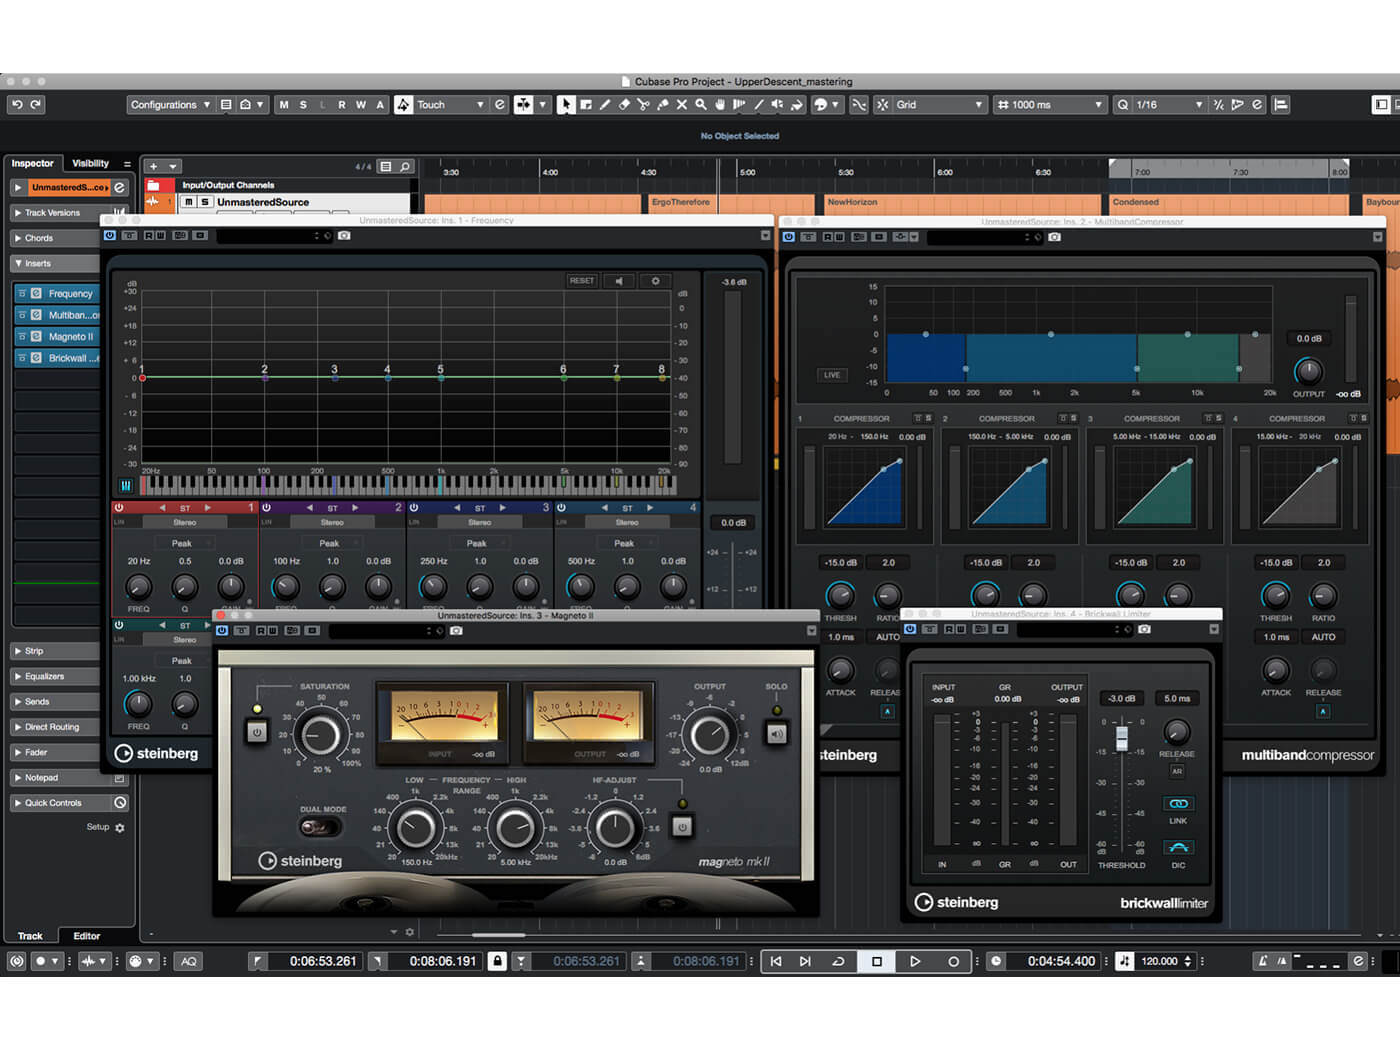
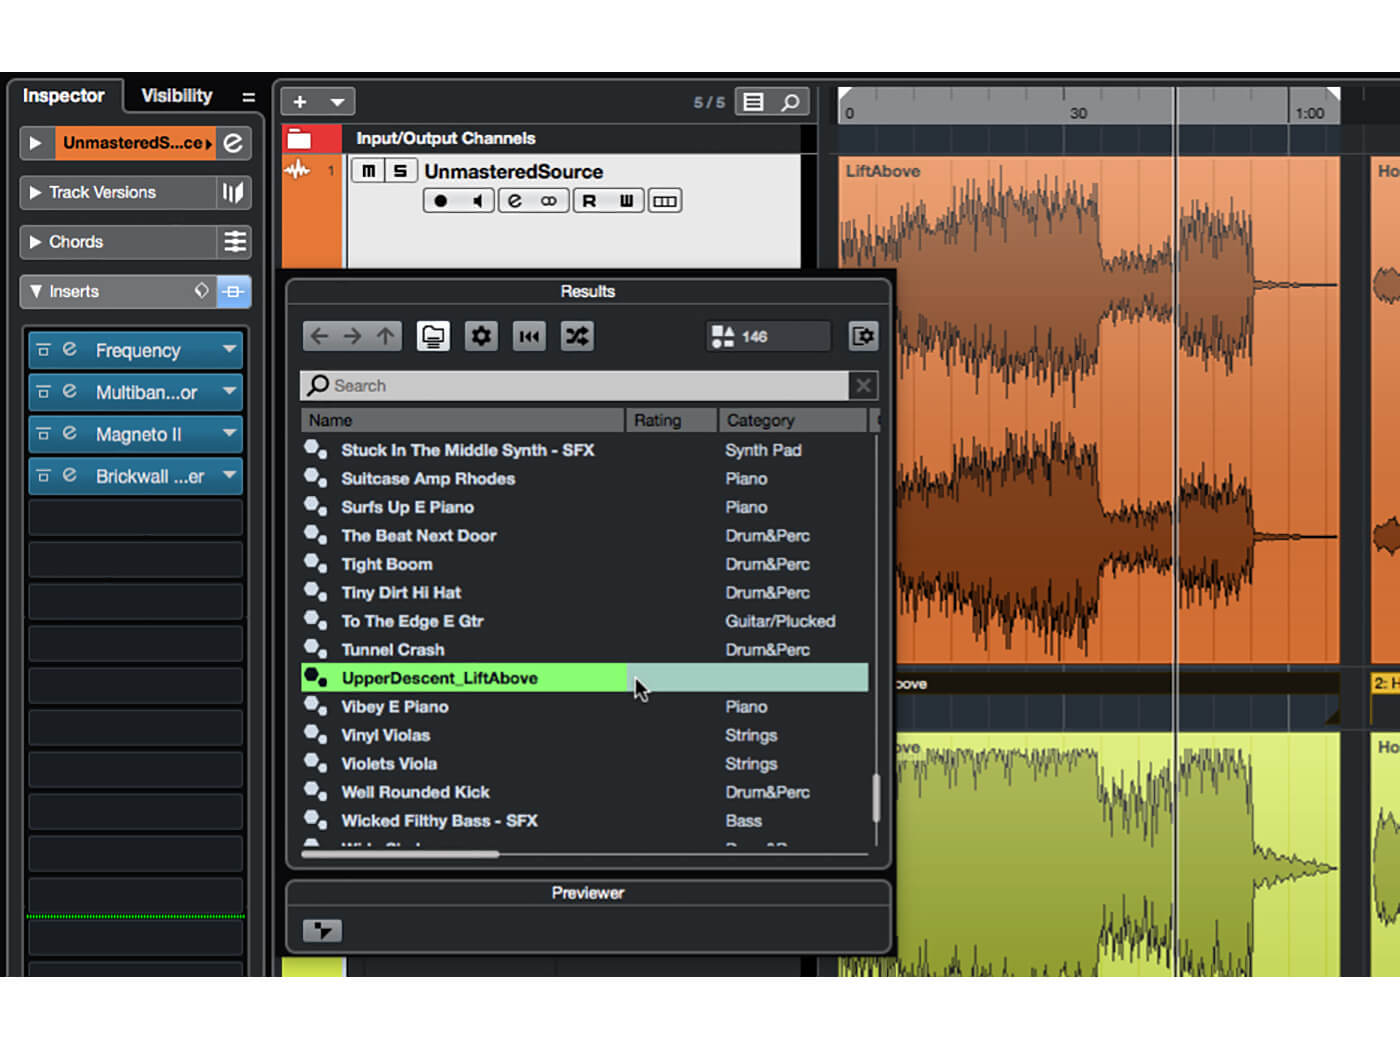
9. Add some suitable plug-ins to the UnmasteredSource track. Start with an EQ – Frequency is an excellent choice – and follow this with instances of MultibandCompressor, Magneto II and Brickwall Limiter. This gives a good starting point, but you can add and remove other processors when needed.
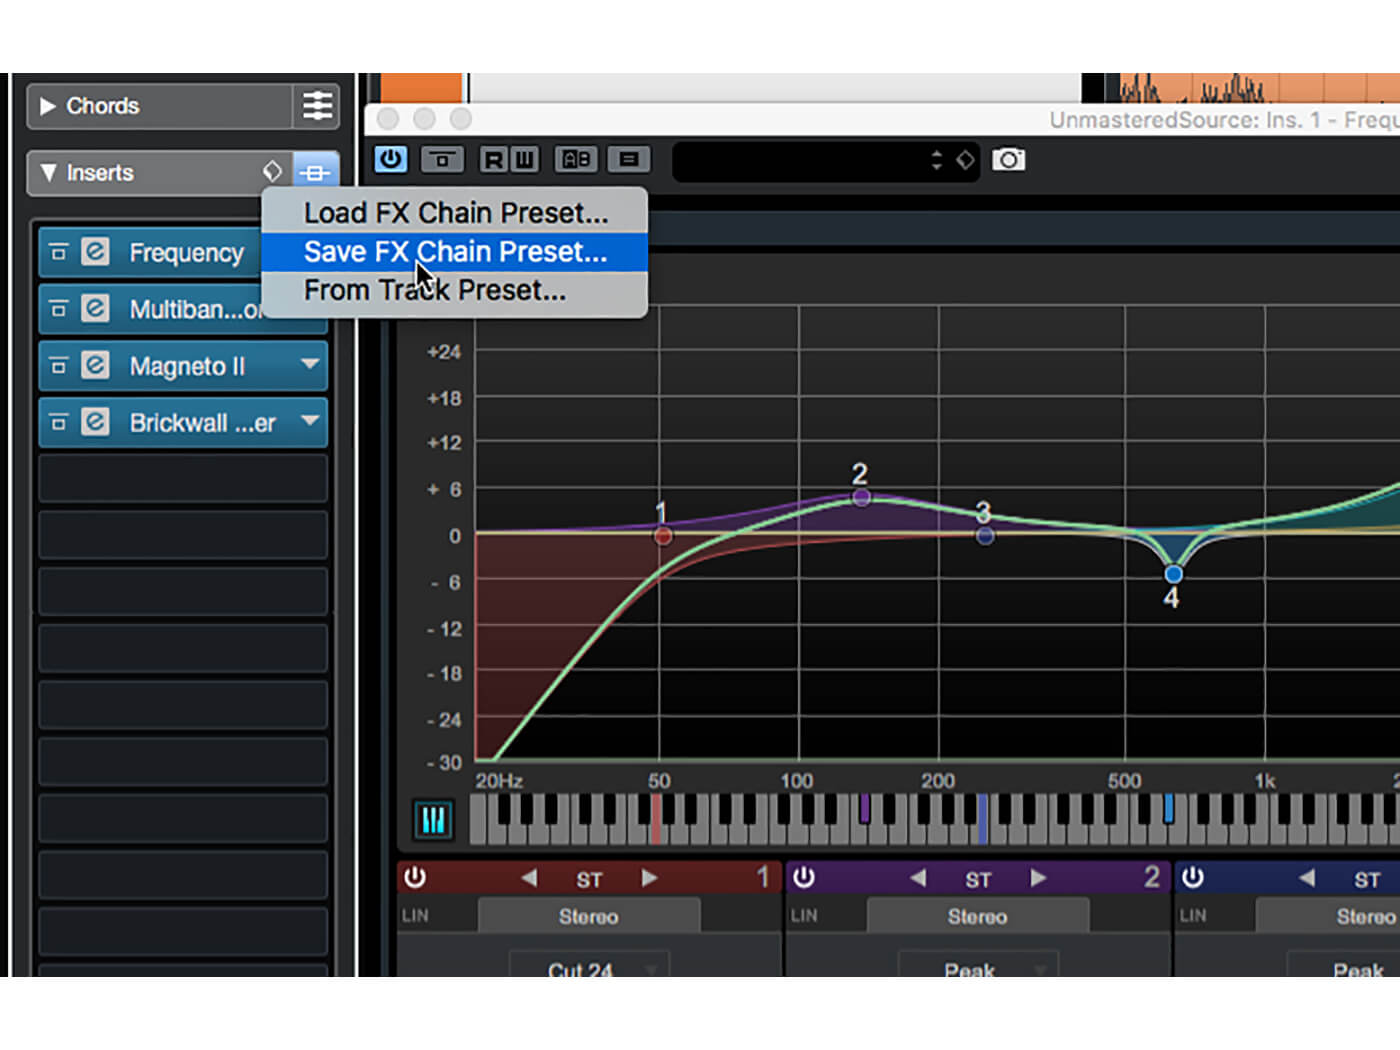
10. Play the mix and modify the processor settings as required. When happy, click the diamond at the top of the Inserts section of the inspector and choose Save FX Chain Preset… Give the preset a suitable name and click OK.
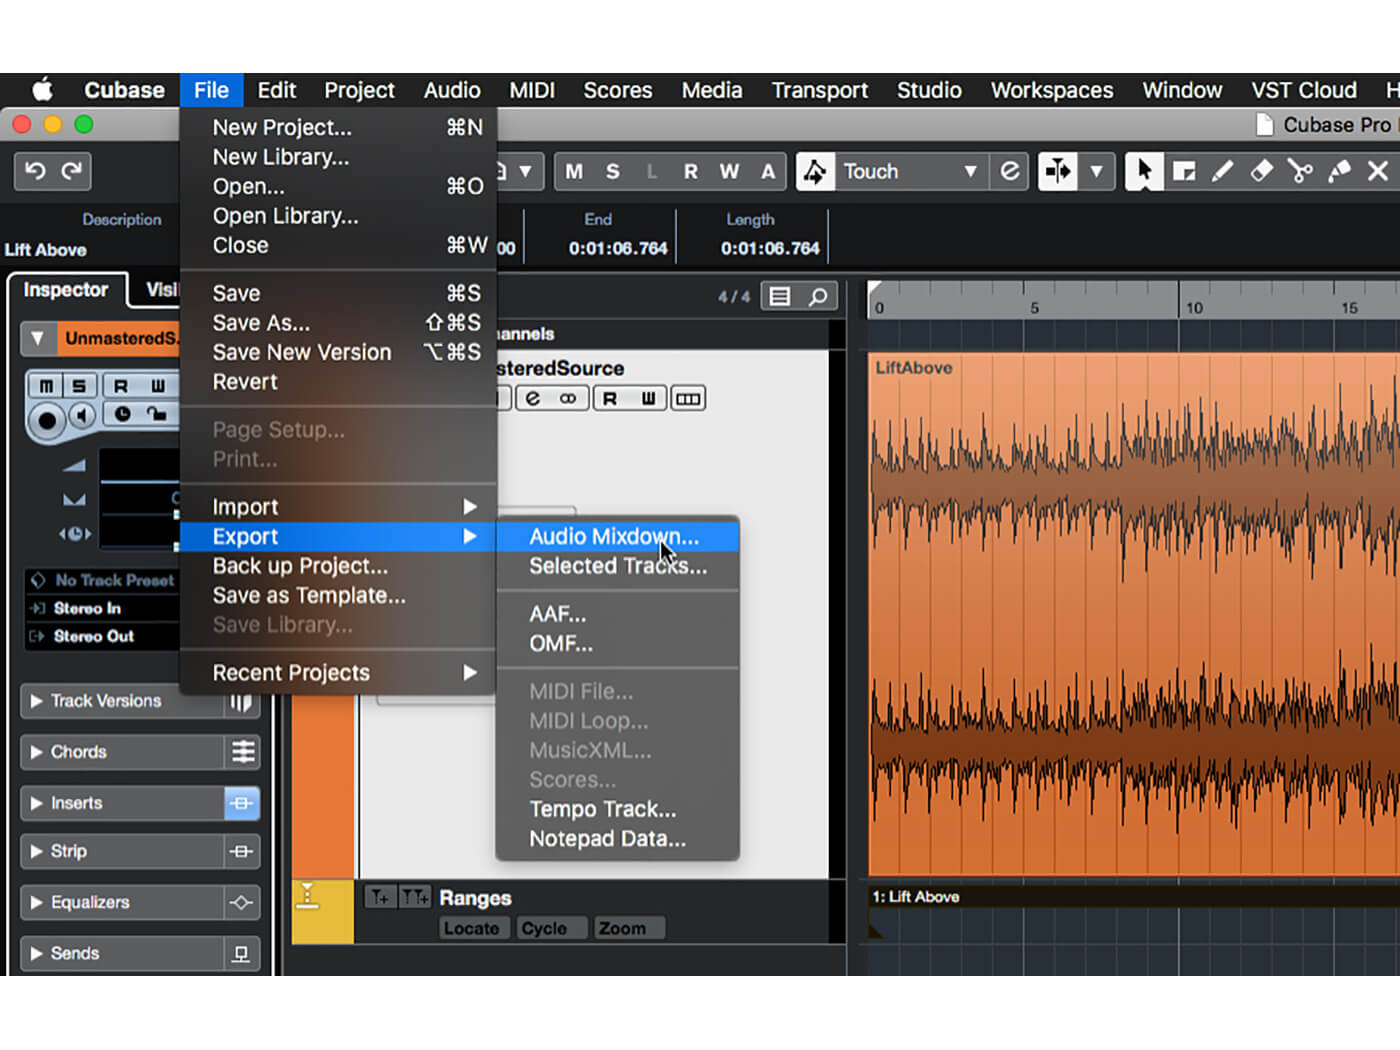
11. On the marker track, double-click the marker that corresponds with the mix you’re working on, thus ensuring the locators are in the correct position. Select Export -> Audio Mixdown… from the File menu. Name the file and set the path to your ‘mastered’ subfolder.
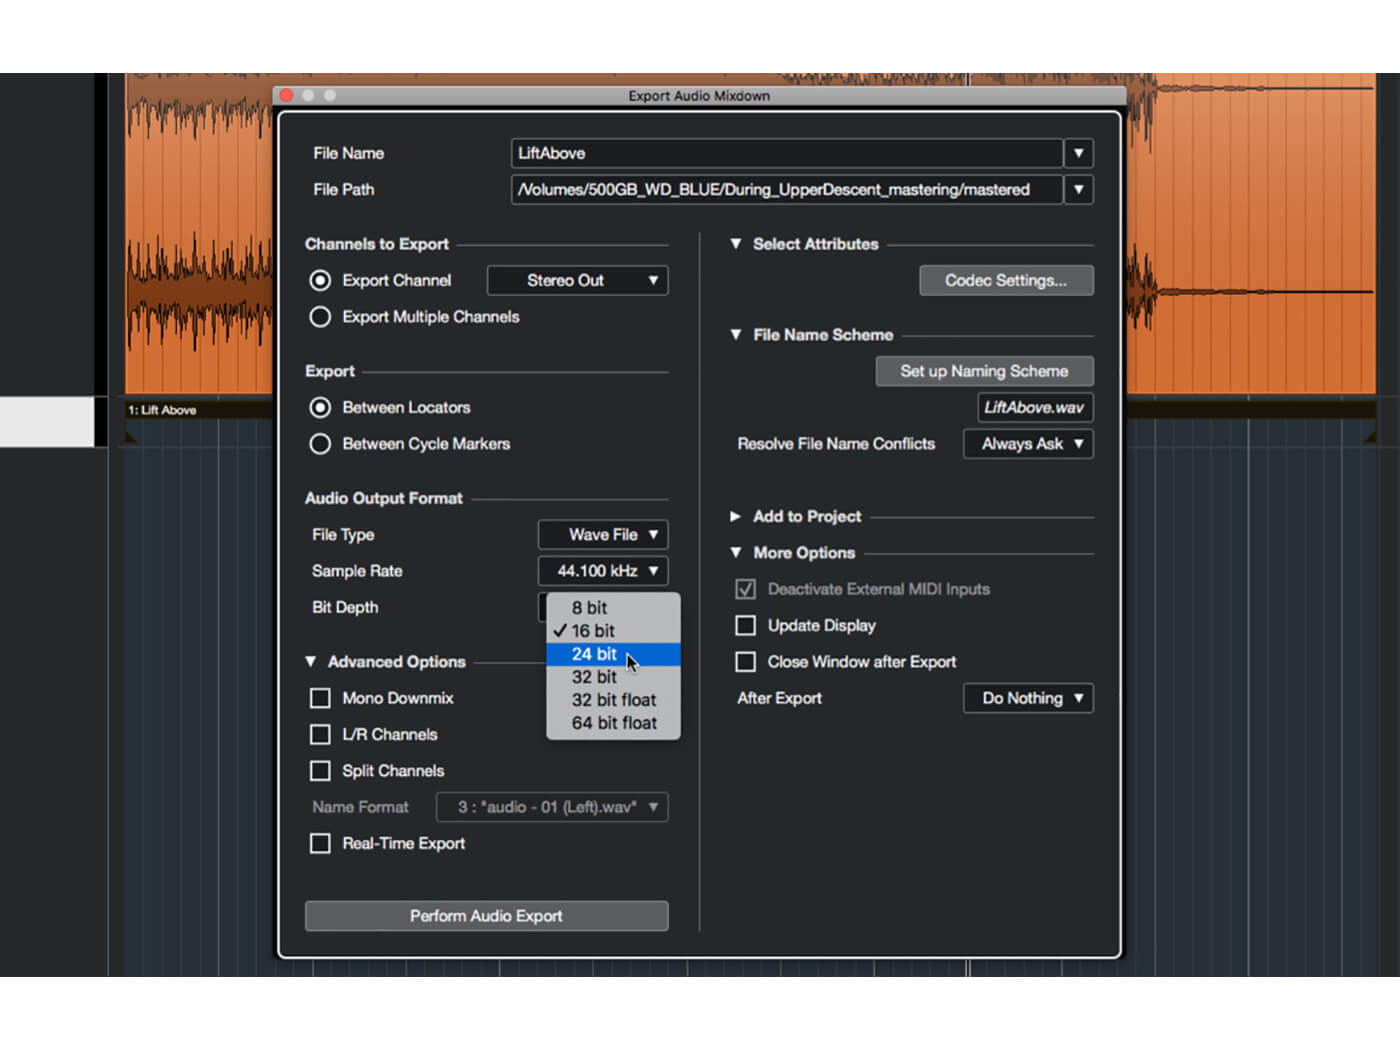
12. In the Export panel, select Between Locators and ensure you’ve selected the correct channels to export. Also, make sure you’re exporting to an uncompressed file type (WAV, AIF etc.) using the same sample format as the unmastered mix. Click Perform Audio Export when ready.
![]()
MASTER WITH A LINEAR TIME-BASE Cubase’s built-in time stretching abilities can be very useful when composing, but are definitely not wanted during mastering. It is therefore important to ensure all tracks are using a linear time base, and that Musical Mode is disabled for all audio files in the pool.
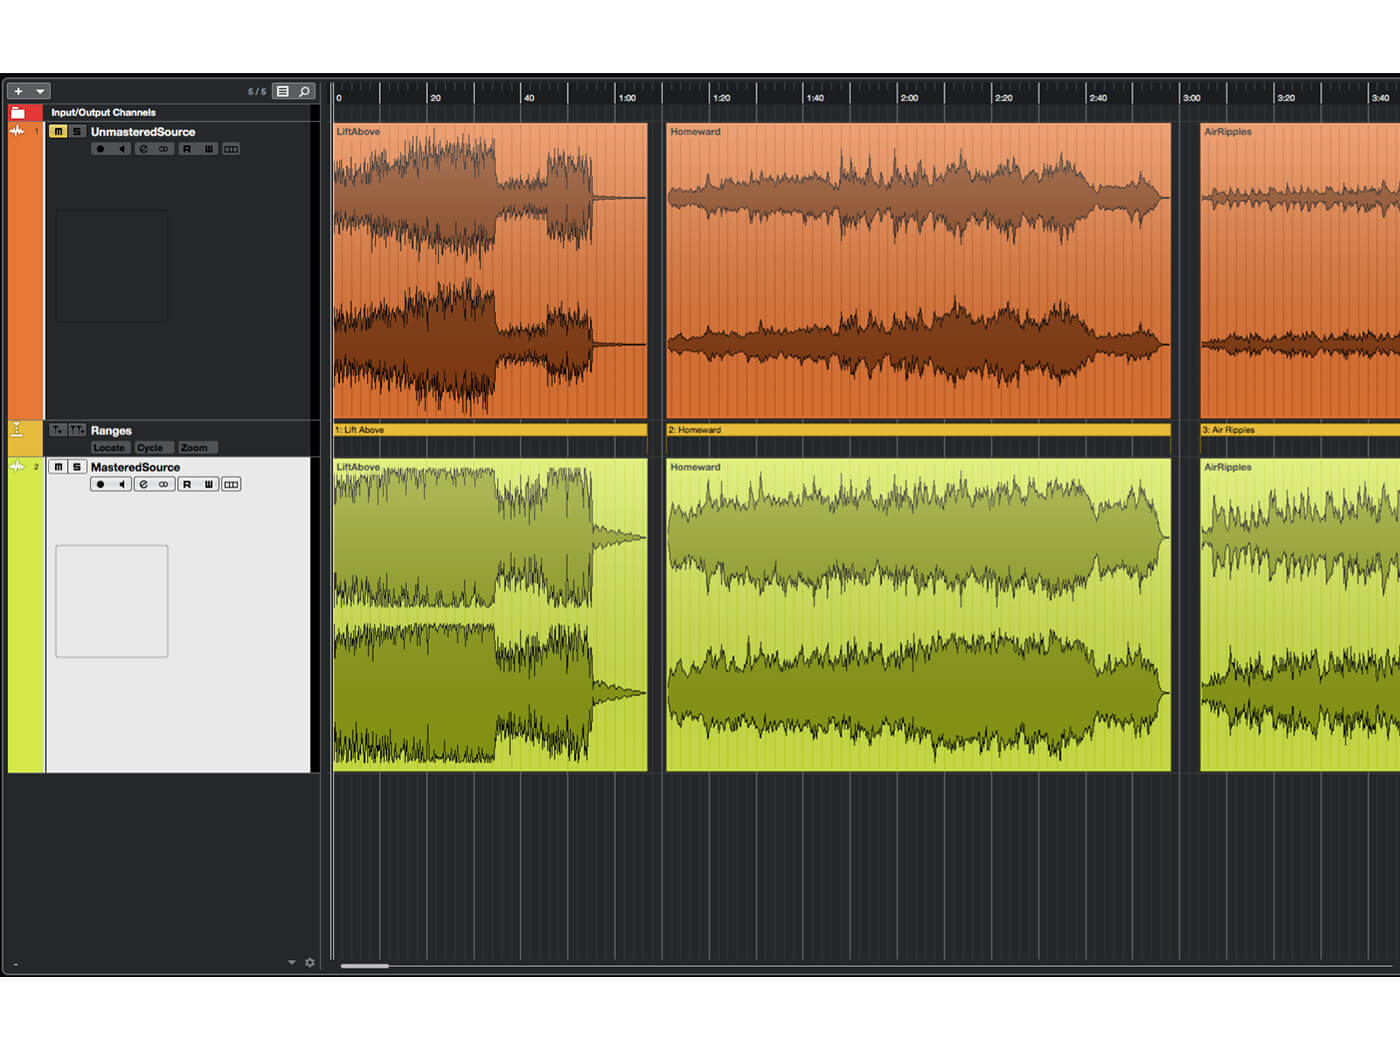
13. Repeat steps 5 to 12 for each mix in your montage. When finished, create a new audio track named ‘MasteredSource’ and drag your mastered mixes into this track, aligning each with its corresponding unmastered mix. Mute the UnmasteredSource track.
14. Work through your montage, comparing the volume of each mastered mix. If a master needs to be modified, reload its FX chain preset, make modifications and then re-export to a new mastered mix. Replace the mix on the MasteredSource track with this new file.
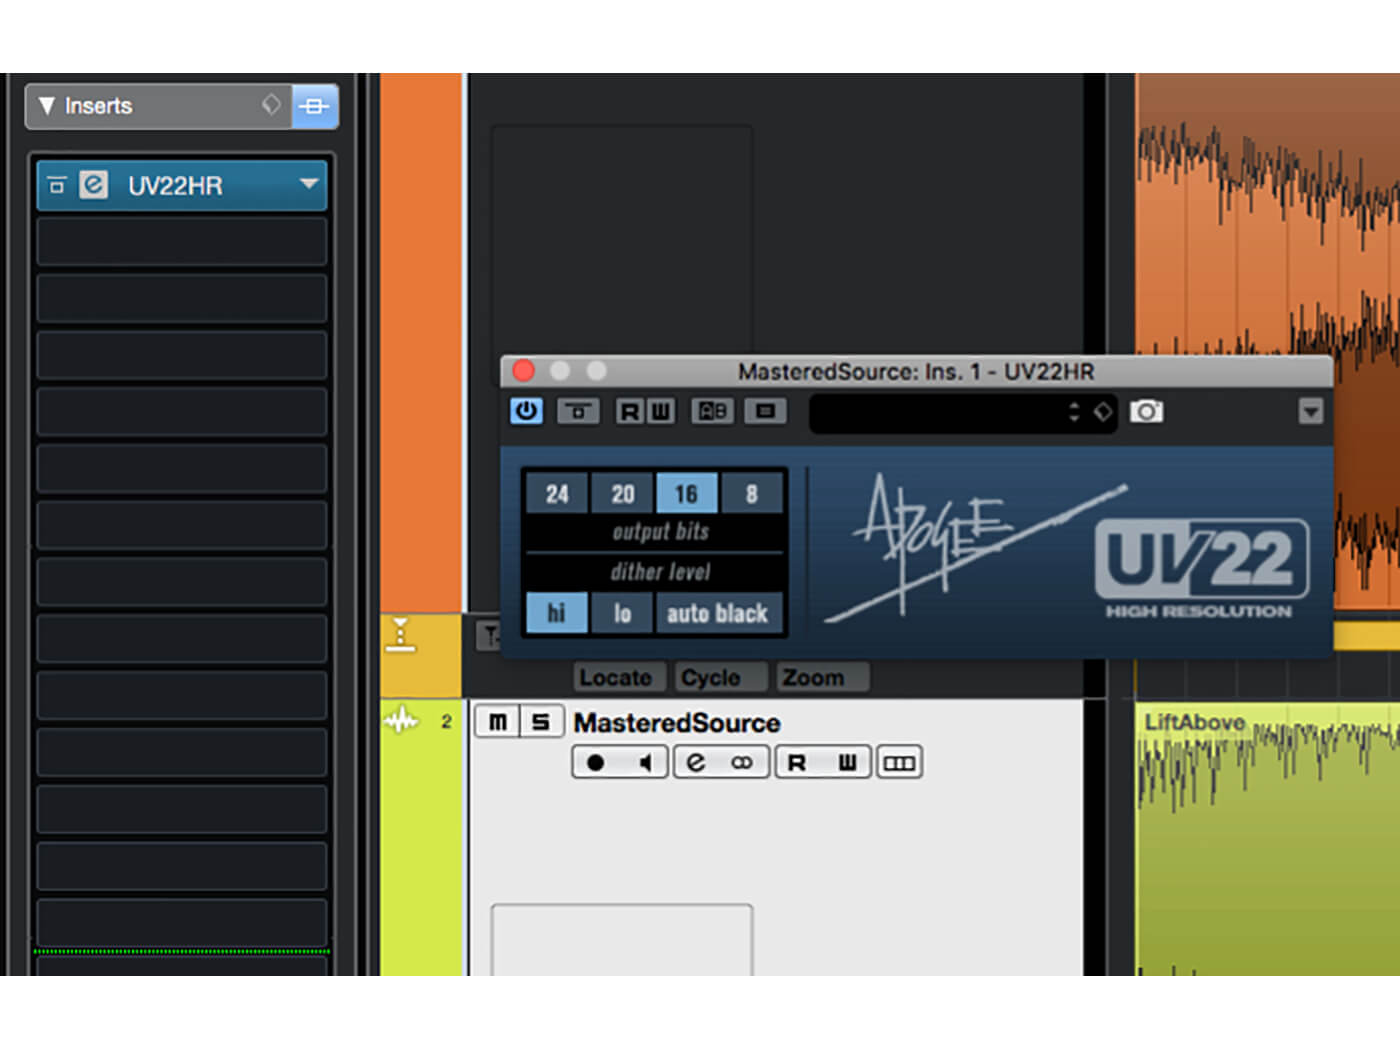
15. If your release files need to have a lower bit depth – perhaps you’ve worked at 24-bit but are distributing on CD – insert a UV22HR plug-in on the MasteredSource track. Set its Output Bits to match your targeted format, and choose the desired Dither Level.

16. Re-open the Export Audio Mixdown panel. Set the Audio Output Format to match your targeted format (44.1kHz/16-bit for CD, for example). Set the File Path to the ‘release’ subfolder you created in Step 1.
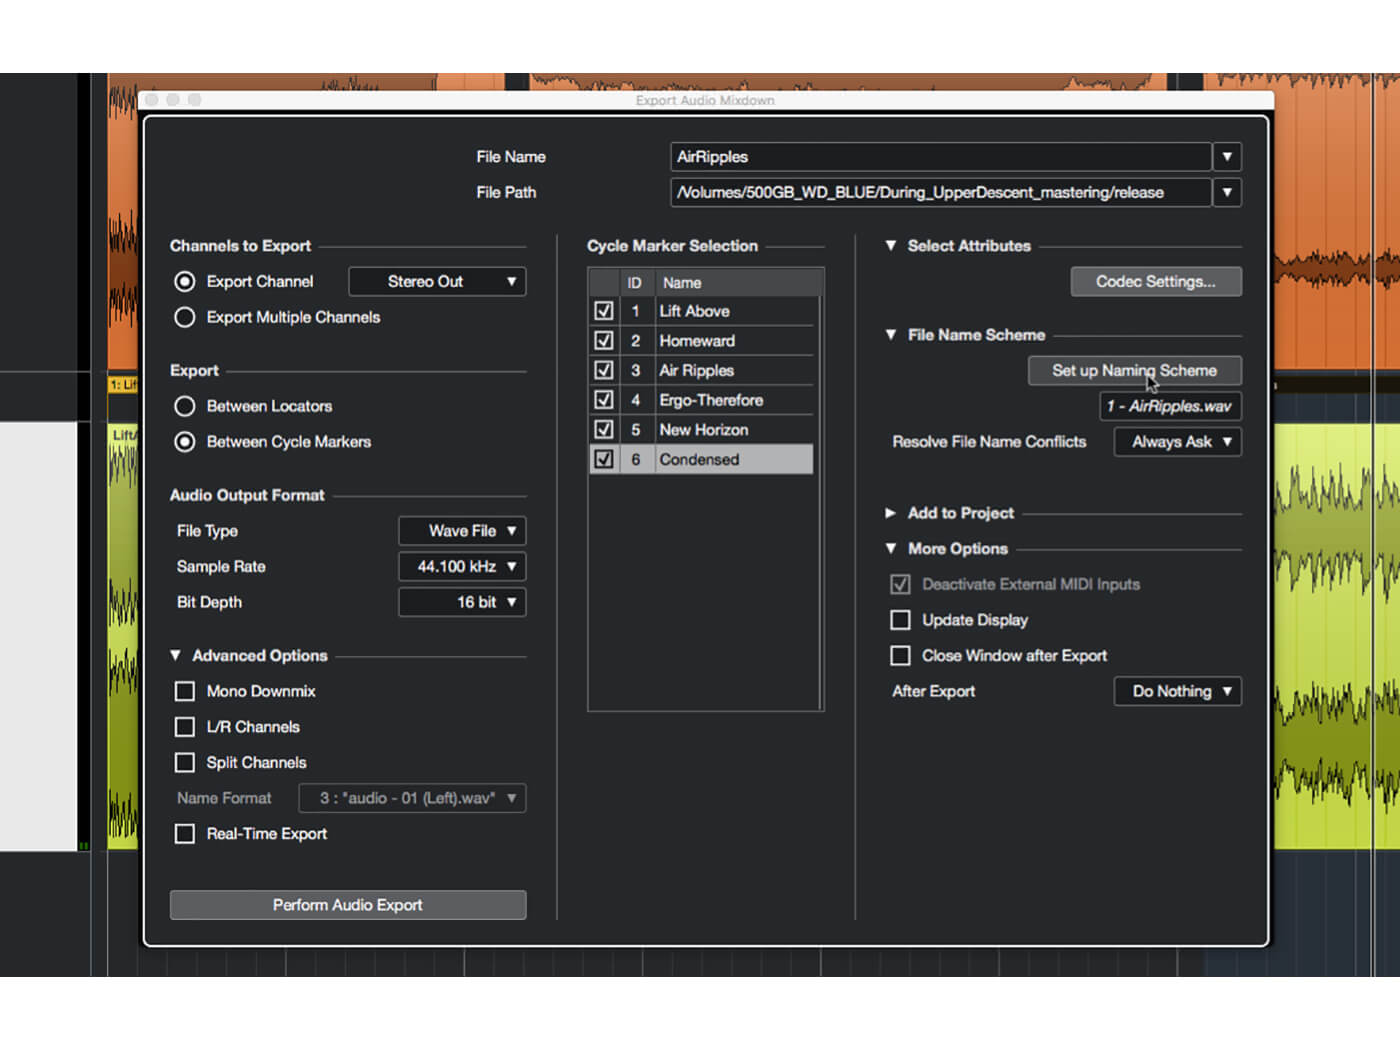
17. Select the Between Cycle Markers option and notice that a list of markers appears in the panel. Tick all of the markers that you wish to include in the export, then click Set up Naming Scheme to open the Naming Scheme panel.
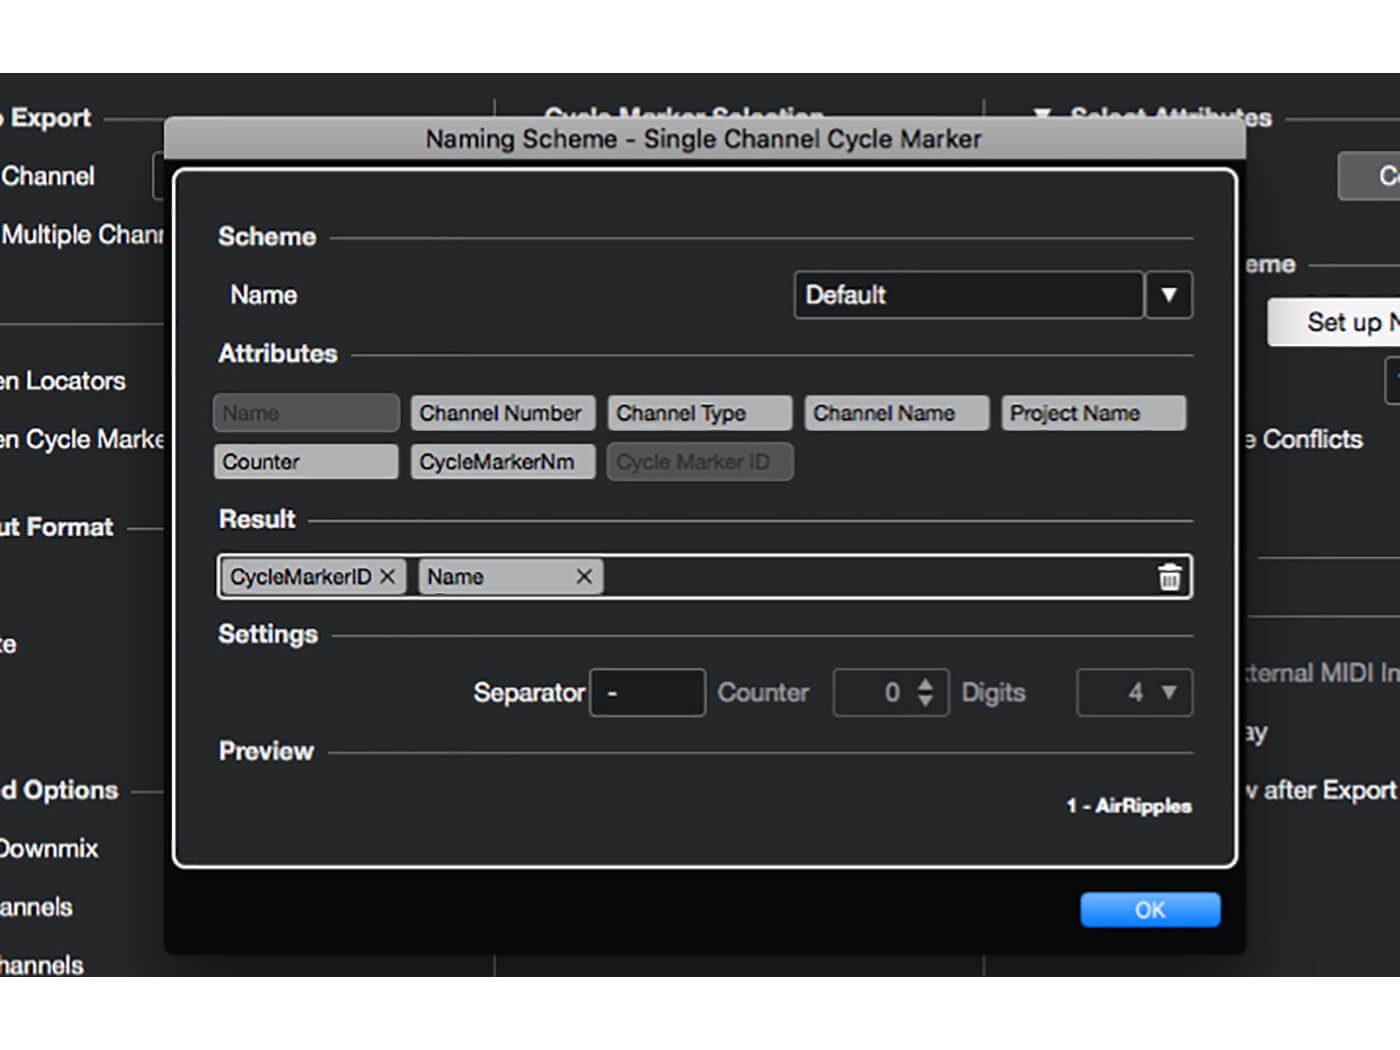
18. Use the buttons in the panel to define a name based on each marker’s ID and name, as shown in the image. Close the panel and then perform the audio export. When done, your ‘release’ subfolder will contain your finished, mastered audio files.