Sketching ideas and using voices in Cubase’s Score Editor
In our last Cubase tutorial, we introduced you to the basics of the Score Editor. This time, we dig deeper to learn about score voices and layers.
Cubase’s Score Editor is a great tool for turning MIDI parts into musical notation, ideal for composing and developing music that will ultimately be performed by musicians. It also lets you create parts from scratch by writing musical notation.
For those au-fait with music theory, sketching out ideas in notation can be liberating. It cuts out the distractions that come with using a DAW – searching for suitable beats and sounds, working out chord voicings and timings, becoming proficient at actually playing your idea – and helps focus the mind on the core of your idea.
Lead sheets
Cubase’s Score Editor allows you to work as you would with a pencil and a pad of manuscript paper. Using it as a sketch pad will save time later when you wish to turn your sketch into a recording or share it with other musicians.
A helpful way to sketch ideas is to create a lead sheet, which shows basic chord names over a notated melody line. Lead sheets are regularly used as guides by musicians who are jamming out ideas or as a kind of crib sheet during a live performance.
Creating lead sheets in Cubase is easy, especially if you sketch out your idea first using Cubase’s Chord Track. That way, the Score Editor will refer to the chord track and synchronise the chord names with your score. The names will stay synced with any subsequent changes you make to the Chord Track.
Score voices
The words ‘monophonic’ and ‘polyphonic’ may be familiar to you from the world of synthesis but they can also be applied to traditional acoustic instruments: brass and woodwind instruments are essentially monophonic, while stringed and percussive instruments are generally polyphonic.
When it comes to writing music notation for instruments, it is easier to write (and read) music for monophonic than it is for polyphonic instruments. This is because these instruments can only play a single musical note at any time, so their notation is made up of a series of individual notes.
Polyphonic instruments, on the other hand, can play various parts simultaneously. For example, on a piano, you may play a bass line with the left hand, and chords and embellishments with the right. When notated, this results in a more complex score because the different musical parts are stacked on the same stave. Typically, these ‘inner’ parts are referred to as ‘voices’, and this is the nomenclature used by Cubase.
When scoring a part that contains multiple voices, the notation for each voice must adhere to the rules of music notation – for example, the notes and rests within a bar of music must add up to the length of the bar, as determined by the active time signature. This can be a challenge when working with the traditional tools of pencil and manuscript paper. Thankfully, Cubase does the heavy lifting here by allocating each note to a numbered voice and automatically managing its bar-timing rules. Notes can share the same voice or can be allocated their own.
In the know
When turning an existing MIDI part into a score, Cubase will attempt to identify voices within the part and allocate notes to voice numbers accordingly. But it often requires assistance from the user to get this right.
When writing music by entering new notes directly into the Score Editor, though, you can specify which voice to allocate a note to before you enter it. The best way to make use of this is to work out how many voices your part requires in advance, and then enter the notes for each voice in separate passes.
To get the most from this month’s walkthrough, you will need to know the basics of reading and writing notation.
Sketching ideas and using voices in Cubase’s Score Editor: step-by-step
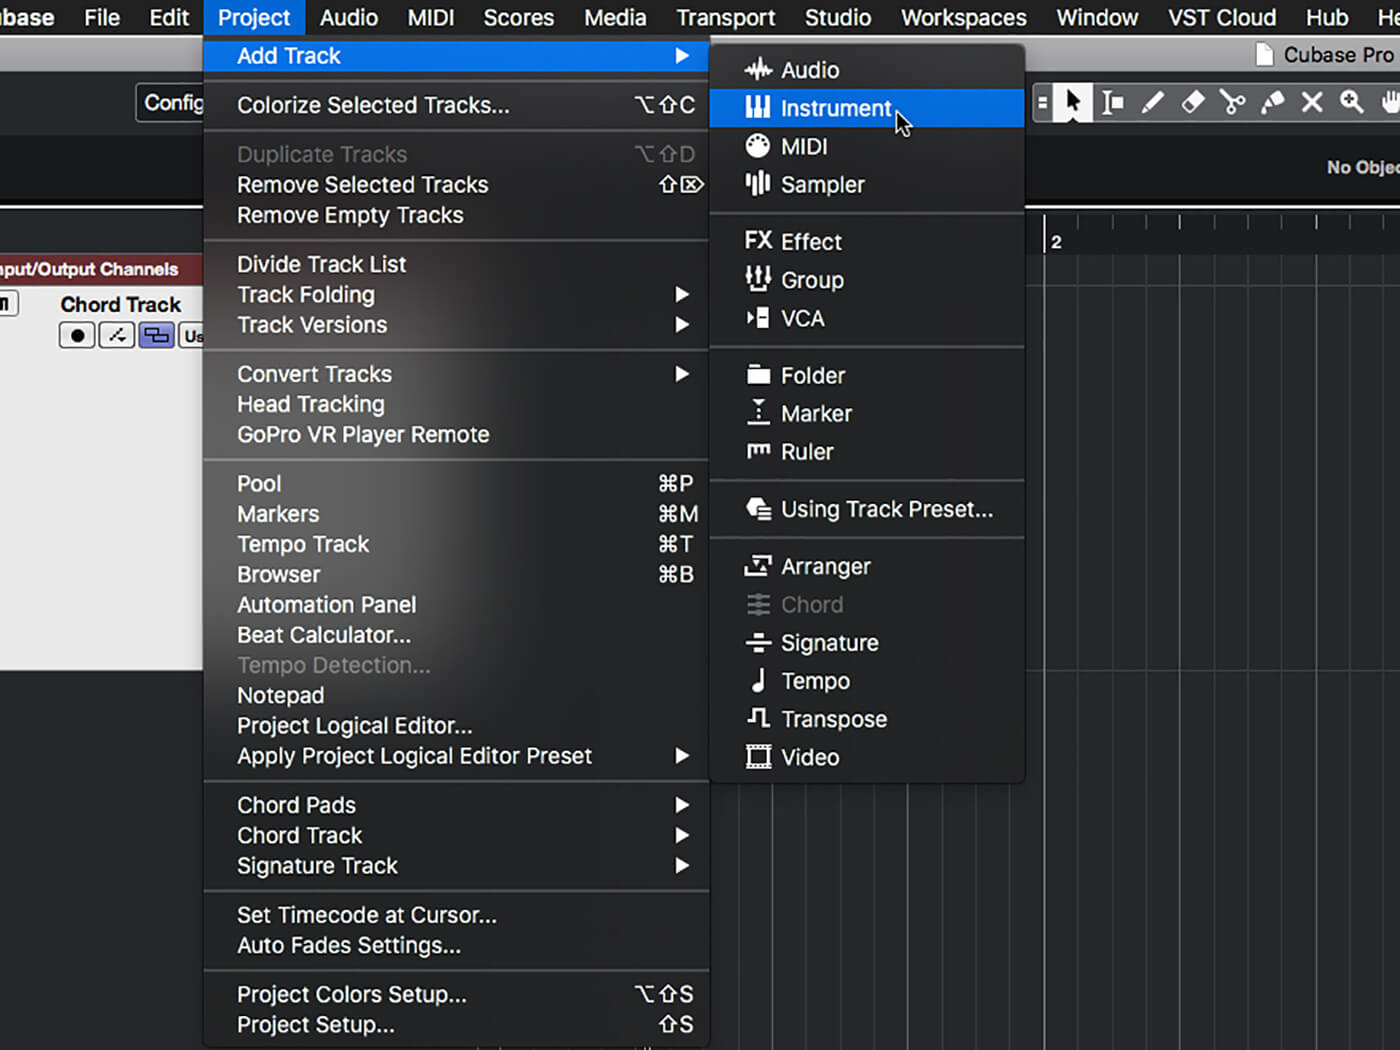
1. Create a new project in Cubase. Use Project > Add Track in the program menu to add a Chord track and an Instrument track. Use HALion Sonic SE for the instrument track, name it ‘melody’ and load an acoustic piano sound into it.
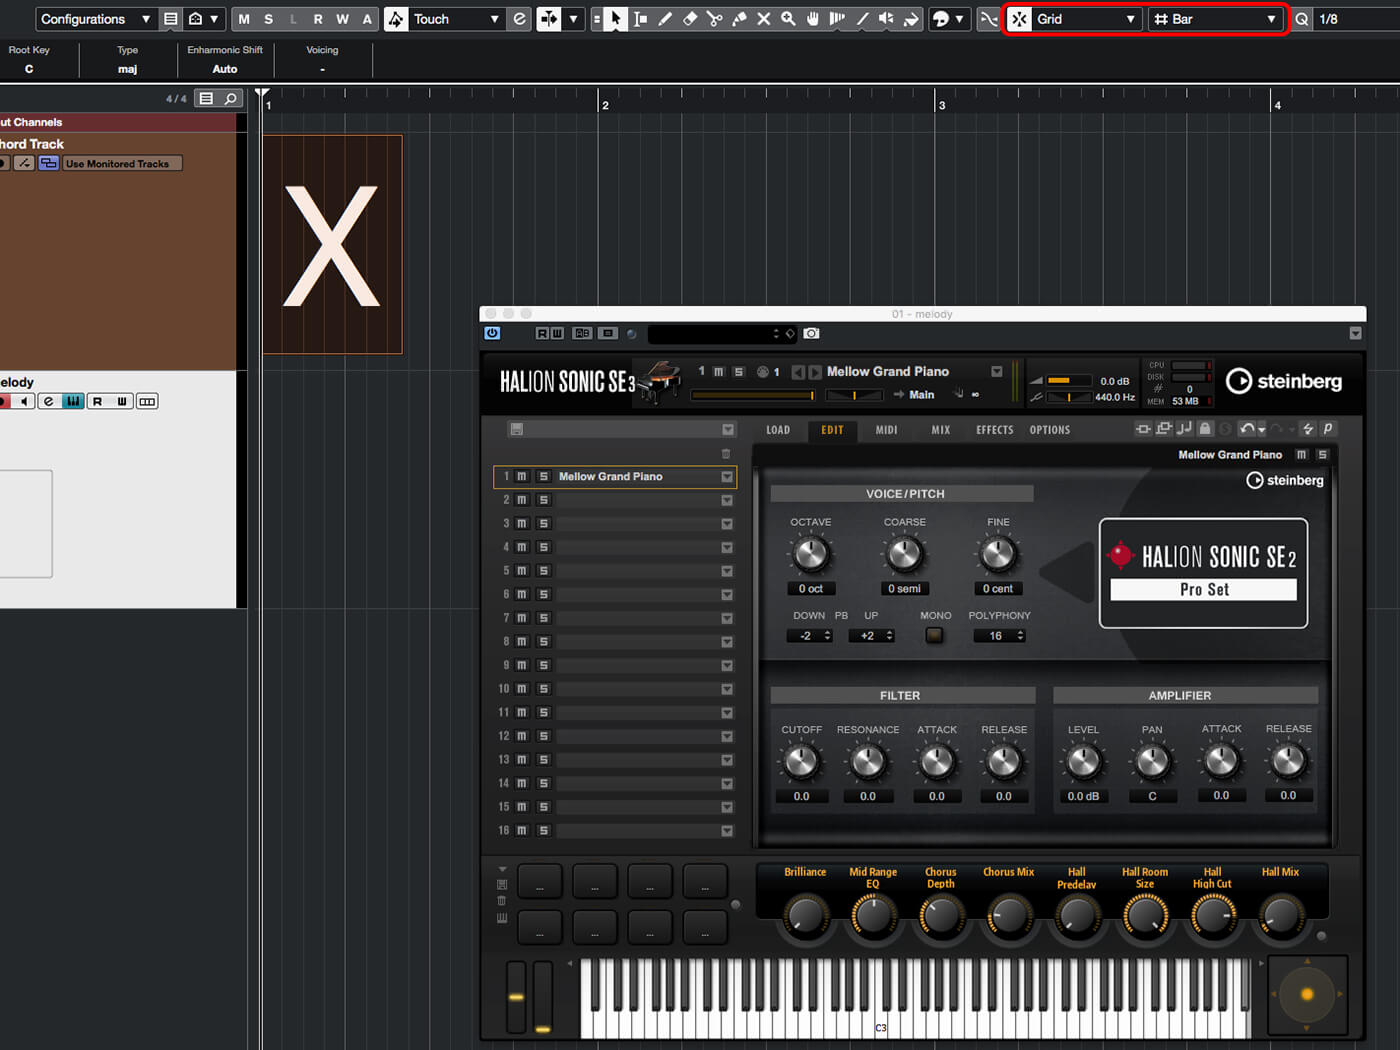
2. Take some time to come up with a simple chord progression. Enable grid-snapping and set the grid size to Bar (highlighted in image). Switch to the Draw (pencil) tool and click at bar 1, beat 1 of the Chord Track.
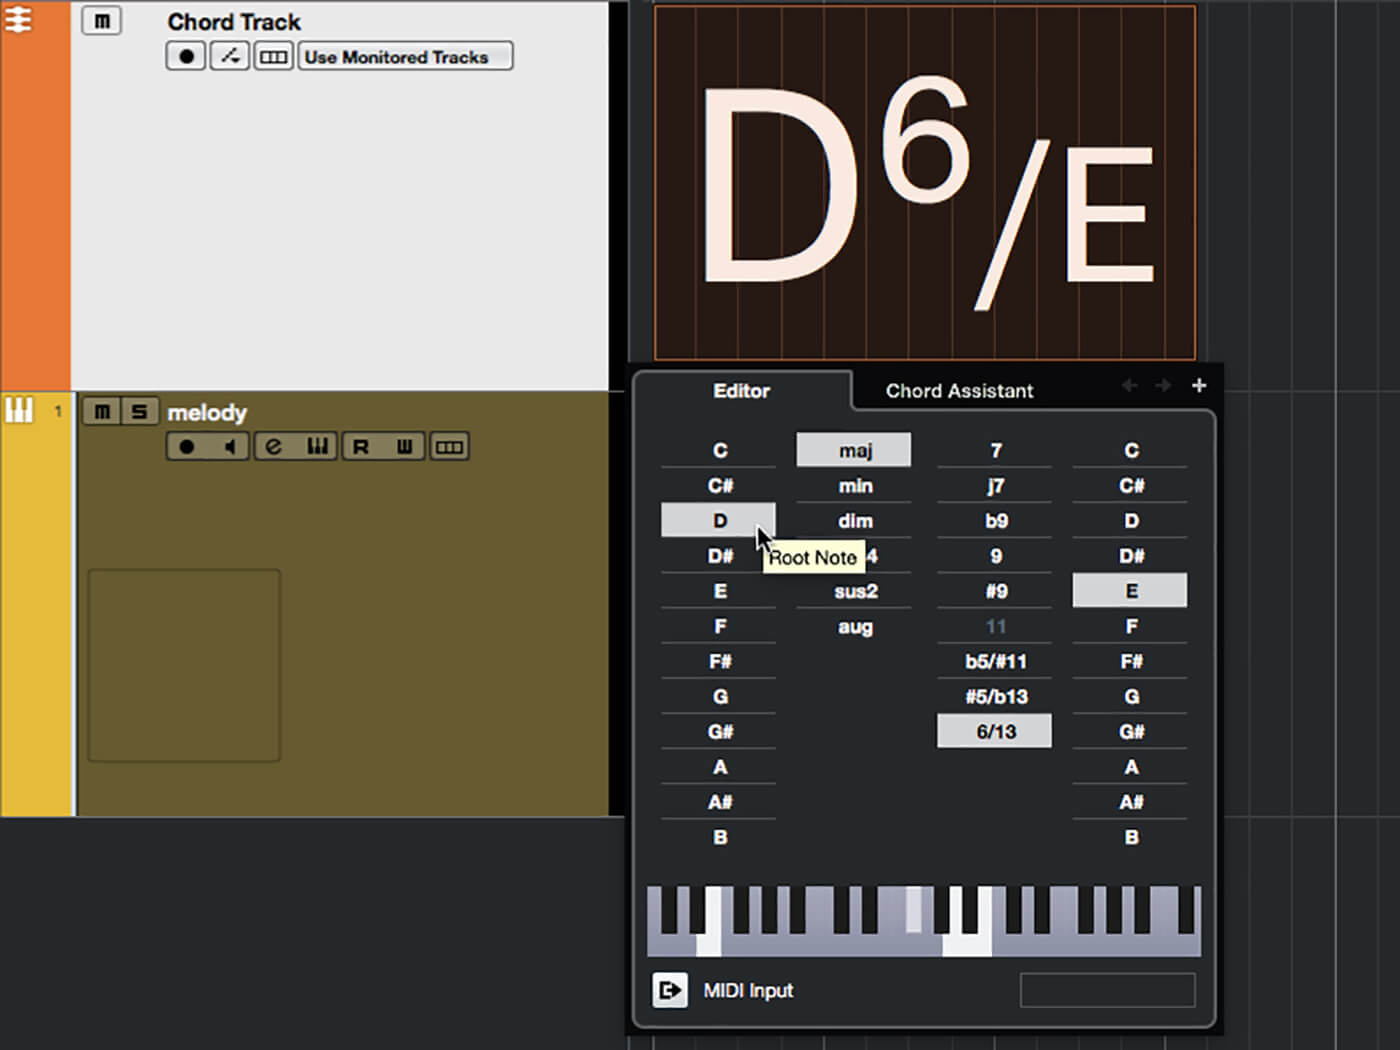
3. Switch to the Selection (arrow) tool and double-click on the newly created chord event to open the Chord Editor. Either play your chord from a MIDI controller or use the editor to assemble the chord name.
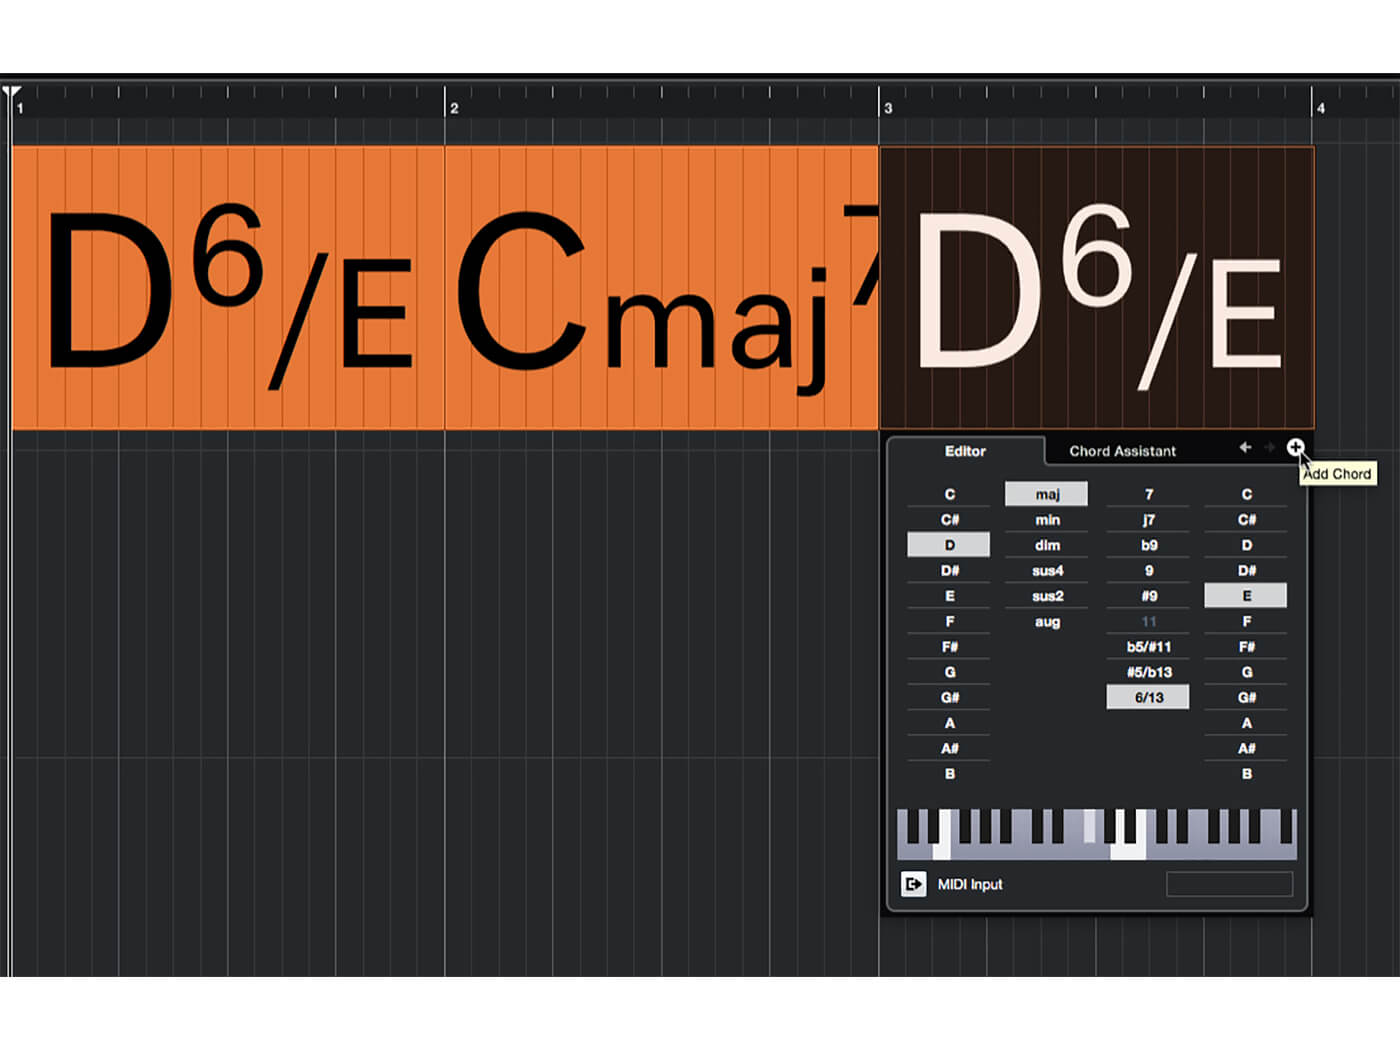
4. Click the ‘+’ sign at the top of the Chord Editor to add a new chord – our grid setting will ensure that the new chord starts at the beginning of the next bar. Enter the name of your next chord. Repeat for your entire chord sequence.
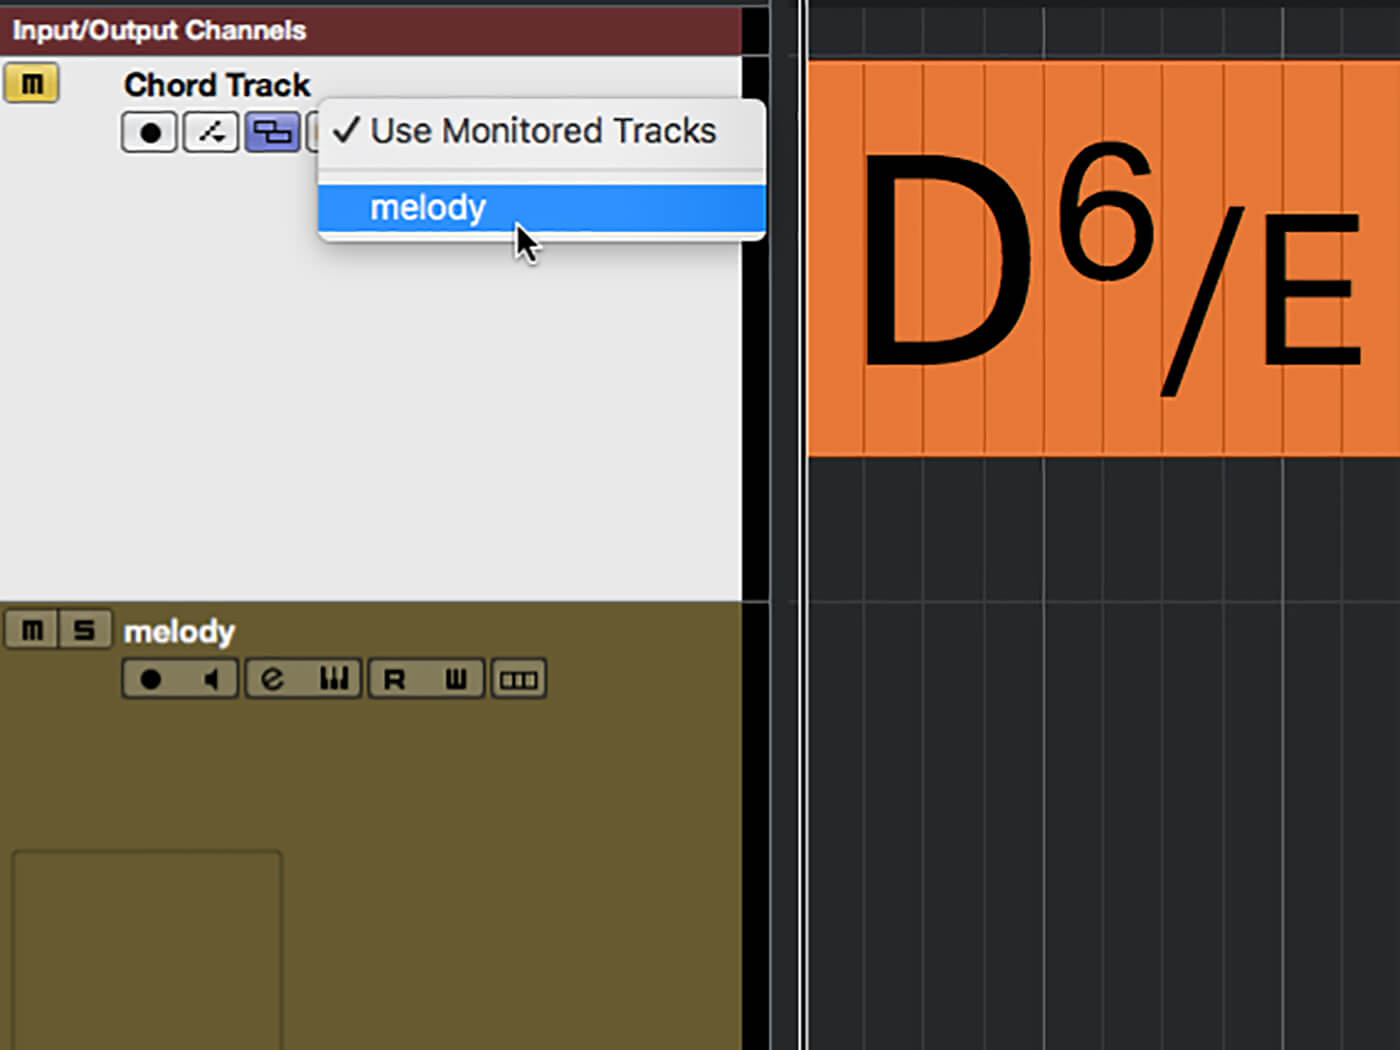
5. By default, the Chord Track will send MIDI notes to any Instrument or MIDI track that is monitor-enabled, but you can also route it to a specific track. Either way, you should mute the Chord Track when you don’t want to monitor it.
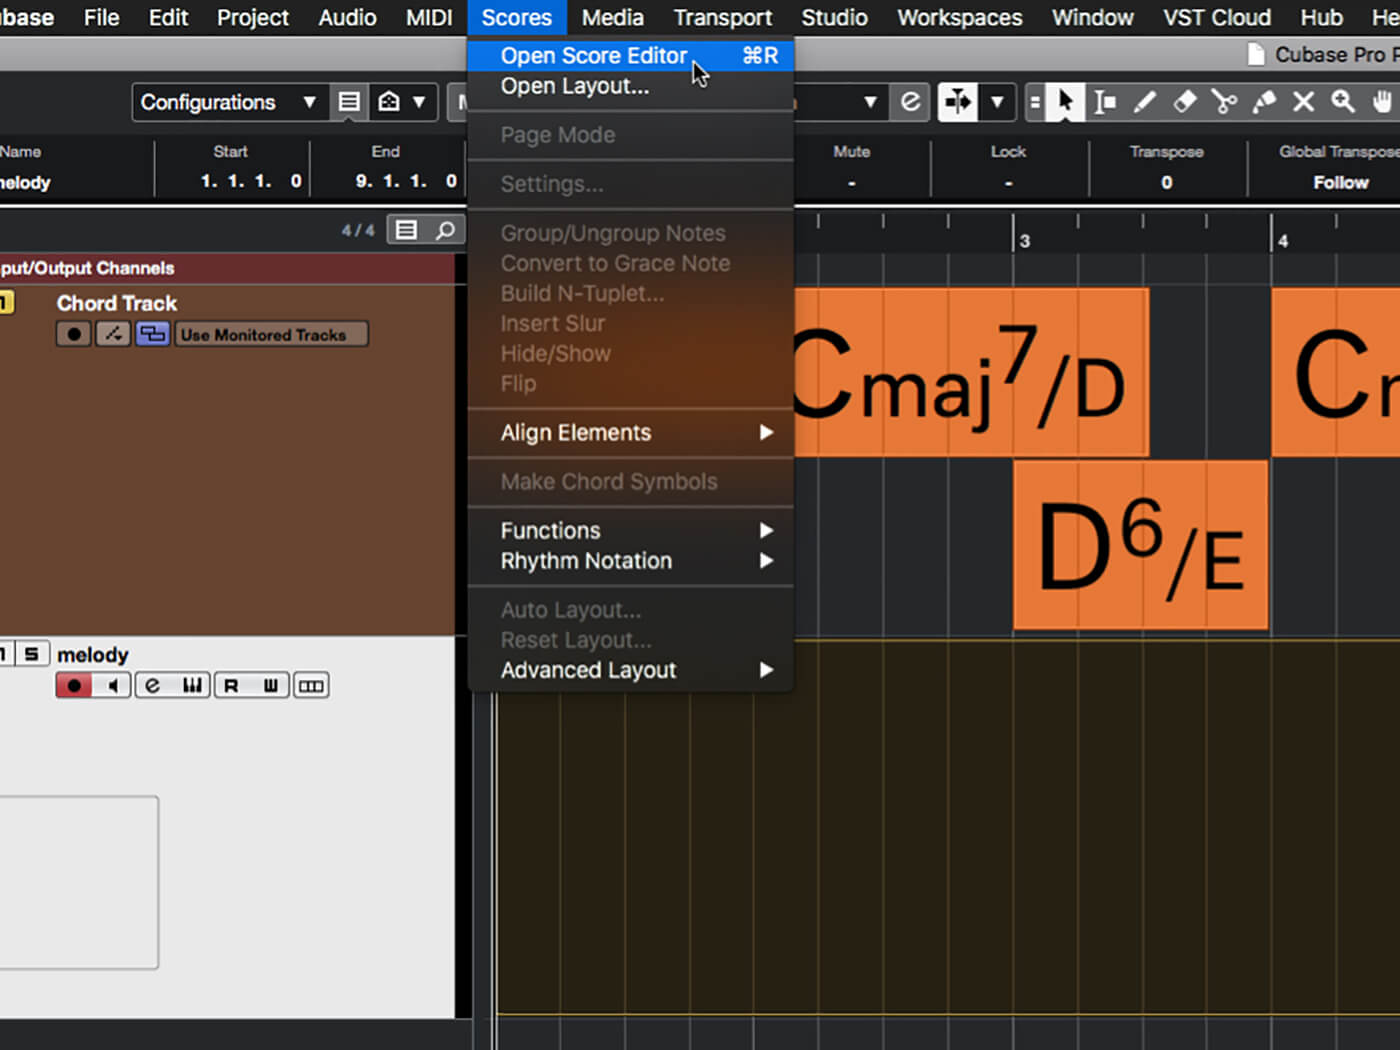
6. Switch to the Draw tool and, on your melody track, drag out a new part that is the same length as your chord progression. With the newly created part selected, select Scores > Open Score Editor from Cubase’s program menu.
![]()
CHORD TRACK Cubase has a special track type called the Chord Track. This isn’t intended as a track that creates an audible output but, rather, a way to define the harmonic framework of your project. It also has tools to assist in finding suitable chords.
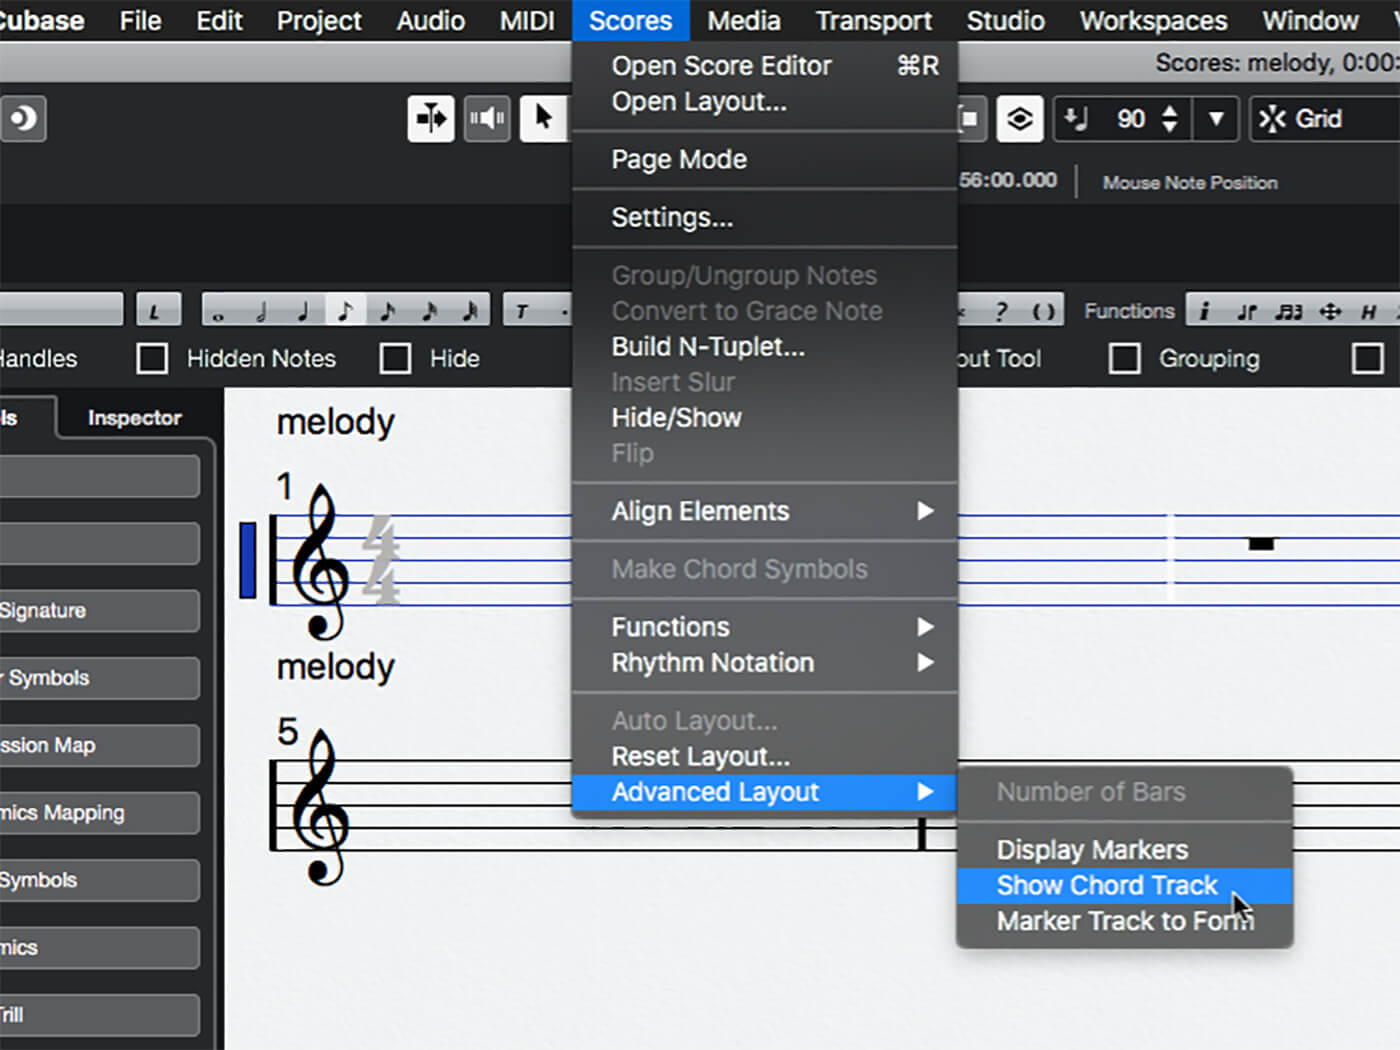
7. Open Cubase’s Scores menu, move to the Advanced Layout submenu and activate the Show Chord Track option. Your chords will now be drawn above the stave. This will affect any and all scored parts in a project.
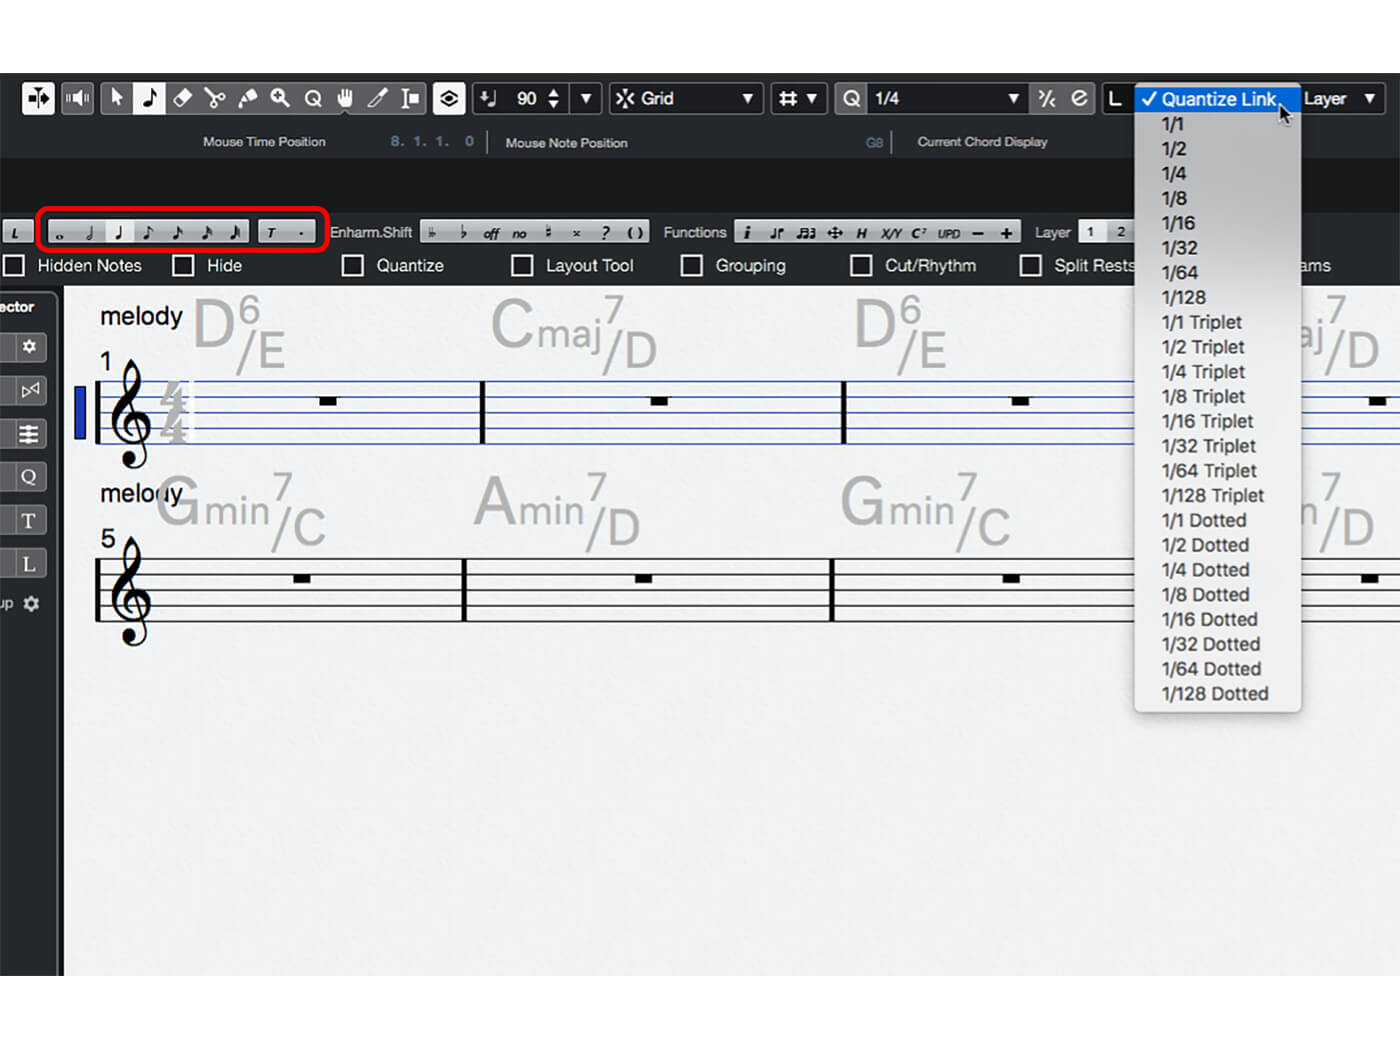
8. Switch to the Insert Note cursor tool. Open the Length Quantize menu and select Quantize Link. Click on a few notes in the Note Length toolbar (highlighted in image) and notice how the editor’s main quantise value also changes.
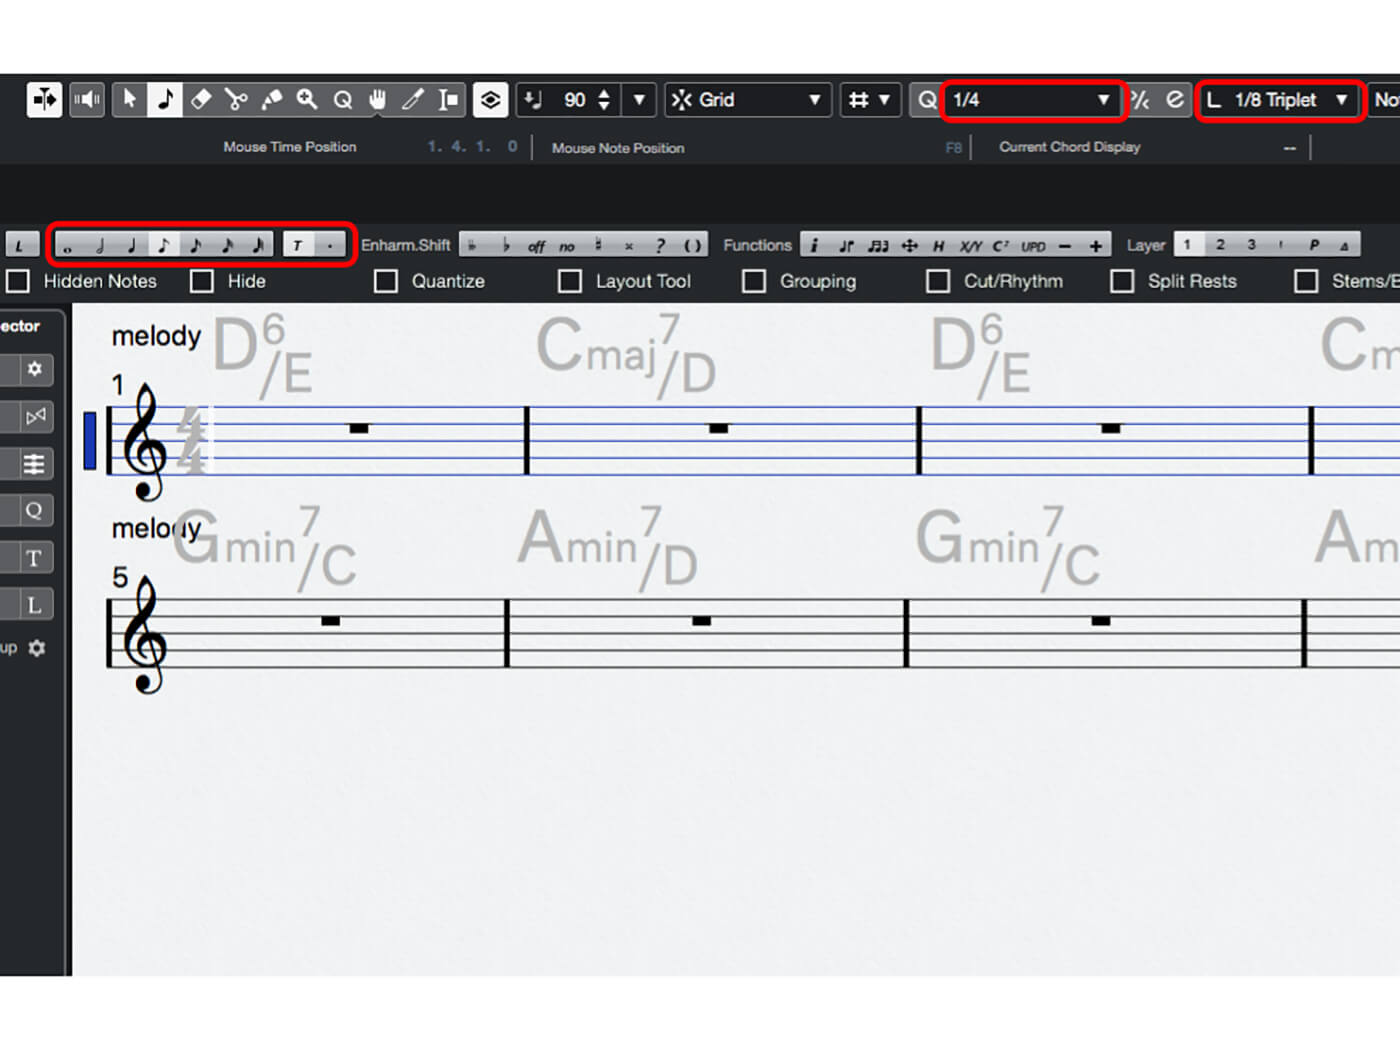
9. Change the Length Quantize to a different value and click around in the Note Length toolbar again, noticing that this time the main quantise value remains static while the Length Quantize changes (see highlights in image).
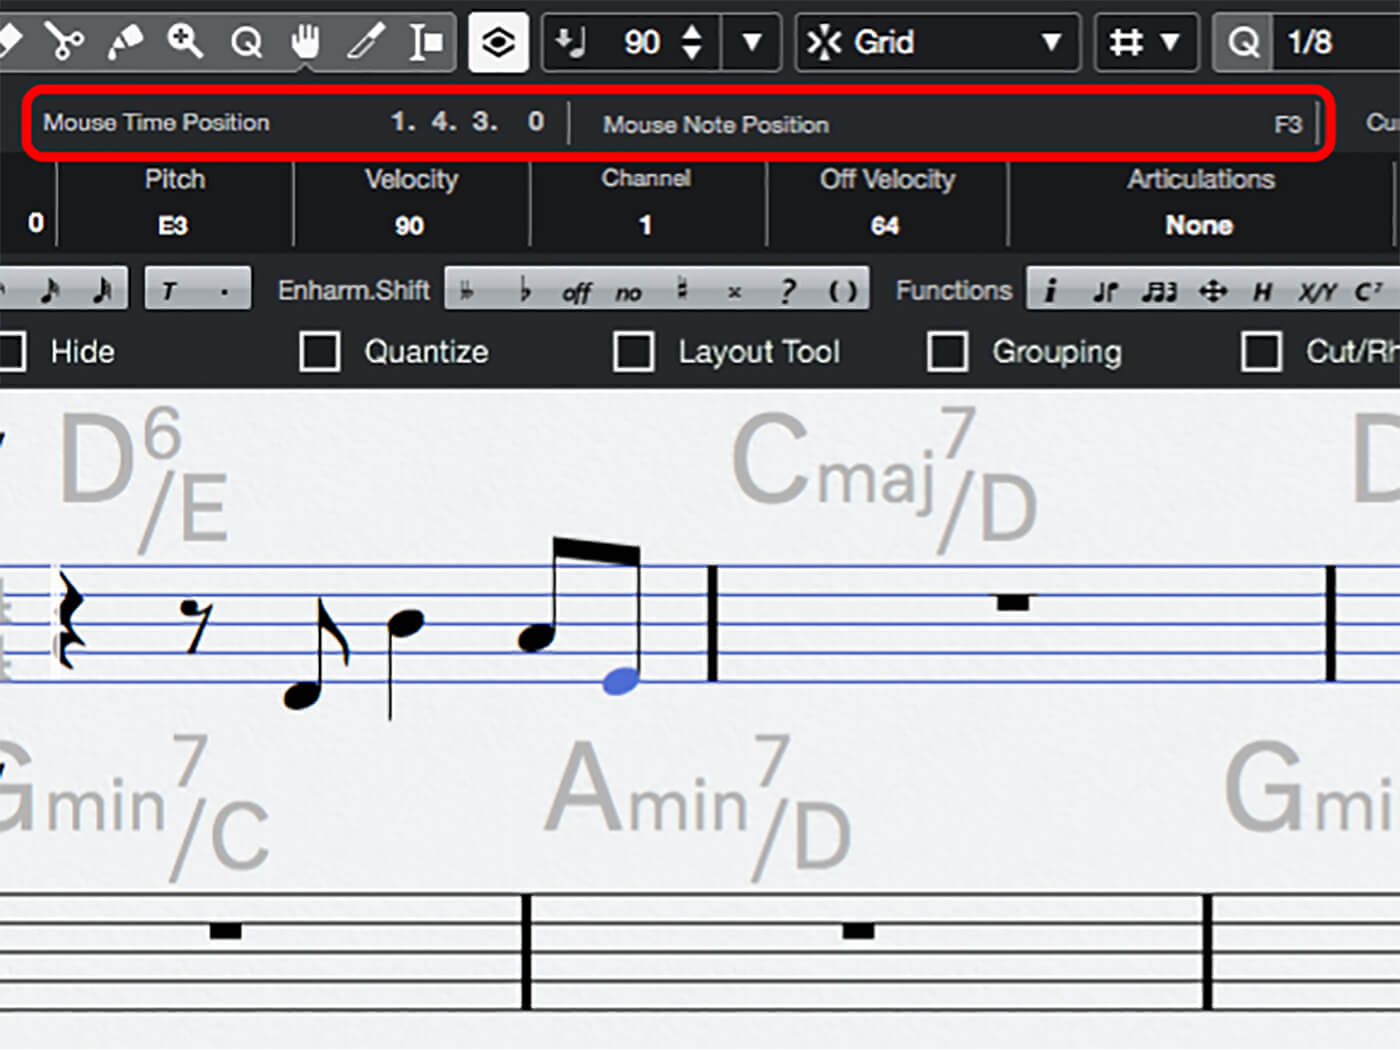
10. Roll the Insert Note cursor tool around on the stave, noticing the Mouse Time Position and Mouse Note Position readouts. Use the tool and readouts to start writing your melody line, clicking to enter notes, and using the editor’s toolbar to adjust positions and lengths.

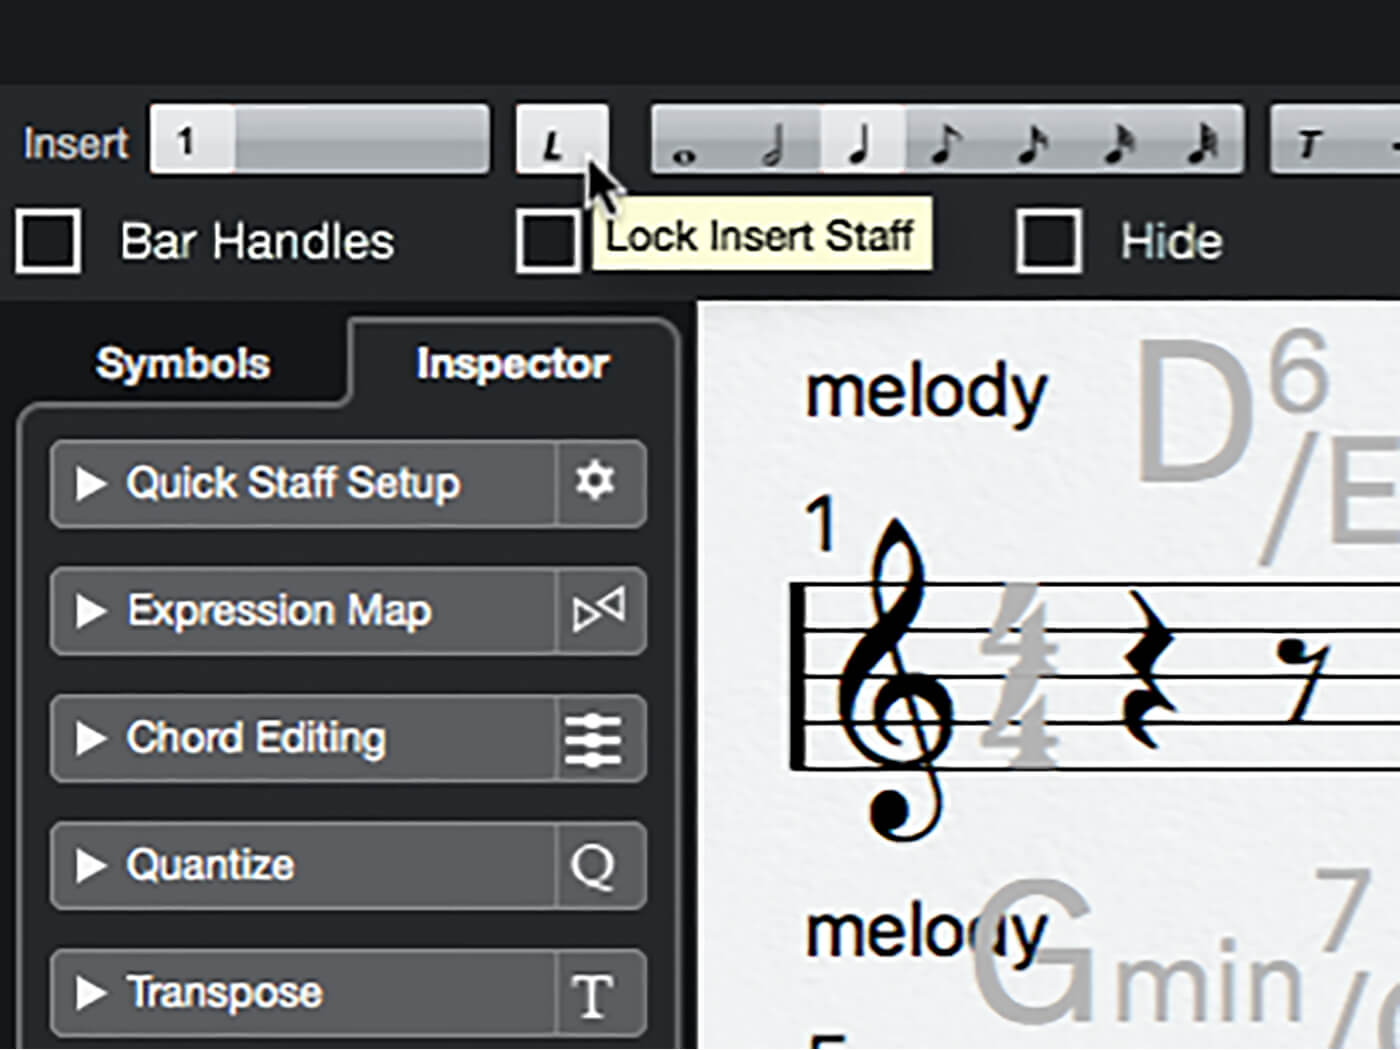
11. Notice that Cubase manages rests automatically. Also, if you’re having difficulty adding notes below the stave and find that they’re instead being added to the stave below, activate the “Lock Insert Staff” button, found on the left of the Note Length toolbar.
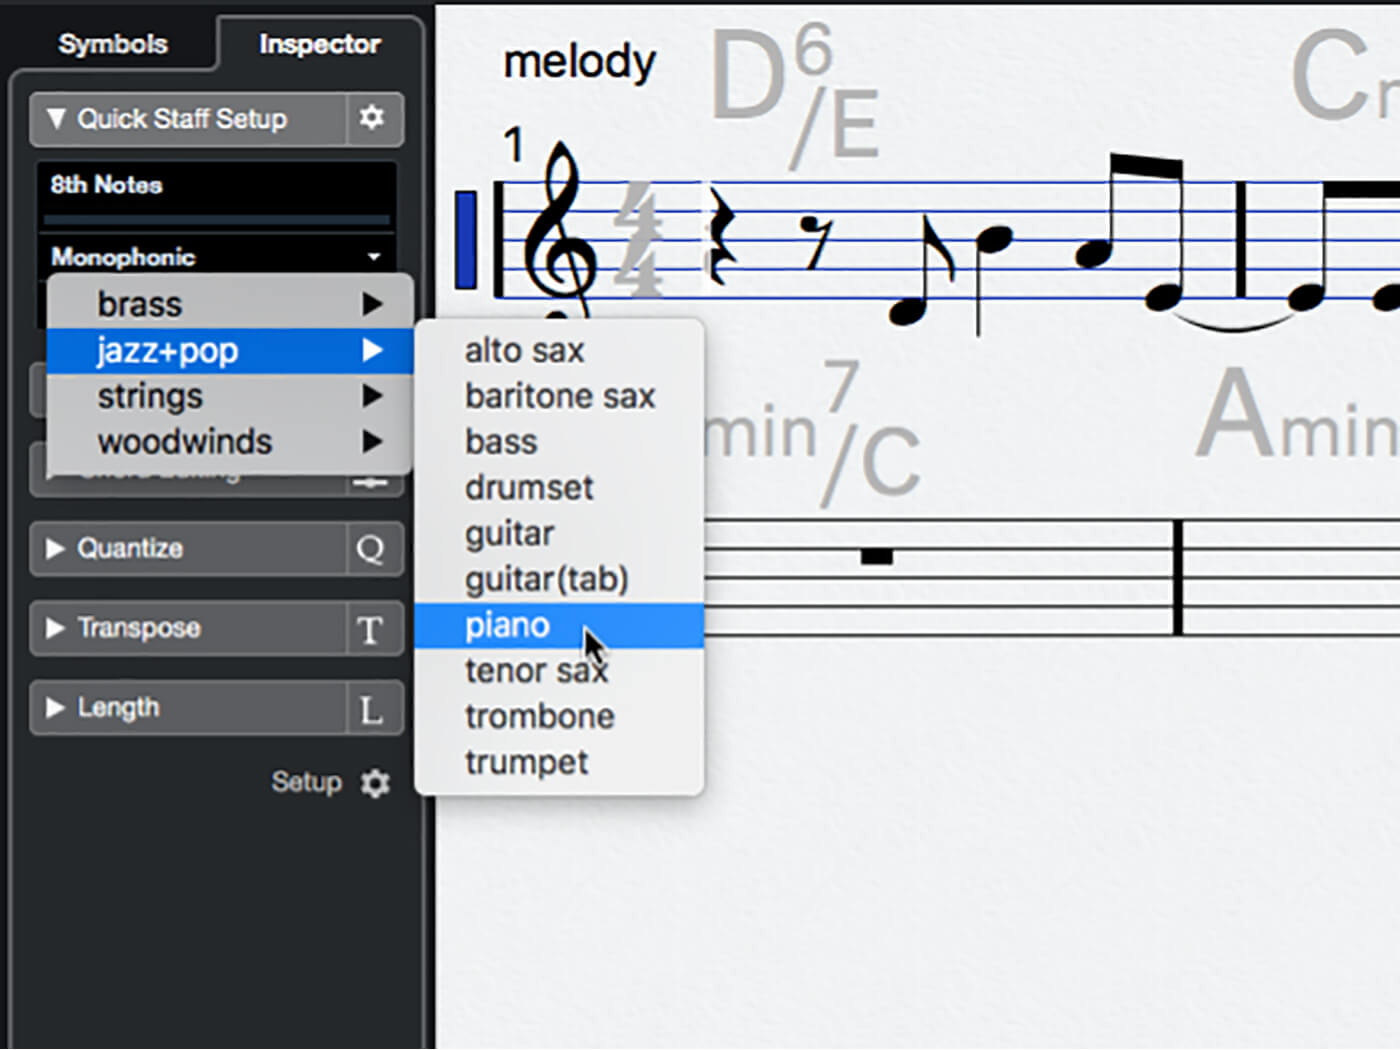
12. Let’s step things up by turning our lead sheet into a polyphonic piano part. Expand the Quick Staff Setup section in the editor’s left-hand zone. Click on the Staff Presets menu and select ‘jazz+pop > piano’.
![]()
MOUSE TIME POSITION BUG If you are working in the Score Editor and notice that the Mouse Time Position readout is showing a weird number that isn’t in a bars-and-beats format, open the part in the Key Editor and then re-open it in the Score Editor, which should solve the problem (just don’t ask us why).
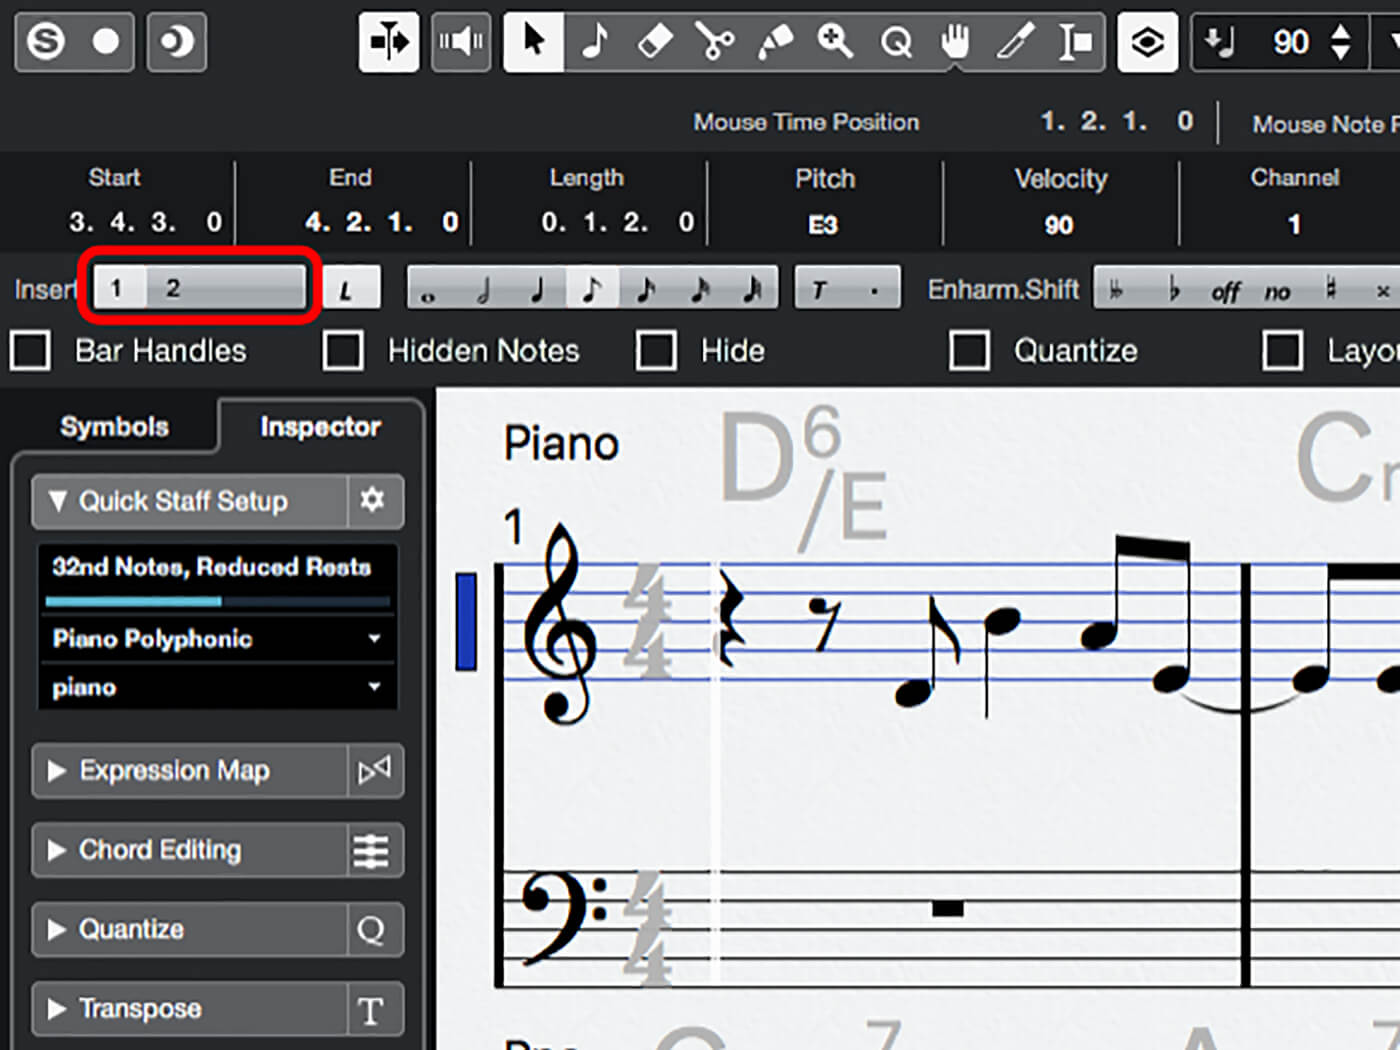
13. Now that we have a split polyphonic stave, Cubase will have automatically created some new voices – you can see this in the voice selection toolbar (highlighted in the image). There are now two voices per stave (the maximum is four per stave).
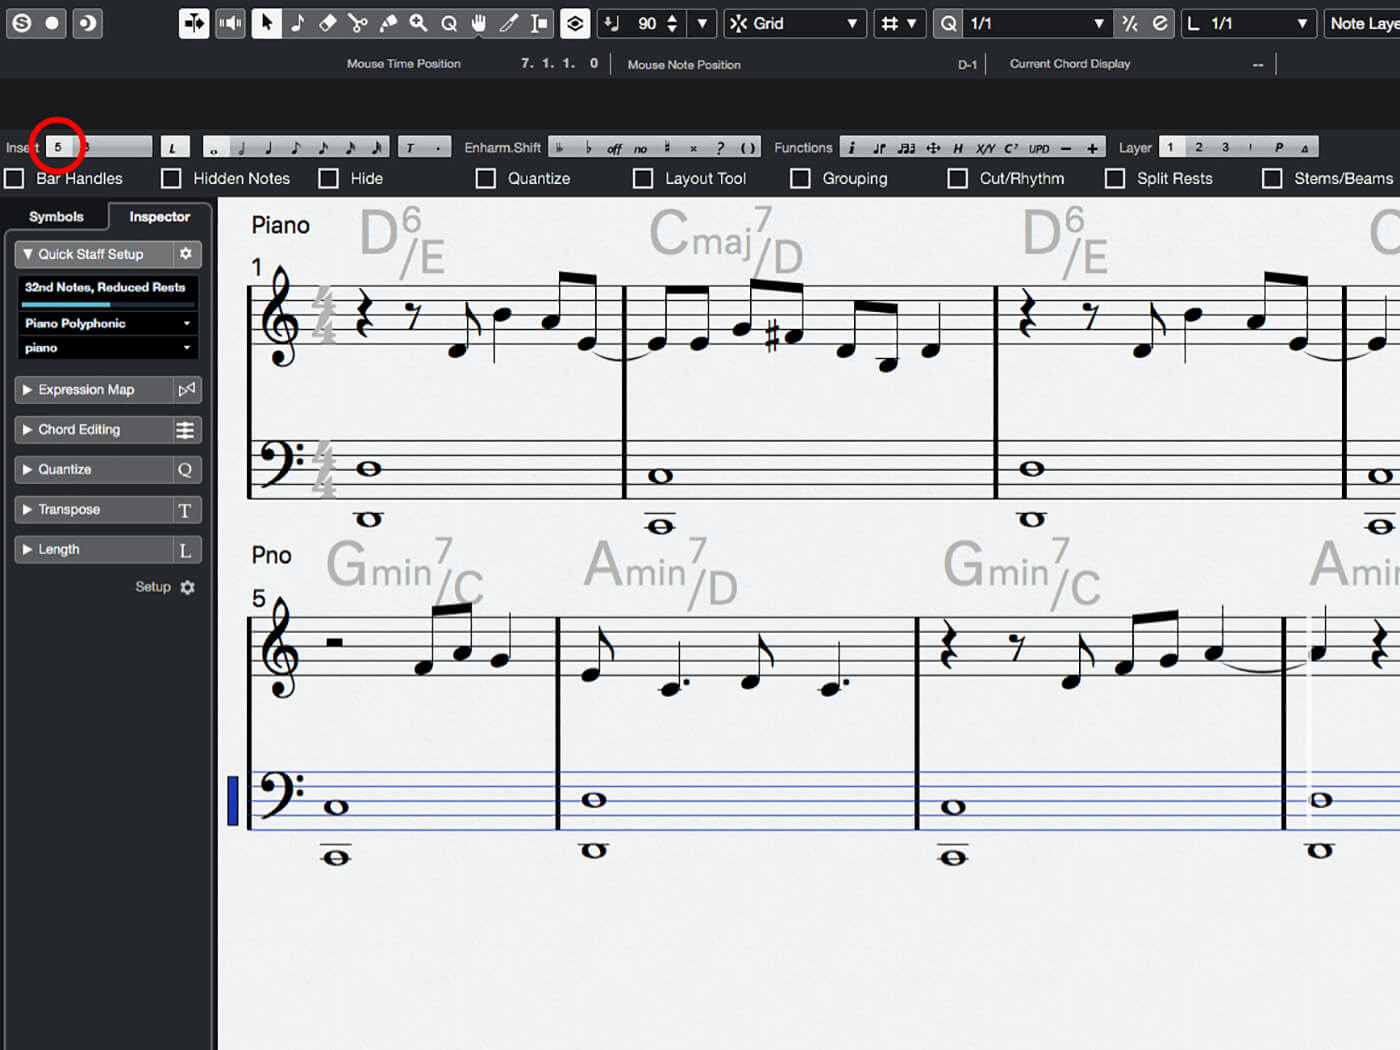
14. Activate the lower (bass) part of the stave. Activate the ‘5’ button in the voice-selection toolbar so that new notes will be allocated to voice 5. Enter a left-hand part into the lower stave (chord root notes will do fine).
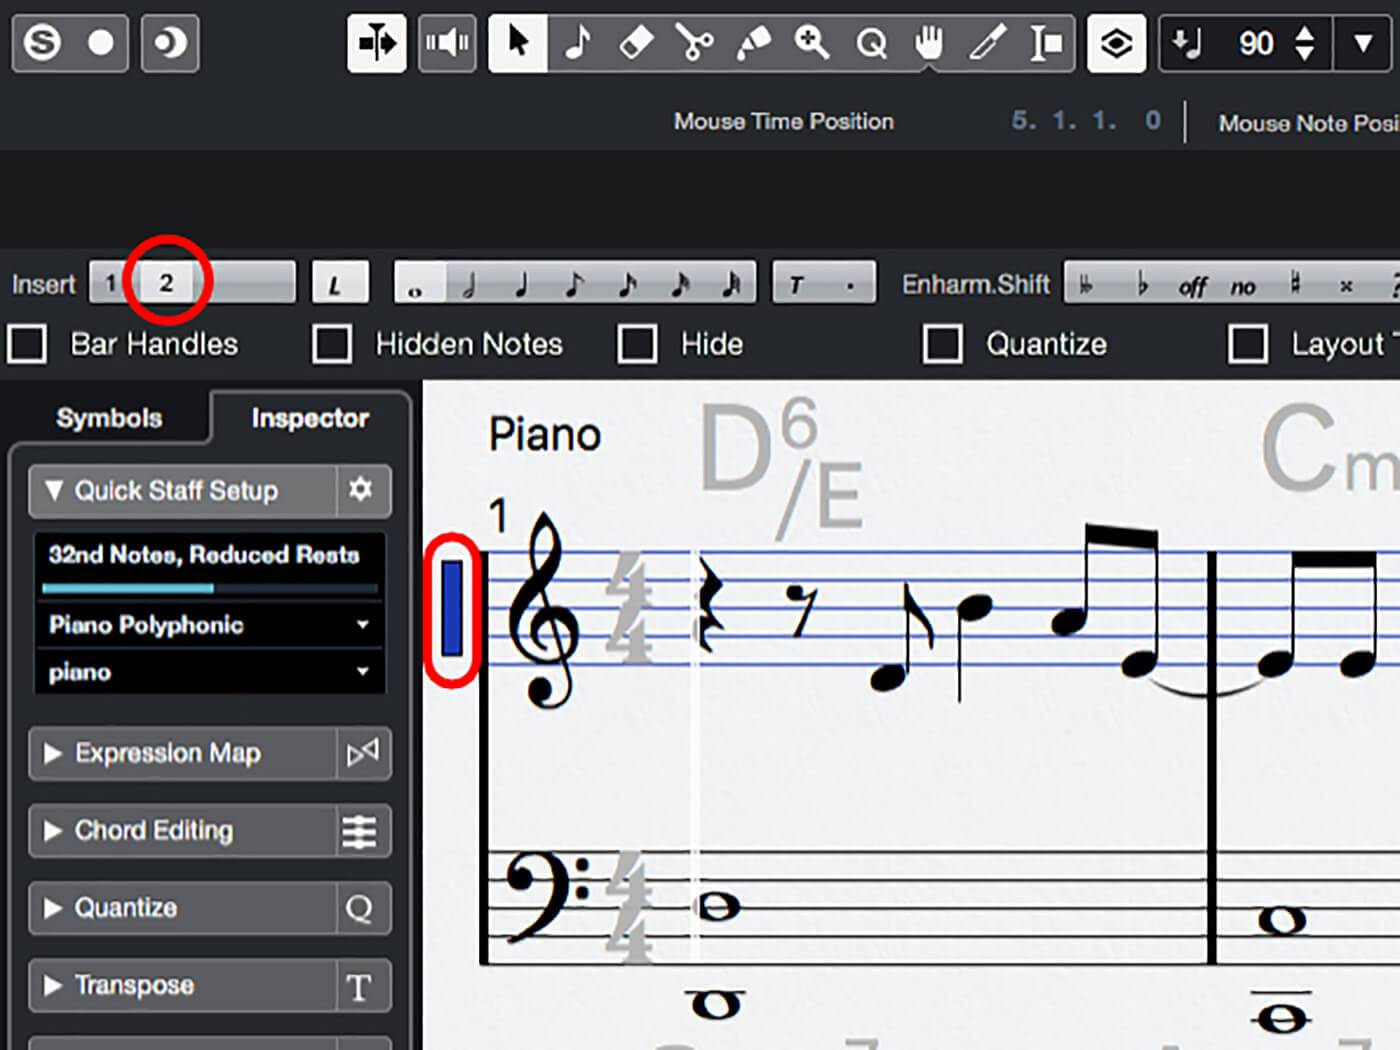
15. Add some held bar-long chords for the right hand and work these around the melody line. The chords will use their own voice, so select the treble clef stave and activate voice 2 in the voice-selection toolbar.
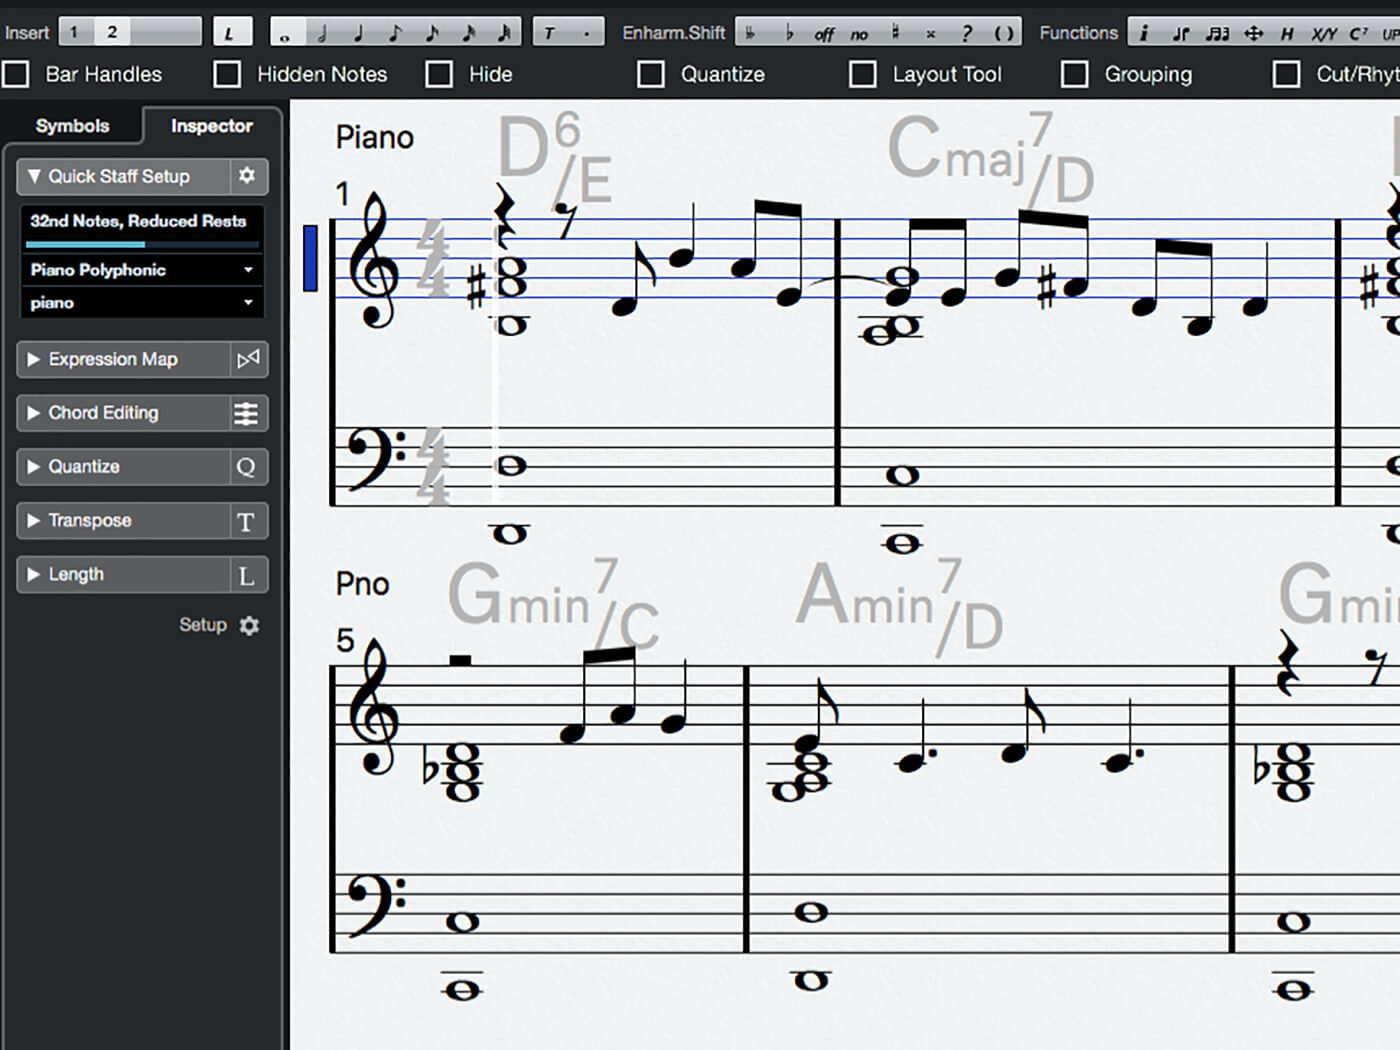
16. Think about how to work your chords in around the melody line and, when ready, use the same technique as above to enter the notes. Notice how Cubase retains the voice 1 rests despite the new notes you’re adding to voice 2.
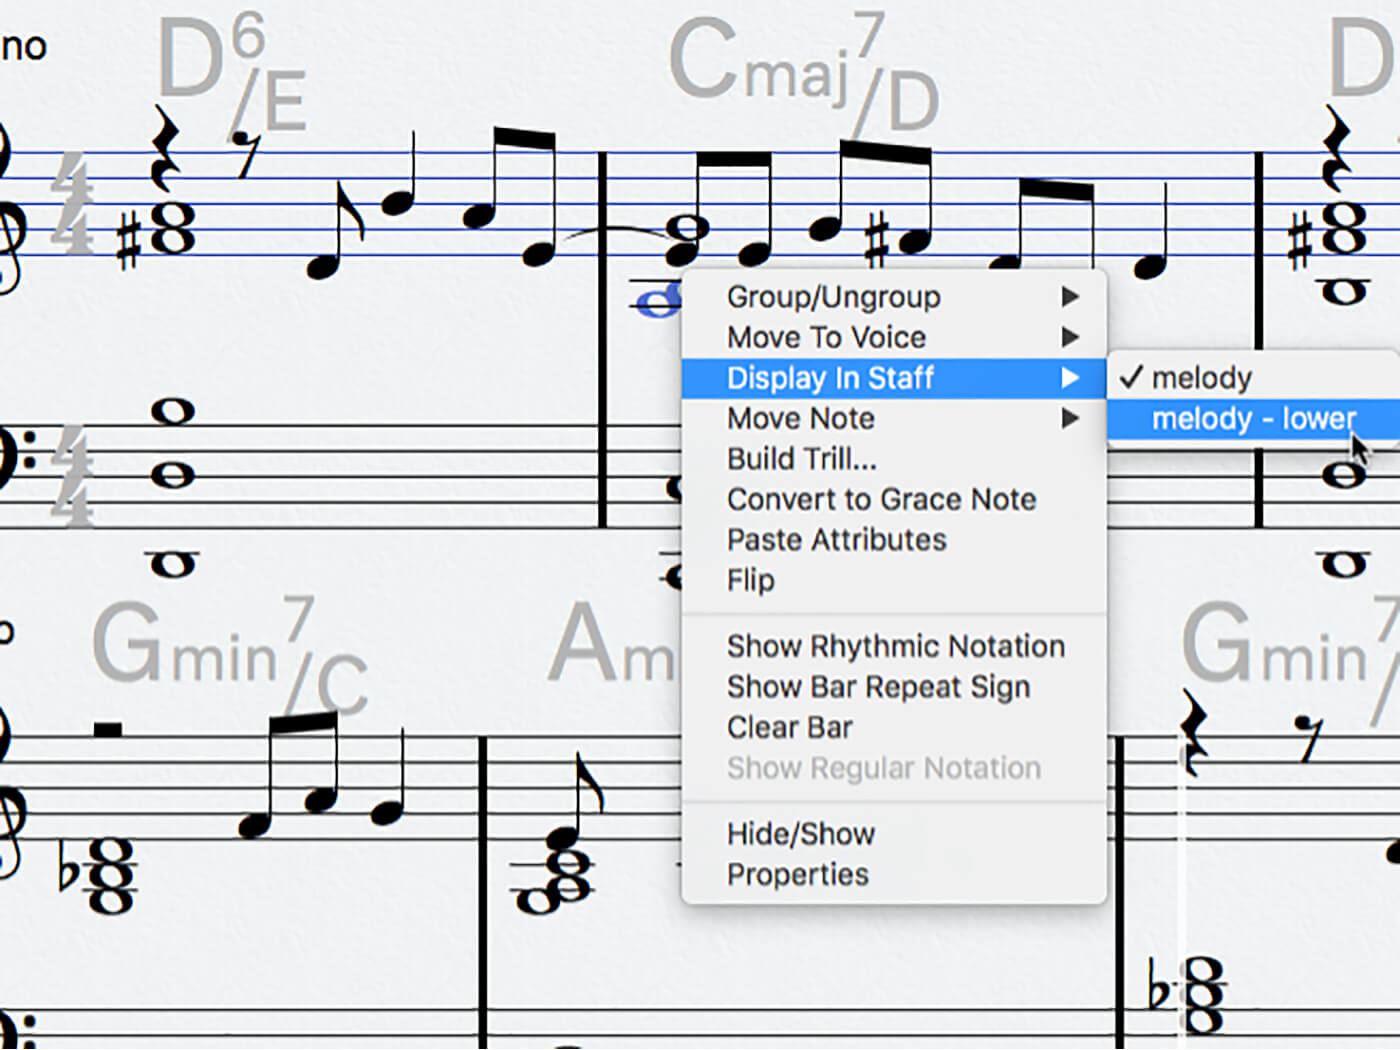
17. You can tell Cubase to move notes between the bass and treble staves, which is useful if a voice involves a lot of ledger lines, as our chord part does. Right-click on a note and select ‘Display in staff > melody – lower’ (the voice allocation is unaffected).
18. You should now be looking at a smart and readable sheet of music that you can share with other musicians, and have hopefully gained a better understanding of how to use Cubase for sketching and scoring musical ideas.
For more Cubase tutorials and workshops, click here.