How to slice up beats in Cubase
The practice of chopping up loops to make them easier to retime and manipulate is as relevant now as it was in the early days of sampling – Cubase’s beat-slicing abilities are a cut above.
Beat-slicing may be something of an old-school technique but it remains an essential weapon in the producer’s armoury. It offers much more in the way of creative potential than modern pitch- and time-processing methods, and the practice isn’t prone to the same artefact-heavy warbles and stutters either.
The core aim of beat-slicing is to retime loops without affecting their pitch, and to do so without the need of processor-intensive time-stretching and pitch-shifting. To do this, the loop is sliced up into its constituent hits, with each hit assigned to a trigger note in a sampler. An accompanying MIDI pattern is created to trigger each slice in the correct order and with the correct relative timing between triggers. By virtue of being a MIDI part, the pattern can be played at any tempo without impacting the pitch of the loop.
The technique became popular back in the days of Atari STs and Akai S1000s when, unlike now, computers and samplers couldn’t handle real-time pitch and time processing, and the results of offline pitch and time processing could be sketchy. Beat-slicing circumvented these issues completely, and turned out to boast a number of beneficial side effects too: you can change the order the slices play in, apply processing to individual hits within the loop, replace slices with different sounds, analyse the groove of a loop, and much more besides.
Recycling day
Back in the day, most people reached for Propellerhead’s ReCycle software for all their beat-slicing requirements, and the REX2 file format created for and used by that software remains a common format for distributing and sharing sliced loops. Modern Cubase, however, has no need for additional software and workflows, as there are a bunch of beat-slicing tools integrated into the DAW.
There are two approaches to slicing in Cubase. One uses the features of Cubase’s standard Sample Editor (that is, the window that opens when you double-click an audio clip in the timeline), while the other comes courtesy of one of Cubase’s bundled plug-ins, Groove Agent SE.
The standard approach concerns hitpoints, a type of marker used by audio clips in Cubase. Hitpoints are defined within the Sample Editor, and can be detected automatically based on the loudness and intensity of the transients within a loop, with a pair of value sliders providing control over these parameters. A common strategy includes making the detector over-sensitive and then deleting the unwanted hitpoints or, conversely, making it under-sensitive and adding missing hitpoints manually.
Once defined, the hitpoints can be used in a variety of ways, such as slicing parts into individual clips on the timeline and converting source audio clips to combined audio parts comprised of the slices. You can auto-create regions from the hitpoints, which makes it easy to grab and work with the individual hits within the loop, or convert the pattern of hitpoints into MIDI notes or a groove-quantise template.
There’s another neat trick worth considering here, even if it isn’t strictly beat-slicing because it relies on pitch and time processing. If you convert the hitpoints to AudioWarp markers, you can intricately adjust the position of each hit in the loop and create interesting effects through the use of different warp algorithms.
Call in the agents
Cubase’s standard hitpoint tools can do an awful lot but, in many instances, it’s quicker and easier to use Groove Agent SE, a plug-in bundled with Cubase Pro, Artist and Elements. It can also be purchased as a plug-in for use in other DAWs. We talked about Groove Agent SE last month but, what we didn’t do, was wax lyrical about its fascinating slicing features.
Defining slice points in Groove Agent SE isn’t quite as easy as it is with Cubase’s standard tools but it’s certainly not difficult either. The real beauty is that, once done, the slices will be assigned to instrument trigger pads, and the MIDI patterns required to recreate your loops are assigned to one of the plug-in’s pattern-trigger pads. This gives your loop, as well as its constituent slices, access to all of Groove Agent’s sample- and pattern-editing tools, which means you can modify the pitch, timing, envelope, filtering and more of individual slices, apply a drum-machine-style swing to the pattern or make it play at half or double time.
Each of Cubase’s approaches to beat-slicing has benefits and shortcomings but, between them, they make light work of a once laborious process. The trick is to understand both well enough to know which to reach for in any given situation.
Slicing up beats in Cubase: step-by-step guide
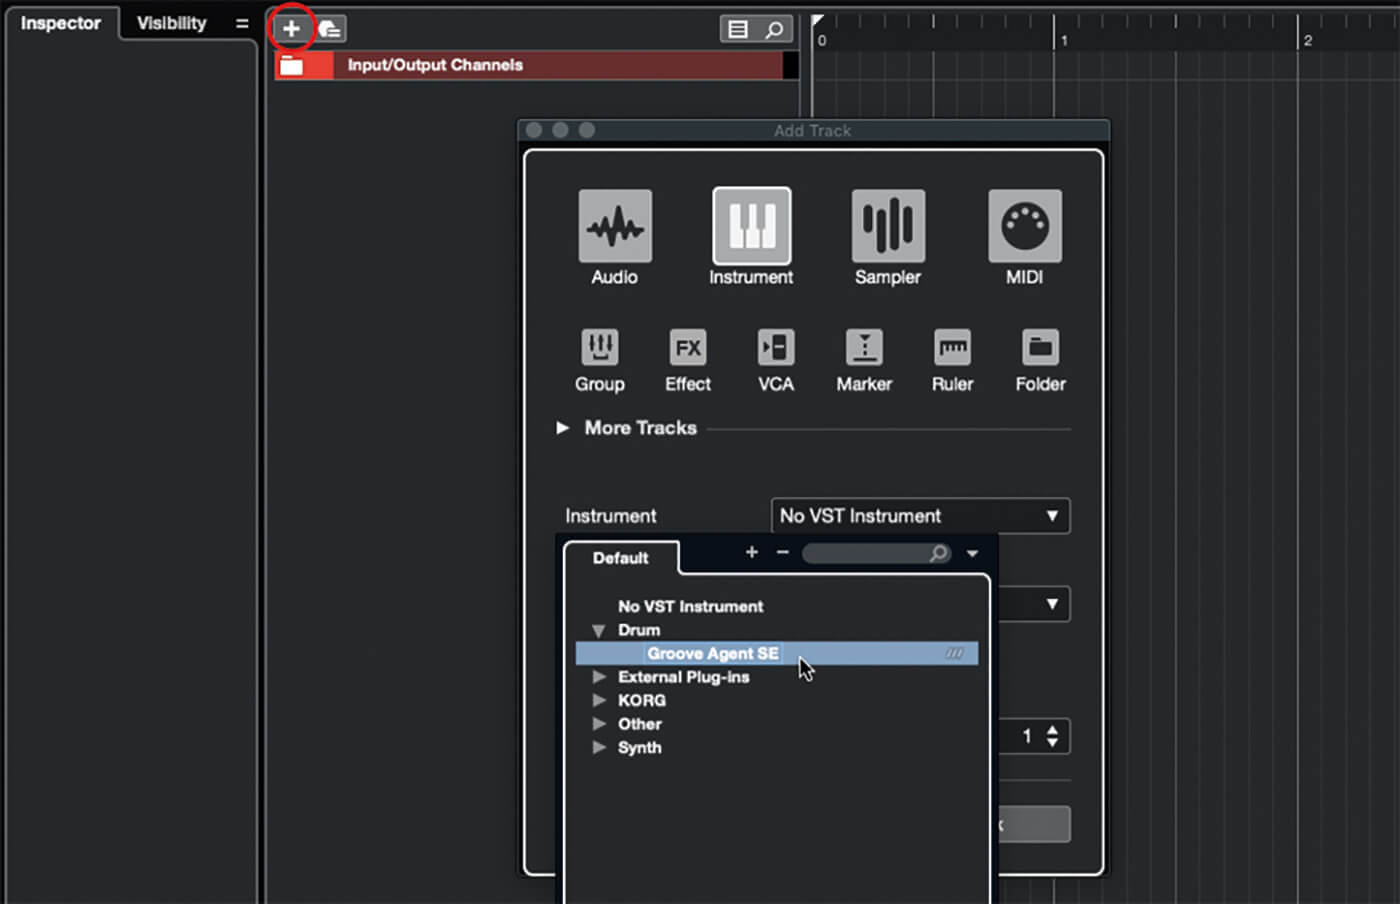
1. Create a new Cubase project. Click the + icon at the top of the tracklist to open the Add Track panel. In the panel, select the Instrument track type, then choose Groove Agent SE. Click Add Track to create the new track.
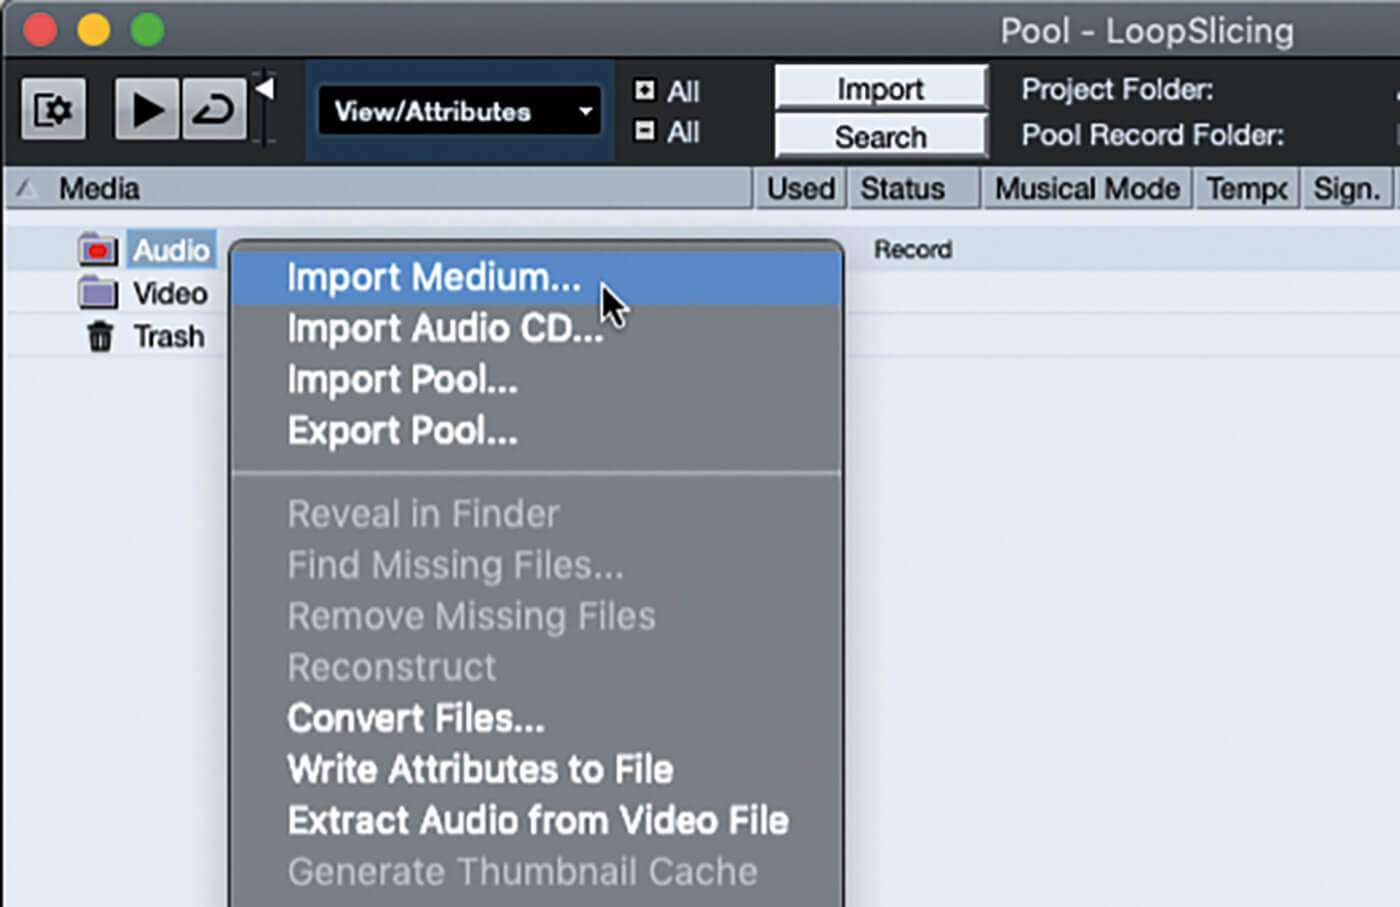
2. Open the Pool window by selecting Pool from the Project menu or pressing Ctrl-P/Cmd-P. Right-click anywhere in the panel and select Import Medium. Browse to and import a drum-loop file.A live-played loop will work best.
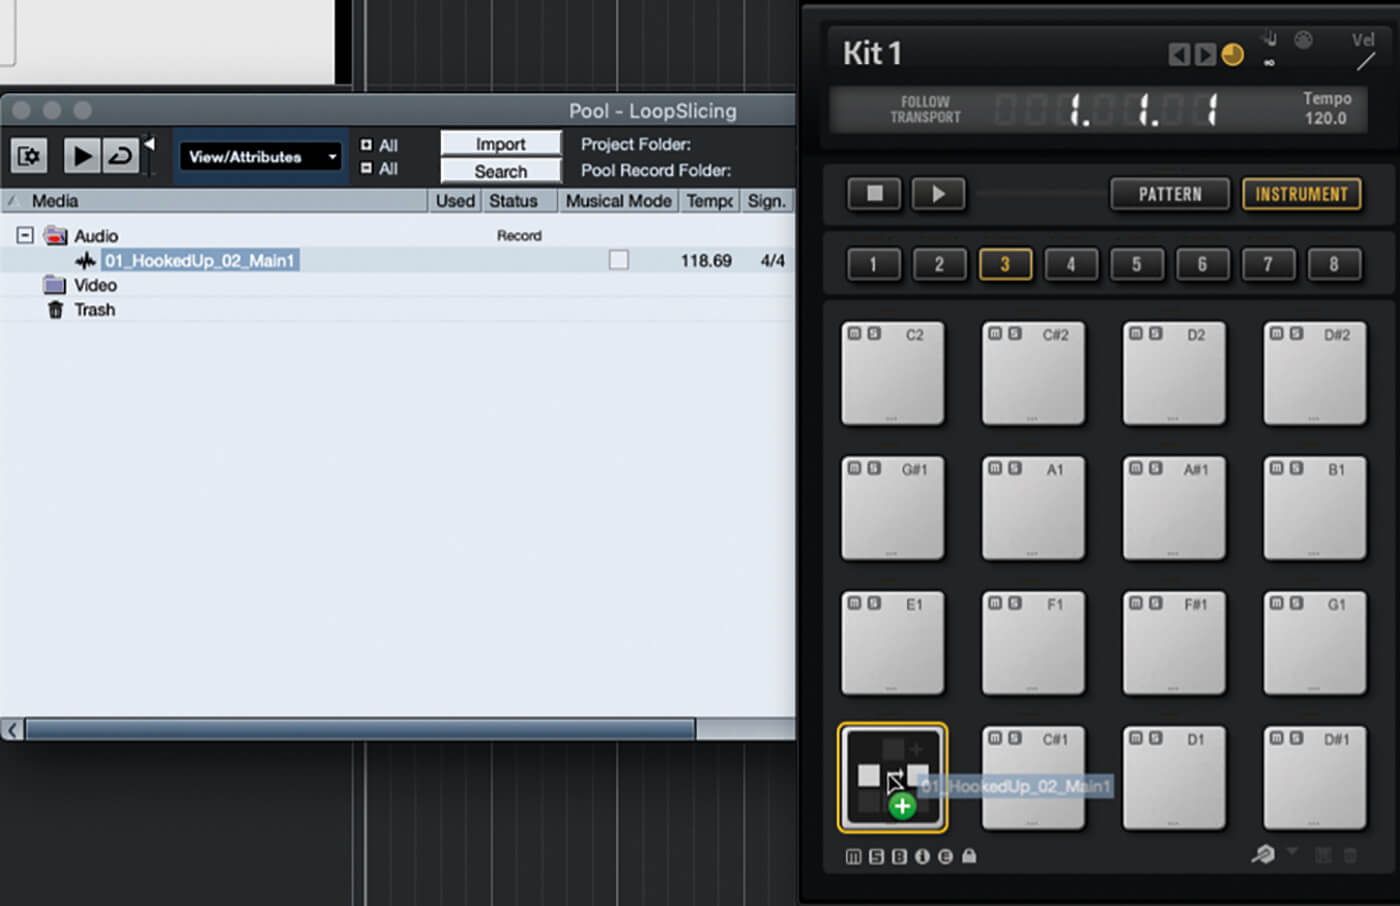
3. Arrange your windows so that you can see both the Pool window and Groove Agent’s panel. Make sure Groove Agent’s pads are in Instrument mode, then drag your imported loop from the Pool to Groove Agent SE’s first pad.
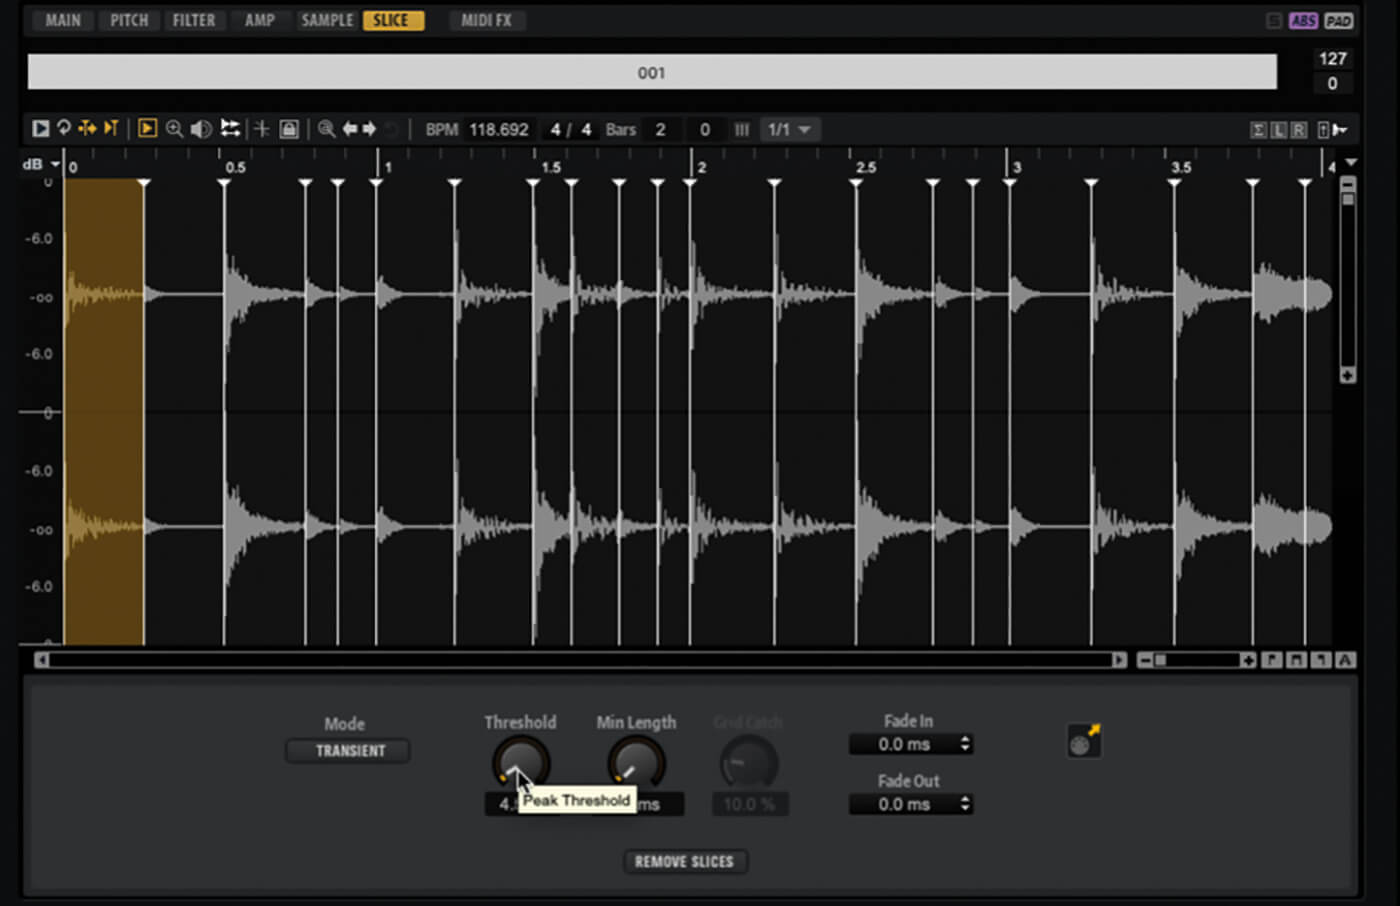
4. Ensure Groove Agent is in its Edit view and click the Slice button. Click Create Slices at the bottom of the edit panel. Adjust the threshold until most transients have a slice marker drawn on them – you needn’t catch all transients at this stage.
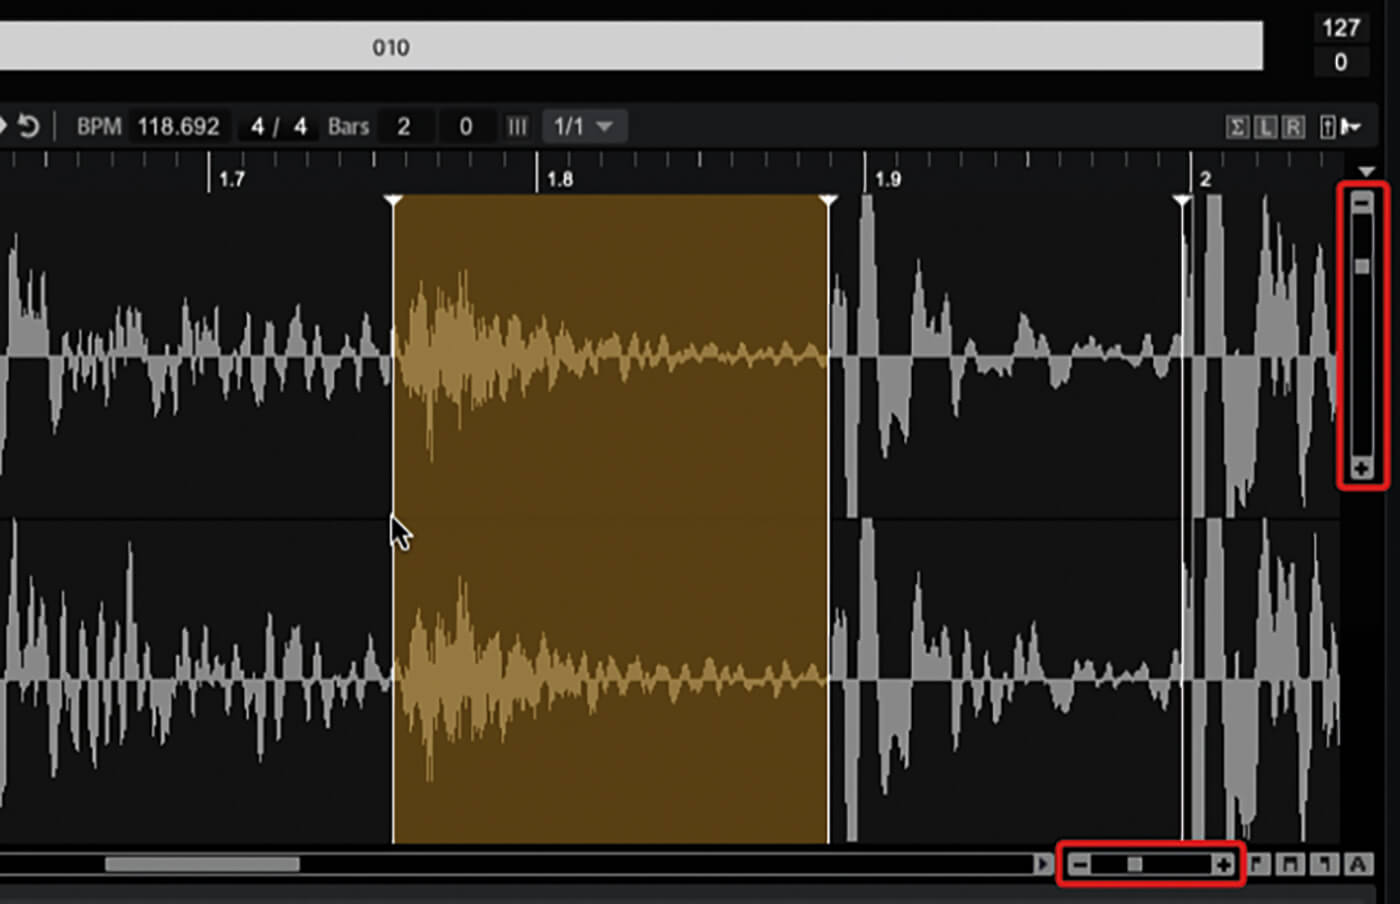
5. Work through the loop, clicking each slice to audition it. Tweak the location of your slice markers as required. Remove unwanted markers or add new ones by holding Alt and clicking the marker or location. Use the zoom sliders if you need a closer view.
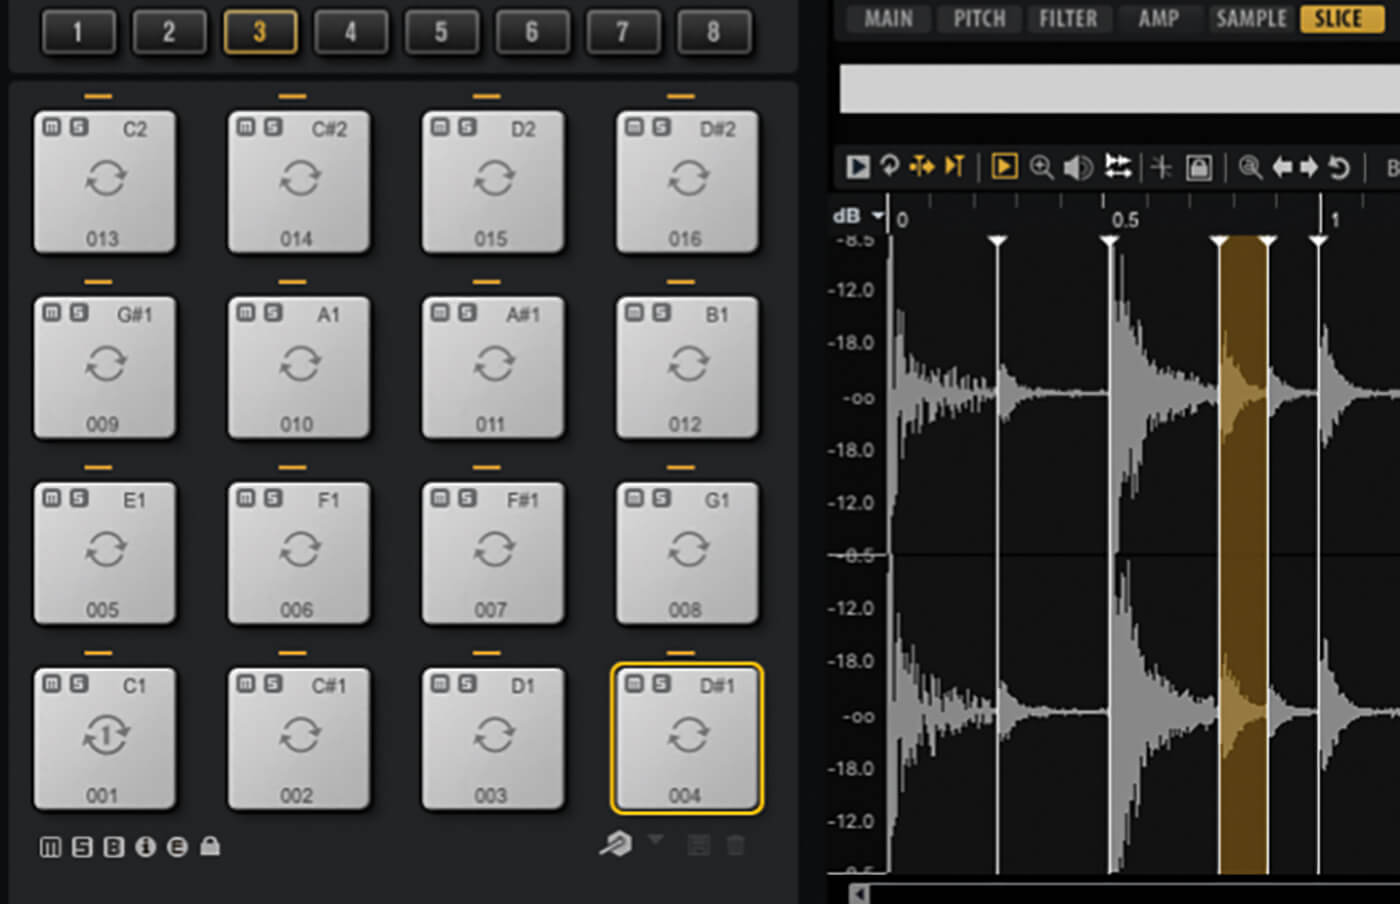
6. Once satisfied with the position of the slice markers, each slice should now be assigned to a pad, with the first slice assigned to the pad you dropped the loop onto, and each pad showing the number of their assigned slice.
![]()
DRUM REPLACEMENT In Groove Agent, you can easily substitute sounds by changing the sample assigned to an instrument trigger pad. If you’re working on longer drum parts, Cubase can create MIDI parts based on a drum recording’s hitpoints, which you can use to trigger replacement samples.
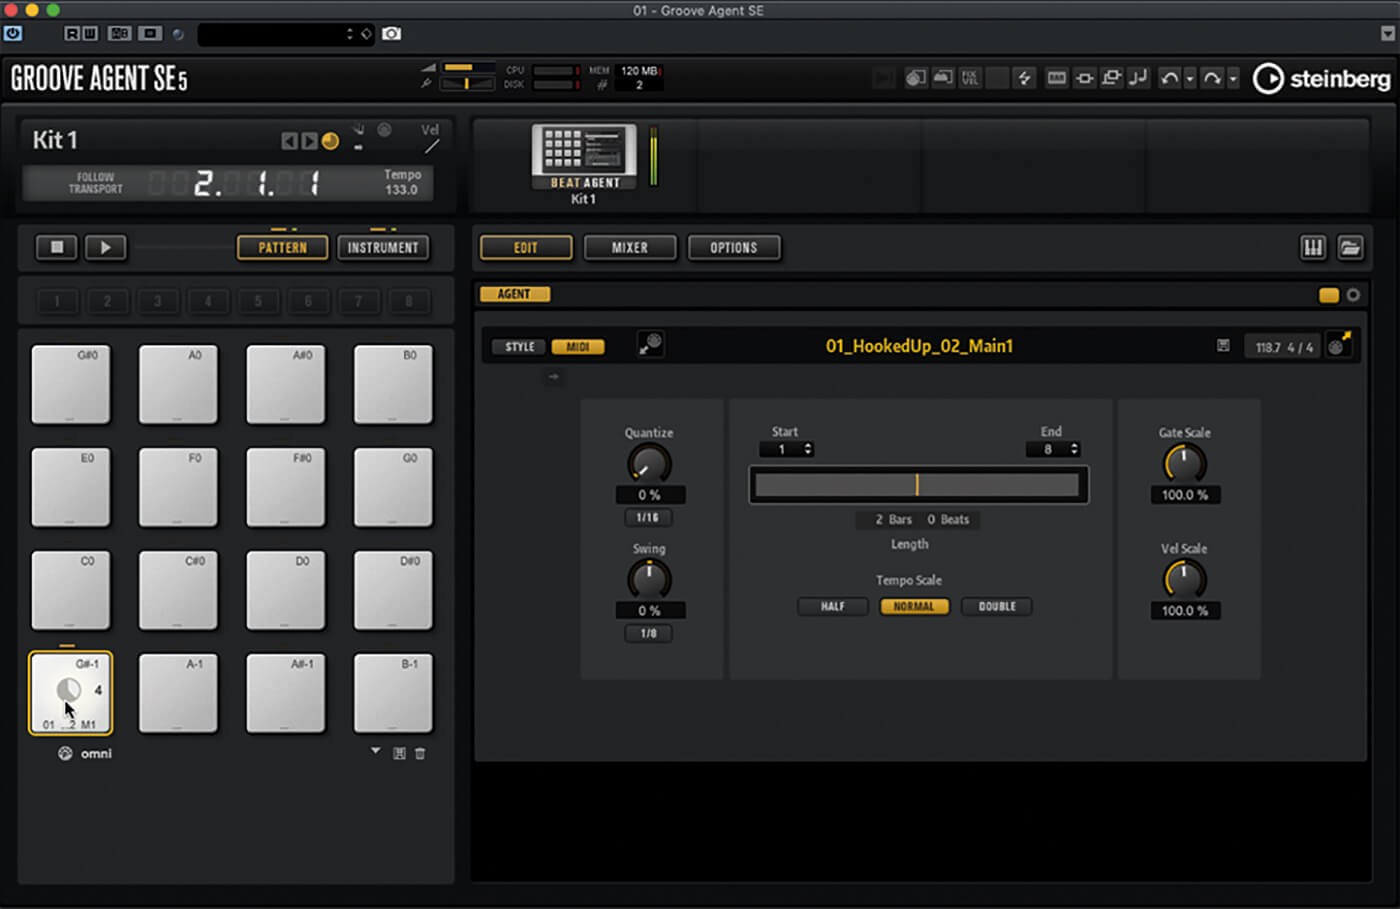
7. Switch the pads to Pattern mode. Click the pad that has your loop assigned to it. This is not playing the audio loop but playing a MIDI pattern that triggers each of the loop’s slices in the correct order and timing.
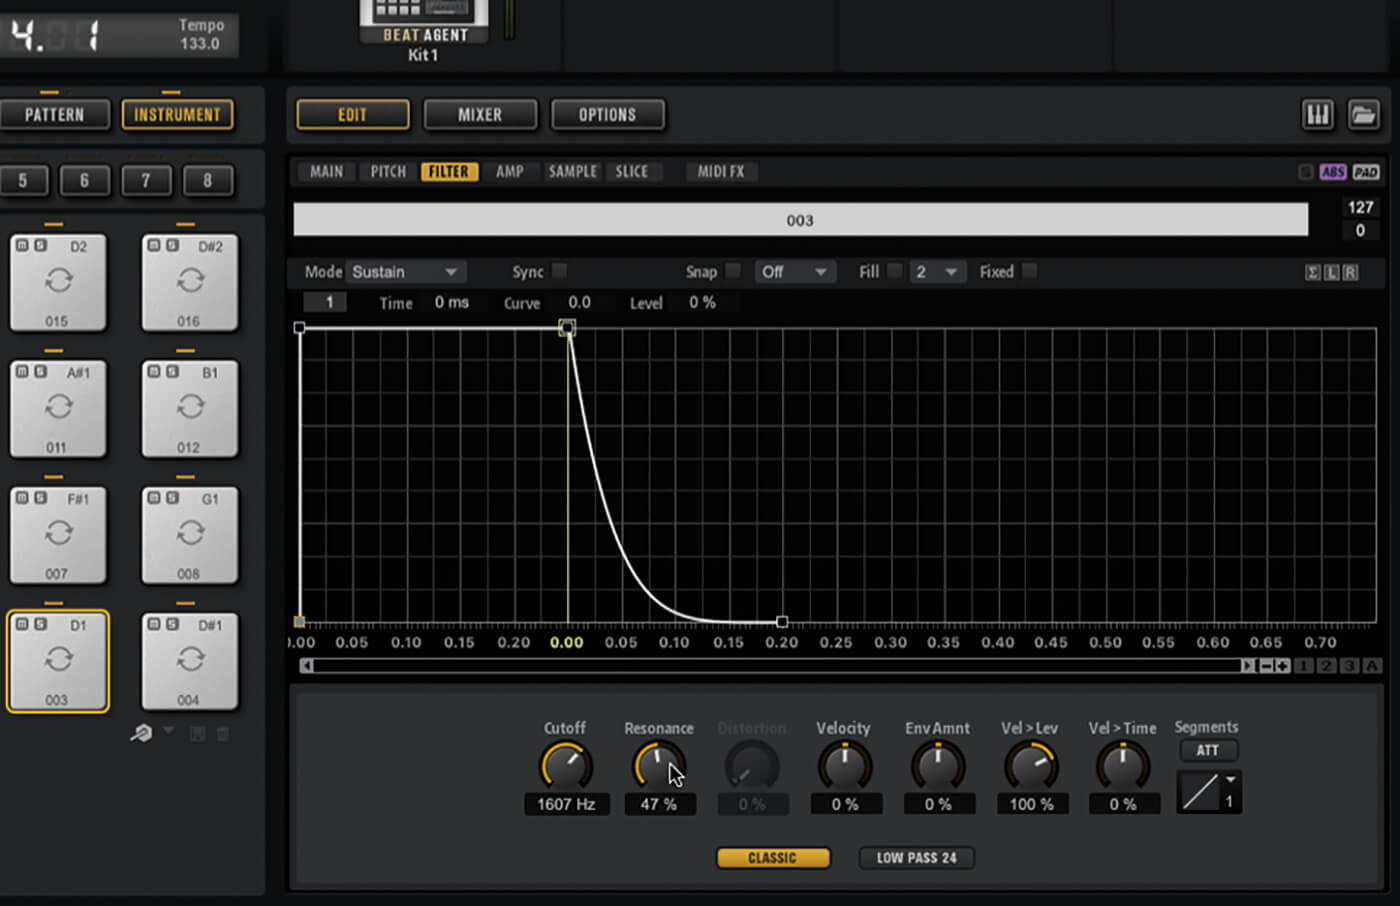
8. Adjust the project tempo. The loop’s tempo follows without any pitch and time processing. Try modifying how the loop plays using Groove Agent’s style-edit panel. Switching back to Instrument mode allows you edit each slice as though it were a standalone sample.
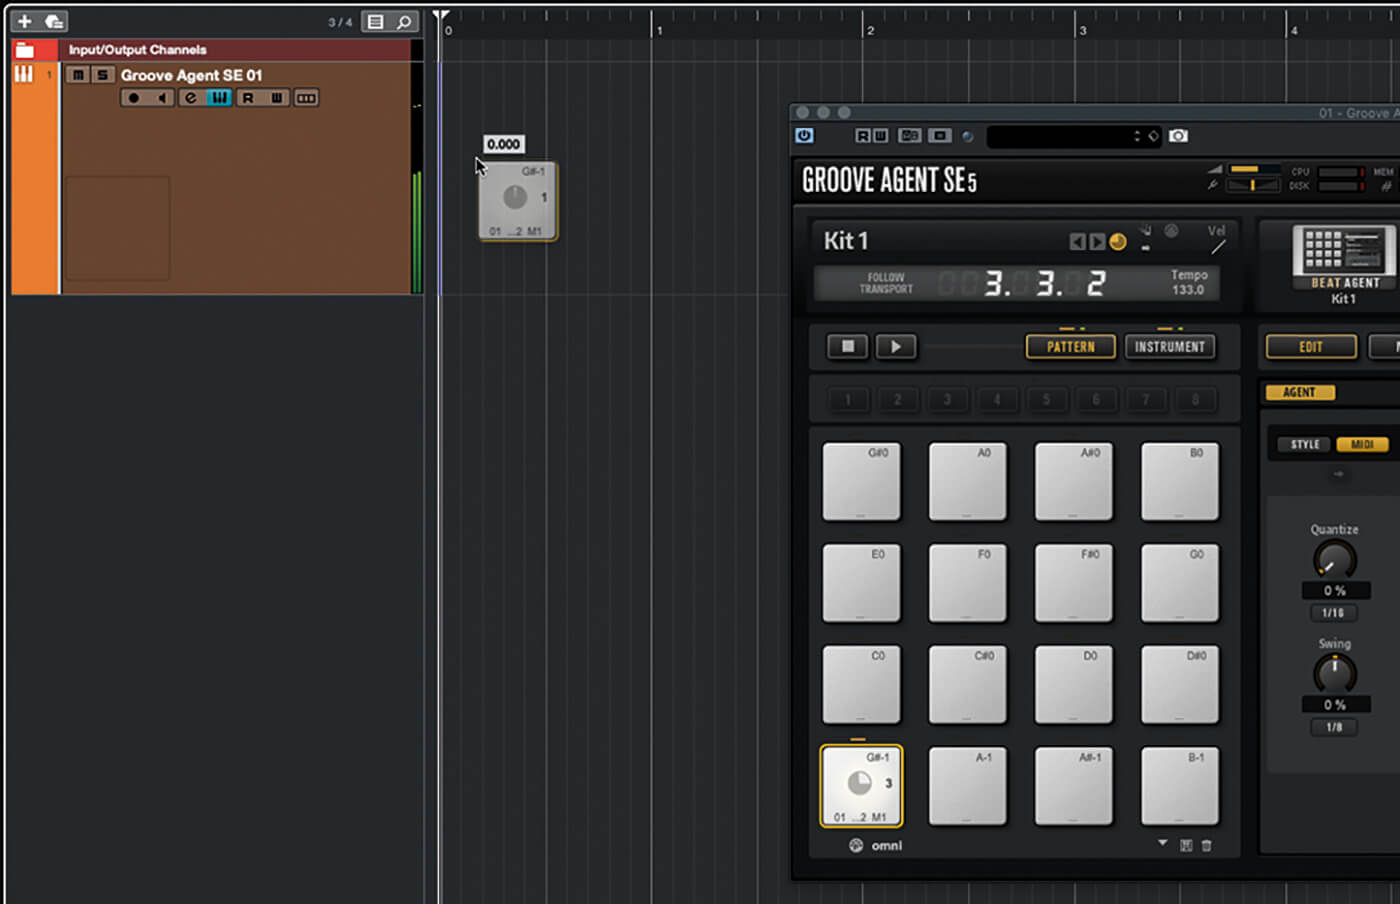
9. Switch the pads back to Pattern mode and reset any changes you made in the style-edit panel. Now click-and-drag the pad to the start of Groove Agent’s track. This creates a new MIDI track containing the pattern. Hit play to confirm.
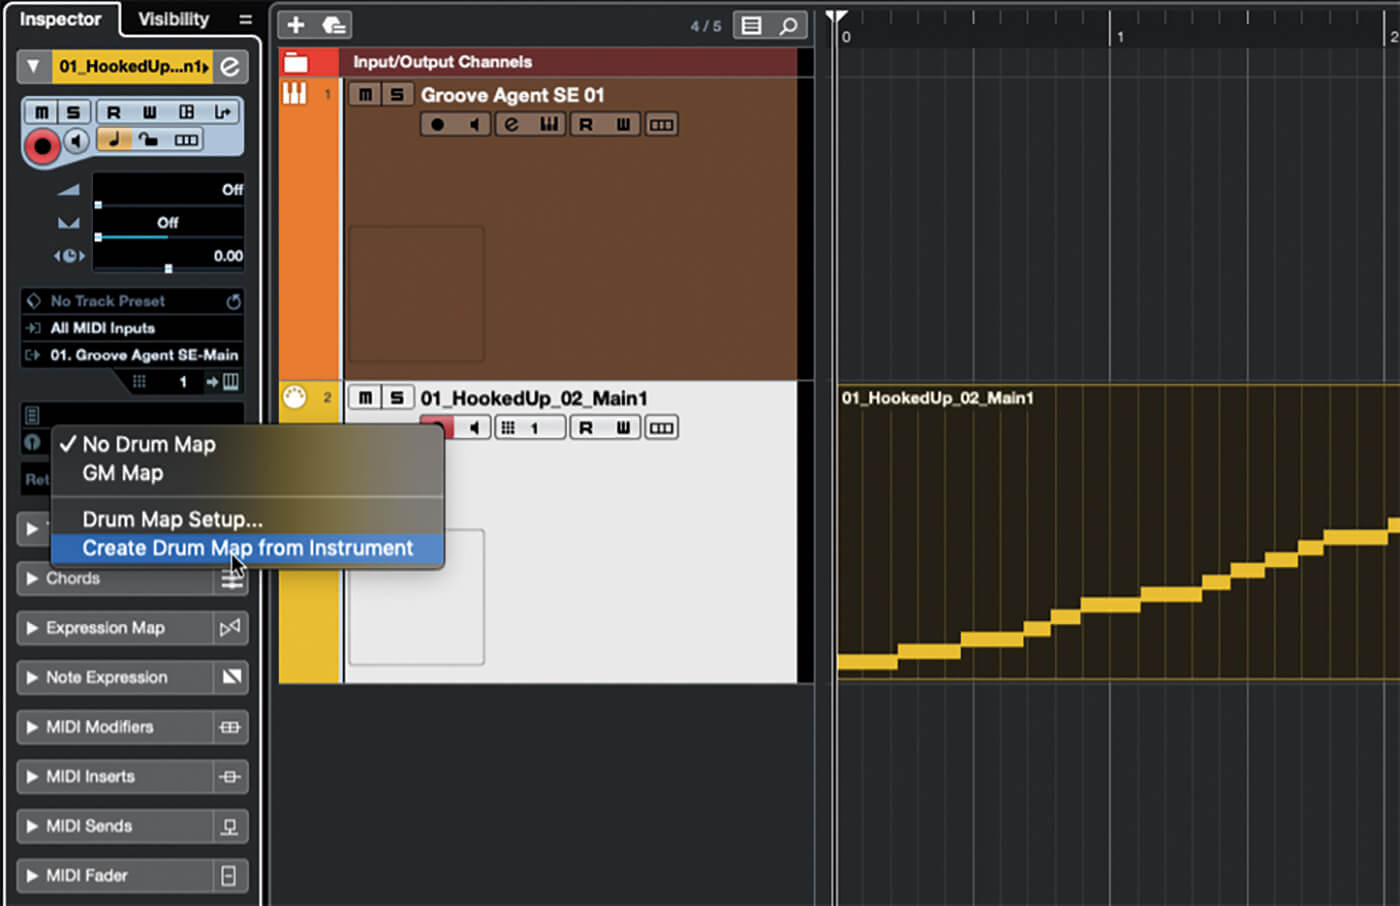
10. Click the MIDI part in the timeline to select it. Go to the Edit menu and select Advanced Quantize, then Create Groove Quantize Preset. Then, in the MIDI track’s inspector, click the Drum Map field and select Create Drum Map From Instrument.
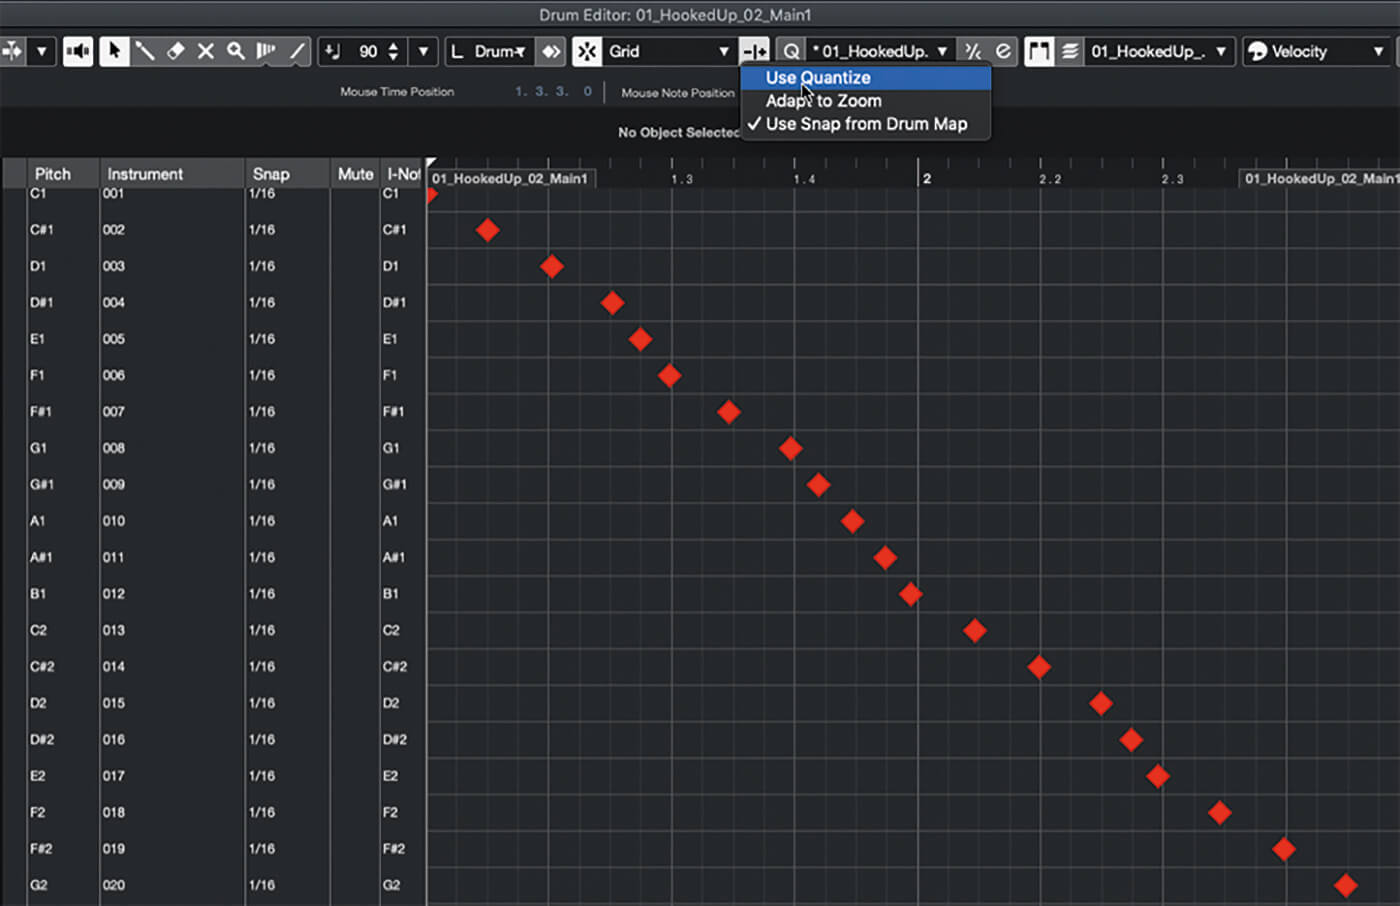
11. Double-click the MIDI part to open it in the Drum Editor. Open the editor’s quantise menu and select the new groove template. Ensure snapping is enabled, click the button to the right of the Snapping menu and hit Use Quantize.
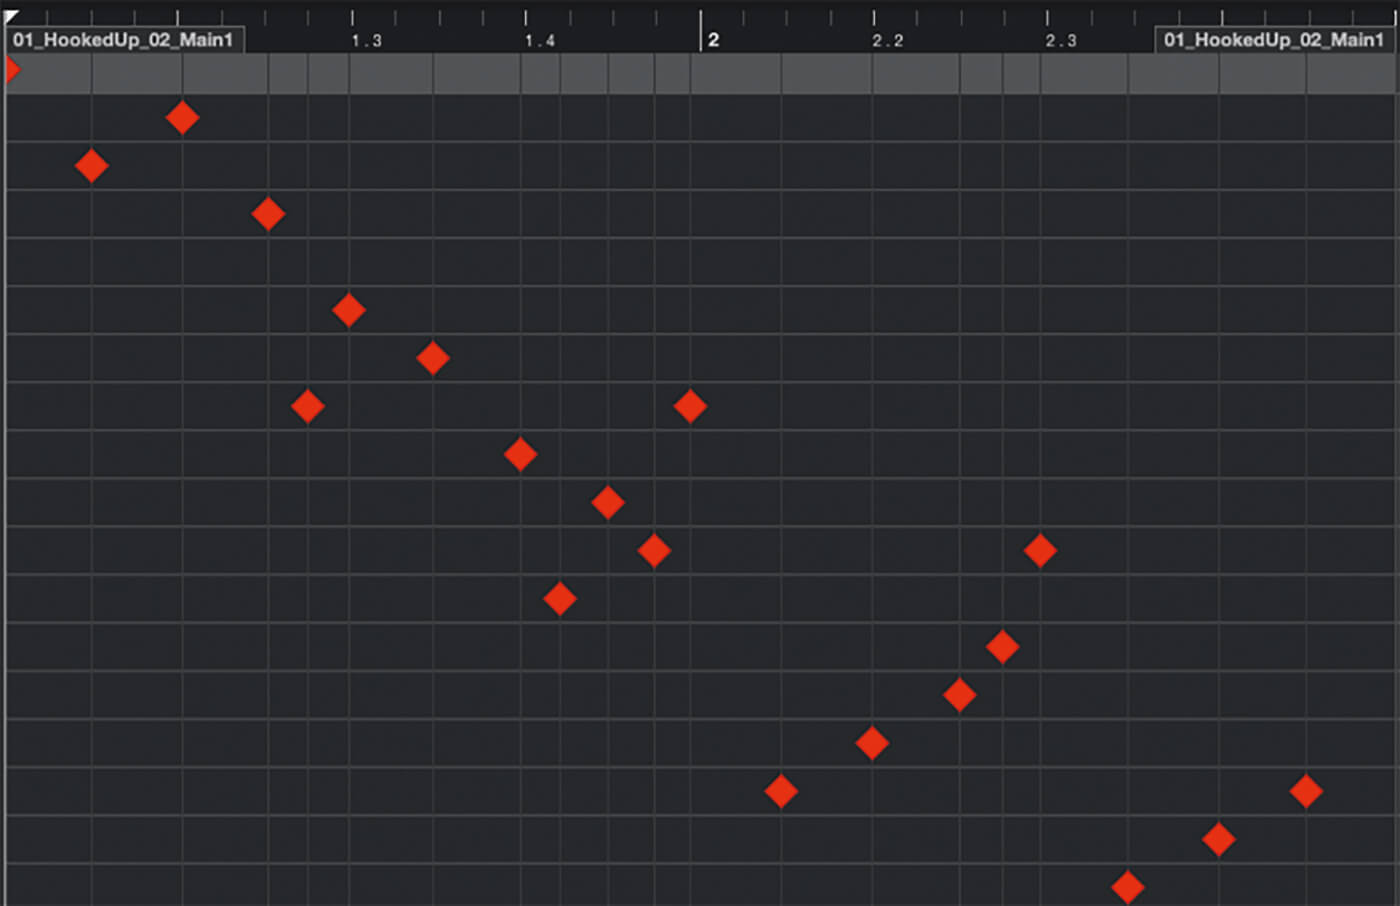
12. The editor grid now matches the groove of the drum pattern. This makes it easy to change the order in which the slices are triggered without impacting the original groove. It allows you to quantise other parts – or other sliced loops – to match the groove.
![]()
GROOVE MATCHING It’s not uncommon to want to combine two rhythmic loops whose grooves don’t match. Sometimes this creates an appealing effect, other times it just sounds sloppy. To fix such sloppiness, create a groove-quantise template from one loop and apply it to the slices of the other.
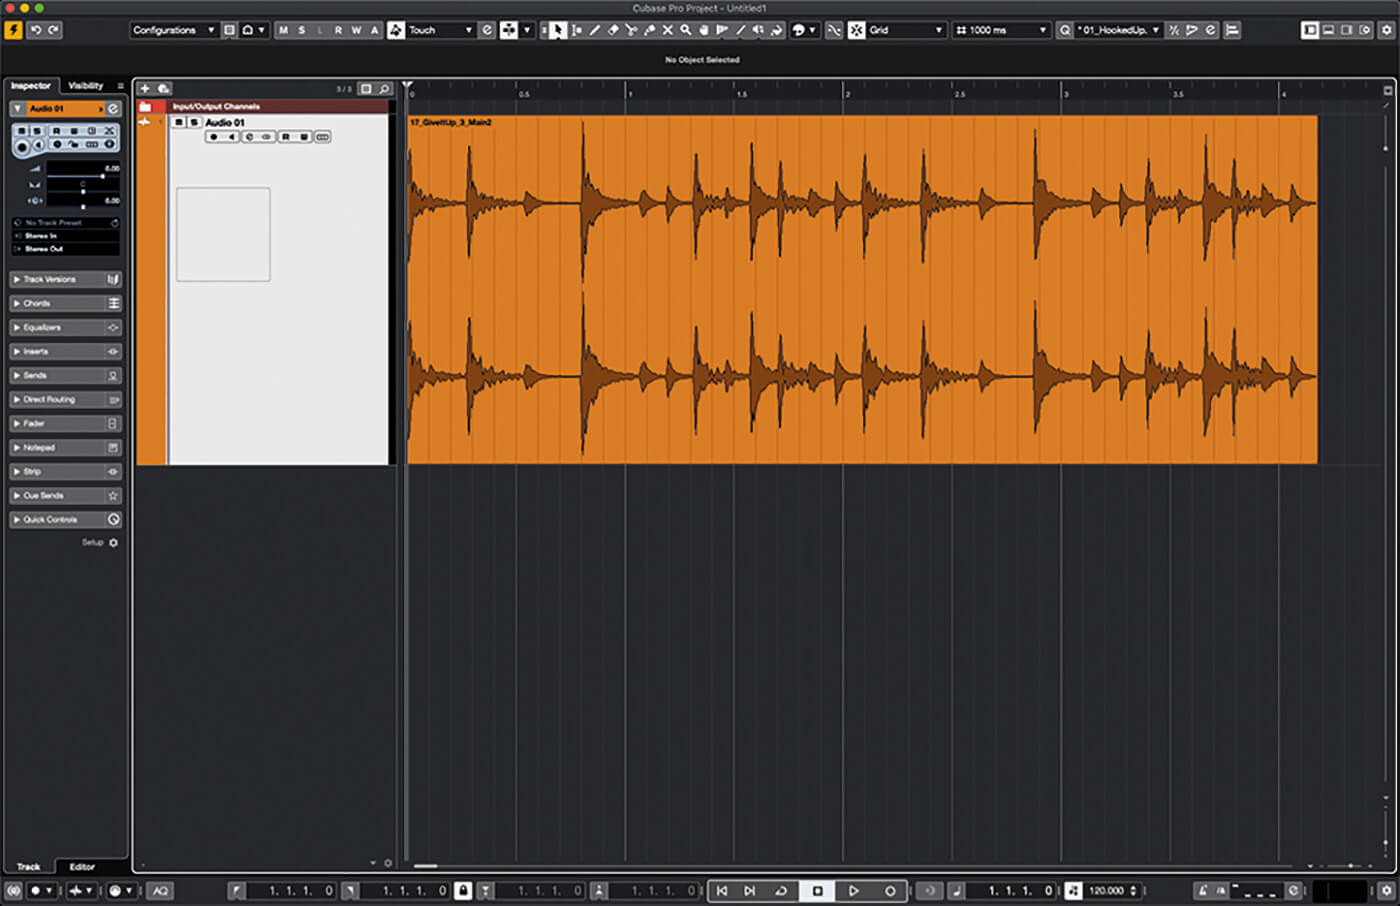
13. Groove Agent is fantastic for beat-slicing but Cubase itself has its own tools for similar tasks. Create a new project. Create a new stereo audio track and set its timebase to linear (grey clock icon). Import a new loop to the track.
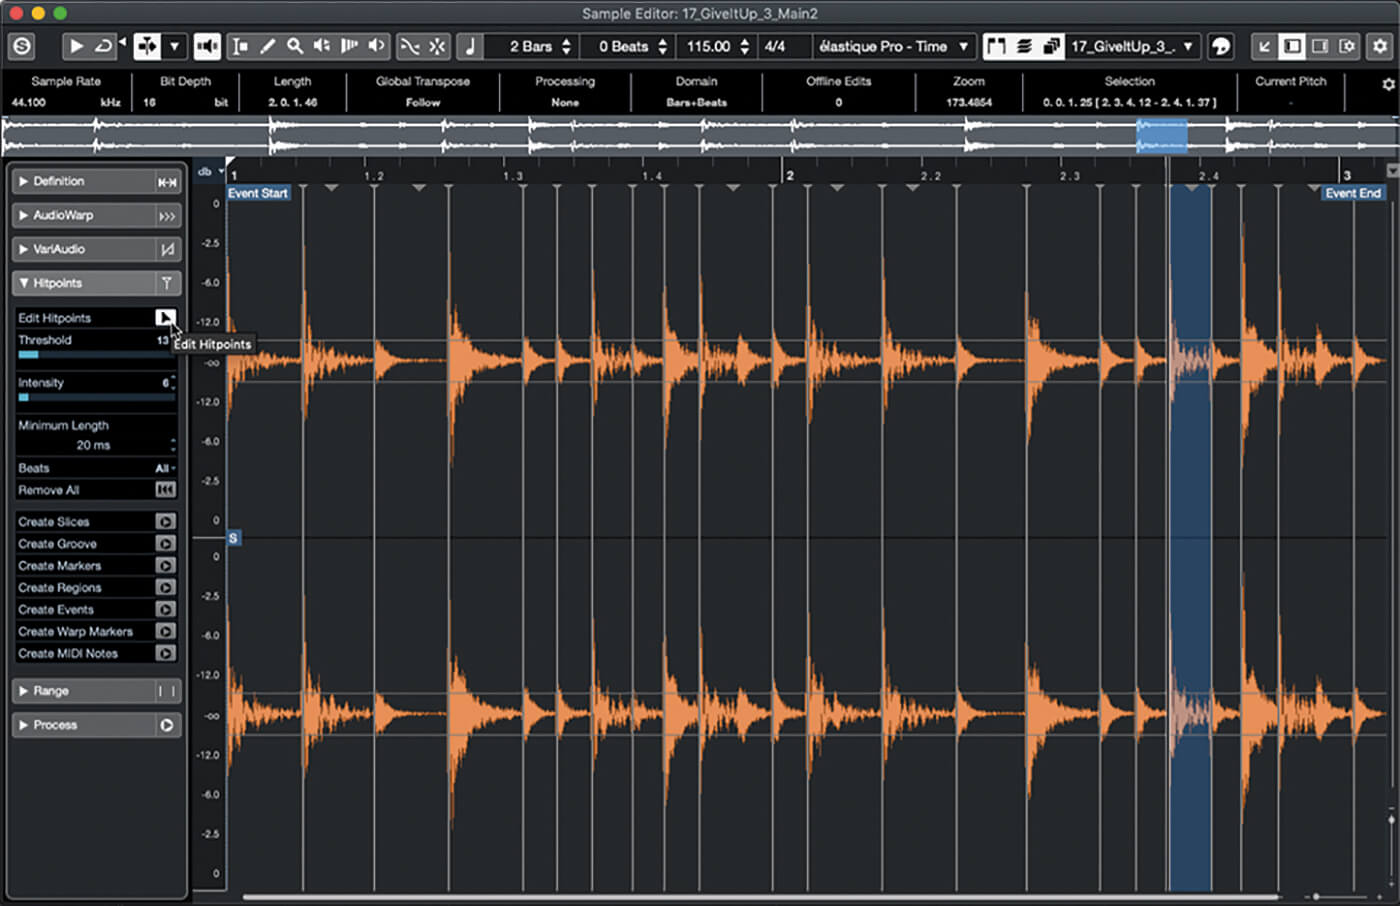
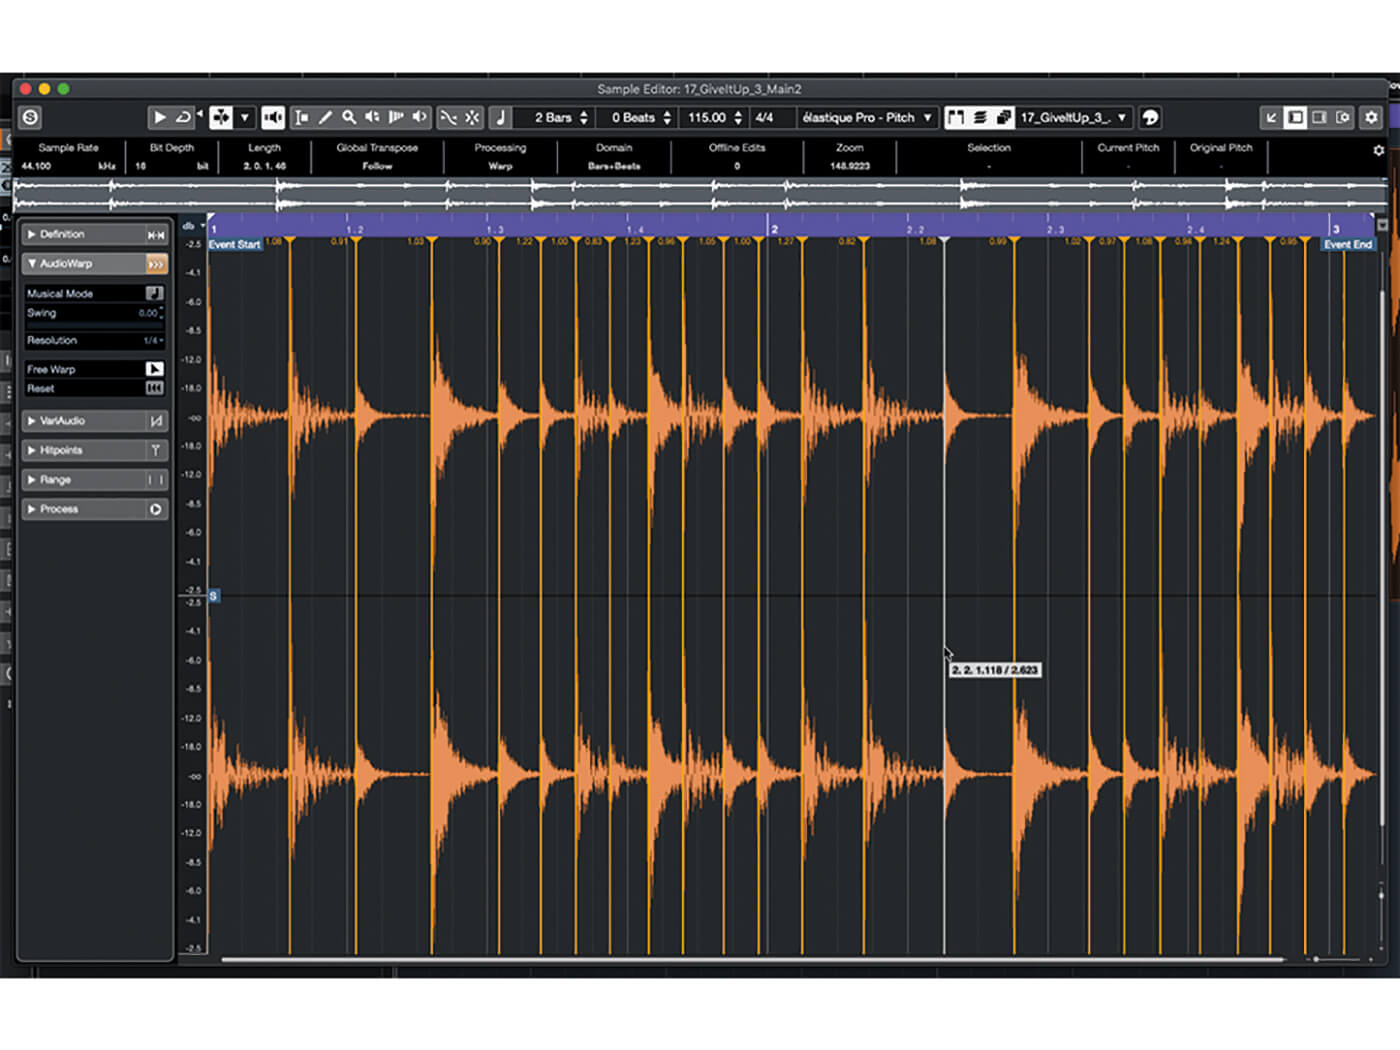
14. Double-click the loop to open it in the audio editor. Open the Hitpoints panel in the left-hand zone. Click Edit Hitpoints then adjust the threshold and intensity sliders until most of the transients have been marked. Notice the visual feedback when adjusting the sliders.
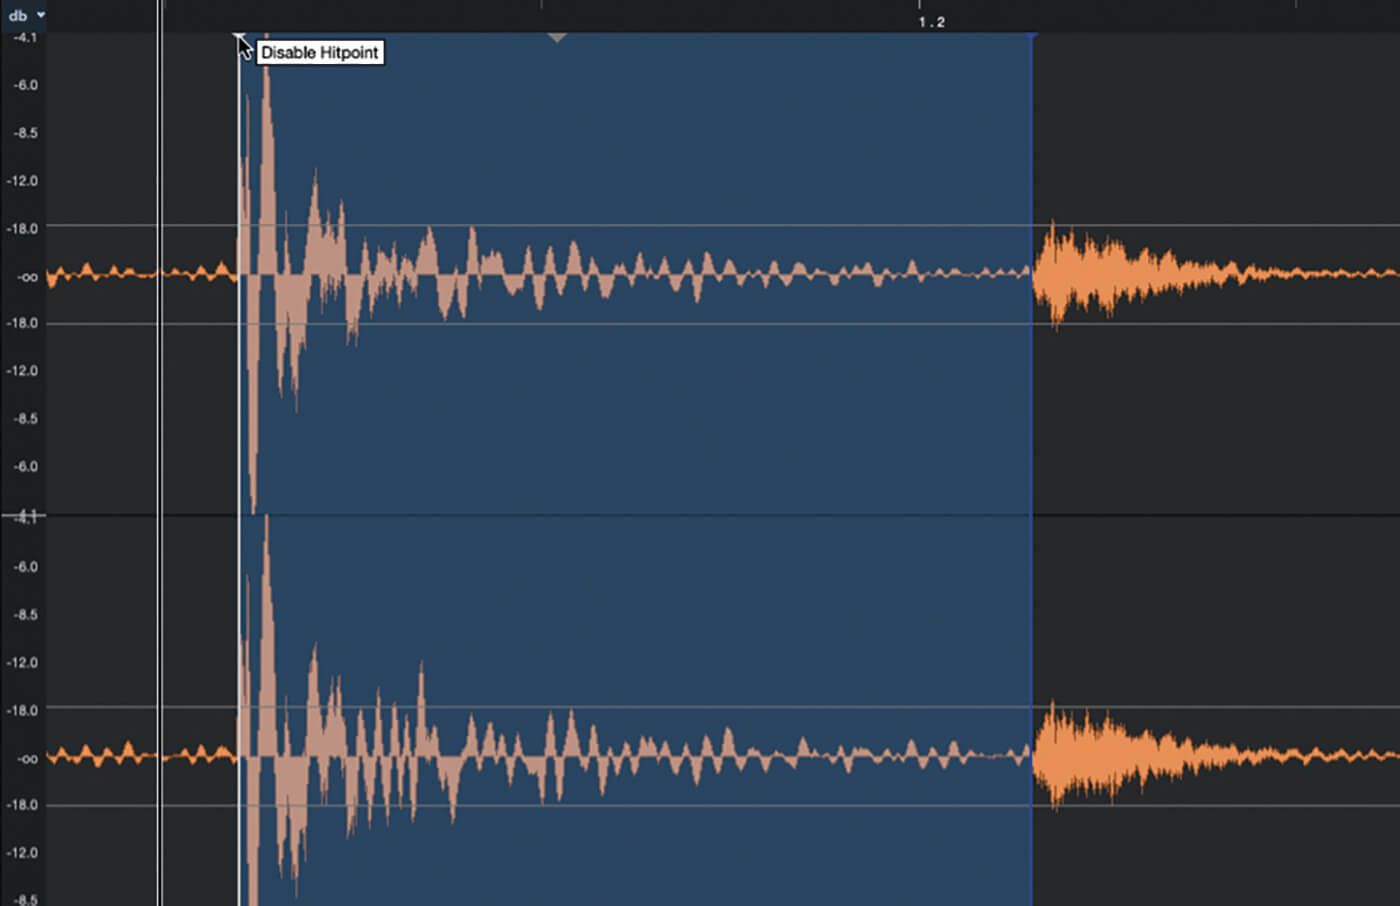
15. Zoom in for a closer look at the waveform. Work through the slices, clicking them to audition them, and moving hitspoints as required. Click the top of a hitpoint to disable it. Alt-click to create a new hitpoint.
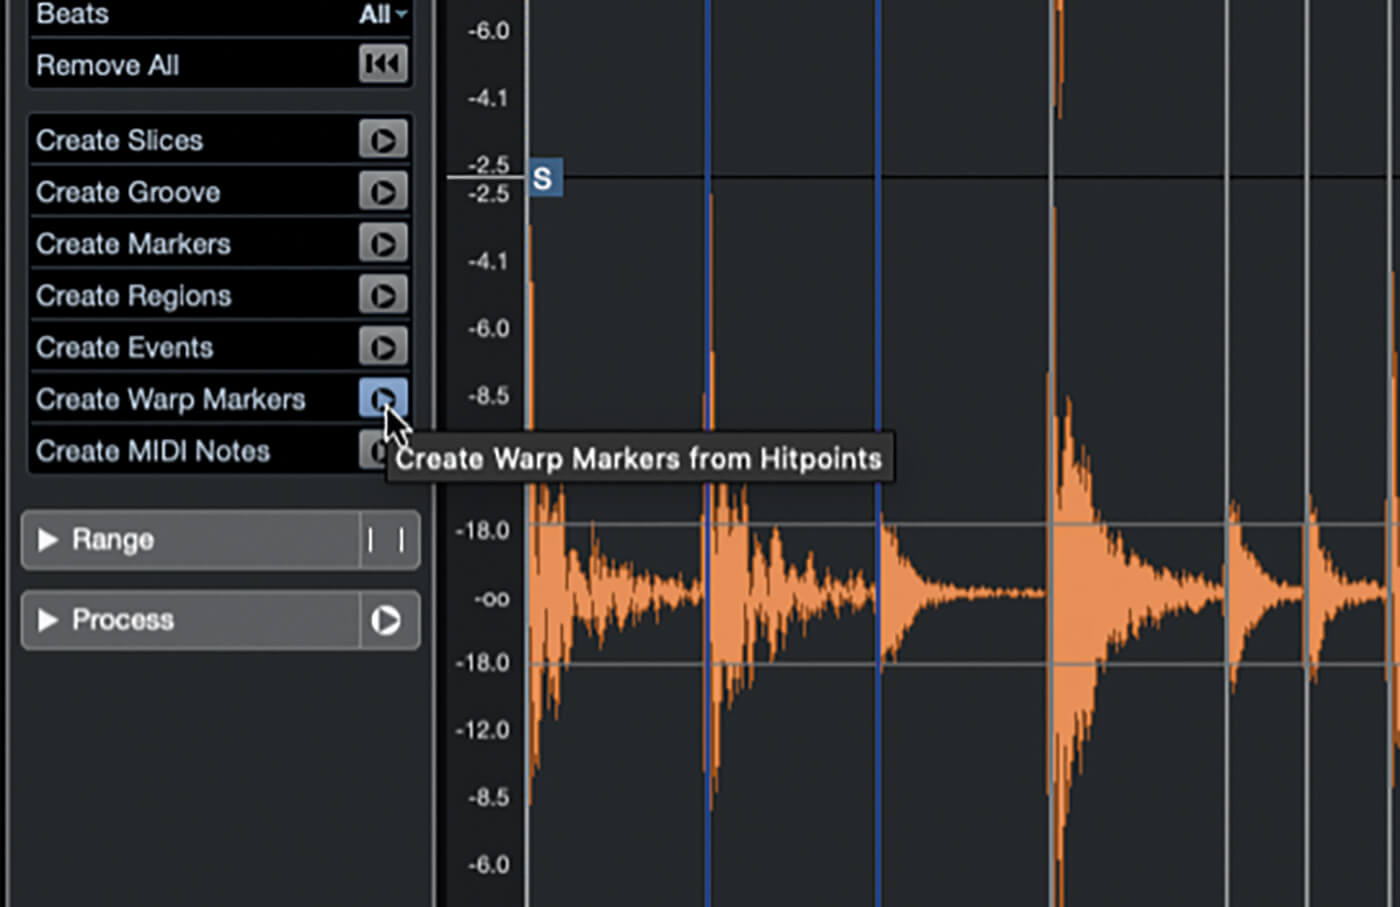
16. You can use hitpoints in various ways by clicking the function buttons in the Hitpoints panel. For example, Create Groove is an alternative method of creating a groove quantise template. Click Create Warp Markers and then switch to the AudioWarp side panel.
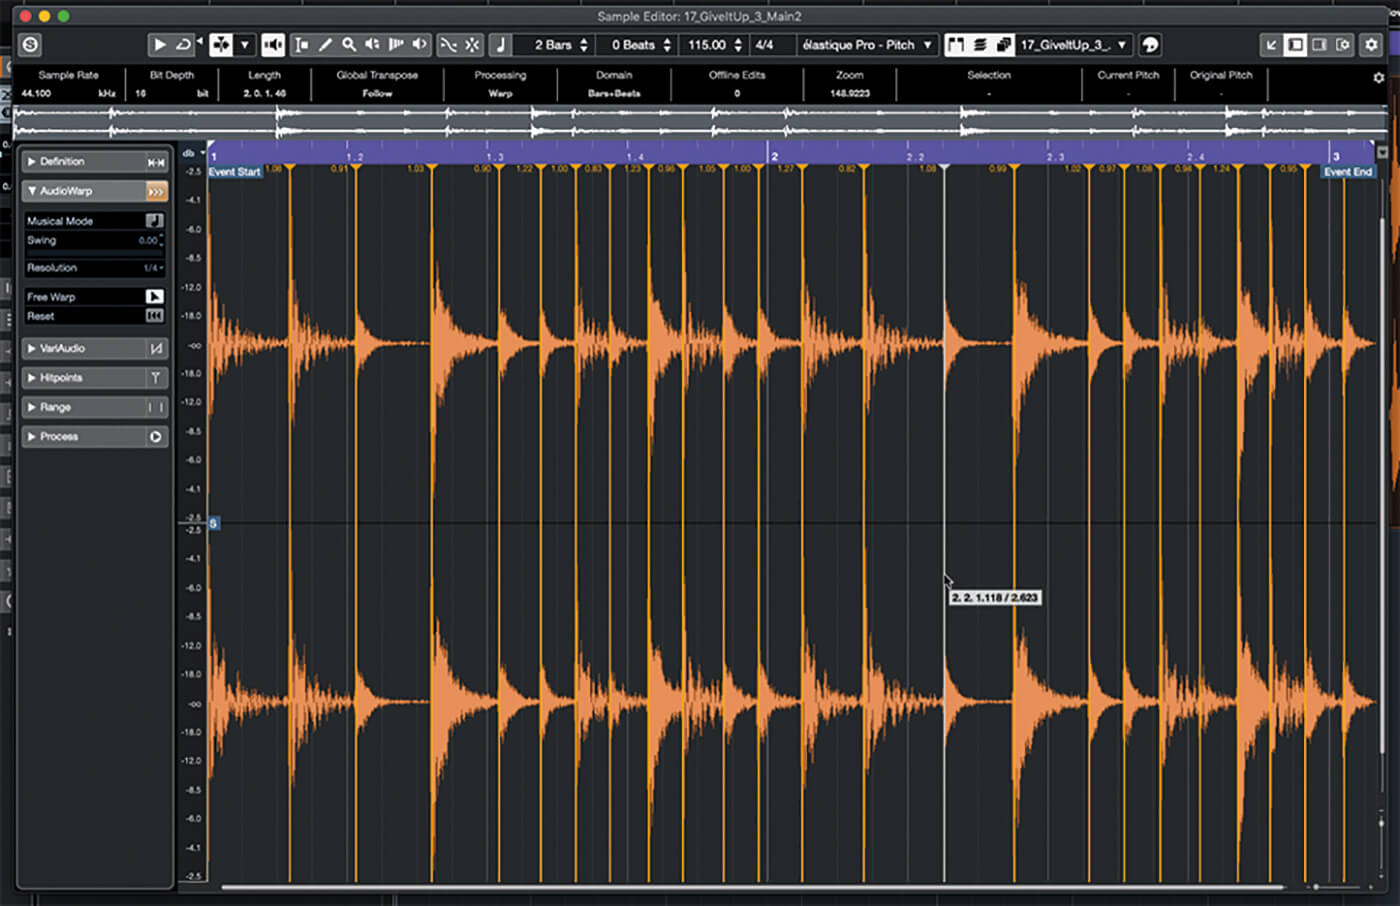
17. Click the AudioWarp panel’s Free Warp button. Move the mouse over a hitpoint marker, then click and drag the marker. The transients will move with the hitpoint. Make small tweaks to the hitpoints to give your loop a new groove and feel.
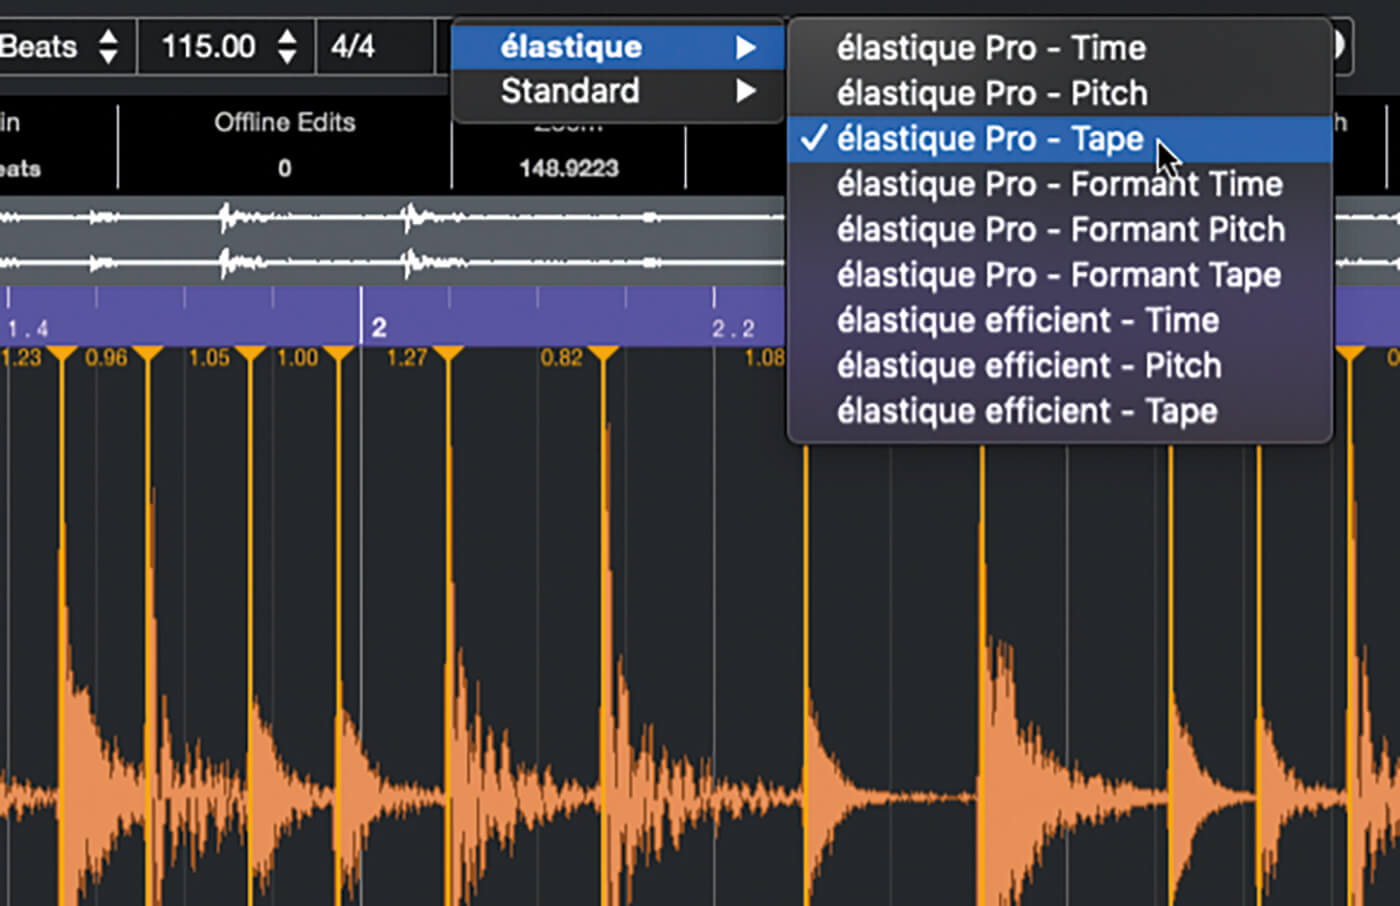
18. The warping algorithm has a big impact on how each slice reacts to being modified. Typically, you would use one of the Time algorithms to maintain the audio’s original pitch but you can achieve brilliant results with the others too.
For more Cubase tutorials and workshops, click here.