Understanding Chord Tracks in Cubase
At first glance, Chord Tracks and Chord Pads can give the impression they’re aimed at producers whose musical ideas exceed their musical skills – they are, however, powerful production tools in their own right…
Chords are a vital component of nearly all forms of music, creating the harmonic bedrock on which melody, mood and emotion are built, so it’s little surprise that Cubase has a number of tools and workflows that centre around them. Chords are, of course, related to musical keys and scales, which places them right at the heart of music theory, something that not all producers have a formal or developed knowledge of.
Major and minor triads are simple enough, but chords can get much more complex than that – both to understand and to play – with voicings, inversions, extensions, augmentations and all the rest of it. Also, knowing what will sound good following, for example, an F9sus4 when playing in C Dorian can require an encyclopaedic theory knowledge… or a lot of experimentation.
The main tool Cubase provides to help with this is the Chord Track. Like Tempo and Time Signature tracks, a Cubase project can contain only one Chord Track, which makes sense if you think about it: yes, you may find two different chords that sound good when played together – F major and C major, for example – but really all you’re doing there is creating a new, extended chord, eg, Fmaj9 or C6sus4 (depending on the root note).
Timeline chord chart
A Chord Track shows a series of chord ‘events’. These are blocks that define a chord and display its name on the timeline, and, given the relationship between chords and scales, can also show scale ‘events’. At their most basic, these events allow you to map out and notate a chord (and scale) progression for a piece of music and to have that progression show in the timeline so that you, or the musician(s) you are working with, can follow it when laying down new parts for the music.
This is actually a very rapid and effective way of laying down a musical idea. It’s the DAW equivalent of sketching out a chord chart on a piece of paper. By doing this, you unlock a whole load of Cubase’s other chord-based tricks.
Chord events aren’t intended to actually play a chord (although you can assign a MIDI or Instrument track through which to monitor the chords being generated by the Chord Track), but rather to act as a data track through which you can tell Cubase what chord is active at any point on the timeline. Chords are added to the timeline using the Draw (pencil) tool, with which you define the timeline start and extent of a chord; once a track contains one chord event you can also use the Chord Editor to add subsequent chord events. A chord stays active until the next chord event occurs, even where there’s a gap between chord events on the timeline.
Chord editor and assistant
The Chord Editor – accessed by double-clicking on a chord event – provides a table in which you can select the root note, ‘type’ (major, minor, diminished, etc), ‘tensions’ (dom7, maj7, #9, etc), and also specify a different bass note (a G chord with a C bass note – G/C – for instance). The editor also allows you to specify the chord via MIDI, or to type the name of the chord into a type-in field.
The Editor provides access to the Chord Assistant, which suggests chords based on the preceding chord and scale, and can display these suggestions in a number of different ways. As well as being an excellent tool to help you experiment with more advanced, colourful chords that may be beyond your playing ability or theory knowledge, the Assistant is phenomenally helpful for building great-sounding progressions and changes.
Harnessing chord tracks
Once you have defined a progression of chord events you can use them to enforce harmonic accuracy on your project in a few different ways. MIDI and Instrument tracks, for example, can be switched into Live Transform mode, which forces incoming notes into the chord and/or scale defined by the Chord Track. As well as rendering duff notes a thing of the past, Live Transform allows you to focus on the feel and mood of a performance while being somewhat blasé about the actual notes you’re playing.
Chord events can also be used to modify existing recorded material, forcing MIDI notes into key and pitch and interacting with Cubase’s VariAudio system to modify the pitch of monophonic audio recordings such as vocals and lead guitars. Used in this way, a Chord Track can become something of a master track from where you can experiment with, modify and develop the harmonic content of a piece of music.
It’s also useful when remixing, forcing the source parts into new keys and harmonies. Let’s now play around with some simple musical ideas to show just how powerful Chord Tracks can be.
Using Chord Tracks: step-by-step
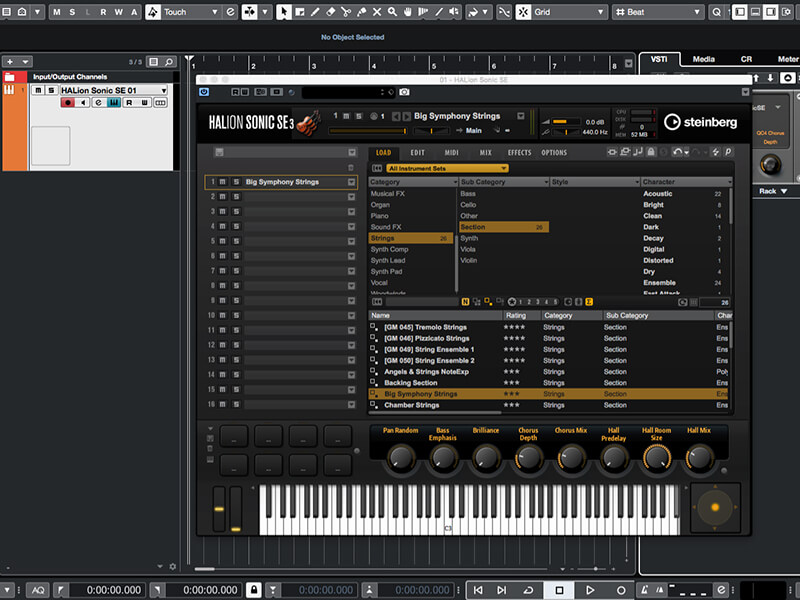
1. Fire up Cubase and create a new project. Add an Instrument track, selecting a preferred instrument as the source and load a string section or similar patch that has a fast attack and that sustains until the keys are released.
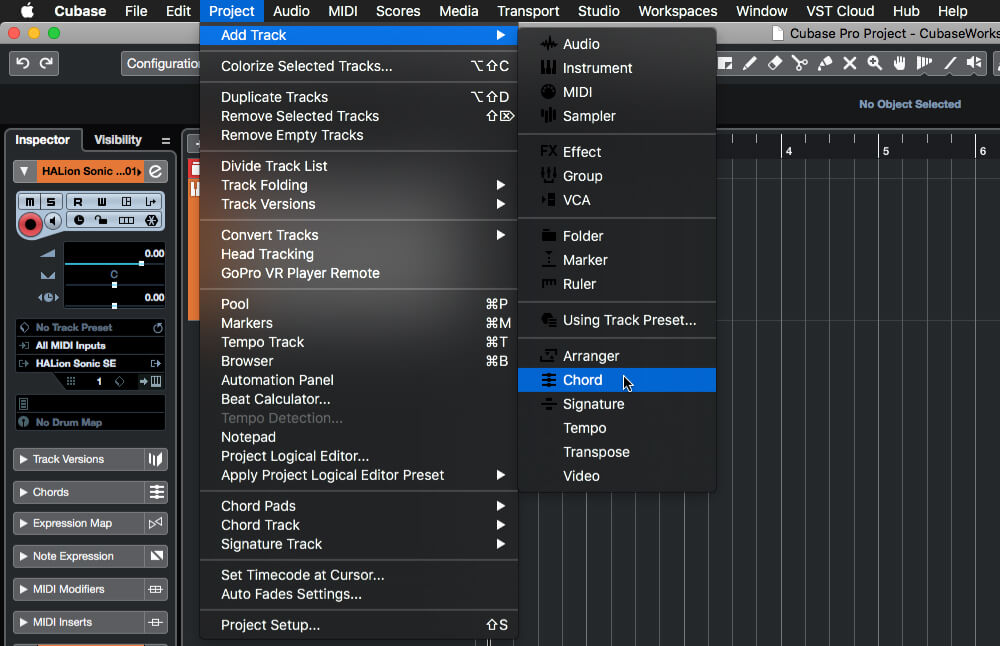
2. Add a Chord Track, either from the program’s Project > Add Track menu, or by right-clicking in the project’s track list and selecting Add Chord Track from the pop-up menu. Also, work out a basic progression consisting of simple triad chords.
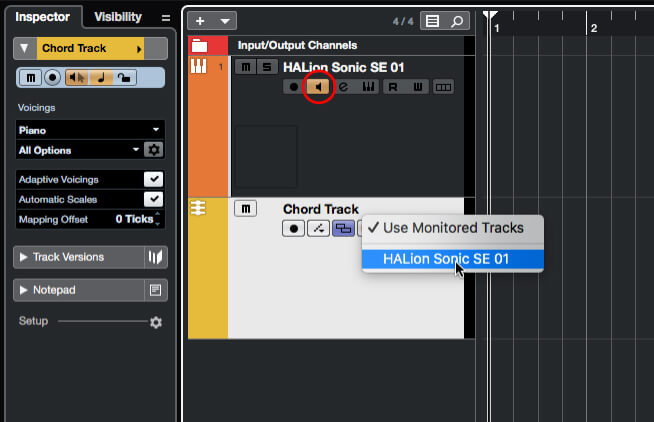
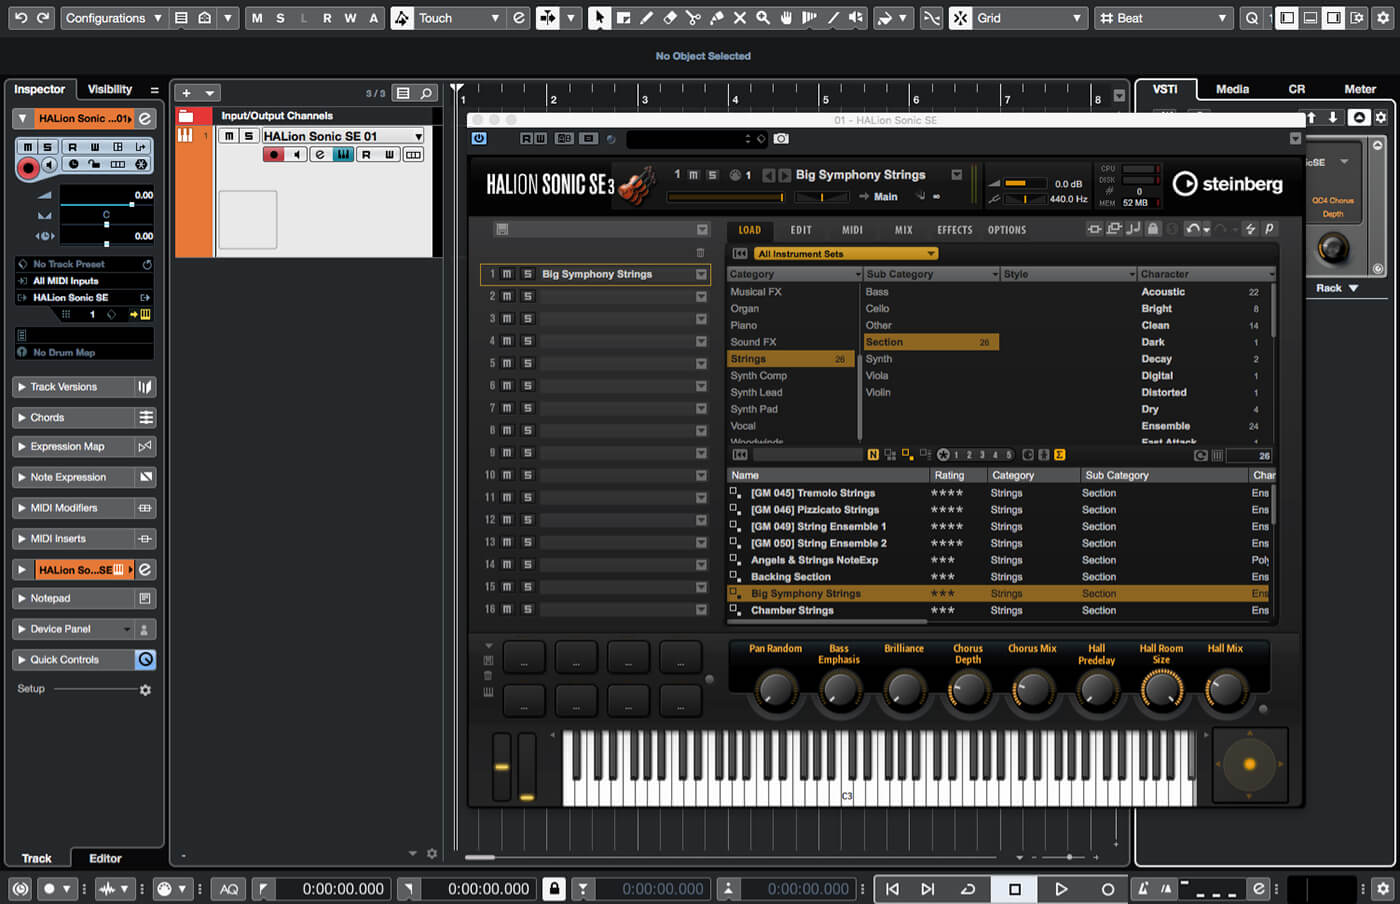
3. Enable monitor mode on your instrument track – this allows us to use the instrument to monitor the chord track’s events. On the chord track, click Select Track for Auditioning and then select your instrument from its dropdown menu.
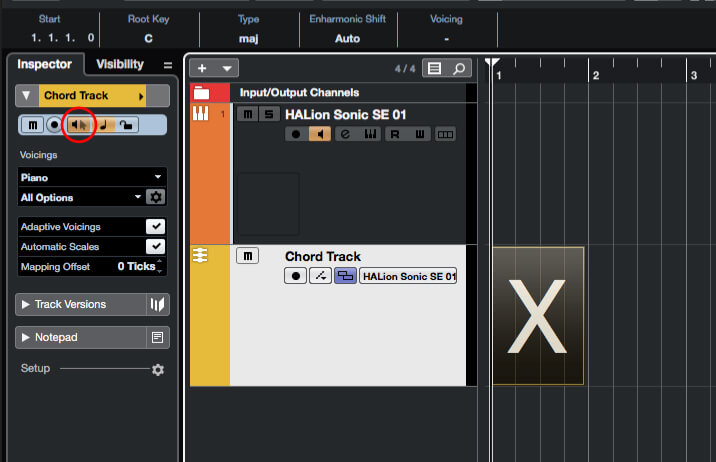
4. Select the chord track and, in the track inspector, enable the Acoustic Feedback button. Switch to the Draw tool and click in the chord track at bar 1, beat 1 – a one-bar-long chord event marked with an X appears.

5. Double-click on the chord event to open the Chord Editor and in its first column, click on the root note that corresponds with the first chord in your progression. If your first chord is minor, click ‘minor’ in the second column, too.
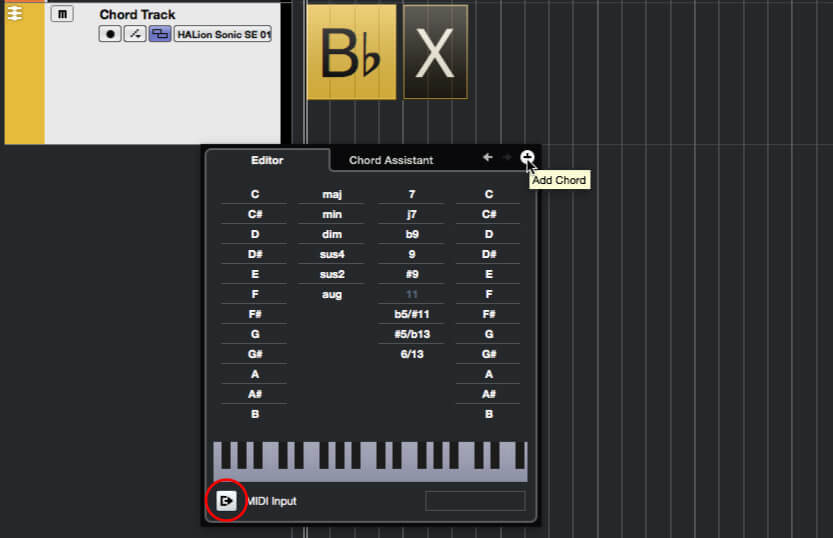
6. Click the small + button at the top-right of the Chord Editor; this creates a new chord. Check that the Chord Editor’s MIDI Input button is lit and then use your keyboard to play the second chord of your progression.
![]()
CHORD VOICING Keyboard players tend to voice chords differently to guitar players. Sometimes, you will want to voice chords in a different way again. In Cubase, a Chord Track’s ‘Voicings’ options deal with this and can impact on how chord events are interpreted.
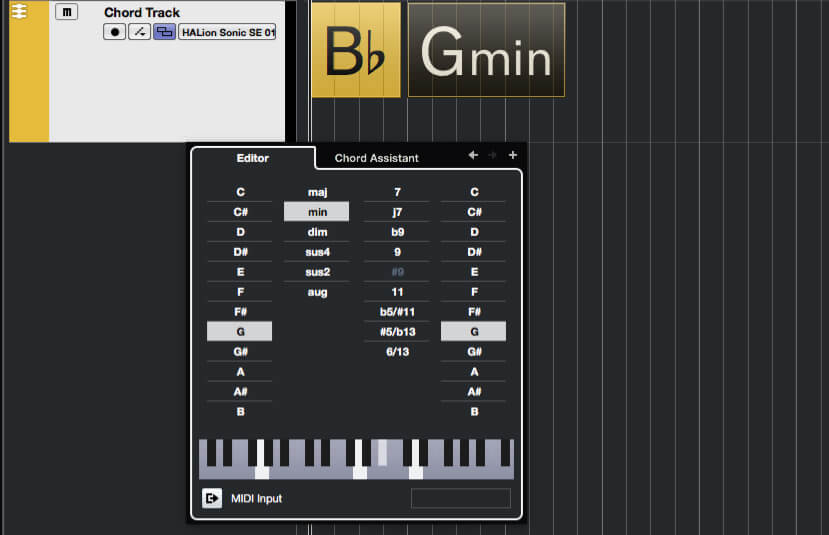
7. This time, Cubase will have recognised the chord you played (its chord recognition is very good) and assigned this to the new chord event. If you play the chord incorrectly you can just try again and the event will be updated.
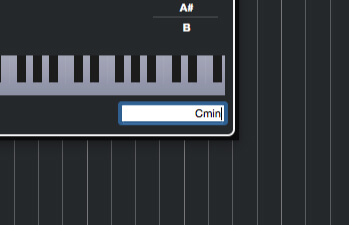
8. Create another new event. Click in the box at the bottom-right of the Chord Editor, enter the name of the third chord in your progression and then hit the enter key – the chord is assigned to the event.
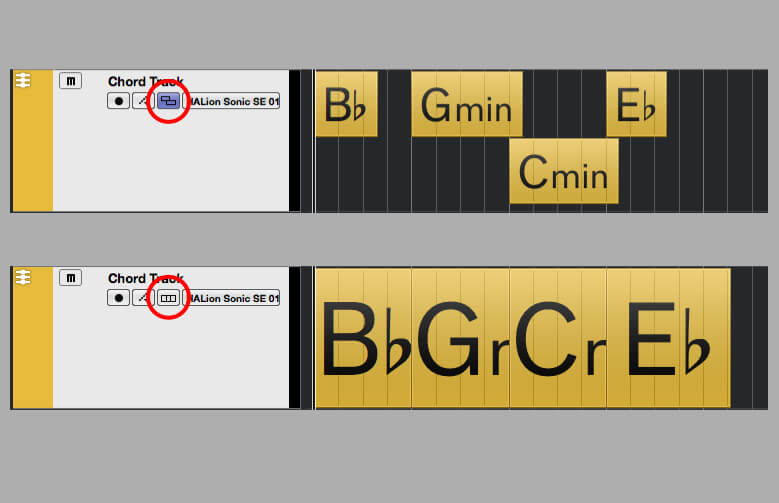
9. Continue to enter the chords of your progression using the method you find most convenient. You may notice the chord event markers resize to accommodate their chord name. Click the Resolve Display Conflicts button (circled) to toggle to a different display mode.
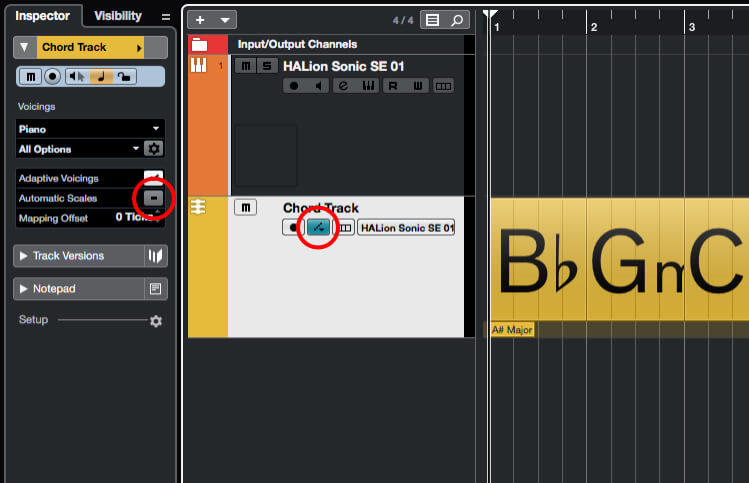
10. Click the chord track’s Show Scales button (circled). A new lane will appear on the chord track with a marker indicating the key/scale of your progression. If you wish to modify the scale lane untick Automatic Scales in the chord track’s inspector.
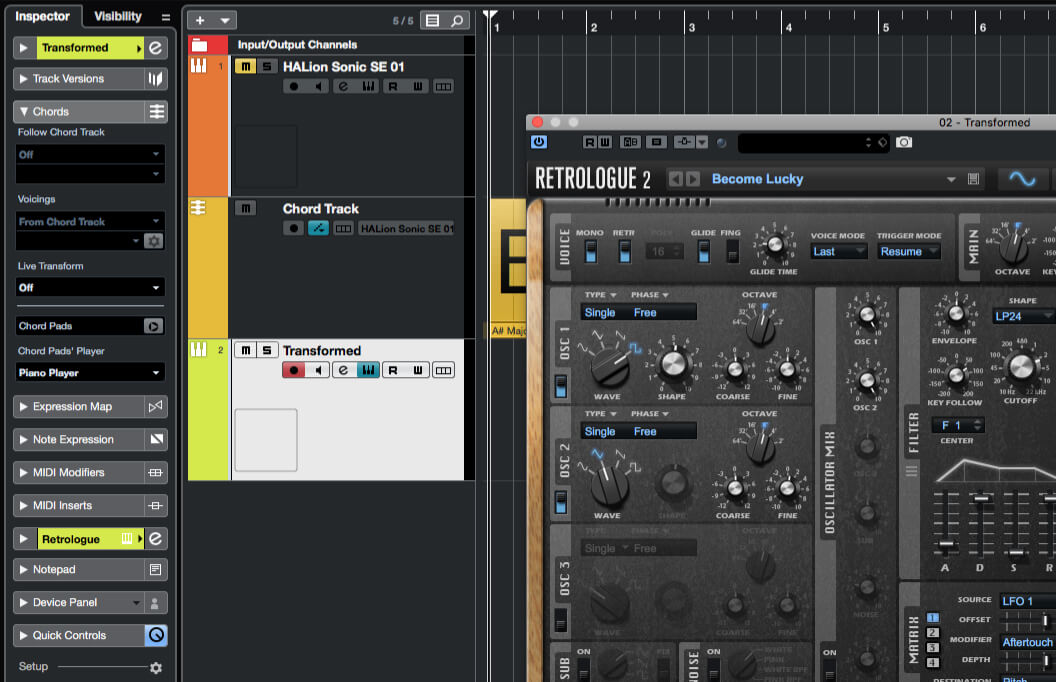
11. Mute the instrument that the Chord Track is using for auditioning, then create a new instrument track using an instrument of your choice. Rename the track as ‘Transformed’ and load a lead sound of some sort. Open the Chords section in the new track’s Inspector.
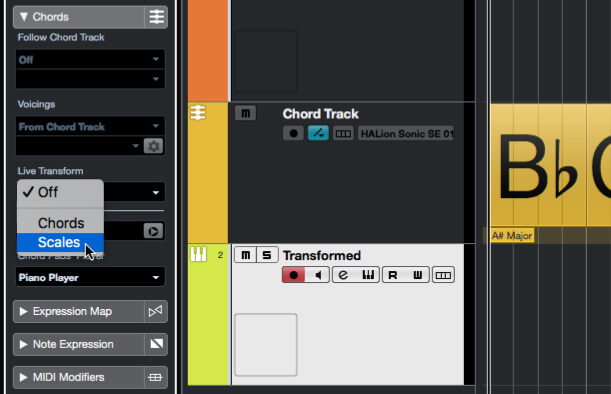
12. Click the Live Transform drop-down menu in the Inspector and select Scales. Now, when you play notes on your keyboard controller, all incoming notes will be forced to match the current scale; using Chords mode would force incoming notes to the chord’s notes.
![]()
MONITORING CHORD TRACKS You can monitor Chord Tracks via an Instrument track, but enabling and disabling this audio feedback can be a bit clumsy, so it’s always worth creating a dedicated instrument track purely for monitoring the chord track, as this can be easily muted when not needed.
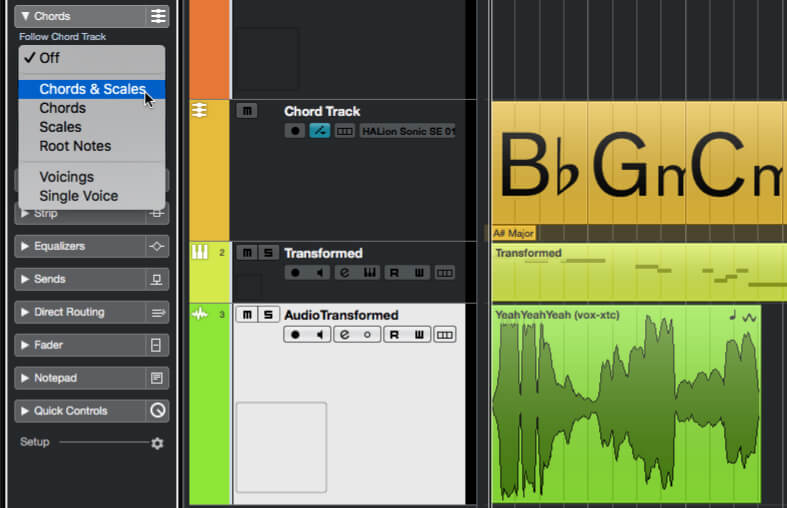
13. Create a new mono audio track and ensure it’s in musical-timing mode. Record or import some monophonic pitched audio (vocals, lead guitar or similar). Open the Chords section of the track’s Inspector, click the Follow Chord Track menu and select Chords & Scales.
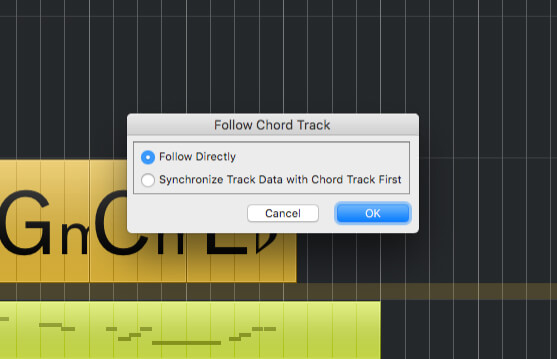
14. The Follow Chord Track popup will open. Select the ‘Follow Directly’ option and click ‘OK’. Unmute the chord track’s audition track and then hit play – notice that the audio is now being forced into key by the chord track using VariAudio.
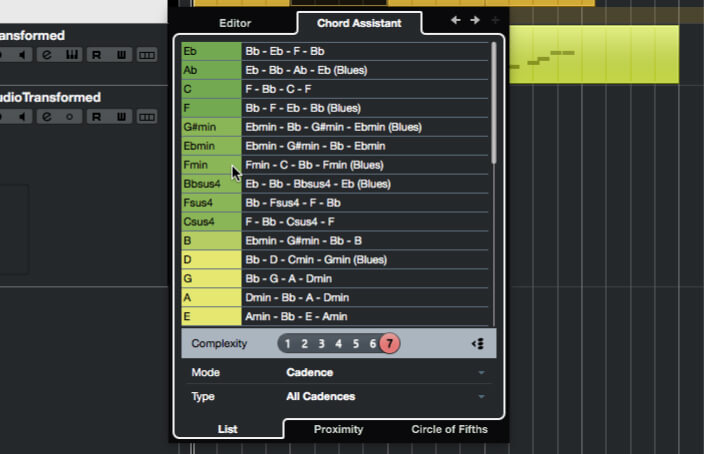
15. Double-click the second chord event and click the Chord Assistant tab in the panel that opens. The list shows possible chords alongside the progressions they belong to – clicking a row updates the current chord event. Use the Complexity buttons to filter the list.
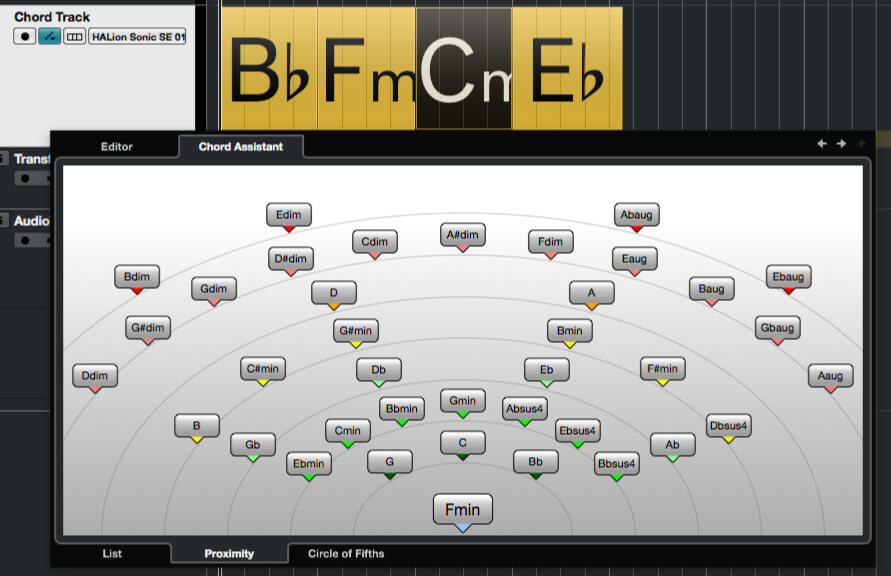
16. Use arrow buttons at the top of the Chord Assistant to select the next chord event. Now, using the tabs at the bottom of the panel, change to Proximity mode. Possible chords are mapped graphically based on complexity – click a chord to select it.
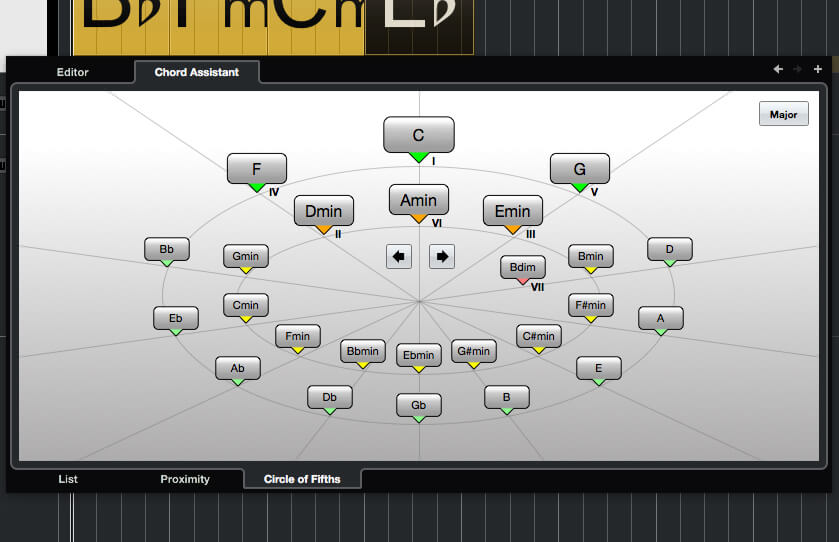
17. Move to the next chord event and then click the ‘Circle of Fifths’ bottom tab. This now displays possible chords in a circular layout based on the circle of fifths musical theory. Each chord is colour-coded according to to the resulting harmonic complexity.
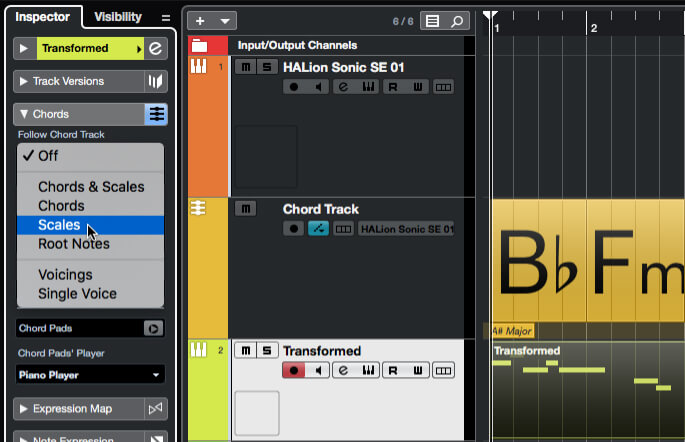
18. Use the Track Inspector to set the ‘Transformed’ instrument track to follow the chord track’s scale (as in step 14). Hit play. The Chord Assistant has helped you select some more interesting chords and the audio and MIDI tracks have updated to follow those changes.
For more Cubase tutorials and workshops, check here.