How to create an old-school hip-hop beat in FL Studio
Recreating those classic sounds of hip-hop is a doddle using FL Studio’s competent beat-editing abilities. In the first of a new series, we explore how to take your mixes back to the 80s.
There’s a lot of nostalgia for recreating classic sounds these days, and a lot of producers work tirelessly to recreate the vibes and feelings of the beats from yesteryear. Most of these beats are actually quite simplistic, compared to contemporary beats, but that does not mean they are easy to make. So today we are going to embark on a journey to see what elements make those classic hip-hop beats sound the way they do, and how we can build them ourselves using FL Studio.
Rapper’s delight
It’s probably a good starting point to get an idea of the exact sound you’re aiming to recreate lined up. Indeed, the easiest way (and probably most popular way) to produce an old-school hip-hop beat is to sample old vinyl records through a sampler. This automatically gives you that old-school vibe through the hiss from vinyl and ‘choppiness’ of the samples. But you will need the right equipment and you would also have to start crate digging for the best vinyl records. So this can be a lot of additional work and maybe not within your reach. But there are other ways to achieve the same kinds of effects, so don’t worry if you only have access to FL Studio (or any other DAW for that matter). First, we need to understand how these old-school beats were made.
Hip-hop originated in the early seventies when DJs like Kool Herc and Grandmaster Flash started looping short drum solos or other parts from existing records. They would play the same vinyl on both turntables and switch between them to create a continuous song. One of the most famous records used is Apache by The Incredible Bongo Band, check this song out and you will most likely recognise it immediately, since it has been used by many others and in many hits over the years. Back in those days, however, you still needed a mixer, two turntables and a lot of records to stitch these loops together. But then the drum machine entered the fray, and a new approach allowed greater creative flexibility.
Beatbox
In the 1980s the Roland TR-808 and the Linn LM-1 Drum Computer (the first drum machine with digital samples) were released. These products brought drum machines to the masses. The more affordable LinnDrum (released in 1982) became a favourite for aspiring hip-hop producers. They were now able to make their own drum loops!
So when you’re finding those drum loops and samples to begin constructing your retro hip-hop-flavoured track, it’s important to find those that sound rather dusty or distorted, but overall they need to sound like an actual physical drum recording, and not electronic.
But there are ways around that. A kick drum with a heavy sub bass to it will not sound old-school, so you can filter that out with a high pass. The snares are usually quite dry and simple – therefore you need to find snares without a long tail or reverb. The same goes for high hats. You can also filter out the high end and you will get that old-school feel instantly.
So if you’re looking for samples for your own old-school hip-hop productions, keep in mind the technical limitations of the producers back in the 80s and 90s. In fact, when you use samples that originate from these drum machines (or are based on them) your production will automatically get that old-school sonic aesthetic, simply because you’re using that same sample source material from back in the day! But as explained you can always get that old-school vibe with the right edits and filter work. Luckily, FL Studio provides more than enough tools to achieve that.
After you have found some fitting sounding samples, you are ready to make that drum loop! The most important element to consider is that you have to humanise your drum loop by varying with placement, volume and panning. In the following tutorial we will guide you through the process of making a fairly standard sounding old-school hip-hop drum loop in FL Studio.
Old-school hip-hop beats in FL Studio: step-by-step
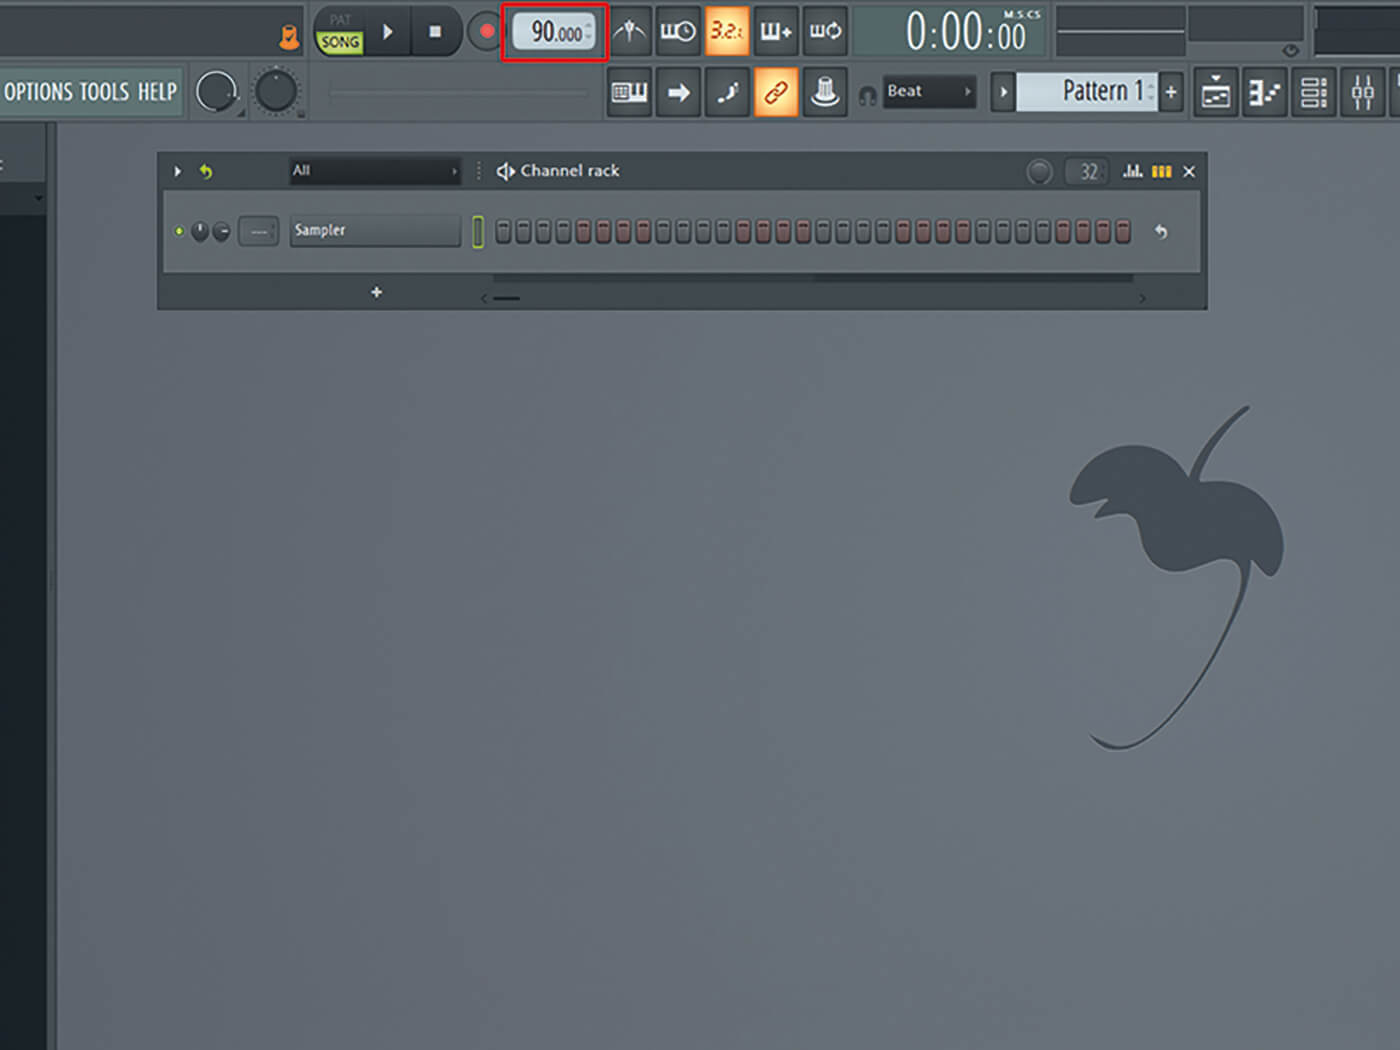
1. Start a new project and set it to 90 BPM (a pretty conventional time signature for this era of the genre). It’s recommended that you start with a basic drum loop and after you lay down the basics, you can add more elements to the drum loop.
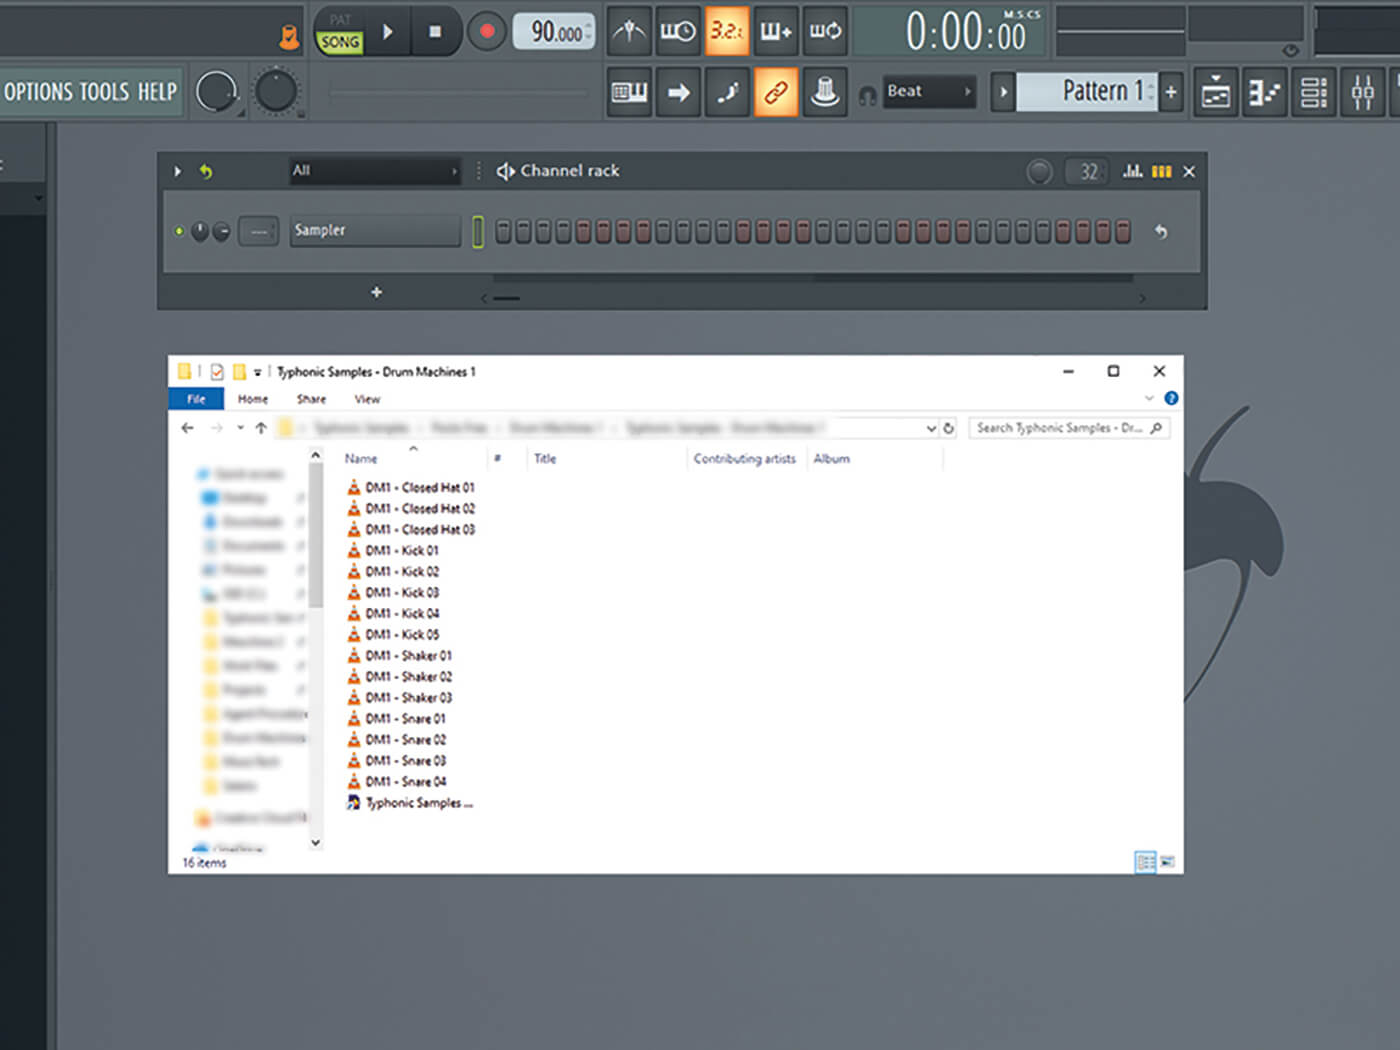
2. Tip: All samples (and some extra) are included in the .flp file on the DVD or via the download link. When you want more, there are lots of free sounds available to work with as a starting point.
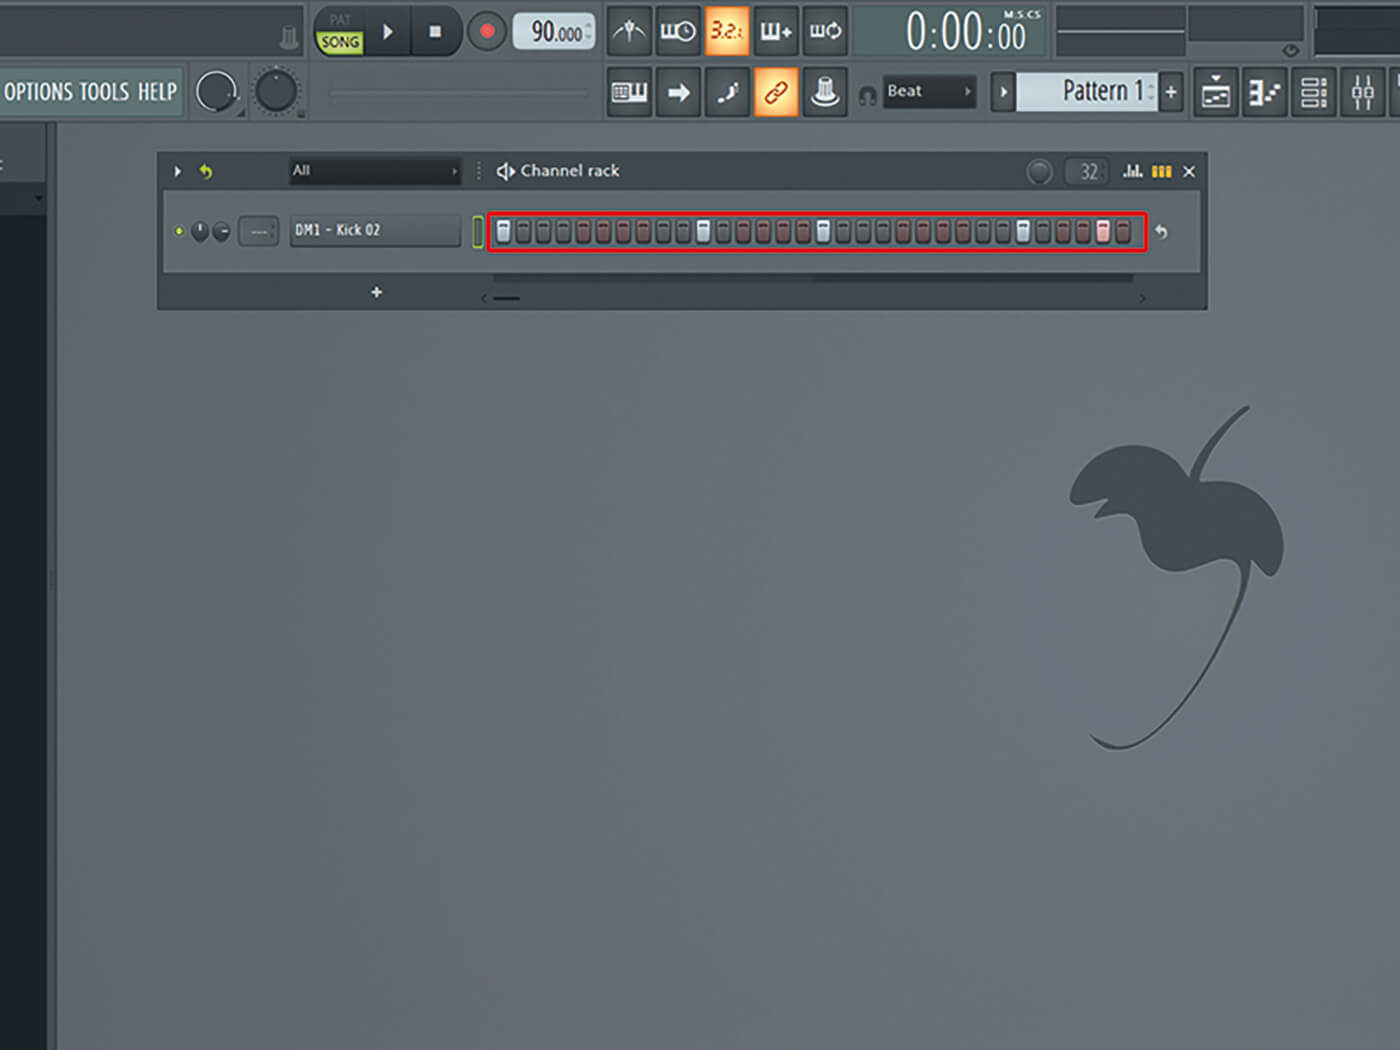
3. As said, it’s important to choose a fairly dry kick with not too much bass, or filter out the bass. Otherwise it will sound too modern. Place your kick on steps 1.0, 3.3, 5.0, 7.3 and 8.3.
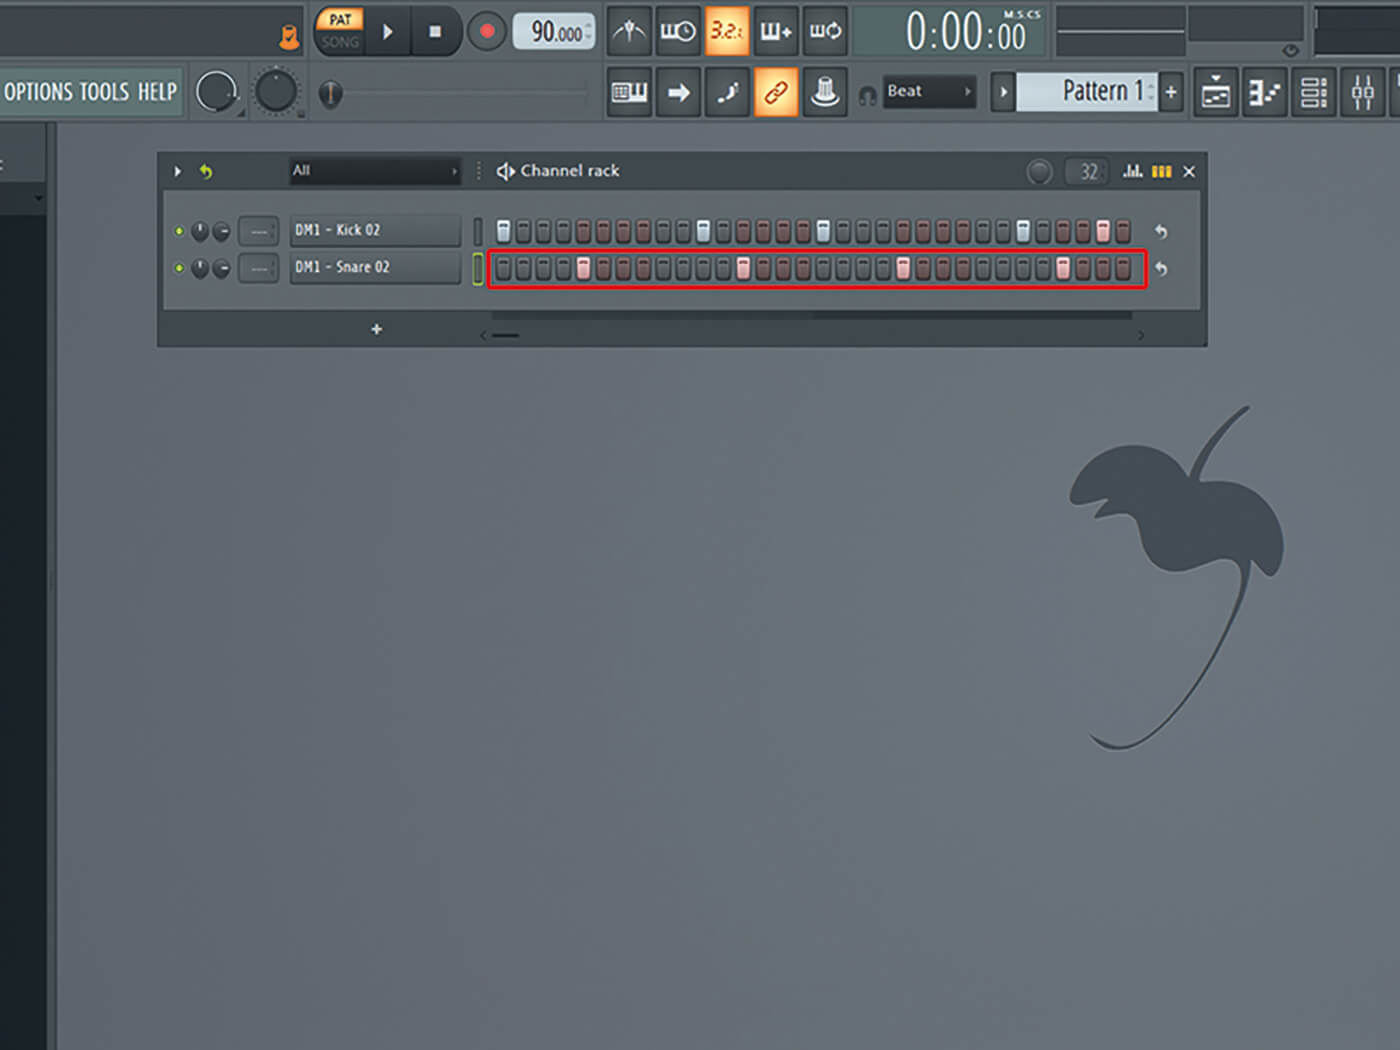
4. Find a nice compact snare and place it on the basic snare position, steps 2.0, 4.0, 6.0 and 8.0. This gives you an indication of the BPM and makes it easier to create a nice hi hat and shaker cymbal pattern.
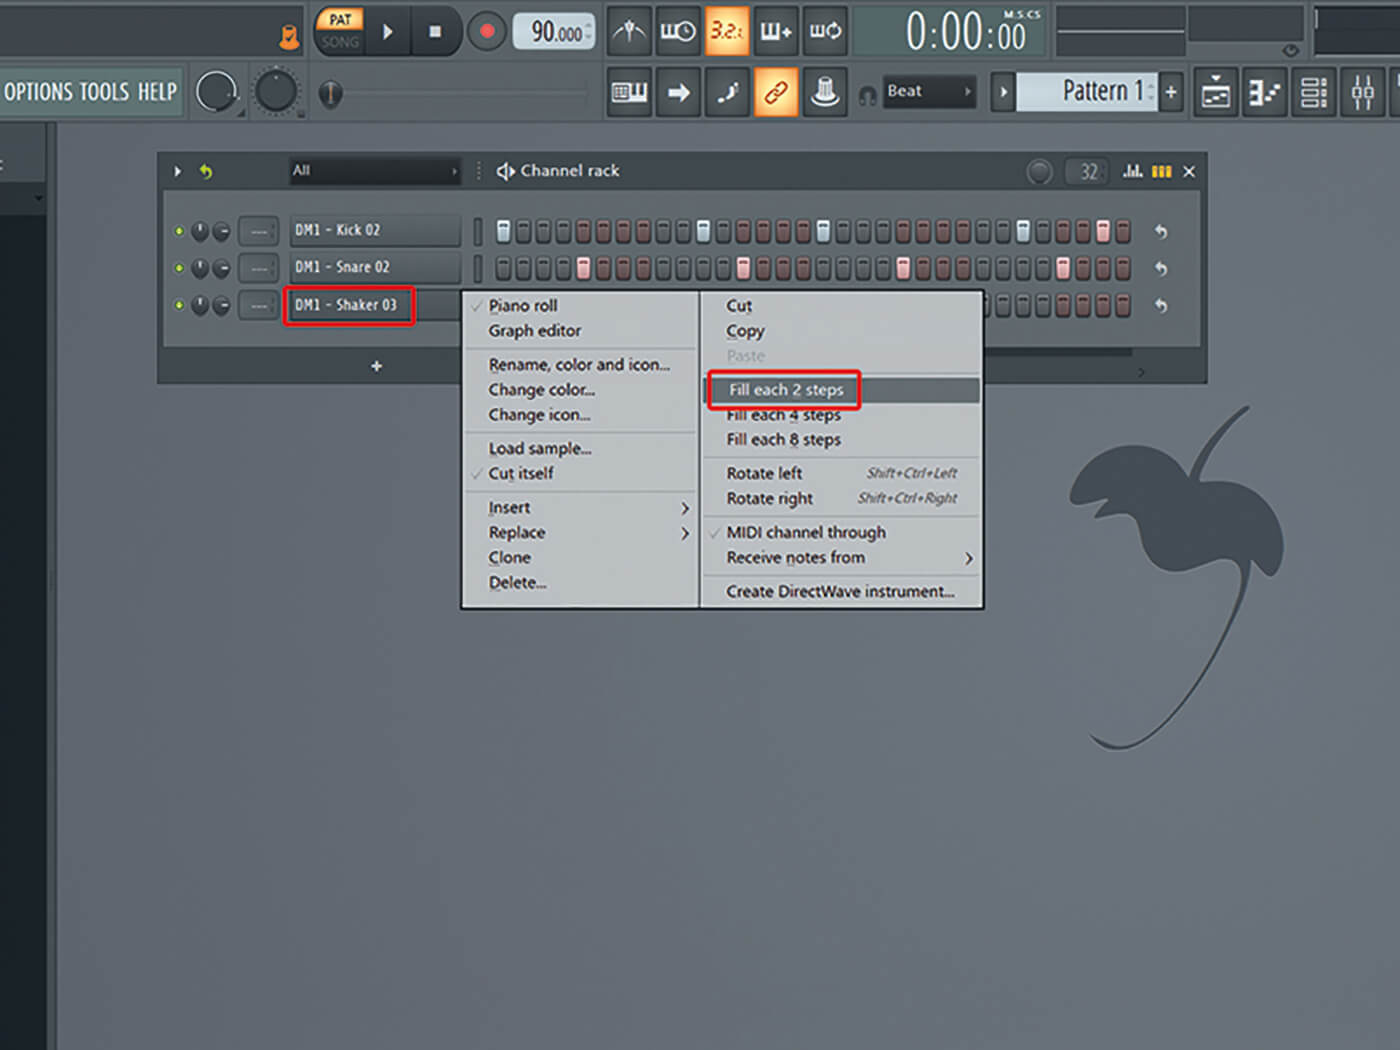
5. The shaker sample needs to be a subtle sweep and will be placed on every uneven step (right-click the sample and hit Fill Each 2 Steps). Reduce the volume of the sample so it falls to the background of the drum loop.
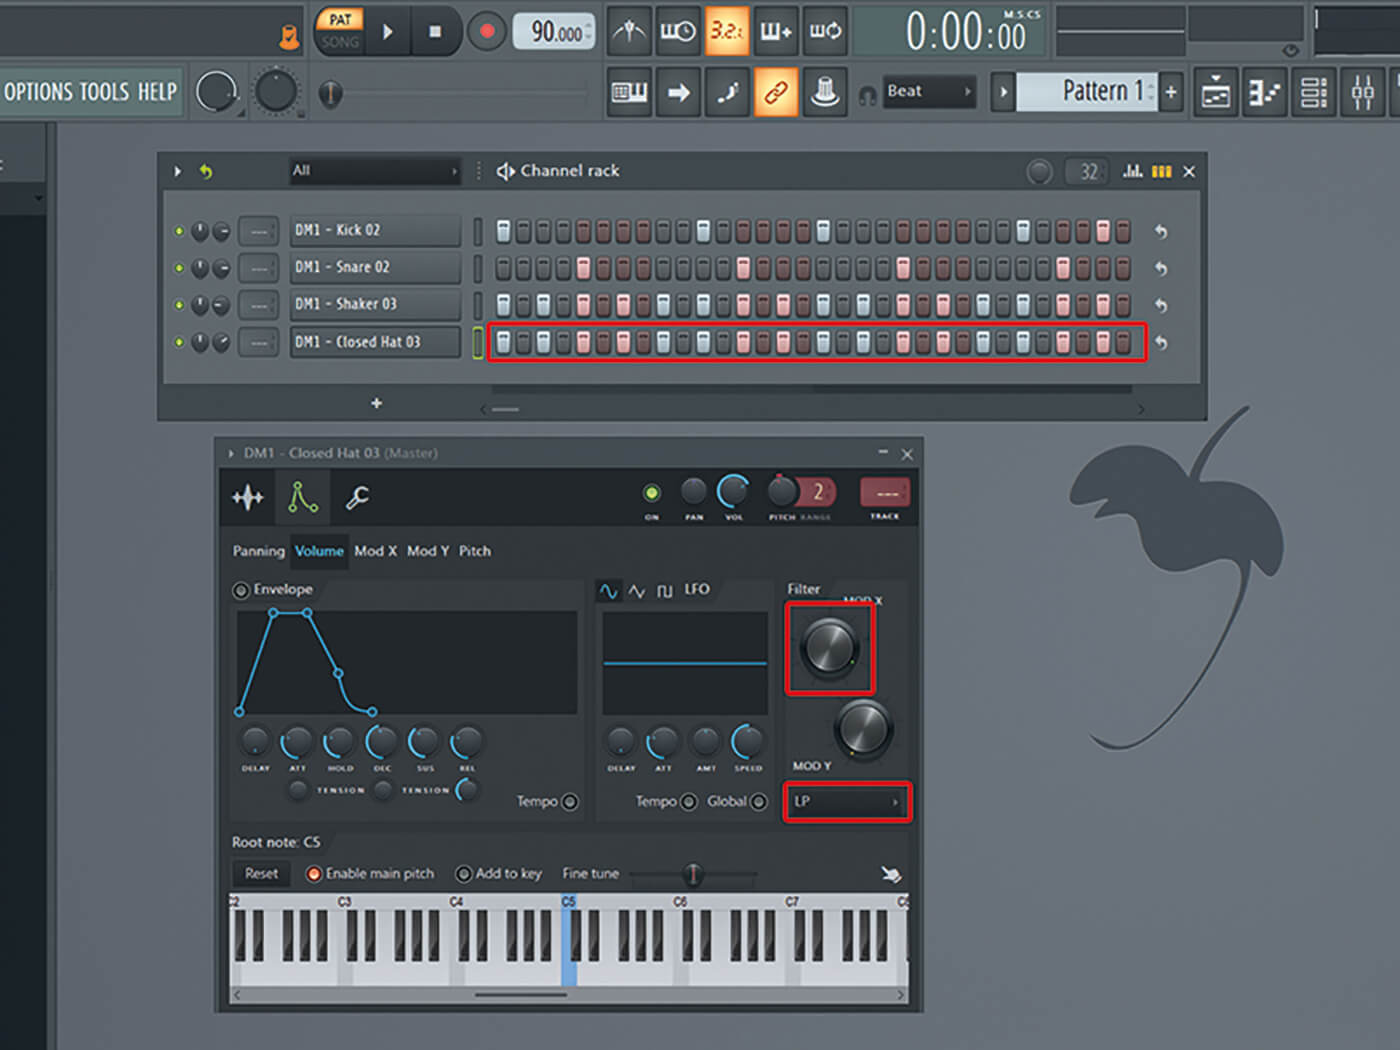
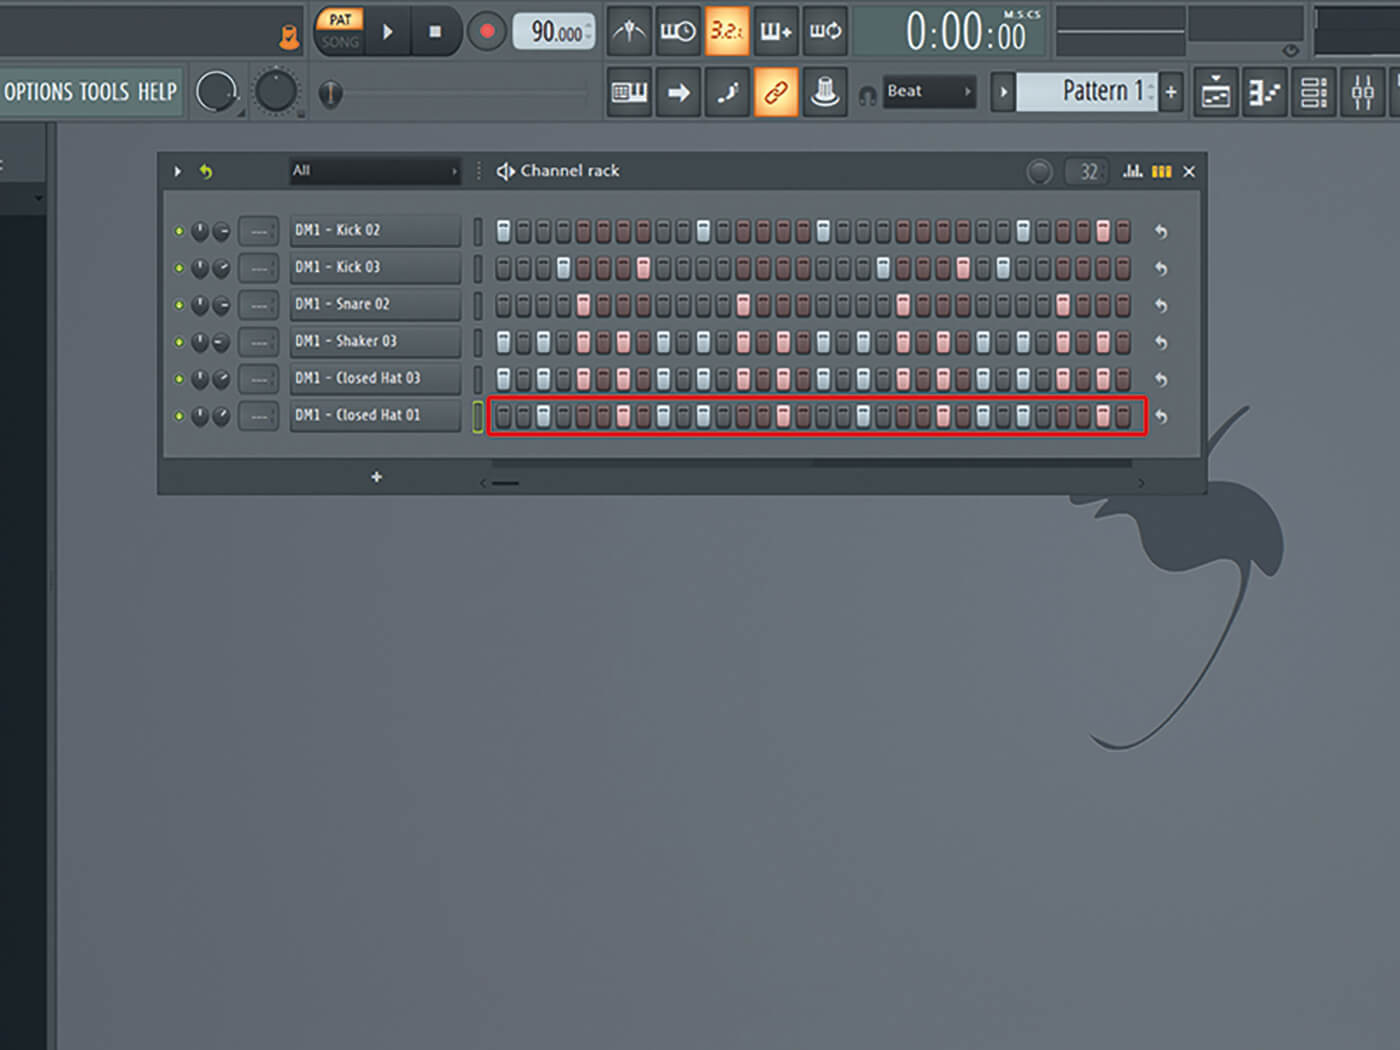
6. Now you can add a hi hat. Pick a simple closed hat and place it on top of every shaker. Try to find a sample that sounds dusty or filter out some of the highest frequencies with an equalizer or low pass filter.
![]()
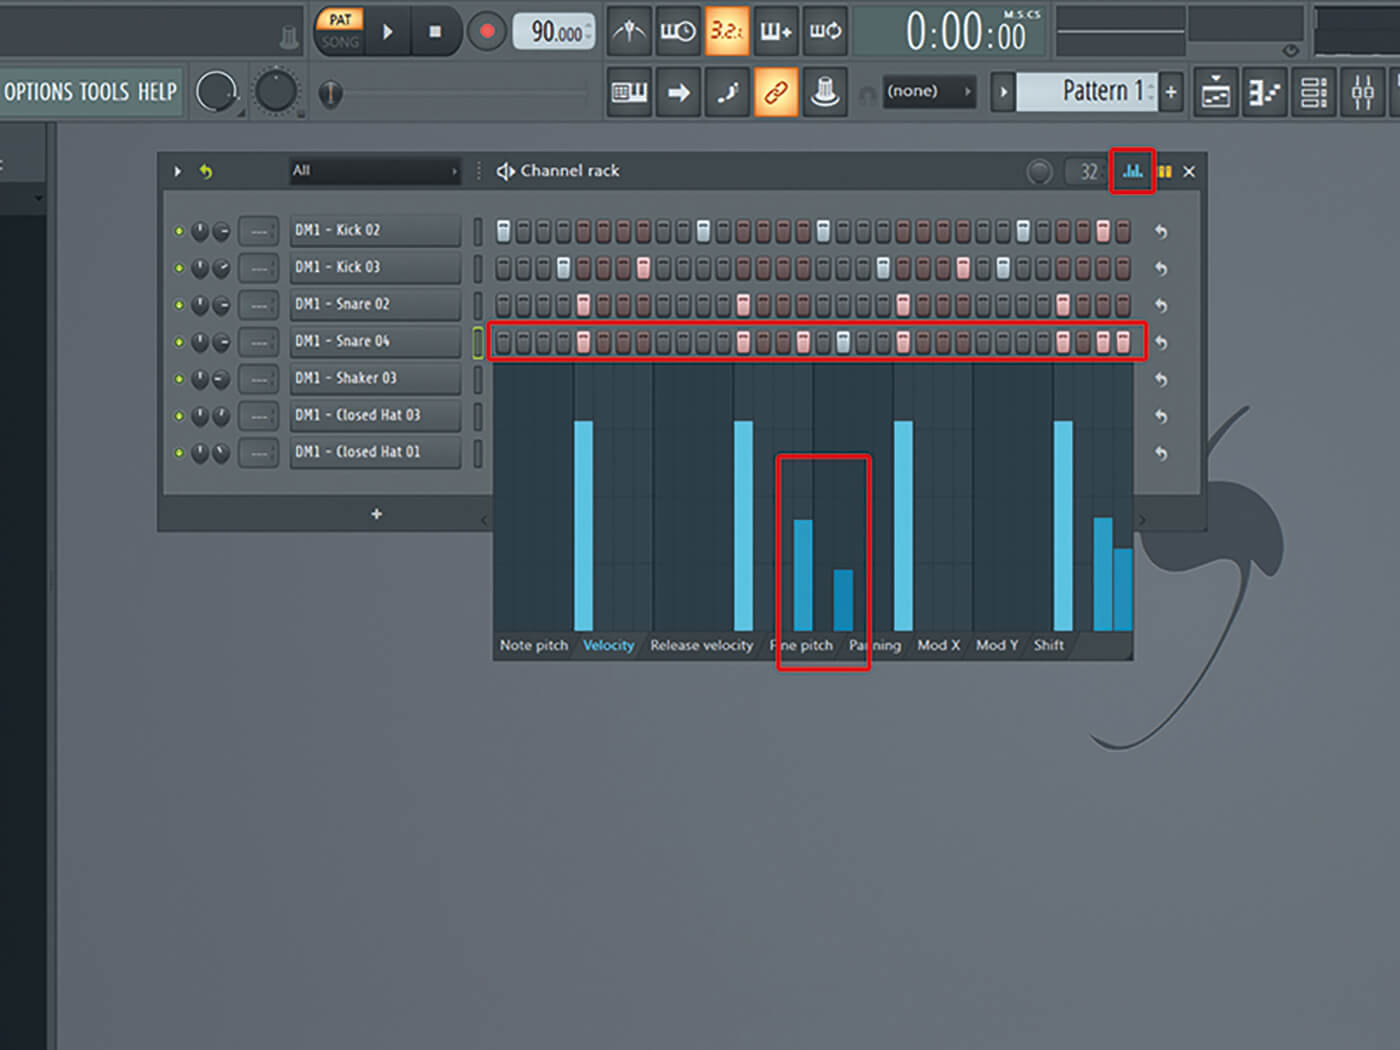
BEING HUMAN Humanising your tracks is very important for hip-hop productions, especially for old-school beats. A drummer will never hit every kick, snare or cymbal with the same velocity, at the exact location and/or with perfect timing. Therefore your drums will sound more natural when they are a bit off beat and random.
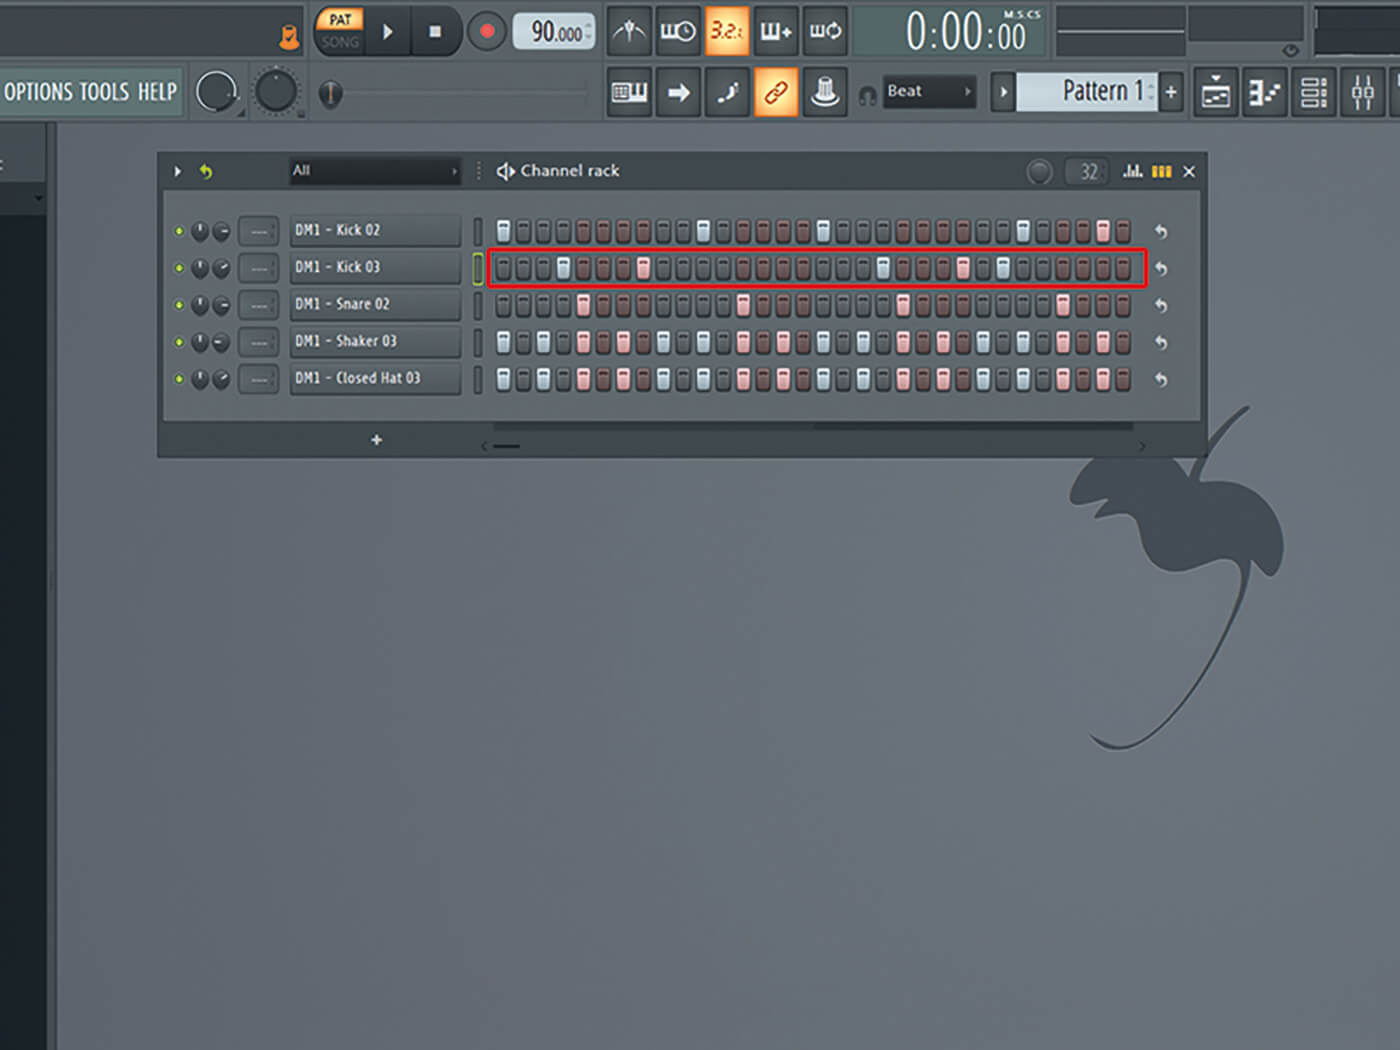
7. Now you have created the most basic hip hop pattern. To make it more unique you can add another kick that sounds slightly different than the first and lower the overall volume a bit. The second kick is placed on 1.4, 2.4, 5.4, 6.4 and 7.2.
8. It’s also recommended that you add another hi hat. This one can have a bit more hit and high end to it, so it will add some extra flow to your drum loop. Often it sounds great to place them on every second step, but avoid the main kick and snare.
9. You can add an extra snare if you like. In this drum loop we have added a second snare, for more punch, to the main snare. We’ve also placed three extra snares with very low volume on steps 4.4, 5.2, 8.3 and 8.4.
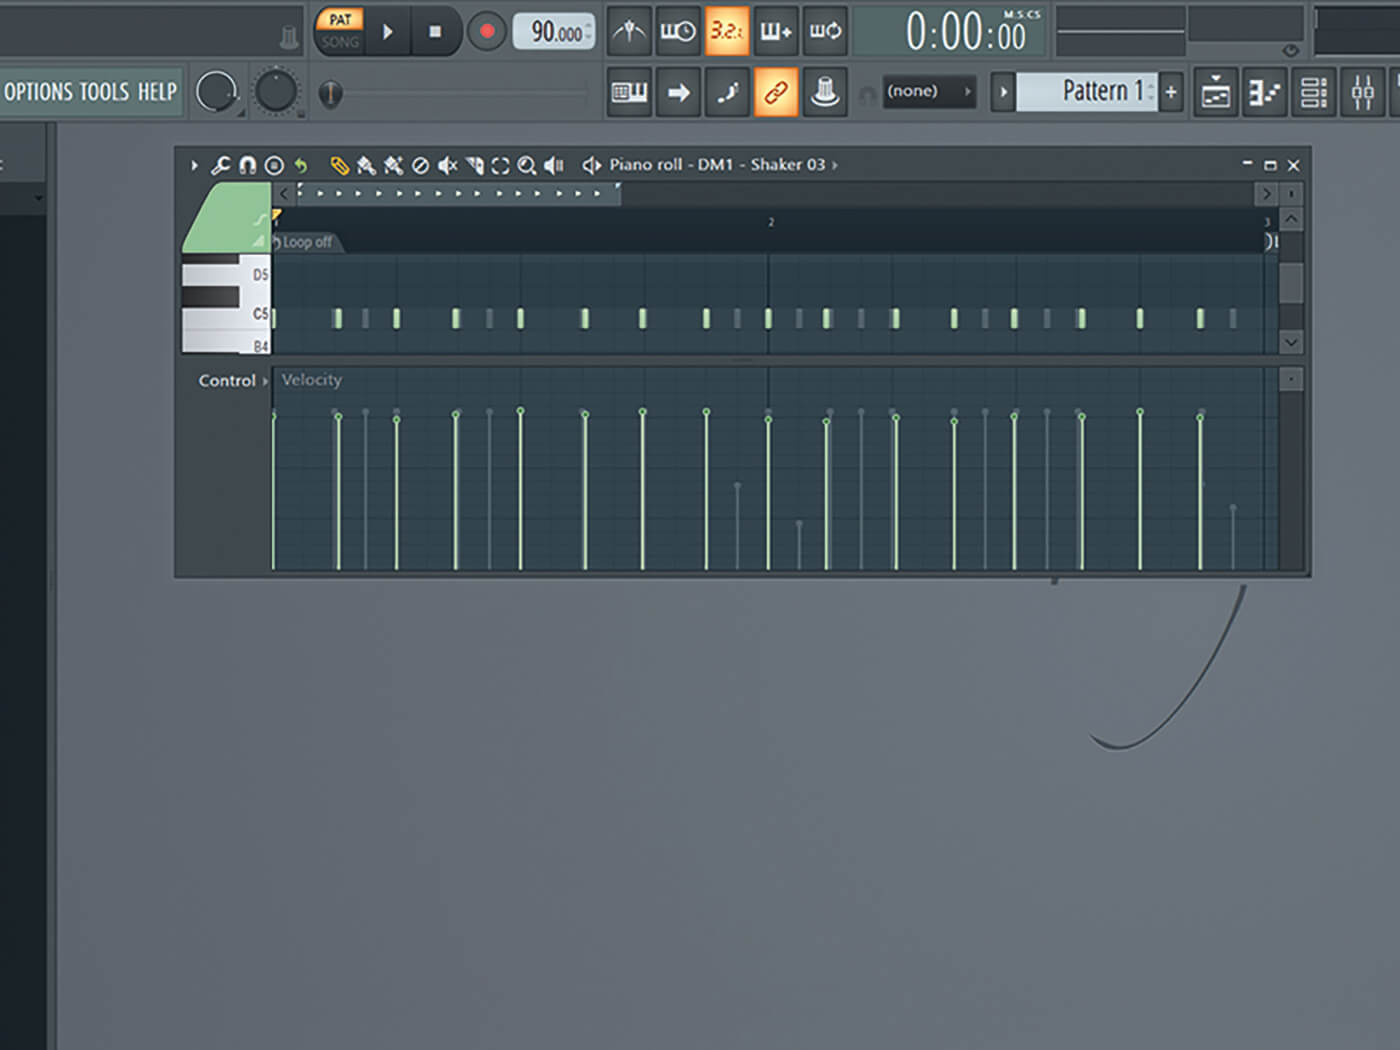
10. Now it’s time to humanise the drum loop; begin with the hi hats and shakers. Give them all a bit of random volume and place a couple one or two places off beat (to the front or back). Raise the volume of a couple of high hats for extra flow.
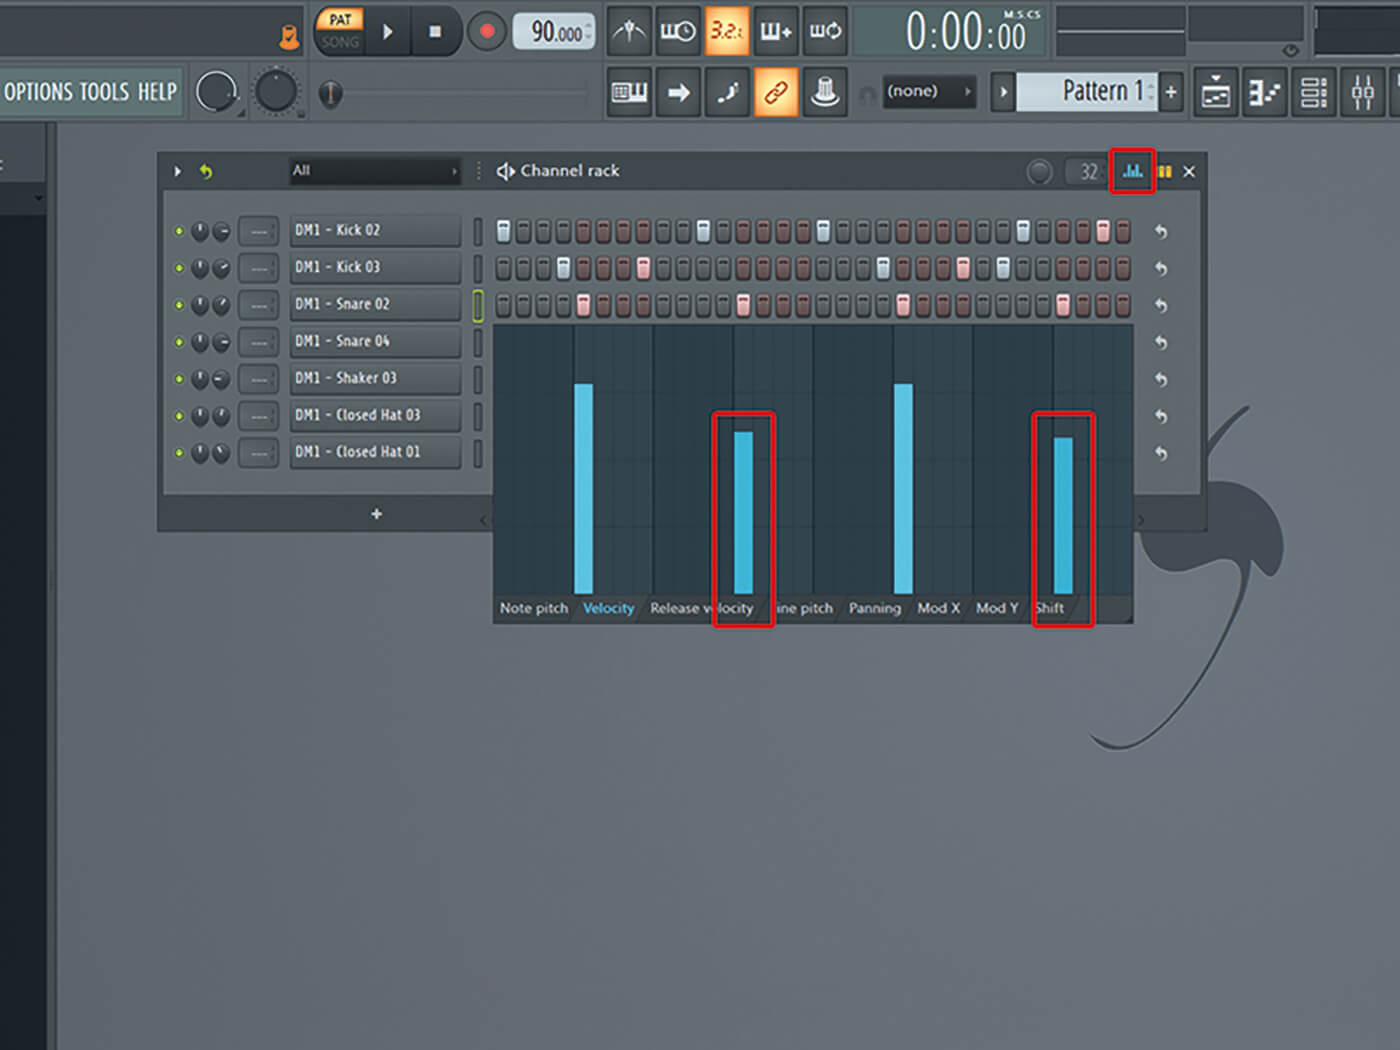
11. Since you have two snares with the same timing, make one dominant at the first hit and the other at the second hit. After that, nudge them all two or three places to the back to make them a bit late.
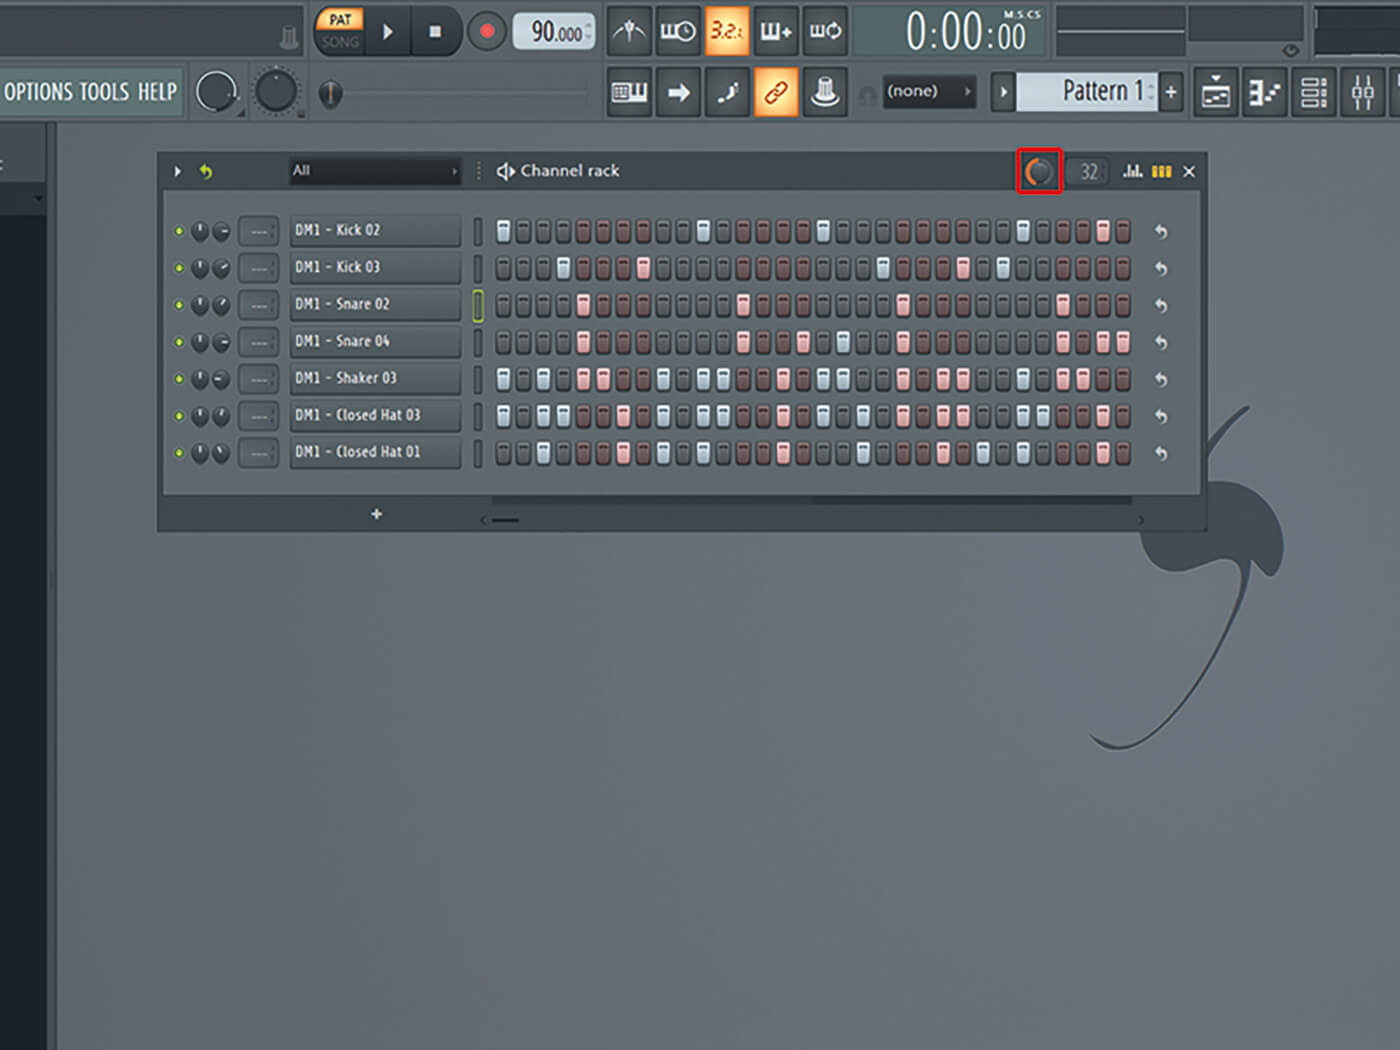
12. Add some extra swing to the drum loop by using the swing button (around 40%). It’s located on top of the step sequencer and it will humanise the beat even more by altering the timing. It will compliment the edits you made at steps 10 and 11.
![]()
DRUM BUS Creating a mixer track (bus) where all your drums are sent to will not only make it easier to apply effects on all your samples simultaneously, but it makes your drum samples sound like they belong together. For example, with a reverb plug-in, they all sound like they’re in the same room.
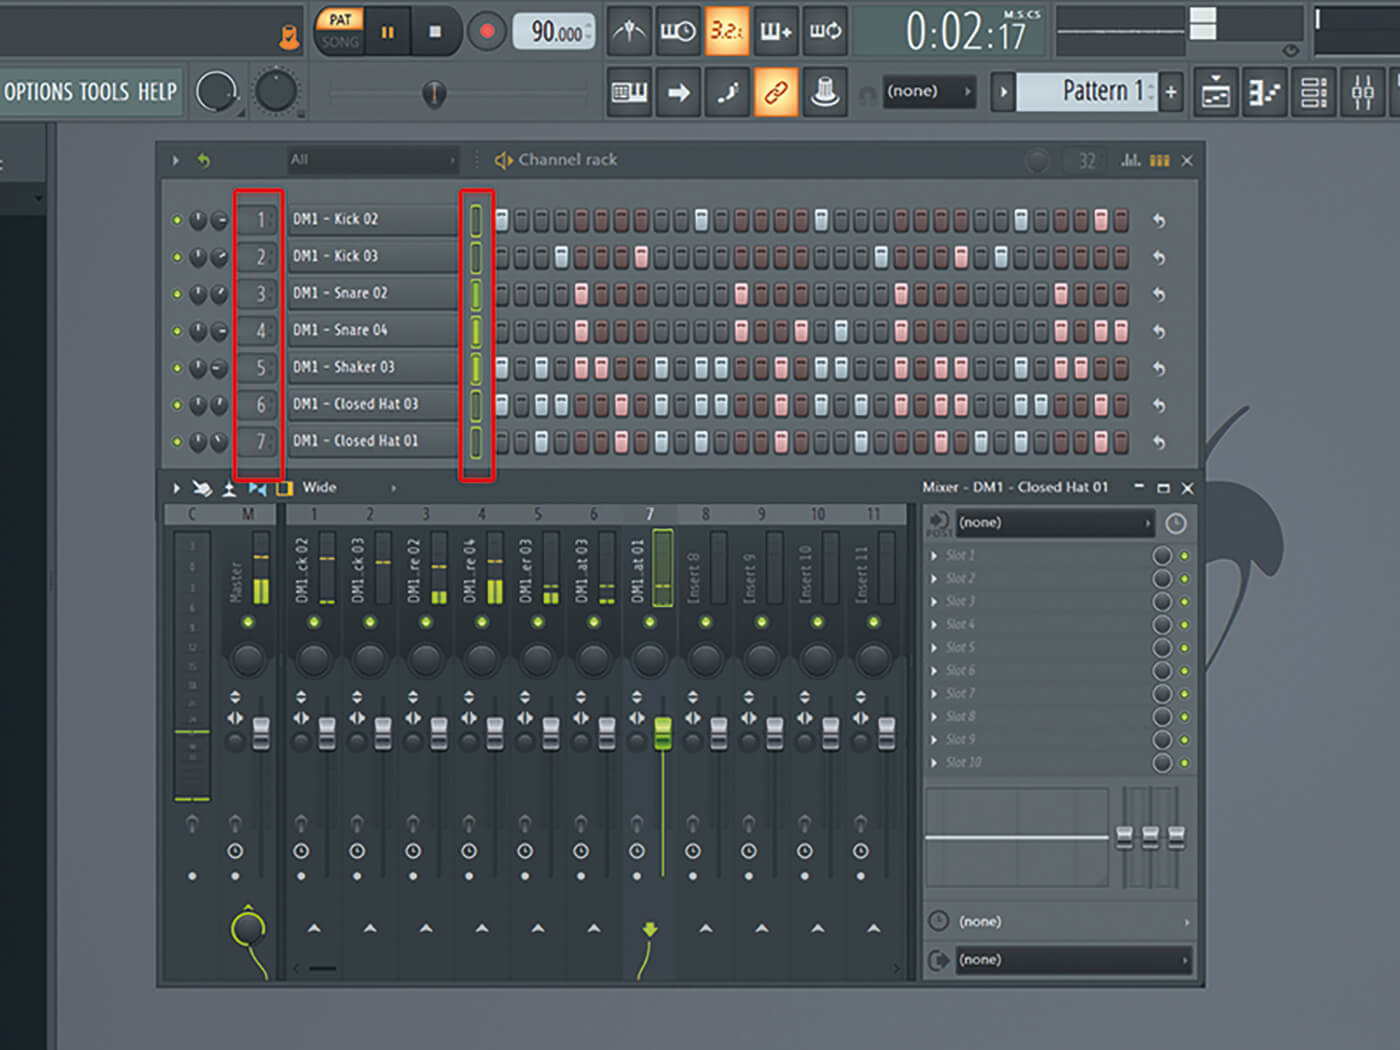
13. To finalise the drum loop, add all samples to the mixer for some extra fine tuning in volume and filters. Use Ctrl+Shift+Left Click to select the samples in your pattern view, then hit Ctrl+L to assign them to free mixer tracks or do it manually.
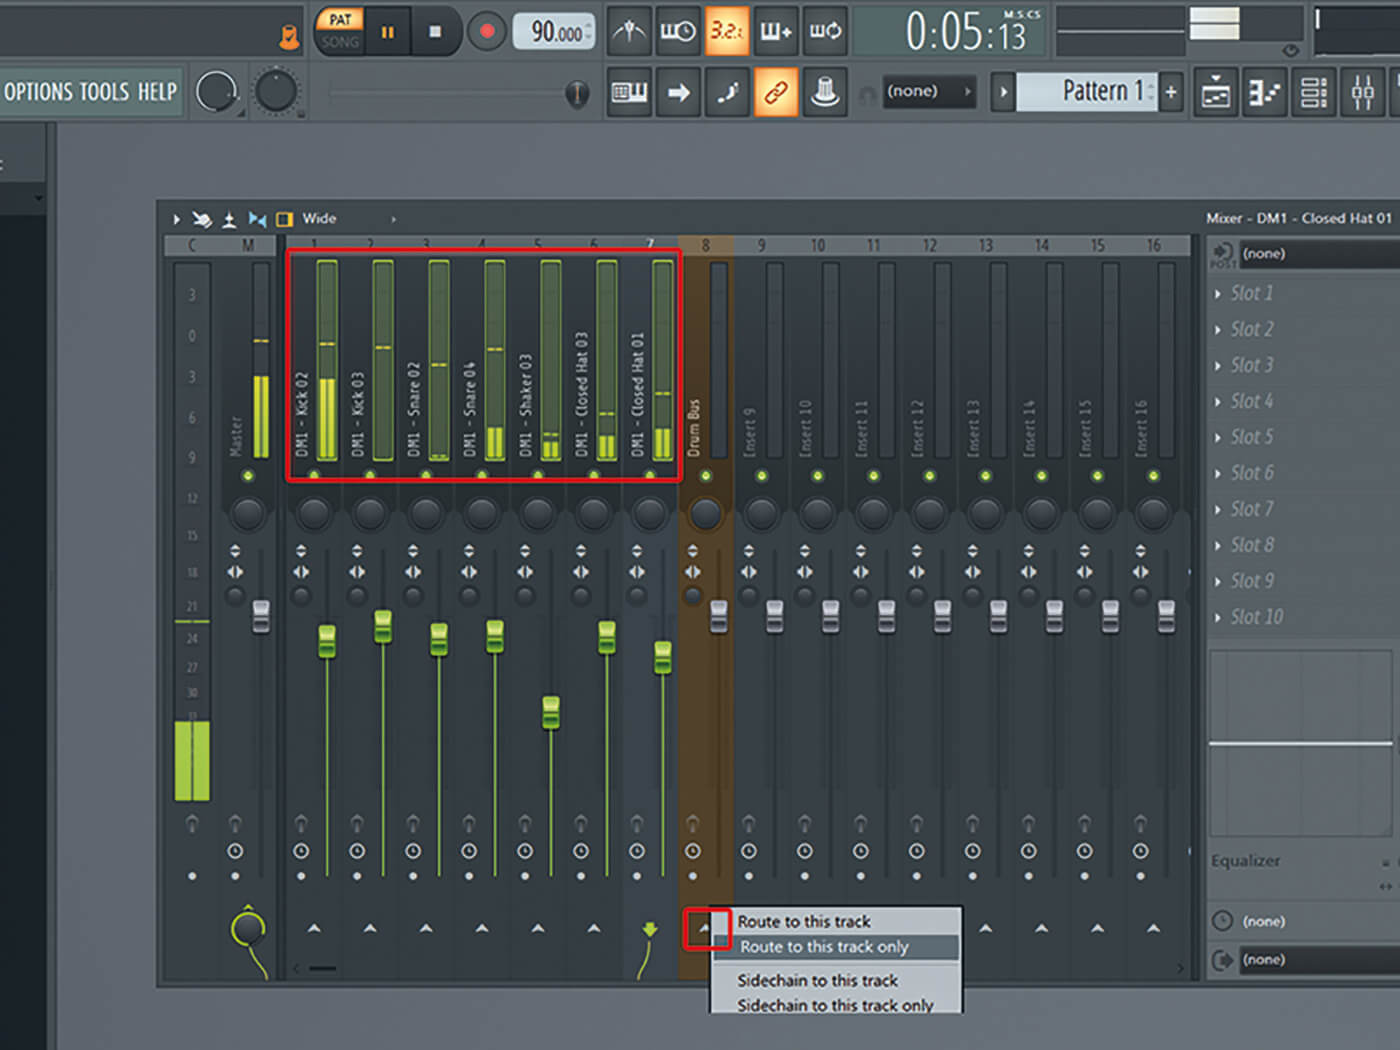
14. Create a drum bus in your mixer so you can alter your entire drum loop in one go if needed. Select the mixer tracks with Crtl+Shift+Left Click and then Right Click the little arrow underneath a free mixer track and choose Route To This Track Only.
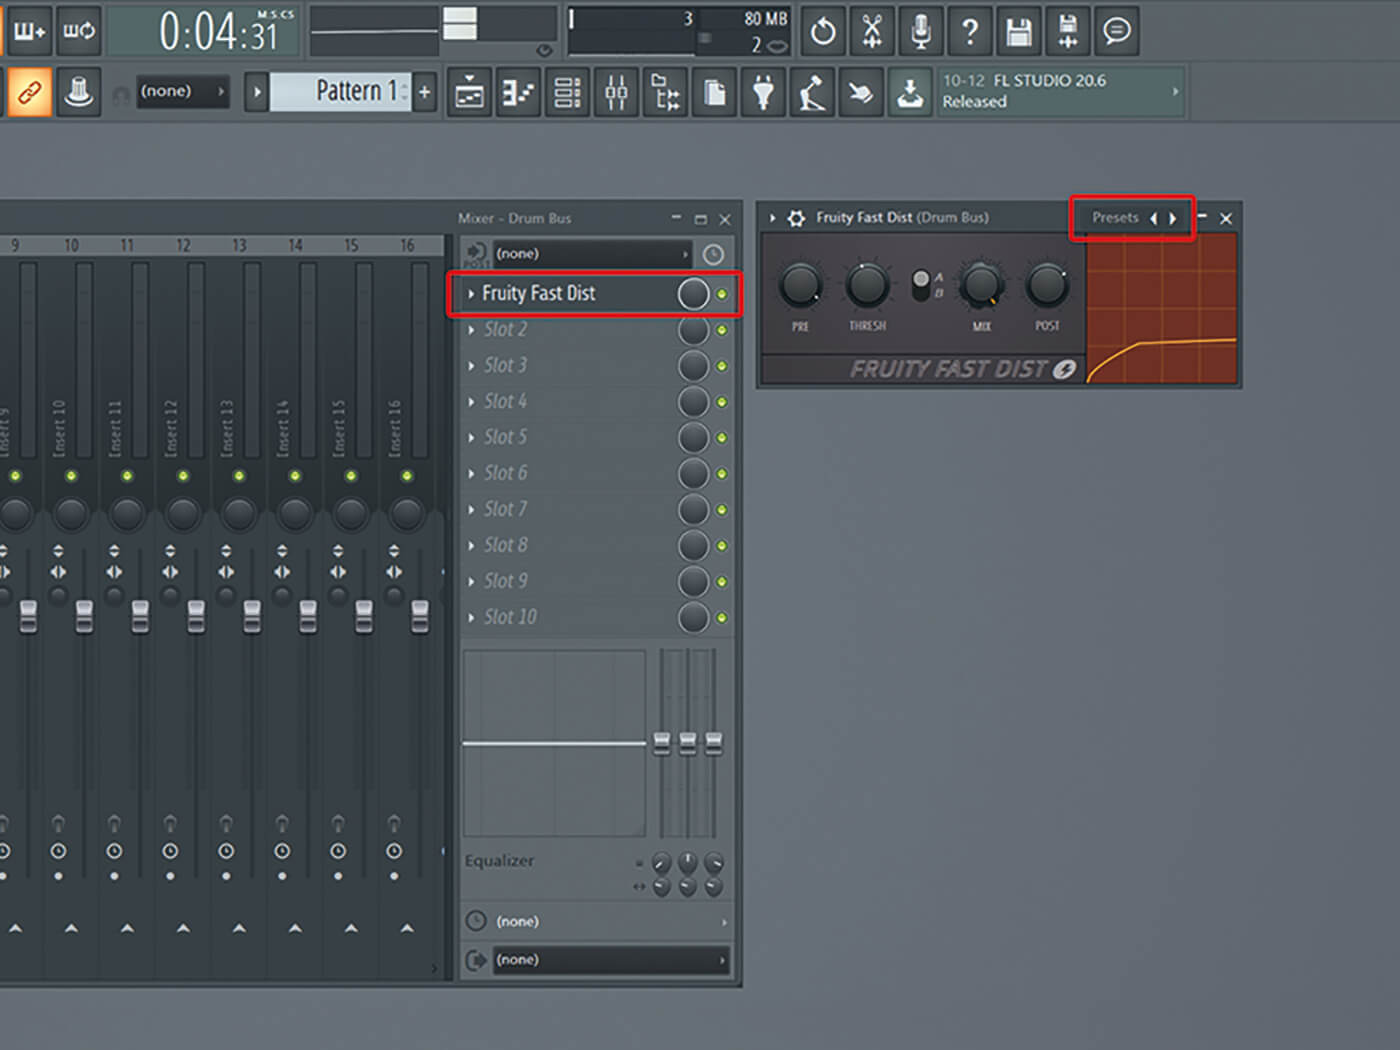
15. Adding some distortion to the drum bus may help to get that gritty feel. One of FL Studio’s native plug-ins will definitely help, choose Fruity Fast Dist from the effect rack and select the Some Oomph preset.

16. If that is not enough you can also add the Fruity Parametric EQ2 to your drum bus or to some other mixer track. With this you can filter out the high and/or low frequencies of your drums.
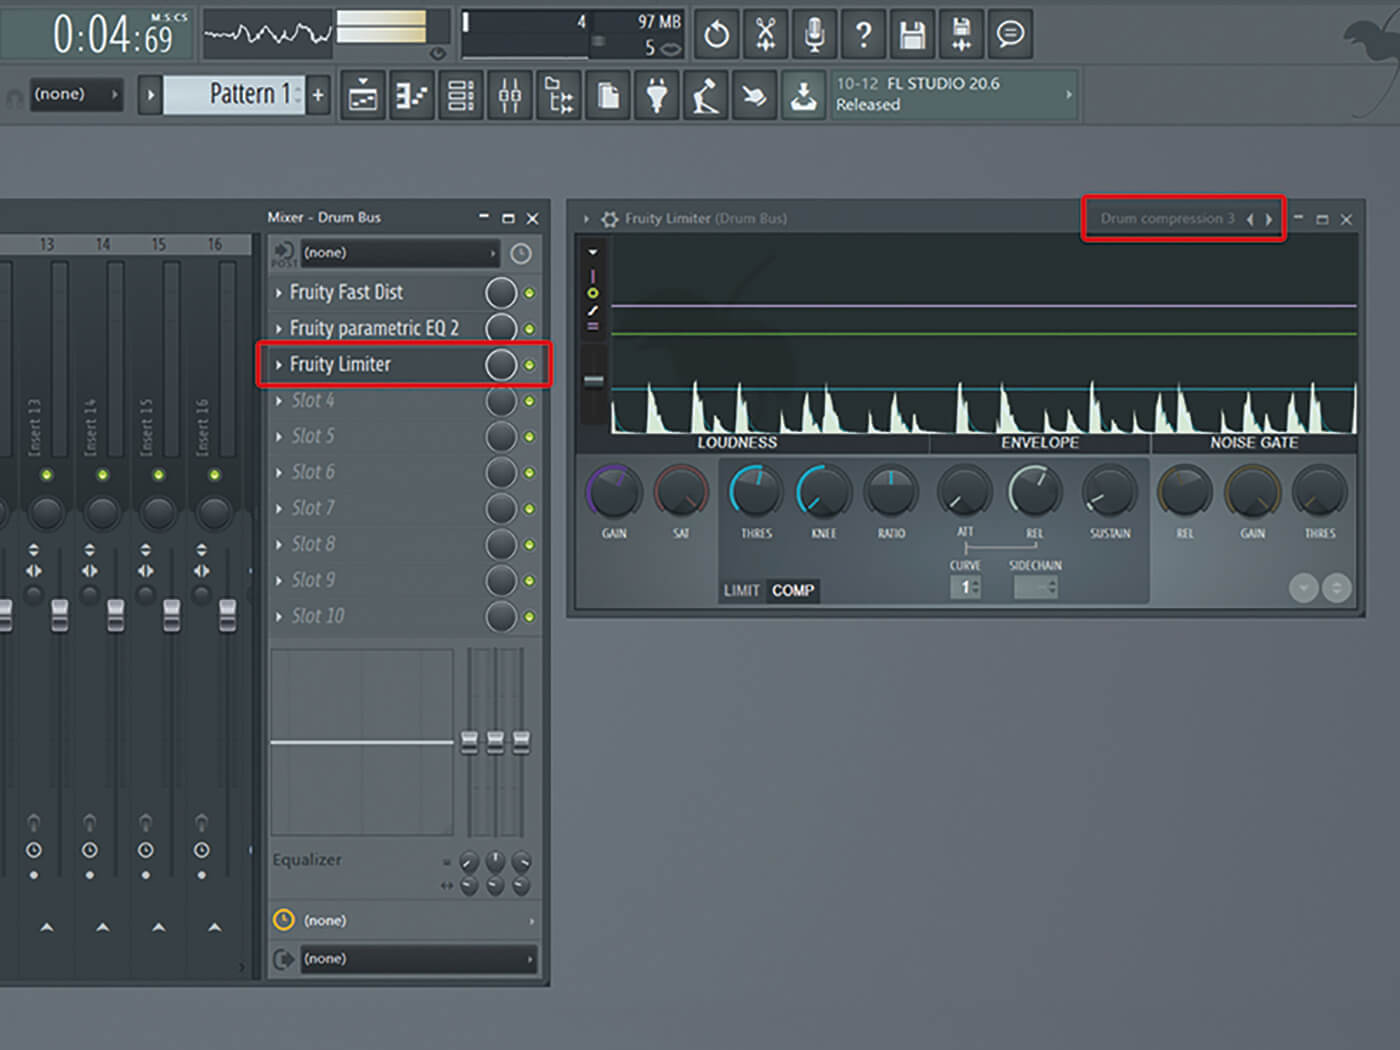
17. Glue together your drum loop with a compressor on the drum bus. You can use the Fruity Limiter for this and the Drum Compression 3 preset. We’re nearly finished now, it should sound recognisably like an 80s hip-hop beat.
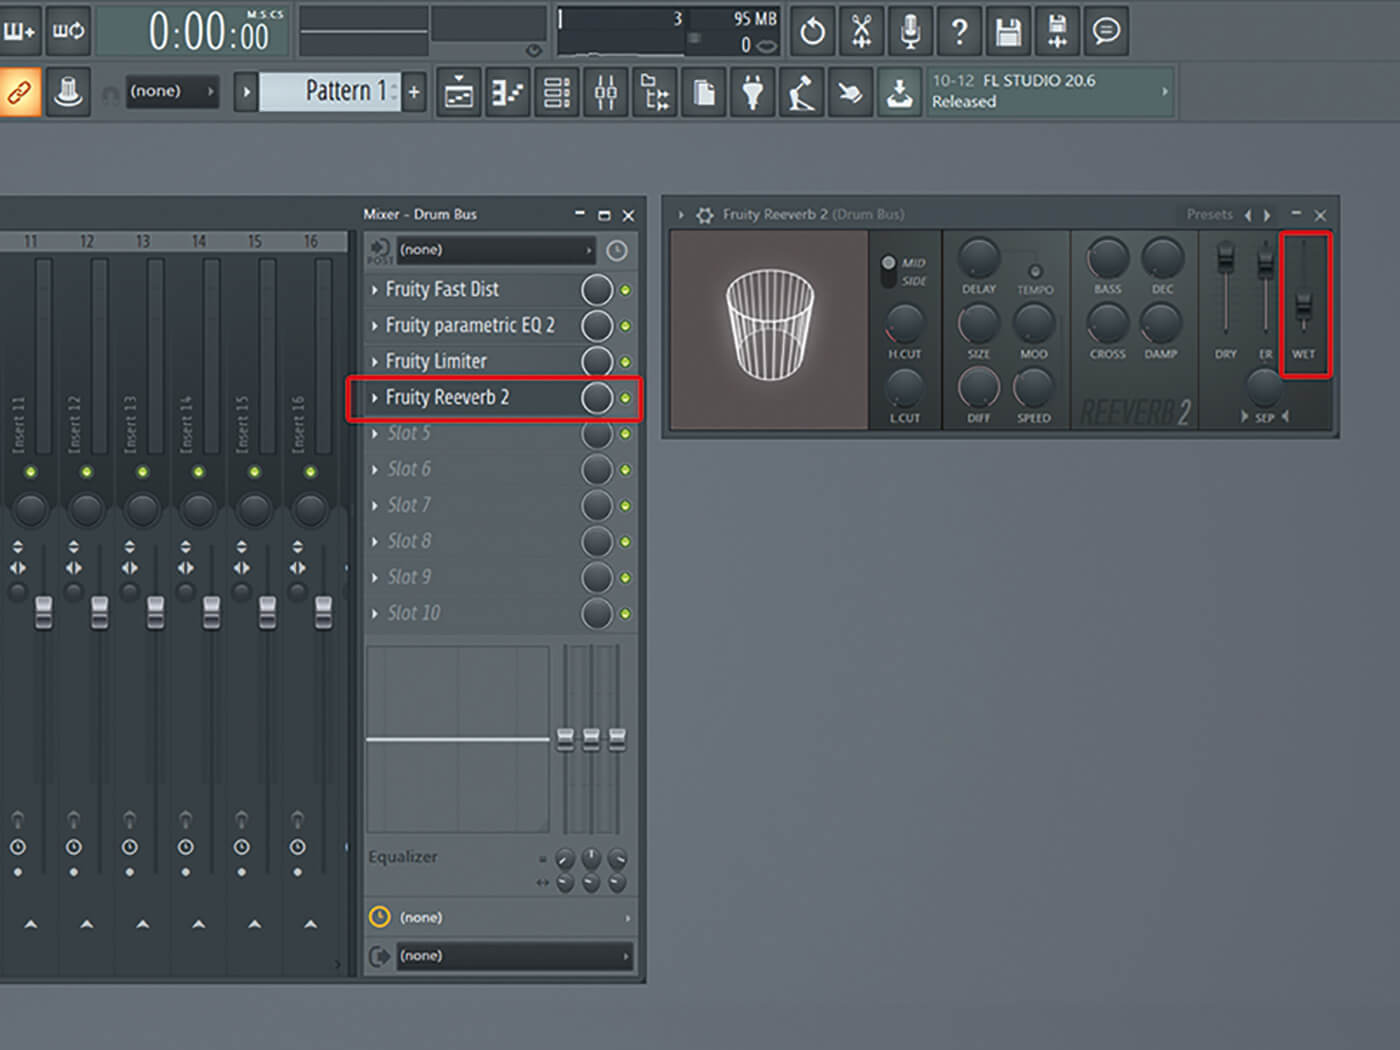
18. For one final touch, add Fruity Reverb 2 to the drum bus. Pick the Drum Room preset and decrease the Wet signal parameter until you hear it slightly in the background. Now to work on your rap…