How to make ambient pads with just FL Studio Synths
From glassy synths and spacious crescendos to billowing smog-thick atmospherics, ambient pads have applications across all genres, and can help shape your piece and add width to your stereo field. FL Studio can help.
Loaded with synths capable of sculpting generous pads, FL Studio makes ambient compositions easy – perhaps too easy. In this tutorial, then, we’re going to challenge you by limiting your synth plug-in privileges to just two: FL Studio’s 3xOSC and Fruity DX10. But before we dive in, let’s first explore exactly what an ambient pad is.
Zone of tranquillity
The ambient genre’s name is self-explanatory. But in practice, it typically translates to the kind of slow-paced easy-listening and gently undulating instrumental sounds favoured by the likes of Aphex Twin, Brian Eno and Tangerine Dream. Often, they’re drenched in reverb and delay, as well as phaser and LFO effects that warp and manipulate them to further affect the stereo field. There are many more sub-genres of ambient music than there are rules that govern it. Ambient sounds need not be organic or artificial, natural or industrial. It all depends on the mood or setting that the music is trying to convey.
But ambient sounds aren’t limited to their titular genre. You’ll find them in electronic genres such as house and techno, where they’re often used to establish atmospheres, or as epic introductions before being shattered by the song’s beat.
Think of the tips and tricks you’ll pick up in this tutorial as broad pointers that can be applied to many projects and compositions.
You’re probably familiar with pads already – and, if not, see our introductory feature on the joys of them here. These stretched-out sounds with prolonged attack and release periods are usually the subject of evolving modulation that builds and releases tension, shaping the sounds as they move. The key to designing strong and spellbinding pads is knowing how to sculpt and conduct their progression. To achieve this, we advise using automation to push and pull your pads across a host of different parameters. Even small adjustments can be enough to drastically alter the course of your sounds.
Layer cake
For our purposes, automation might mean something as simple as turning up the volume of a particular sound as the song builds. In FL Studio, you’re free to run numerous automations simultaneously. These will be the essence of your ambient track, and will open your sounds up and make them more human (or not, if that’s your preference).
It’s important to pick a synthesiser with a lot of options or, alternatively, to combine multiple sounds or synths to form something singularly unique. Here, we’ve selected native FL Studio plug-ins 3xOSC, a three-oscillator subtractive synthesiser, and Fruity DX10, an eight-voice polyphonic FM synth, and will combine them using Layer. With this plug-in, you can have both synths react when you hit a key.
One of the advantages of plug-ins such as this, however, is that they also allow you to use each synth separately – ideal if, for example, you’re creating a build-up or break and want to capitalise on a single synth’s characteristics. You can add effects plug-ins to individual synths too, giving you total control over different layers of sound. When you incorporate these options and parameters with some well-drawn automation, you’re almost guaranteed to get distinctive and compelling pads that you can call your own.
As before, in this tutorial, we’re using only 3xOSC and Fruity DX10 and we’d recommend you do the same. Given the amount of variables available when you take into account all the potential automation and parameters, two synth plug-ins is plenty. However, if you’re feeling frisky and want to add even more options into the mix, introduce some more plug-ins to the signal chain. But be sure to set some time aside if you do – the more raw materials you’re working with, the more time it’ll take you to sculpt your otherworldly sounds.
Making ambient music is all about subtlety. If hard-hitting house, thumping techno and ungodly gabber is a sprint, think of ambient compositions as a marathon. You’re not aiming for fireworks here. Instead, adapt and control your sounds over extended durations. There’s plenty of room to manoeuvre with ambient compositions too.
We encourage you to make use of effects that might not seem screamingly obvious and whose typical results might ordinarily seem at odds with what you’re trying to achieve – with a bit of manipulation, even effects seemingly ill-suited to ambient composition can reveal unexpected new traits. Apply an unusual effect and try lowering the wet signal so that it lets through more of the dry (unaffected) signal, and see what you get. There’s unending creative potential here. You’ll likely be surprised by the end results.
Making ambient pads in FL Studio: step-by-step
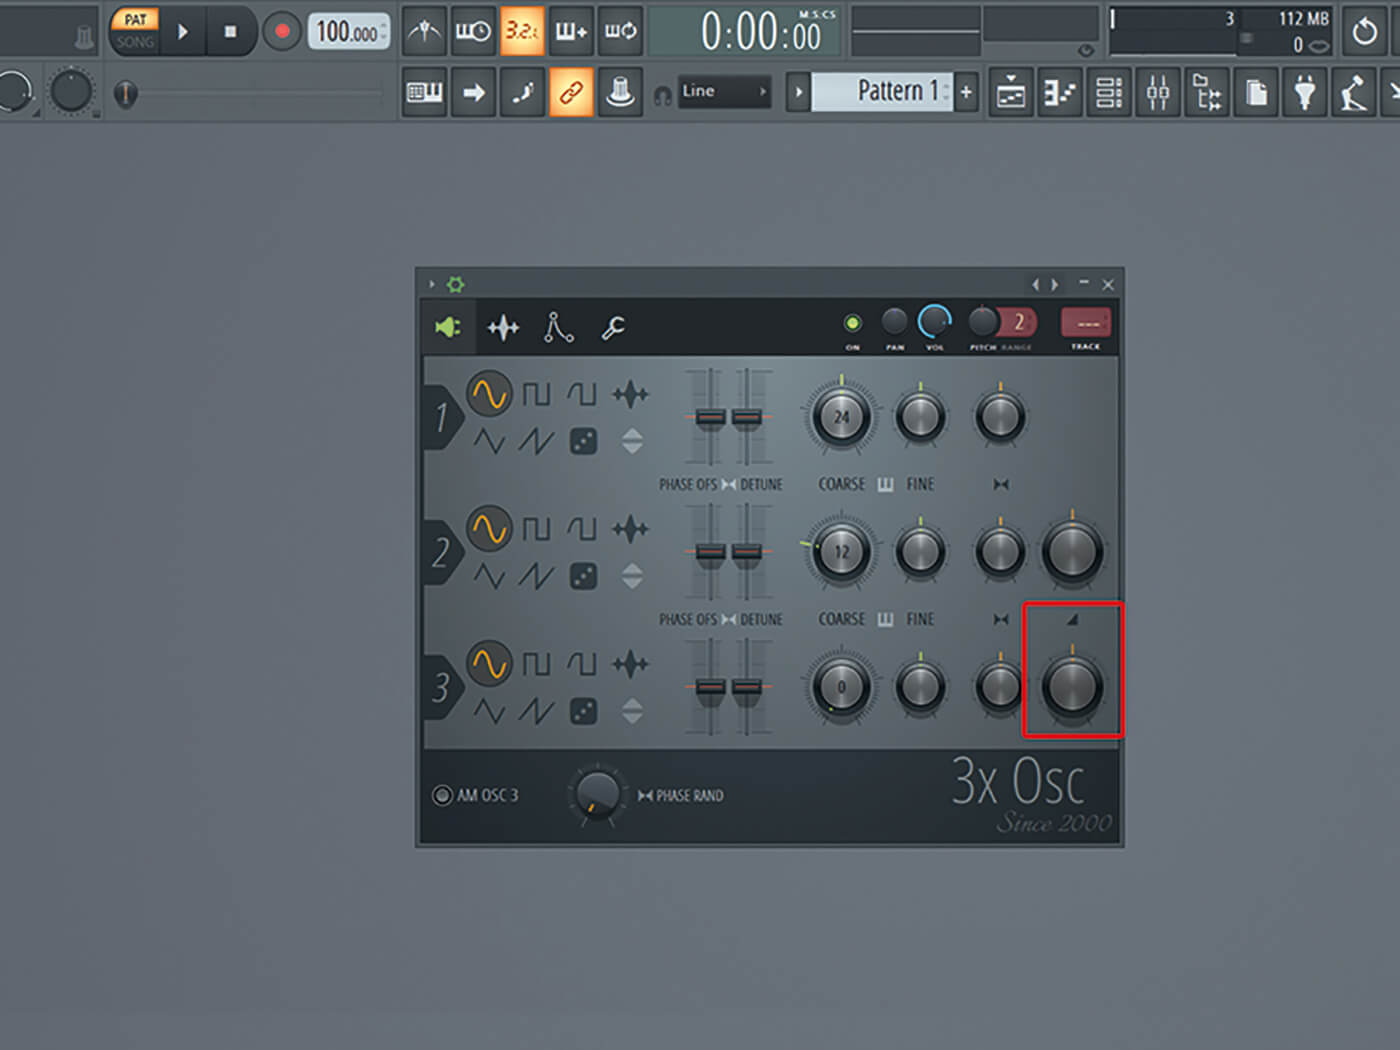
1. Open the 3xOSC plug-in. The default setting across its three oscillators is three sine waves. Set the volume of the third oscillator to 50 per cent.
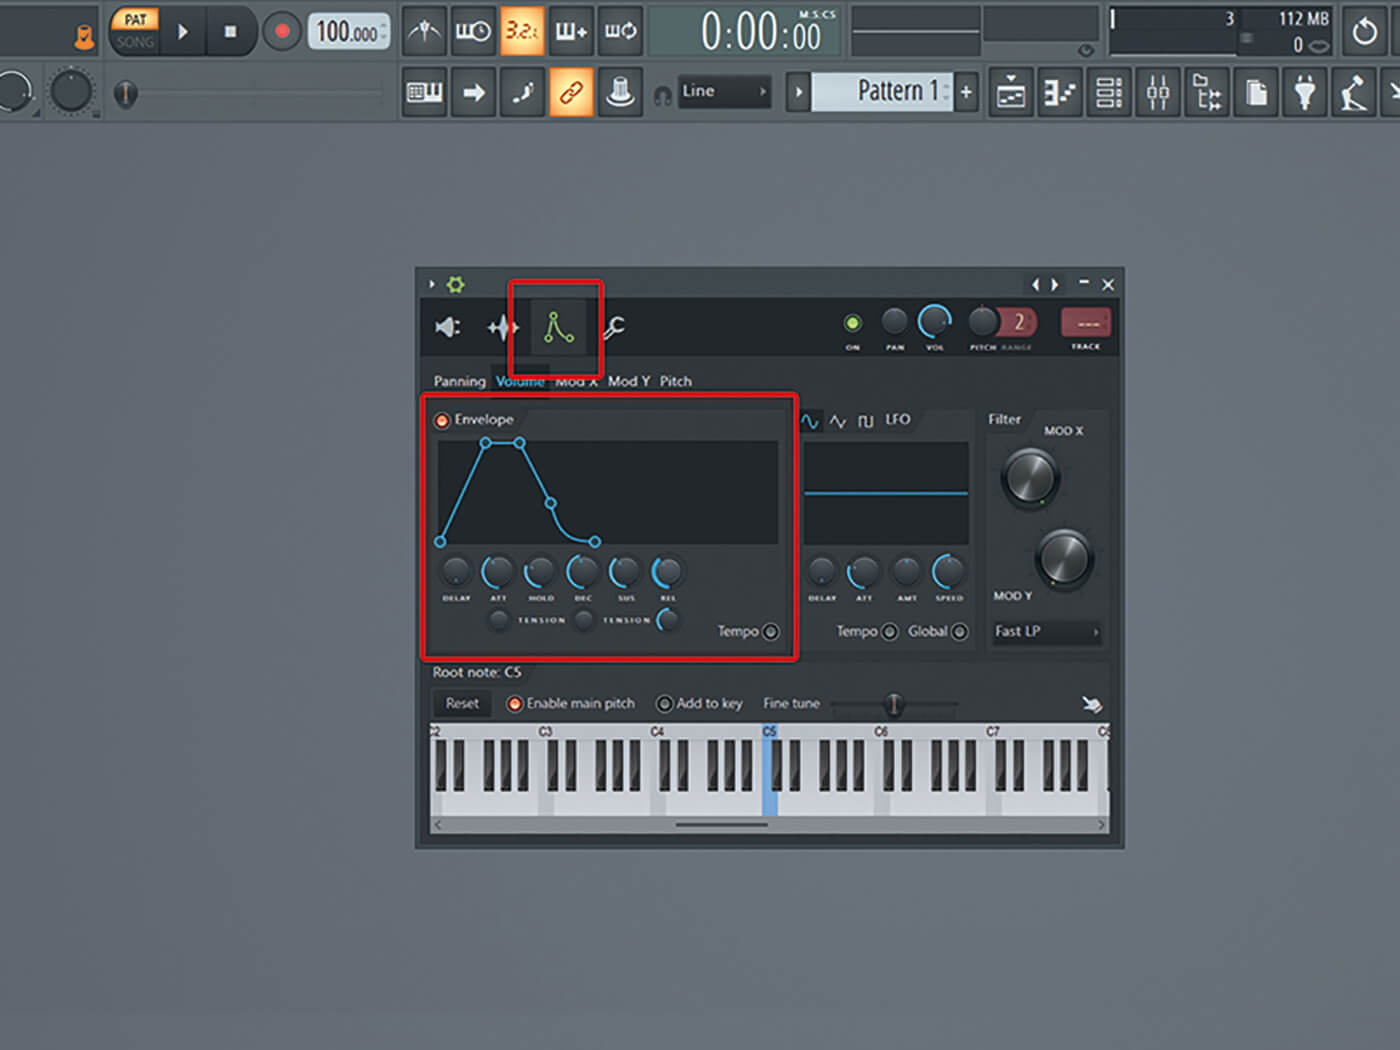
2. Shape the sound into a pad by adjusting the volume envelope. Here you can determine how the volume of the sound progresses when you hit and/or hold a key. Increase the volume of the attack and release a little.
3. Open Fruity DX10, a simple FM synth that will add texture and movement to your pad.
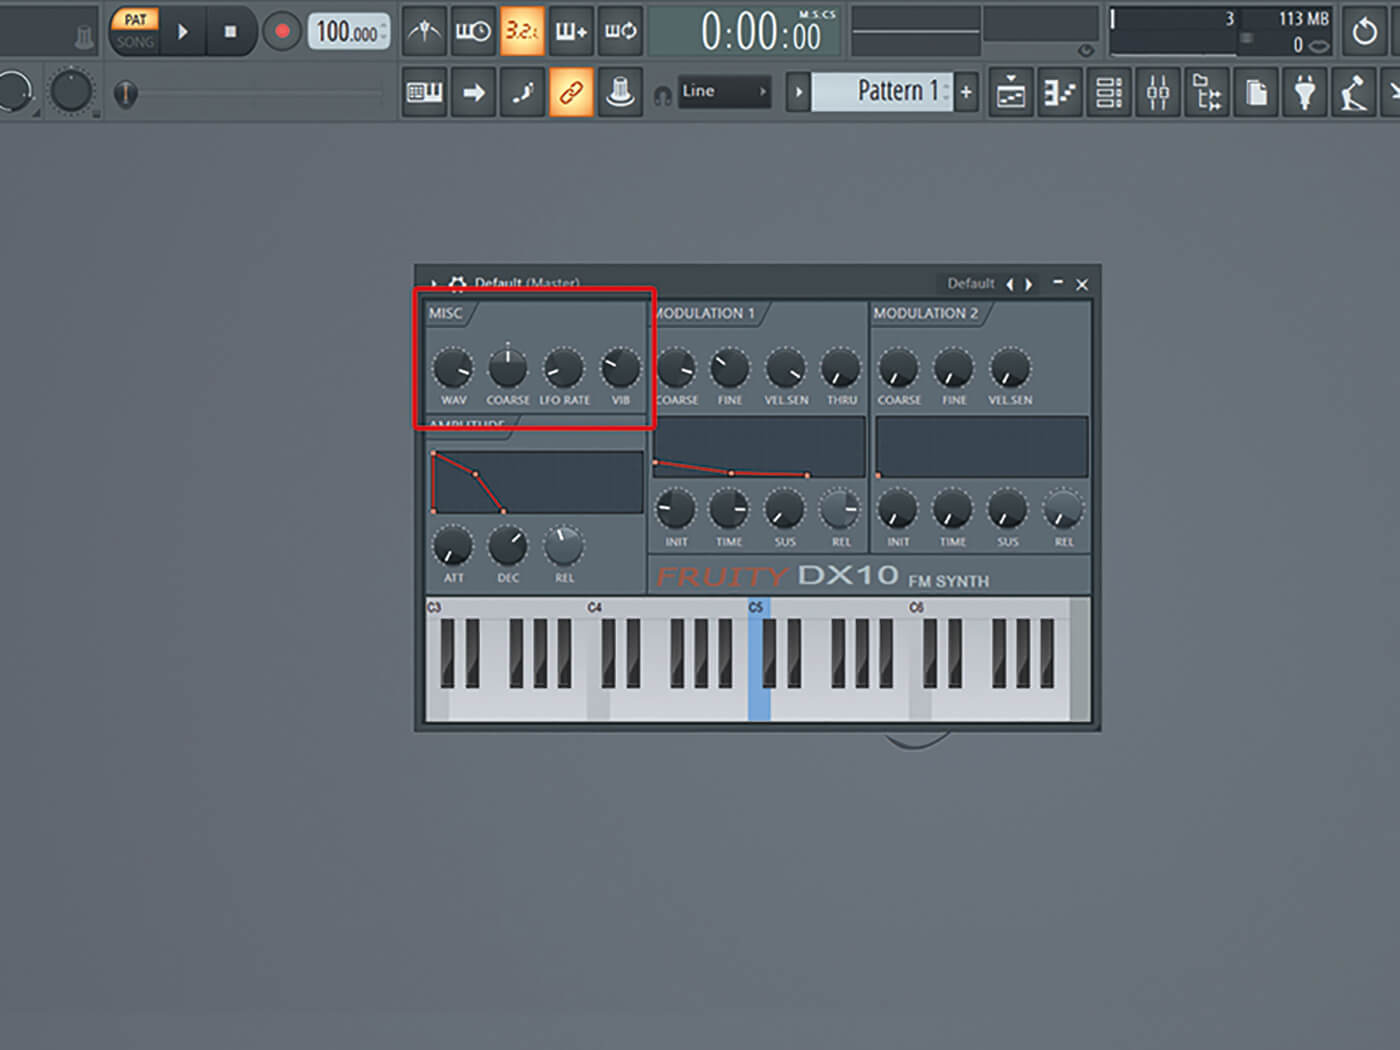
4. Alter the sound of DX10 via the Misc Tab. Increase the Wav parameter to about 85 per cent, decrease LFO Rate to about 14 per cent, and increase the Vib to about 29 per cent.
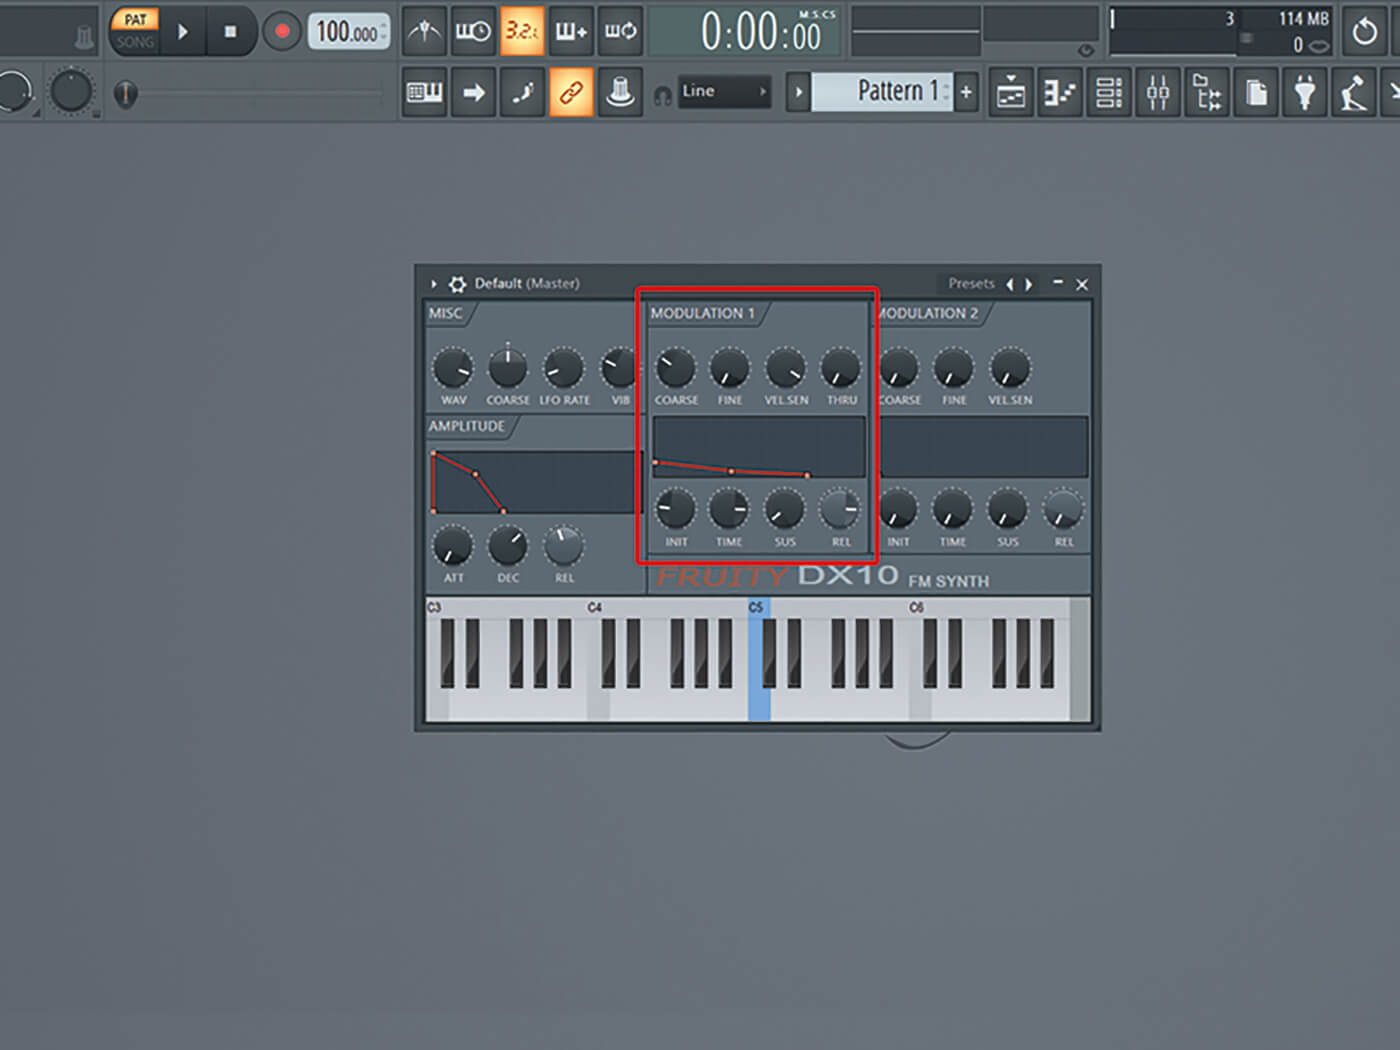
5. Add some movement via the Modulation 1 tab. Decrease Coarse to 4, Fine to 0.0 and increase the Sustain to about 8 per cent. The sound’s additional movement should be evident when you hold down a key.

6. Alter the DX10’s volume envelope via its Amplitude tab. Increase Attack to about 78, Decay to 100 and the Release to about 87.
![]()
THE POWER OF THREE First introduced in 2000, FL Studio’s in-built 3xOSC plug-in is a powerful subtractive synth with three oscillators that can generate old-school 1990s raw synth sounds.
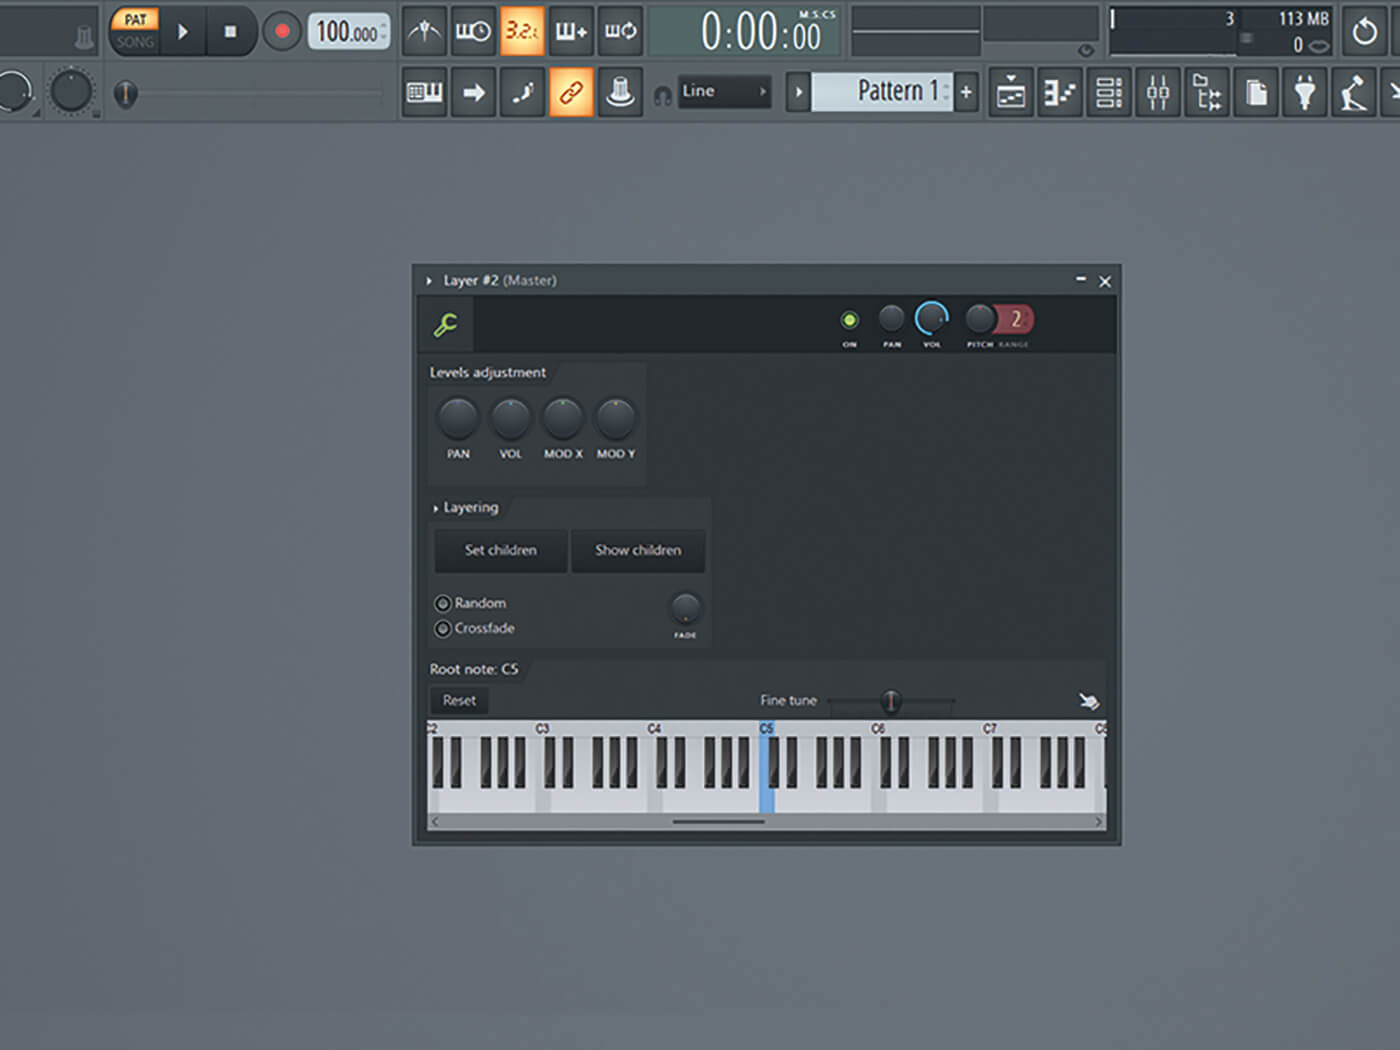
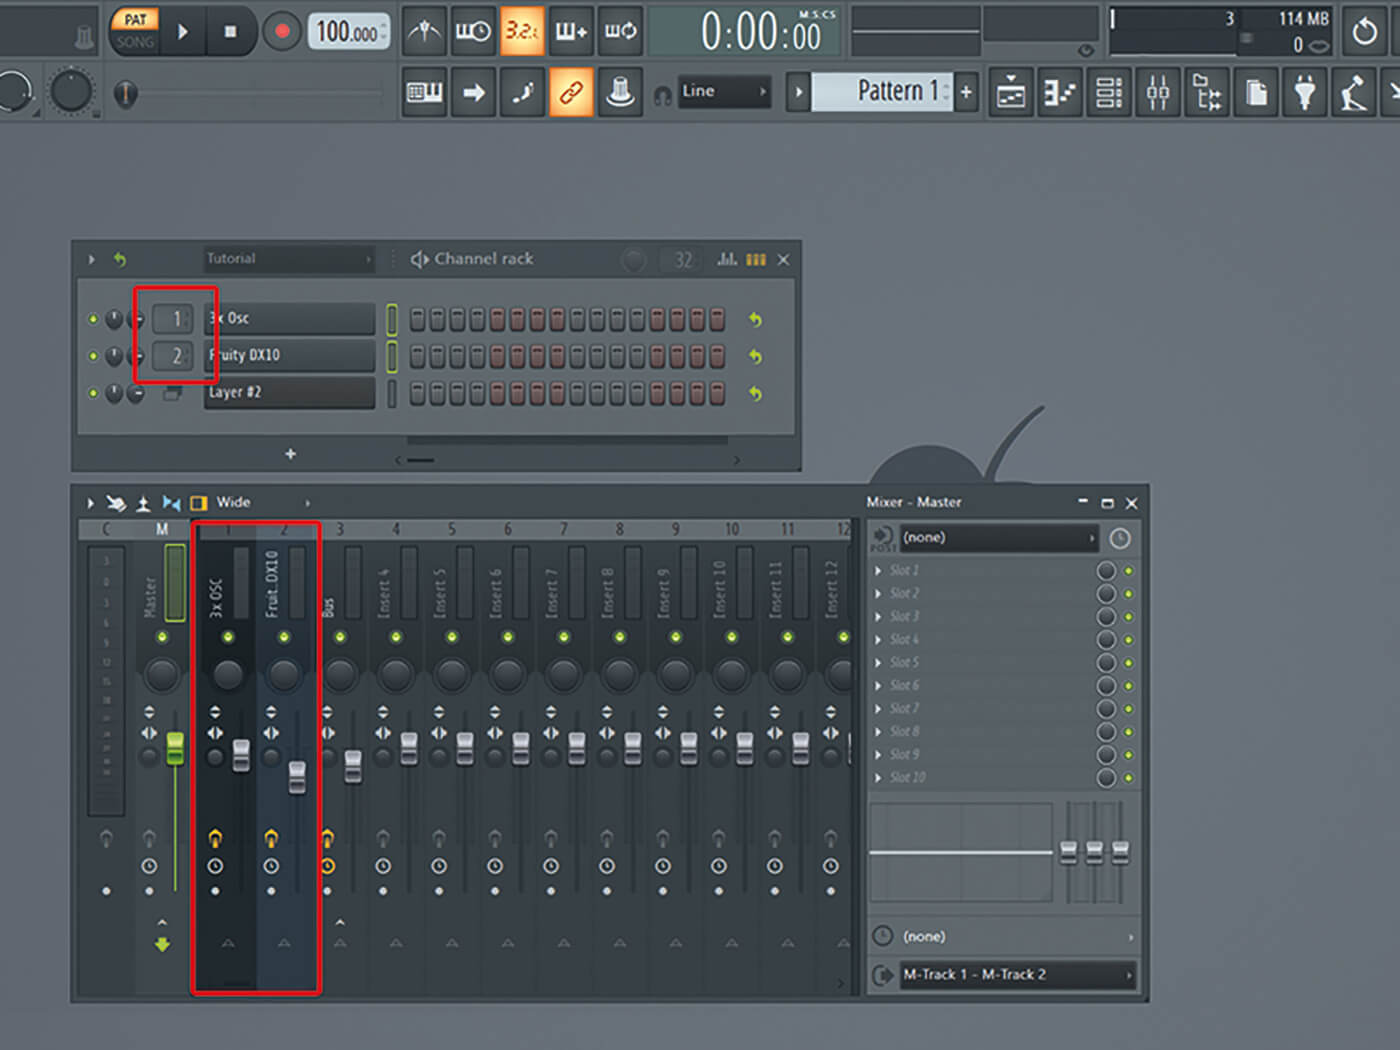
7. Combine your 3xOSC and DX10 sounds via FL Studio’s Layer tool. This will allow you to control both synths together or separately.
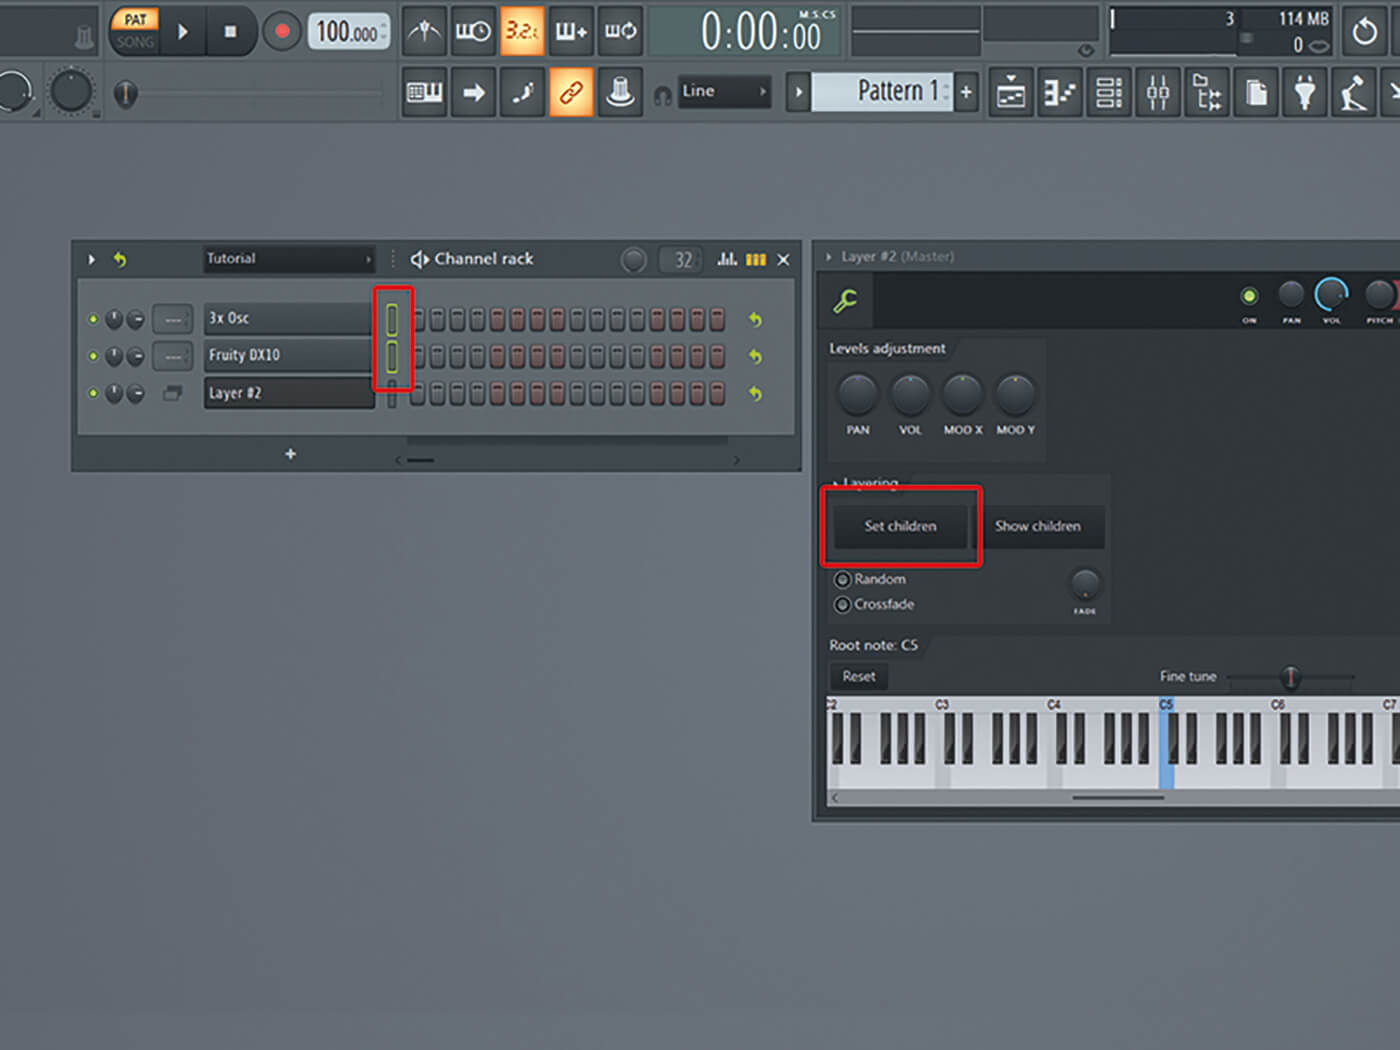
8. Select the 3xOSC and DX10 plug-ins in your pattern view by right-clicking the select boxes, and hit the Set Children button in the Layer plug-in. Now, when you have the Layer channel selected, you’ll play both synths simultaneously.
9. Add some effects to your sounds. Send both synths to the mixer by selecting them and hitting Ctrl+L, or choose a mixer track manually. Make sure each has its own mixer track.

10. Add Fruity Phaser to the 3xOSC channel and select the Stomp It 2 preset to add further movement to your sound. Tread lightly with adding effects to your base sound – this can quickly get messy.
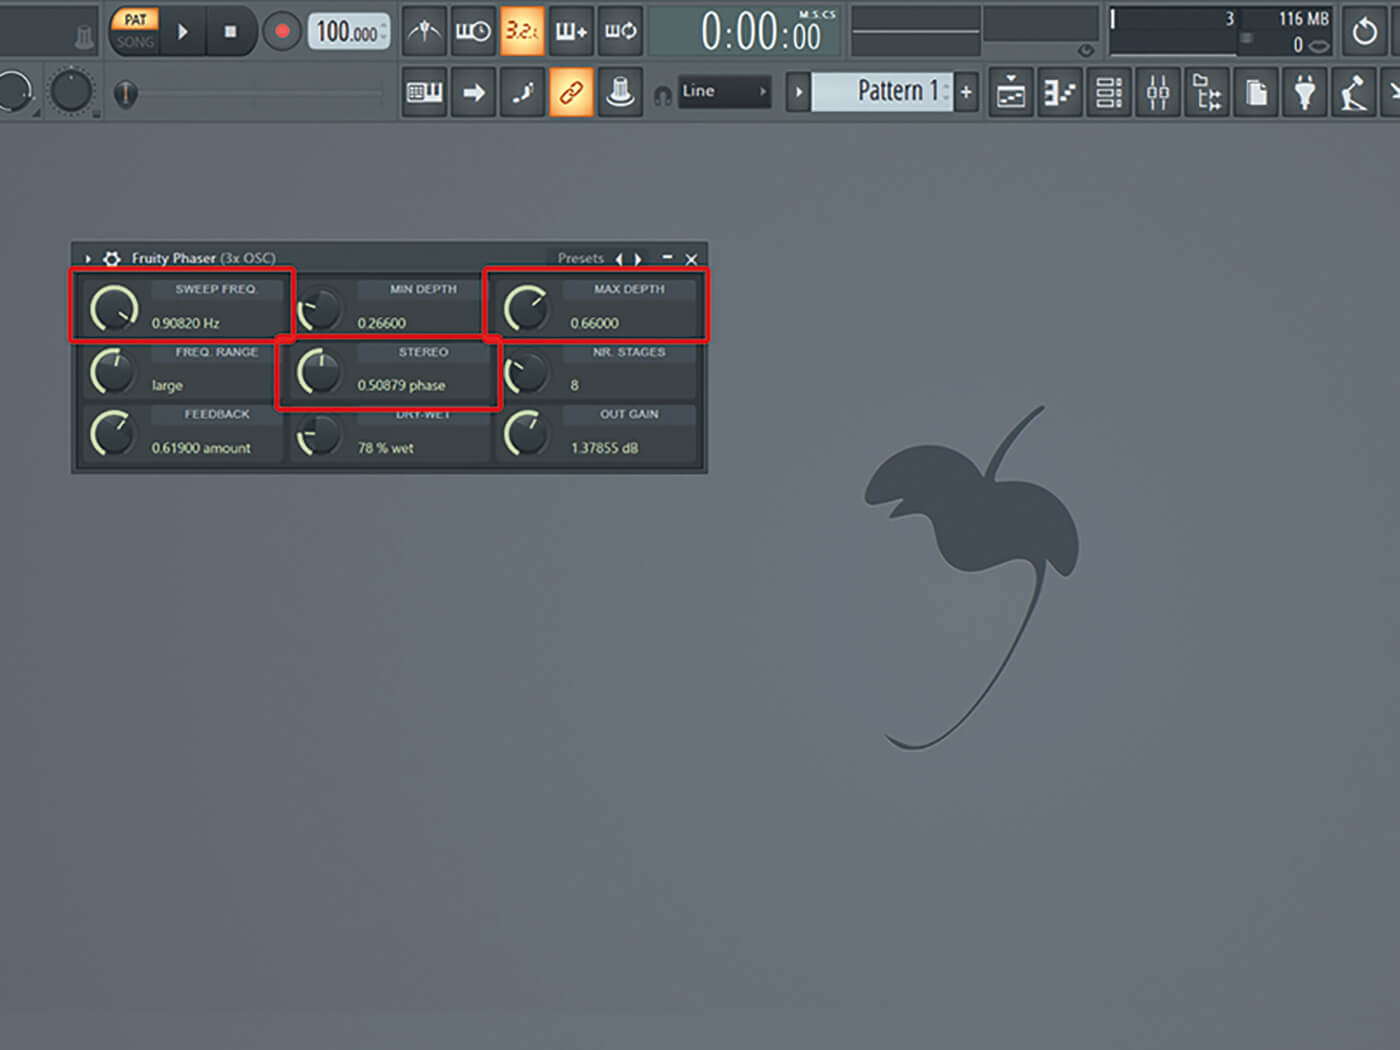
11. The Stomp It 2 preset is quite a passive sound, so you’re free to increase the Sweep Freq to about 0.9, the Max Depth to about 0.66 and the Stereo to about 0.5 phase.
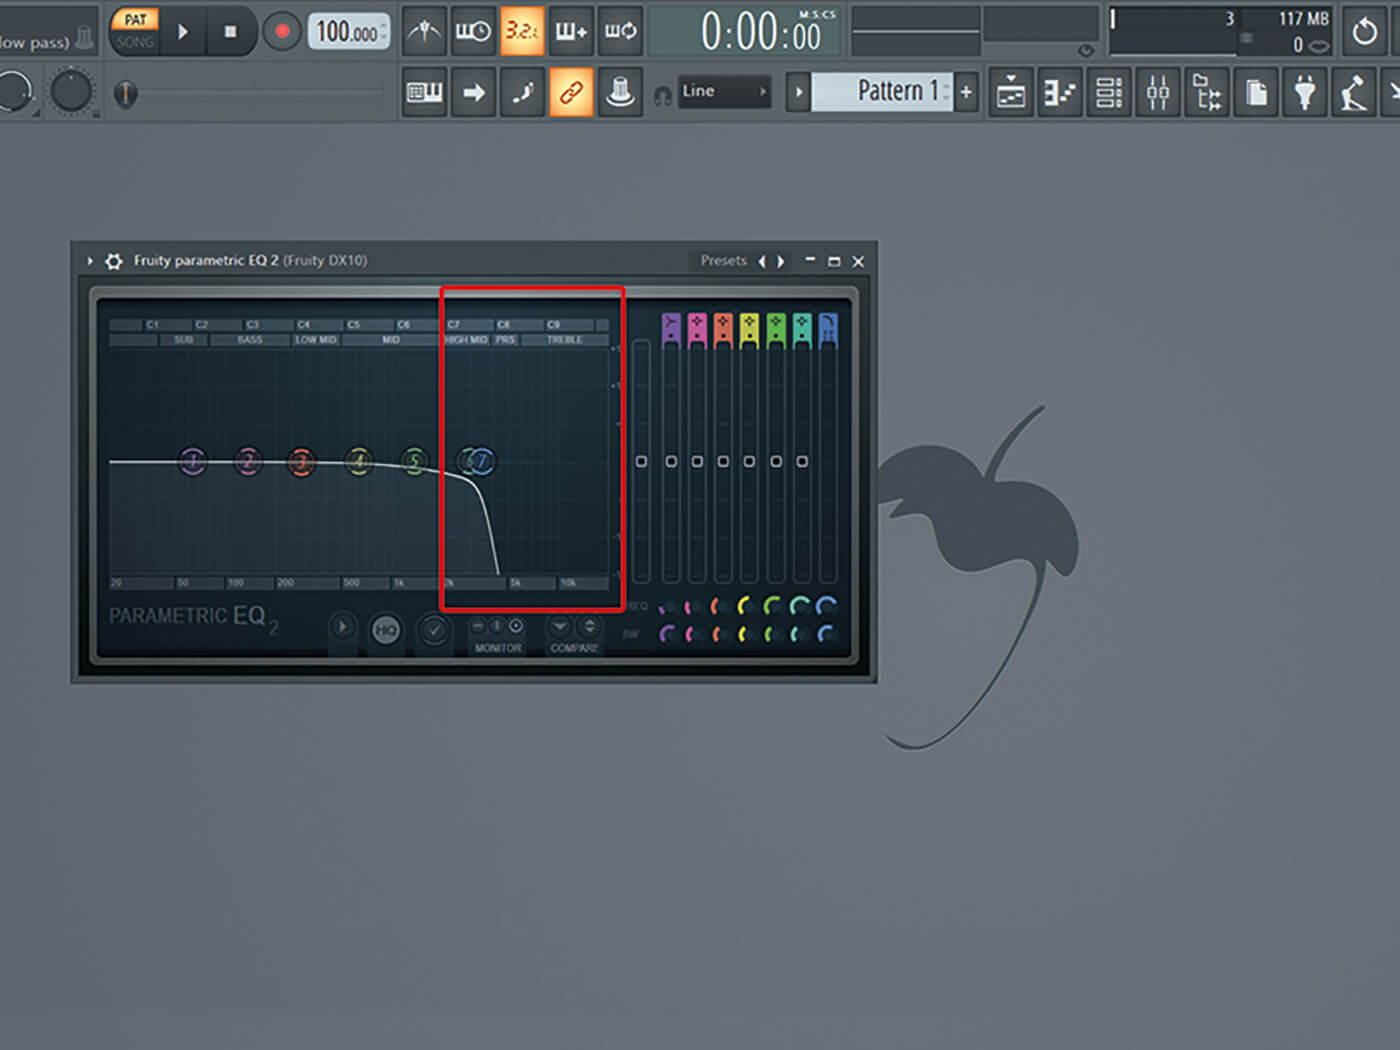
12. If your DX10 is too harsh or distorted for your tastes, counter it by adding a Parametric EQ2 to its channel to kill some of the higher frequencies.
![]()
AMBIENT FM Fruity DX10 is an eight-voice polyphonic FM synth based on Paul Kellett’s MDA plug-in version. It’s a fantastic exploratory tool and, conveniently, doesn’t hog too much CPU power.
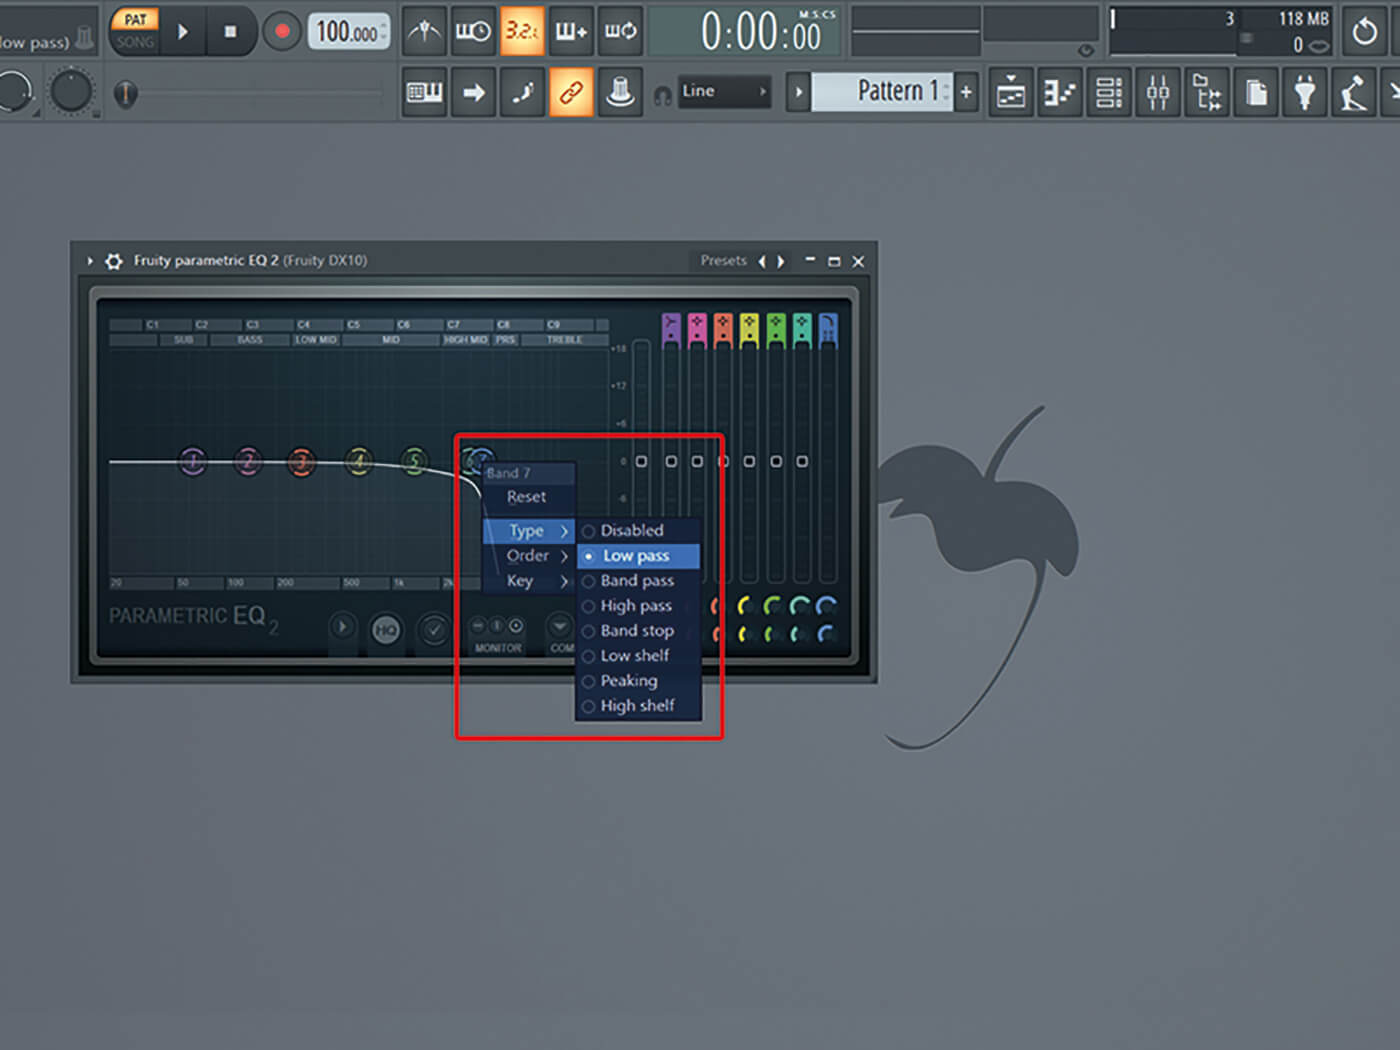
13. You can easily create a low-pass filter using Parametric EQ2. Right-click on the 7 circle and choose Type and Low Pass, then decide on the steepness of the descent via Order.
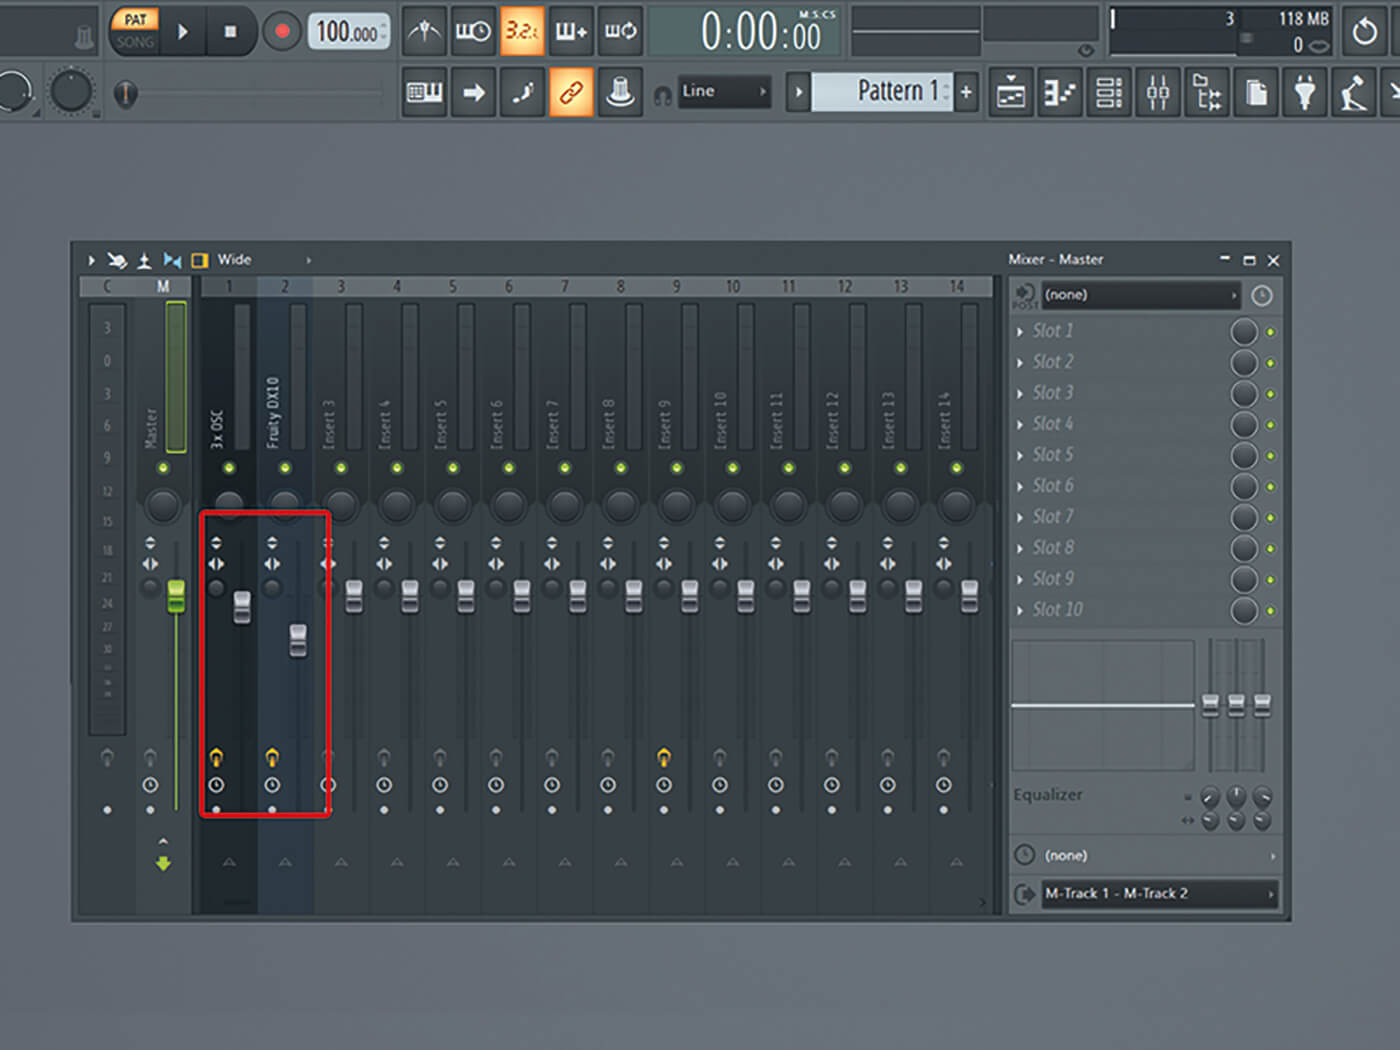
14. Now that you’ve edited both sounds separately, adjust volume of both channels so that they blend nicely together. Lower the DX10 channel’s volume to create more room for your 3xOSC base sound.
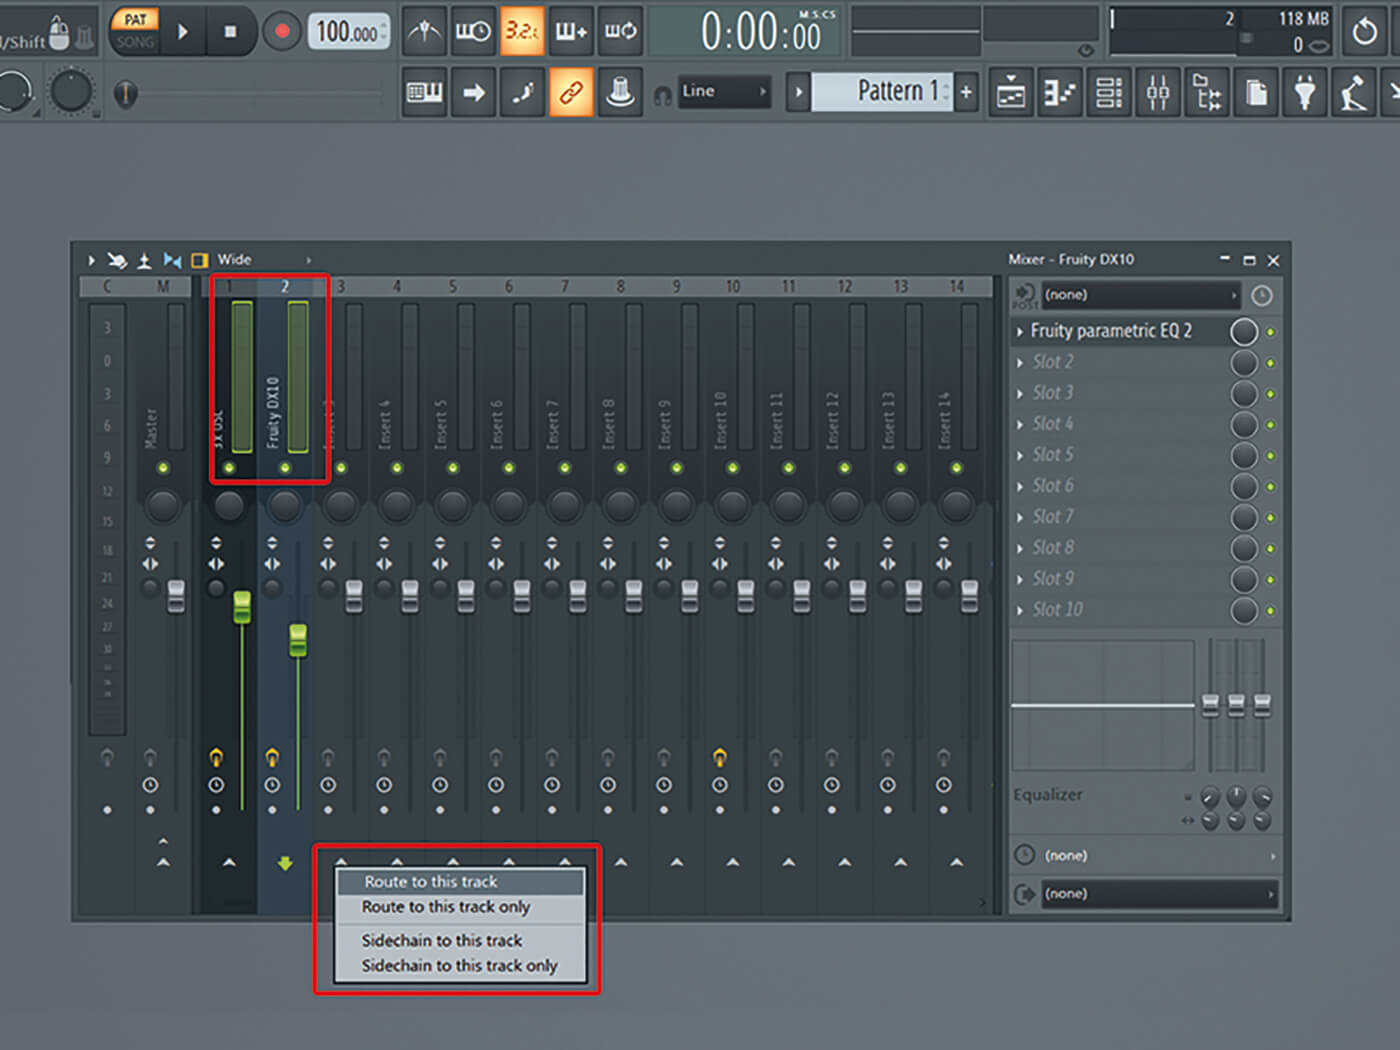
15. Add some final effects to your combined sound by sending both synths to one shared mixer channel (a bus). Select both channels by holding Ctrl+Shift and right-click on the arrow at the bottom of an empty mixer channel.
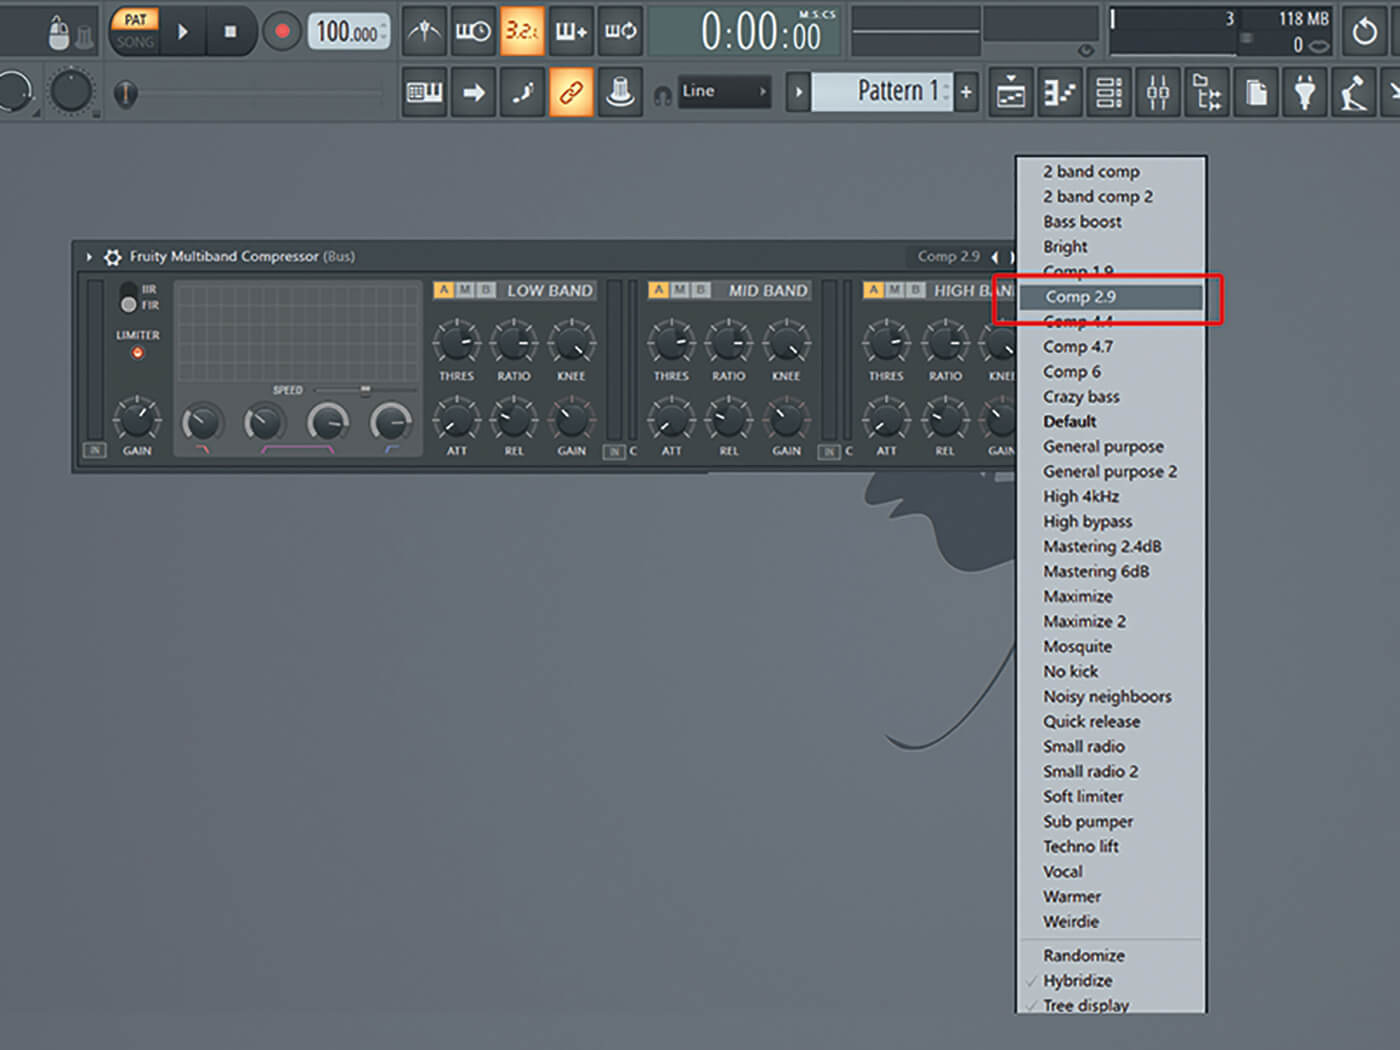
16. Add a Fruity Multiband Compressor to the bus mixer channel and select the Comp 2.9 preset. This will glue the separate sounds together and give them more body.
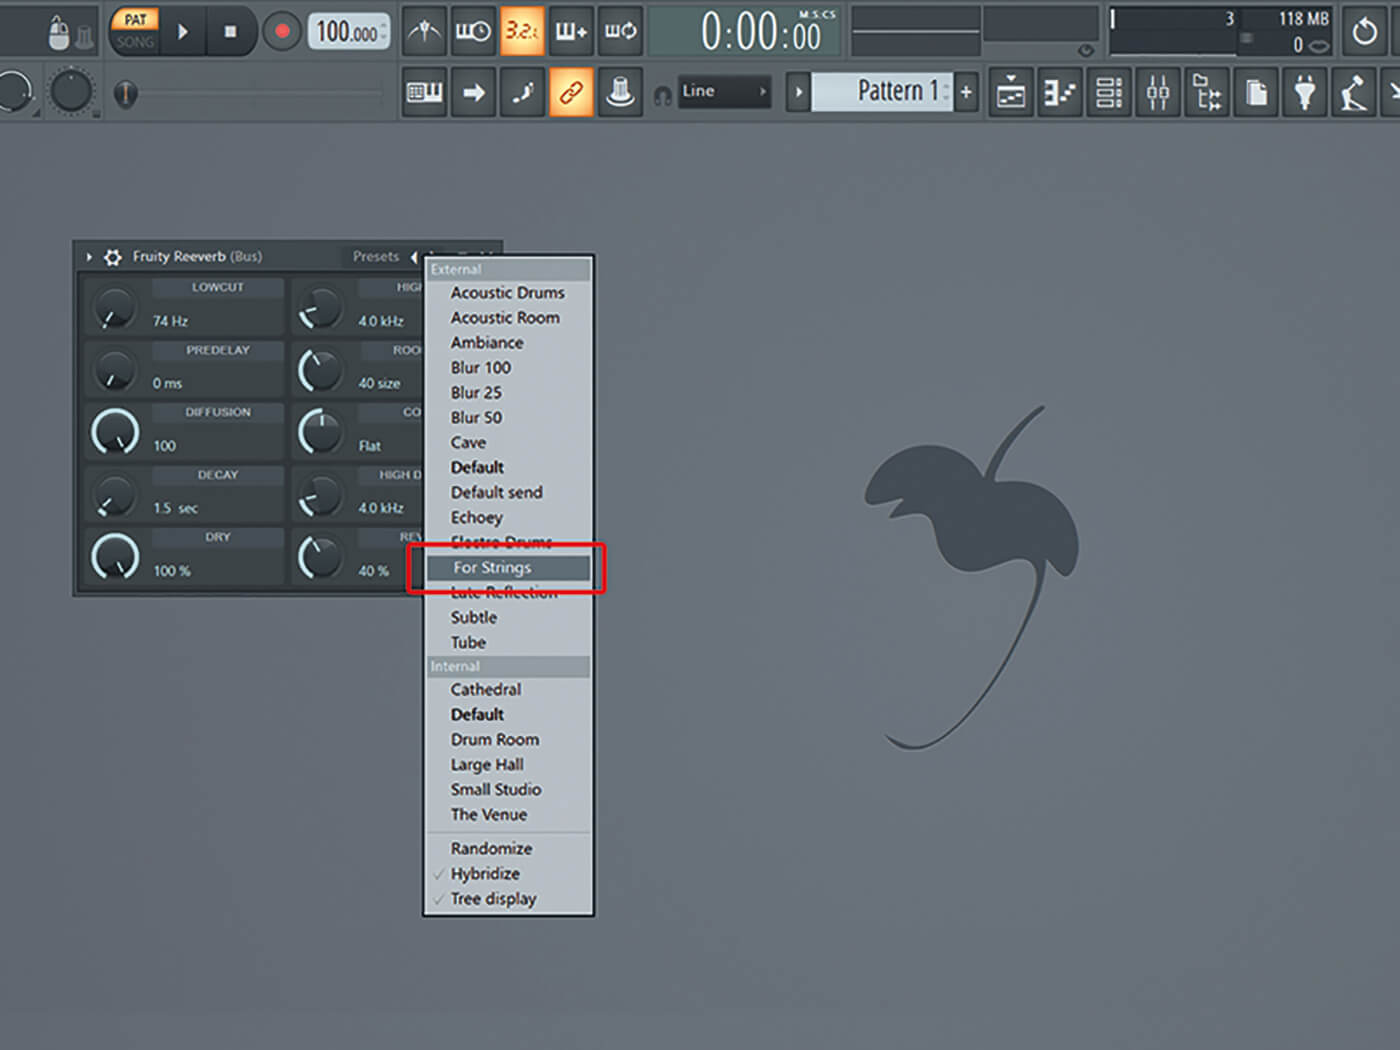
17. Though the long release of both your synths already give your sound a nice tail, you should make the sound more open and ambient by adding some reverb. Add the Reeverb effect and choose the For Strings preset.
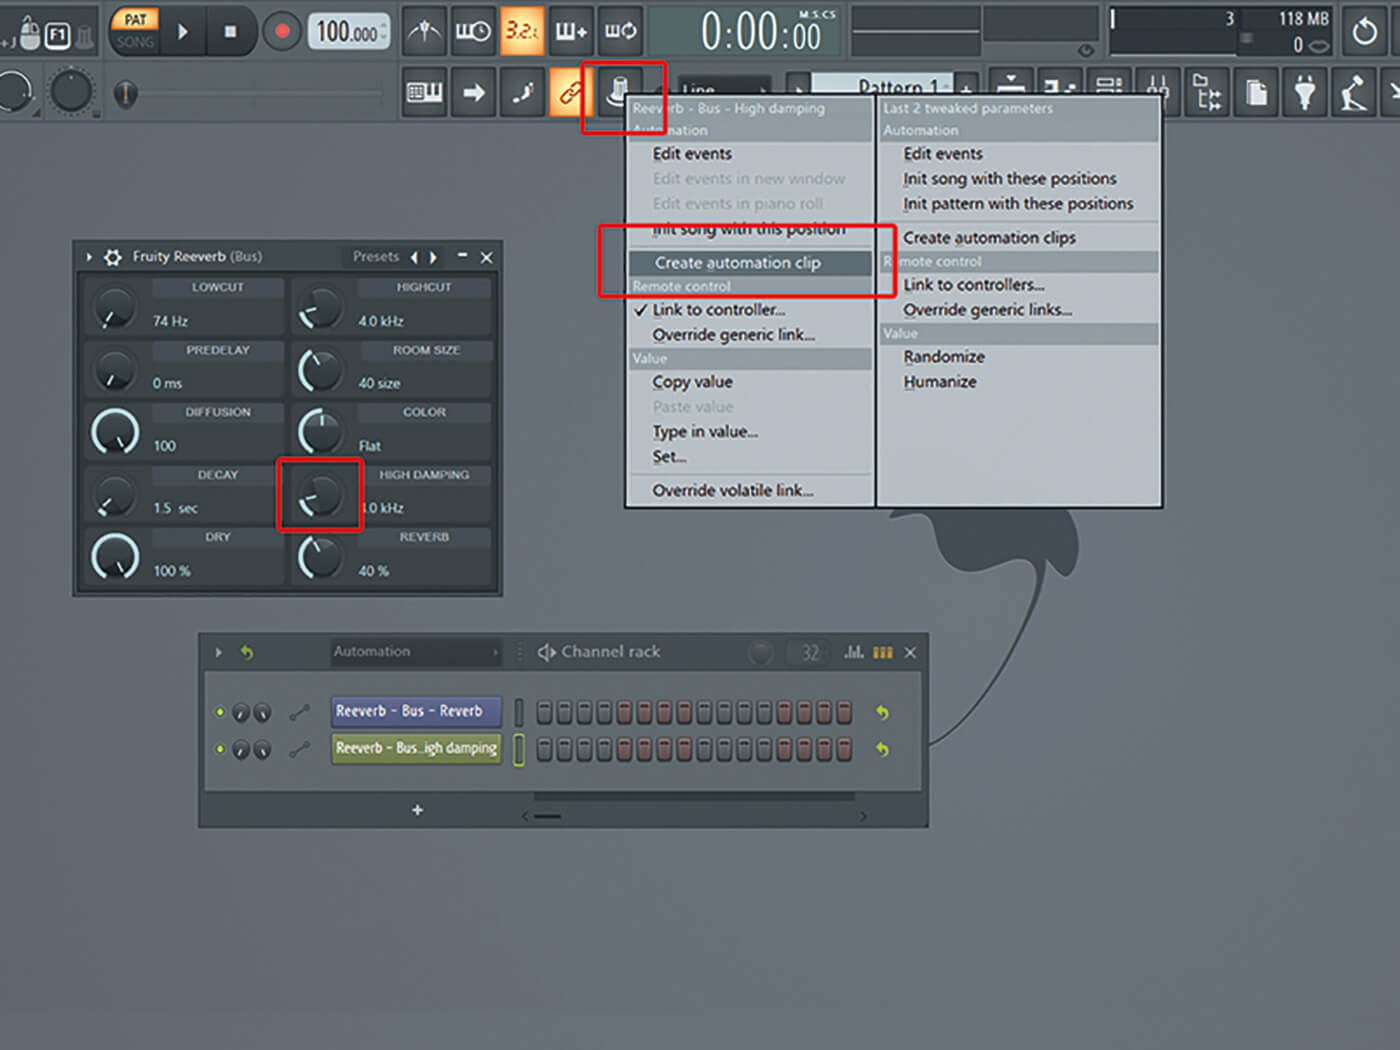
18. Do some further nips and tucks to your sound using automation. You can do this to any parameter by turning the desired knobs and sliders, right-clicking on the knob icon in the top toolbar and choosing Create Automation Clip.
For more FL Studio tutorials and workshops, check here.