How to mix rap vocals in FL Studio
Not all vocals are created equally – and they shouldn’t be mixed that way either. The placement and resulting impact of a mix’s rapped vocal should be considered differently to sung parts. FL Studio presents some impeccable tools to help get your rhymes in time.
Mixing vocals is an intricate and often delicate art. Problems are posed right from the recording stage all the way through to the implementation of rap vocals into the stew of your mix. Sometimes, as a producer or audio engineer, you can encounter mixes that prove fascinating simply by virtue of how the audio sits and blesses your ear. These are the mixes you can learn from. In this tutorial, we’re diving into the crafty art of mixing and blending rap vocals in FL Studio by carefully guiding you through some of the most essential steps to steer your raps right.
Phone booth rules
Rap vocals are not an instrument, nor are they sung vocals. Most of the time, though, you’ll want to treat your rap vocals as the lead elements of your mix. This may mean artistic sacrifices need to be made in order to get everything clear and just-so. Bear in mind too that rap vocals are perhaps the most active leads you can have in a mix, due to the nature of rap itself.
Add in the fact that rap vocals don’t simply impart rhythm and sound to the listener but also words that need to stand out, be processed and understood, and you’ll understand that rap vocals need to be granted considerable room in the mix. So if you’re having a hard time figuring out how to blend your rap vocals, zoom out and consider the overall picture: are there are too many voices that want to speak up?
This space-awareness concept flows nicely into the next essential step that needs to be addressed: the human voice. Though not an instrument per se, the human voice has a range just like any other instrument. Yes, every voice is different but, for the sake of practicality, we can draw some averages here. This average range is very active in the mids and high-mids.
Naturally, then, we don’t want this range to be pressured in the instrumental. If your mix already boasts booming mids and you want to stick in a rap vocal, the result might be the sonic equivalent of jamming two angry UFC fighters in a phone booth. Know where you are with your audio. If you’re in a phone booth, follow the rules of the space, and try to keep competing frequencies apart.
FL flow
An enormous part of processing your vocals is understanding what type of recording you’re dealing with. The microphone, the rapper’s performance, their distance from the mic, and background static – these factors can lead to varied recording results. Treat every recording as its own unique identity. What works for one might not work for another.
Earlier, we described how we want the mix to adapt to the vocal. But this goes both ways. We also want the vocal to support and supplement the mix by becoming one with the identity of the track and colour of the mix. We encourage you to create FL Studio mixer presets as you go. That way, you can test them on your vocal and find out which textures work for you. If you enjoy certain presets, you can use them as a starting point and tweak them along the way.
The traditional way of working with rap was always to have the instrumental in place before recording and implementing the vocals. Often, this worked fine, especially if the producer had experience making tracks for (rap) vocals. However, times have changed. These days, we have the beauty and potential of electronic production. What we’re saying is, you can make changes with just a click or two. Don’t be afraid to build around the rap vocal and experiment by adding and muting sounds, and working out specific rhythms and pulses to enhance the movement of the vocal. The instrumental and vocal can truly work together if you want them too. You can go as deep into the rabbit hole as your producer brain pleases.
Mixing and blending rap vocals in FL Studio: step-by-step
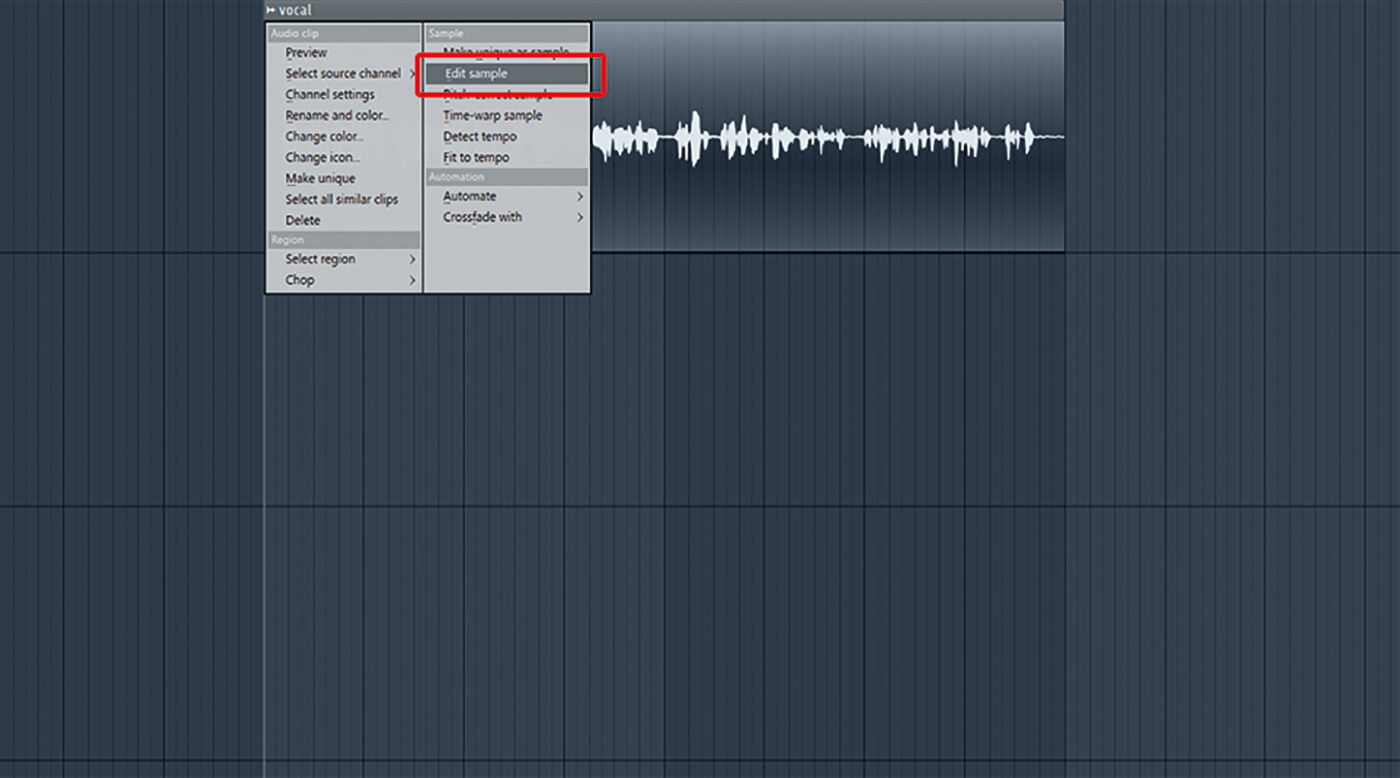
1. Clean up static from the vocal by opening it in Edison and processing it with a clean-up de-noising tool. Right-click the top bar of the vocal recording and select Edit Sample.
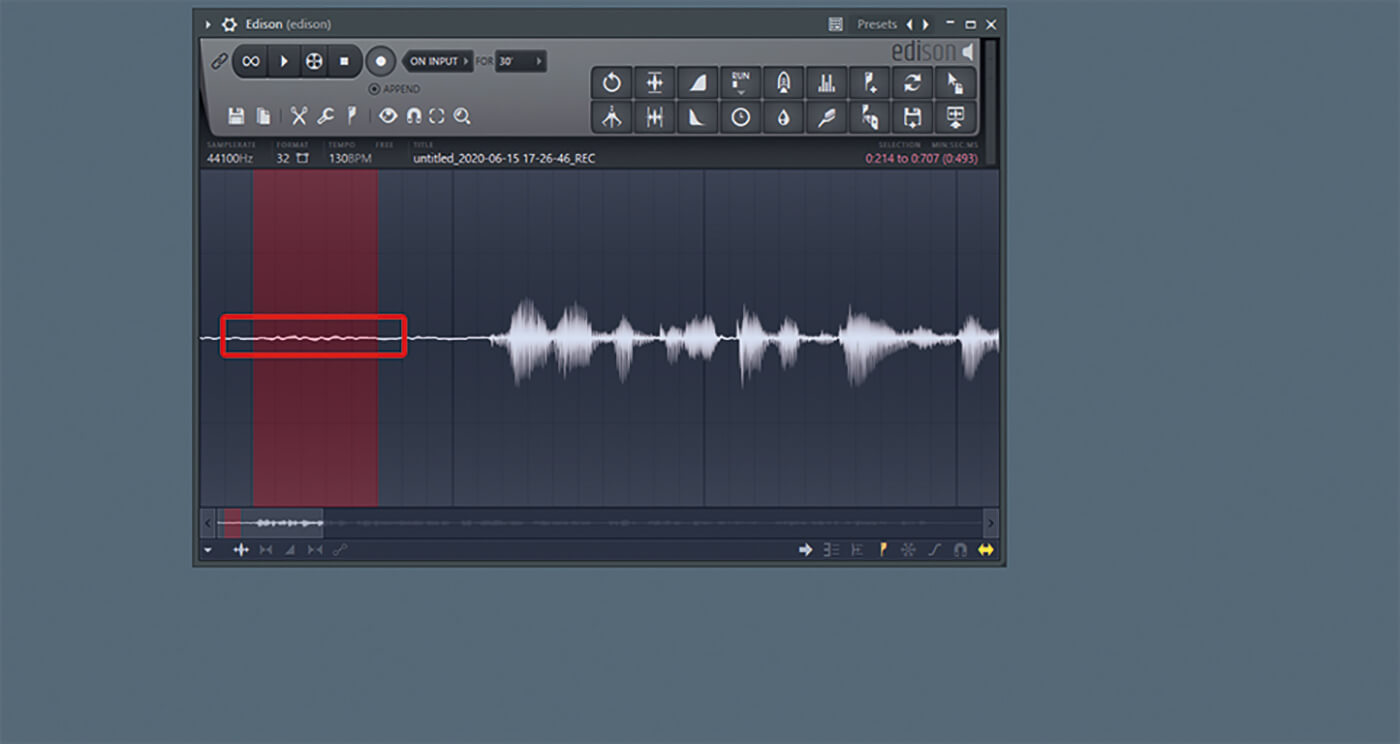
2. Select an area of the vocal recording that features static that you want to reduce. Make sure there’s nothing in this area that isn’t static, such as clicks, pops and ticks.
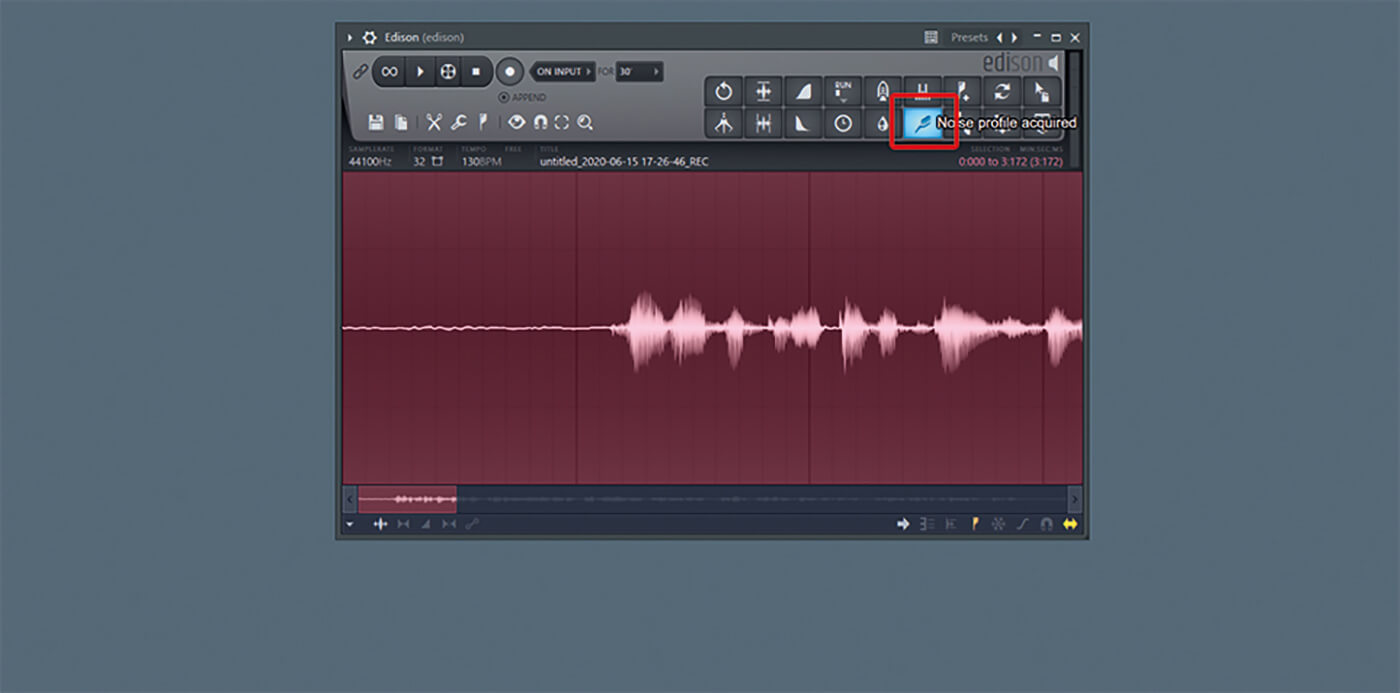
3. Right-click the brush icon to acquire the noise profile. Press Ctrl+A to select the whole vocal recording and left-click the brush icon to open the clean-up tool.
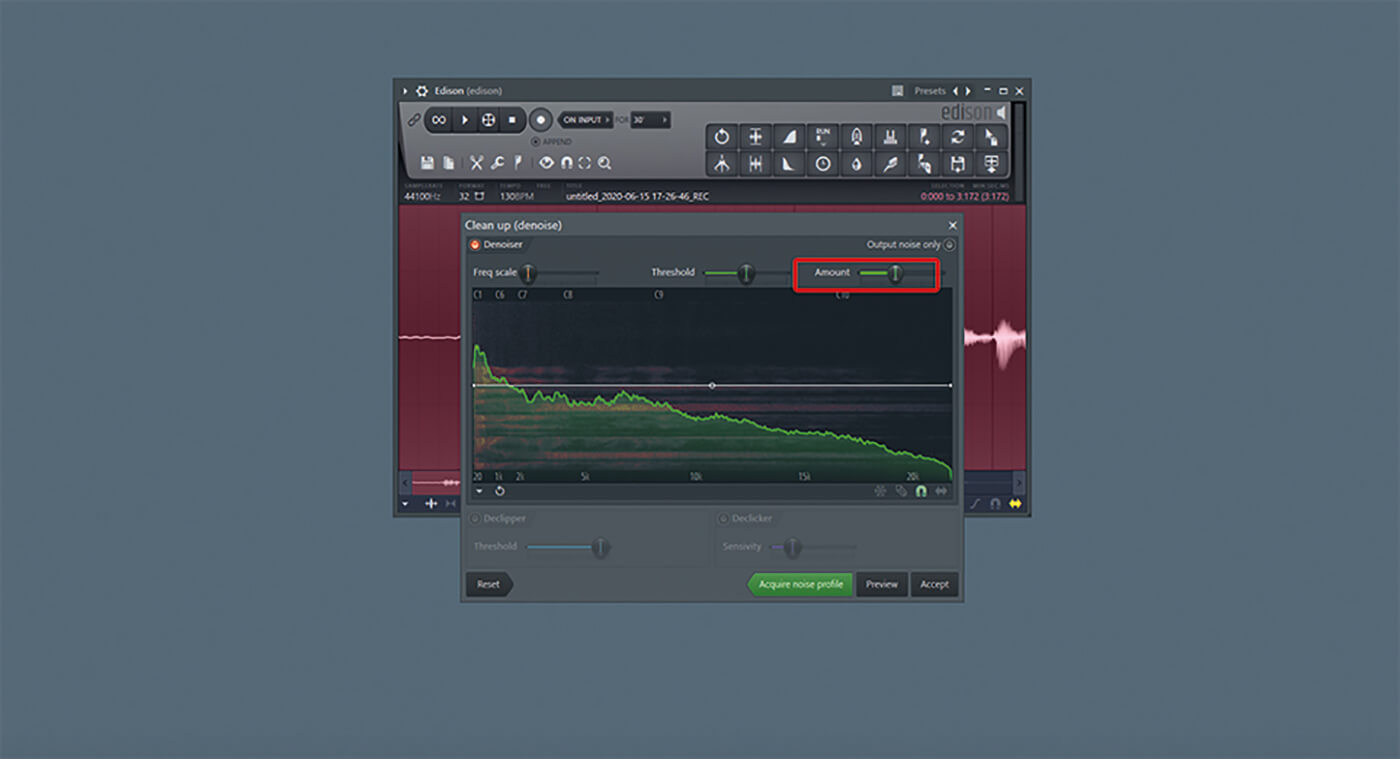
4. Using the amount slider, determine how much noise you want to kill in your vocal recording. Keep in mind that too much reduction can lead to an inorganic sound.
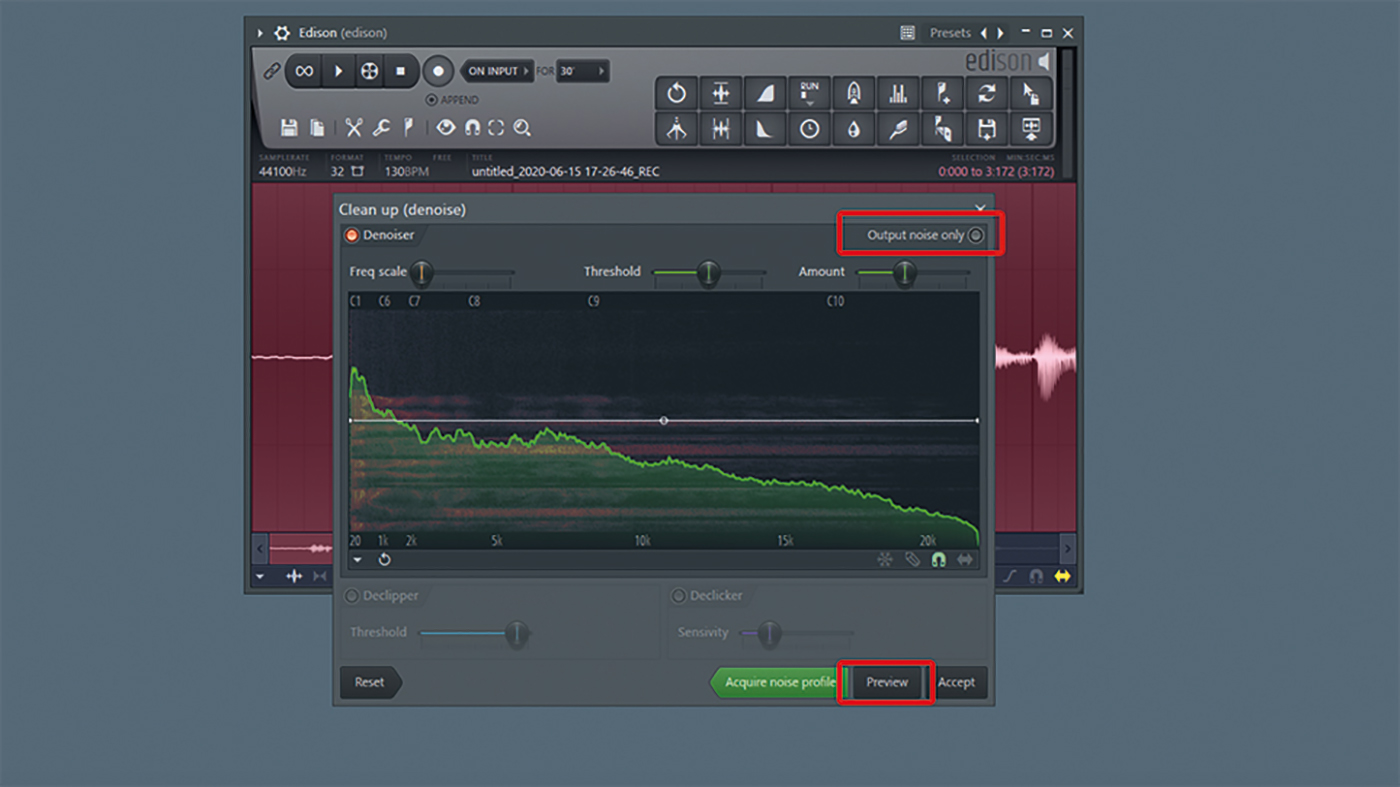
5. Click preview to hear the condition of the vocal recording with the clean-up active.To just hear only what you’re removing from the vocal, select Output Noise Only in Edison.

6. Accept your changes and, with the arrow tool in Edison’s menu, drag your new vocal clip onto your song view. You can always keep the initial recording as a backup.
![]()
KEEP IT DOWN Instead of using the noise-reduction section of Edison to eliminate static in your vocal recording, you can also use a simple noise-gate tool. It’s less fancy but will get the job done most of the time.
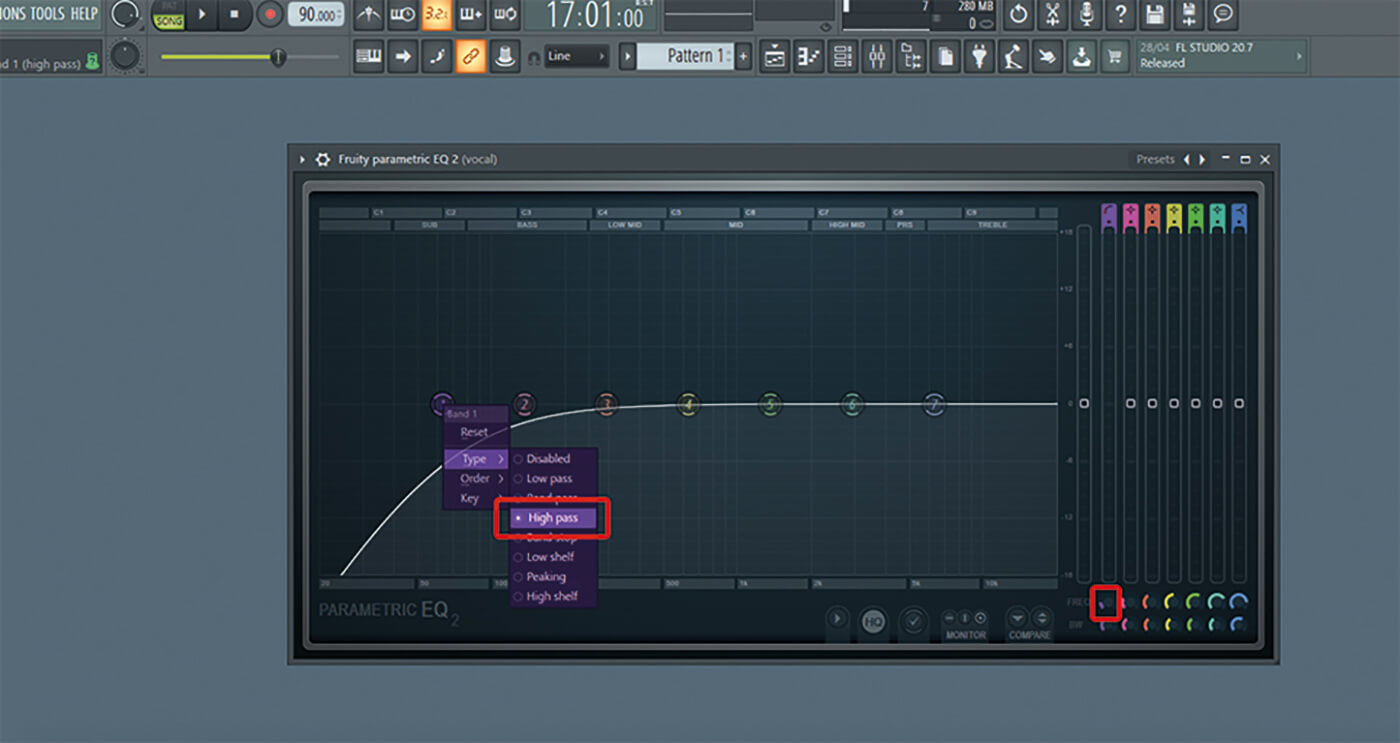
7. Open up the Fruity Parametric EQ 2. Right-click on knob one and create a high-pass filter. Use the frequency slider to kill off a bit of the low end that often proves too present in vocal recordings.
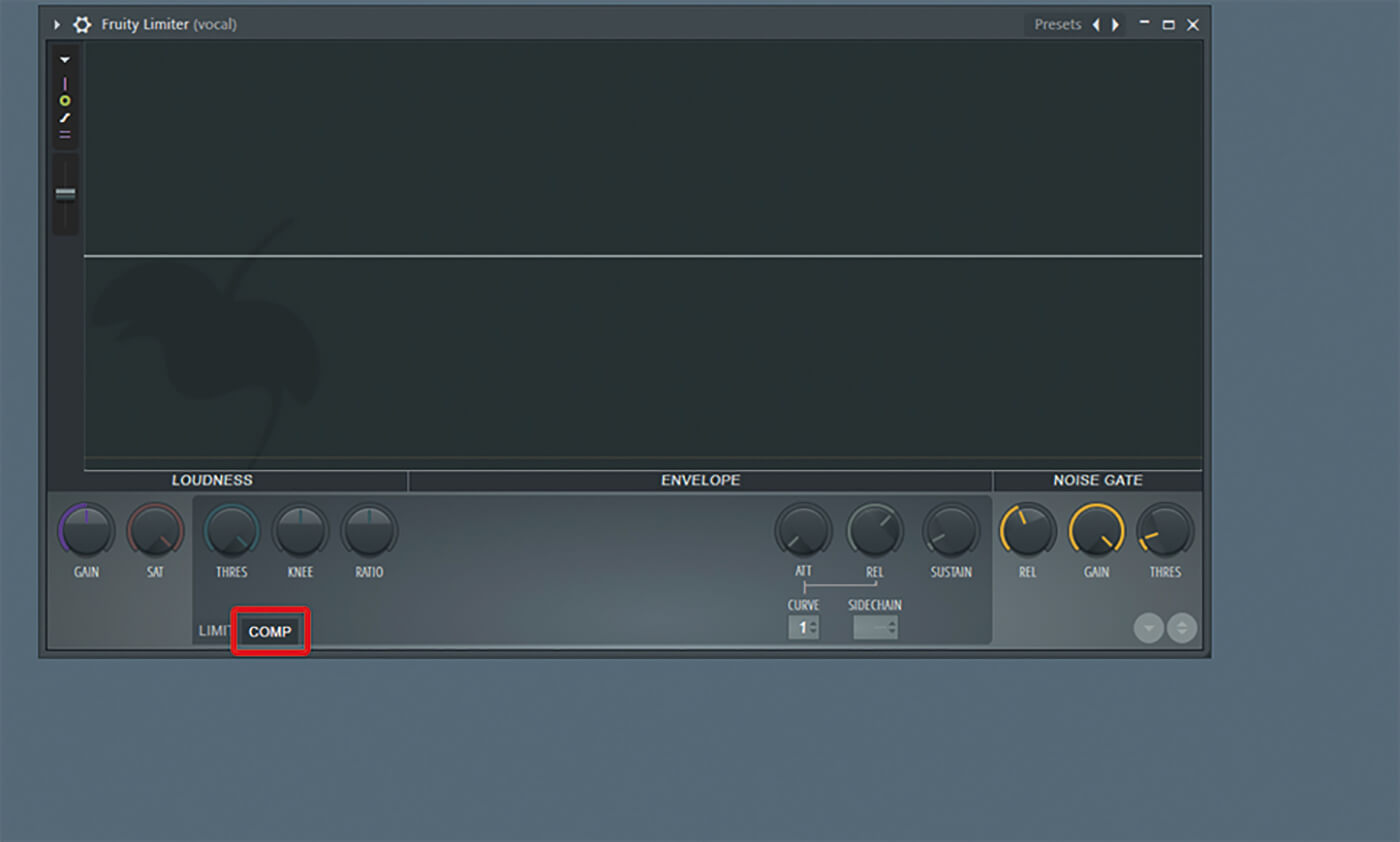
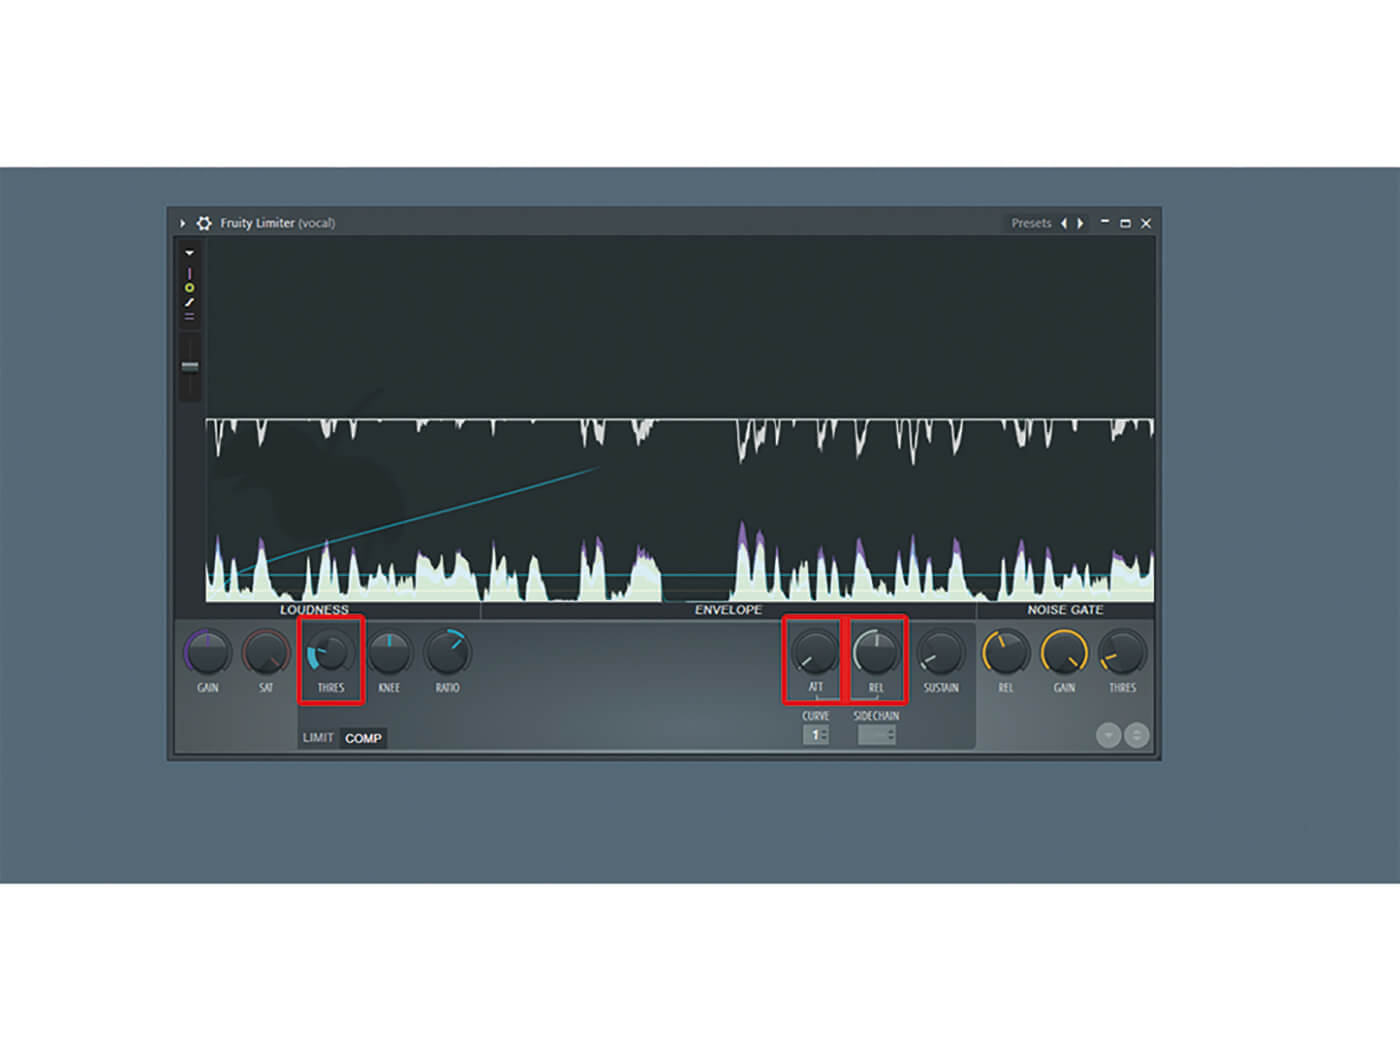
8. Compress the vocal by opening the Fruity Limiter and going to the compression section. Compression will help to create vocal presence and clarity.
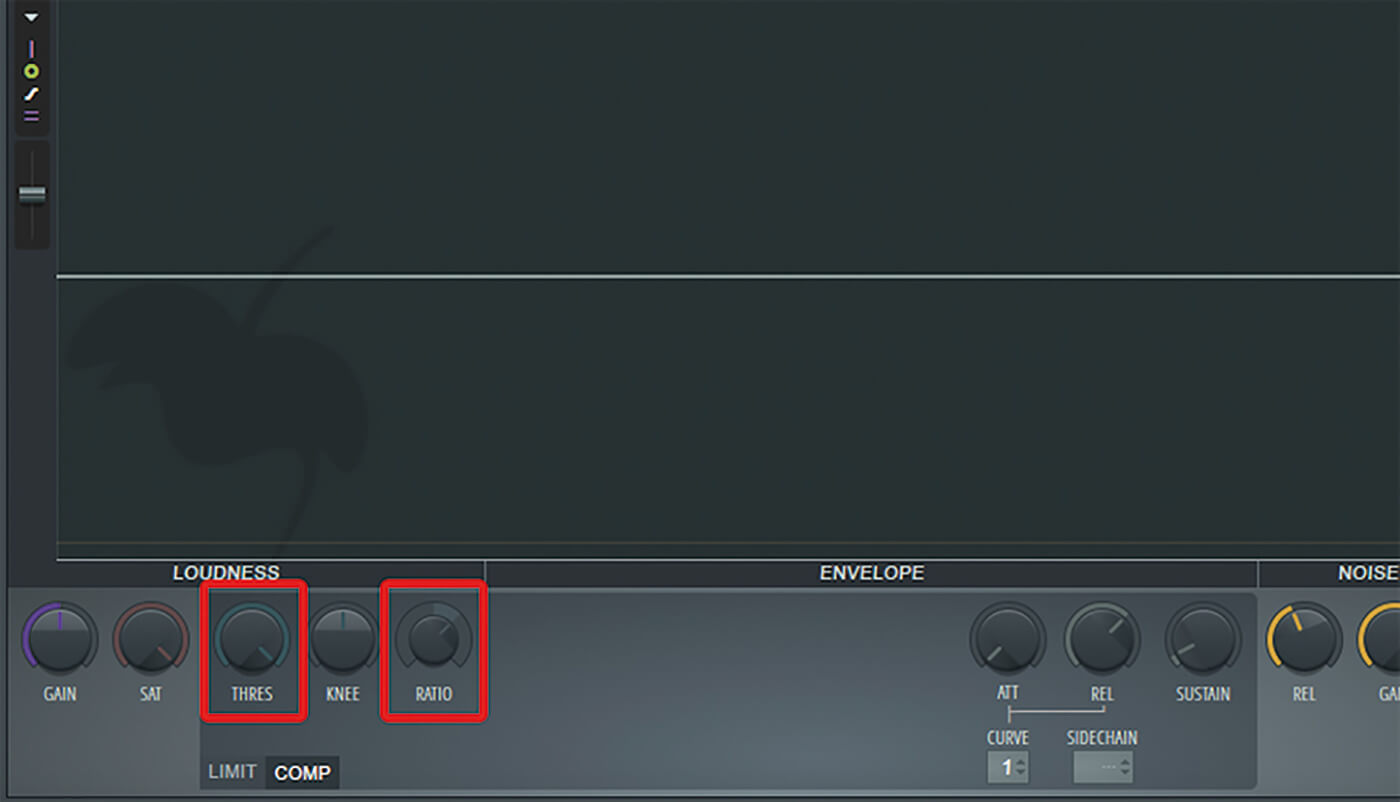
9. The threshold dictates the region of compression, and the ratio what percentage of that region will be compressed. Start by setting the ratio to 2:1.
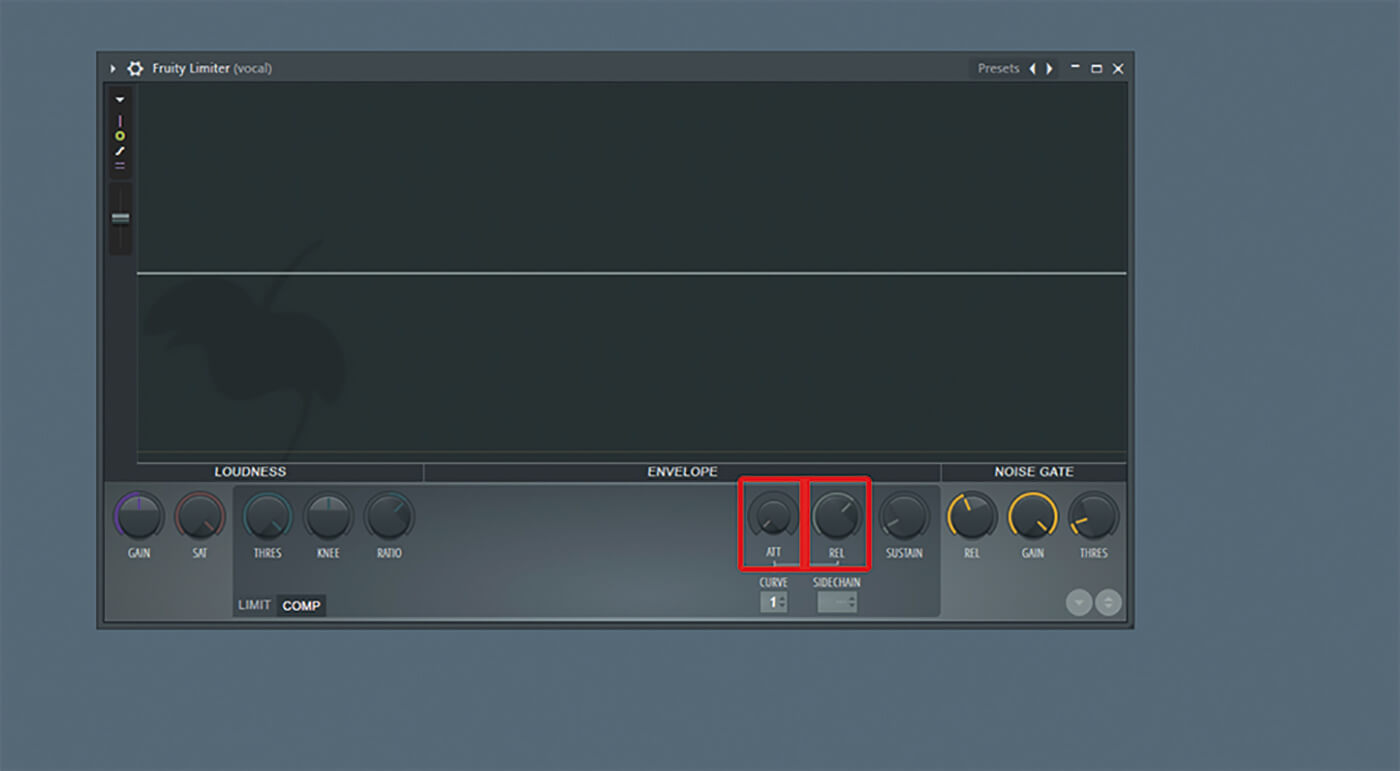
10. The attack dictates how quickly the compressor will kick in, and the release the time it takes for the compressor to disengage. These values determine the smoothness of your compression.
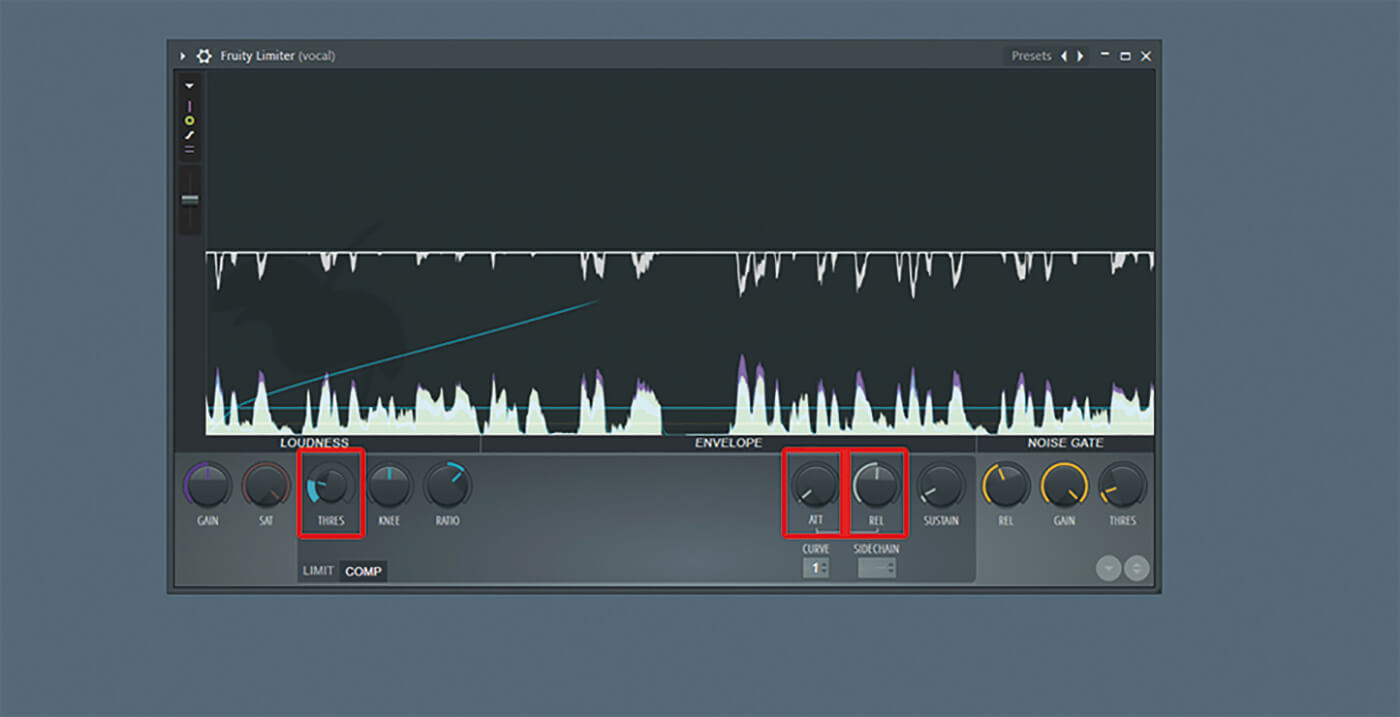
11. Start with a 20ms attack and a 90ms release. Play the recording and you should now be able to decide how heavy your compression should be.
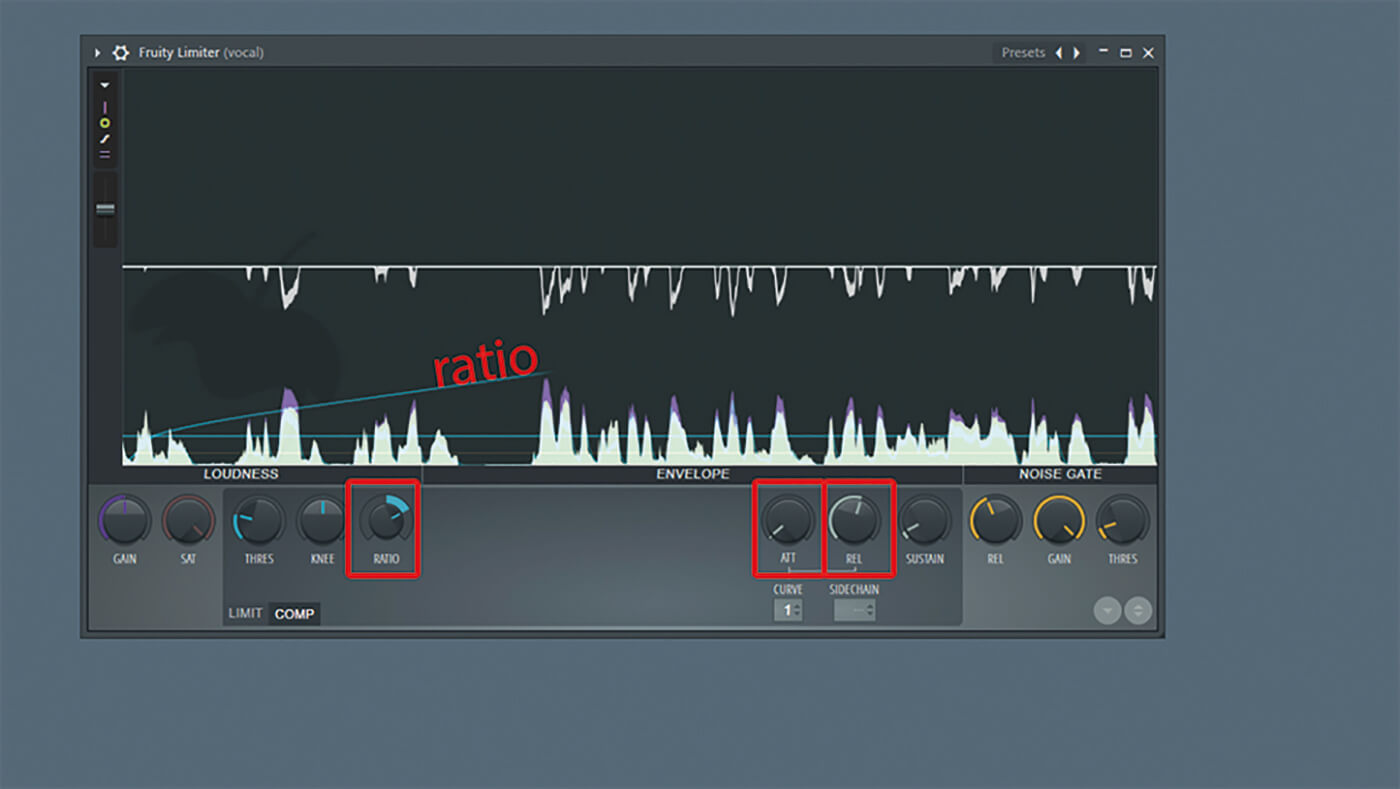
12. Determine what’s best for your vocal by playing with the ratio, attack and release. Compression is meant to create vocal clarity but should never induce unpleasant wobbles and artefacts.
![]()
CRISPY COMPRESSION It can help to centre your rap vocals. Crispy compression and small-room reverberation are solid options. Try to make your track breathe by limiting the frequencies in the midrange so that they don’t dominate the mix.

13. Open up the Fruity Reeverb 2 and retain the default preset. Play with the low-cut knob to make sure there isn’t too much low end from the reverb coming through. This reduces muddy effects.
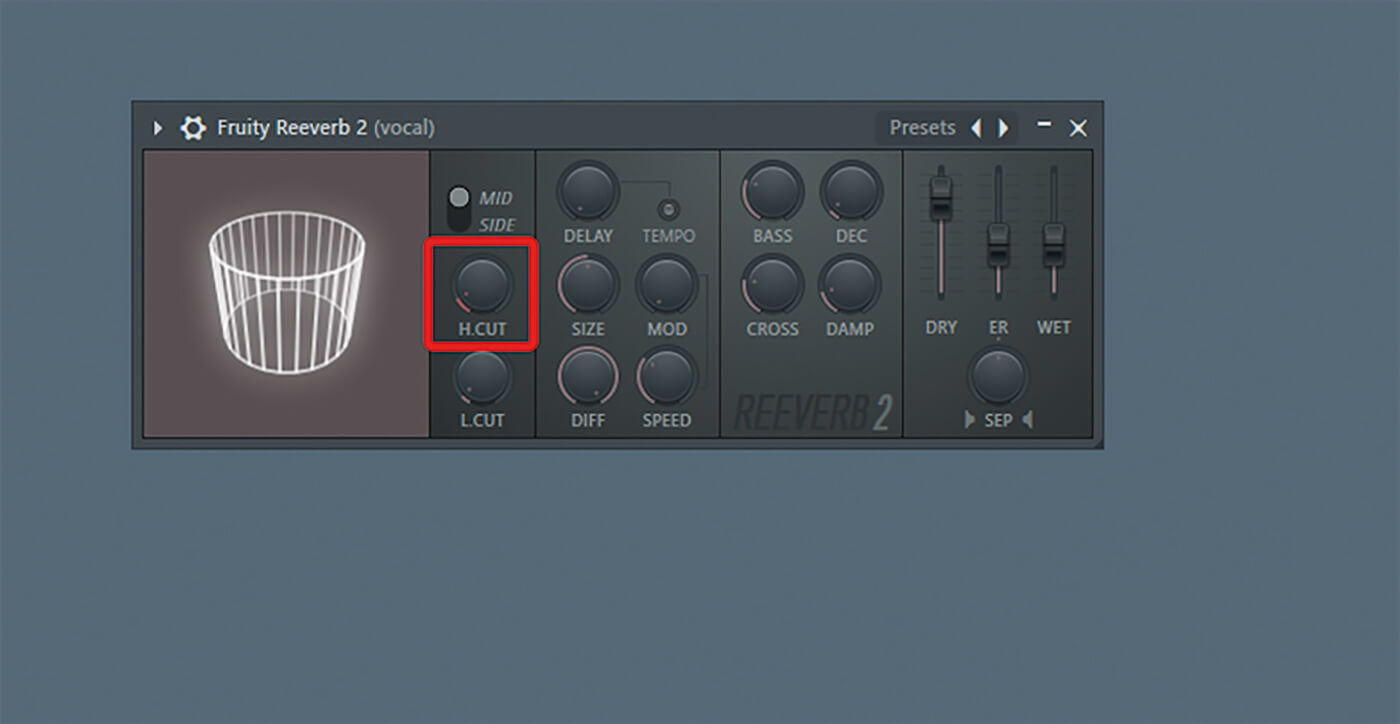
14. Play with the high-cut knob to decide how much high end will reverberate. For a more organic effect, keep it under about 3,00-4,000Hz. Though this setting will depend on your track.

15. Play with the SEP (stereo separation) knob and decide on the width of your reverb. Play your vocal and mix together, and look for a nice spot for your soundscape.
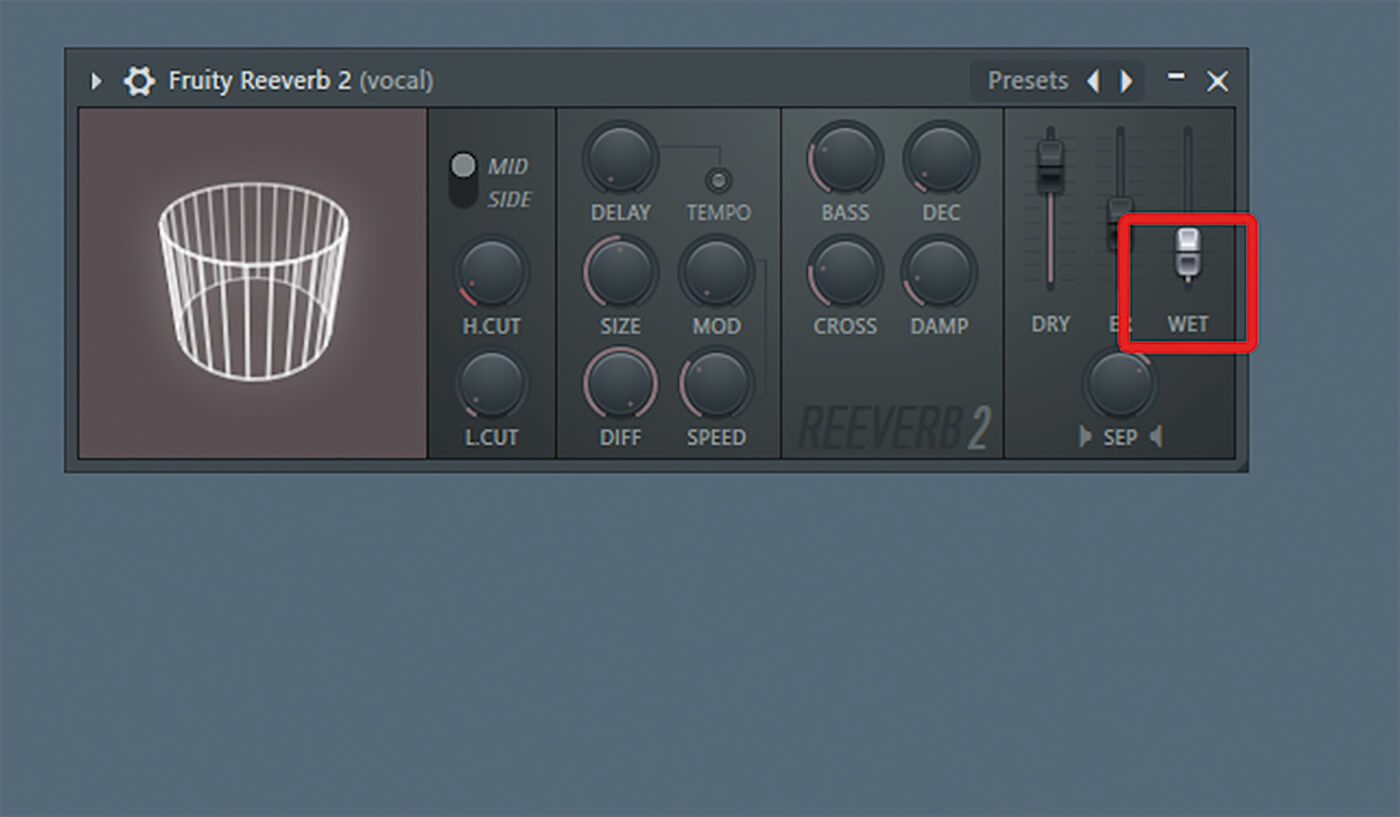
16. Use the wet slider and decide how much reverb you want to apply to the vocal. Keep it low. Too much reverb might make your whole track sound muddy.
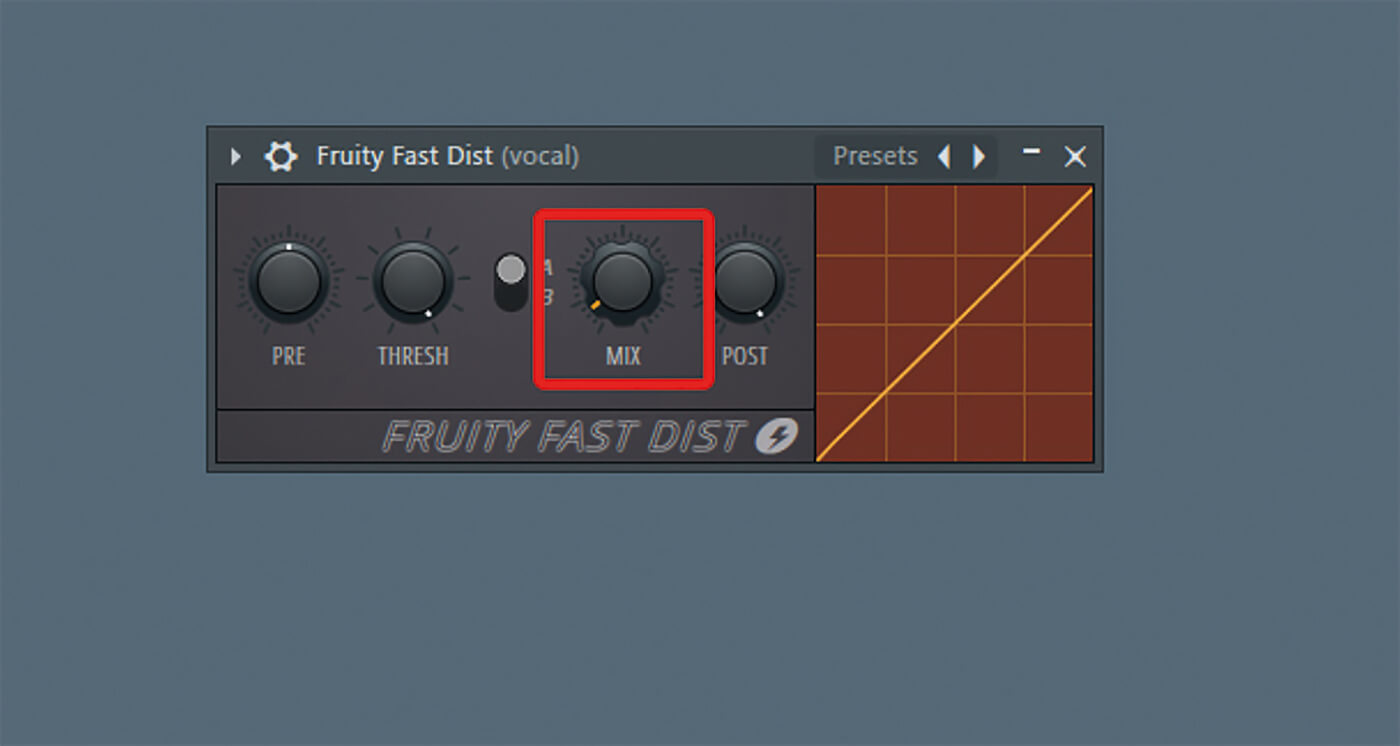
17. Open the Fruity Fast Dist to apply distortion to your vocal. A bit of crunch can give your vocal more presence in the mix. Use the mixknob to determine the amount.
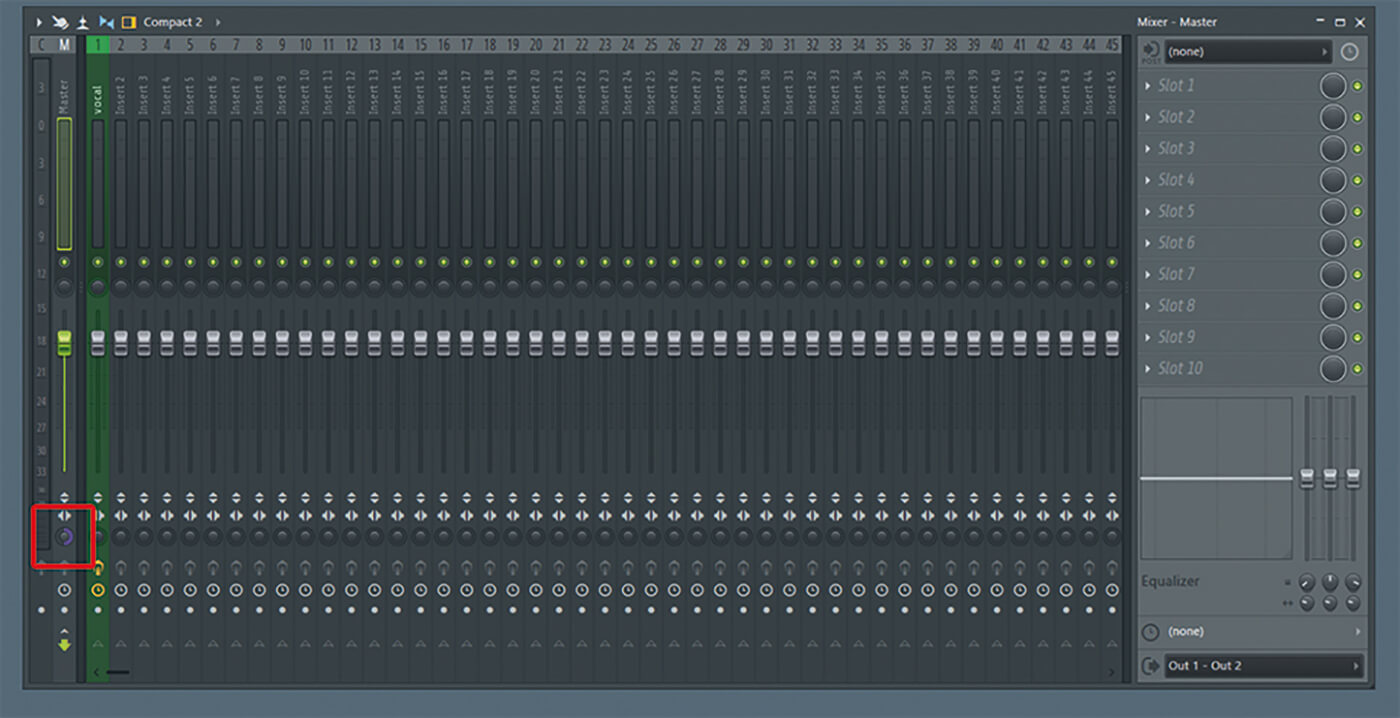
18. On the master channel, use the SEP slider to temporarily make your track fully mono, which should help you level the volume of your vocal into your song, as mono depicts the realistic balance of your sounds.
For more FL Studio tutorials and workshops, check here.