Genre Focus Tutorial: Produce Authentic House in Ableton Live
Welcome to a new series that focuses on different genres of music production across every DAW. We kick off with house, the simplest of dance genres. ‘Or is it?’ asks Rob Boffard… For this tutorial you will need the project files – Download Here House music is a perfect candidate to start with if you’re […]
Welcome to a new series that focuses on different genres of music production across every DAW. We kick off with house, the simplest of dance genres. ‘Or is it?’ asks Rob Boffard…
For this tutorial you will need the project files – Download Here
House music is a perfect candidate to start with if you’re just beginning to get to grips with the key concepts of music-making. While any piece of music can be complicated, it’s house, more than perhaps any other genre, that can sound superb despite comprising only a few very simple elements. As long as you have a great lead, a fat bass line and a good collection of rhythmic percussion – and as long as you’re willing to spend a little time getting your mix right – you’ll have a winner.
Much of producing house is actually about sound design – specifically, sound design using synths. An understanding of the fundamental concepts of synthesis – how oscillators make sound, how you can modulate them, what filters do and so on – is absolutely crucial. You’ll also need to have a good understanding of how MIDI data works and how it’s different from audio (put simply, a MIDI note is just a signal to the instrument it’s attached to in order to play a sound; unlike audio, it doesn’t actually contain any sound itself).
We’re going to produce a house track in 12 steps, using various techniques to create our lead, bass line and percussion, as well as covering a couple of mixing principles such as sidechaining. We’re using Ableton Live to do this, but the principles we discuss can easily be transferred to other DAWs. Live is ideal for this job mainly because of its Session View, which enables you to create Clips, each containing a loop or a selection of audio. You can fire off the loops at any time, and when you bring in others, Ableton keeps things perfectly in time.
Session View is a giant sketchpad for your track, letting you add in and remove things on-the-fly and craft the perfect beat. Once you’ve mastered it, it’s just as good for live performances as it is in the studio.
But if you want to produce house music, the most important thing you can learn is something not covered in this guide: listening. You need to hear as much house as you possibly can – pour as much of it into your ears as you can handle. Try to isolate the individual sounds and, if possible, reverse-engineer them. Not only will this help you get a deeper understanding of your synths, but also a deeper understanding of the music itself.
How To Produce Authentic House

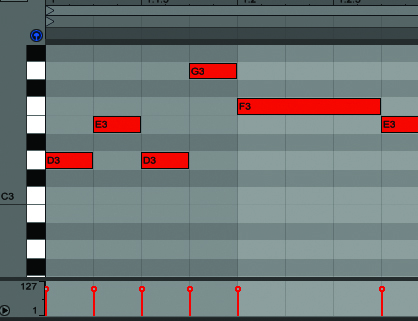
1: A good house track depends on a kick-ass lead. We’re going to build one using Ableton Live’s Operator synth. Drag it onto a track, then double-click the Clip Slot to open a new MIDI track. Lay down a four-bar sequence – doesn’t have to be anything fancy, as you can always change it later. When you’re done, press [Shift]+[Tab] to switch back to Instrument View.
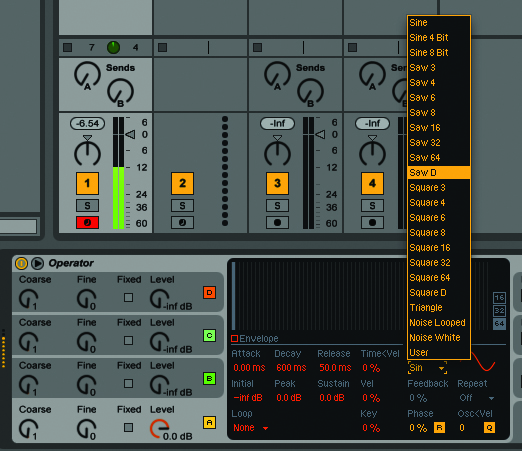
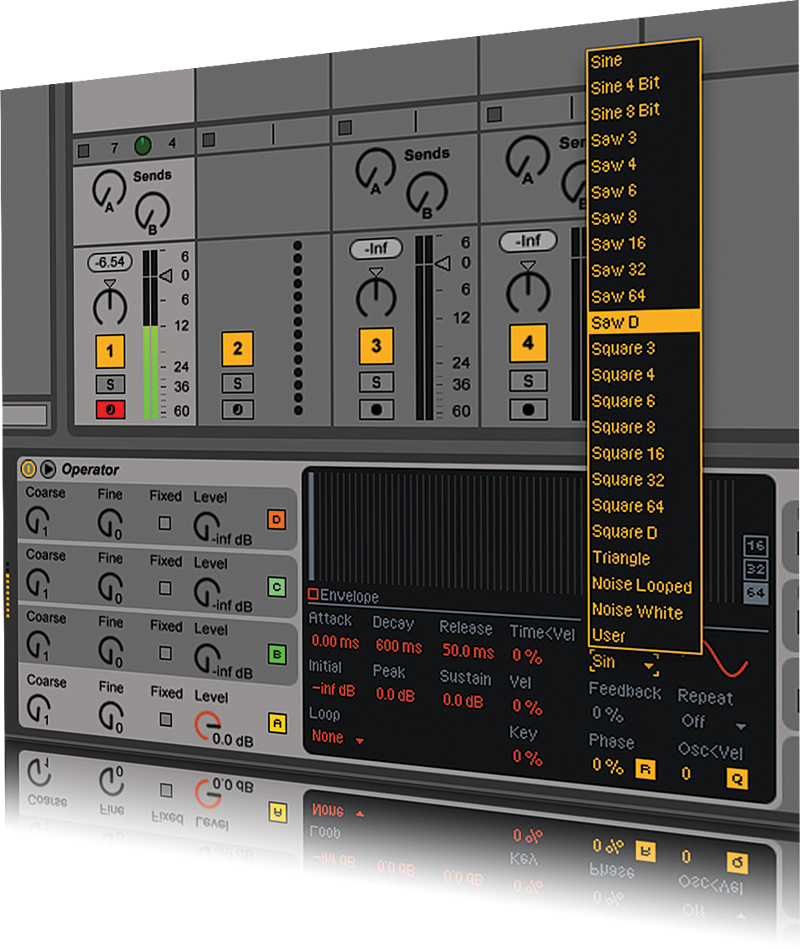
2: First things first: pick a wave. The current Sin wave isn’t really strong enough, so select Oscillator A (by clicking in the grey box surrounding it) and then open the pop-up menu in the main instrument window. Pick one of the Saw waves – this will give you a much grittier, more interesting tone. Dial down Osc A’s Coarse knob a little, too.

3: Right now, if you introduce more oscillators – and you’ll certainly want to – each will be modulating the other, which will give a very odd sound. Click the bottom-right grey box (the one with Time, Tone and Volume in it) and you’ll see a bunch of colourful patterns appear. Select the right-most one, with the boxes – each representing an oscillator – lined up.
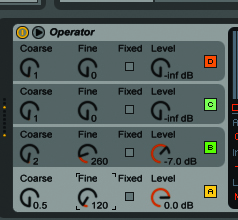
4: Push up the level of Osc B, set the wave to the shape you picked for Osc A, and use the Coarse knob to detune it to your liking. Already, you’re getting something more interesting. Play around with the Fine knobs on each Osc to get just the tone you like. This part of the process all comes down to personal taste.
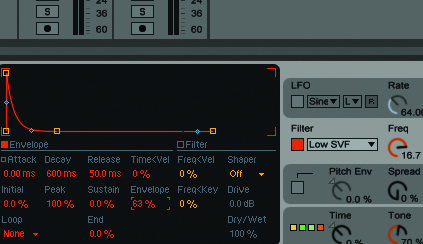
5: Filter time. You’ll automate this later when you’re building your track, but for now, play around with the various values to see how it affects your sound (remember to click the square button to activate it). We suggest playing with the envelope value in the main display – a setting of 60–70% can give some real character.
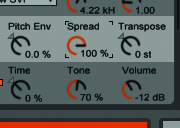
6: There are a couple of other things you can do to give your lead more life. Adjust the Spread control to maximum – you’ll instantly hear the stereo spread widen – then activate the LFO. The low-frequency oscillator is going to give your sound a bit of wobble, which will really make it stand out.
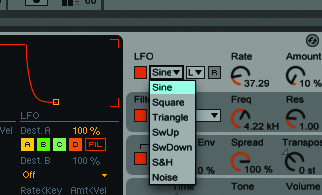
7: With the loop playing, pick the shape of your LFO. You’ll be able to hear how each shape affects the sound differently – a triangle will make it rise and fall evenly, while a square will be choppy. You can probably leave the Range and Retrigger controls alone for the time being, although feel free to experiment.
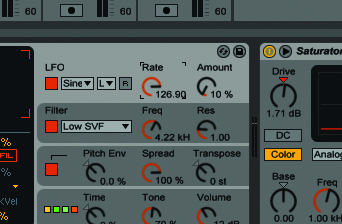
8: Rate and Amount will determine how much LFO actually gets injected into your sound. For something subtle, try turning Amount up to almost completely full and set the Rate very low (no higher than 10%). You’ll instantly hear that another element has been injected into the sound.
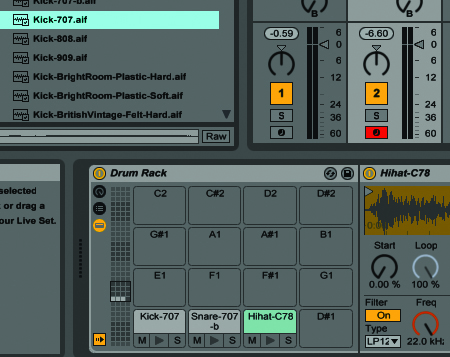
9: That’s the lead sorted – time for some drums. Actually, getting a basic drum pattern going is pretty straightforward: put a Drum Rack into a track, open a MIDI clip, then use the Browser to start auditioning kicks, snares, hats and cymbals. For house beginners, we’d recommend a 707 kick for that classic vibe.
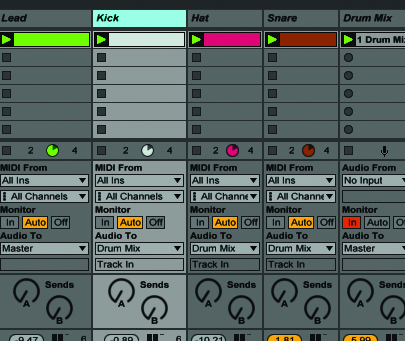
10: You may want to think about putting each drum element into its own track – you can then create a sub-group, allowing you finer control over the mix. Lay down your drum pattern as you like (we’ve gone four-to-the-floor here) and spend a little time processing and mixing your drums with EQ and some light compression.
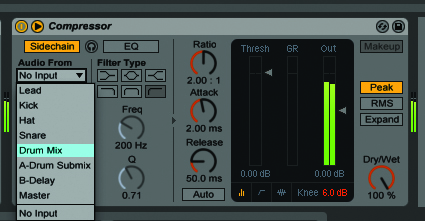
11: Sidechain compression is something you’ll use again and again. It lowers the volume of a chosen sound every time a drum (or whatever you specify) hits. Load a compressor onto your lead track, click Sidechain, select your drum sub-mix, then adjust the compression values with the main loop playing. This will create loads of room in your mix.
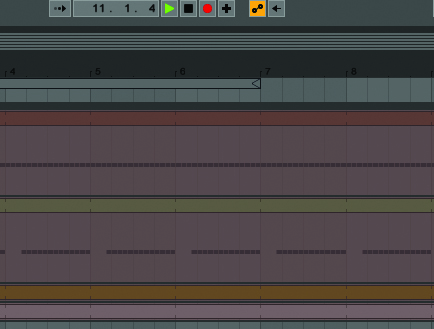
12: After adding a bass line (Operator again, just tweaked differently) it’s time to mix it all together and actually lay down your track. Once you’ve got a balance you’re happy with, start recording it to Arrangement View. The beauty of Ableton is that everything stays in time, no matter when you fire off your clips.