Get Hands-On With Mastering: The Basics (Part 1)
For 20 years, Marc JB has been mastering mixes for the likes of Lady Gaga and Rihanna. Here, he explains the beautiful art of mastering and details the techniques needed to make your own tracks sound as epic as possible… The process behind mastering may seem like a dark art – but the aim is […]

For 20 years, Marc JB has been mastering mixes for the likes of Lady Gaga and Rihanna. Here, he explains the beautiful art of mastering and details the techniques needed to make your own tracks sound as epic as possible…

The process behind mastering may seem like a dark art – but the aim is simple. Good mastering makes a record sound sonically balanced, warm, clear, punchy, present and loud (without distortion, of course), with tight bass and sublime stereo width.
If a record sounds good on a variety of systems – a phone speaker, laptop speakers, supermarket PA, a lift, car stereo, hi-fi system, club PA and festival sound system – then we have mastering success.
What is mastering?
Once an audio recording is mixed down, mastering is the final stage of creative sound shaping, before the record is let loose into the big wide world for replication and distribution. Traditionally, mastering has been the domain of specialist mastering engineers, who use high-end equipment with impeccable monitoring and great experience to manipulate the audio. Doubtless, if you have the funds, this is still the best route to go. But we’re blessed these days with the ability to master in our DAWs, with the assistance of a huge array of inbuilt and third-party plug-ins. So let’s take a look at some practical ways to get to grips with the process…
Preparing your tune for mastering
Before we get into the wonderful world of mastering, we need to make sure the record mix is correct. To get the best possible sound, here are some useful pointers to make sure the mix is sounding fantastic before we focus our attention on the mastering stage.
- Set up your monitoring so you have a clear, uncoloured sound.
- Use great microphones, and the best recording gear you can lay your hands on.
- Use traps, sheets and reflective surfaces to create a good acoustic environment.
- Get the best musicians, playing great instruments.
- Take your time recording, and spend time editing the takes. Ensure you’ve managed to capture the best compiled (comped) performance.
- Mix the tune, making sure every sound has its space. EQ parts so they have their pocket of frequency to shine through. If two or more parts are competing (for example, the vocal and a warm pad), let the most important part have the space and then EQ out competing frequencies from the other sound.
- Use high-pass filters on parts to clean out any rumble. For example, there may be ‘pops’ on the vocal take; set a high-pass filter at around 120Hz to take out this unnecessary noise, which will otherwise compete with the kick and bass. Also, watch out for low guitar hum and vinyl rumble on samples.
- Check the phase of your audio. If something sounds like it has a ‘hole’ in the middle of the mix, the left and right signals may be out of phase. Listen to the mix in mono; if parts disappear, then change the phase on one side.
- Get rid of anything that doesn’t add to the mix – less is best.
- Indulging in heavy amounts of intoxicants and pulling an all-nighter may have harmful effects on your mixing abilities, as well as the judgement of your ears, so keep a clear head.
- If the mixer output is overloaded, the signal is going to clip and distort. Make sure the loudest passage in your tune is peaking at -4dB on the master fader in order to leave some headroom.
If your mix is too hot, select all channels and simultaneously pull them all down together, if your DAW allows it. Watch out for volume automation data, which may reset channels back to their original levels – I know this one from experience! - Mix down your tune at a high-quality 24-bit 44.1kHz sample rate or at higher quality, leaving a space of silence before and after the mix down. It’s worth pointing out here that it’s not necessary to mix down the audio, as you can put your mastering plug-ins straight onto your master output channel.
At this stage, you can play the track on your hi-fi and car, to ensure the mix is balanced and dynamic.
“Check the phase of your audio. If there’s a ‘hole’ in the middle of the mix, then the left and right signals may be out of phase”
Monitors and room acoustics
If you’re mastering on the same equipment you’re mixing on, you’ll be subject to the same colour from your speakers and room, which can make it difficult to be completely sonically subjective about what you’re working on. Here are some tips for a good setup…
- Have your monitor tweeters at ear height – place them in an imaginary equilateral triangle with your listening position.
- Isolate the monitors from your work surface, or place them on heavy stands, to avoid the furniture vibrating and making noise.
- If you have the cash, then it’s well worth acoustically treating your space. Ideas for good placement include bass traps in the front corners, broad-band bass traps behind you and full-range traps in the reflection points to your left and right. You can find reflection points by getting a friend to put a mirror on the wall – where you see the speakers is where the sound is reflected to you.
- Use the free program Room EQ Wizard (www.roomeqwizard.com) to find your room modes (where the sound is bouncing and resonating between the walls) and to see how your room colours the sound. I have generally found the most annoying room resonances between 40 to 120Hz; they’re harder to tame.
- Audio purists will say, ’know thine speakers’. But I say, use a room correction plug-in like IK Multimedia ARC II to make your monitors flat at all frequencies.
- Don’t be tricked into listening too loud. Many monitors start distorting at higher levels; this can make them sound more energetic and exciting. However, this will be lost on the master, which may sound muffled as a result. If you want to listen at the often ear-shattering volume level you might experience in a club, then turn up the volume for a short while and then back it down again, so you’re not exposed to the volume for too long. Your ears are all-important – don’t risk your hearing.
- Listen to tunes of a similar genre, which you know sound good on a variety of playback systems. Play them on your monitors, to get your ear trained to the sound of your setup. Find a comfortable level to listen to, and mark the volume dial – have this set as your go-to level for mastering.
The End Of The Loudness Wars
For years, clients have been pushing mastering engineers to make their record super loud compared to other tunes, in the hope that this will make it stand out. Mastering engineers have used mystical trickery (like clipping the occasional transient at the start of the mastering chain) to achieve the desired results. Thankfully, sense has prevailed and we’ve seen an end to this rampage of ruined recordings. Since the peak of the loudness wars around 2005, recordings are becoming better, with higher dynamic range.
Streaming services, and iTunes Sound Check, are normalising tracks – (iTunes Sound Check -13LUFS, iTunes Radio -16LUFS, YouTube -13LUFS, Spotify -12LUFS). This means they are making loud ones quieter and, in some cases, quiet ones louder, for consistent listening pleasure.
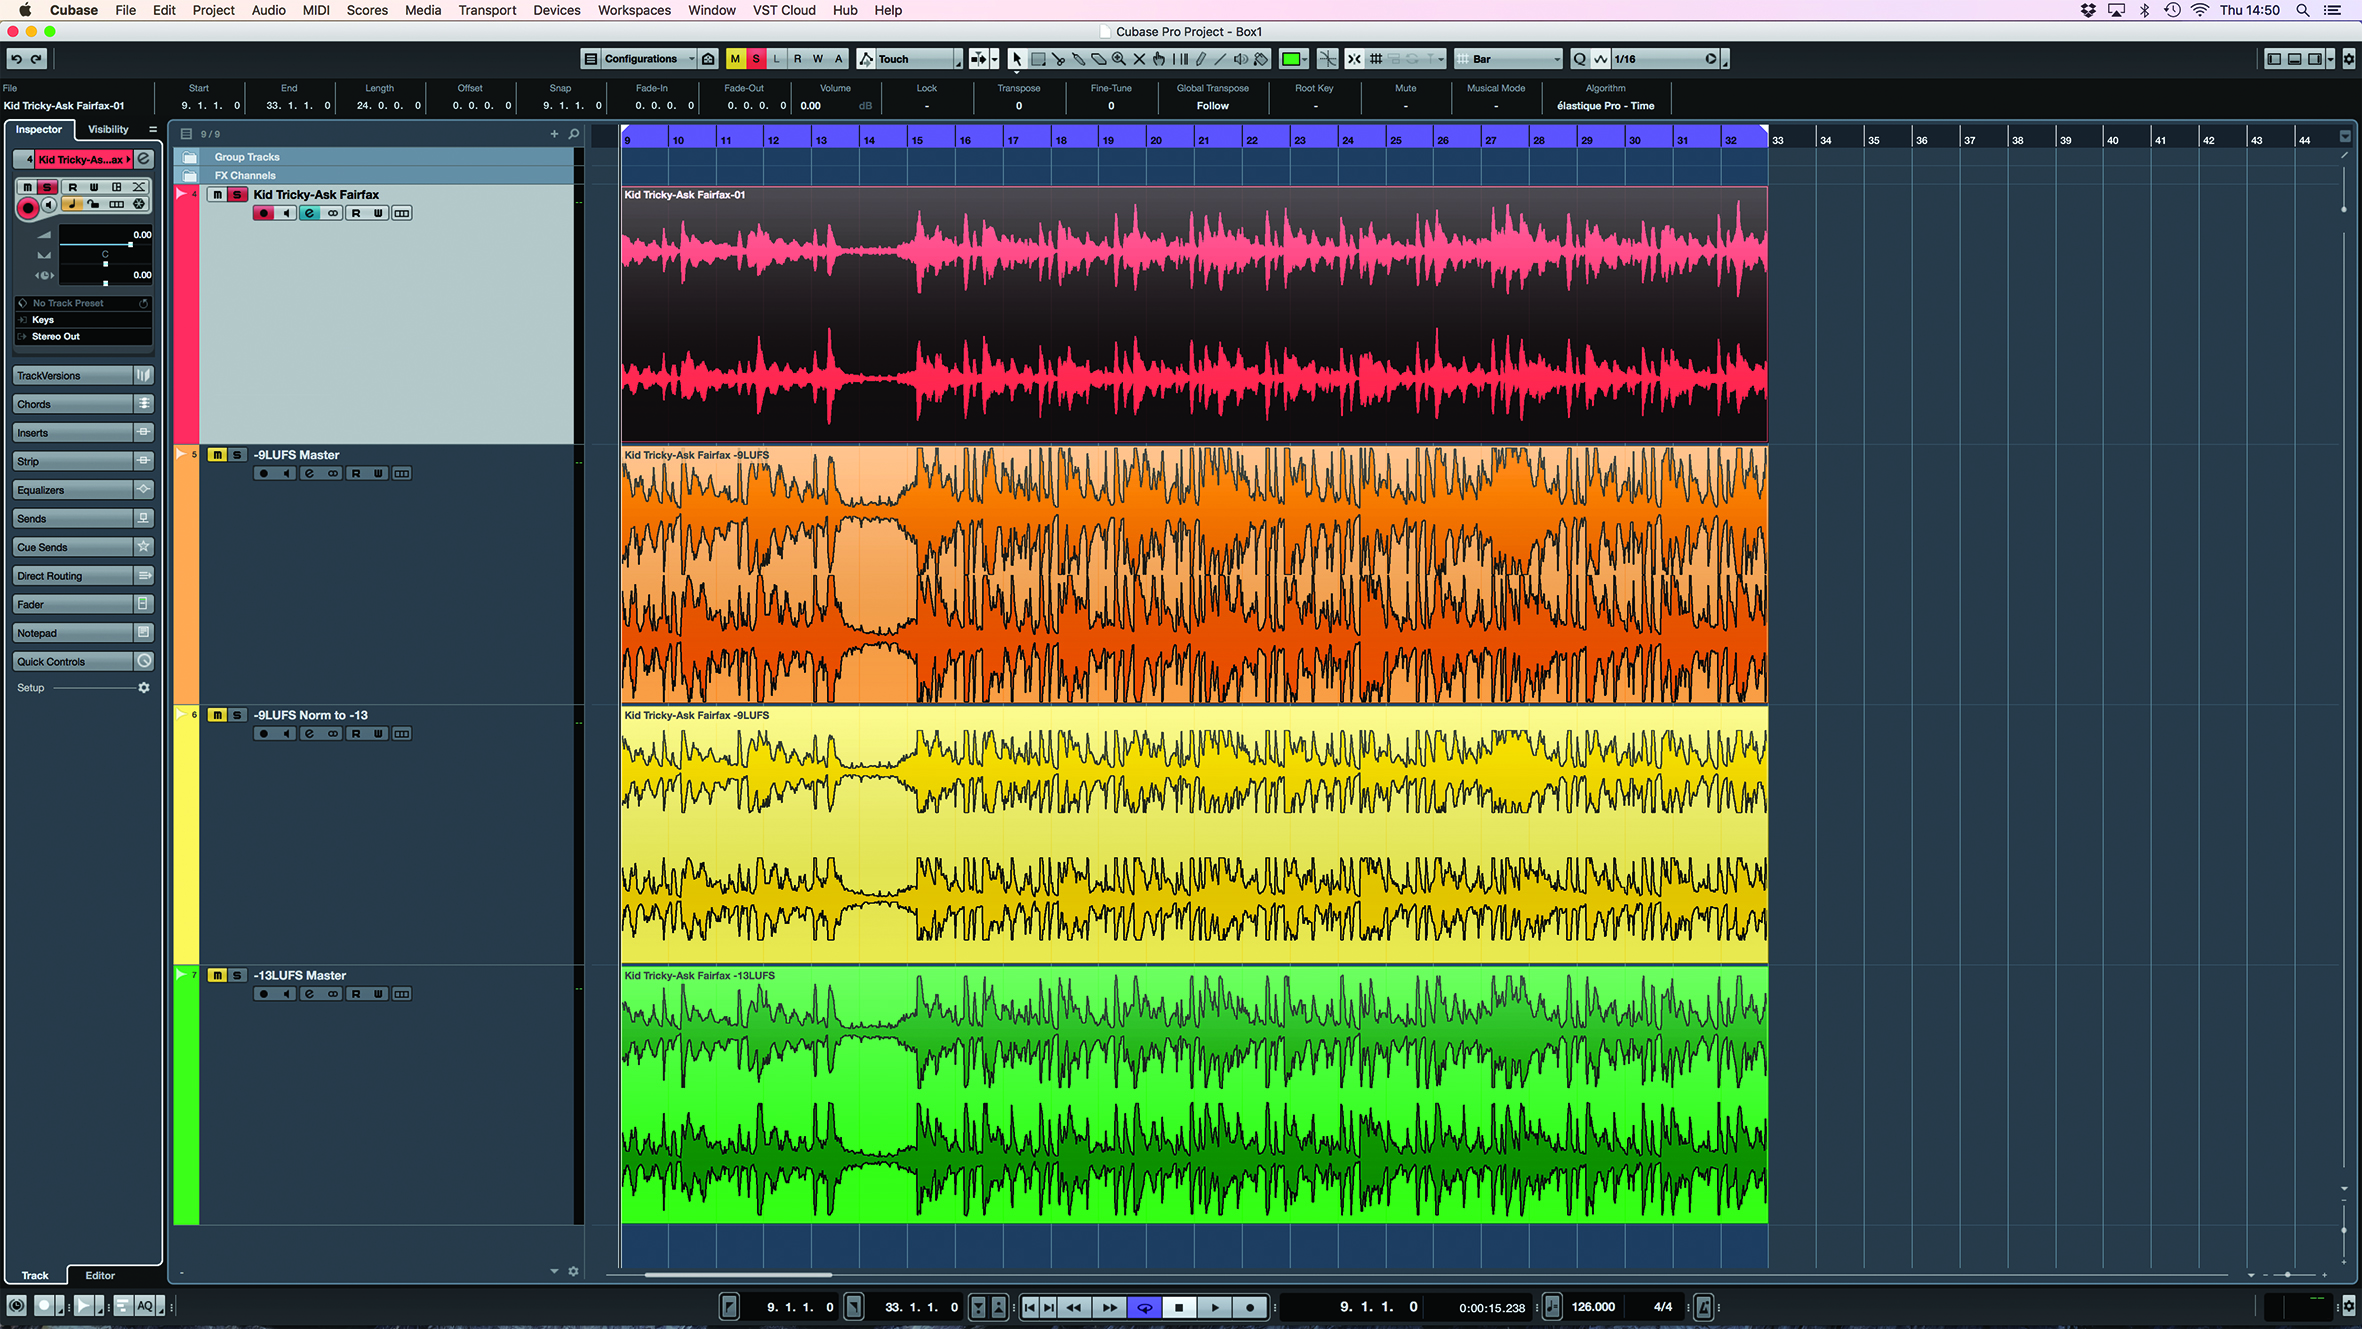
This also means if you master a track over the normalisation threshold of these services, you’re losing dynamics and punch in your tune. So, if you’re mastering for iTunes, master to -13LUFS for maximum playback quality. Here’s what happens if you master too loud. I used one of my chillout tracks Kid Tricky, as found on Spotify, for the example seen in the image above.
1. Original Source Track -20LUFS True Peak Max -4dBTP
2. Track mastered at -8LUFS
3.Track normalised to -13LUFS
4. Track mastered to -13LUFS
Look at the difference in quality between this and the -8LUFS track, which has been normalised. They sound the same in terms of loudness, but the -13LUFS master has better dynamics and more punch.