Get Hands-On With Mastering: Plug-In and Go! (Part 2)
Now that you’re armed with the basics, it’s finally time to open up your DAW and start putting what you’ve learnt into practice. Be sure to read up on the basics in part 1 before continuing. Let’s master! Okay, folks this is it, this is where we are actually going to do it. I’m so […]
Now that you’re armed with the basics, it’s finally time to open up your DAW and start putting what you’ve learnt into practice. Be sure to read up on the basics in part 1 before continuing.

Let’s master!
Okay, folks this is it, this is where we are actually going to do it. I’m so excited about this, I may just put the kettle on for a cuppa. For this article, we’re assuming that you’re working on a DAW, in the box. Each stage of processing is subtle (unless the recording needs desperate help): but, as a whole, the combined effect on the sound is noticeable.
Crop
Tidy up the start and end of your recording. Crop the intro, leaving a tiny fade in before the audio starts. Many records are cropped to the start of bar one, which is great for DJ mixing; however, some playback systems may glitch if the audio comes in on the first sample. Crop the end with a fade out.
Back in the days of big pro recording studios in the 70s and 80s, there was one guy whose job was to ride the master fader down on recordings – he had the steadiest fingers in the world!Next up, here’s a tried-and-tested plug-in chain for this tutorial. This is by no means the only way to organise mastering plug-ins, though… There are many ways of organising the processing chain.
Restoration > EQ > Imaging > Exciter > Reverb > Compression > Limit > Dither
Restoration
If you’ve been given a recording with noise, hum or clicks – for example, you may be restoring an old recording – then now is the time to use dedicated software, such as iZotope’s RX 6 Noise Reduction And Audio Repair plug-in pack. Don’t push the processing too hard, or the high frequencies will disappear.
“Find reflection points by getting a friend to put a mirror on the wall: where you see the speakers is where sound is reflected to you”
EQ
When an EQ is applied to a master, it affects everything. Boost the thump of a kick drum, and all bass frequencies will be boosted there, too – this then makes the high end sound quieter, as there can only be a certain amount of energy across the frequencies. Cut a harsh frequency at 4k, and it will cut the presence on all instruments.
Cutting the presence of a snare will also make the vocals sound dull. We’re looking to achieve a good tonal balance. Have a look at some of your trusted reference tunes on a spectrum analyser, and you’ll discover that a satisfying energy around the bass and a gradual high-frequency roll-off sounds pleasing to the ear.
Different genres have different tonal balances, so use the spectrum analyser for a little guidance – let your ears do the deciding.
Bass, bass – how low can you go?
Back in the 70s, the best home speakers produced frequencies down to about 80Hz, so most music was mixed and mastered with no energy below this point. Now, speakers can go down to eye-wobbling frequencies like 20Hz. But beware, if there‘s a lot of energy at these low frequencies, the mids and highs may be quiet on the master. This is especially apparent on a phone speaker, which may only produce frequencies from 500Hz up. You ain’t gonna hear an 808 sub-bass line on a phone, dear. This can be helped during mixing, by layering up another bass with a higher frequency component.
25-40Hz
Try putting a high-pass filter here, to get rid of rumbly sub noises. Be careful that the filter doesn’t add distortion to the kick fundamental (the lowest frequency in the sound) and 808 basslines.
50-80Hz
Bass Tighten up the bass by giving a boost to the thump of the kick in this range. This also carries the sub in the bassline, giving weight and depth. Essential for deep vibes in roots music.
90-200 Hz
Low Mids Gives richness, a low, warm, loving embrace – and adds punch to a snare. Too much, and the mix is boomy. Too little, and the mix is thin and weedy. The midrange frequencies 200Hz to 2kHz are the most important, as they carry the message of the track. The fundamental frequency of lead parts, such as vocal, guitar, brass and piano, are in this range. Try filtering out bass and treble, and the human brain will fill in the rest of the information. However, take out this midrange, and the sound is hollow and unintelligible.
200-500Hz
Mids The sonic solidness in lead instruments – if the mix is sounding muddy, back it off. Many speakers have a crossover point between the bass and tweeter speaker at this frequency.
500-1000Hz
High Mids The body of many instruments – too much makes the mix nasal and hollow.
Typical loudness levels
- -38 LUFS Cinema’s high dynamic range, which results in pleasant dialogue levels and very loud action scenes
- -19 LUFS Vinyl LP
- -16 LUFS iTunes Radio Sound Check auto level
- -15 LUFS Michael Jackson’s Don’t Stop ’Til You Get Enough
- -9 LUFS Mastering past this can sound distorted and fatiguing
- -7.2 LUFS A big American artist master that came into the studio recently
- -6 LUFS In-flight entertainment
The high frequencies…
Around 2Hz
Boost this for bite, edge, clarity and aggression. Harshness and vocal sibilance is around 2-4kHz: a balance is needed to give the mix presence, but not harshness, in this region.
5-10kHz High Treble
Boost for presence, brightness and openness. This frequency range can breathe life into a track. Too much will sound nasty and blow your tweeters.
12kHz Very High Treble
Boost for fairy dust and sparkles. Too much will sound synthetic and natural. We have the air of vocals, the sizzle of hi-hats, the brightness of strings and the biting presence of synths. Some sample collections I’ve bought recently have a ridiculous amount of energy at 18kHz plus, which is fatiguing and pointless. Use wisely.
The lower a Q factor on an EQ, the wider the frequency range that has been boosted or cut. Use a low Q to make gentle contouring changes to the sound. Use very high Qs to make surgical adjustments to the mix – if, for example, there’s too much low conga, vocal sibilance or annoying muddy room resonance in the sound.
To find annoying frequencies, use the highest Q and boost the EQ high to scan through all the frequencies. When the EQ starts resonating like hell and sounds terrible, you may have found a problem frequency that can then be notched out by a few dB. Do this at low speaker volumes, so you don’t take your ears off!
Regular EQ can add phase issues around the frequency affected, so try a linear-phase EQ plug-in that will give you phase-free EQing for your precious record. Some modelled and vintage EQs add sonic character to the sound, so try different types – even try chaining EQs, to get a signature sound.
Step-by-step: Mastering using built-in plug-ins
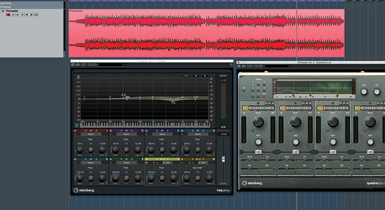
1. Mix down your tune with a maximum peak of -4dB. Use your plug-ins to remove noise or hum, if necessary. Add Fade In/Fade Out (see above).
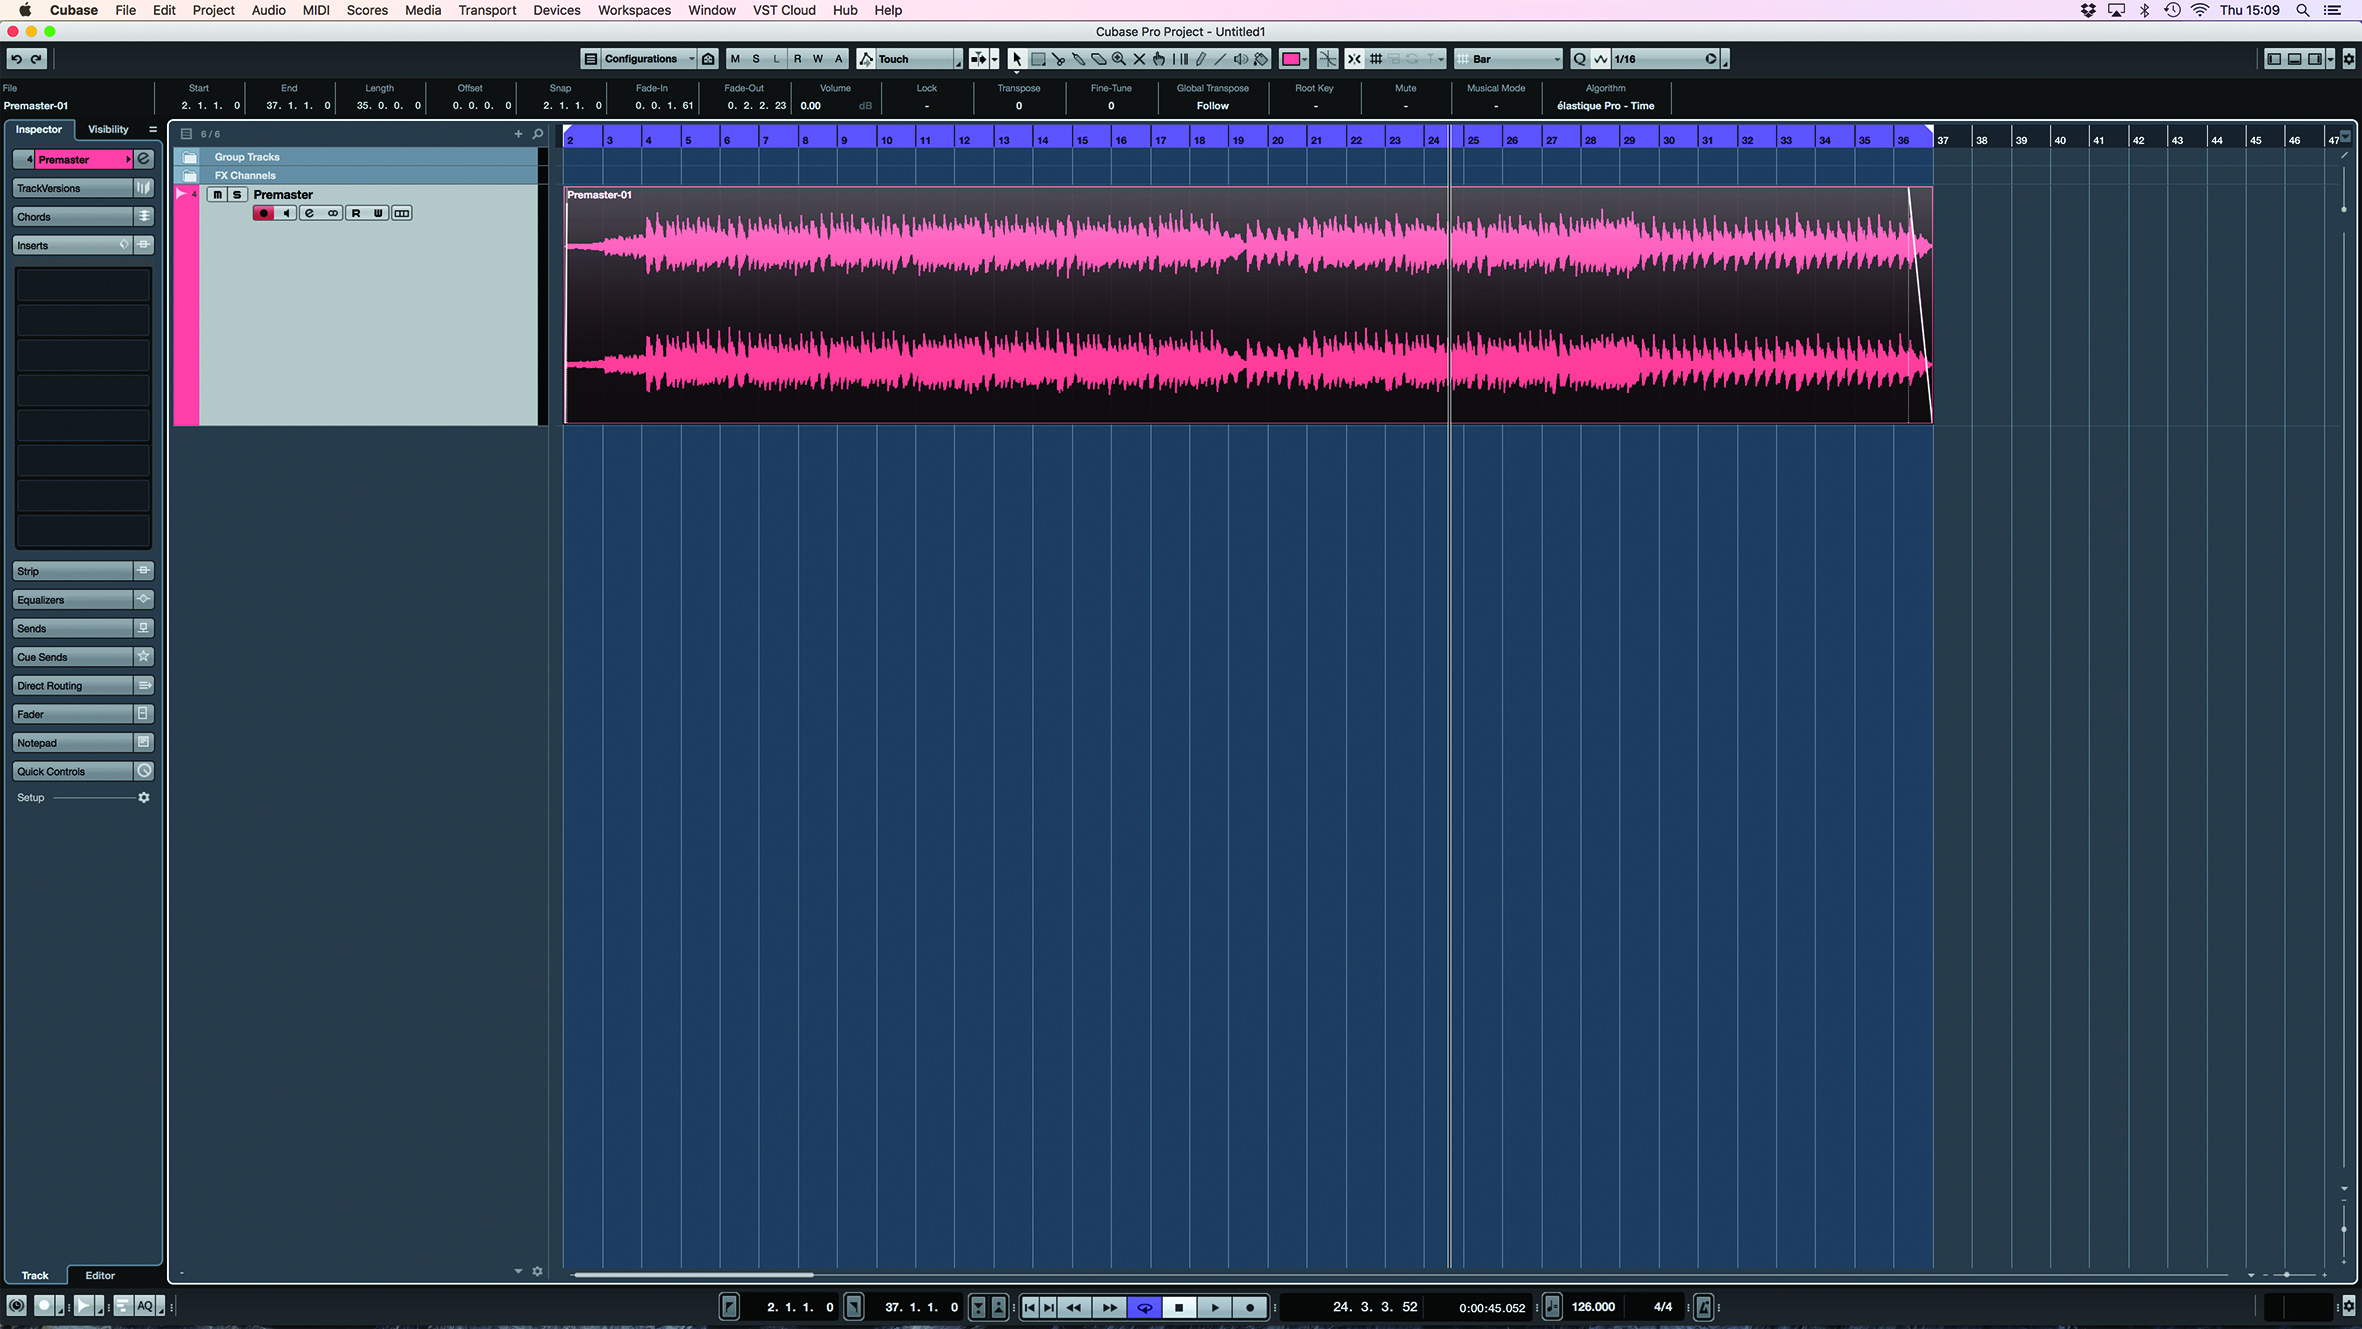
2. EQ – here, I’ve put a high-pass cut at 38Hz (EQ1); added some thump to the kick (EQ2); reduced the low mids slightly (EQ3); notched out an annoying guitar resonance (EQ4); added some presence (EQ5), and added some sizzle with a high-shelf EQ (EQ8).
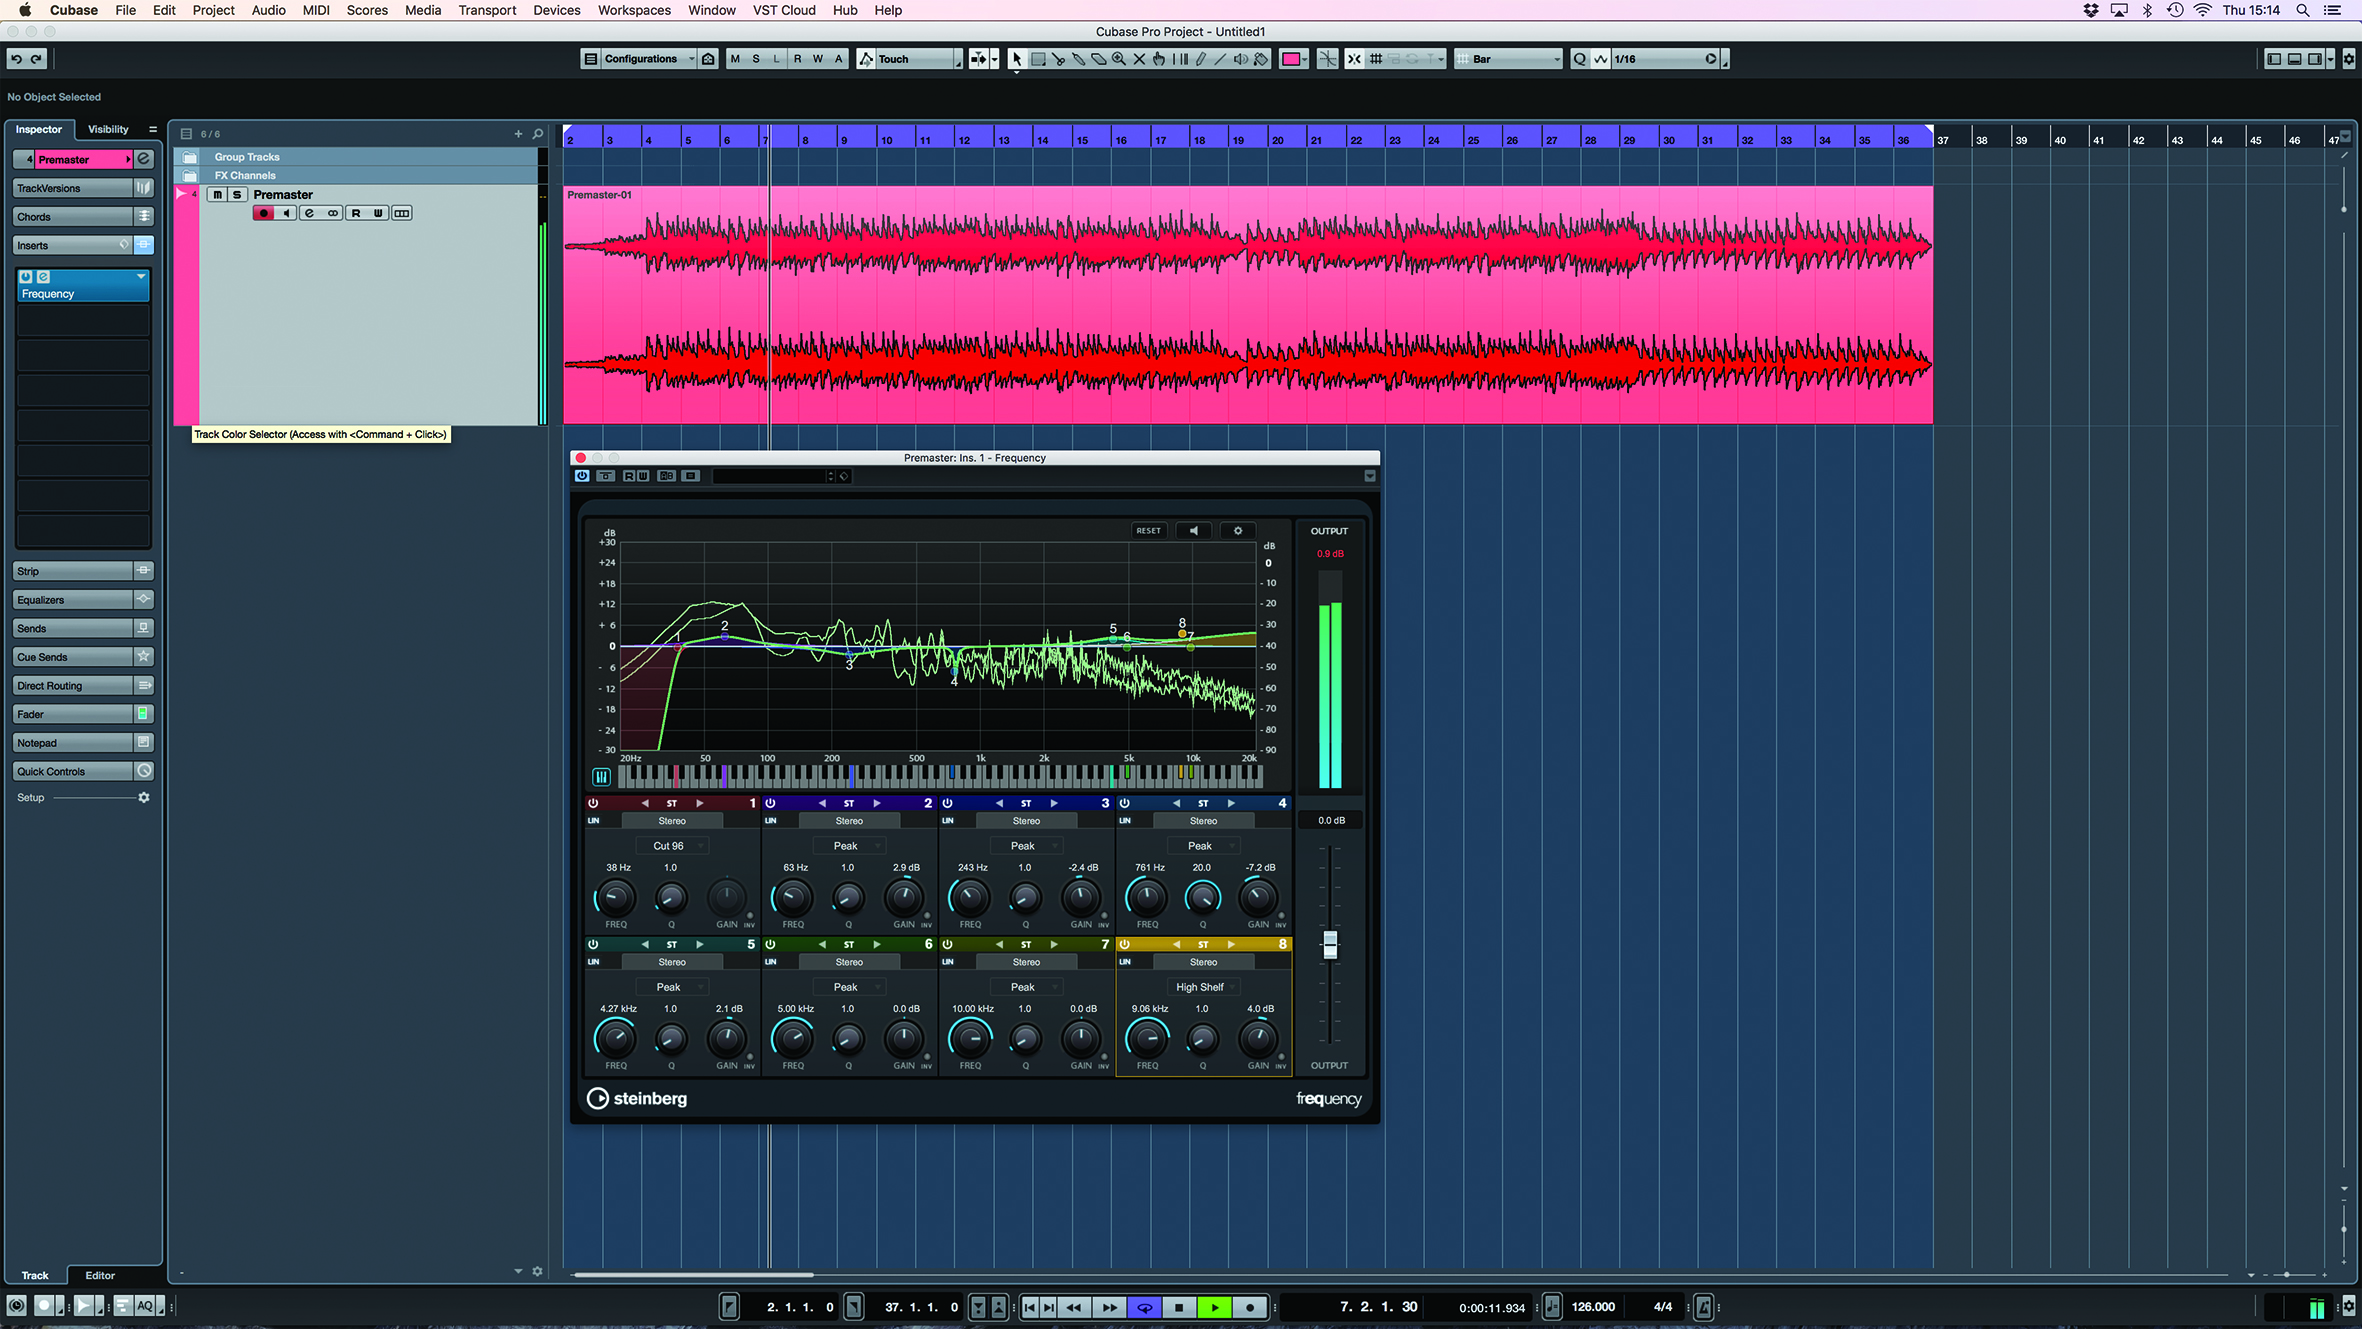
3. Imaging. I’m using Cubase’s Frequency EQ, in Mid/Side mode, to boost the mids upwards in stereo (EQ8), and then taking out some stereo harshness of the guitars at 2.95kHz (EQ7).
4. Exciter – I’ve used Cubase’s Quadrafuzz to add some very gentle tape saturation from 150Hz to 1.5Kz, and a touch more at 1.5kHz and up.
5. Add reverb, if needed. It’s not my cup of tea, so I’m leaving this dance anthem alone!
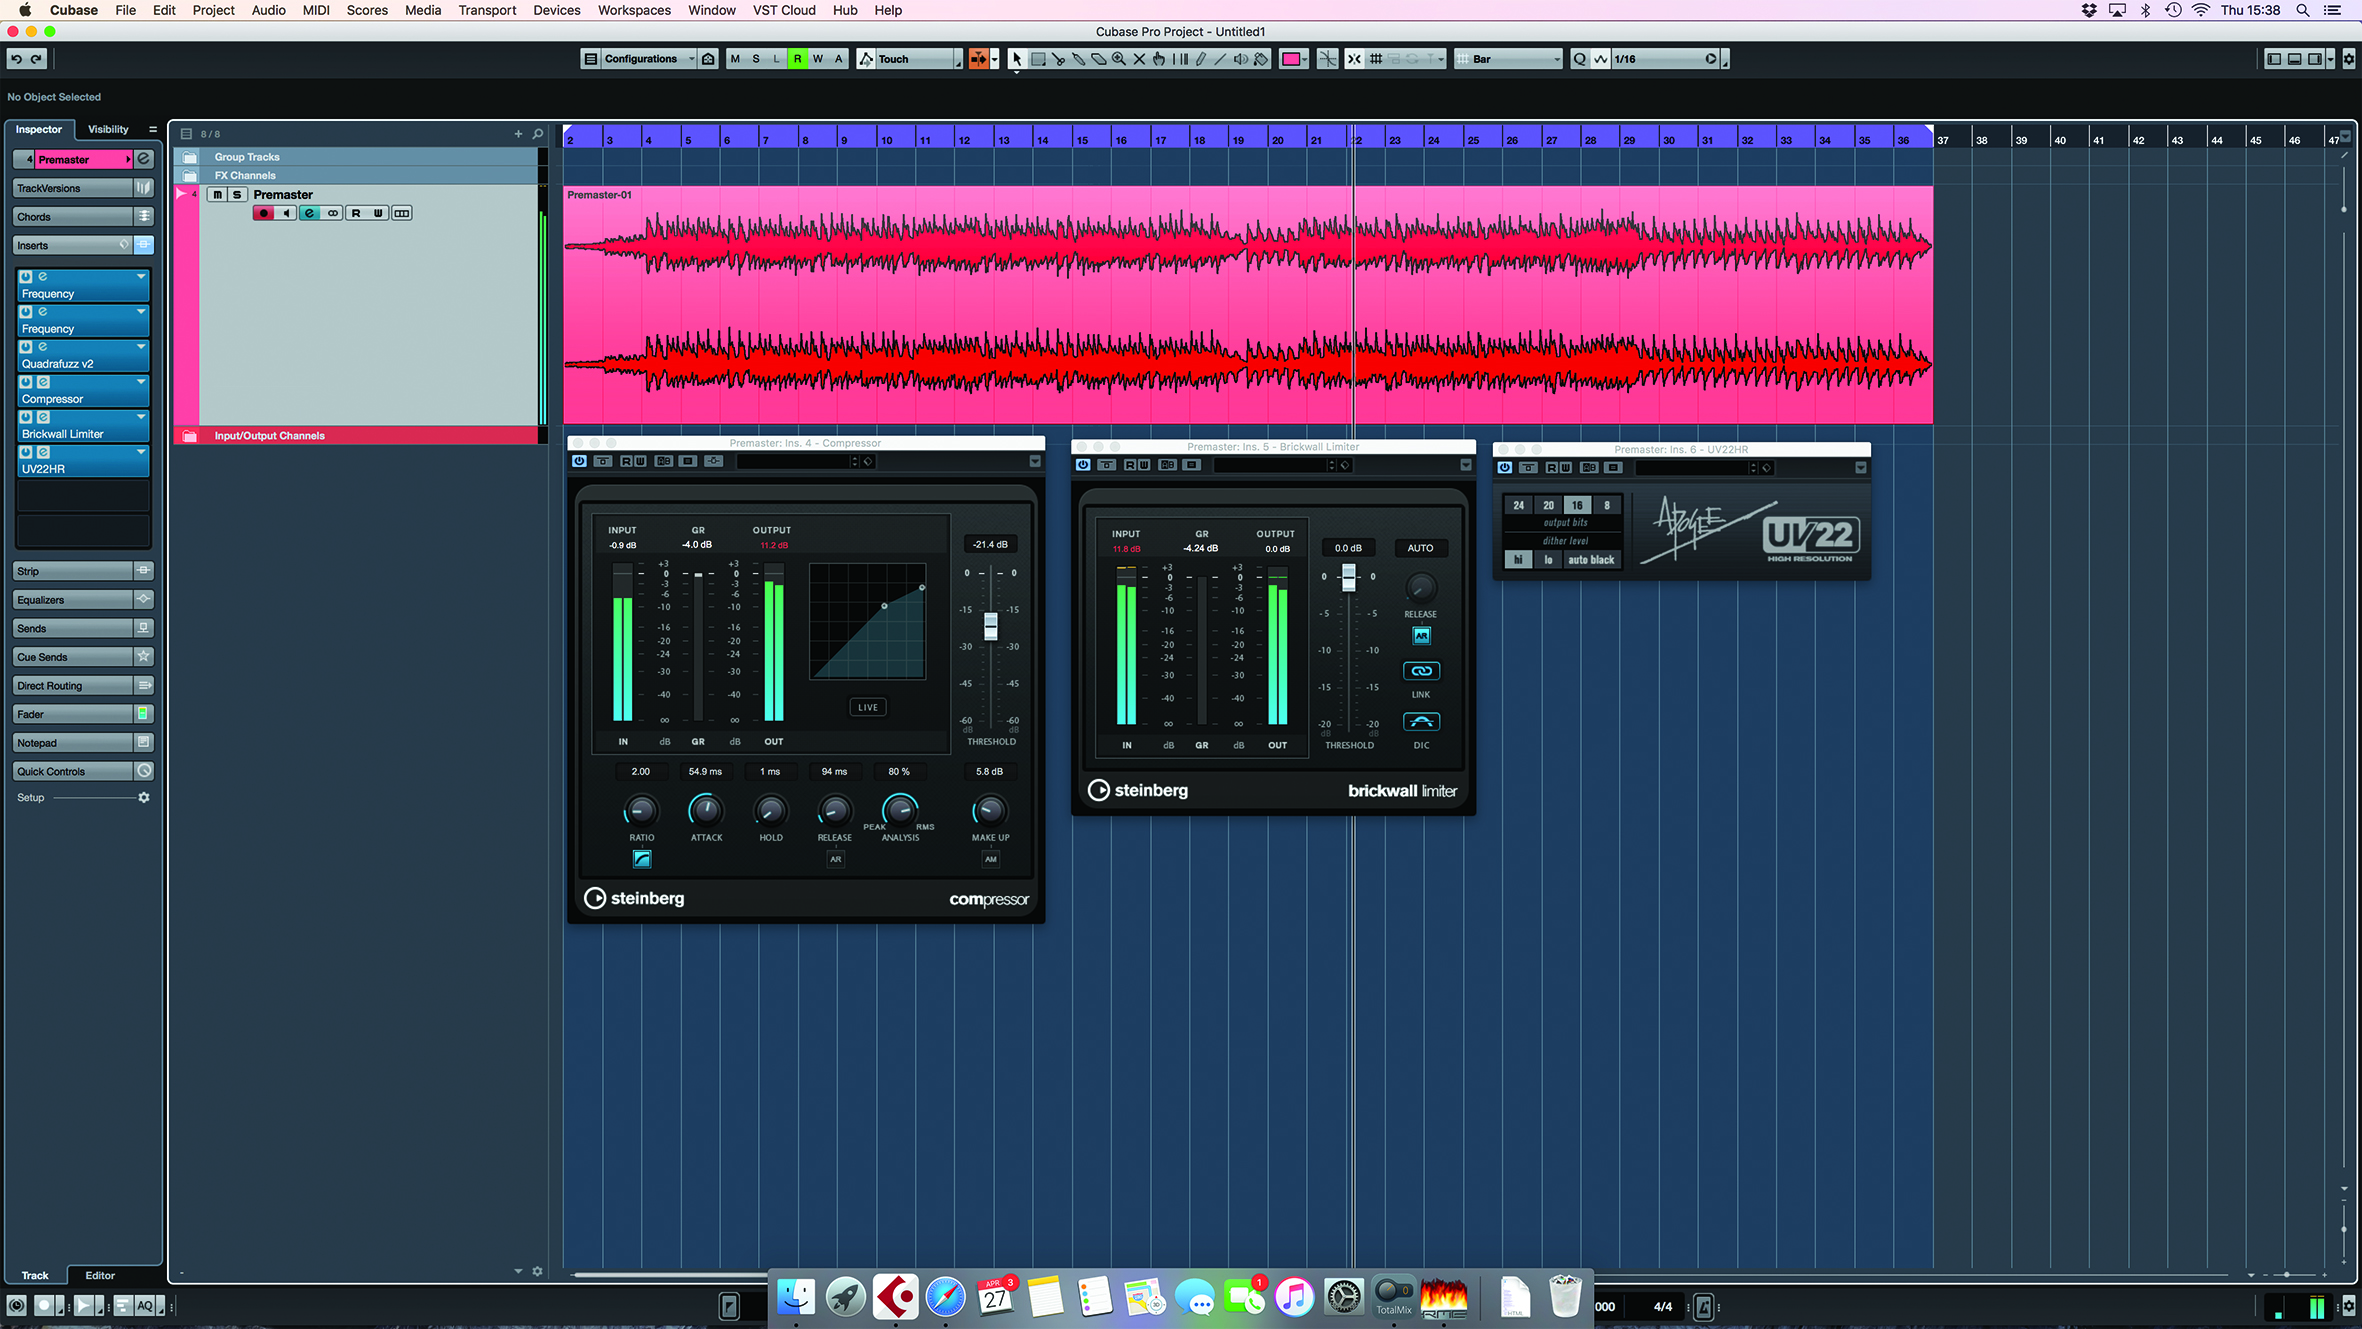
6. Compress – with a ratio of 1:2, I moved the Threshold down until I had about -4dB of gain reduction. I found that an attack of 55ms allowed the transient energy of the kick, hats and guitar through. I started off with a long release and shortened it, until I could feel the track pumping at an agreeable 94ms.
7. Limit/Dither – I increased the makeup gain on the compressor until I got about -4dB of reduction on the brick-wall limiter. Beyond this, the sound was becoming distorted. I then added the Dither plug-in, set to 16-bit.
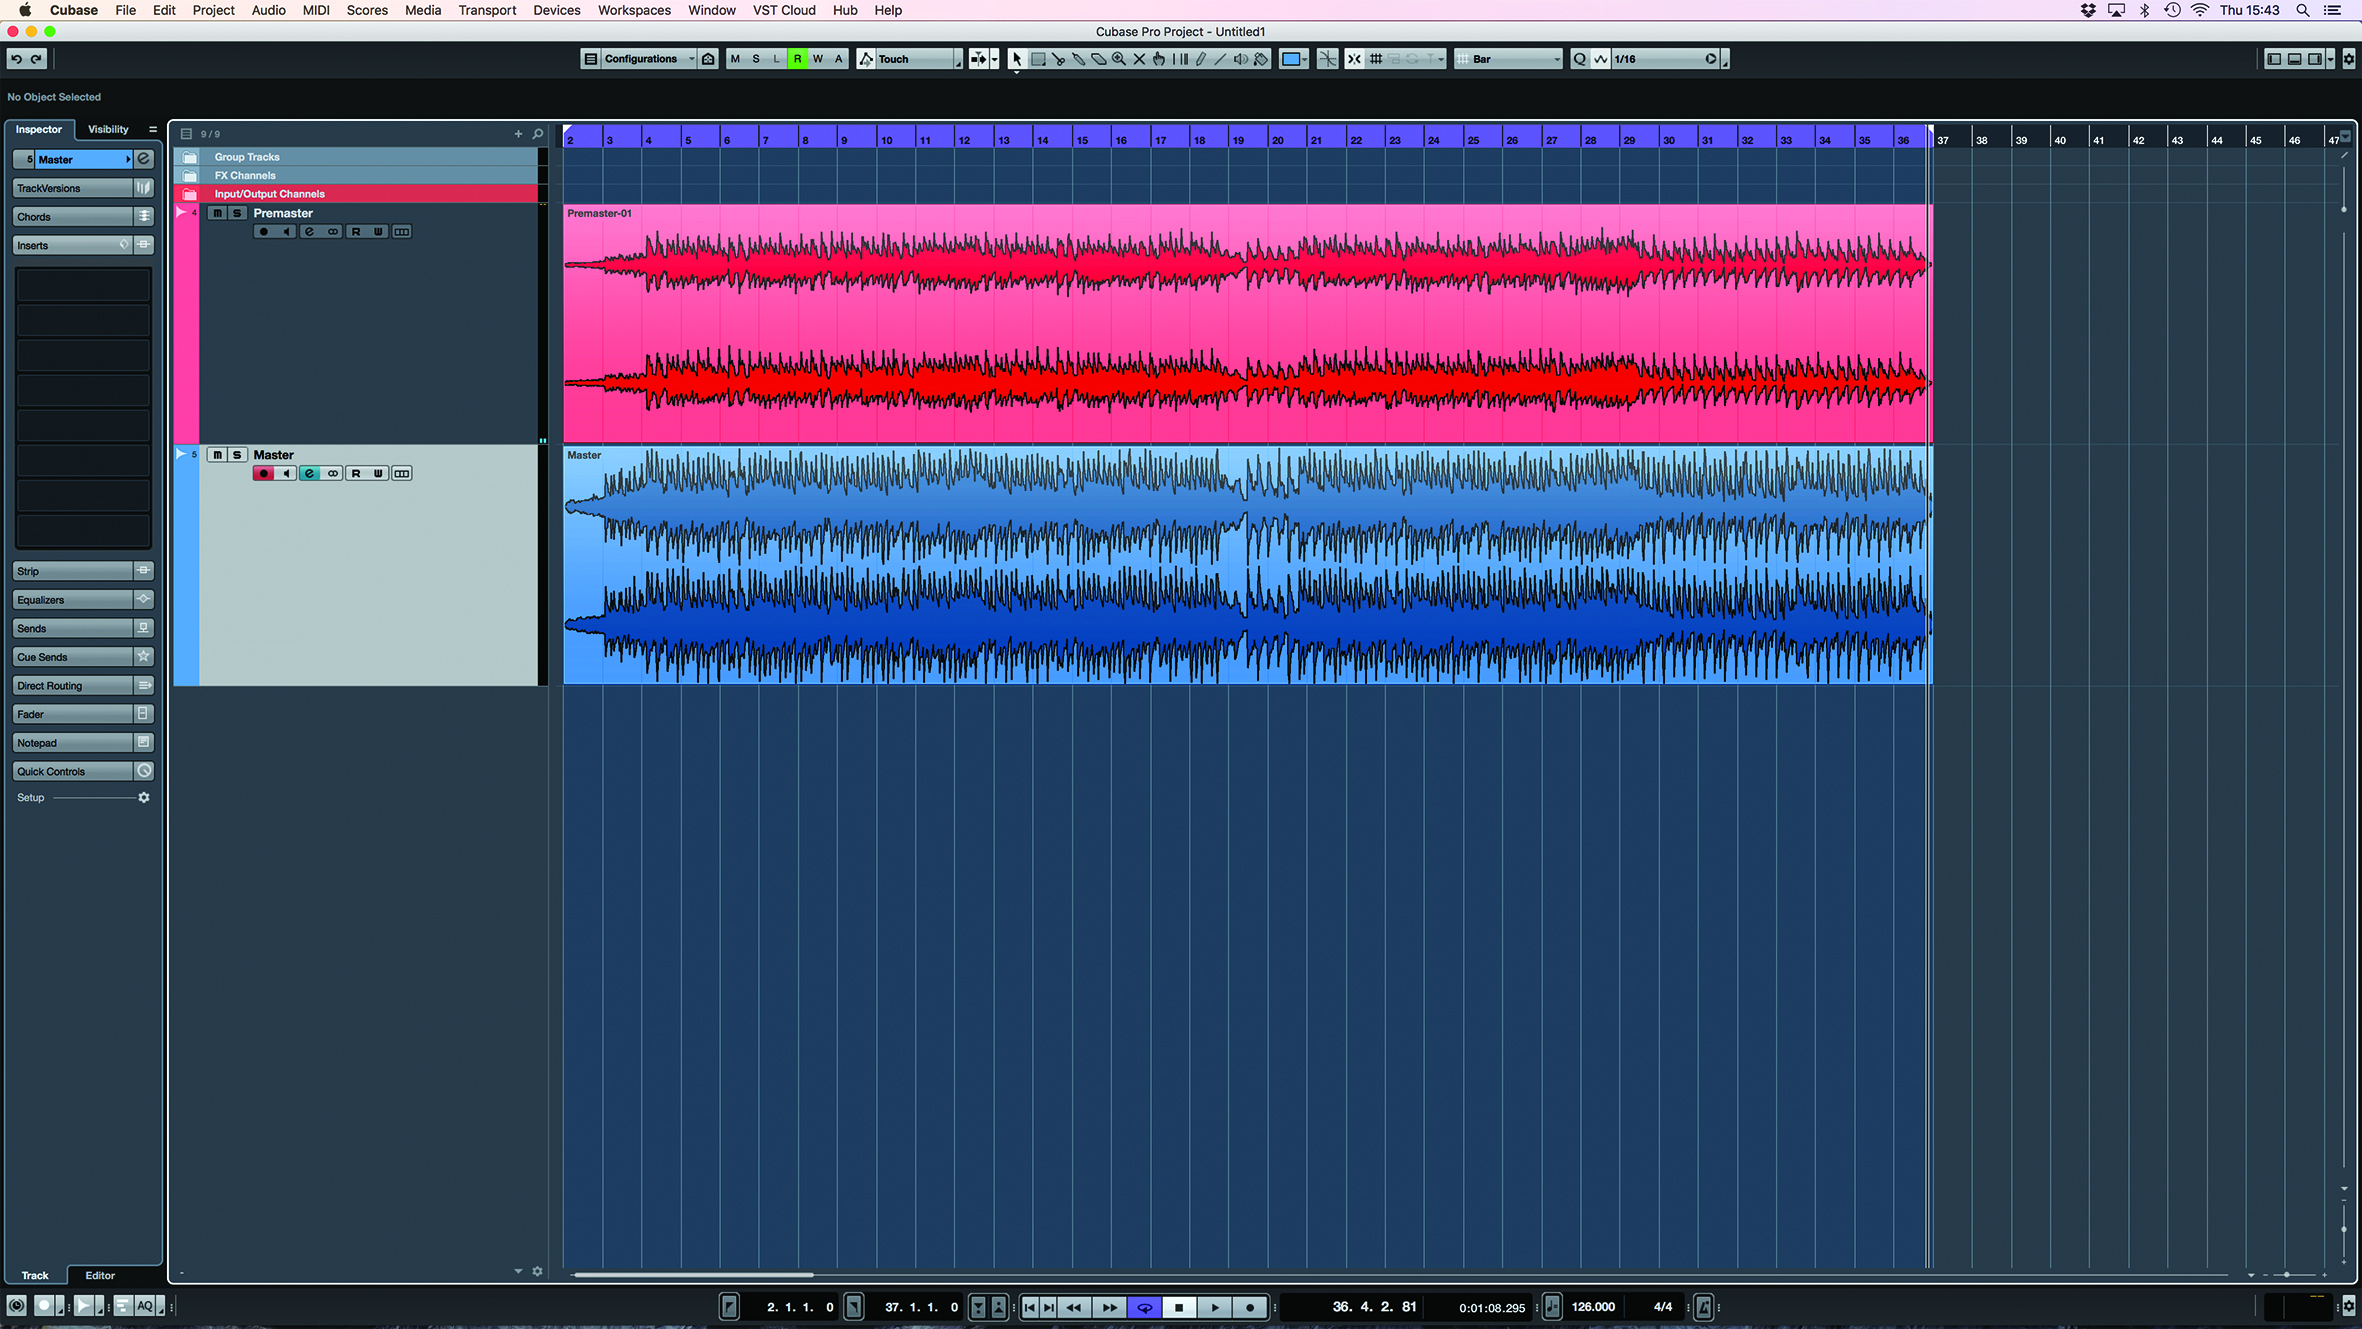
8. Here is my master, with a loudness of -10LUFS. I’m going to listen to this on a few systems and check that it is rockin’. Then I’m going to celebrate with a curry, a very hot one (not pictured).