How To Create A Dub Delay in your DAW
It’s a fairly straightforward process to get classic dub delay sounds in your DAW. Erin Barra shows you how… One of most compelling and characteristic elements to Dub music is the quintessential Dub Delay sound. Originally, these delays were created using analog tape machines and the hardware informed the sound in a big way. Tape […]
It’s a fairly straightforward process to get classic dub delay sounds in your DAW. Erin Barra shows you how…
One of most compelling and characteristic elements to Dub music is the quintessential Dub Delay sound. Originally, these delays were created using analog tape machines and the hardware informed the sound in a big way.
Tape generally adds a lot of compression and sound artefacts while at the same time losing some high end. Additionally, as the motors in the tape machines became worn they wouldn’t spin at a consistent speed, resulting in pitch and time variations and creating sort of warbly sound.
At the time there was no ‘sync’ button since there was no clock running, artists and engineers had to manually set the delay times by ear – meaning that they were never perfectly in sync with anything. Needless to say, Tape has a distinct sound that is still favoured by some.
This short tutorial will show you how to create a dub delay chain in your DAW, digitally recreating that analog tape sound with a number of software effects processors. All of these effects need be run in parallel, so first things first, set yourself up with an aux or return track to insert these effects onto. All of these effects will need to be set at 100% wet so you’re only hearing the fully processed signal output.
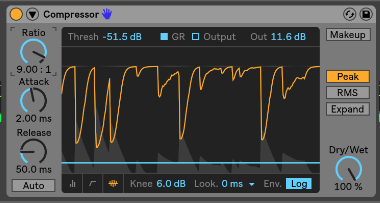
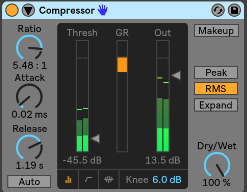
1) First up, we need heavy compression. Grab whatever compressor you’d like and make sure it’s set to reduce peaks as opposed to RMS (Root Mean Square). This first insert will help to smooth dynamics of the delay and also emulate the heavy compression of a tape machine. You need a high ratio and a low threshold so that everything gets a good dose of compression.
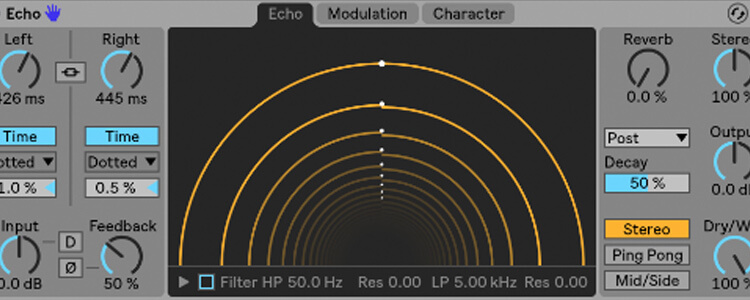
2) Next we’ll need a stereo delay device. Not all delays are created equal and some will have lots of bells and whistles while others only serve one or two purposes. If you have a Tape Delay, use it. You want to sync the rate of the delay to either ⅛ or ¼ notes, but since analog tape delay didn’t have a sync parameter, you’ll want to somehow get these rates slightly out of sync by either setting a m/s amount by hand or using a delay offset or groove parameter.

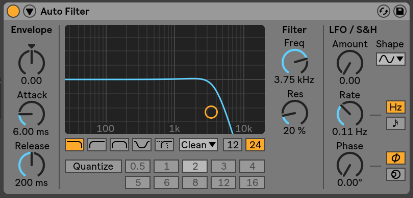
3) From there we’ll need the high cut to emulate the poor high frequency response of analog tape. Grab an EQ or single band filter and cut out some of that high end with a low pass filter. How much to cut is something you’ll have to play by ear and taste. By removing the high end you’re also carving out space for your dry signal which will help to send the delay more towards the back of your mix.
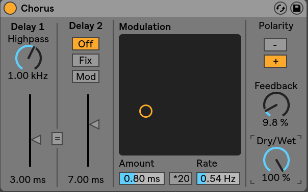
4) Then insert a Chorus effect to create the warble and pitch variations. Any chorus will do, but just like delays, some have lots of additional parameters to set, so make sure you have what you need and can control or attenuate the rest if need be. Again, this needs to be set by ear, but a moderate amount goes a long way.
5) Last up is another compressor, but this time set to RMS compression. RMS takes an average of the loudness and compresses accordingly, making things louder or softer, but at a slower rate since it’s calculating averages in real time. You’ll want to have a fast attack and a slow release setting so that things slowly move from louder to softer as the RMS is calculated.
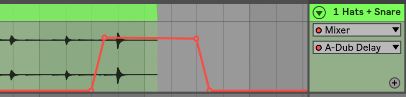
Now that we’ve got the chain created, the next order of business it to automate the amount of the send up when we want the delay to come in and then back down at the end of a delay phrase. Traditional dub music has lots of space which allows and calls for such a delay throw. When doing this, make sure you pick your moments and don’t overdo it with the dub delay. Here’s an audio file which caught the very end of this file where a dub delay throw is automated on a share and high-hat stem.
And there you have it – a nice digital dub delay right at your fingertips. After you’ve built yours, save it to your user library so you can pull it into subsequent sessions and impress your friends with your dub delay skills and knowledge!