Ableton Live Tutorial: Become a Power User Part 4 – Audio Recording and Editing in Live
Whether you intend to record a multi-mic’ed performance or just the odd found sound, you’ll need to understand how recording and editing works in Live. Liam O’Mullane explains… Since part one of this Become a Power User series, we’ve covered programming techniques, getting the most out of Push and composition and experimentation. But although we […]

Whether you intend to record a multi-mic’ed performance or just the odd found sound, you’ll need to understand how recording and editing works in Live. Liam O’Mullane explains…
Since part one of this Become a Power User series, we’ve covered programming techniques, getting the most out of Push and composition and experimentation. But although we covered the ins and outs of setting up low-latency performance in Live in part one, it’s not until now that we’ve focused specifically on the recording process itself.
Like many aspects of Live, there’s more than one way to skin a cat, and when it comes to recording audio, the main option is whether to record in Arrangement or Session View. The first two walkthroughs will guide you through both approaches, but like the different approaches to editing described in the third step-by-step, one size does not fit all. So take the techniques discussed onboard, but it’s only through repeated use that you’ll gain a personal context for their use. This time is needed to decide which approach best suits your own preferences for workflow and the tasks you will typically undertake. For instance, pitch-correction (covered in the third walkthrough) can be applied by using many of the excellent Warp modes available.
While these will allow you to preserve the timing of your recordings, a side effect can be that the sound quality is compromised as it stretches or condenses your audio to keep it in-time after re-pitching. You can minimise this by using different Warp modes on either a global or edit-by-edit basis as required, but the good, old-fashioned vari-speed approach can also come in handy when you want to completely avoid any time-stretch-based artefacts. But this isn’t artefact-free, either, as the sound will suffer from timing distortions as you alter pitch. So after hearing the differences between the two, you’ll have a better idea of which approach is the most appropriate for the task at hand.
Before hitting record, also make sure that you’re set up for the desired bit-depth and sample rate. Bit-depth dictates the available dynamic range in your recordings, with 24-bit being a typical choice. Sample rates represent the highest frequency limit (once halved) of your recordings, and there are all sorts of arguments as to which setting is best. In general, the higher the fidelity you want, the higher the sample rate needs to be. Orchestral recordings tend to be recorded at 88.2kHz or above. Most electronic music can be set to anywhere from 44.1kHz and above. Sample rate can be altered after opening Preferences from the Options/Live (PC/Mac) menu and selecting Audio from the left-hand tab. For bit-depth, click the Record Launch Warp tab.
Recording in Arrangement View

1: You can choose to record in both Session and Arrangement Views. This can be when Live is already in the middle of playback or you can use a pre-count to count in the start of both recording and playback at the same time. The metronome button has a menu for tailoring the duration of pre-count for the performers’ needs.
2: To capture a natural performance, it’s best not to focus on smaller sections and loop around them. Instead, use Live in a purely linear mode by making sure that Loop Switch is disabled, then record the performance from start to finish. This will result in a much more natural-sounding recording than working in small sections.
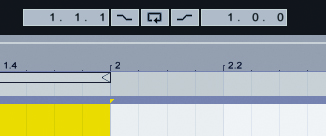
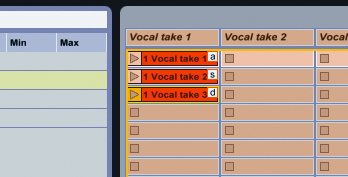
3: If you want to record multiple takes with this non-looping approach, it’s best to record each new take to a different track. You can then accurately split each part by disabling Snap To Grid from the Options menu and using Split from the Edit menu. The [0] key can be used to disable takes when determining the best ones.
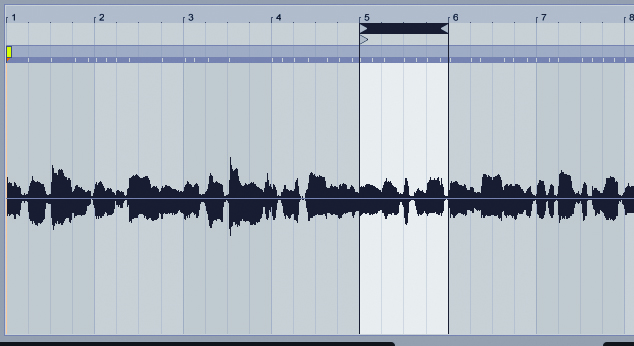
4: If a performer can’t quite nail a full take or did a good job but small sections might benefit from a re-take, you can use Live’s punch-in/-out function. Click and highlight the area to focus on and select Loop Selection to move the Loop Brace. Press the Punch-In/-Out Switch (in yellow) to map to the Loop Braces’ start and end points. Recording will now take place only between these two points.
5: Another approach is to track multiple recordings by cycling over a small section repeatedly. This is useful if you want to ad-lib and try out multiple different ideas. Start by looping around the area of focus, then record various times until you think there are sufficient decent parts to work with.
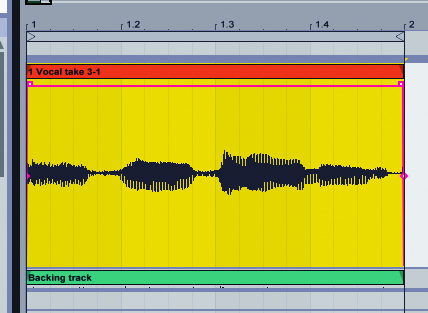
6: The audio clip that you’ve recorded will have an internal Loop Brace that’s the length of your clip. To audition the other takes, simply move the Loop Brace around to change the content of the clip. This avoids the alternative, lengthy approach of moving and extending the clip to gain access to the other takes.
Recording in Session View

1: Session View can be useful for Arrangement View-like cycle recording, except that clips are recorded to separate slots, which keeps things easier to deal with visually. If you intend to work in a linear way you can simply hit record in an empty clip slot and record continuously, then drag the file into Arrangement View for editing.
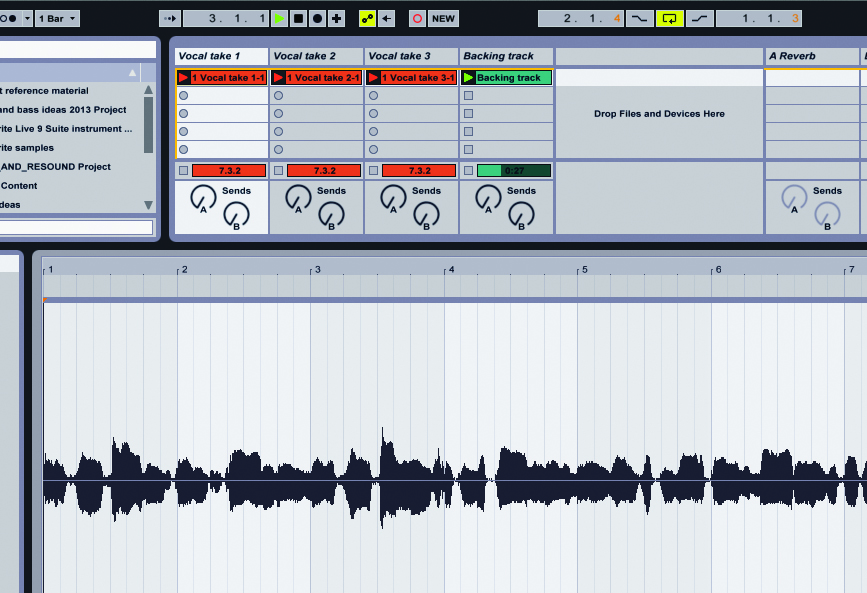
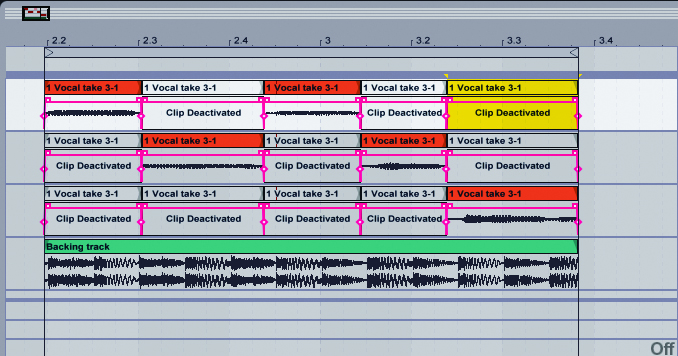
2: Multiple takes can be recorded separately by creating multiple tracks with their Arm buttons enabled. Then, as long as Start Recording on Scene Launch is enabled from the Preferences menu, you just trigger a scene to start playback and recording of your multiple takes. Alter each clip’s Loop Brace position as in Step 6 of the previous walkthrough so that they represent each take.
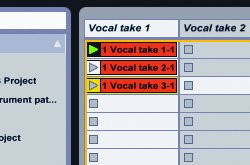
3: Now that you have your recordings, you can either drag them into Arrangement View for editing, or use an exclusive method within Session View. This technique is much more hands-on and less graphically-based. Once you’ve set up your Loop Braces to represent each take, drag the recordings to one track so you can play back only one take at a time.
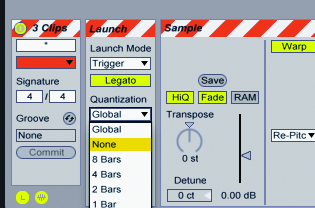
4: Highlighting your recordings, open the Launch Box, enable Legato mode and set Quantization to none. Legato allows you to move from playing one clip to another without losing the playback position. This lets you jump between one take and the other like a manual edit. The lack of Quantization means launching of clips will be immediate.
5: Next, assign computer keys or MIDI notes to each clip using either Key Map mode or MIDI Map mode from the top right of the screen. Now you can launch the takes with your fingers and jam out potential edits of the recordings. We find that this helps you listen to how the edits alter the performance, and you can practice until you think it sounds right.

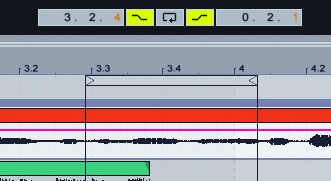
6: When you’re ready to commit your compiling to Live, hit the Arrangement Record Button to capture your performance in Arrangement View. From here you can fine-tune and edit between parts. Drag the takes back to Session View if necessary after consolidating it to a new audio file via the Edit menu.
Editing Techniques
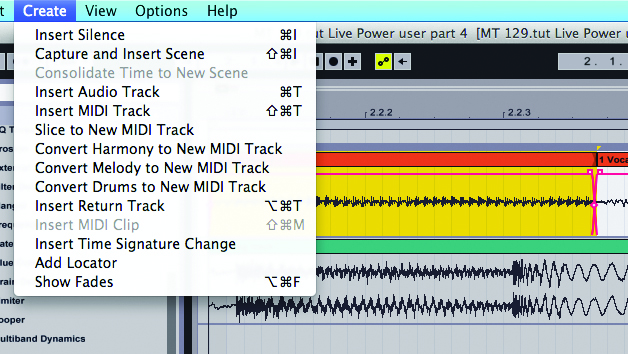
1: There are several key tools you’ll need to work with when editing a performance. If you’ve already comped from various takes you’ll have multiple clips sequenced one after another. Live will automatically smooth-out the edits you’ve made with a crossfade. To view and edit these, select Show Fades from the Create menu. Fade-ins/-outs can also be controlled in this way.
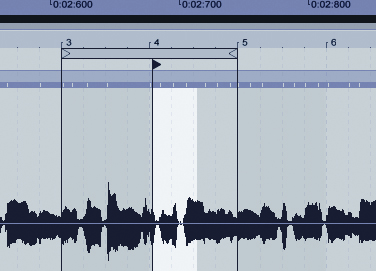
2: When trying to improve the timing of smaller edits, rather than trying to move the clips, move their content instead – just grab the Start Marker in the Sample Editor window to move the content and disable Snap To Grid for more accuracy. Re-size the clip to avoid abruptly chopping off the sound’s start or end points.

3: Disabling Warp mode from the Sample View allows you to re-pitch your audio clips for correction purposes using vari-speed. This means that the audio’s duration will expand or contract as you go down or up in pitch respectively. Use the Transpose and Detune amounts to correct your audio’s pitch.
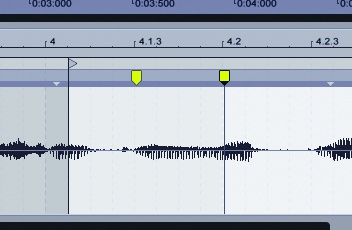
4: Live’s Warp mode can be used when you want to edit the timing within an audio clip but leave the pitch information intact. Pseudo Warp Markers will appear above the waveform in the Sample Editor. These can be double-clicked and dragged to condense or expand the clip’s content.
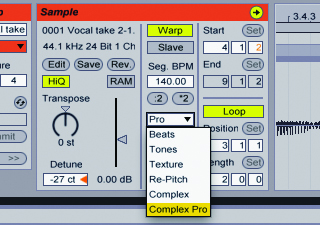
5: Like tuning a non-warped clip, Transpose and Detune can be used with Warp mode enabled as long as it’s set to anything but Re-Pitch mode. Finer tuning through Detune is best for minor corrections, but this can have only a static setting per clip, so Split each area to be corrected and set the Detune on a part-by-part basis.
6: If you plan on warping a multi-audio recording like drum mics or various instruments from a live performance, first ensure that all audio to be edited is the same length (Consolidate all pieces to a new length from the Edit menu if needed). Highlight the parts, edit one clip’s Warp Markers and the others will follow. The striped pattern across the top of the clip confirms you are in a grouped Warp mode.