Logic Tutorial: Granular Synthesis With Alchemy
Delving deep into Alchemy’s granular synthesis engine can yield some unique-sounding textures. Mark Cousins unlocks the power of the grain. Programming your own sounds on Alchemy is a rewarding process, with a wealth of source options, modulation routings, filter types, FX modules and so on, all to be explored. Some of Alchemy’s more unique sonic […]
Delving deep into Alchemy’s granular synthesis engine can yield some unique-sounding textures. Mark Cousins unlocks the power of the grain.

Programming your own sounds on Alchemy is a rewarding process, with a wealth of source options, modulation routings, filter types, FX modules and so on, all to be explored. Some of Alchemy’s more unique sonic traits are born from its ability to work with sample-based sources, using tools like additive, spectral and granular synthesis.
For those that haven’t explored these sound design techniques, it can be little overwhelming to know where to begin, both from a creative standpoint, but also in relation to the range of new parameters – like Grain Density, RTime and so on – that you’ll start to encounter.
In this workshop, therefore, we are going to take a closer look at one of Alchemy’s advanced sound design engines – the Granular module. As well as understanding the basics of granular synthesis, we’ll also explore some practical applications of the technology, as well as how it integrates with Alchemy’s more traditional synthesis tools, like filters, step sequencers and LFOs.
Grain Store
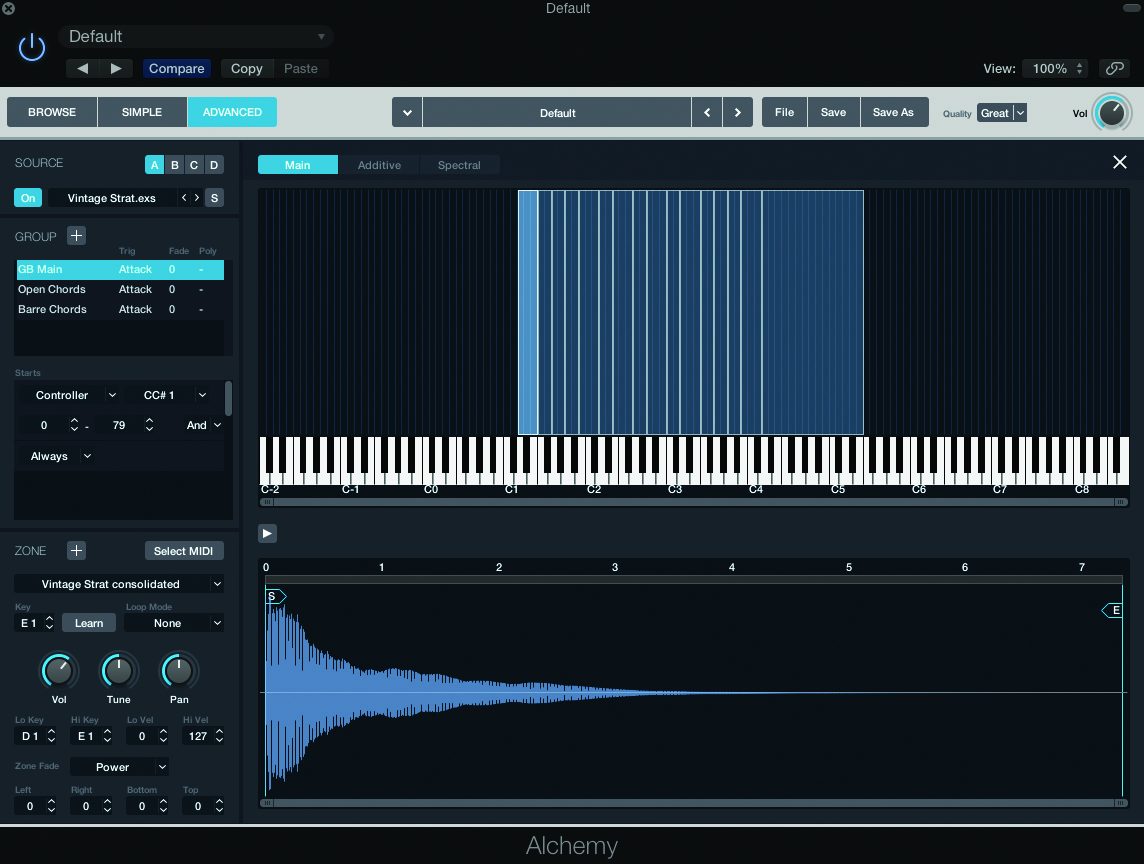
As with the Additive, Spectral and Formant modules, Alchemy’s Granular engine is designed to work with sample-based sources. To begin a granular patch in Alchemy, therefore, you’ll need to import an audio file into the corresponding Source (A, B, C or D). You can access the browser via the drop-down menu under the Source selection, either loading WAV files from Alchemy’s own sound library (many of which are designed to suit granular applications) or from a source of your own choosing, simply by dragging-and-dropping audio files into the Drop Zone.
Before you import the sample, though, you need to choose which Analysis mode you intend to work with, which, in turn, relates to your choice of sound engine. In the case of granular synthesis, we can either pick the Sampler or Granular Analysis Mode (found in the bottom left-hand corner of the interface) before we press the Import button. In effect, the two modes are interchangeable, so that we can freely move between conventional sample-based playback and that of granular synthesis.
The reasons for choosing either the Granular engine or conventional sample-based playback are apparent when you move between the two modes. With sample-based playback, the pitch and the duration of the sample are interlinked – in other words, as we raise the pitch, the duration becomes shorter and vice versa.
Granular, on the other hand, uses a series of sound grains (short looped portions of the audio file, in other words) to build the output, ultimately leading to pitch and duration of the sound being completely independent of one another.
Two of the most important parameters for a Granular source are Position and Speed. Speed, of course, can be freely changed without any affect on pitch, even going to an extreme where the sound appears ‘frozen’ in time.

In the case of Speed being at its slowest setting, Position then becomes a means of stepping through the sample data, much in the same way you might step through a wavetable. Add modulation to the Position control – either in the form of an LFO, envelope generator or step sequencer – and the wavetable-like qualities are complete, creating shimmering ‘granular’ pads, for example, or radical timbral changes with an LFO set to a sample-and-hold waveshape.
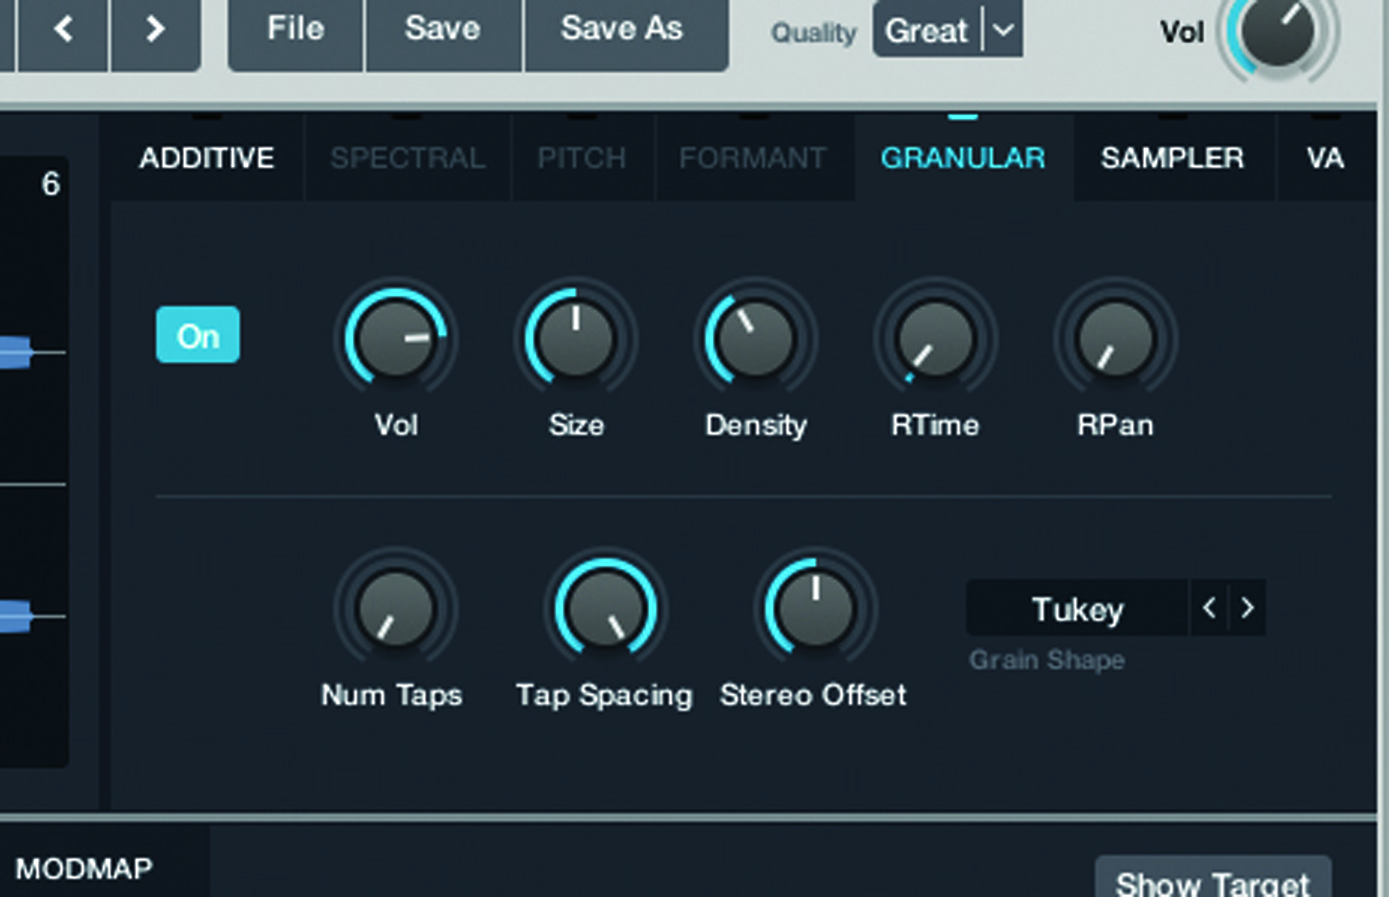
To better understand the sound of granular synthesis, it’s well worth adjusting some of the grain parameters to hear the process in action. For example, Density and Grain Size are two fundamentally important parameters in the overall granular effect.
To hear a single grain, reduce the Density to its lowest setting and then adjust the Size parameter. With settings around 140-230ms, you’ll hear an effect similar to an audio gate being opened and closed, playing back short snippets of audio based on the Speed and Position parameters. As you move through the audio file, therefore, the grain ‘window’ changes, almost like a series of sonic snapshots.
Rather than using just a single grain, most granular sounds use a number of simultaneous grains to produce a smooth and continuous output. Even so, you’ll want to trade-off the Grain Density and Size to get the results you’re after. A more ‘textural’ application of granular synthesis (maybe using a noisy, almost percussive sound source) might favour low-density settings and a relatively large grain size. If you’re interested in smooth granular pads – where the sounds morphs between different harmonic states – then you’ll want to increase the grain density and adjust the size to taste.
Once you understand the mechanics behind granular synthesis, the musical applications soon start to become apparent. Ideally, the best audio files for granular synthesis involve a sound that clearly changes over time, rather than sounding relatively static. As one of the examples illustrates in the walkthrough, you can achieve some interesting results using synth sweeps, creating granular twists on many classic subtractive sounds. You can also get some great results using music phrases as granular sources, especially ethnic instruments, which can have erratic or unusual timbral changes over their duration.
Once you’ve set up the basics of your granular texture, it’s then a case of using traditional subtractive tools to enhance the effect you’re trying to achieve – whether it’s adding animation to the grain movement using LFOs and Envelopes, or using signal processing tools like filters to accentuate the timbral colour you’re after.
For example, if you want a warmer grain sound with some of the edges smoothed off, pick a low-pass filter, or if you want to accentuate the texture of the grains, try using a high-pass filter. Ultimately, the more you play with granular synthesis, the more you’ll appreciate the extra set of tonal colours it delivers.
Focus On EXS24 Import
For those that feel restricted by the synthesis possibilities offered by the EXS24, it’s reassuring to note that Alchemy features an EXS24 import option. You can access the EXS24 import in the same way that you import conventional audio files.
Simply browse the corresponding EXS24 instrument, and press the Import button. As with audio files, you’ll want to select the correct analysis method, either using the Sampler option; if you largely interested in combing the samples with VA waveforms and filters, or the Granular, Additive or Spectral modules; if you want you want to be more sonically creative.
Note that the importing process isn’t 100% accurate to the original instrument, as Alchemy needs to consolidate velocity layers and so on. For simple instruments, though, you should find the import faithful to original mapping.
Step by Step – Alchemy Granular Synthesis
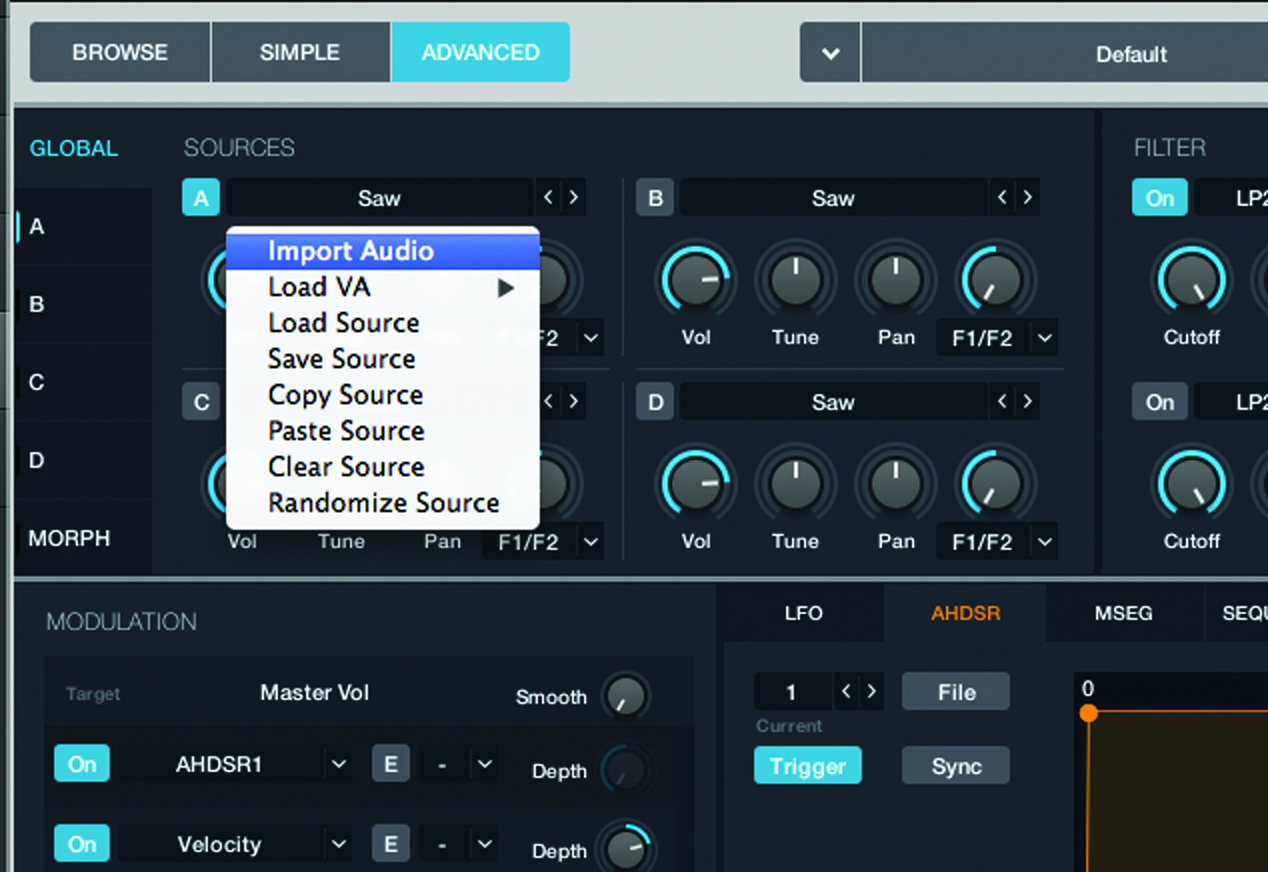
1: Start from an initialized patch (File>Clear, from Alchemy’s own internal menu). Go to the Advanced tab and pick Import Audio from the drop-down menu that accompanies the Source selection, which will currently be in its default Saw setting.
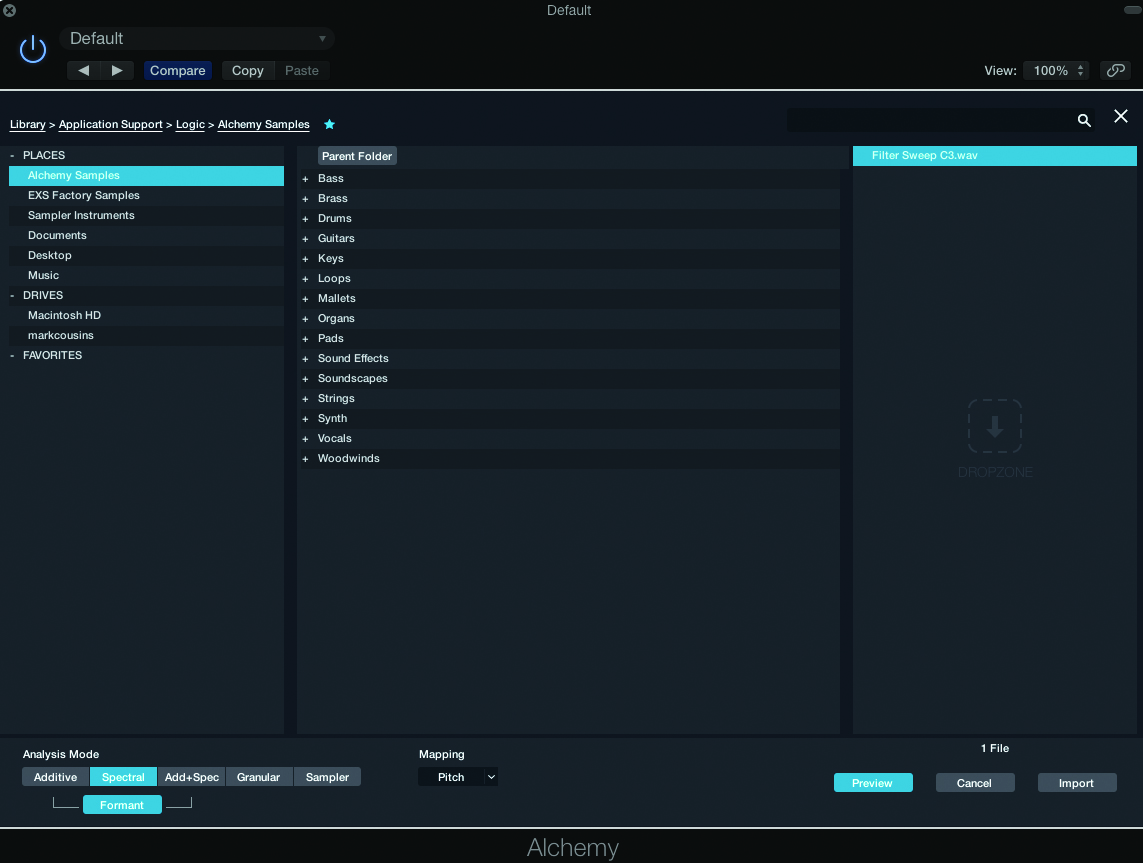
2: You can important a range of sample material into Alchemy, including its a diverse collection of sample data. We’re pulling the Filter Sweep C3 (in our Logic project) file over to the Dropzone, selecting Sample as the Analysis Mode and pressing Import.
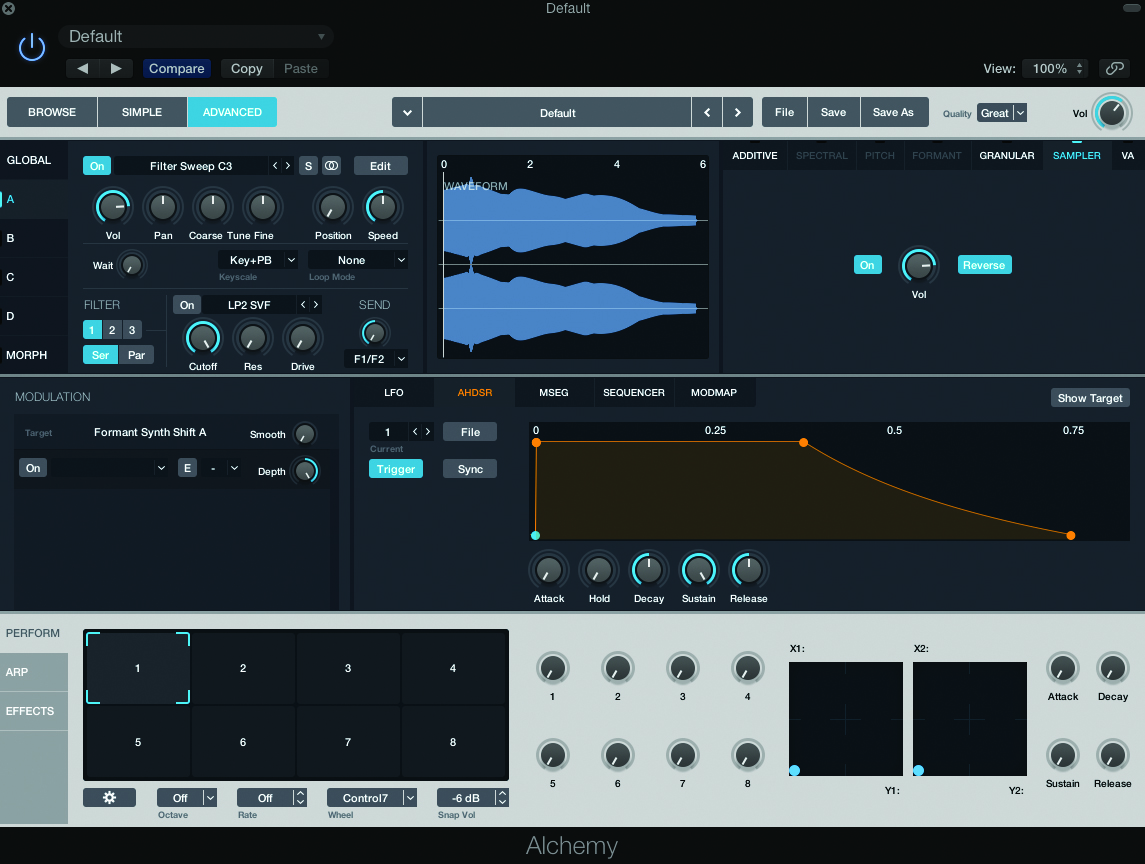
3: The filter sweep has been imported as a conventional sample, with just a Reverse control and Volume parameter. Playing the sample up and down the keyboard results in the playback being shorted and lengthened accordingly, as well as changing in pitch.
4: Now move over to the Granular tab and activate the Granular mode. With Granular active, Alchemy plays the audio file as a series of Grains. Notice now that the duration of the filter sweep is the same wherever you play on the keyboard.
5: With the sweep held in its Granular form, we gain new flexibility over the playback of the sample data. Reducing speed slows the progression through the sweep, stepping through the grains slower without affecting the pitch of the playback.
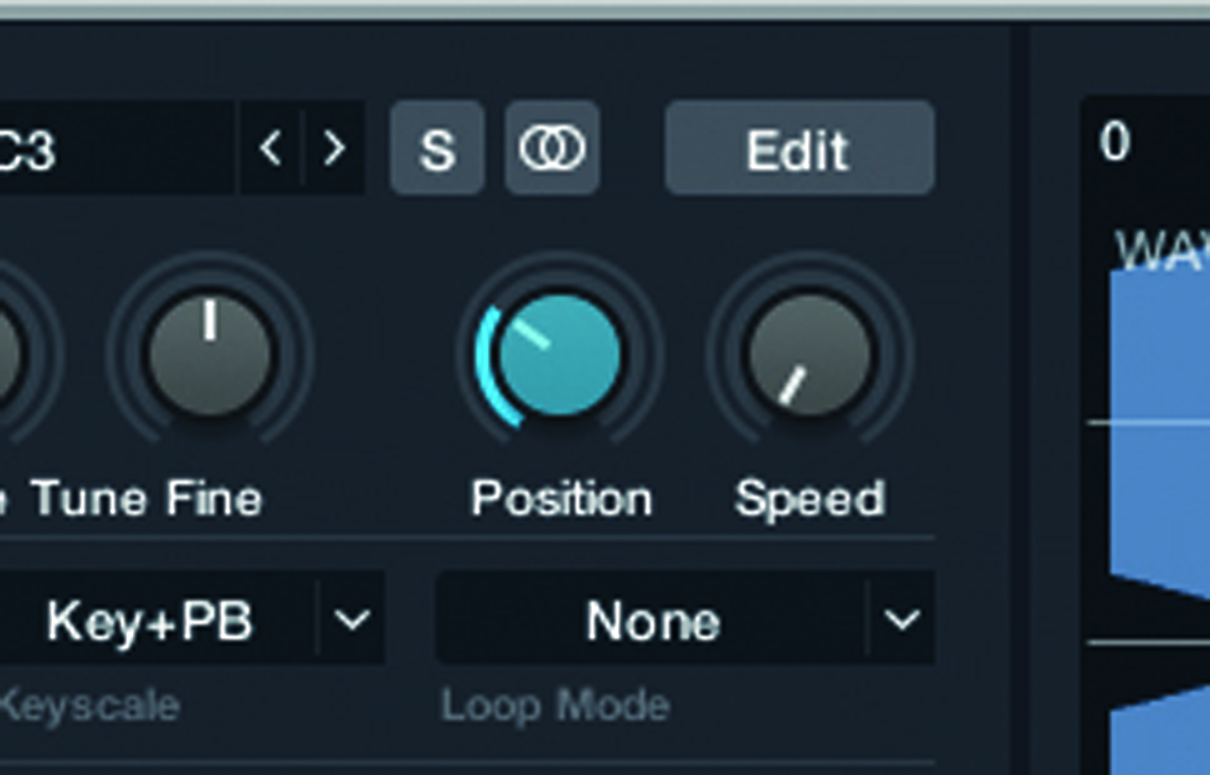
6: Taking the granular concept to an extreme, we can reduce Speed to zero, creating an effect similar to ‘freezing’ time. With the Speed at zero, try moving the Position control to hear the sound slowly sweep through the harmonic spectrum.
Click Here To Continue
This tutorial is endorsed by Point Blank. With courses in London, online and now in LA, Point Blank is the Global Music School. You can study sound to picture on their Music Production Diploma courses, with pro industry tutors.
