Logic Pro X Tutorial: Become A Power User Part 4 – Mastering MIDI Plug-Ins
As well as the Arpeggiator, Logic Pro X’s MIDI plug-ins system has a host of powerful features up its sleeve. Mark Cousins gets plugged in. Although most users will spend their time playing with the Arpeggiator, Logic Pro X’s MIDI plug-ins system offers some intriguing new ways of looking at MIDI data within your Logic […]

As well as the Arpeggiator, Logic Pro X’s MIDI plug-ins system has a host of powerful features up its sleeve. Mark Cousins gets plugged in.
Although most users will spend their time playing with the Arpeggiator, Logic Pro X’s MIDI plug-ins system offers some intriguing new ways of looking at MIDI data within your Logic projects. As you’ll see in this tutorial, the application of MIDI plug-ins floats part-way between live, on-the-fly MIDI editing and a more creative role that almost touches on a generative approach to music-making. Certainly, it’s an exciting new way of looking at your composition process, and a great way of extracting real musical potential from newer plug-ins such as Drum Kit Design and Retro Synth.
To explore the full potential of the MIDI plug-ins system, this tutorial examines three practical applications. The first application looks at an important part of the MIDI plug-ins concept – that of real-time ‘performance tweaking’.
Although it’s possible to edit MIDI data using the Piano Roll, MIDI plug-ins offer an intriguing new way of tweaking your MIDI data, especially when it comes to plug-ins like the Velocity Processor. As we’ll see, the results can be transformative, and certainly demonstrate that you shouldn’t think of MIDI as being merely a sequence of note data.
From a creative standpoint, MIDI plug-ins are a dream come true for musicians working in the field of dance music. Rather than programming or performing note data from scratch, you can use features such as the Arpeggiator, Chord Trigger and Note Repeater as a means of actually creating your musical parts. For example, what might start as just a single note could end up as complex patterns of rhythmic chords, or swatches of notes flying around a given chord sequence. As with the extremes of audio processing, you soon start to realise that what you do with an input is as important as the source itself!
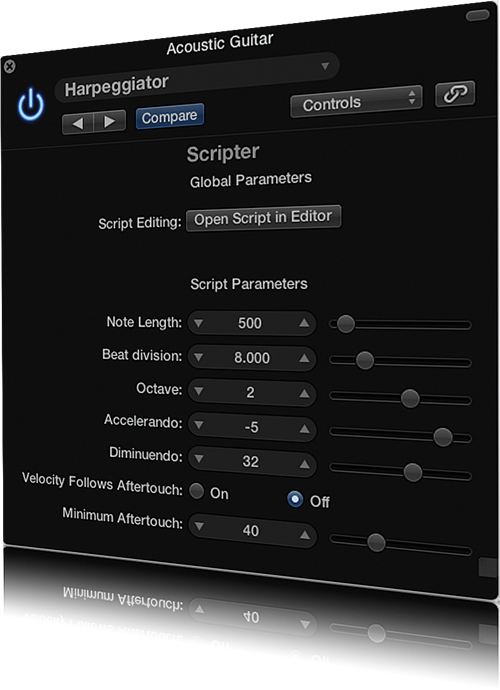
Although this tutorial covers all the defining techniques of using MIDI plug-ins, it’s worth remembering that this is just the tip of the iceberg in terms of what you can achieve, especially when it comes to the Scripter plug-in. Ultimately, MIDI plug-ins are an exciting part of the Logic universe, and something that all styles of music can actively exploit in one way or another.
Using MIDI Plug-Ins
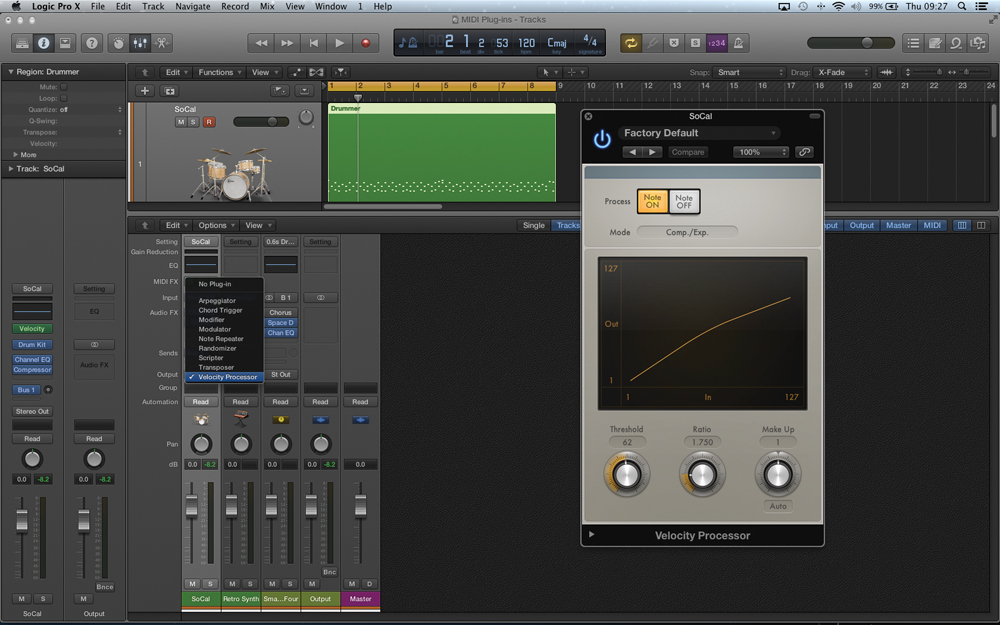
1:In this first example we’re going to explore how a single MIDI plug-in can have a significant affect on the musicality of a performance. The starting point is a basic drum sequence routed to Drum Kit Designer. Instantiate the Velocity Processor into the MIDI FX Slot found towards the top of the channel strip. Note the green colouring to indicate that it’s a MIDI plug-in.
2: All MIDI plug-ins work by changing the MIDI data stream in real time – just like an audio plug-in modifies an audio signal. In this case, the Velocity Processor is working with velocity data, applying a form of MIDI compression to the data stream. As a result, notice how the dynamics of the drum performance have immediately changed.
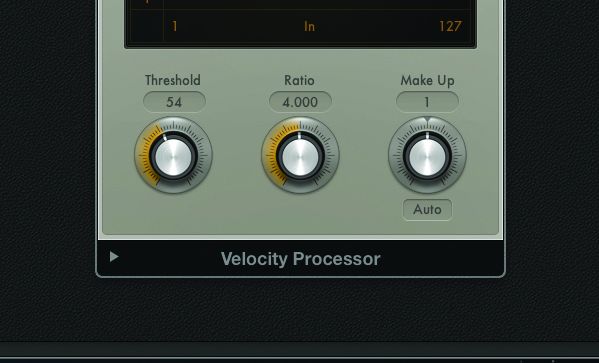
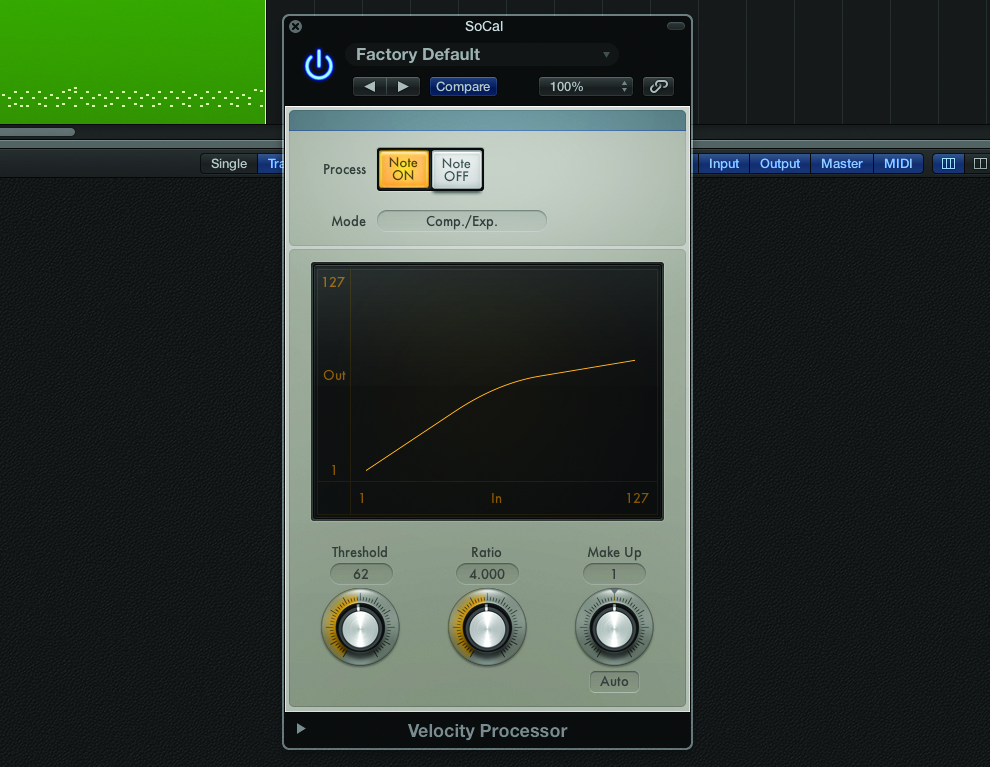
3: Now let’s start adapting some of the parameters to see what happens when we use the Velocity Processor. Increasing the Ratio, for example, increases the strength of velocity reduction over and above the threshold. Notice how the performance becomes immediately quieter, as well as having the dynamic range of velocities reduced slightly.
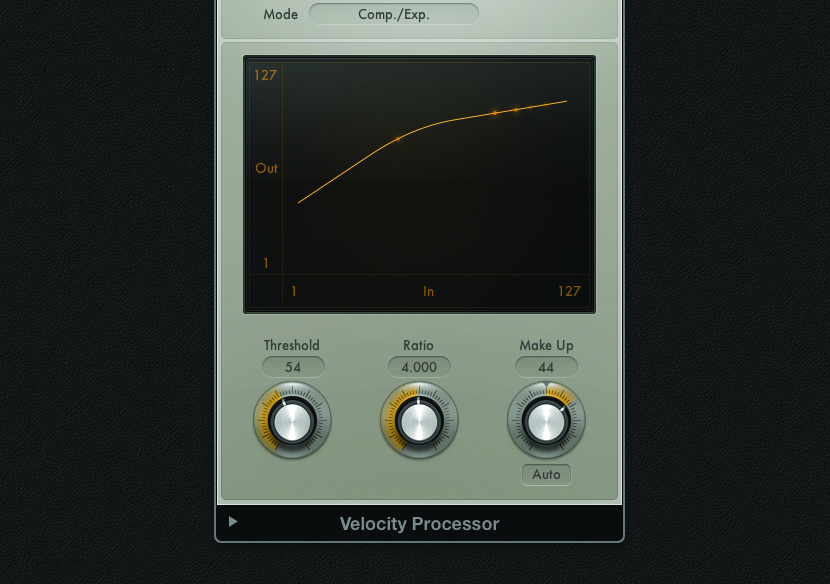
4: Try adapting the Threshold next and listen to what it achieves. At lower settings, the performance becomes quieter and orientated towards a single dynamic. Raising the Threshold makes a louder performance, with the reduction directed more towards the louder hits. Finally, try increasing the Make Up to restore any lost level.
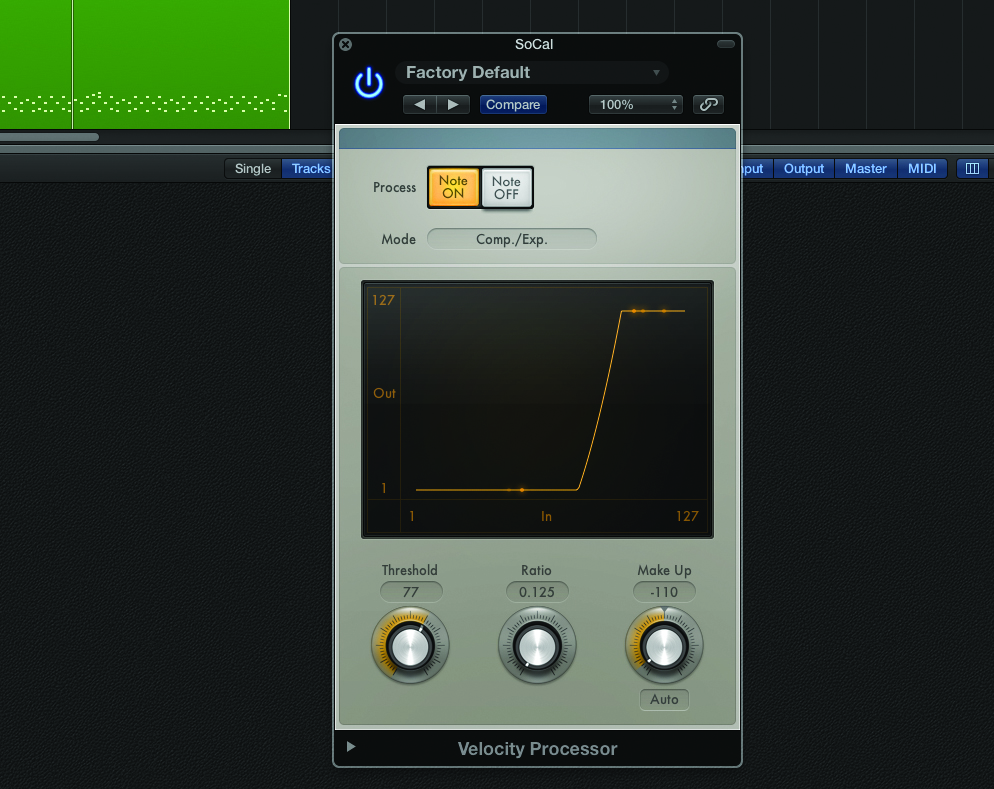
5: As an example of something radically different, try using an expander-like setting with the Velocity Processor. Use a low Ratio (0.125), a negative Make Up (-110) and then experiment with the Threshold. Tune the Threshold correctly and it’s almost like parts of the performance are removed in their entirety, lending the drum track a simpler, more direct feel.
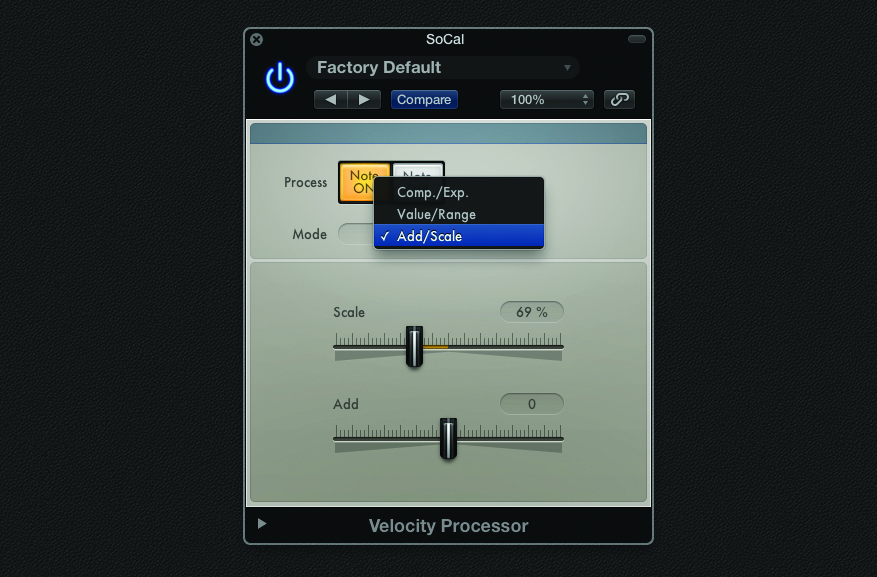
6: The Comp/Exp mode always delivers great results, but it’s also interesting to note the other modes available with the Velocity Processor. Add/Scale is an interesting alternative for simple modifications. Use Scale at around 69%, for example, to bring in the extremes of the performance, so that both loud and quiet velocities are brought more in-line with an average setting.
Multiple Plug-Ins
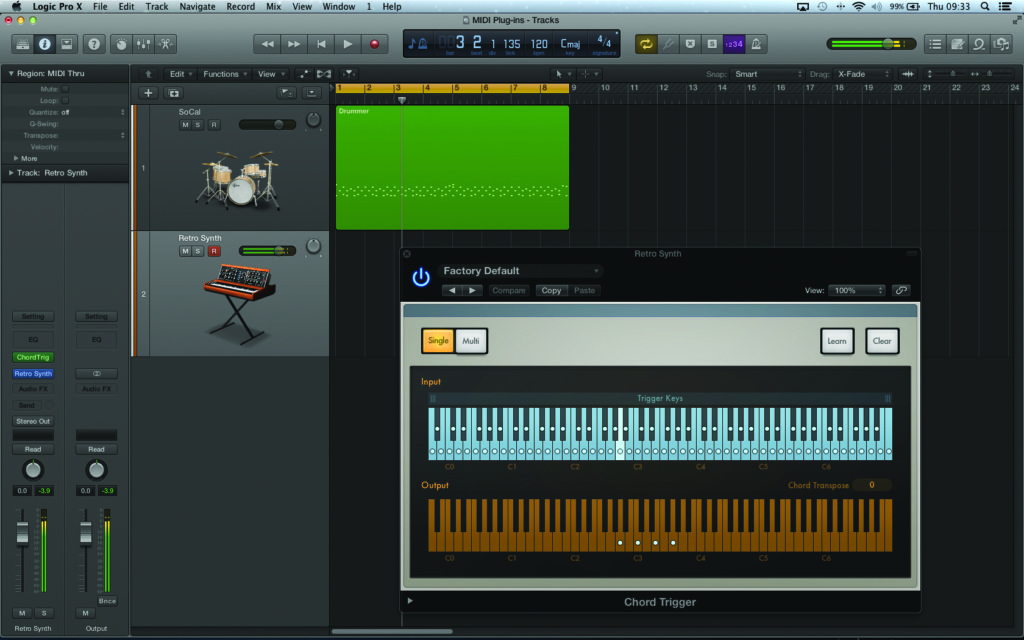
1: Just as with audio plug-ins, we can use multiple MIDI plug-ins in a cumulative fashion, each plug-in adding to the results of the last. Using multiple plug-ins, you soon start to see the real potential of the MIDI plug-ins system. In this case, start by instantiating the Chord Trigger plug-in across the Retro Synth instance on track two.
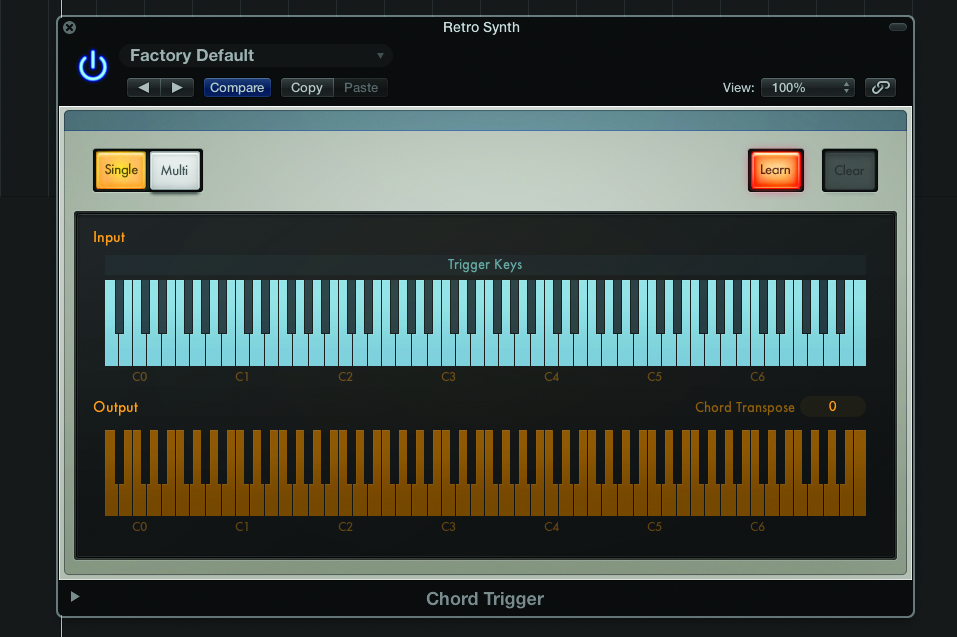
2: The Chord Trigger plug-in is similar to the old Chord Memorizer object found in the Environment. By pressing the Learn key you can map a given chord shape, either using the mouse (clicking on the notes in the lower orange keyboard) or simply playing a chord on the keyboard. The chord will now track the keyboard chromatically.
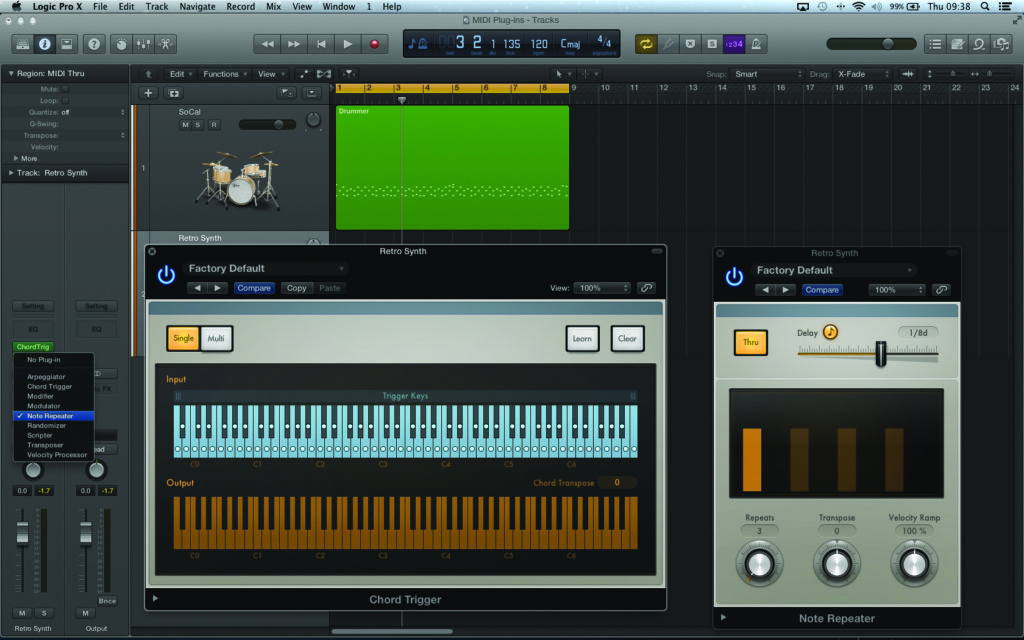
3: Following on from the Chord Trigger, try instantiating the Note Repeater plug-in. The Note Repeater is a form of MIDI delay line, playing a repeat of the original input several beat divisions later. In this case, set the Repeat count to 3 and the delay time to 1/8d. Now, from just a single note, we hear three perfectly formed chords.
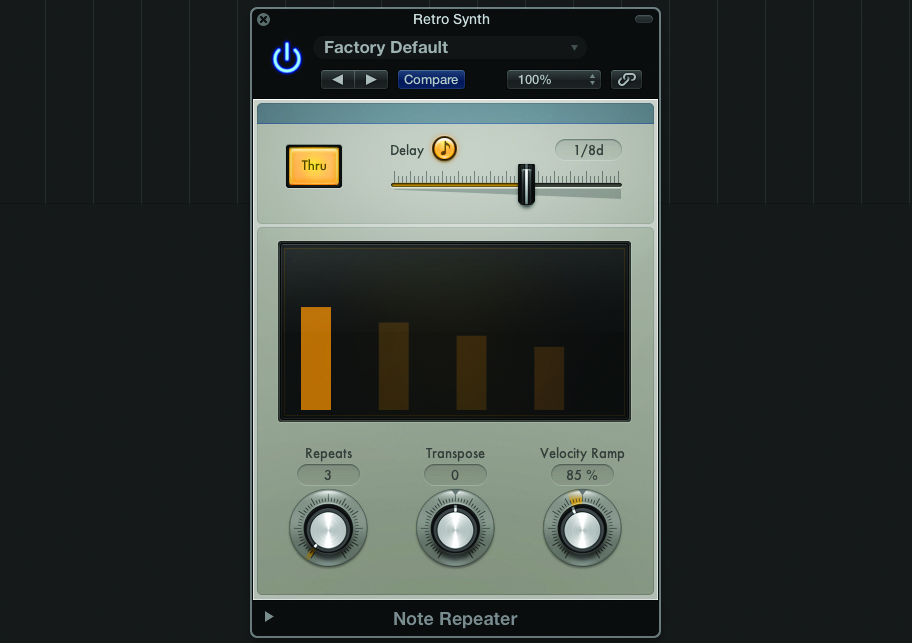
4: The two most intriguing controls of the Note Repeater have to be the Transpose and Velocity Ramp parameters. Transpose shifts the chord position for each repeat, so that a +12 setting, for example, shifts each repeat up an octave. The best is the Velocity Ramp control, which we’ve set to 85% so that each repeat is slightly quieter.
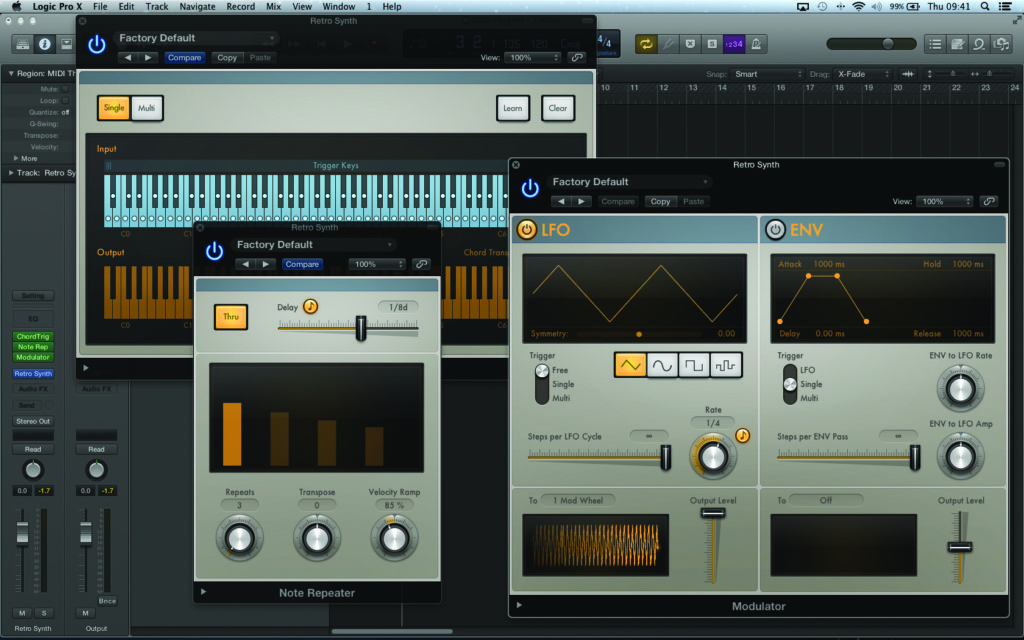
5: To add another element into the equation, try instantiating the Modulator as the next device in the chain. Rather than modifying existing data, the Modulator creates new MIDI CC information, using a free-running LFO, for example, or an envelope triggered from note events. In this case, the default setting produces a simple tempo-sync’ed LFO movement.
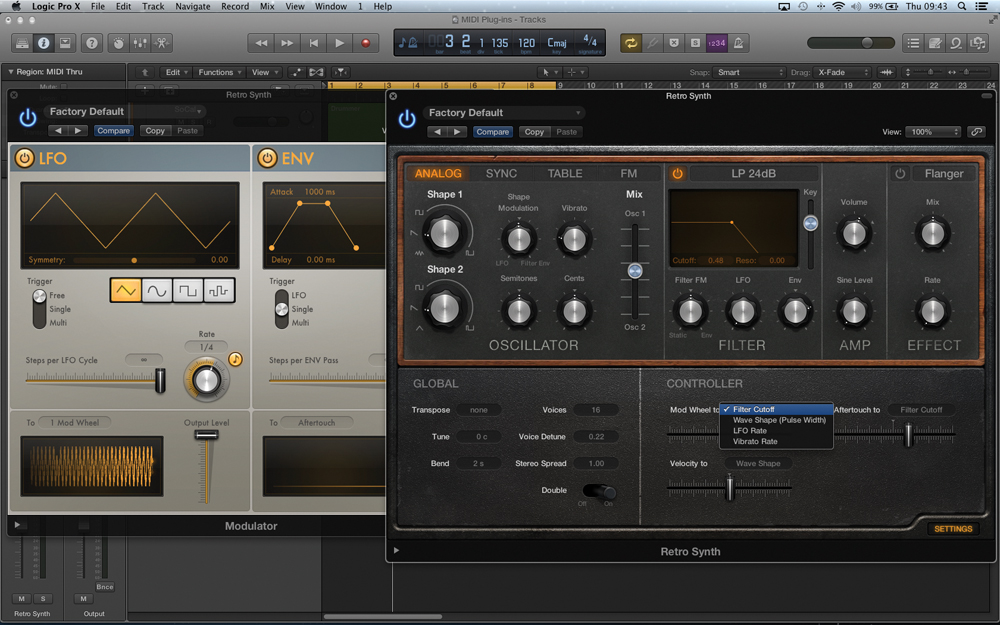
6: As with all of the MIDI plug-ins, it’s well worth being clear on how your eventual virtual instrument responds to the data you create – whether it’s velocity data or MIDI CC commands. Retro Synth, for example, has velocity sensitivity pre-wired to its amplifier and filter, but you can also add other modulators – such as the modulation wheel – via the Settings page.
Randomizer and Arpeggiator
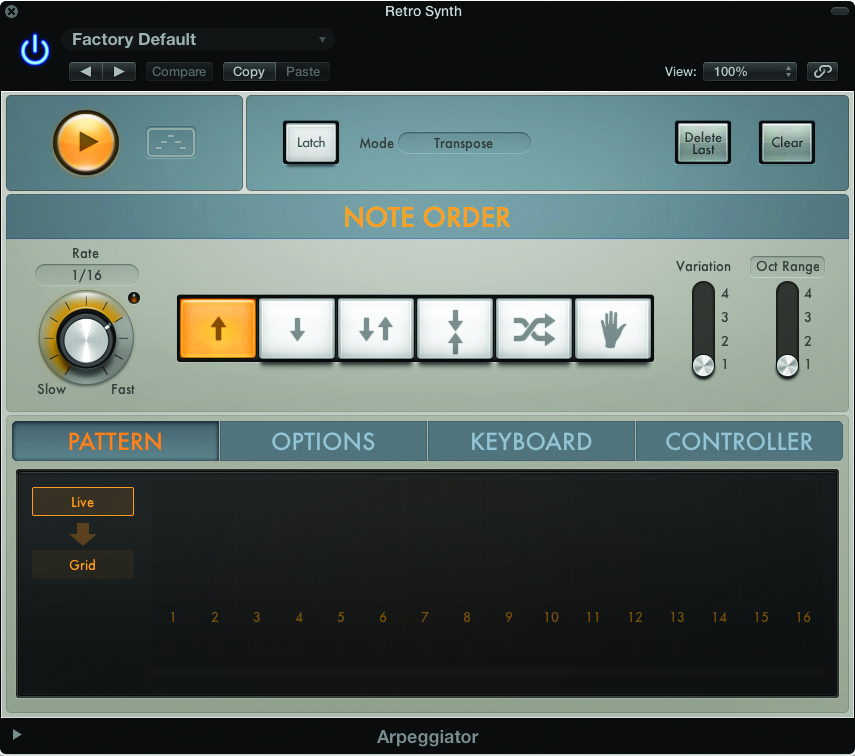
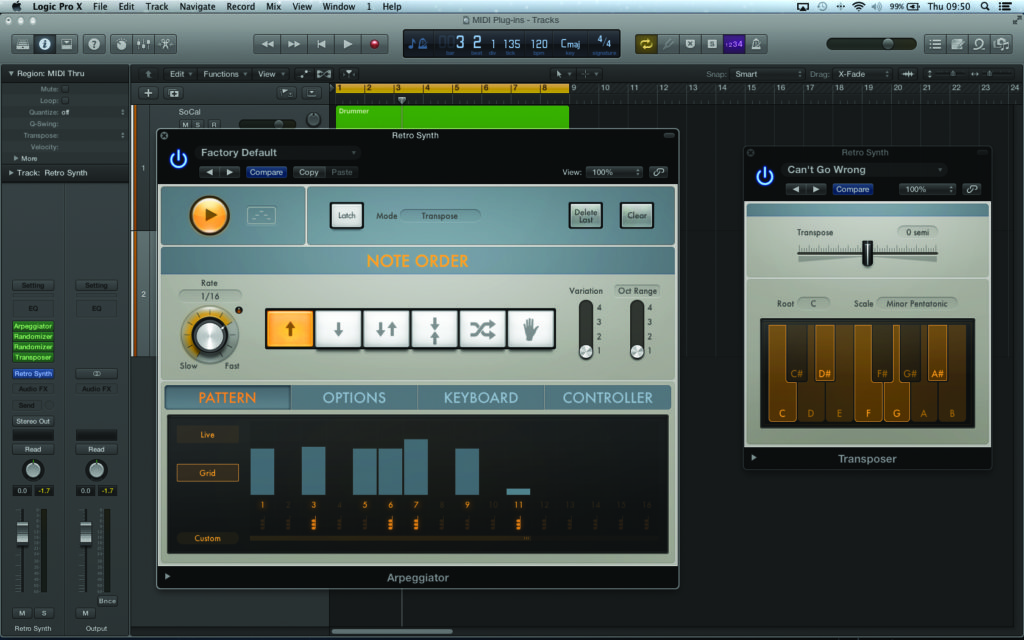
1: The last example pushed the MIDI plug-ins concept to an extreme, to the point at which the music is almost completely formed by the MIDI plug-ins. Working again with the Retro Synth track, remove all the existing MIDI plug-ins and place an instance of the Arpeggiator on the first insert. Use the default 1/16 rate for now.
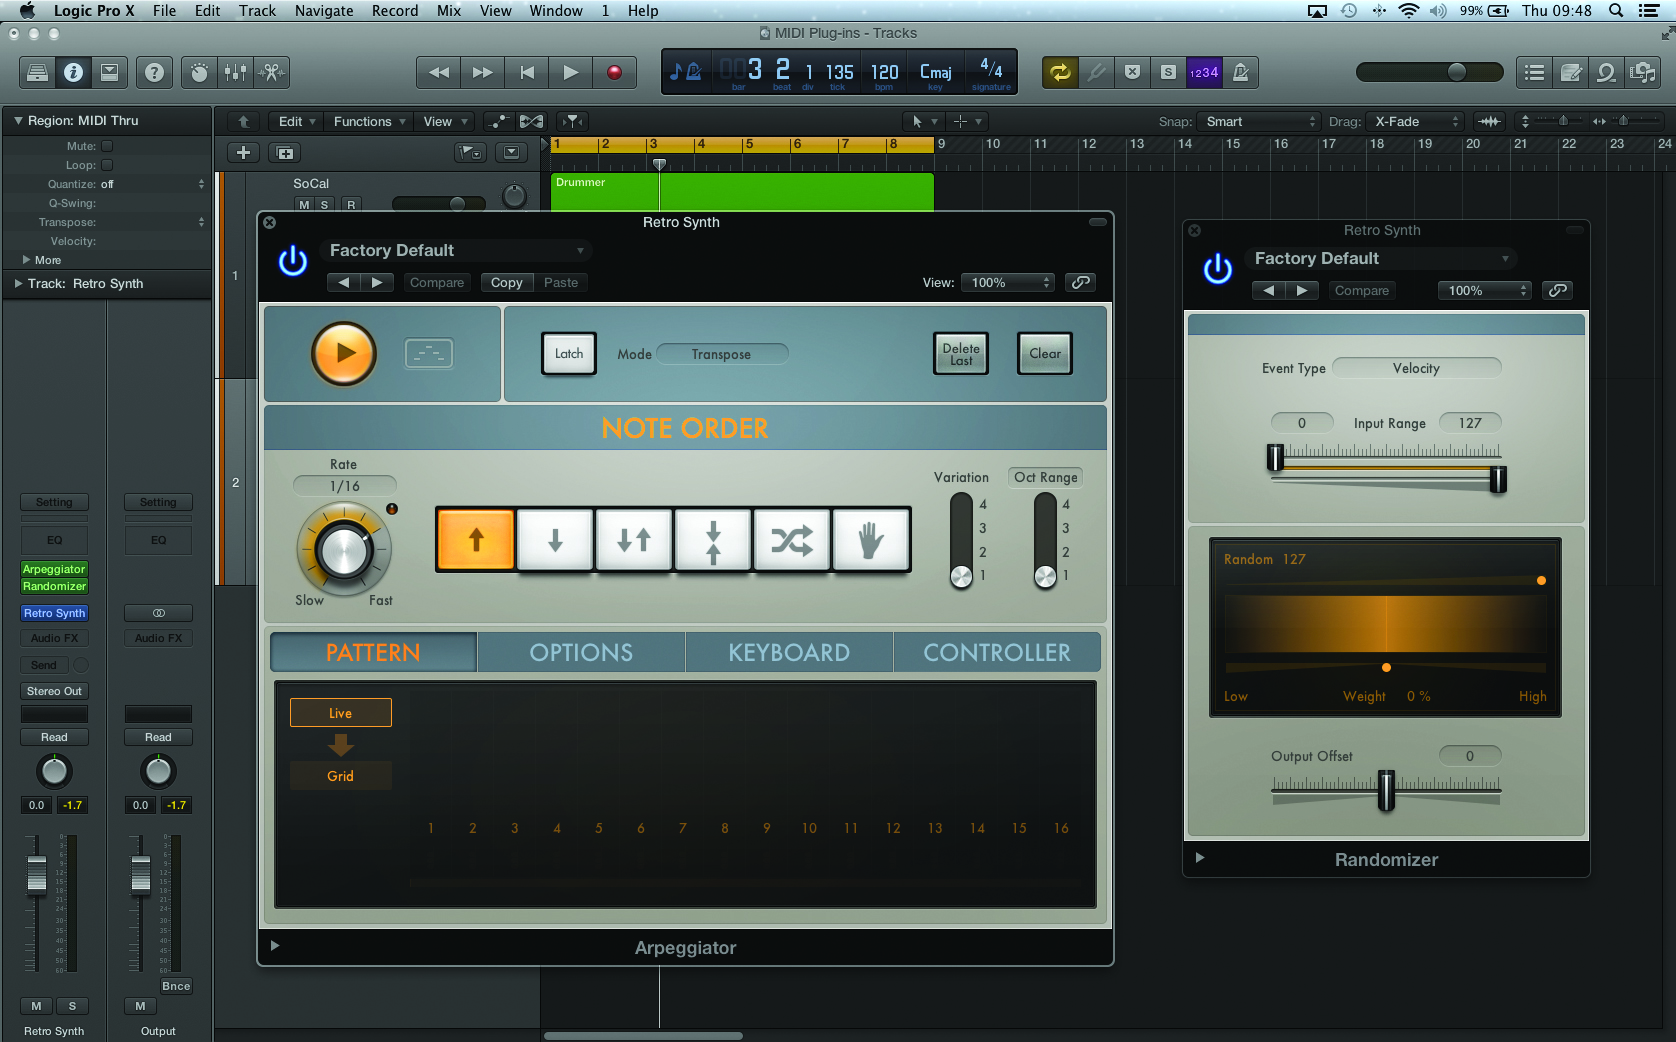
2: The key component in this exercise is the Randomizer plug-in, which we’re going to use twice in the MIDI signal path. Placed after the Arpeggiator, the Randomizer’s default setting is achieving what we need at this stage, taking the existing ‘flat’ velocity messages from the Arpeggiator’s output and randomising over the full MIDI range of 0–127.
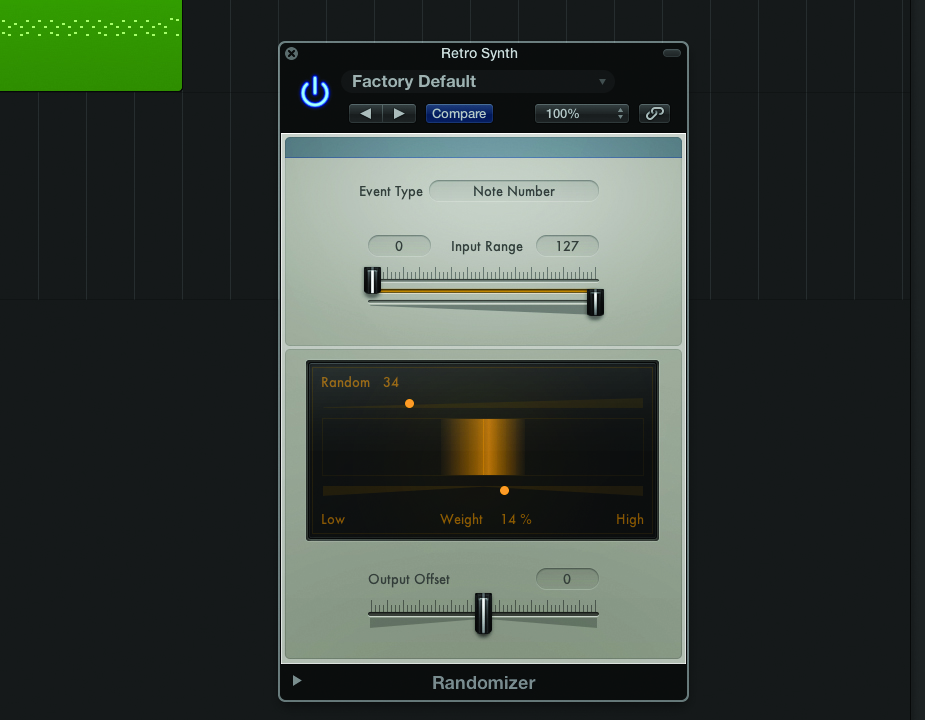
3: Follow the Velocity Randomizer with and another Randomizer instance, but this time change the Event Type from Velocity to Note Number. Notice how the pitch wildly varies for each step. Try tailoring this by setting the Random parameter to around 30 (this is almost three octaves) with a slight weighting towards High values. This is a good example of ‘tailored’ randomness!
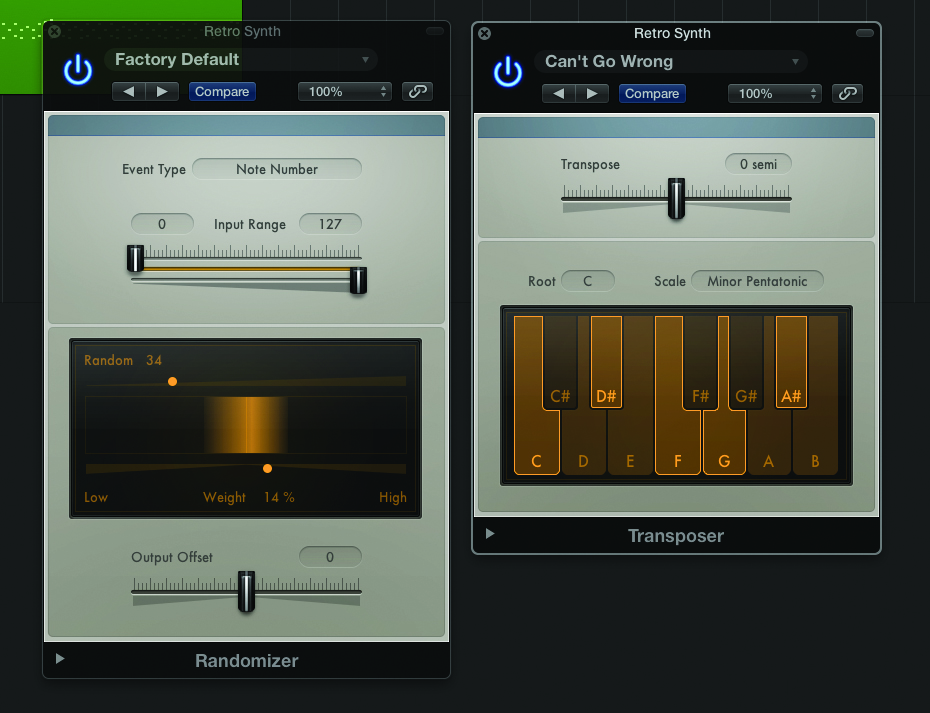
4: Random notes are fine, but they’re not very musical! To solve this problem, try placing an instance of the Transposer plug-in after the two Ramdomizers. As well as transposing MIDI data, the Transposer is also useful in that it can provide scale-correction. Try the Can’t Go Wrong setting or program your own preferred scale type.
5: Now try going back to the Arpeggiator and experimenting with the Input Type. Move over to Grid and create a pseudo-random rhythm so that we’re not just dealing with swathes of 16th-notes. Also try some steps with the Chord mode active and try holding down more than one note to kick-start the sequence.
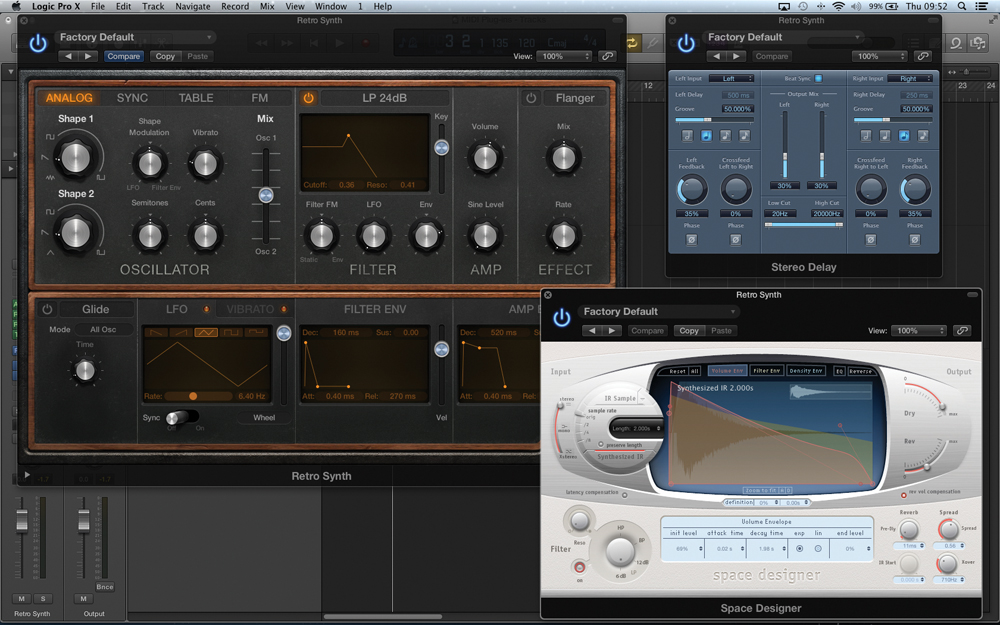
6: Setting the final result in the right context is an important part of the task. As with the second exercise, make sure that Retro Synth is responding to your controller information – adding a touch of filter movement with velocity, for example, as well as some resonance. Delay and reverb are also important, creating space and even more movement in the sequence.