Logic Tutorial: Create Your Own Transition Effects
Creating your own transition effects in Logic can bring a new level of excitement and dynamism to your productions. Mark Cousins shows you how in this Logic Tutorial Transition effects are used across a range of different musical genres, from cutting-edge cinematic trailers to dubstep, forming an important ‘ratcheting-up’ of tension ahead of […]
Creating your own transition effects in Logic can bring a new level of excitement and dynamism to your productions. Mark Cousins shows you how in this Logic Tutorial

Transition effects are used across a range of different musical genres, from cutting-edge cinematic trailers to dubstep, forming an important ‘ratcheting-up’ of tension ahead of a key shift in the music.
Although there’s a healthy number of existing sample libraries covering transition effects, it’s also beneficial to be able to able to create your own. If you do decide to create your own effects, therefore, Logic’s range of sound-design tools pack a powerful punch, having a number of features ideally suited to the creation of transition effects. This Logic Pro 9 Tutorial will show you how create your own transition effects
Making The Transition
Transition sounds are principally created in one of two ways – either by reversing one or more sounds to create a gradual crescendo of sound, or by synthesizing pitch, noise or filter sweeps to a create a similar rising effect over one or more bars. Musically speaking, these effects create tension ahead of some form of change in the music – a breakdown in an electronic production, for example, or a rise at the end of an a trailer act.
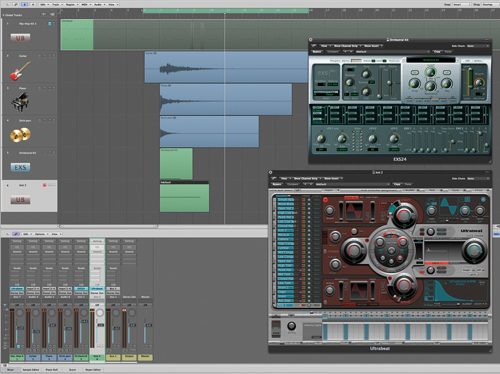
In the first exercise we’re going to explore the art of ‘reverse-engineered’ transition effects. Open the project included on the DVD (included with issue 120) and you will find a selection of sounds to get you started. The key is to layer a number of interesting and unusual sounds – some percussive, some textural and some tonal – all of which will work well when reversed. Try adding additional sounds to what’s already been supplied, with good examples being some additional subsonic kicks from Ultrabeat (having a wide range of frequencies always helps) or some extra percussion sounds from the EXS24 (See featured image)
To get both the length of decay and the all-important ‘scale’ of the effect, it’s worth exploring the addition of some reverb, especially if you’ve used percussion sounds as a key component. Look to using some of the longer Space Designer settings, with reverb times of around 10–20 seconds often delivering the best (and most spacious) results. It’s also beneficial to look at adding some compression to Space Designer’s output to help add extra body to the tail of the reverb. Aim for around 6dB of gain reduction, applied to the earlier stage of the reverb tail, which in turn allows you to bring the overall gain make-up by about 4–5dB. Harder compression setting can also be interesting, especially if you’re after a more abstract result.
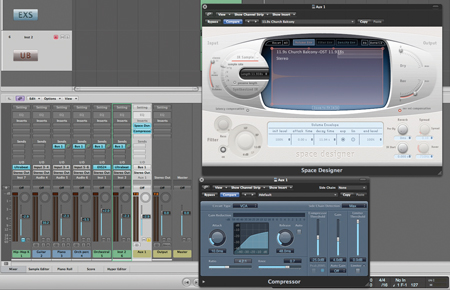
Reverse Logic
To create the final transition effect we need to bounce the composite sound, using the Bounce to Disk option on the main outputs and checking that the Add to Audio Bin option is enabled so that resulting file is imported back into your project. Drag the newly created bounce into the Arrange area, open the region using the Sample Editor and then use the local menu option Functions> Reverse to create a reverse sting effect. You should now hear the transition effect in its full glory, with the sounds appearing to ‘blossom out’ from the reverb tail.
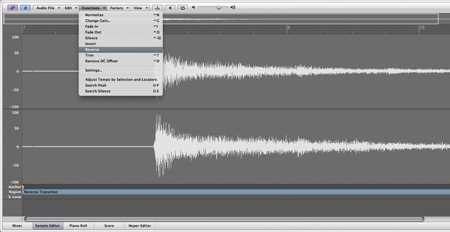
In many ways, the reversed transition effect forms only the beginning of what you can achieve. On a basic level it’s interesting to cut the region ahead of it reaching its climax, as even just short snippets of the reverb tail can often be quite effective. It’s also worth exploring the use of speed fades found as part of the region inspector, especially using the Speed Up fade (over part or the whole duration of the transition effect) to create a pitched glissando effect.
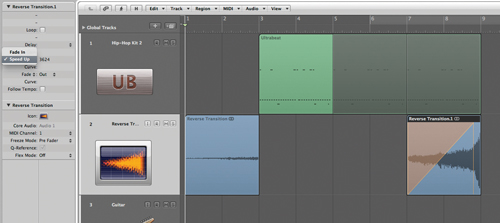
The best effect, though, is to cut into the tail, creating 1/16th slices that stutter just before the climax of the transition. To makes a series of rhythmic region divisions, hold down [Alt] as you cut into the first 1/16th of the region. As a result of using the [Alt] modifier your region should now be split into a series of 16th regions. You can then either mute the slices or change their respective length to create the stuttering effect (or even form 12th or 24th slices if you want to create something that’s even more alluring to the listener’s ear).
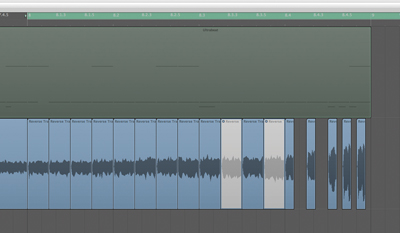
Synthesized Transitions
As well as applying reverse treatments to create transition effects, it’s also worth exploring techniques using pure synthesis, either to be used in conjunction with the reverse transition or instead of. In this part of the Workshop we’re going to look at three ways this can be achieved, all using the same basic sequence data. To start with, therefore, create a two-bar note sustaining on E2. In addition to this, open the controller lane at the bottom of the piano roll editor and create a pitch bend movement that lifts over this same duration.
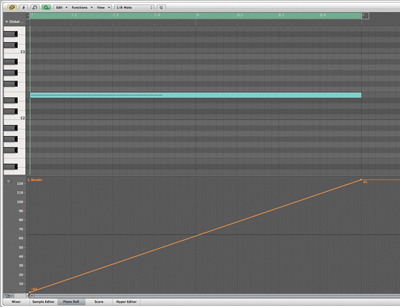
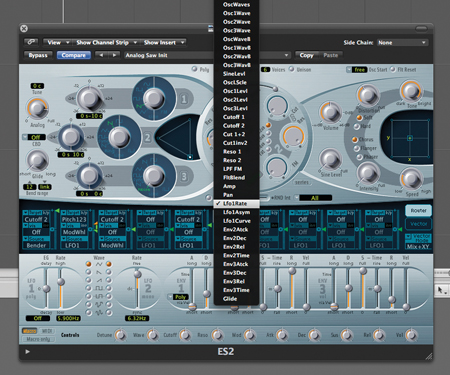
The first sound we’re going to explore uses pitch as a means of creating the transition effect. Working from a default Saw Init patch, therefore, create a Unison sawtooth patch with plenty of detune so that you create a rich, almost dissonant sound. You’ll then need to make sure that you’ve set the Bend Range correctly to establish the amount of pitch movement. A setting of 12 will give you an octave either side of the centre position, effectively creating a two-octave sweep, although you can also achieve some interesting results using a bend range of 19, effectively creating a sweep over an octave plus a fifth.
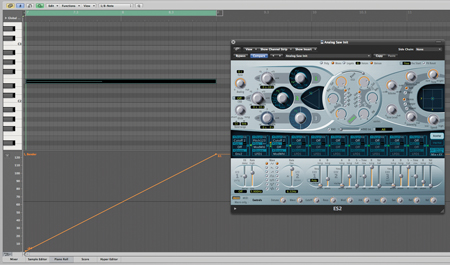
As with our reverse transition sound, there are some important extra ingredients to make the pitched transition even more effective. Firstly, it pays to add some distortion into the ES2’s signal path – using either the Drive control in the filter or the Distortion control as part of the output section. You should also apply some tempo delay (using either Tape Delay or the Stereo Delay plug-in) as well as some of the aforementioned super-long reverb to provide extra colour and interest to the spiralling pitch effect. The result isn’t too far from sounding like an air raid siren on its ‘up’ phase, which is no bad thing when it comes to transition effects!

Make Some Noise
As well as detuned oscillators, there are other synthesis-driven sounds worth exploring. Another popular choice is a noise sweep, which is useful in situations when you don’t want the effect to have too much ‘pitch’. Create a complete duplicate of the first ES2 track, complete with a copy of the original sequence data. We’ll need to adapt the ES2 patch, removing the Unison and switching to using just Oscillator 3 set to a Noise waveform. To create the sweep effect, modulate the filter cutoff using Bender as the source (pitch bend, in other words), making sure that the filter cutoff position is set at its lowest position and that there’s around 0.50 of resonance. The resonance adds a frequency peak to the noise, which helps to define the sweeping effect.
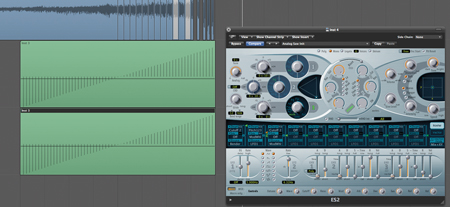
Another variation is to use a self-oscillating filter, setting the filter’s resonance to max and removing all the oscillators from the audio mix. The modulation routing between the pitch bend wheel (Bender) and Cutoff 2 remains, although we also need to add in some LFO modulation so the filter has a distinctive wobble (use LFO1 as the source, mapped through to Cutoff 2 with an amount of 0.22). The really clever part comes when you add additional modulation routing, this time using the Bender to modulate the speed of LFO1. As well as rising in pitch, therefore, the transition effect appears to ‘wobble’ more as we get nearer the climax.
While the addition of reverb and delay adds considerably to the spatiality of the transition effect, it’s often far less effective at the point immediately after the transition, especially if you’re cutting down the track to near-silence. As with our first reverse transition effect, this is a another perfect example of the wisdom of being able to print the resulting transition effect as an audio file. Once rendered in this way it’s easy enough to trim the end of the region so that the effect cuts short at the end of the rise. Not only will this make the mix less cluttered, but you’ll also gain a unique sonic shift from an ultra-deep spacious reverb to a completely dry mix.
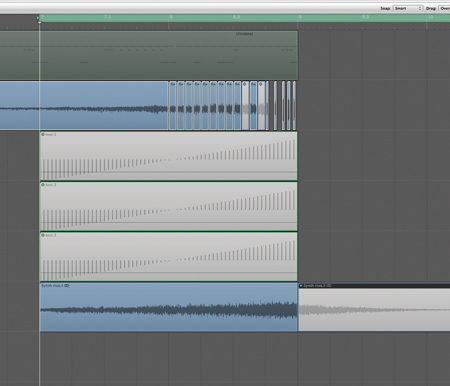
Rather than simply sticking to just one of the four techniques we’ve mentioned here, it’s well worth building up a composite transition effect that uses some or all of the elements described. In particular, the ‘cut-up’ reverse transition effect married with some of the pure synthesis methods sound really distinctive. Also, try to contrast transitions that perhaps build up over a number of bars with those that are short and sweet, possibly lasting no more than 1/8th of a beat. As always, variety is the spice of life.
Beyond The ES2
There’s also plenty of synthesis potential away from the ES2. Try experimenting with the EFM’s FM frequency sweep effects, with the amount of FM depth increasing as you rise through the transition. Also, Sculpture’s weird physical modelling sound is interesting as a means of adding texture into your transition sounds, especially using the patches found in the Warped Sculptures bank. Ultimately, it’s just the beginning of your creative exploration, with the techniques here covering everything you need to get started!