Logic Pro X Tutorial: Become a Power User Tutorial Part 12 – Mastering in Logic Pro X
Logic Pro X’s new and improved Channel EQ plug-in really comes into its own during mastering. Mark Cousins finds the perfect tone. When it comes to mastering there’s little doubt that a good equalizer is one of the most important tools to have at your disposal. Rather than just sounding good, an effective mastering equalizer […]
Logic Pro X’s new and improved Channel EQ plug-in really comes into its own during mastering. Mark Cousins finds the perfect tone.
When it comes to mastering there’s little doubt that a good equalizer is one of the most important tools to have at your disposal. Rather than just sounding good, an effective mastering equalizer needs to be a versatile and precise tool that’s able to direct the right amount of timbral magic to the correct part of the mix.
As well as featuring plenty of parametric bands, filtering options and shelving controls, it’s vital that you have discrete access to both the left and right channels and, if you’re feeling really adventurous, M/S processing as well. Add to that the ability to move between Linear Phase operation and good old-fashioned ‘phase-shifting’ EQ, and it’s clear that the demands of a mastering equalizer are plentiful!

Having received a major facelift and operational upgrade with the latest version of Logic Pro X, the Channel EQ plug-in coupled with the Linear Phase EQ are powerful tools that are perfect for mastering your tracks. In this workshop we are going to take an in-depth look at how the features of the Channel EQ and Linear Phase EQ plug-ins can be used for mastering tasks – a process that has some distinct differences to the use of EQ in more conventional mixing applications.
One of the most exciting possibilities with the Channel EQ is that of M/S equalisation, which deals with a stereo signal as Mid/Side components rather than the traditional Left/Right stereo. Despite being a popular technique in mastering circles, M/S processing can create some confusion due to the different way it handles stereo. With M/S stereo the mix is broken into a Mid component formed from the sum of the left and right channels, and a Side component formed from the difference between left and right. In effect this enables you to apply the EQ in a more directed way, especially towards instruments that are planted in the ‘phantom centre’ of a mix.
More than just being a mixing tool, the Channel EQ is a versatile and effective tool for mastering, and well worth closer inspection.
This tutorial is endorsed by Point Blank Music School, which specialises in courses on production, sound engineering, the music business, singing, radio production, DJ skills and film production, all run by top British music producers and media professionals, with regular visits from legends in music and media.
www.pointblanklondon.com
Getting started
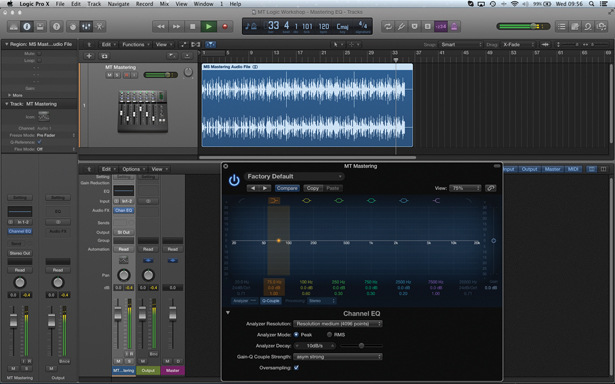
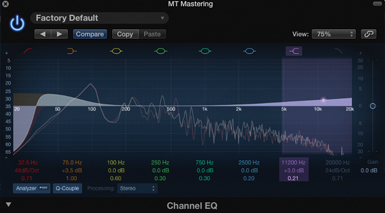
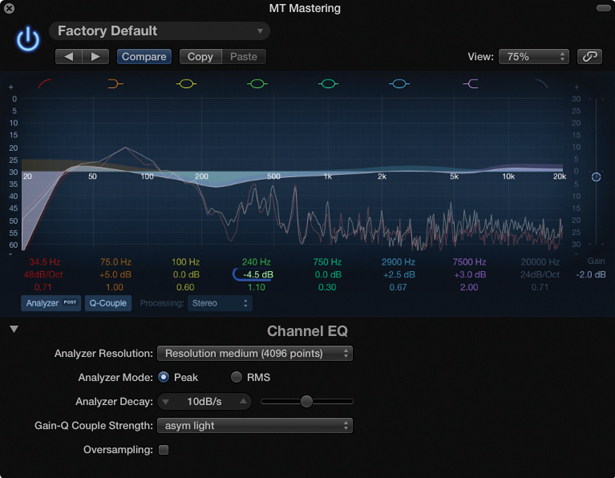
1: In most mastering signal paths the Channel EQ is usually used as the first device in the chain, with compressors and limiters placed afterwards. Once you’ve added the Channel EQ plug-in, remember to open the expanded parameters at the bottom of the interface and click on the Oversampling option for the highest audio quality.
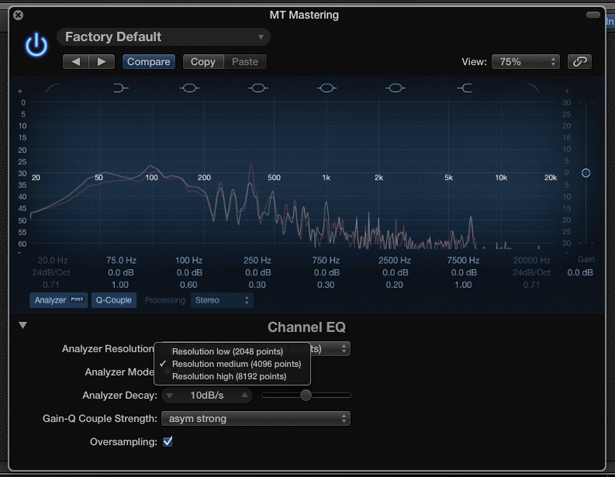
2: As with all equalisation tasks it’s well worth using the Channel EQ’s Analysis option to gain a more informed understanding of the track’s frequency characteristics. Click on the Analyzer to make it active, setting the Medium or High resolution (found as part of the extended parameter set) so that you get a more accurate and detailed frequency plot.
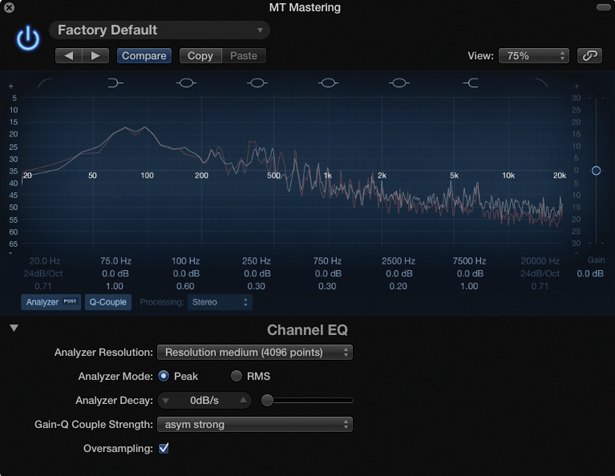
3: One interesting control worth investigating is the Analyzer Decay, which defaults to around 10dB/s. Setting a slower speed – even as low as 0dB/s – produces an ‘averaged’ frequency plot over time, rather than an instantaneous snapshot. This slower setting can be useful as a means of understanding the broad frequency characteristics of your track.
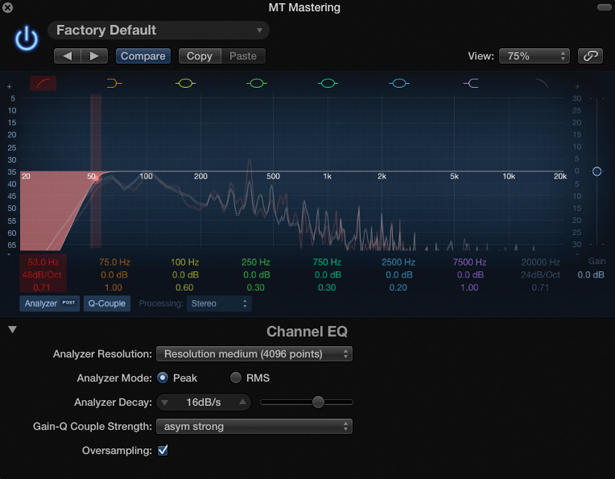
4: Let’s start the equalization process by looking at the low end of the track. To keep things controlled it’s well worth applying a high-pass filter so that any subsonic elements are removed. Click on the high-pass filter curve in the top left-hand corner, set the Curve to its steepest setting – 48dB/Oct – and adjust the Frequency control to around 20-30Hz.
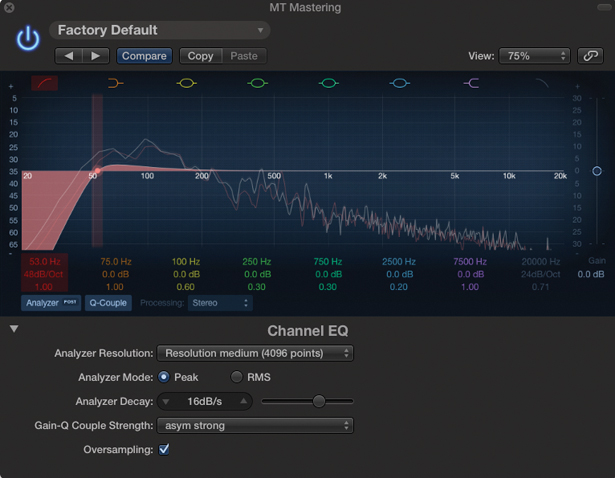
5: Another useful trick with high-pass filtering is adding resonance, which is the lowest parameter, beneath frequency and slope. Increase the setting to 1.00 and notice the small bump around the cutoff. With the added resonance you might want to slightly raise the cutoff. The result can be a tighter and weightier bass end if used correctly.
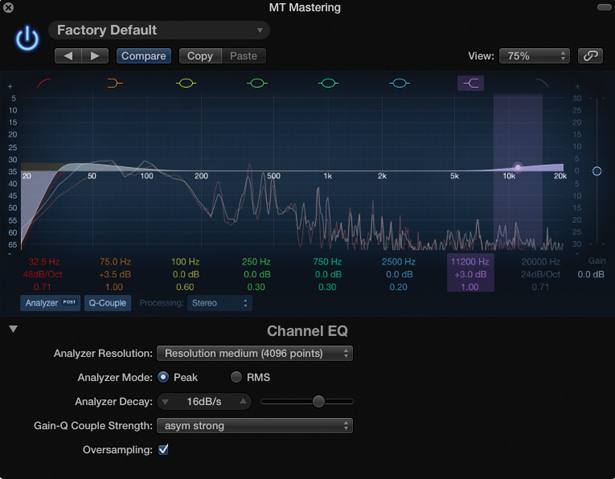
6: At the two opposite ends of our track – low and high, respectively – a shelving equalizer is used to establish the broad frequency characteristics of the track. Carefully position the respective frequency controls to achieve the desired colour. A treble boost at 7kHz, for example, adds presence, while a lighter ‘air-like’ tone can be found between 12-16kHz.
Q and Linear Phase EQ
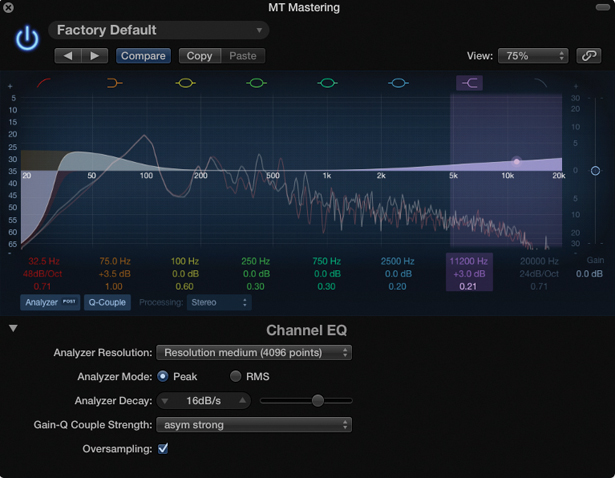
1: As with the high-pass filter, it’s worth noting how the Q can be called into action. In the case of shelving, lowering the Q produces a wider curve with less of a plateau-like shape. The curve is similar to the classic Baxandall EQ, which is a favourite among many mastering engineers thanks to the gradual way it lifts treble ahead of the frequency setting.
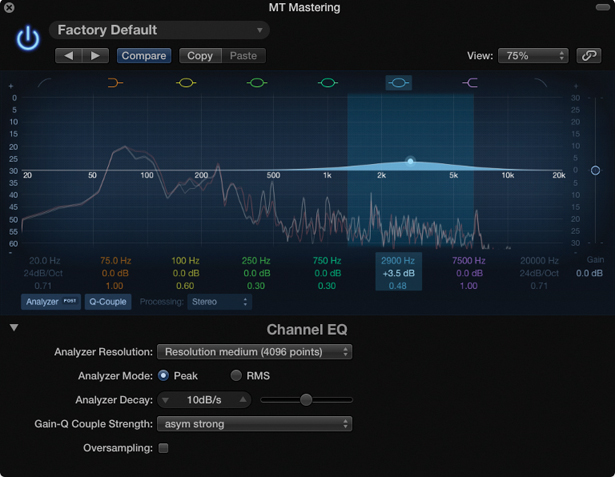
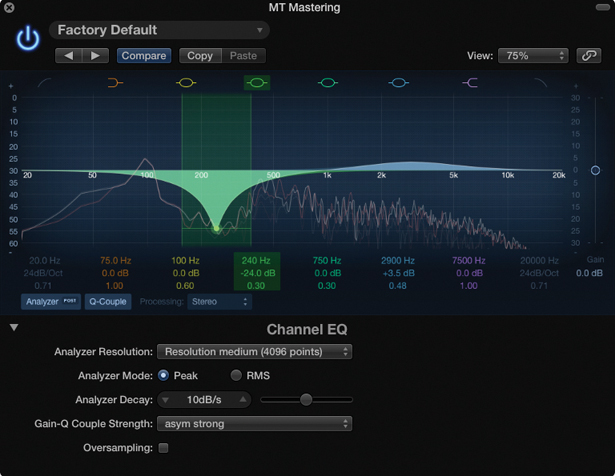
2: Timbral modifications across the rest of the mix are achieved using the four parametric bands. On the whole, the best approach is to use wide Q settings for boosts coupled with a narrower Q setting for cuts. The result is an EQ that’s transparent to the ear, and musically effective for the result you’re trying to achieve.
3: One behaviour worth noting is the Gain Q coupling. By default the Q effectively becomes sharper the more you apply a boost or cut, so that the bandwidth of the EQ remains constant irrespective of the amount of boost or cut applied. In effect, this Q-Coupling enables the EQ to work in a musical way, so it’s best left as it is.
4: With any equalisation task it’s highly likely that the net result of the EQ curve is an increase in signal level. Therefore to preserve your gain structure and provide a more objective view on the un-equalized source, consider balancing an overall increase in level with a corresponding gain cut using the Gain slider located on the right of the interface.
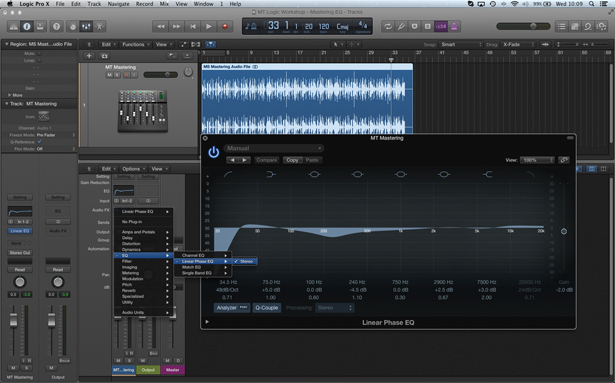
5: As well as the Channel EQ, Logic also includes a Linear Phase EQ. You can move over to a Linear Phase EQ at any point (with your settings immediately transferred over) making it easy to compare the sound of the two plug-ins. Notice the increased transparency offered by the Linear Phase EQ, as opposed to the character of the Channel EQ.
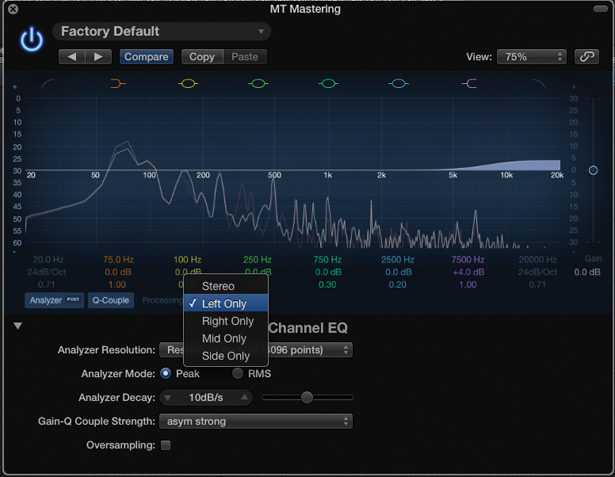
6: Rather than processing the entire mix it’s often useful for mastering EQ to be more ‘directed’. By changing the Processing parameter we can assign the Channel EQ to either the left- or right-hand side of the mix. Try a left-only treble boost, for example, and notice how you can tangibly grab hold of the hi-hat without over-enhancing the top end.
Mid and side processing
1: If you’ve used one Channel EQ plug-in to process the left-hand side of the mix it follows that the right-hand side will need its own separate instance, set to Right Only under the Processing parameter. Rather than equalizing the entirety of the mix with the one plug-in you now have separate control over each side of the mix.
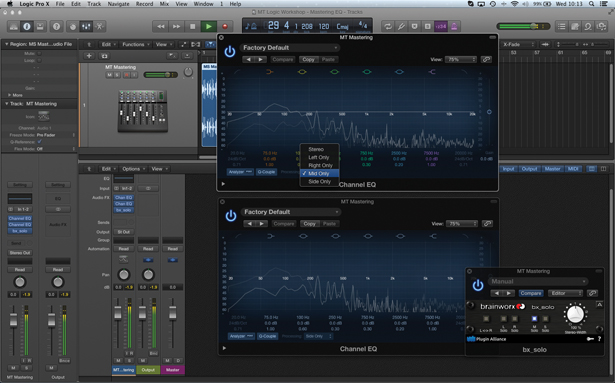
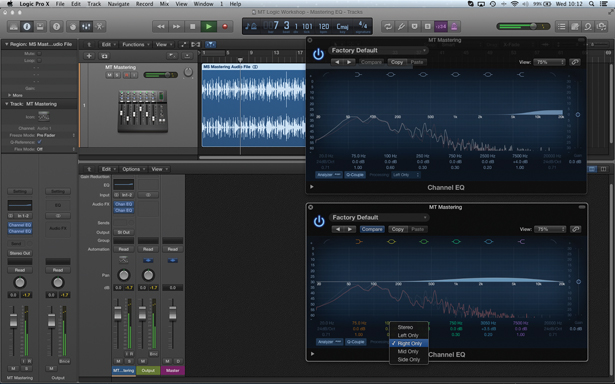
2: As well as being able to process the mix with discrete left and right channels you can also experiment with M/S processing. Create a basic M/S matrix using two Channel EQs set to Mid and Side, respectively. The freeware bx_solo (www.brainworx-music.de) at the end of the chain enables us to isolate the Mid and Side channels.
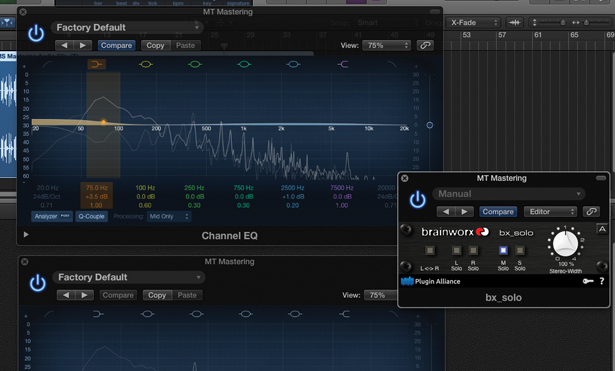
3: Press the M Solo button on the bx_solo channel to hear the Mid channel in isolation. Notice how the bass is prominent in this channel as it’s fixed in the centre of the mix. Applying a low-end boost, therefore, will lift both the kick drum and bass in a directed way, leaving the sides of the mix untouched.
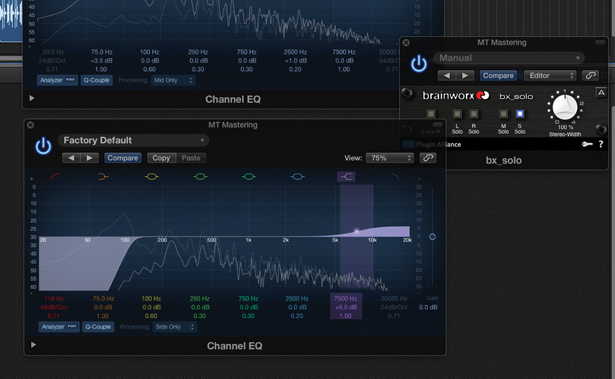
4: Now move over to the Side channel, noticing the distinct omission of Mid elements such as the kick and bass. A good strategy with Side-channel equalisation is a bass cut (which can be relatively extreme as you want to keep the bass end mid-focused) and a small amount of air lift to increase the vibrancy and dimensionality of the mix.
5: One interesting feature of the Channel EQ’s M/S operation is the use of the Gain control. As part of the M/S matrix, the Gain control can be used as a means of modifying the stereo dimensionality of the mix. For example, increasing the Gain on the Mid EQ while lowering the amount of Side channel will result in the mix becoming more mono-centric.
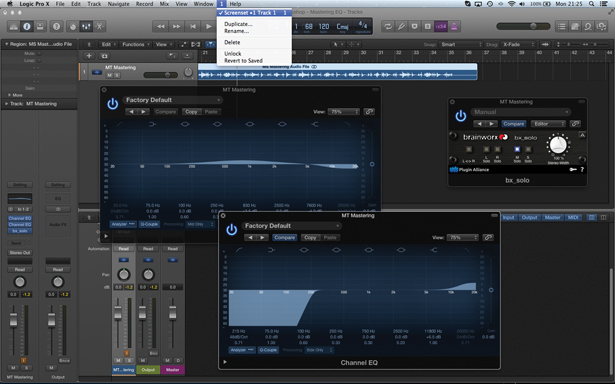
6: If you’re having to open and close matrix’d combinations of plug-ins, consider using Logic Pro X’s Screenset feature, found on the menu bar. Screensets can be assigned to a number key, so it’s easy to establish a unique Screenset for each song in your mastering project, even including plug-in windows for the rest of your signal path.
