Creative beat-slicing in Logic
Using loops in your Logic Project needn’t result in creative dead-ends, especially if you make use of the new slicing options offered by Quick Sampler.
Logic Pro X handles the switch from audio to MIDI seamlessly. It can, for example, convert audio regions into time-sliced samples triggered from a MIDI region or, going the other way, convert a MIDI-triggered software instrument into an audio region. Such flexibility is particularly useful with drum loops. Rather than playing back loops at the correct tempo, Logic can slice and map loops, which opens up an array of resequencing, filtering, enveloping and glitch-type effects. With the release of Logic Pro X 10.5 and the new Quick Sampler and Sampler instruments, this slice-and-dice approach to drum loops is now even easier to achieve.
Designed as a quick-and-easy solution for time-sliced drum loops, Quick Sampler is one of the key benefits of Logic Pro X 10.5. Loops can now be dragged directly for the browser area onto track headers, where Logic will present you with a series of auto-mapping options: two for Quick Sampler, one for Drum Machine Designer and three for Alchemy. For simple and accessible loop slicing, the logical choice is either of the two Quick Sampler options.
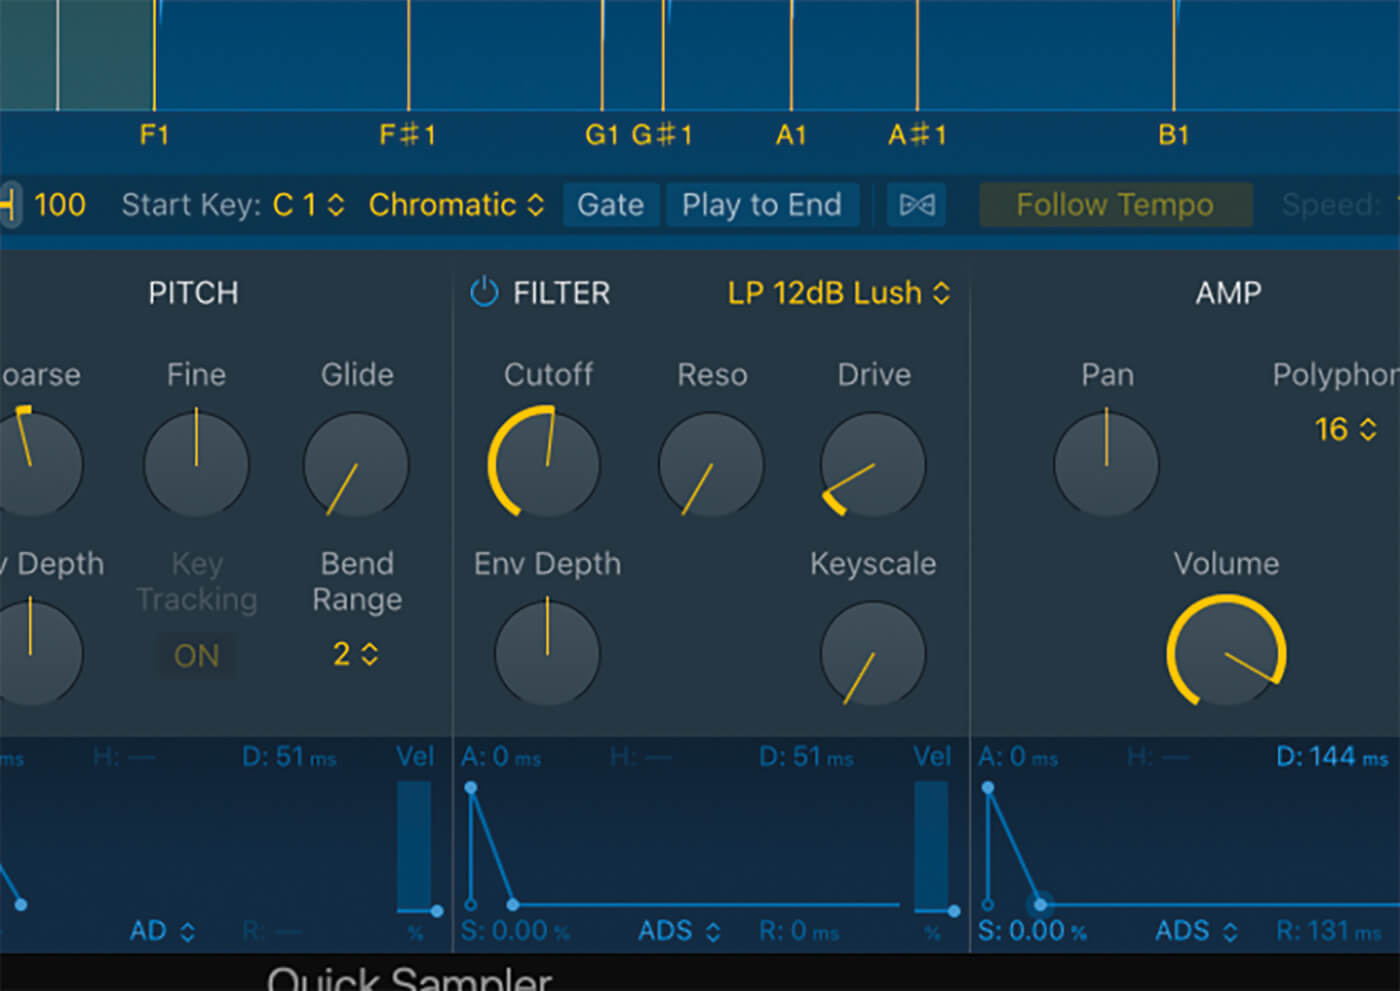
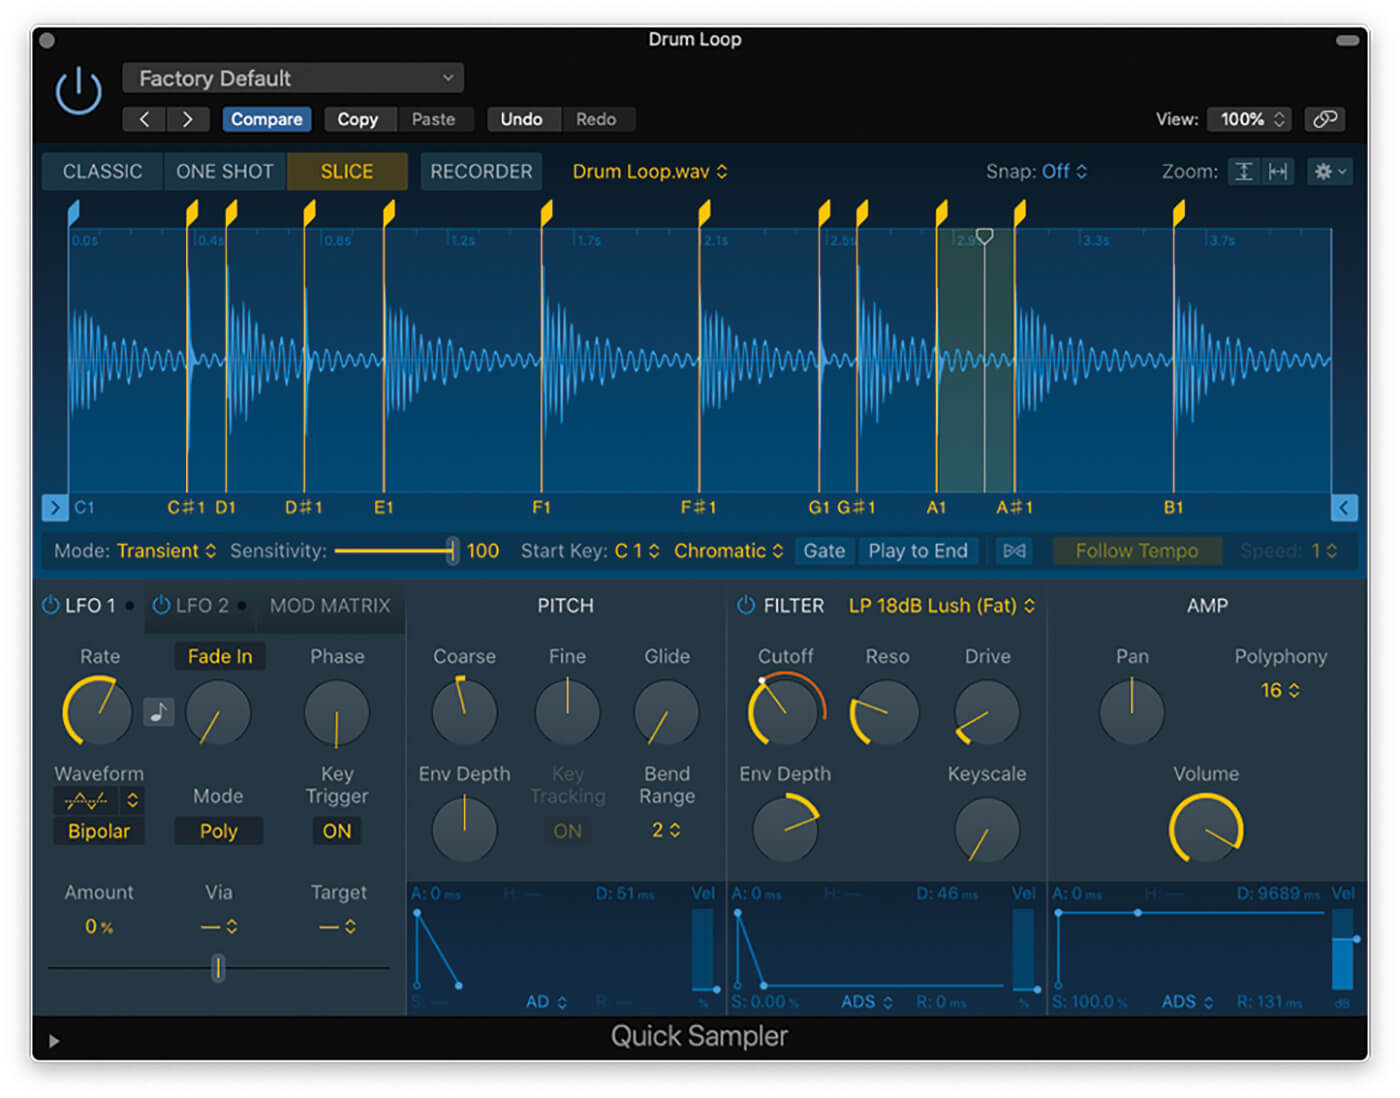
Quick Sampler features three playback modes. If presented with a drum loop as the source file, it will default to Slice mode. Slice mode scans audio files and places a series of Transient Markers across the duration of the loop, which will correspond to MIDI keys on the lower octave of your controller keyboard. You could program a completely new drum pattern using the various slices as percussion sounds or, if you wanted the loop triggered in its original form, you could drag and drop a MIDI file from Quick Sampler onto the Tracks area.
Loop mangling
As its name suggests, Quick Sampler shouldn’t really be your go-to if you’re looking to dig deep and really mangle your drum loops. It is useful as a means of modifying loops in a way that is consistent across all your slices, however. Techniques you might want to explore include global pitch shifting, where the tuning of all your slices can be moved up or down accordingly, and re-enveloping, where the loop is progressively reduced down to a series of transient clicks. Filtering, of course, can also be used to change the overall timbre, which can be further enhanced using an envelope so that the filter sweeps on each step.
Quick Sampler is an effective way of mapping your loops across the keyboard, and fantastic for transformations that are applied to the loop as a whole. But what about treatments that are specific to individual slices, such as the addition of reverb to a snare slice or the reversing of a hi-hat note? For this and other slice-specific modifications, you’ll want the Sampler instrument. Rather than having to remap your samples, though, you can simply swap the instance of Quick Sampler to Sampler and have the slices mapped as per their original import, which will save you a lot of time.
Slice of cake
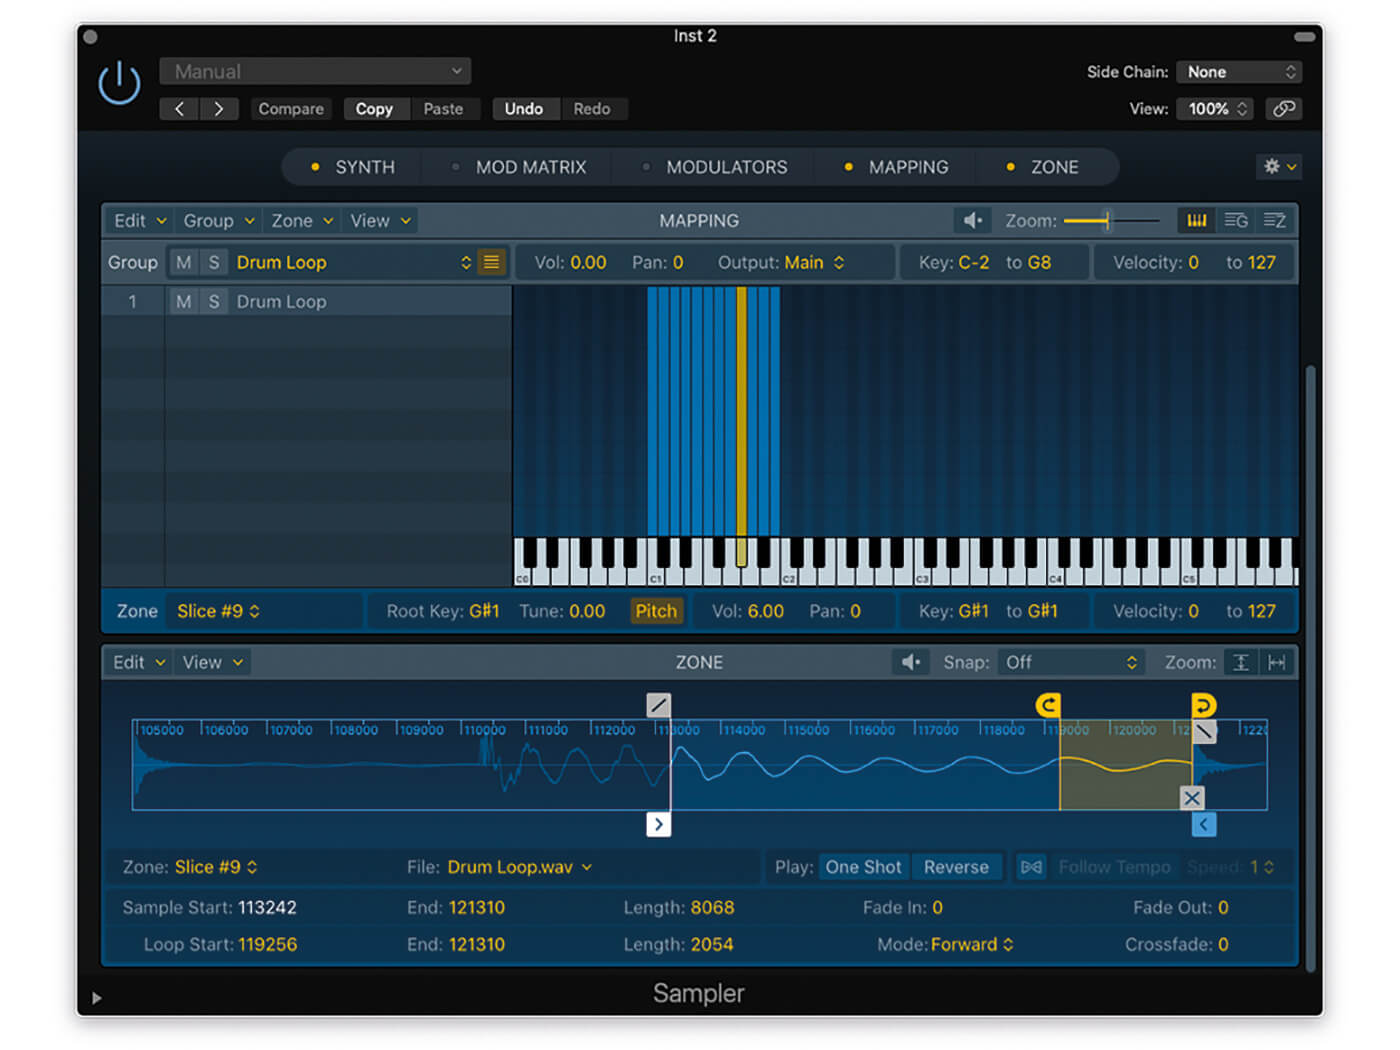
Sampler maps slices as a series of zones and, given the inherently more complex architecture of this instrument over Quick Sampler, you’re able to adjust its zone-specific parameters, including tuning, pan and output assignment. Assuming you’ve loaded the Multi Output version of Sampler, zones can be sent to individual channels on the mixer, letting you apply zone-specific treatments such as reverb, delay, compression and EQ. Because Sampler’s interface is more complicated than Quick Sampler’s, finding the correct zones can take some time. But the ability to work creatively with each slice opens up a variety of interesting sonic options nonetheless. It’s worth investing the time to learn this instrument.
If you like glitch and stutter treatments, you might want to examine the Zone page and, in particular, the Start, End and Loop controls. By switching the playback mode off One Shot – which plays the slice in its entirety – you can set up micro loop points within your slices, which can range from simple stutter effects to pitched, granular-like sounds. You can also move the start and end points of the slice to create interesting effects when you deliberately cut into a sound, and move the start and end points to completely different points in the loops.
Beyond the loop
Despite loops being an efficient way to kickstart a project, they can also result in generic music that lacks individuality. But this needn’t be the case. If you exploit the creative features of both Quick Sample and Sampler, you can imprint your own identity onto your loops, whether that comes from simply resequencing your slices or, in more extreme cases, mangling the loops beyond all recognition. The loop is simply the raw material from which your music is honed, rather than the beginning and end of your creative process. Think of Quick Sampler and Sampler as the tools through which you’ll hone it.
Creative beat-slicing in Logic: step-by-step
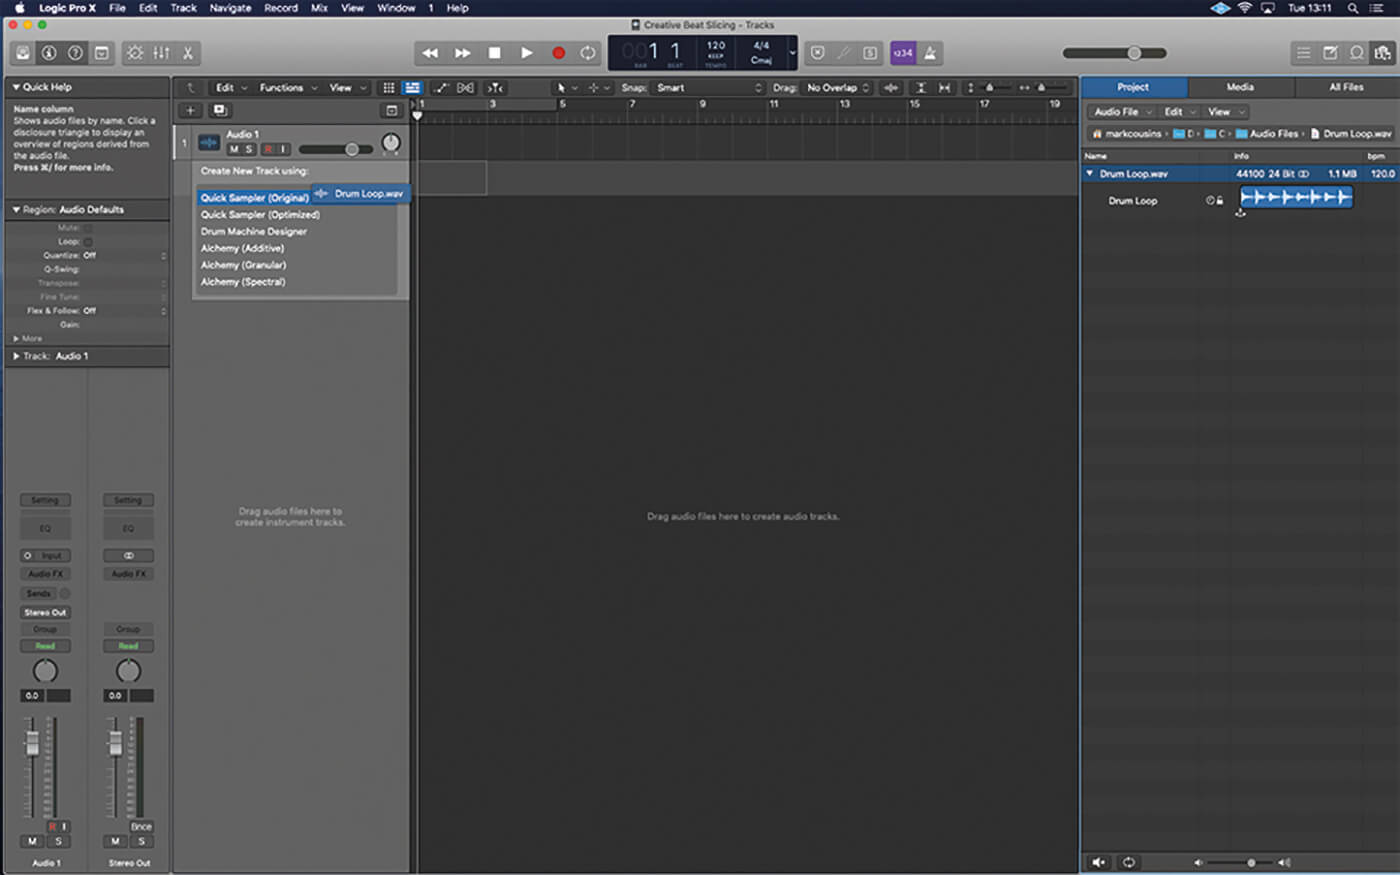
1. Dragging a drum loop from the browser into the Track header will create an instrument and map the loop accordingly. Use the Quick Sampler (Original) option to have the loop mapped as slices.

2. Drag the blue box that appears on the bottom half of the waveform across to the Track area to create a MIDI region to trigger the mapped slices. The loop should playback in its original form.
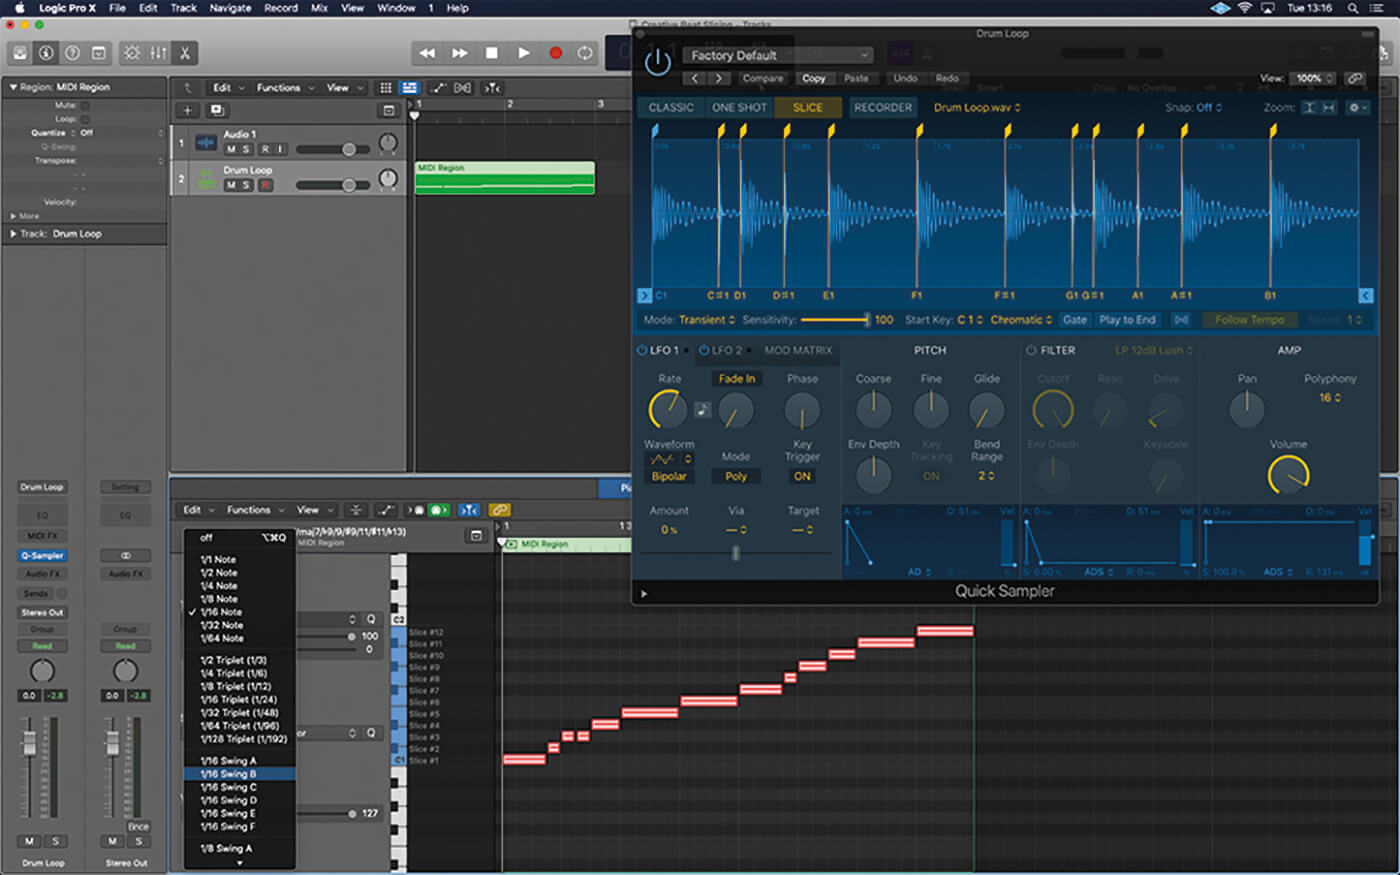
3. Open the piano roll editor to explore the possibilities of resequencing. Try retriggering some of the steps for simple stutter-like treatments or requantise the loop to a swing setting.
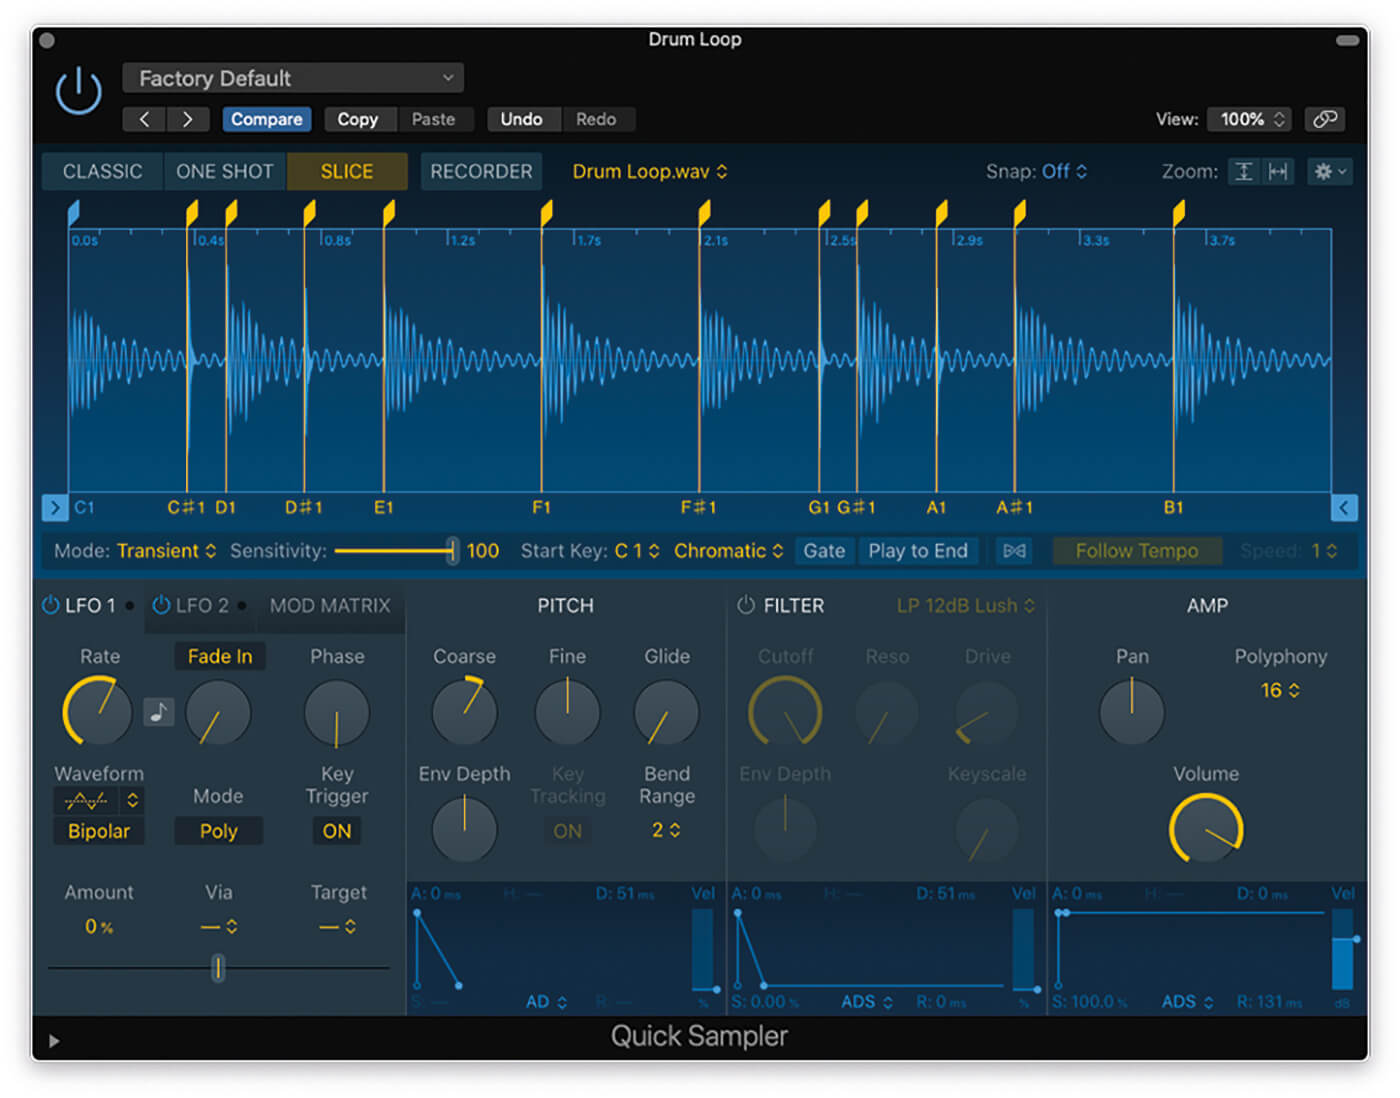
4. One way of changing the sound of the loop is to adjust the coarse pitch. The drum loop will still play back at the same tempo but each slice will be pitched up or down according to the Coarse parameter.
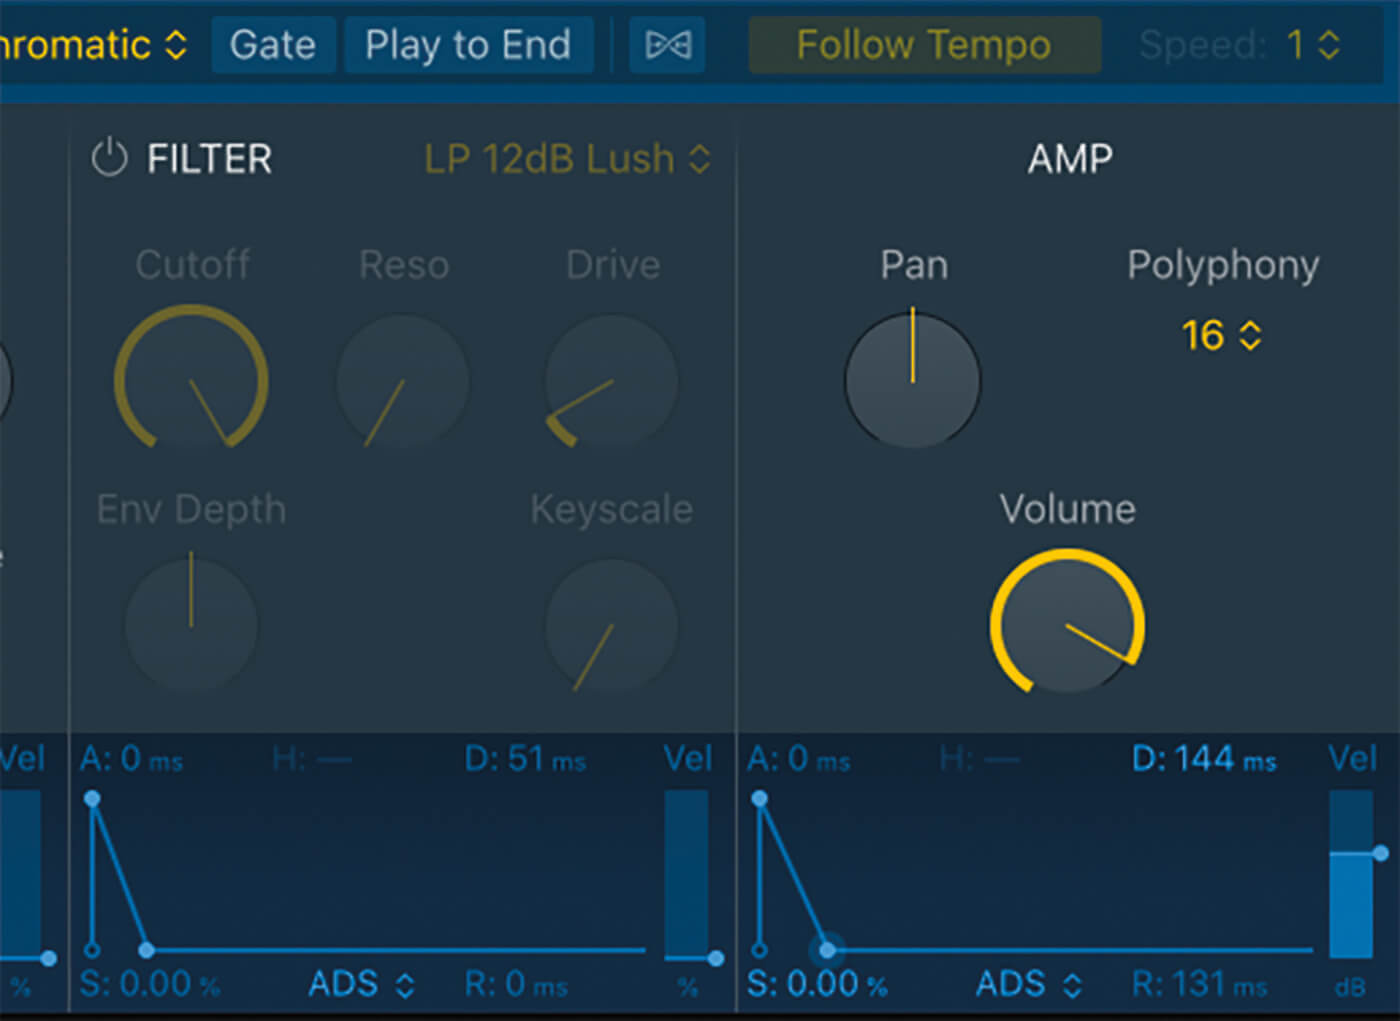
5. The Amp envelope lets you change the duration of the slices, either sustaining for the full duration of the slice or, by lowering the decay, producing a more clipped transient-heavy version of the drum loop.
6. Activating the filter and adjusting the cutoff will apply a static change in timbre. Use the drop-down menu to switch between the filter modes, which include low-pass, high-pass and band-pass.
7. Raising the End Depth will make the filter effect dynamic, with the filter moving each time a new slice is triggered. Add some resonance to make the filter’s movement (defined by the release) more pronounced.
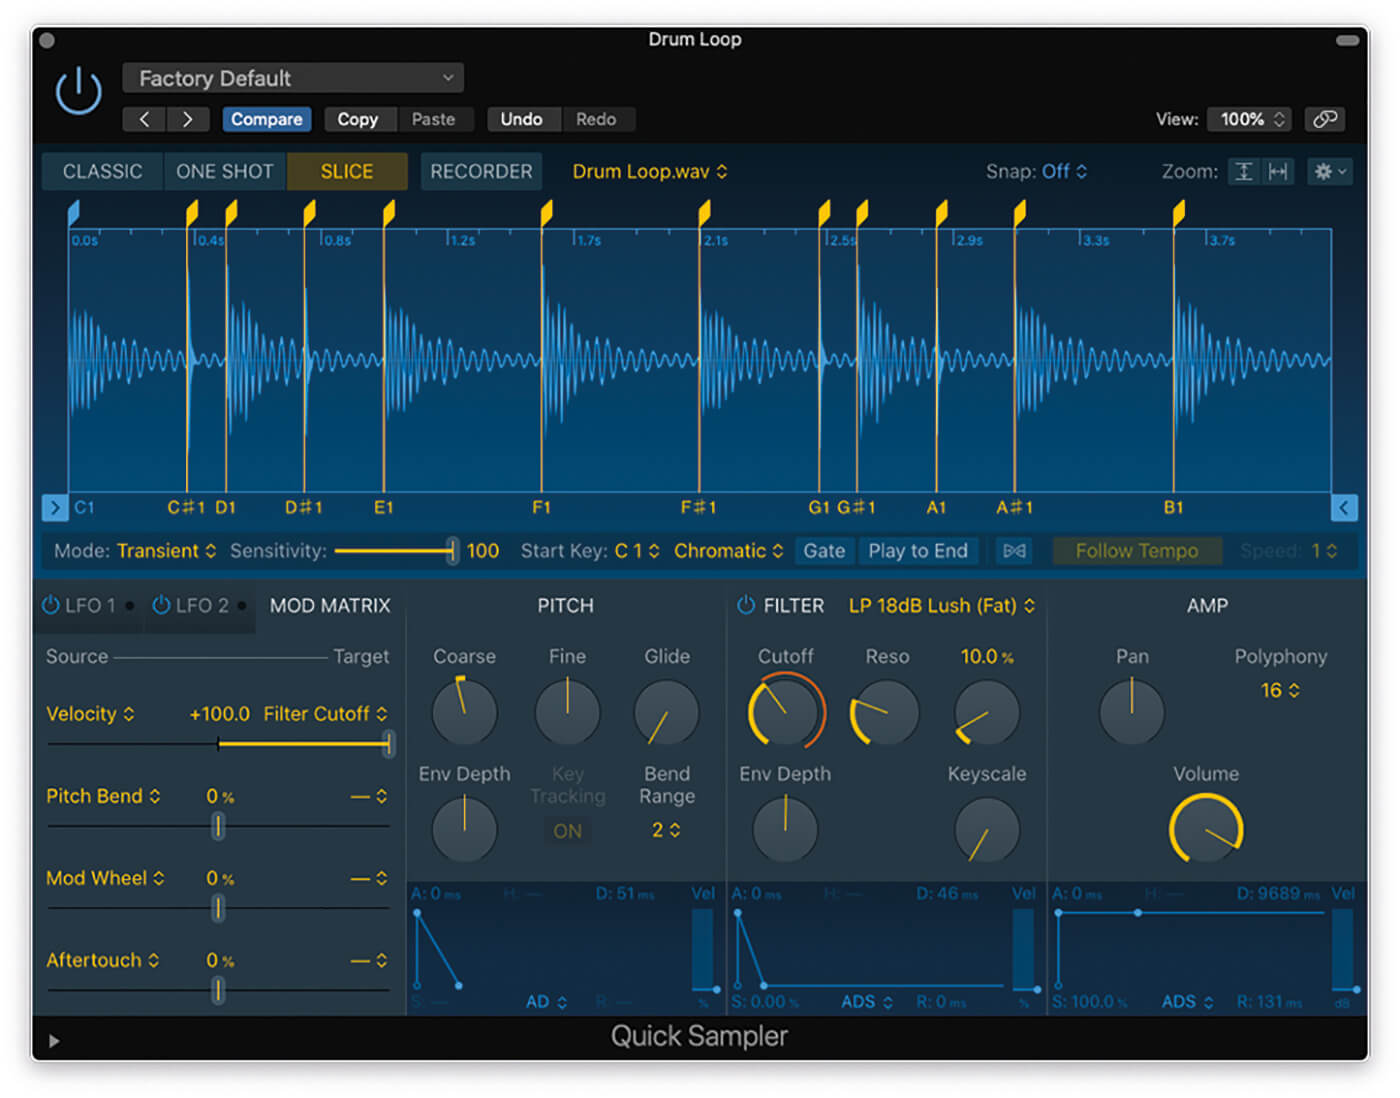
8. The mod matrix opens up new ways of controlling the Quick Sampler’s main parameters. Set the velocity to Modulate Filter Cutoff and lower the Vel slider in the Amp so that velocity doesn’t control amplitude.
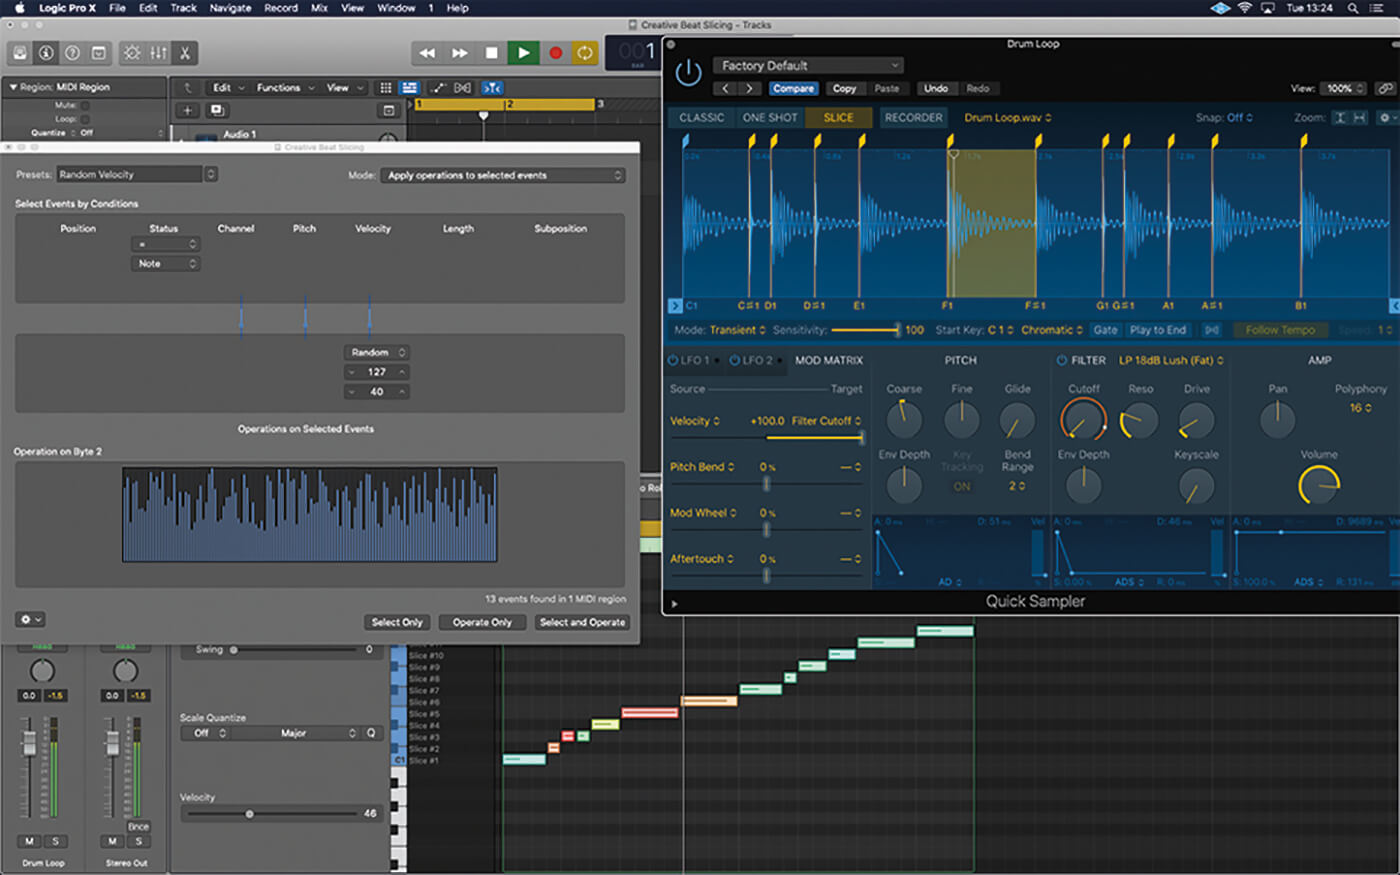
9. Use the Transform editor’s random-velocity preset (Window > Open Transform) to create randomised velocity settings. Set the cutoff to low and the velocity to 100 per cent to hear the effect.
![]()
GET INTO THE GROOVE Extracting the groove from a loop can be just as important as the audio material contained in it. Once your MIDI region has been imported, highlight the region and select Make Groove Template from the region inspector’s Quantize menu. Once you have the Groove Template, you can apply it to any other region in your project so that MIDI notes position themselves to each slice point.

10. To explore slice-specific treatments, use the Sampler. Create a new version of the sliced loop as before, by dragging the loop from the browser.
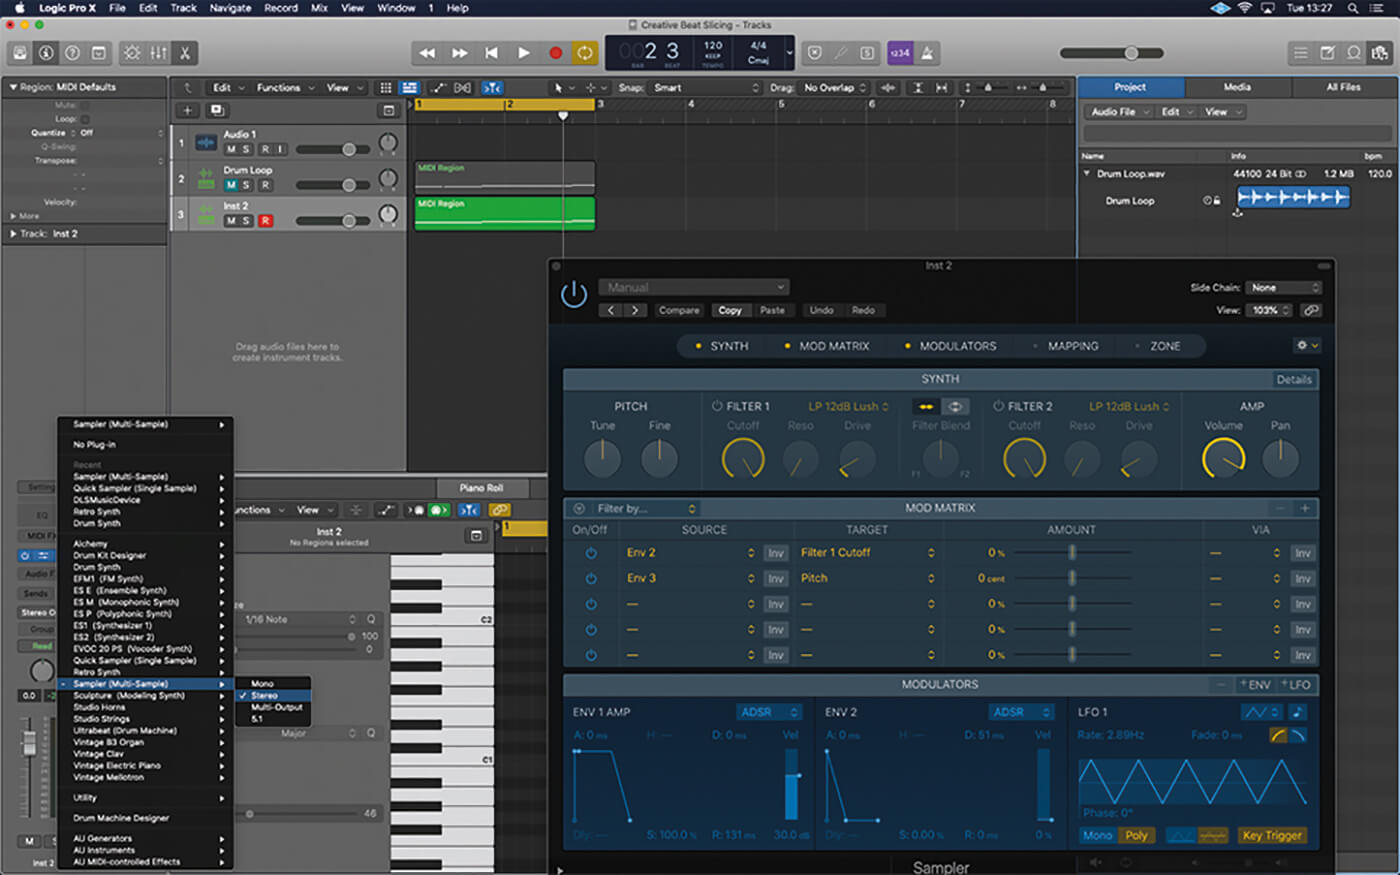
11. With the loops mapped, switch the instance of Quick Sampler over to Sampler. The mapping you’ve created in Quick Sampler should playback exactly the same, even though you haven’t saved the instrument.
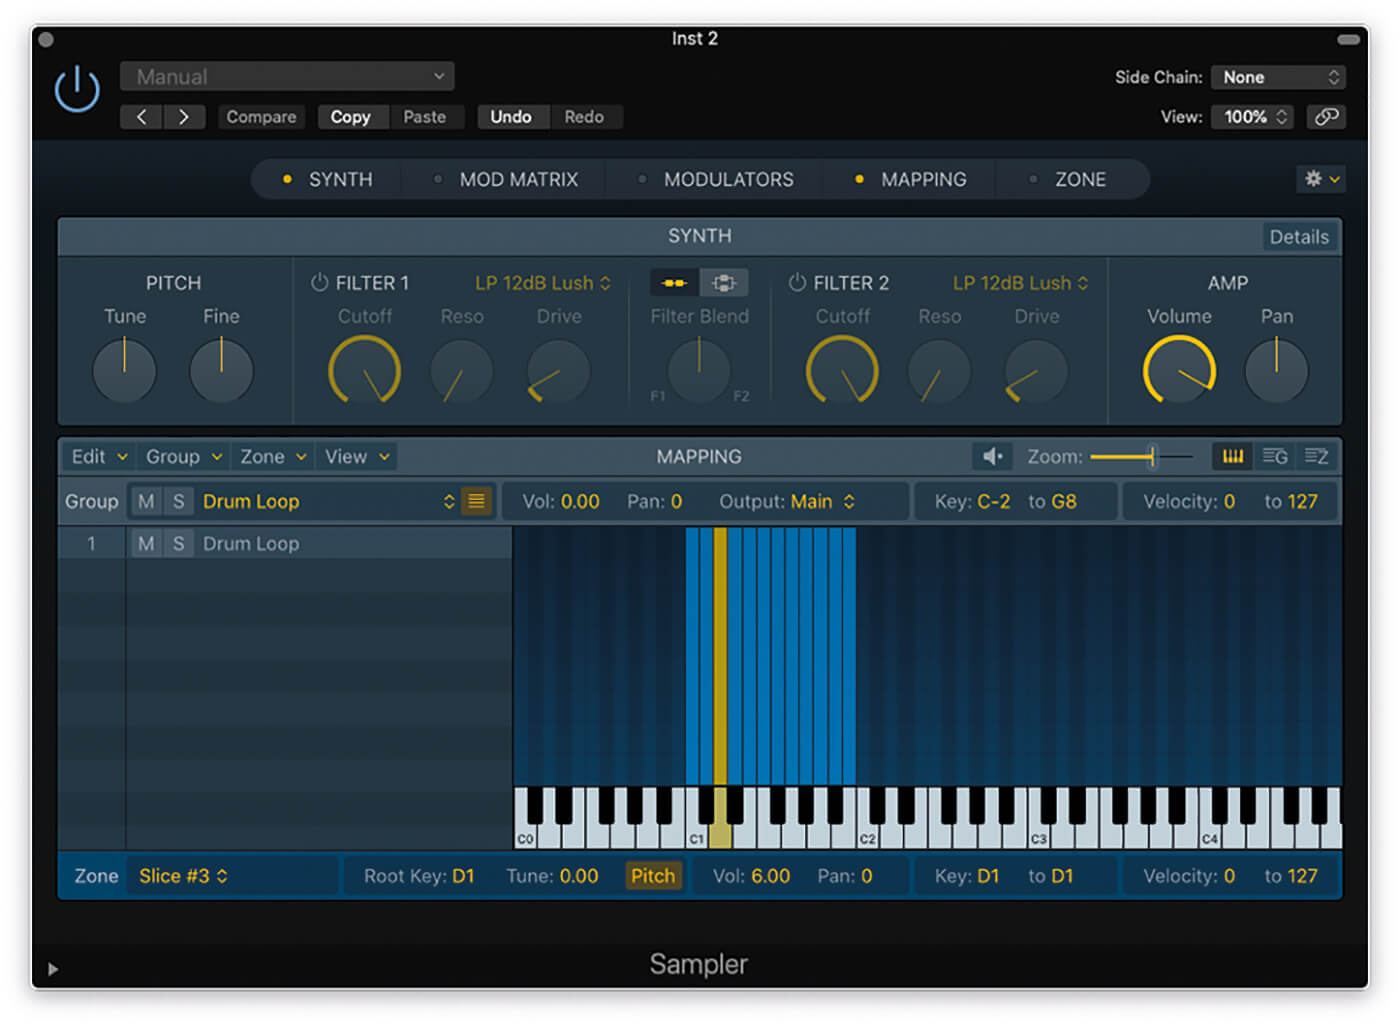
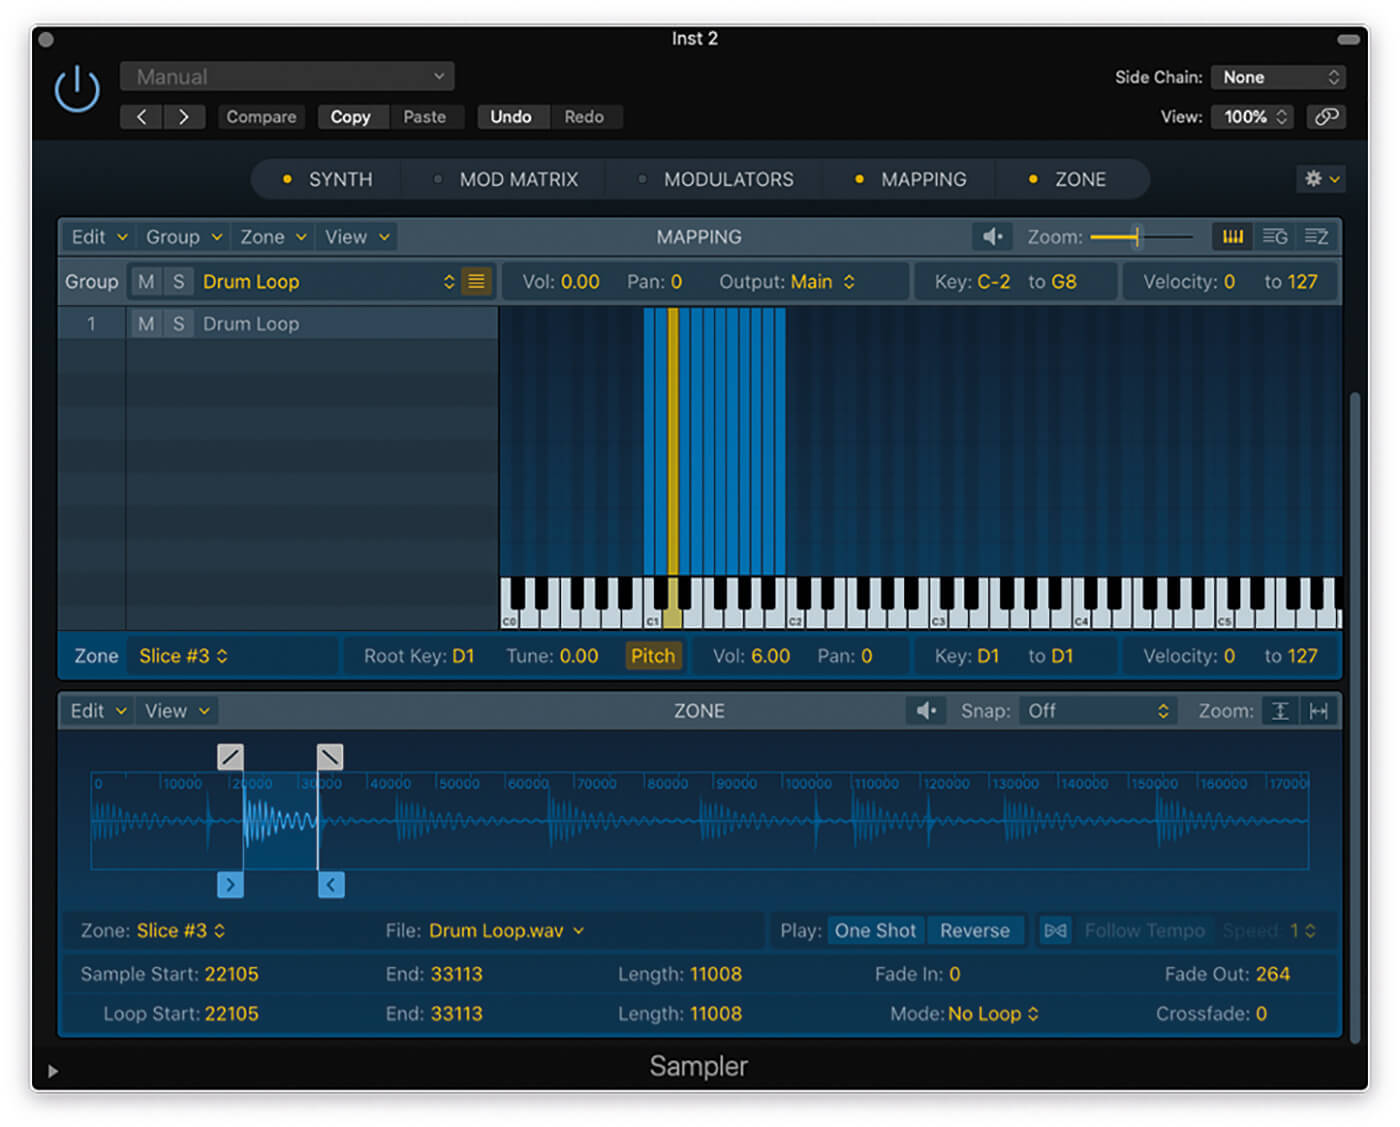
12. Sampler has a much more complicated interface than Quick Sampler. Use the tabs at the top to activate and deactivate parts of the interface. In this case, we’re mainly interested the Mapping tab.
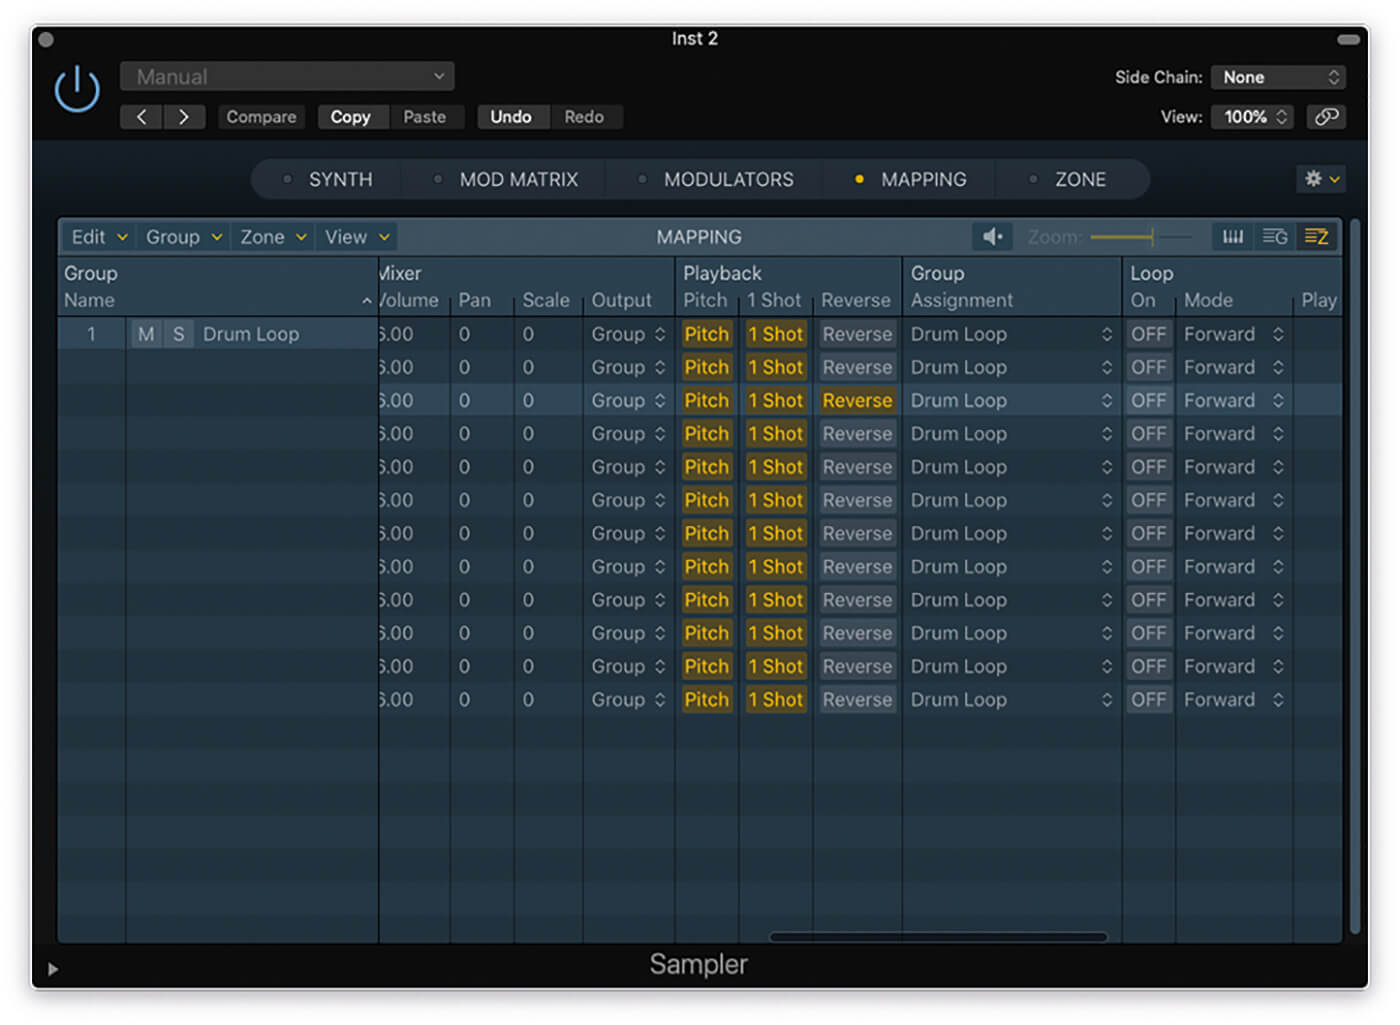
13. Click the Z button towards the right-hand side to open the expanded zone view. There’s a host of parameters unique to each slice/zone. Select reversing playback on one or two of the zones.
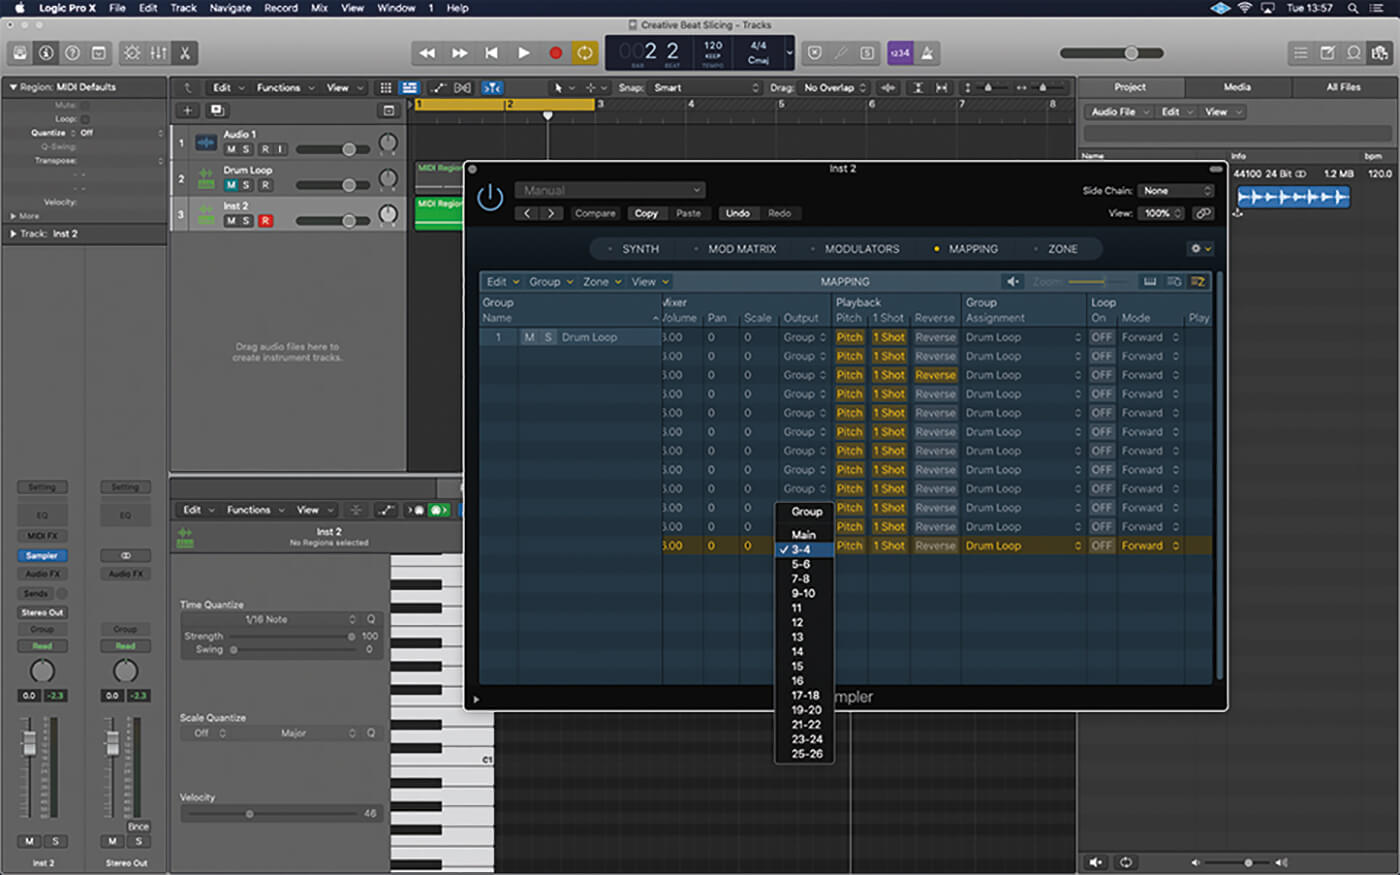
14. Another important control is the Output option, which lets you reroute zones to individual outputs to access zone-specific plug-ins. We selected the last slice/zone and directed it to Output 3-4.
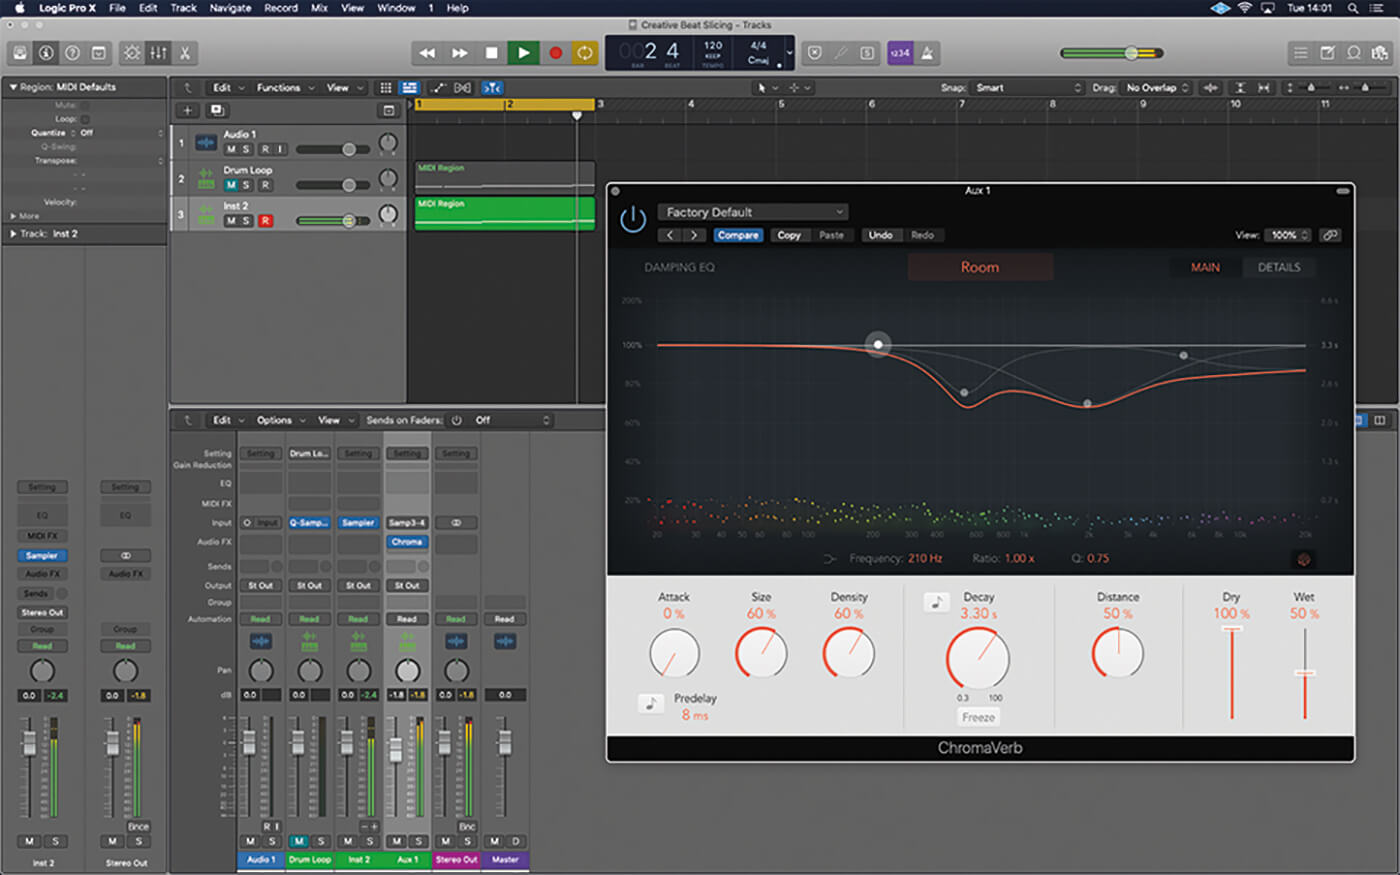
15. If not already set, change the instance of Sampler from the stereo to the multi-output version. Click + on the mixer to create additional outputs. In this case, we’ve added an instance of ChromaVerb.
16. Hit the Zone tab to display various controls in relation to start and end points, as well as looping. These are useful for glitch and stutter effects. Begin by deactivating the One Shot play mode.
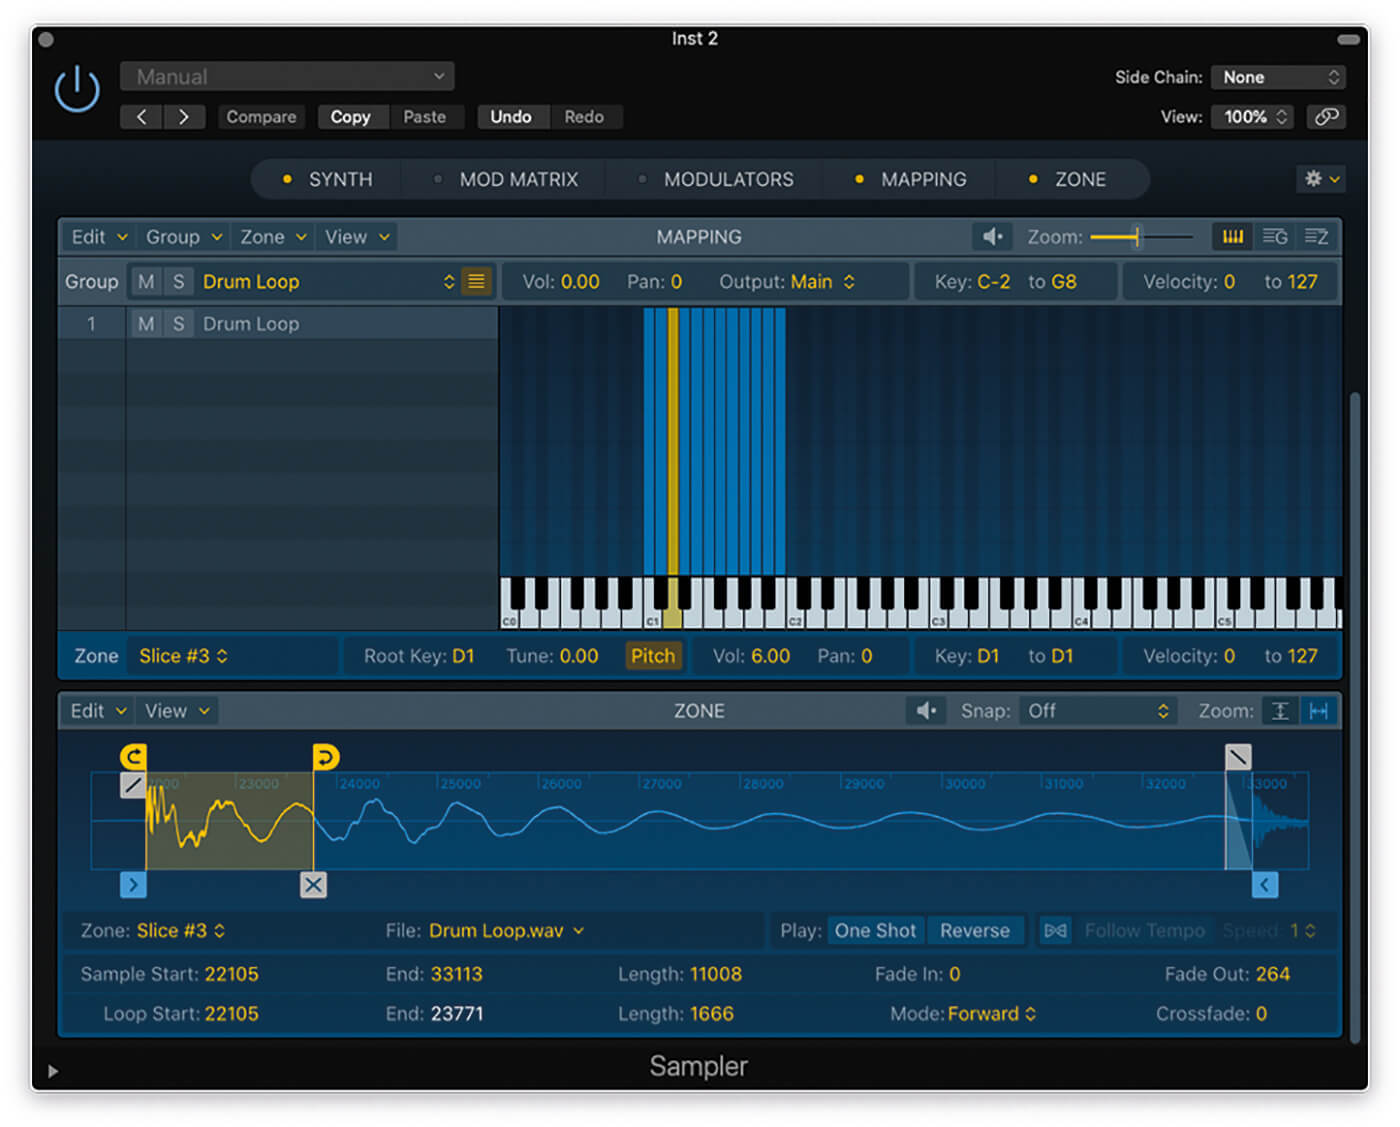
17. Set the Loop Mode to Forward and adjust the yellow loop markers to enclose part of the slice. Small loop settings produce a grain-like ringing, while longer settings produce a type of stutter effect.
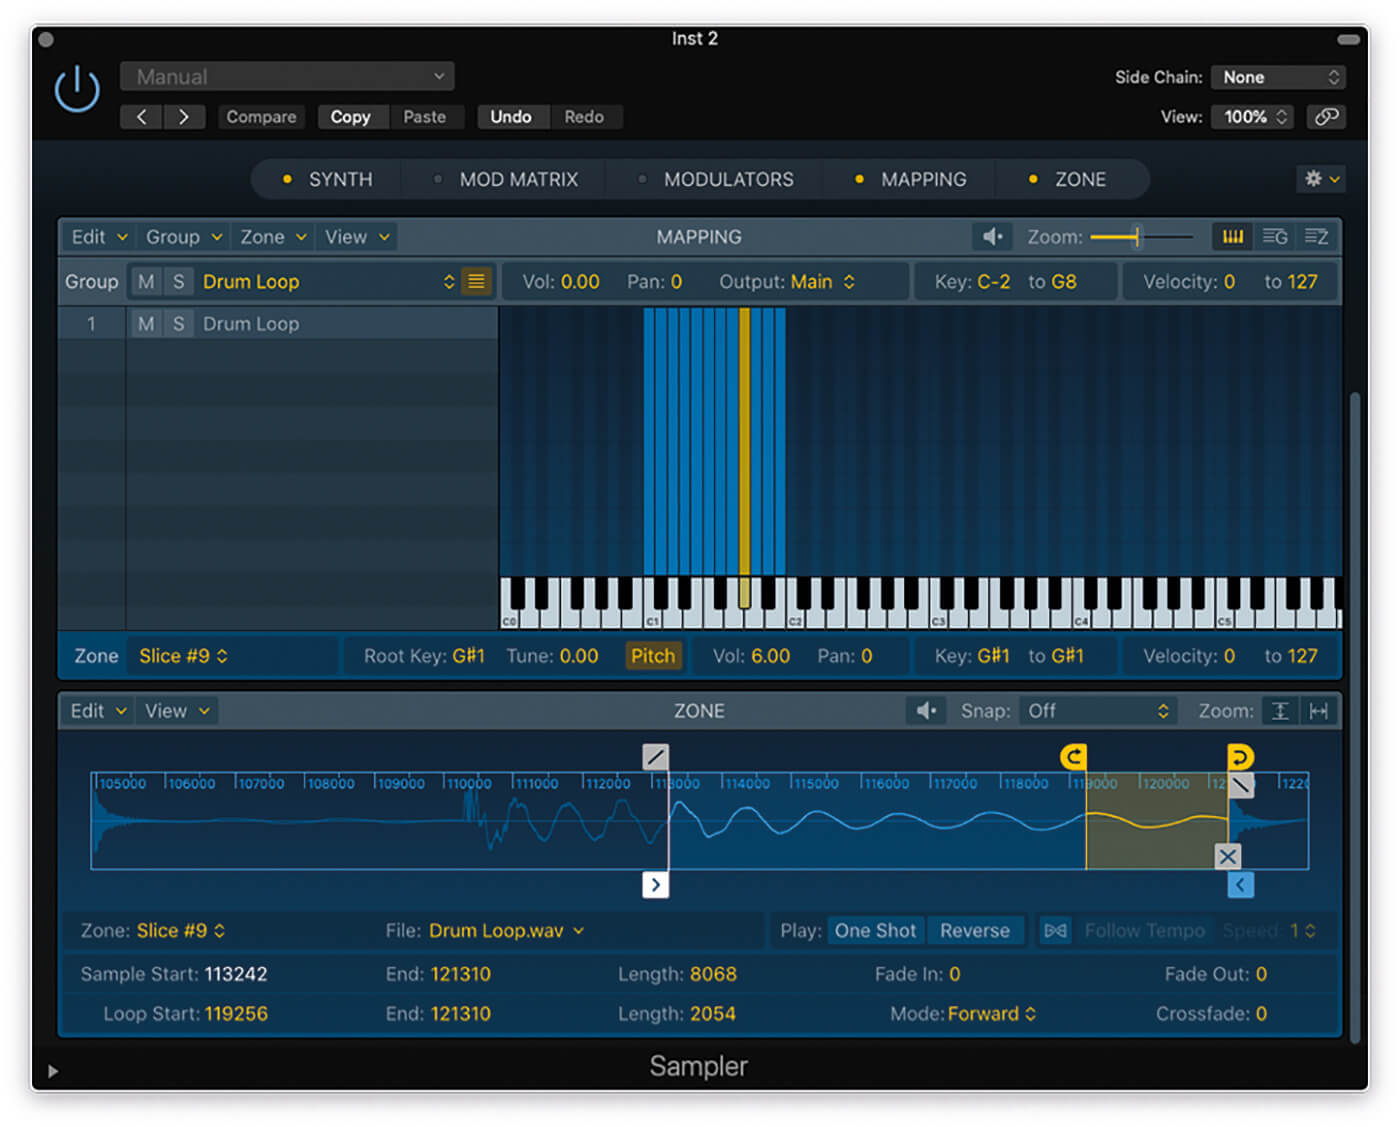
18. If you want to get more creative with your glitch effect, try moving the Zone’s start and end point – aggressively cutting out the initial transient, for example – or setting the loop point further along the slice.
For more Logic tutorials and workshops, check here.