Melodic step sequencing in Logic Pro 10.5
Logic Pro X Step Sequencer is equally adept at bubbling 303-style step sequences as it is at drum programming. We take a closer look at melodic Step Sequencing.
The Step Sequencer in Logic Pro 10.5 has transformed drum programming in the DAW but it can turn its hand to unique melodic step sequencing treatments. If you’re an adept keyboard player, it’s possible that Logic’s existing sequencing features, combined with the Piano Roll editor, might just be enough for your needs. Using a step sequencer, however, can be really beneficial to those working in electronic genres, where the music often benefits from the programmed mechanical edge that a step sequencer can deliver.
Arguably the best example of a step sequencer in the real world is the Roland TB-303 Bassline synth, whose classic sound is born as much from its (somewhat fiddly) internal sequencer as much as its one-oscillator synth controls. For that reason, we’re taking a look at melodic step sequencing using the sound and performance of the TB-303 as a reference point. Of course, there’s no reason to restrict yourself to using the Step Sequencer solely for TB-303 basslines, as many of these techniques can be applied to a range of different melodic patterns and synth sounds.
Acid trip
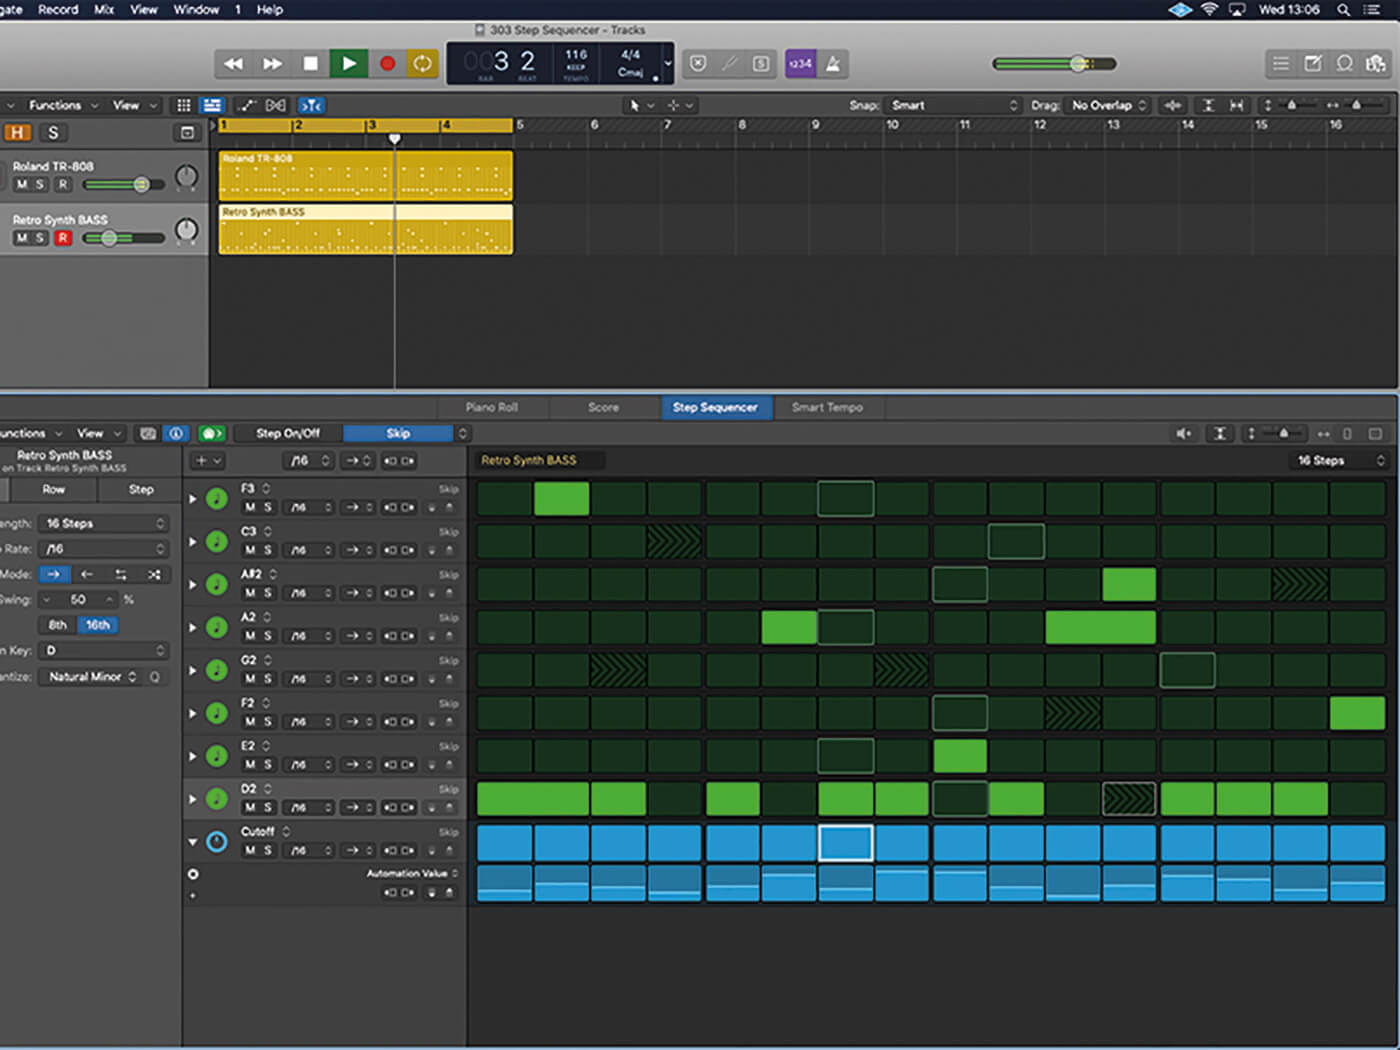
Based on your current instrument selection, Logic will smartly switch between melodic and drum-based pattern regions. As we saw in our previous Step Sequencer drum programming tutorial, you’ll need to create a special pattern region by control-clicking in an empty Software Instrument track and choosing Create Pattern Region from the shortcut menu. For melodic step sequencing, Logic will default to a note grid covering a one-octave range in C Major, with each row representing a different note from the C Major scale.
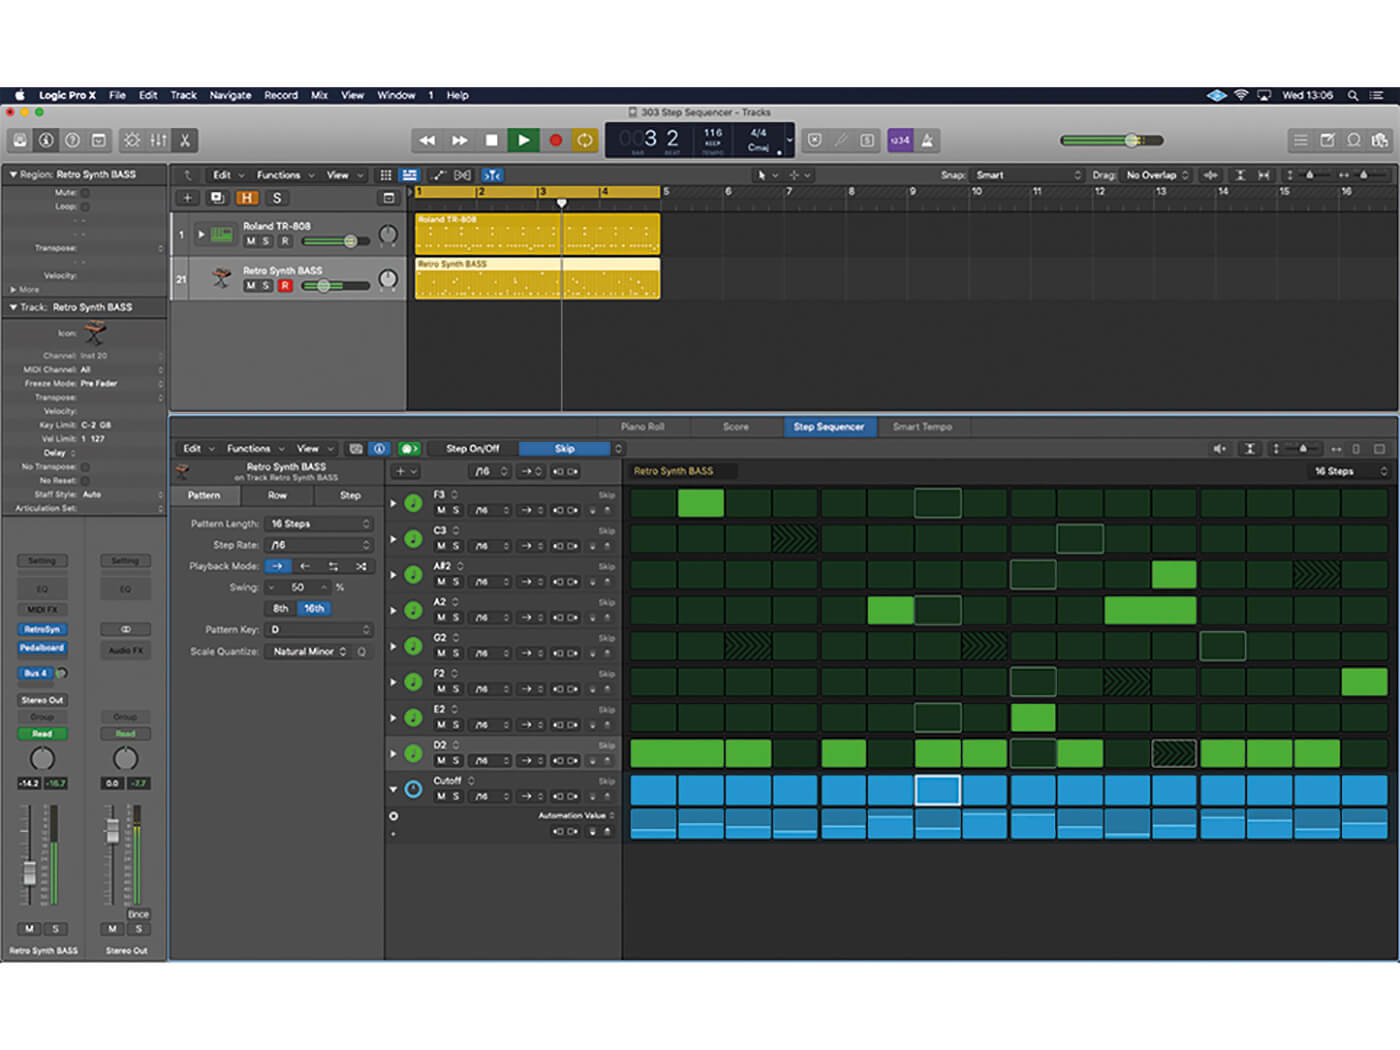
One of the joys of step sequencing, and indeed, the TB-303’s sequencer, is the way you can quickly program serendipitous one-bar riffs by randomly clicking across the Step Grid. Using the Step/Off controls, therefore, you can quickly create repeating riffs over the duration of the pattern. As the Grid is set to notes of a given scale, anything you program will sound musical. Usefully, the Pattern settings (as part of the Step Sequencer Inspector) let you specify both a key and scale quantise, instantly repitching any existing notes.
Gate keeper
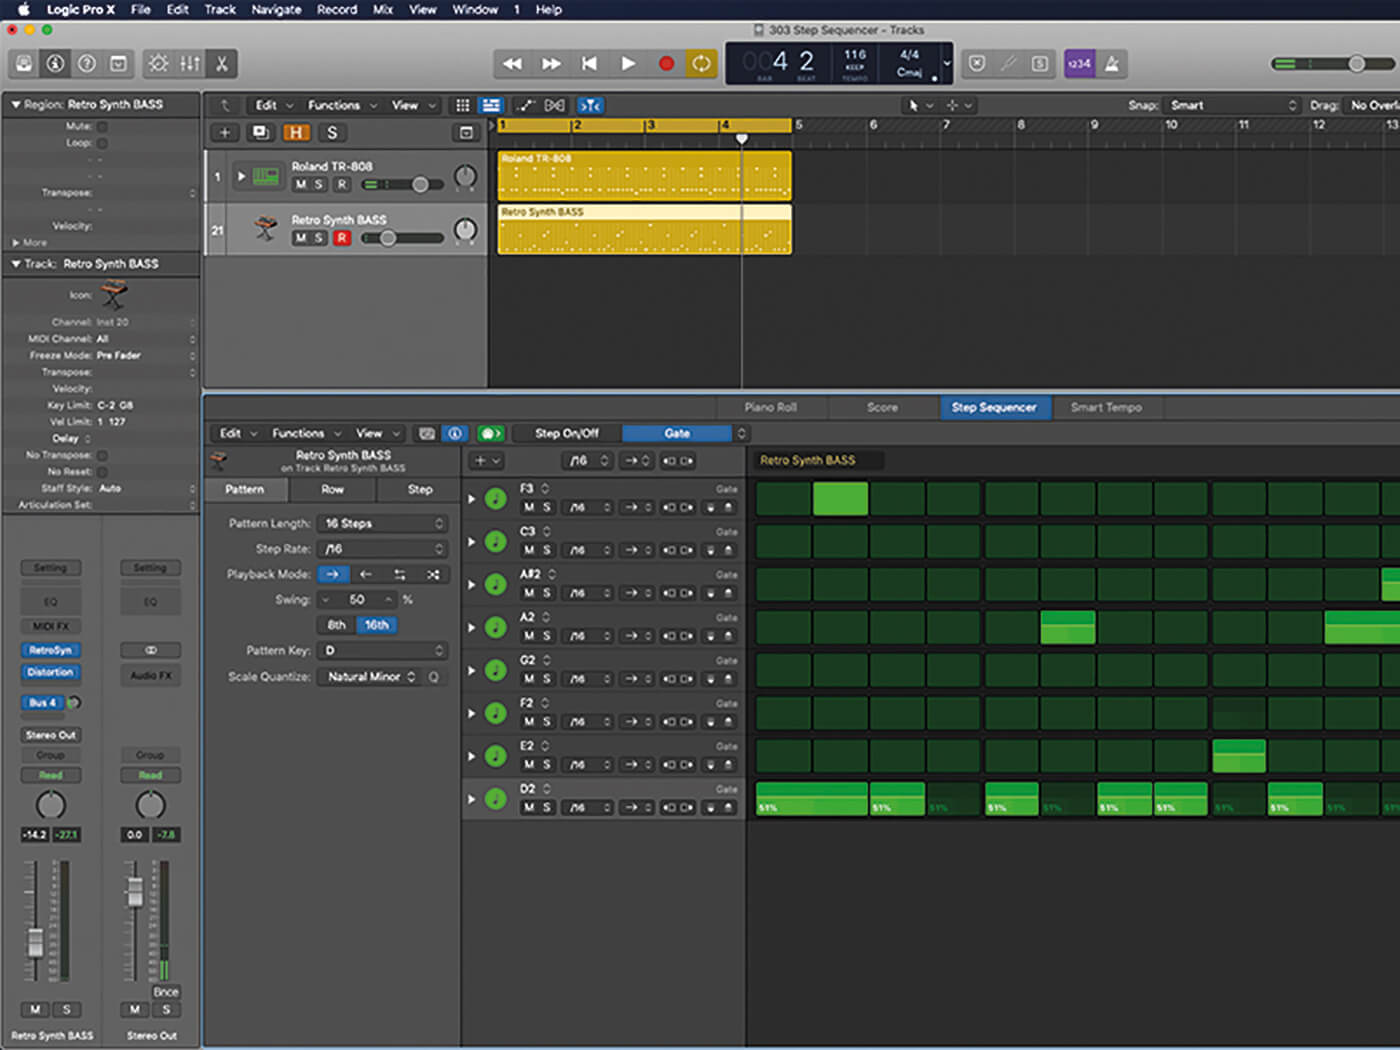
Unlike programming drums, the gate setting for melodic step sequencing is important. Technically, Logic’s Step Sequencer defaults to a gate time of 100 per cent, meaning that each step sustains for a full 1/16th note. Many analogue step sequencers like the TB-303 had a gate time that was closer to 50 per cent of the note’s duration. For the most authentic results, therefore, you’ll either need to edit each step to a 51 per cent gate setting (the reason will become clear later) or cut and paste each of the step triggers (from a default 51 per cent gate step) rather than drawing them in.
One of the most distinctive effects produced by the TB-303 is the note glide effect. In the case of the Step Sequencer, this can be achieved using the Tie feature, which can extend the length of one step into the next. For this to work, you need to ensure the accompanying synth (in this case Retro Synth) is set to monophonic playback with Glide engaged. This explains why we suggested a 51 per cent Gate setting, as a Tied 50 per cent Gate would only run-up to the note, rather than over it.
Auto filter
There are many ways you can use the Step Sequencer to enhance the basic TB-303 effect. You could try creating additional automation rows that let you modulate parameters on Retro Synth on a step by step. One of the distinctive qualities of the TB-303 was that users would dynamically modulate the cutoff by hand as the pattern was playing. In this case, we can set a relative position for the cutoff (or any other parameter) on each step.
There are features that go above and beyond the TB-303’s abilities too. The Note Repeat feature, for example, is great for the type of ratcheting sequencer lines made famous by Tangerine Dream. For the best results, try setting small Repeat values of two or three for the occasional step.
If you’re interested in different ways of making music – methods that don’t rely on your dexterity with a keyboard or the production of results that can be described as predictable – you may well find the Step Sequencer an intriguing tool that merits closer inspection. To see what’s possible, it’s well worth looking at some of the presets patterns to see how step sequencing can be a creative tool in its own right
Melodic step sequencing in Logic: step-by-step
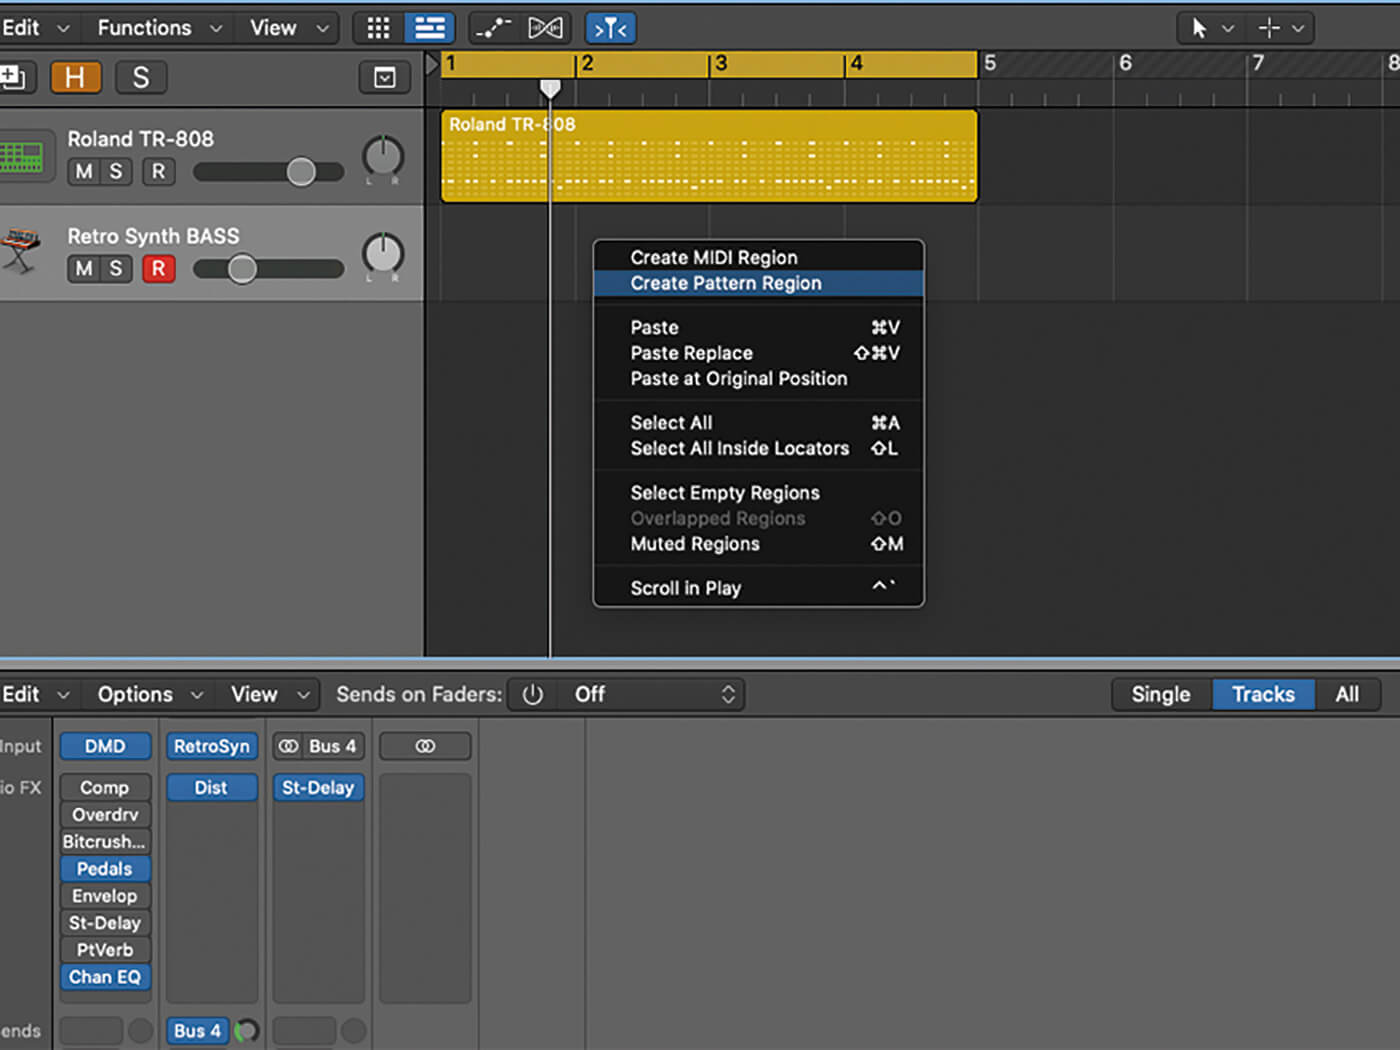
1. Working from the instance of Retro Synth included in the Logic Project, create a new Pattern Region by control-clicking in the Tracks area. Double click the Region to open it in the Step Sequencer mode.
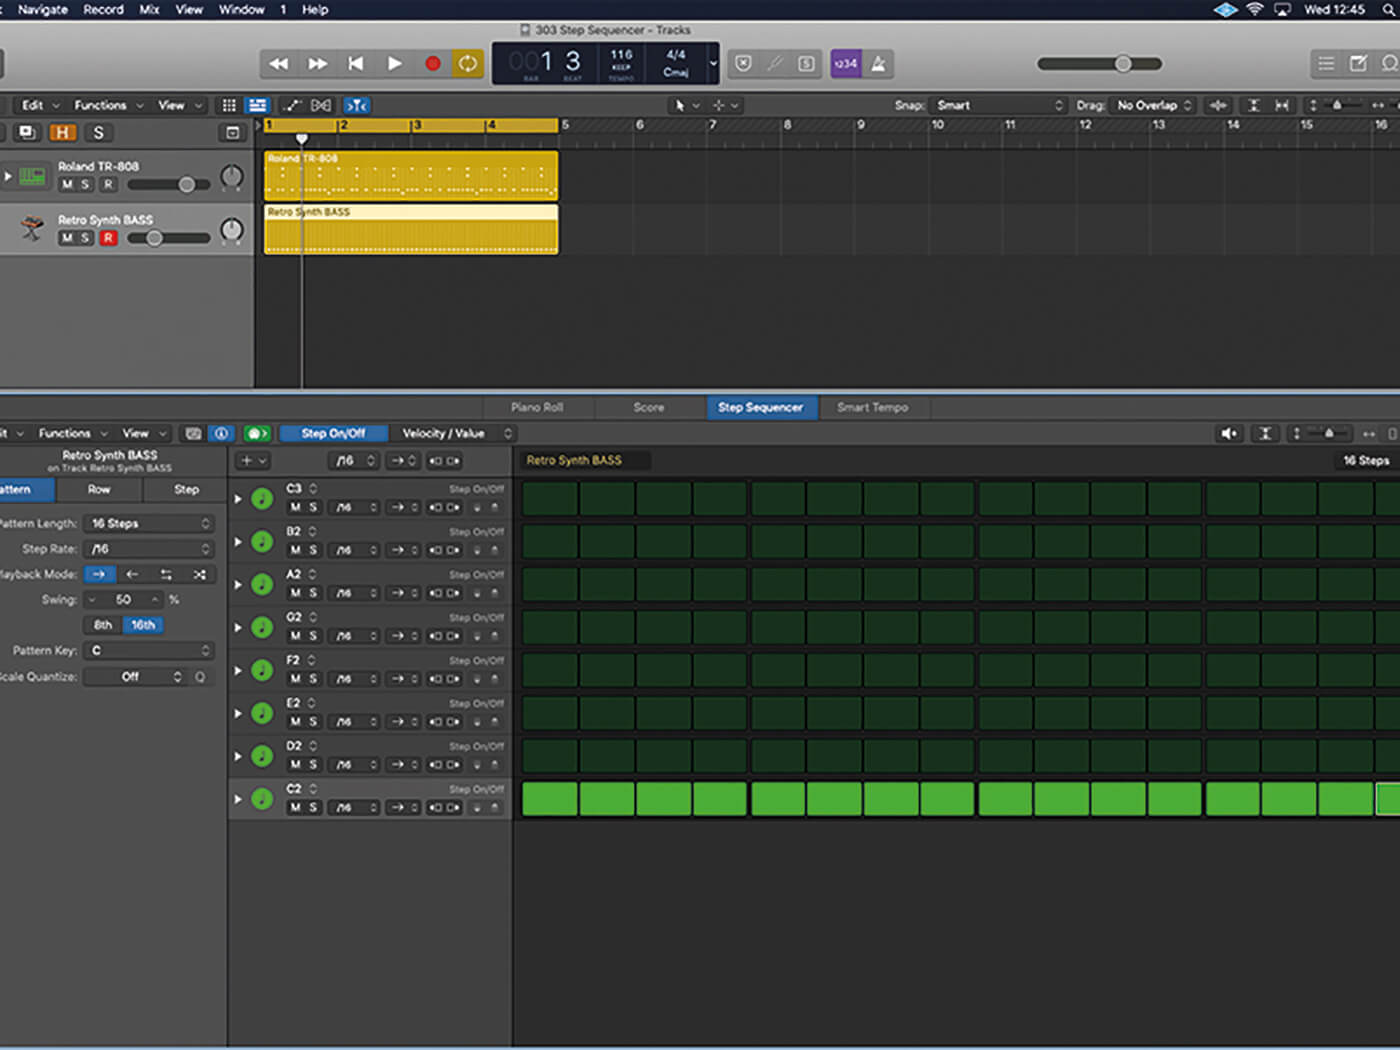
2. The Step Grid currently represents an octave in C Major, with each row set to one of the seven different notes in the scale. Start by populating the grid with consecutive 1/16th steps on the lowest note (C2).
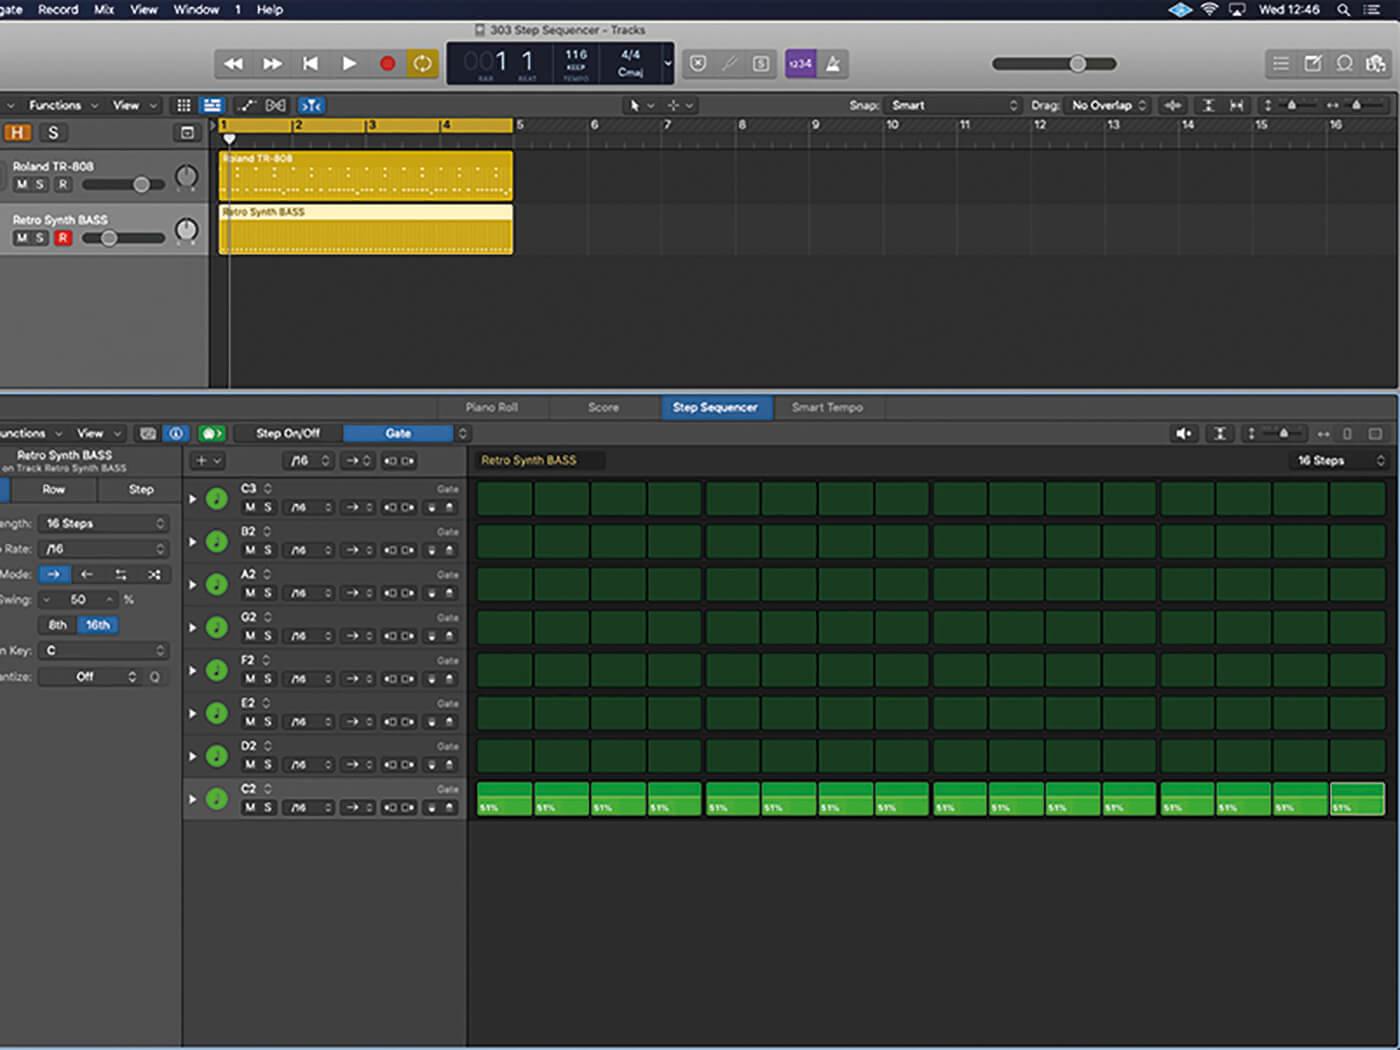
3. Change the grid mode so that it shows the Gate setting for each step. Set each step so that the length on each note is 51 per cent. You should now hear a more clipped sequence with shorter note lengths.
4. Build up some sense of melody in the sequence using the cut-and-paste feature ensuring the gate setting remains at 51 per cent). Set some steps with big leaps and some with smaller jumps.
5. When working with some of the steps that have interval leaps (small or large), switch the Step Grid to Tie mode and then click to extend one note into the next. Play this back to hear the glide effect.

6. The Glide effect is dependent on the Retro Synth having its Glide mode active. You can change the quality of the effect – or, more specifically the length of glide – using Retro Synth’s Time control.
7. Open the Step Sequencer’s Inspector to see the Pattern parameters. Changing the pattern key (in this case D) will shift all the notes accordingly so that the lowest and highest notes are D and the F is sharp.
8. The scale quantise e will then change the tonality from the default major to a multitude of different scale types. Use natural minor for minor keys, or one of the more esoteric options for unusual tonalities.
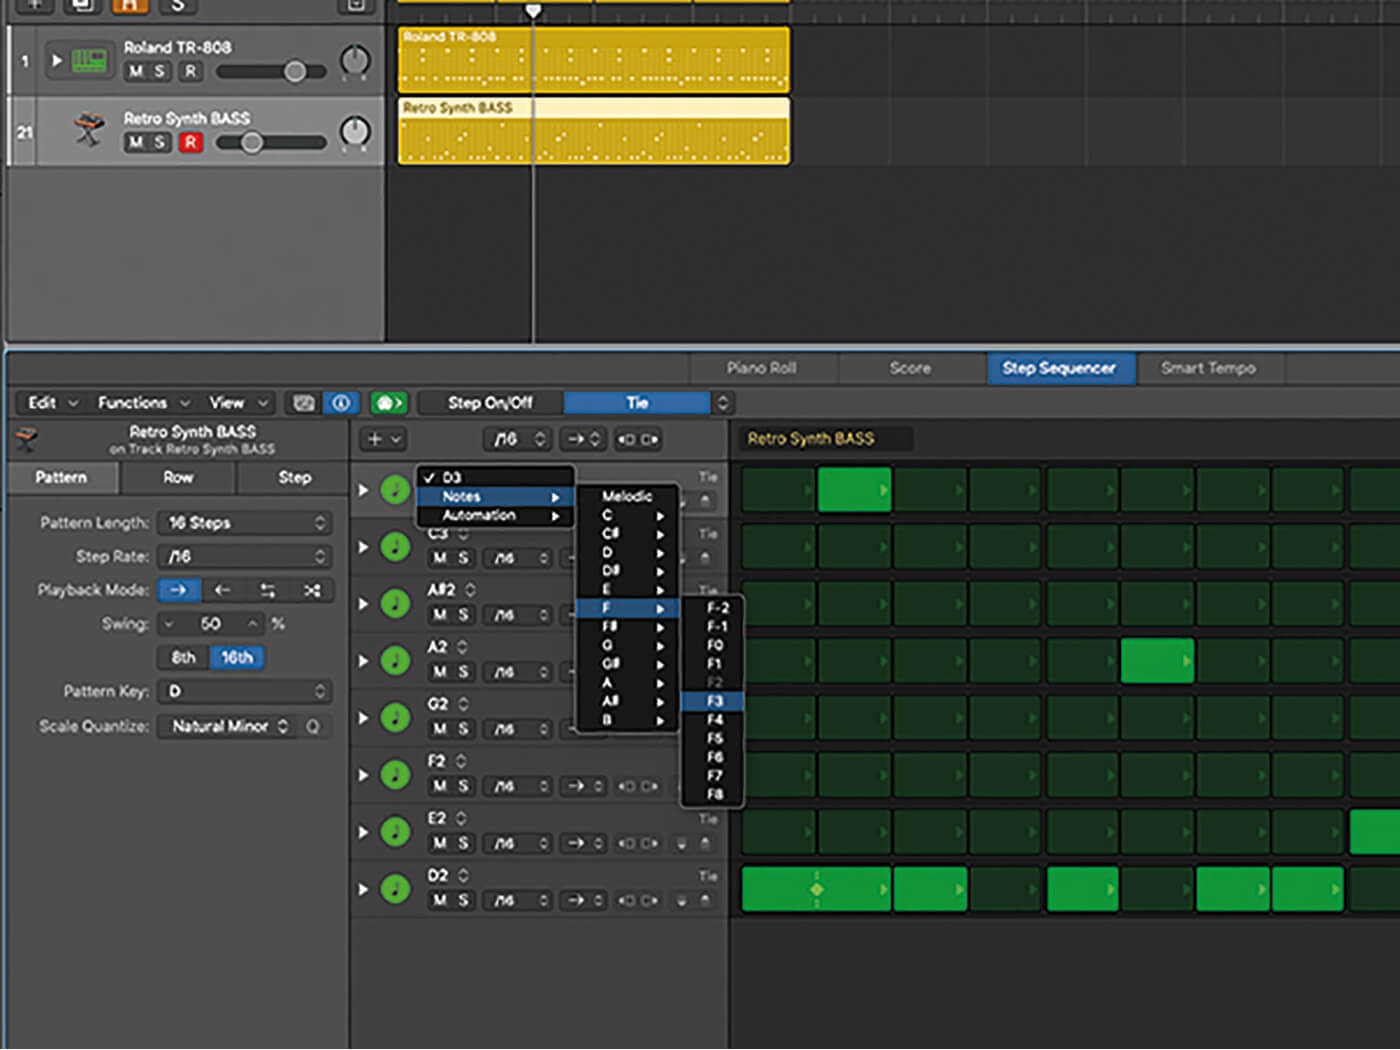
9. As well as the key and scale quantise, you can manually adjust row pitches in the Step Grid. In this case, we’ve taken the highest note and pitched it outside the default octave setting to F3.
![]()
PATTERN PRESETS The Step Sequencer includes its own Pattern Browser, opened with the button in the Step Sequencer menu bar. Patterns are organised into Bass, Drums and Melodic and you can also create Templates for useful starting points. Take a closer look at the preset patterns to see what can be achieved – especially in relation to Melodic Sequencing, which can even work as springboard to your own compositions.
10. To make the pattern more interesting, try adjusting some of the default 51 per cent gate settings. Use longer gate settings on some of the slide notes, for example, or shorten notes where they are repeated.
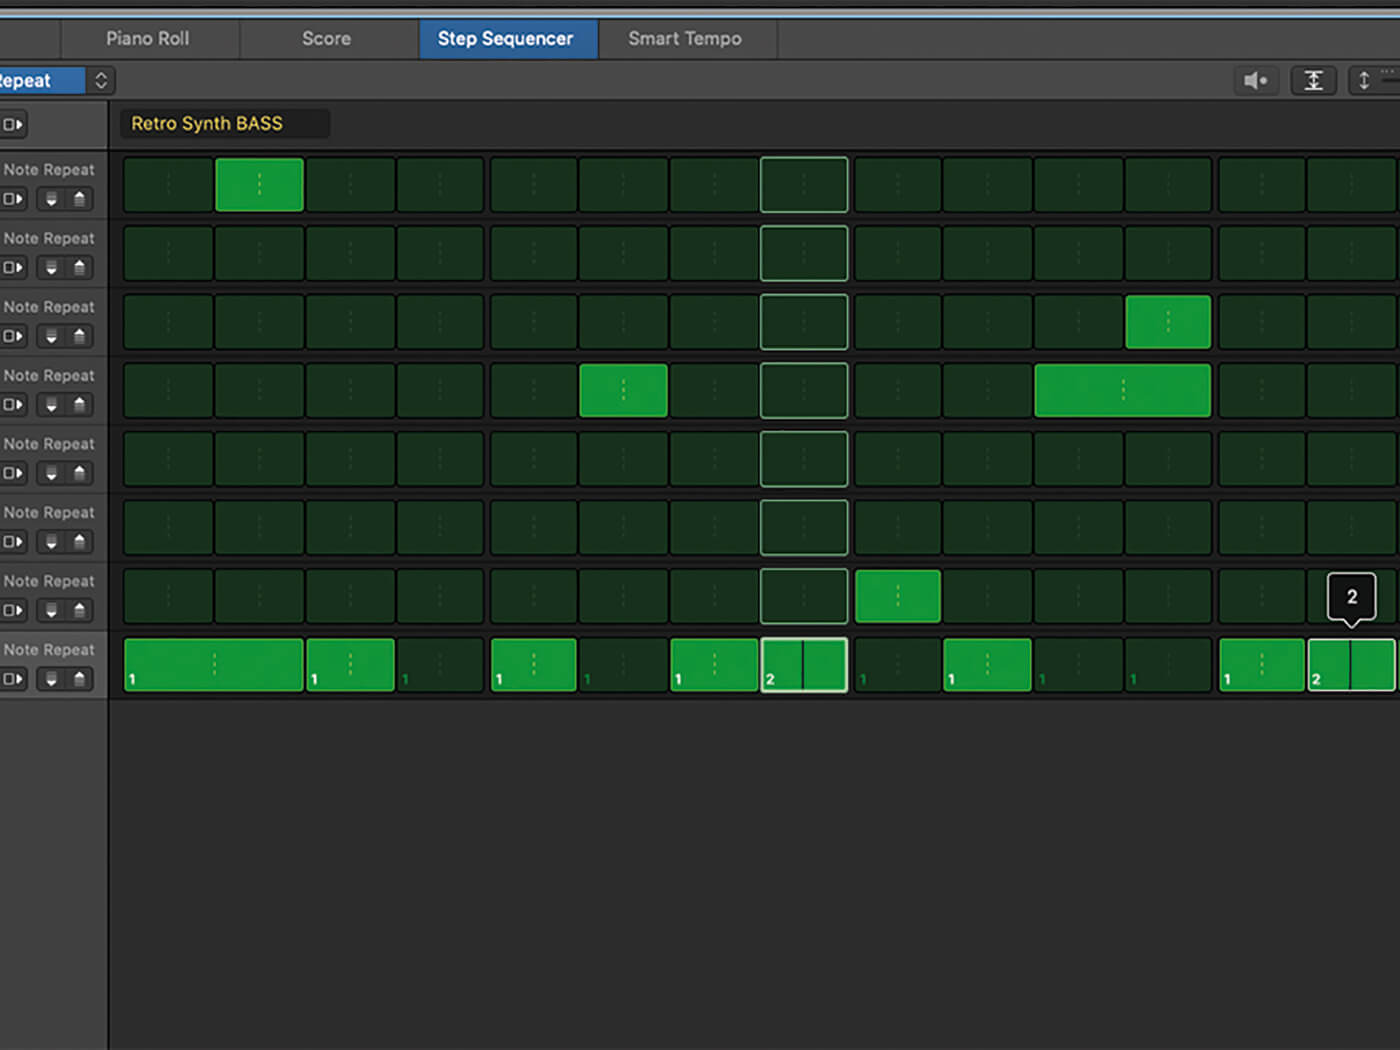
11. Another interesting option (despite falling outside the remit of an original TB-303) is the note-repeat function. Here, you can set a note to re-trigger a number of times (two or three is usually best) in a given step.
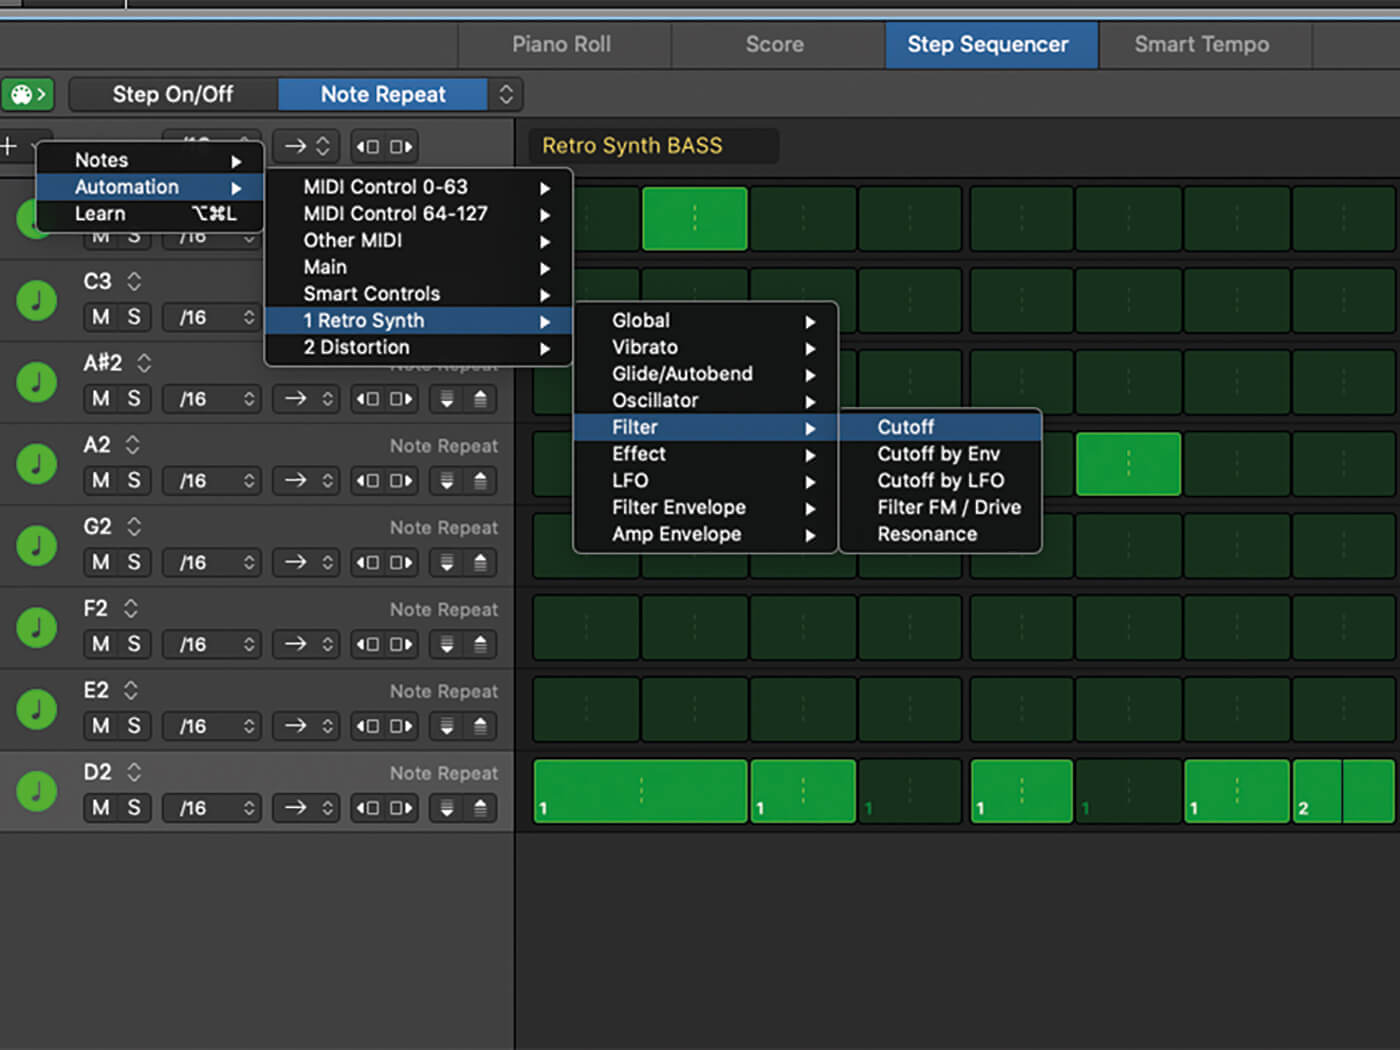
12. Use the + sign at the top of the Step Grid area to add new rows. In this case, we want to add a new Automation row, using it to control Retro Synth’s filter cutoff parameter.
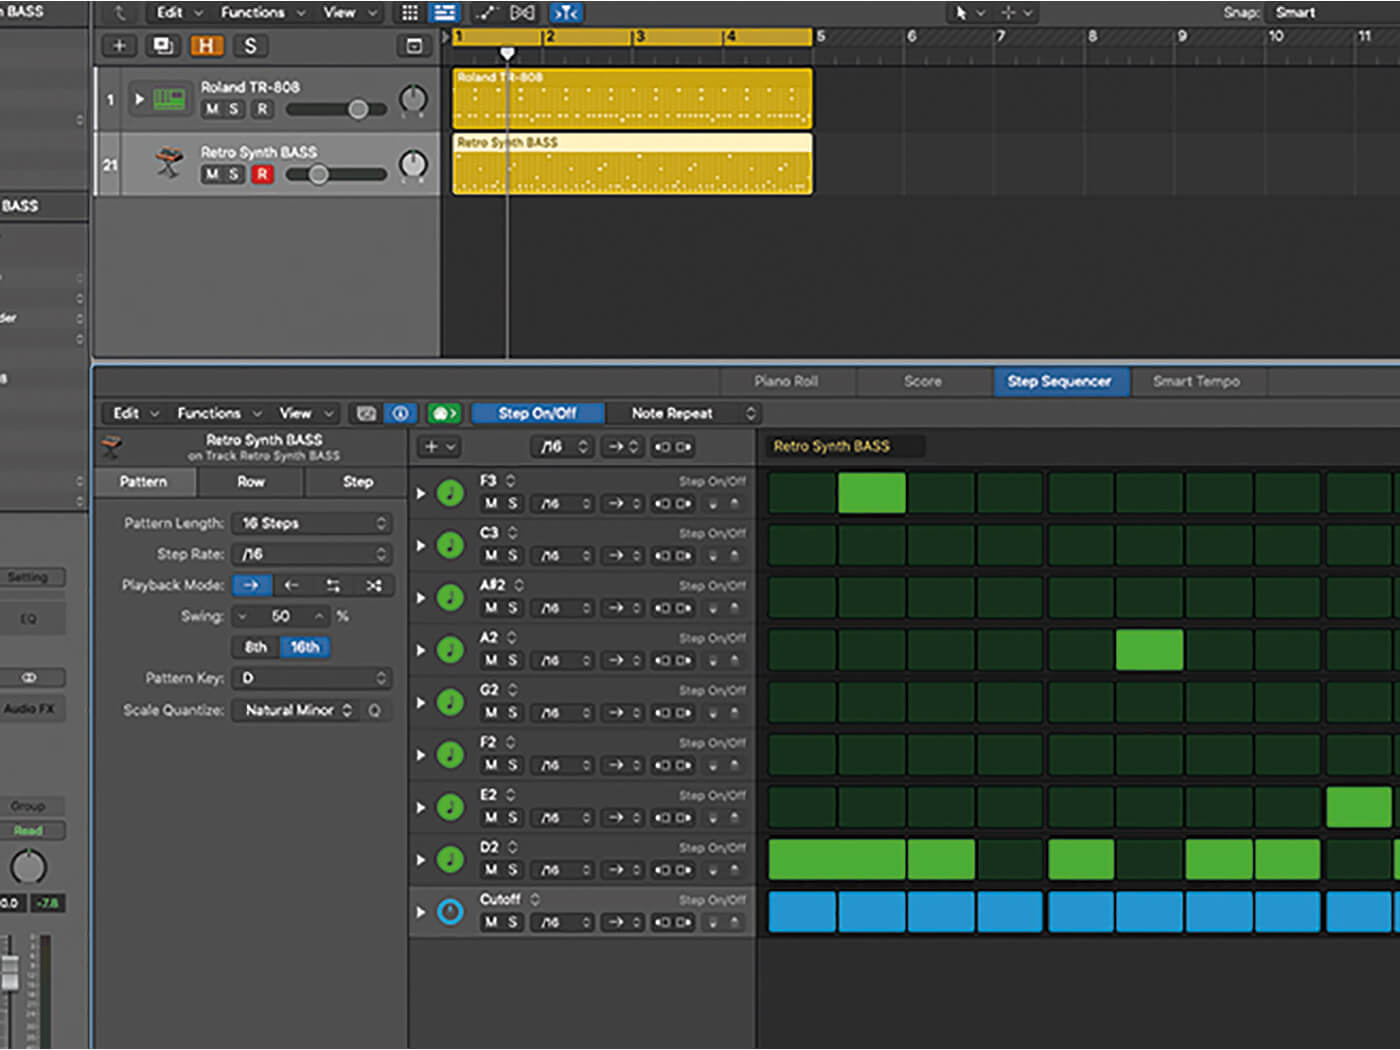
13. You’ll need to create an automation event for each step of the sequence. Move back to the Step On/Off mode and active each step of the automation row. Click the arrow to expand the track lane.

14. In its expanded view, you should see both the Step On/Off controls and the parameter level for each step. Use the Automation Value to dynamically control the filter, opening and closing it on note-by-note basis.
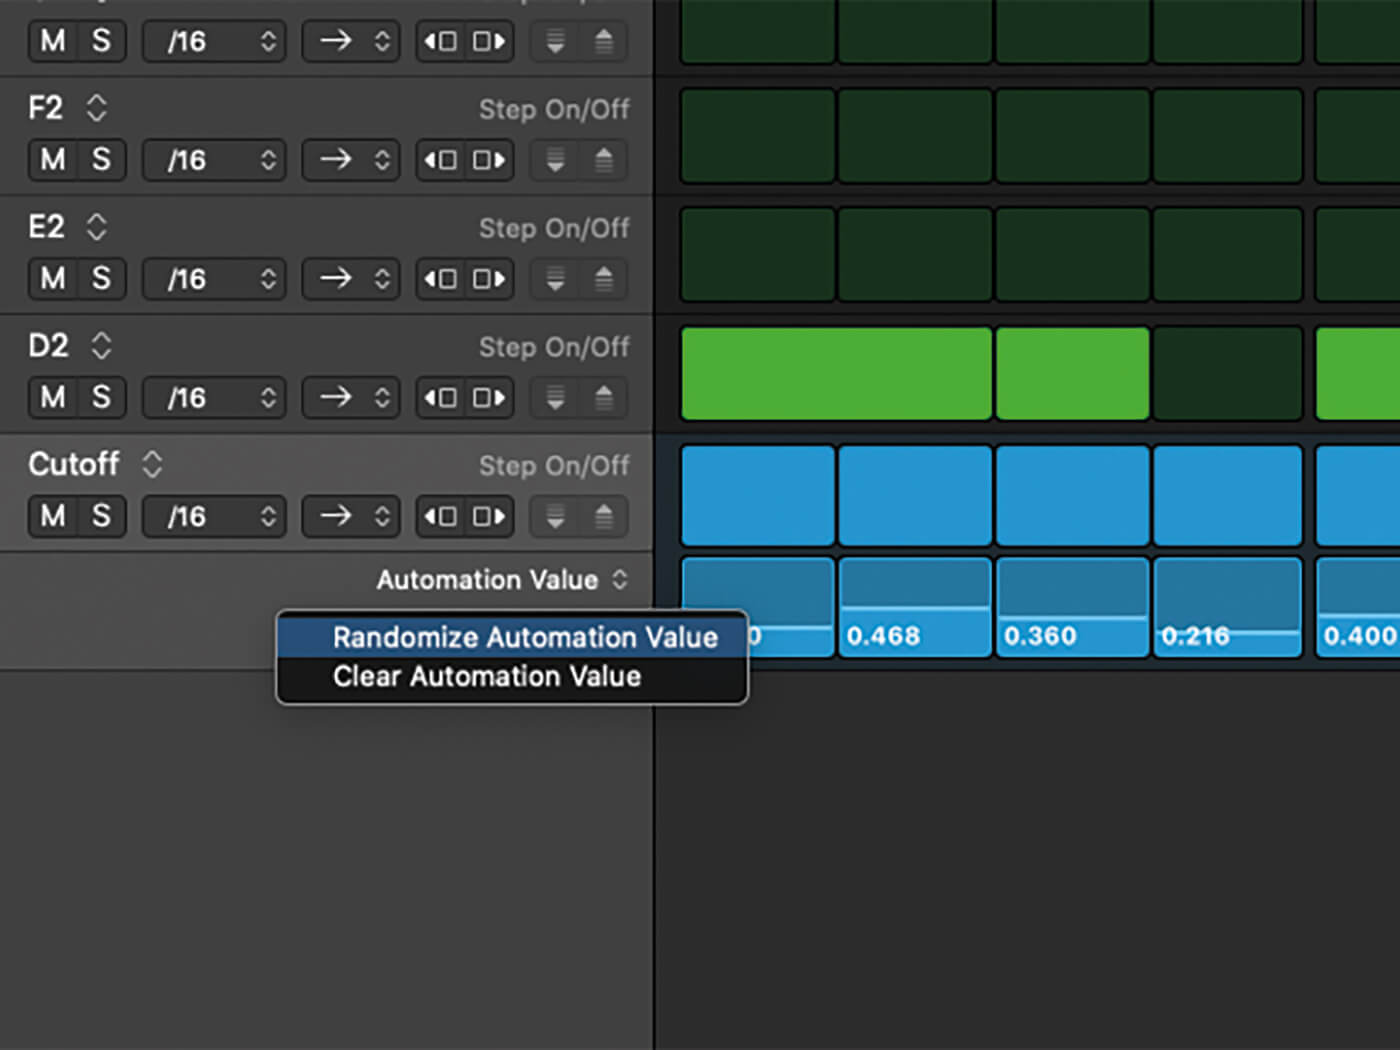
15. In many ways, the serendipity of randomised filter movements can be more interesting than manually programmed results. Ctrl-click on the row header and select Randomize Automation Value.
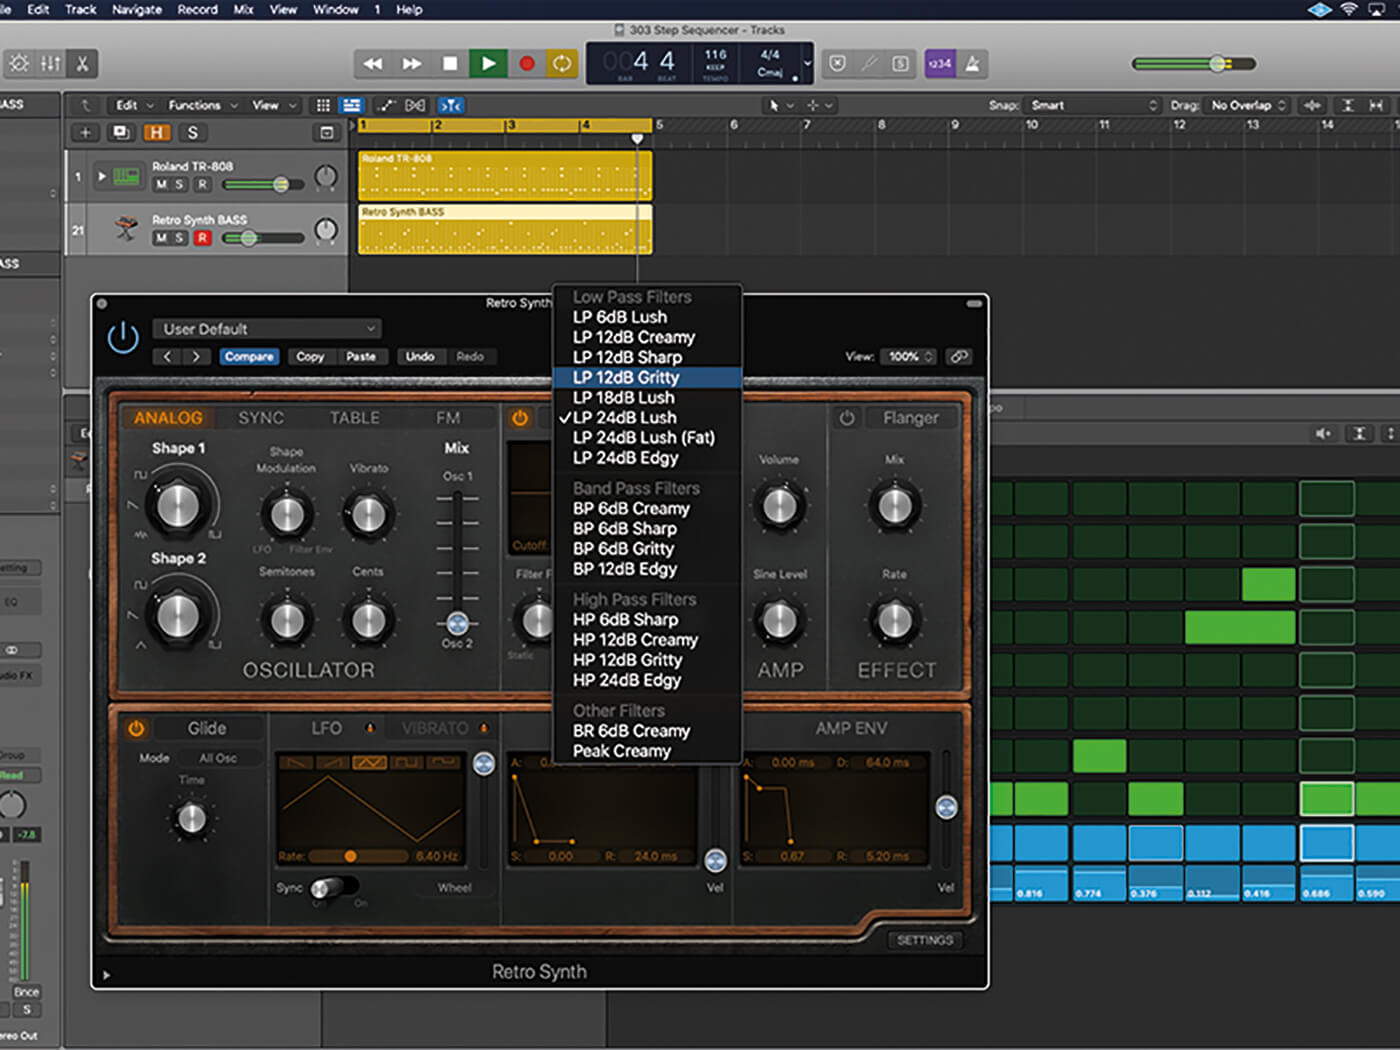
16. A large part of the TB-303 effect is the settings on Retro Synth. Try experimenting with different filter decay times, various filtering options, or different presets.
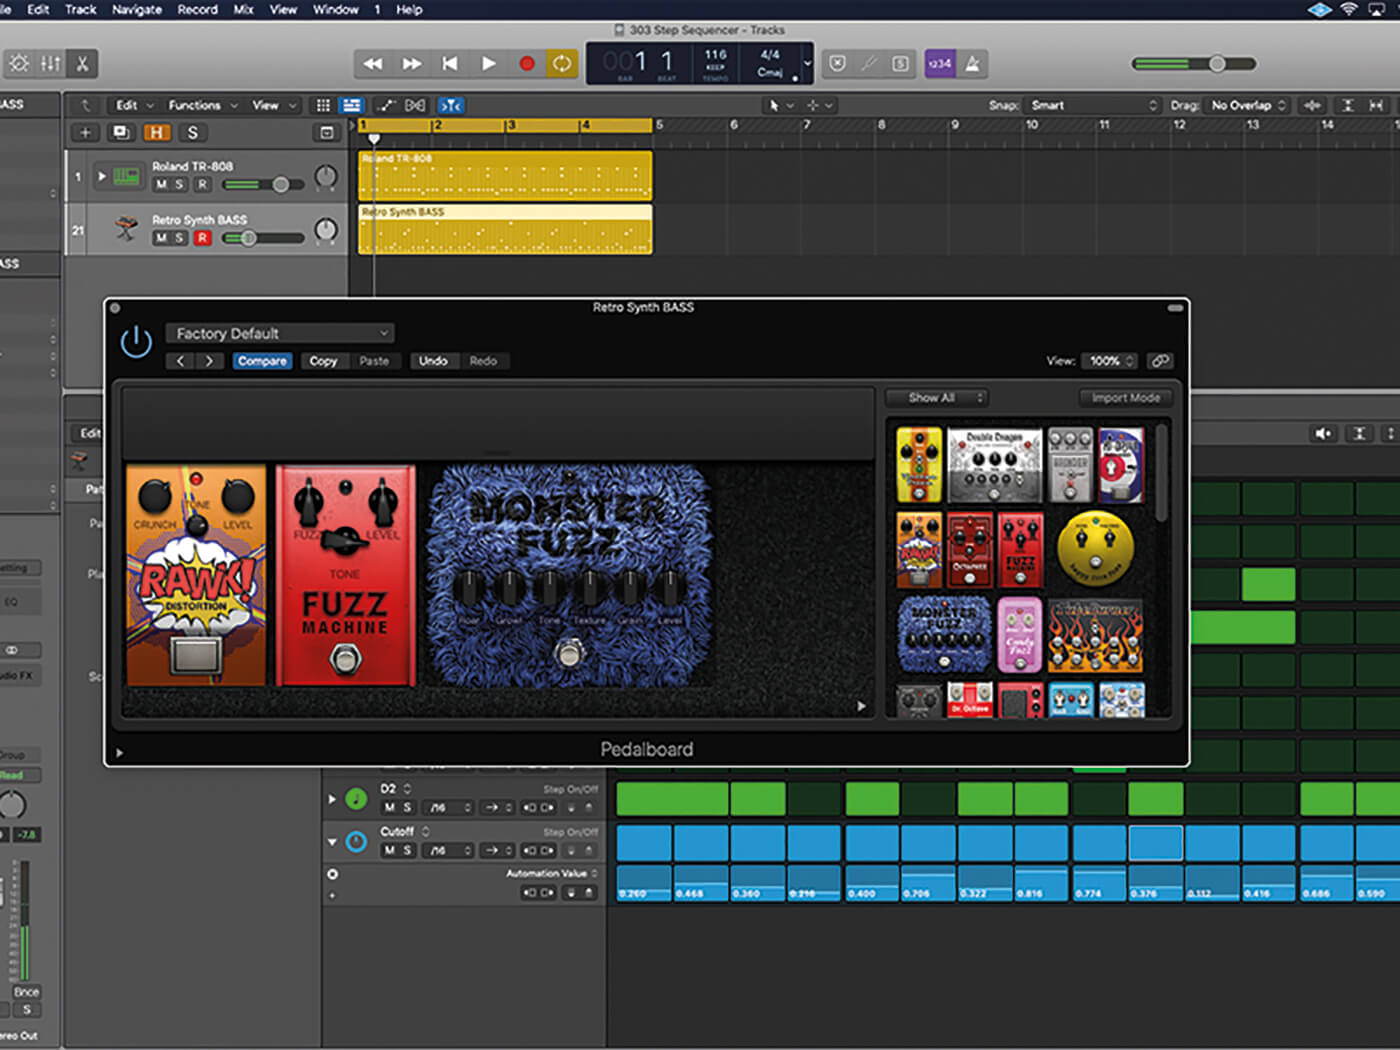
17. The original TB-303 effect was often paired with distortion, so it’s worth exploring some of the distortion options in Logic’s plug-ins. Pedalboard includes some colourful options, like Rawk and Monster Fuzz.
18. The more creative options in Step Sequencer go above and beyond what the TB-303 could achieve. The Skip step is great for pseudo-random changes, where the pattern differs from one bar to the next.
For more Logic tutorials and workshops, check here.