Mapping Multisampled Instruments in Logic Pro’s Sampler
Sampler’s new intelligent mapping take the headache out of multisampling. We take a look at the speedier way to transform a folder full of samples into a finished instrument.
If there’s one word that sums up Apple’s revised look at sampling in Logic Pro X it would be immediacy. Certainly, from our previous workshops on Auto Sampler and Quick Sampler (in MT212 and MT211, respectively) it’s clear than a range of sample-based tasked are now quicker and easier to achieve – whether that’s time-slicing a drum loop or sampling hardware and software synths. One of the principle ways Apple has achieved this immediacy is by differentiating the various roles of their sample-based plug-ins – Quick Sampler, for example, is specifically limited to single samples, or time-sliced loops, whereas Auto Sampler is specifically designed for the task of sample recording. But where does that leave the re-built EXS24, now known as Sampler?
In the case of Sampler, Apple has specifically orientated the instrument towards the task of mapping Multisamples – or in other words, the process of mapping multiple samples across a MIDI keyboard, often using complex layers of velocity switching. In short, Sampler amalgamates the old EXS24 plug-in and separate EXS24 Instrument editor as a singular entity as well as adding a number of ‘intelligent’ mapping options that make the process of creating sample-based instruments significantly easier.
Map reader
Rather than explore the entirety of Sampler, this workshop is designed as a means of exploring the different ways you can map samples using Sampler’s new drag-and-drop features. This could involve a series of one-shot drum samples, for example, or a collection of multi-sampled instrument files with different velocities – the kind of fodder that you can often find on the internet as raw sound files rather than finished patches for Kontakt or the EXS24. Put simply, this is quick way to turn raw sound files into a finished sample-based instrument.
Given the complexity that used to surround the process of creating EXS24 instruments, Logic has now effectively reduced the process to four different drag-and-drop options that, if used correctly, can take you around 90% of the way towards a finished instrument. In understanding these options, we need to look at the different ways we might receive samples, as well as the two principle ways those samples can be mapped.
Such a drag
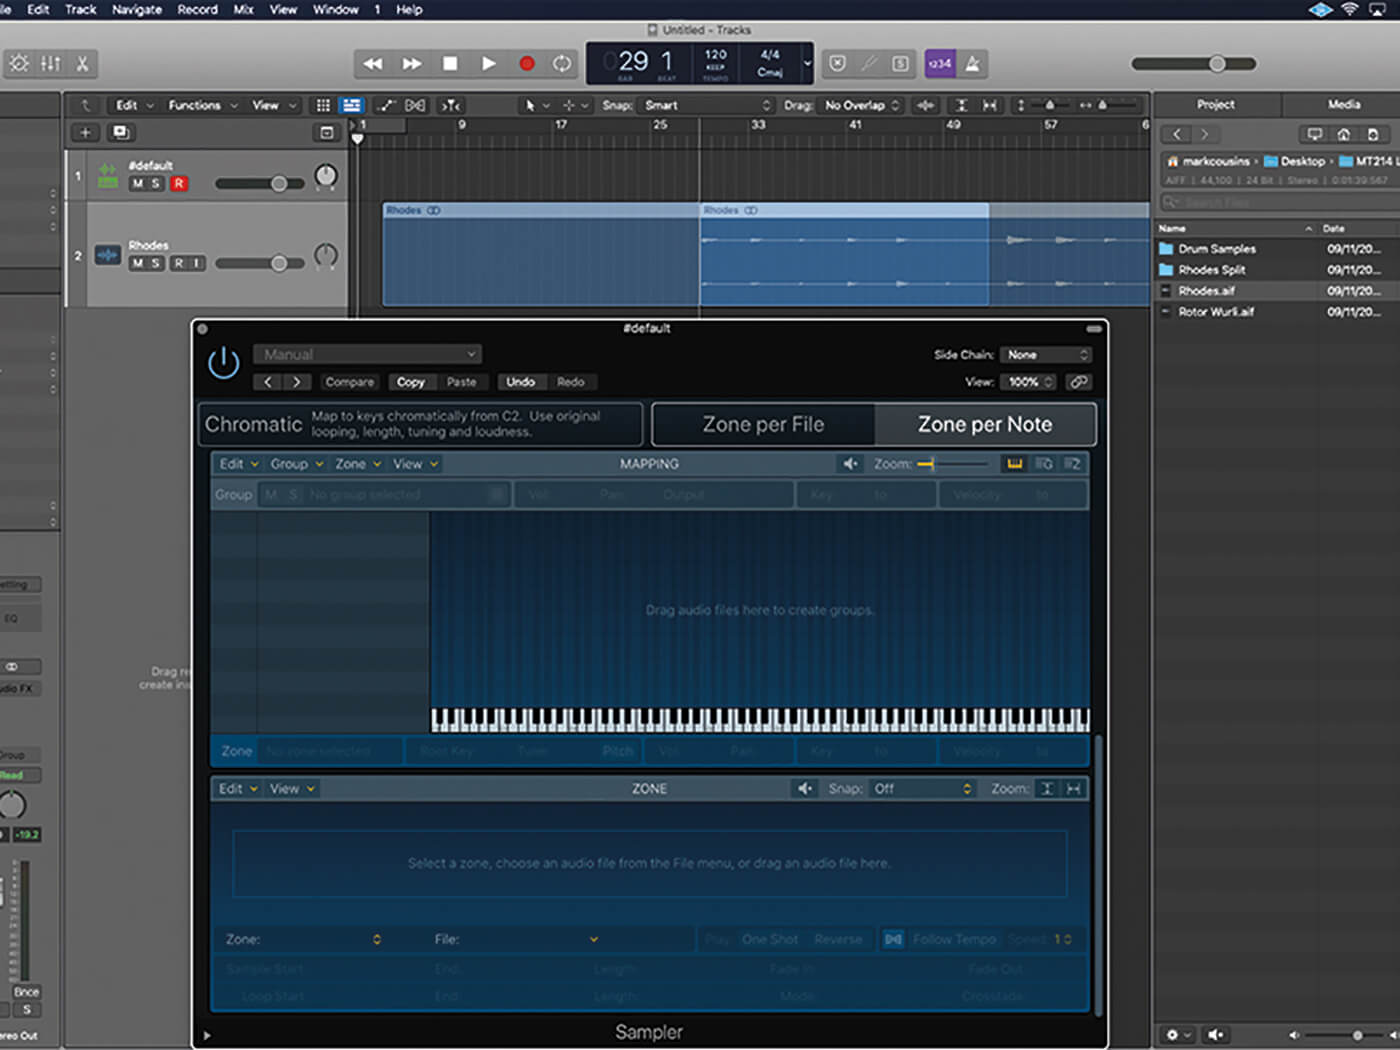
As we’re dragging sound files over into Sampler, we need to make a distinction between Chromatic and Optimized mapping. Chromatic is typically used to map drum samples, where we assign a different drum sample (kick, snare, and so on) to each key of the keyboard. As such, Chromatic is much the same as early auto-mapping options that were included in the EXS24 editor. The Optimized mode, though, is where things get really interesting, and comes in especially useful when you’re working with a complex set of multisamples for a given instrument – all at different pitches and velocities.
In Optimized mode, Sampler uses a number of intelligent analysis tools to map the samples in a way that makes most musical sense. Firstly, Sampler looks at the pitch of each sample, which it then uses to map the sample horizontally across the keyboard – each sample covering a range of keys before it hits the next, higher-pitched sample. Where duplicate note pitches occur, Sampler also makes a relative assessment of the sample’s volume, which it then uses to create a vertical map based on different velocities. Irrespective of any information in the file name, therefore, Sampler can create a finished multisampled instrument in seconds!
Isolation zone
The next distinction to make is whether you want a Zone per File or a Zone per Note/Split at Silence. Again, traditionally, you’d use the Zone per File option, on the assumption that each separate file represents a different velocity layer, for example, or note pitch. The big shift with Sampler, though, is its ability to create multiple zones from a single file, which in turn, changes the whole way we go about the process of sampling. Using the Zone per Note/Split at Silence feature, there’s no need to create multiple audio files, as instead, you can simply record a single take with all the pitches and velocity layers as one and have Sampler do all the hard work for you!
Once a time-consuming process, audio can now be quickly turned into multi-sampled instruments
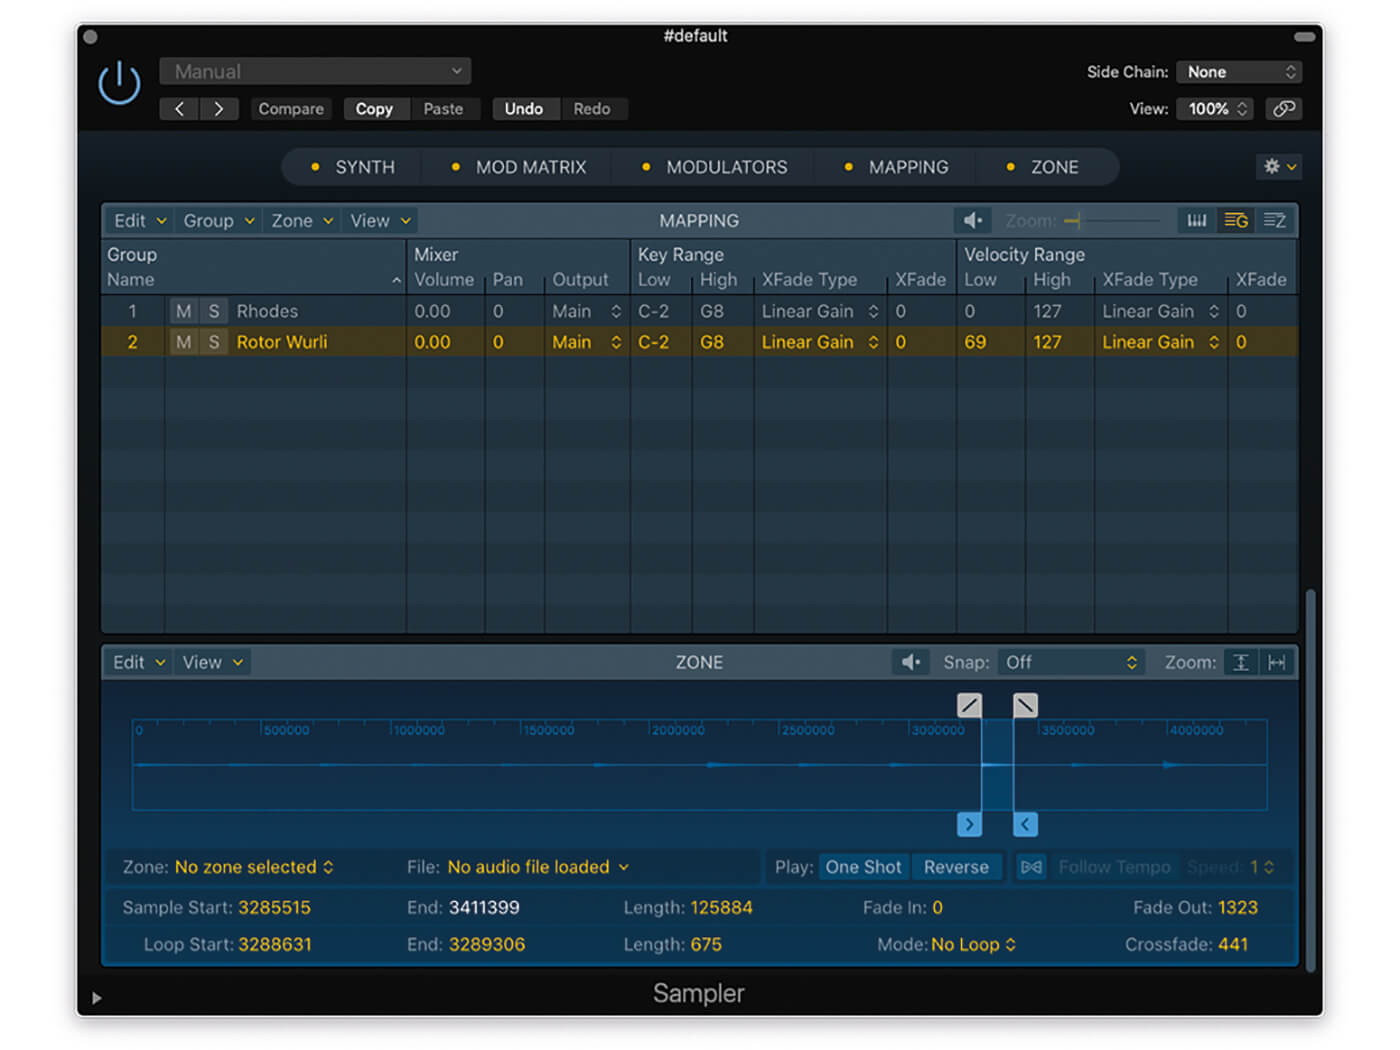
Once imported of course, there’s a degree of tweaking and adjustment you’ll want to perform to Sampler’s mapping. The zones are displayed graphically across the keyboard, with the aforementioned vertical axis governing the velocity mapping. Most of the edits can be performed graphically – resizing velocity split points, for example, moving the relative position of zones, or even dragging further samples onto the mapping display. You can also make use of Groups, which are a convenient way of dividing up more complex instruments into different layers or accessing advanced mapping options like key switching and release triggers.
Super sampler
What’s significant with Sampler (and, by extension Quick Sampler and Auto Sampler) is how it changes your relationship with Sampling in Logic’s workflow. Once a distinct and seperate process, audio regions can be quickly transformed into complex multisampled instruments in seconds, making the divide between audio recording and virtual instruments almost paper thin.
Multisampling with Sampler in Logic: step-by-step
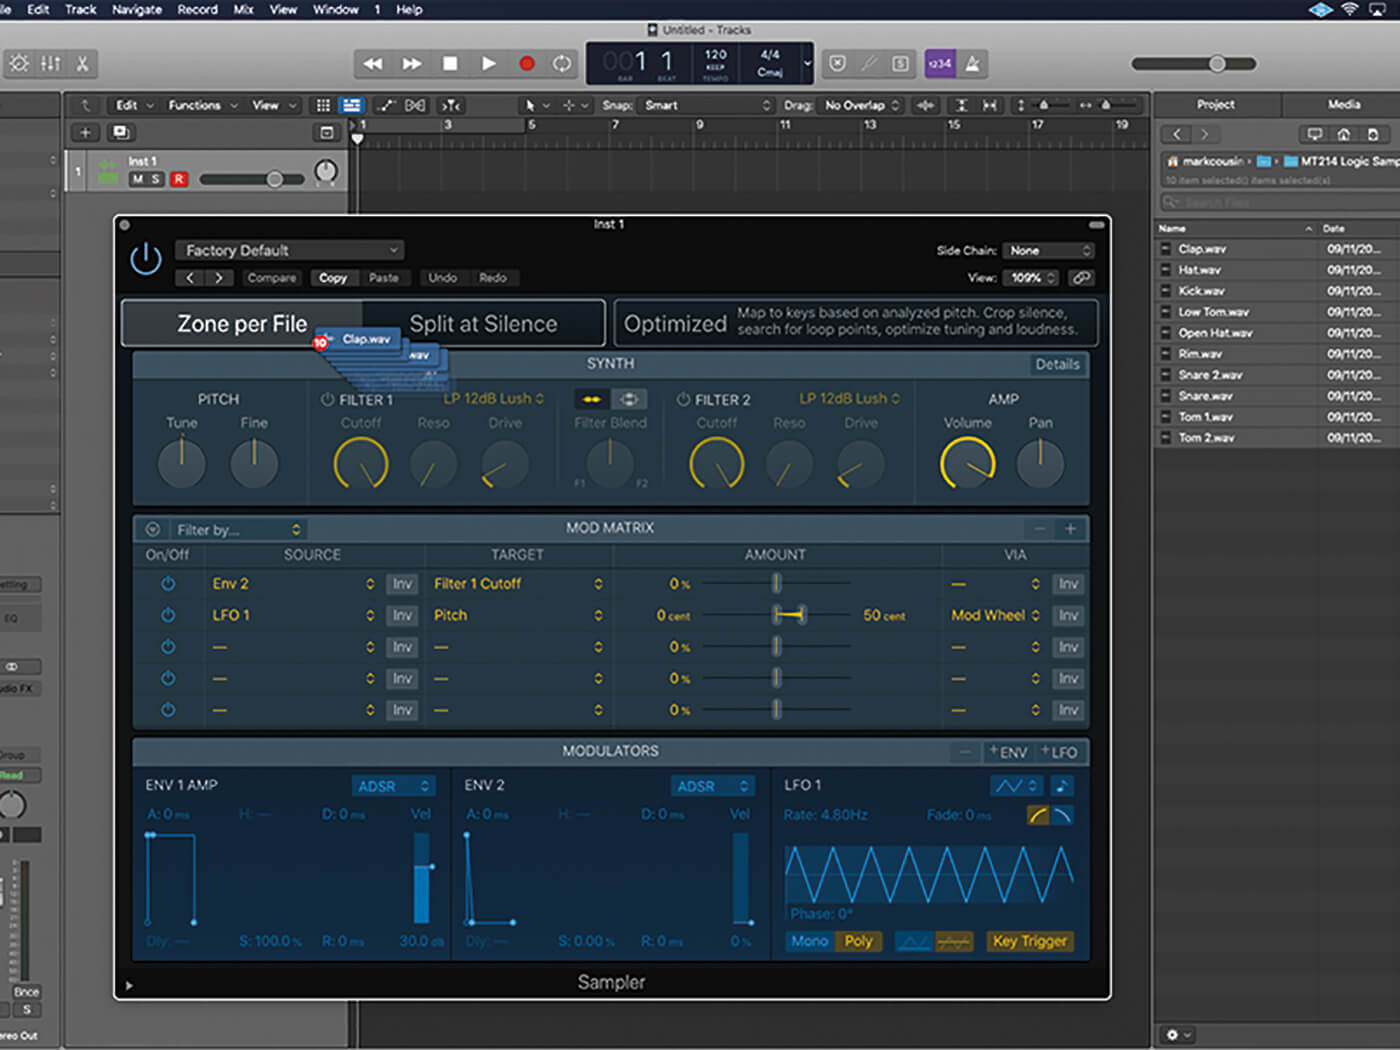
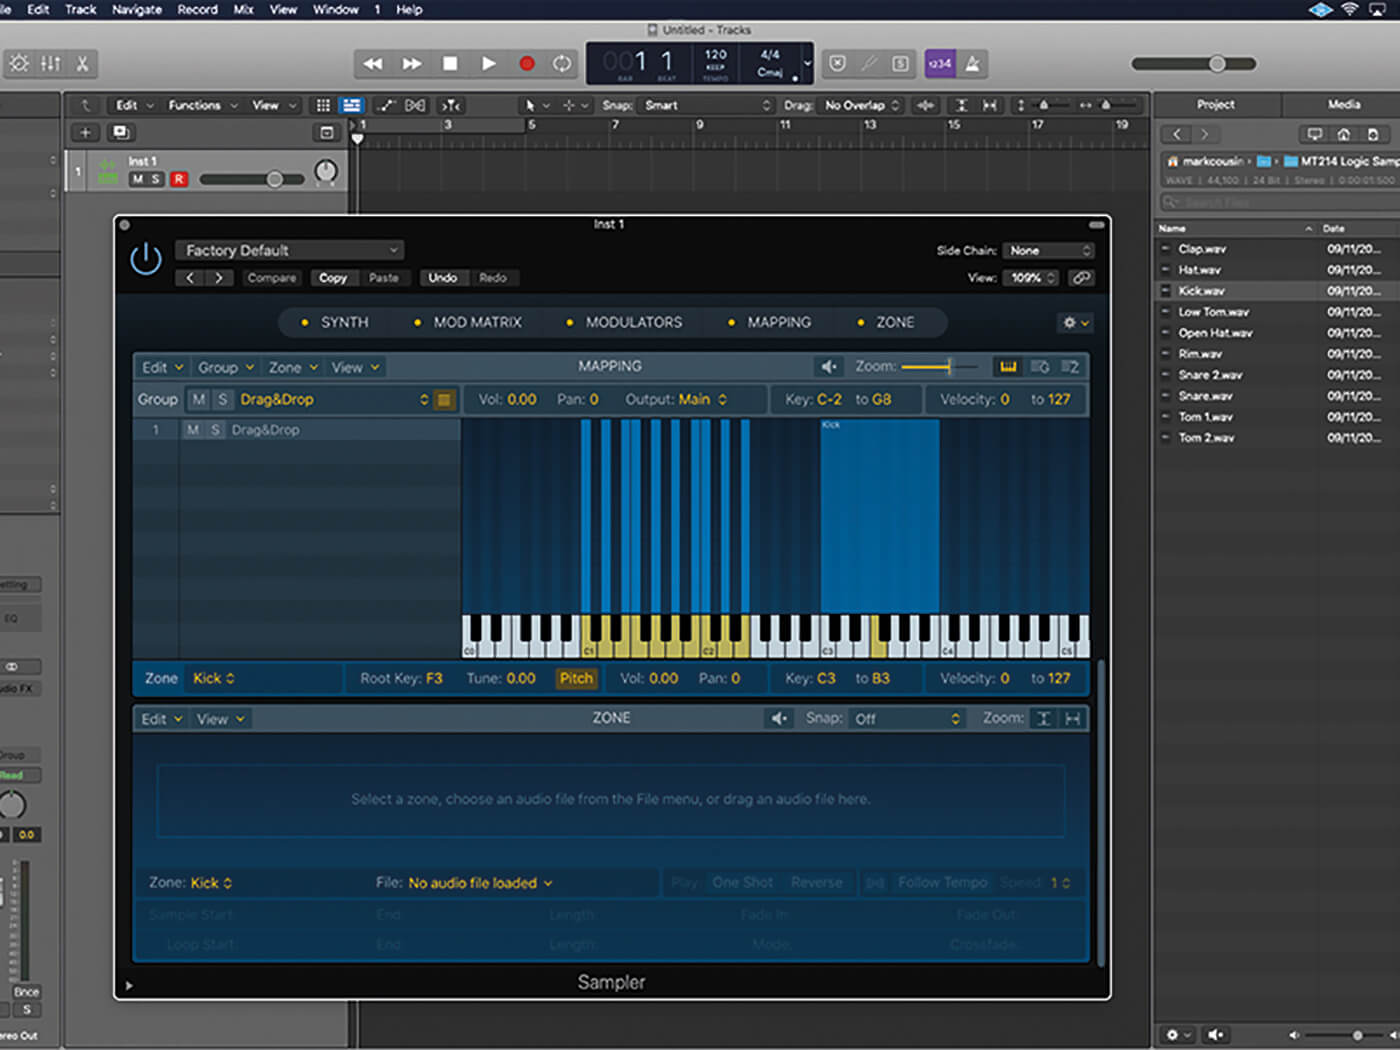
1. Create a new instance of Sampler. Use the All Files Browser to drag the files from the Drum Samples folder (included on the cover disc) over onto the top of Sampler’s interface. Select the Chromatic, Zone per File option.
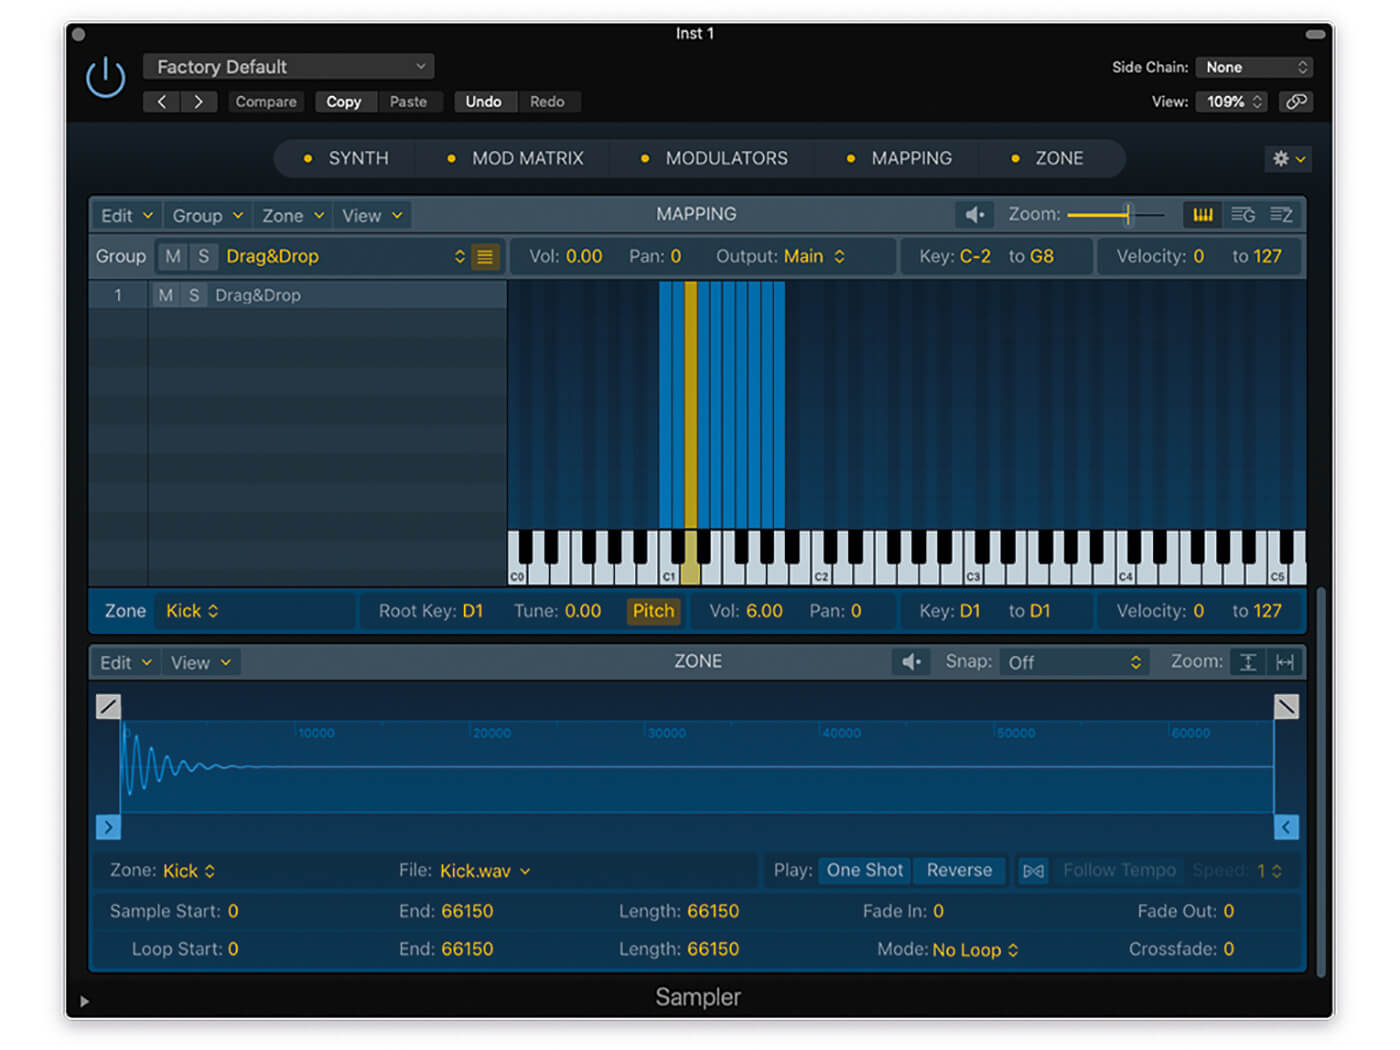
2. Sampler will now import the audio files, and update to show the Mapping and Zone displays. Note how the samples are mapped chromatically across the keyboard (starting from C1) with a Zone for each sample.
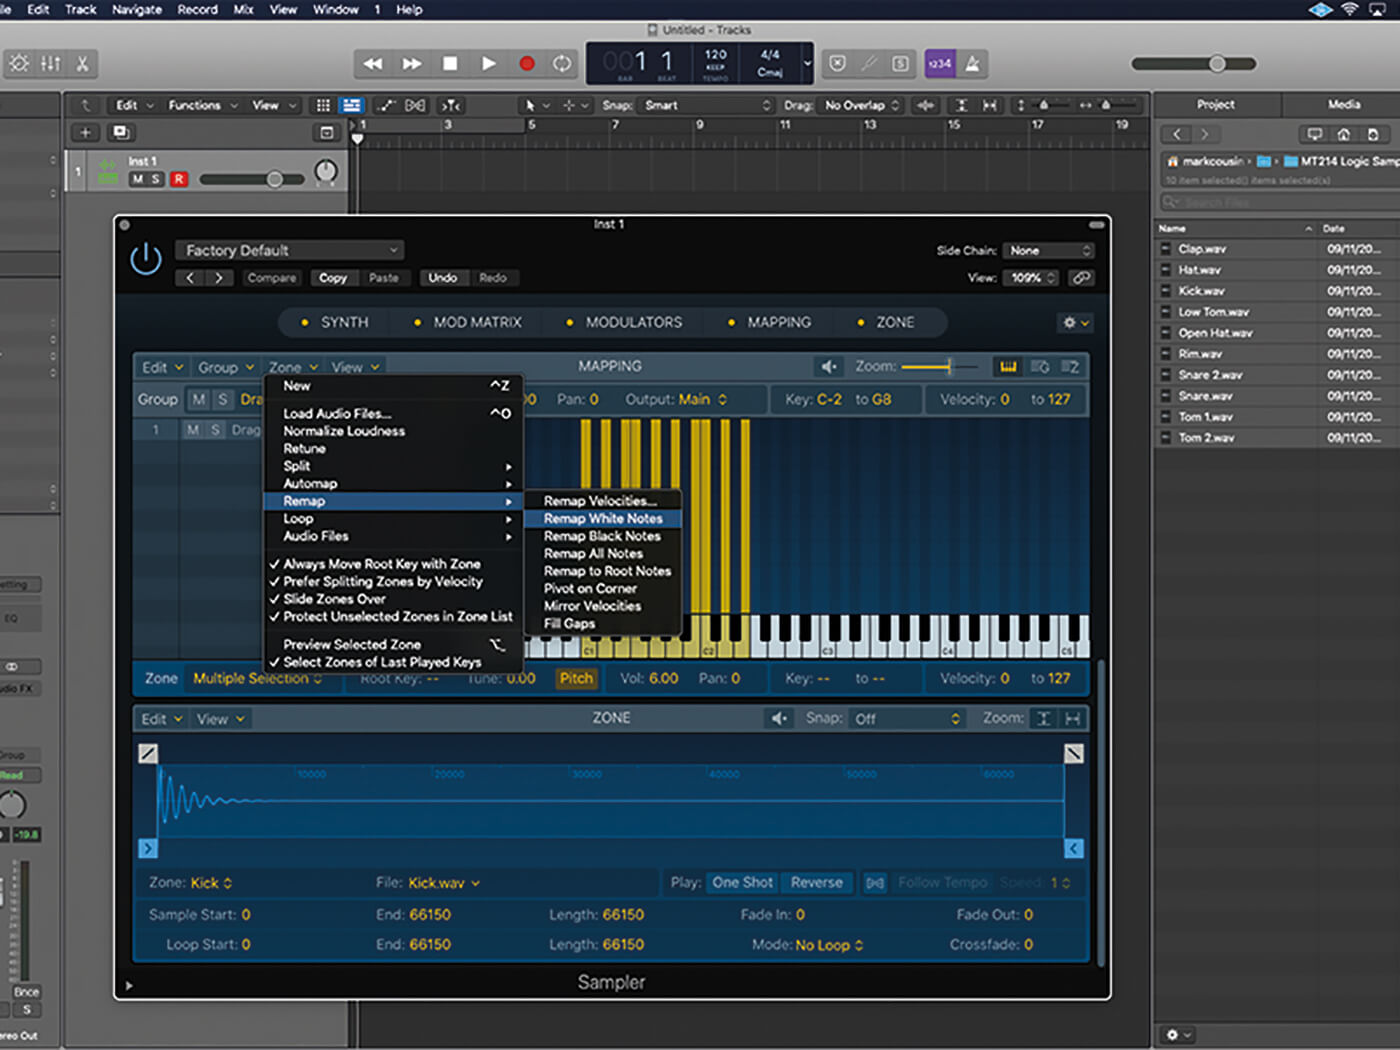
3. You can adjust the mapping graphically or use the Zone > Remap > Remap White Notes to have Sampler remap the samples to white keys, which in the case of drums, makes them easier to play.
4. As well as mapping samples en-masse, you can drag-and-drop single samples directly onto the Mapping display. To map over a range of keys (up to an octave), drop the sample nearer the top of the Mapping display.
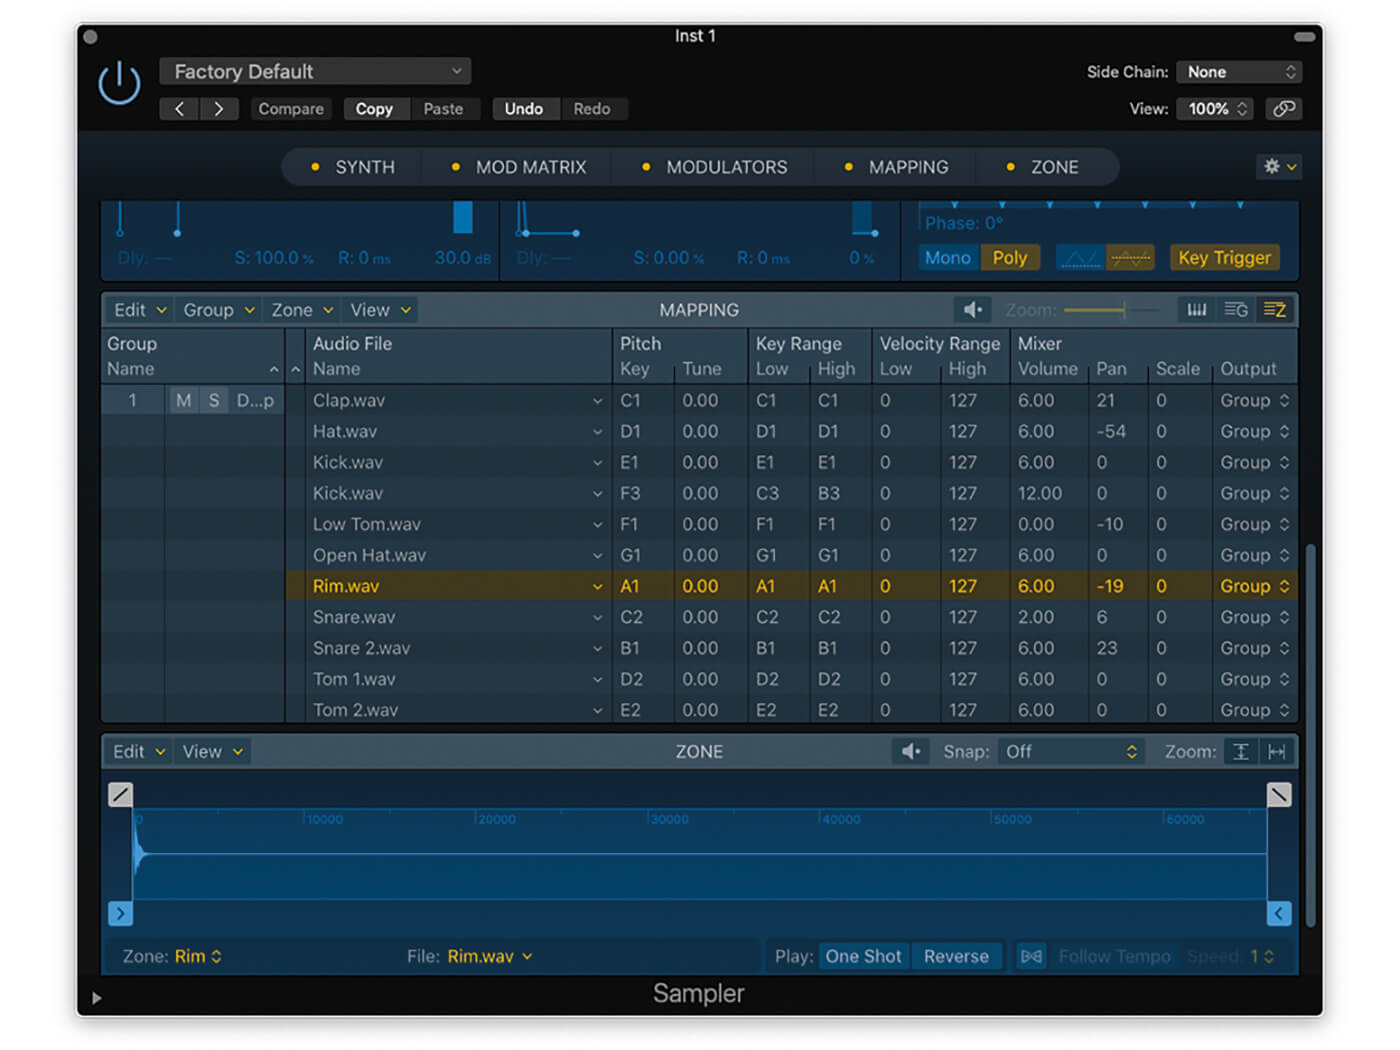
5. Each Zone has its own set of parameters, which can be seen across zones by click the small Z on the top right-hand corner of the Mapping display. Volume and Pan are particularly useful for mixing the drums.
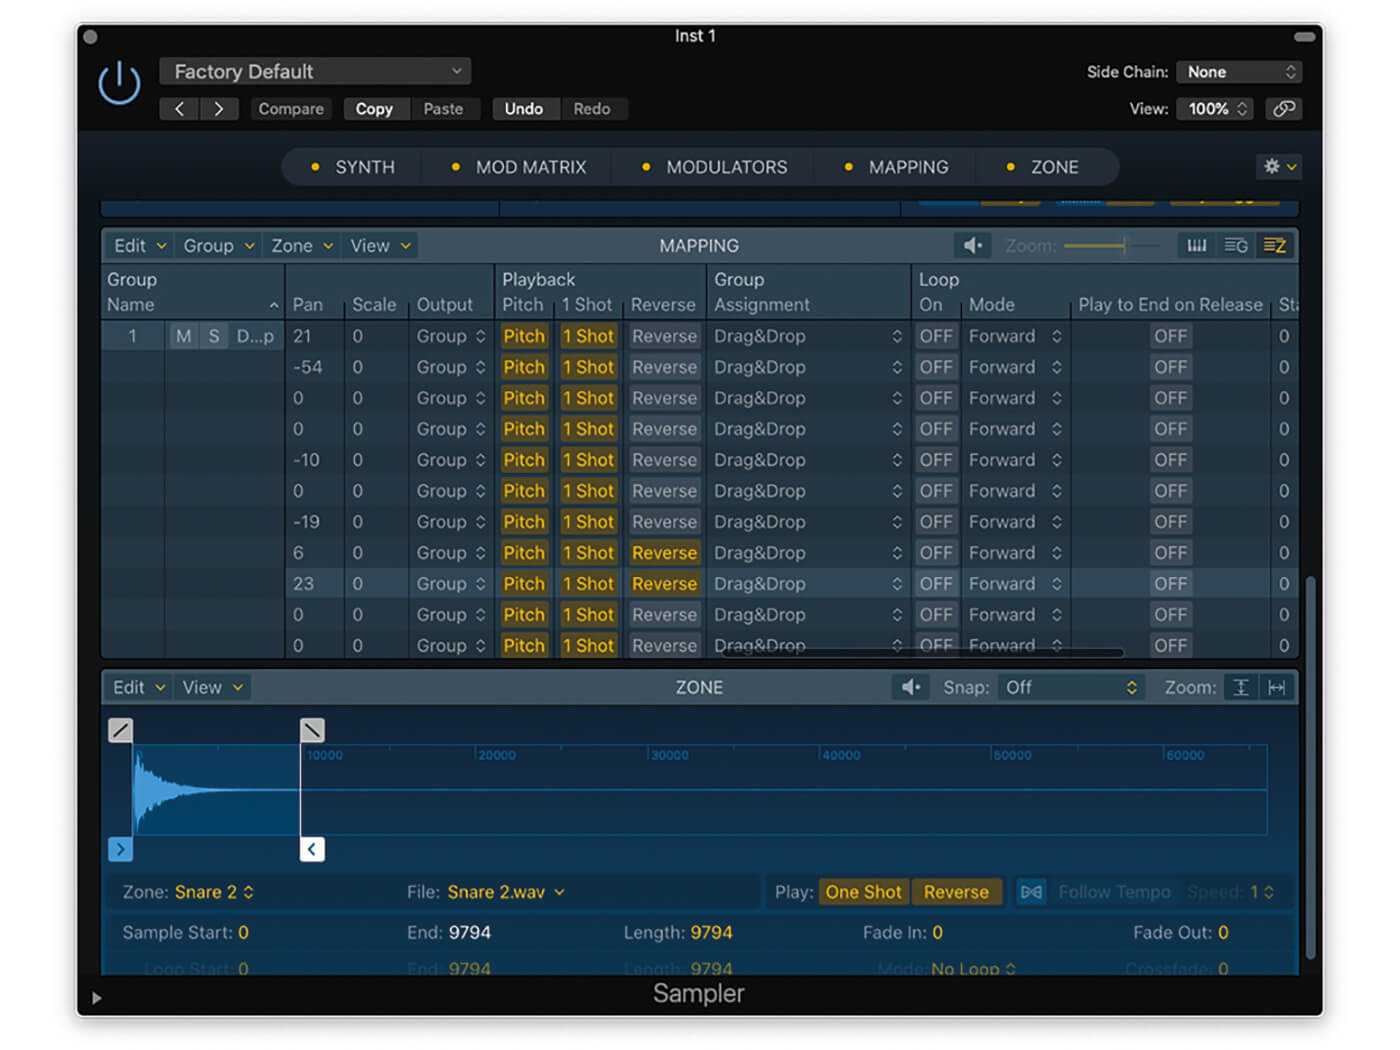
6. The 1 Shot option (under Playback settings) is also good from drums, so that the entire sample is played. You can also Reverse zones, adjusting the End parameter to get the timing of the reverse correct.
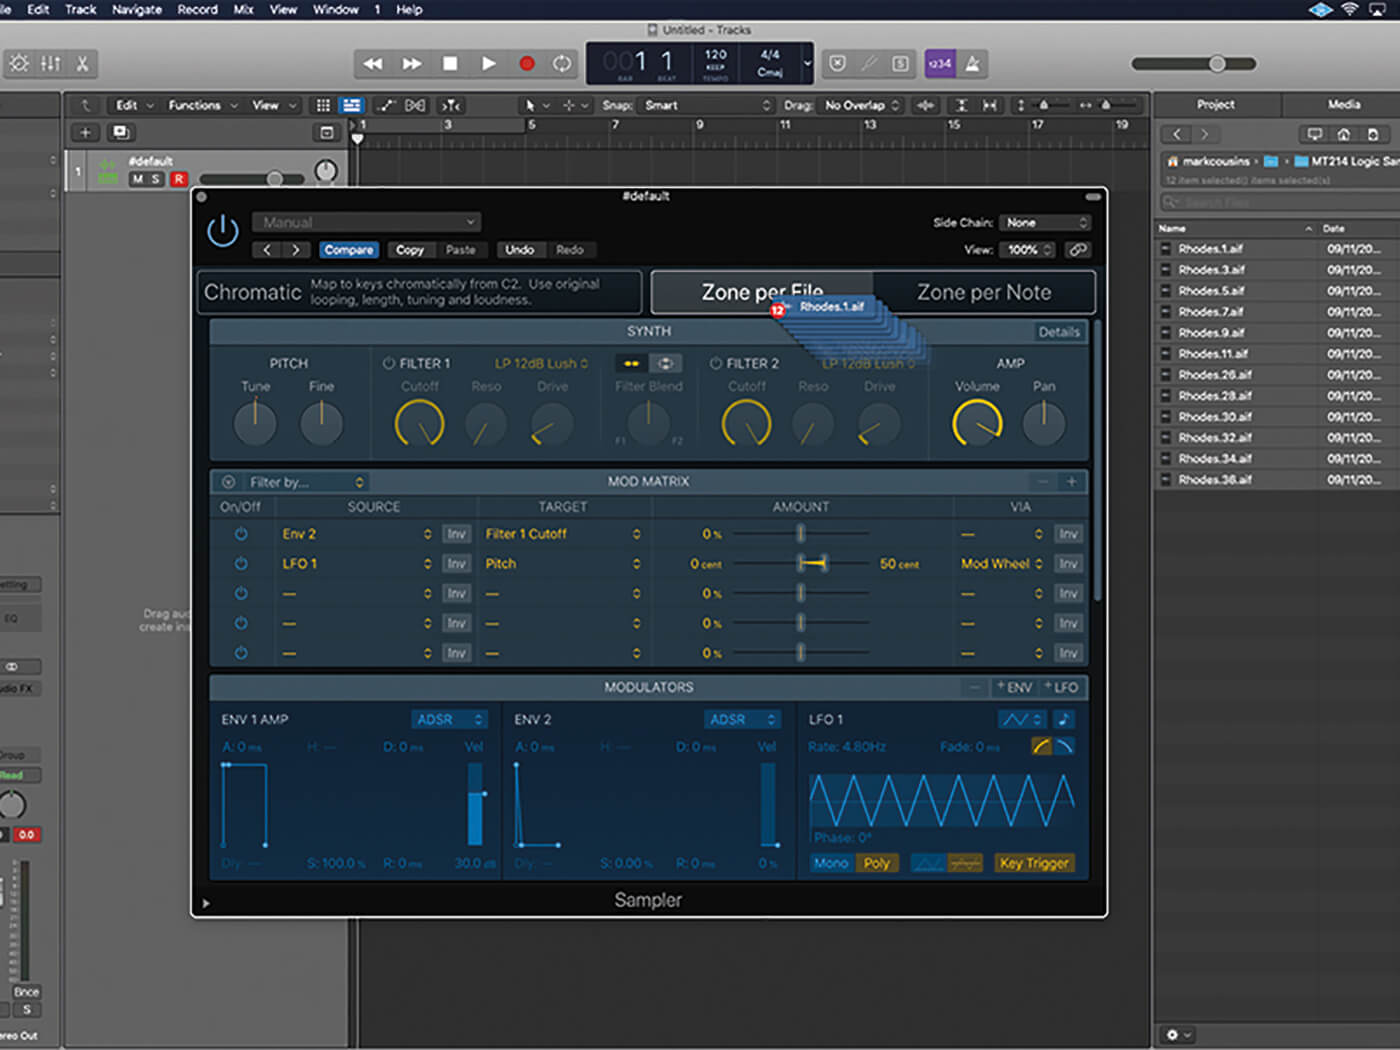
7. Reset Sampler using the Recall Default option. Now let’s explore a more complex velocity-switched mapping using the samples in the Rhodes Split folder. Drag these into Sampler using the Optimized, Zone per File option.
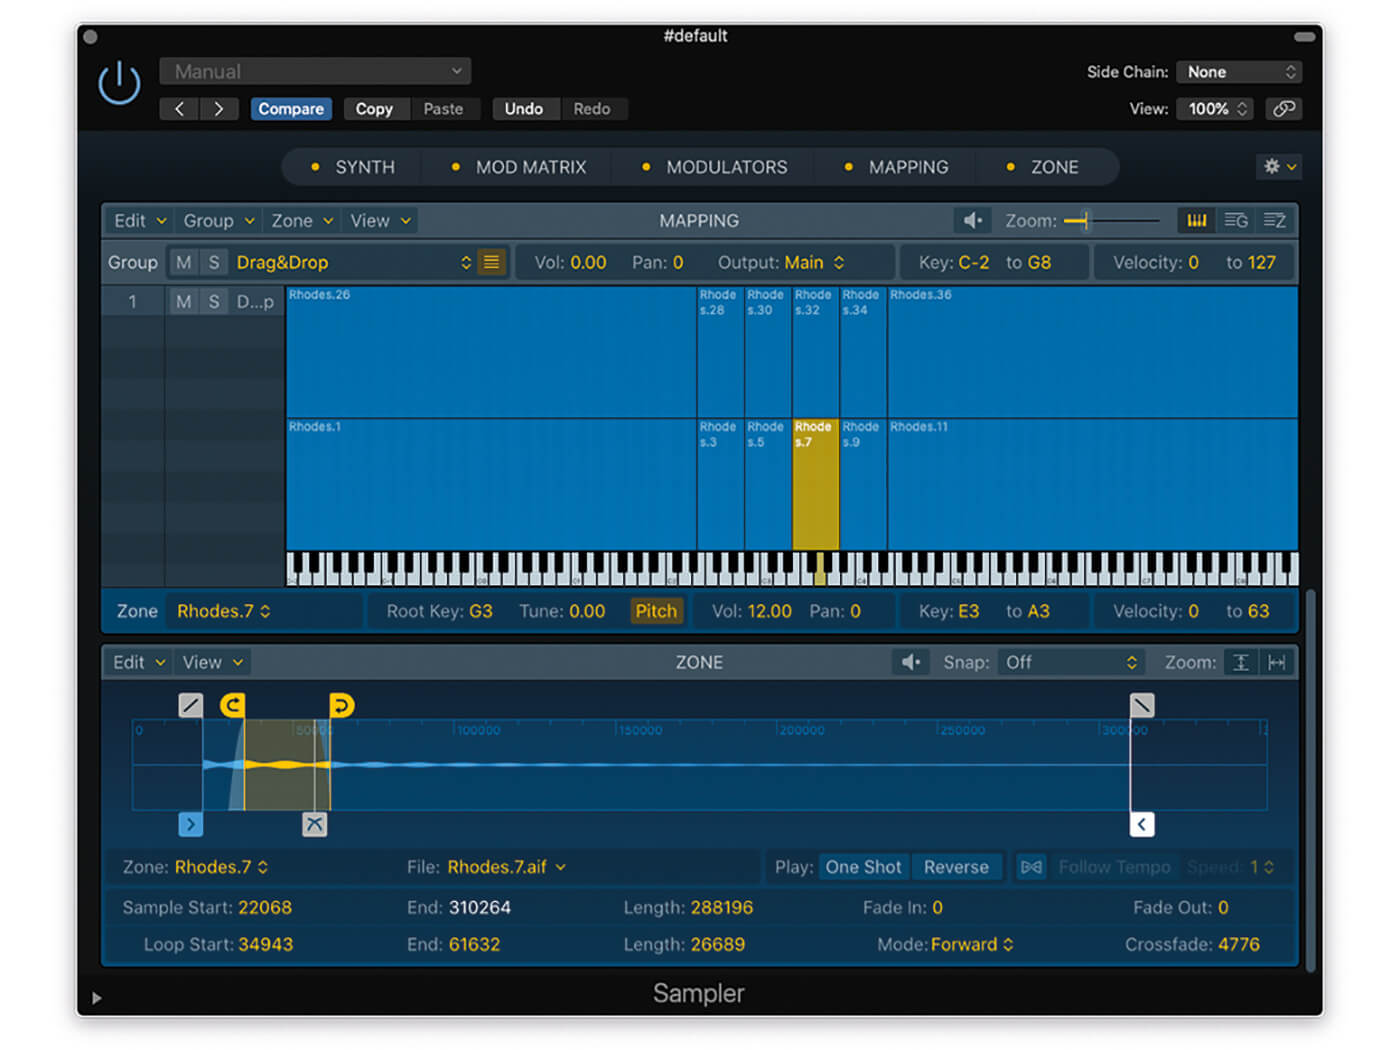
8. Take a closer look at how Sampler has mapped the imported samples – without any information contained in the file names. The pitch ranges track the keyboard perfectly and there’re two distinct velocity layers.
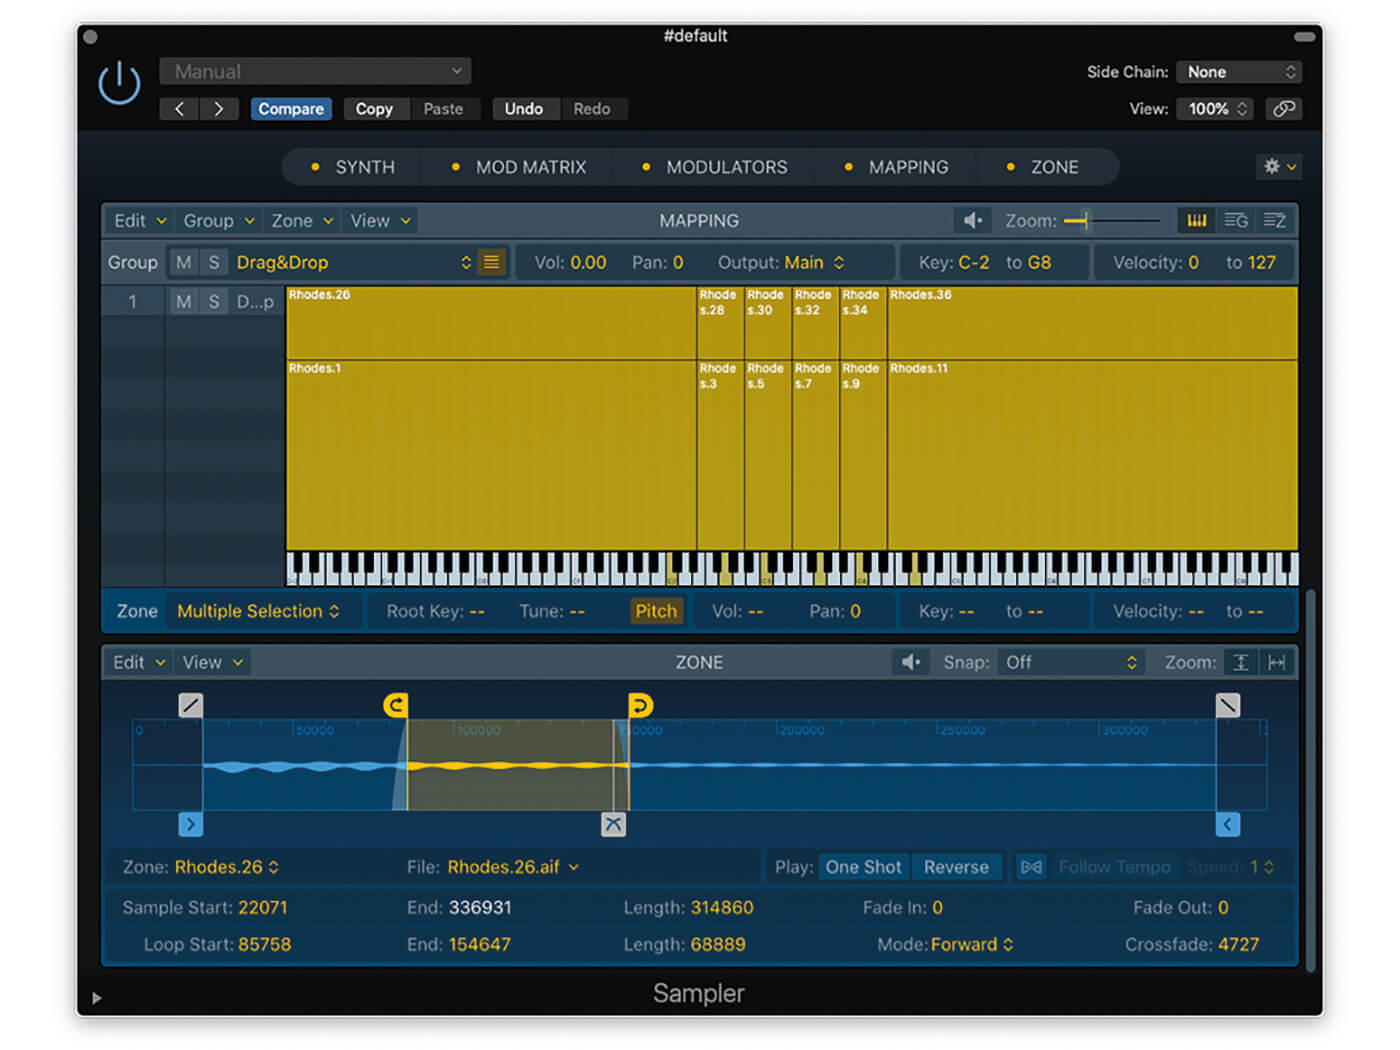
9. We can change the velocity switch point between the lower and upper zones by selecting all the zones (Cmd+A) and then dragging the line between the two velocity layers up or down accordingly.
![]()
DATA MANAGEMENT Remember that Sampler’s Plug-in Settings (.exs) are separate to the actual sample data. You can choose to save the sample content with the project, as parts of a Projects’ Assets settings, but remember that if you delete the project, you’ll might also delete the sample data. Another option is Save As option in Sampler, which includes an option to ‘Save with Audio Data’.
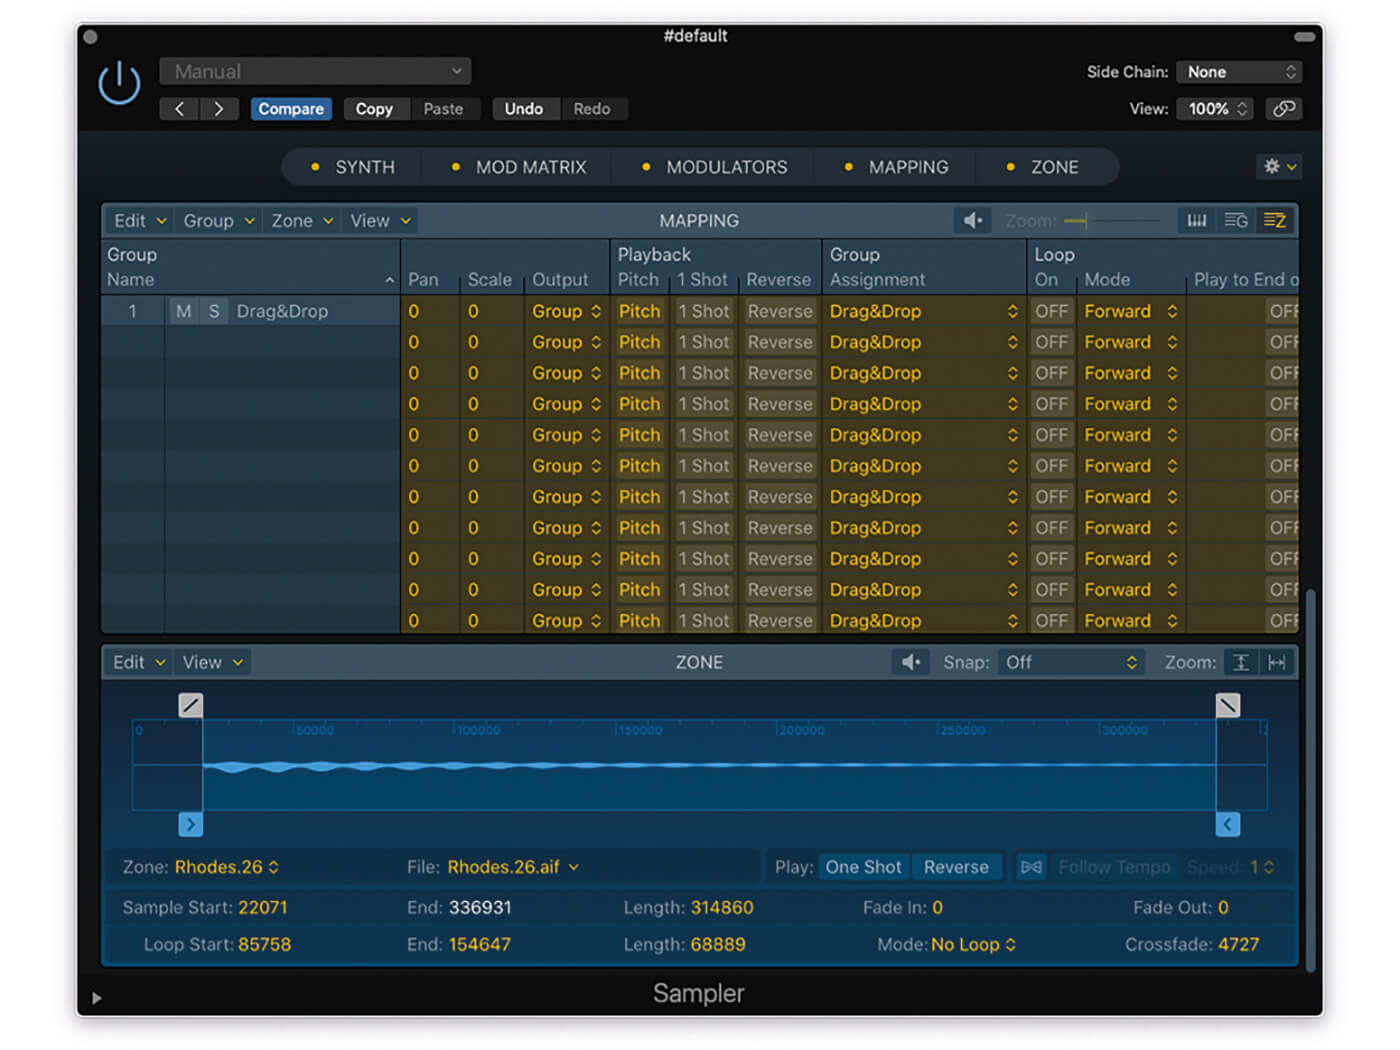
10. By default, Sampler will apply some intelligent looping, which we don’t want here. Open the Mapping pane zone view, select all the zones, and set the Loop to Off. None of the zones should loop now.
11. Reset Sampler again and let’s explore the Zone per Note feature using a single file (Rhodes.aif). This single file contains all the notes – across a variety of note pitches and two dynamics – completely un-edited.
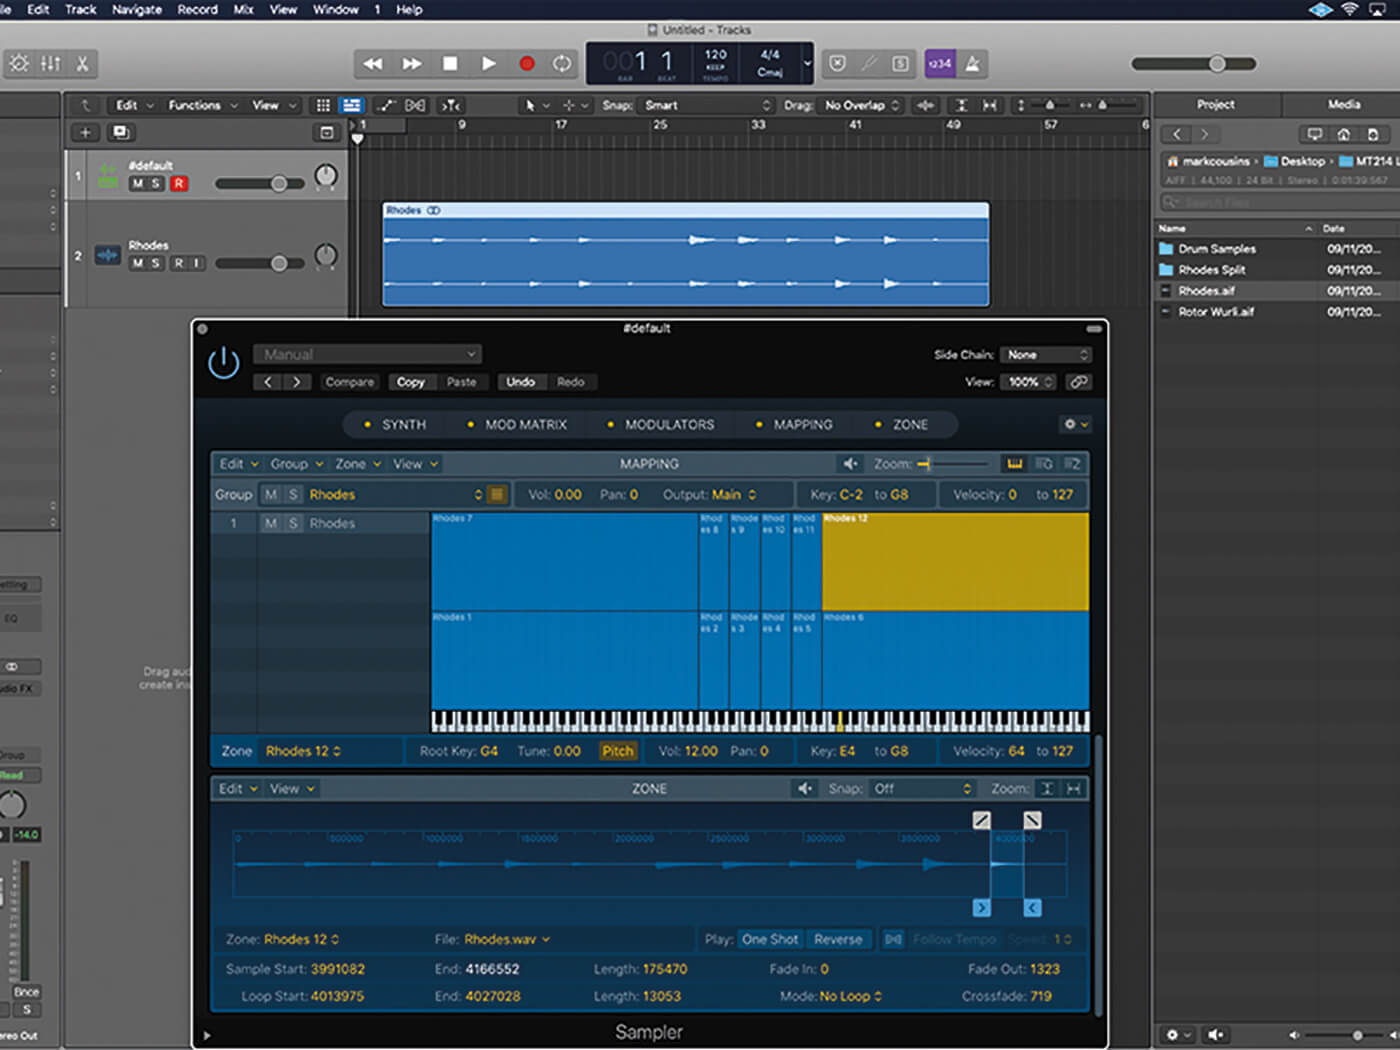
12. The finished map looks (and sounds) exactly like the version from multiple samples, although if you look closely at the Zone display, you’ll notice that each zone refers to a different part of the same audio file.
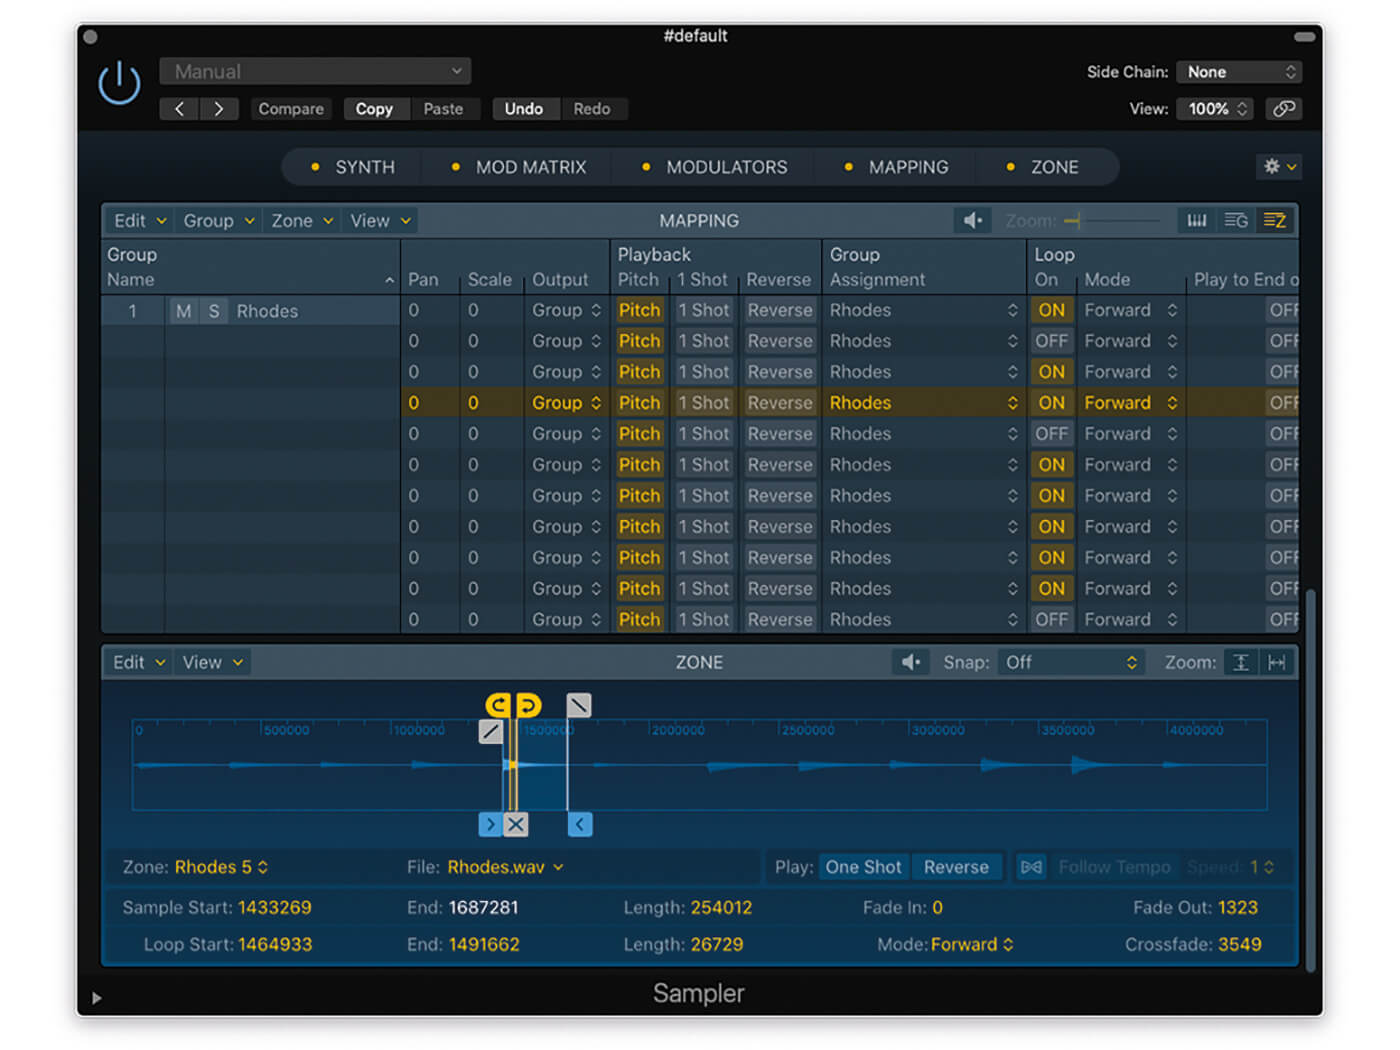
13. Again, Sampler applies automatic looping to some of the zones, which we’ll need to deactivate using the Mapping pane zone view. Now move back to the All Files browser to find the Rotor Wurli.aif file.
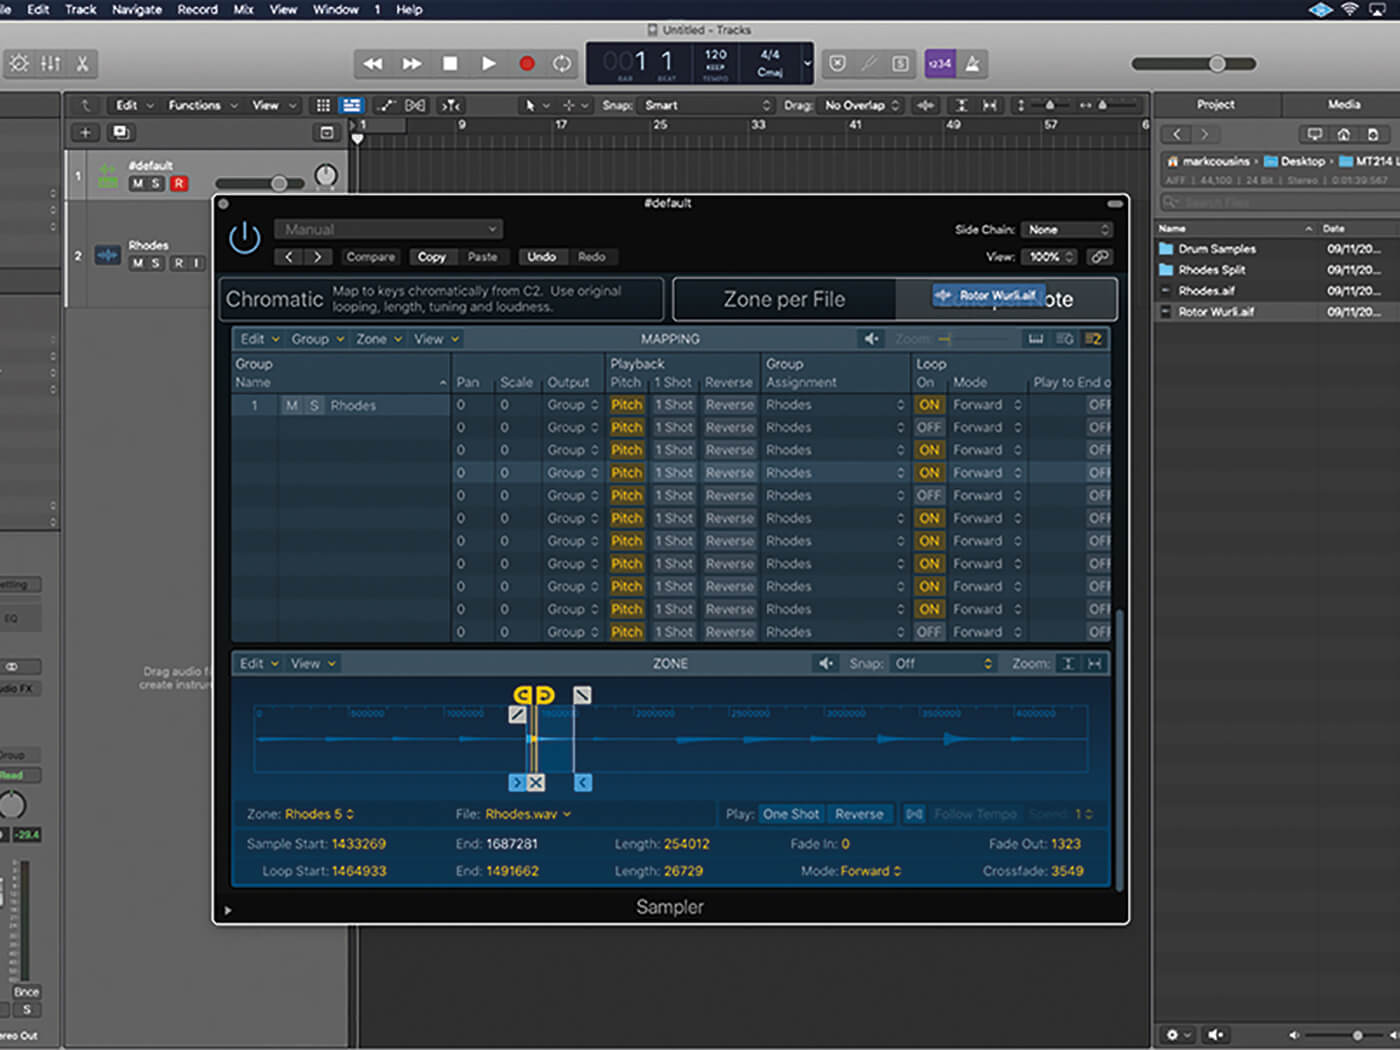
14. Drag the Rotor Wurli.aif file into Sampler, picking the Optimized, Zone per Note option. Importing a new sample in this way won’t erase the last mapping. Instead, Sampler creates a layered hybrid of the two sounds.
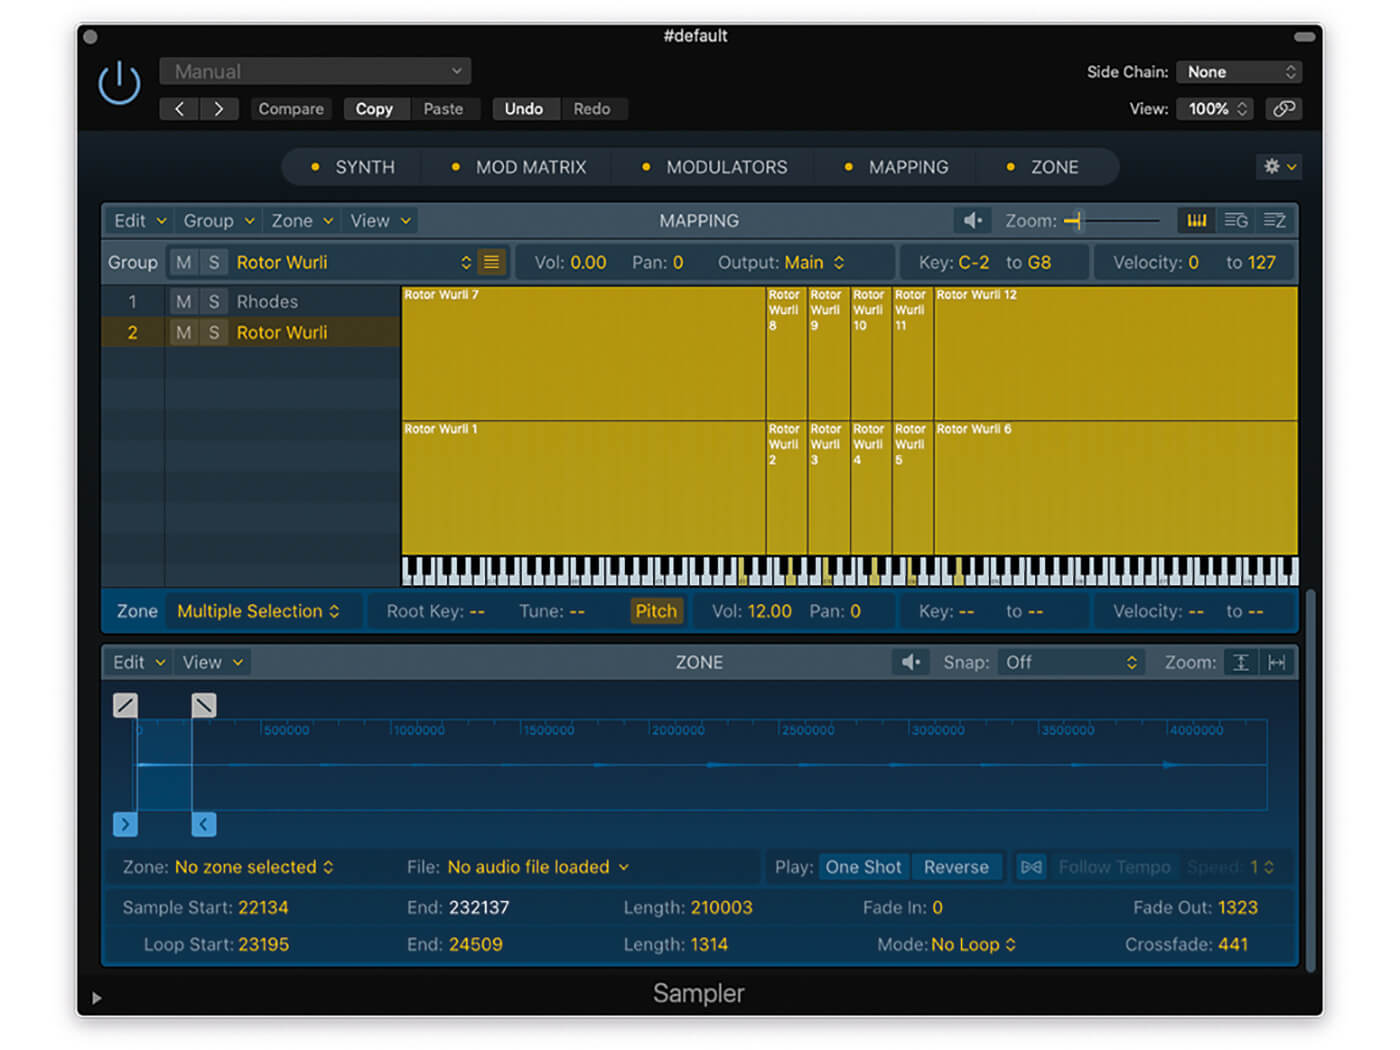
15. Rather than ending up with a complex Mapping screen, Sampler splits the two imports across two separate Groups, which can be viewed to the left of the keyboard display. Note the similar layout on the Wurli group.
16. Like Zones, Groups have their own set of parameters, applied across the whole sample set. For example, we could raise the Low Velocity Range parameters, so that Rotor Wurli is only triggered on higher velocities.
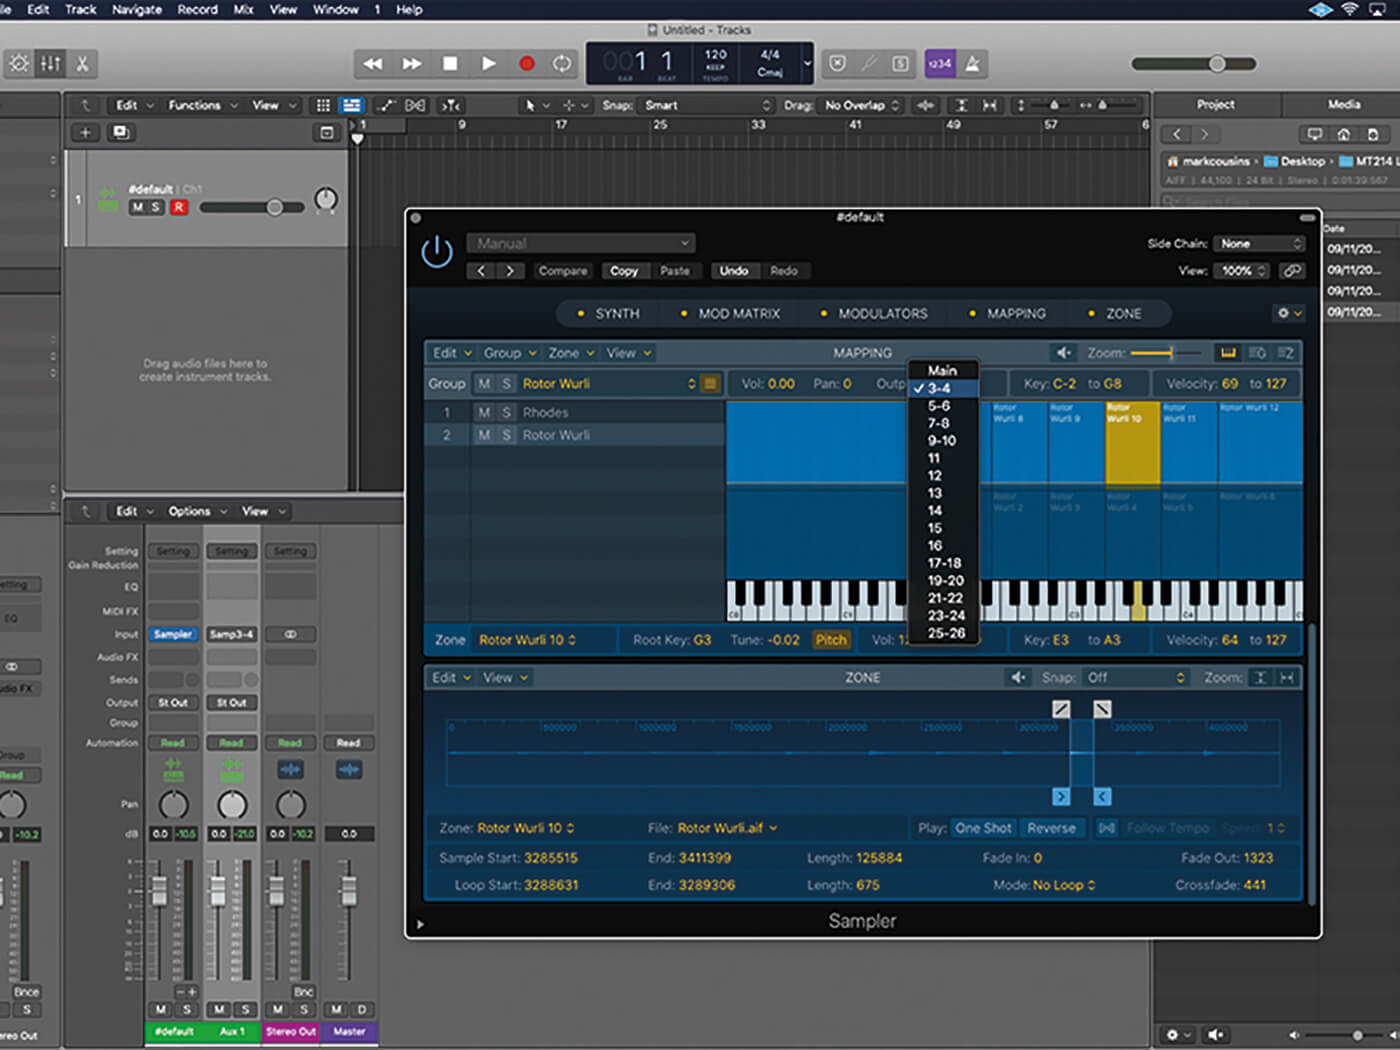
17. Another useful Group option is the Output parameter. Assuming we’ve instantiated a Multi Output version of Sampler, we could then route the Rotor Wirli Group to its own output fader in the mixer.
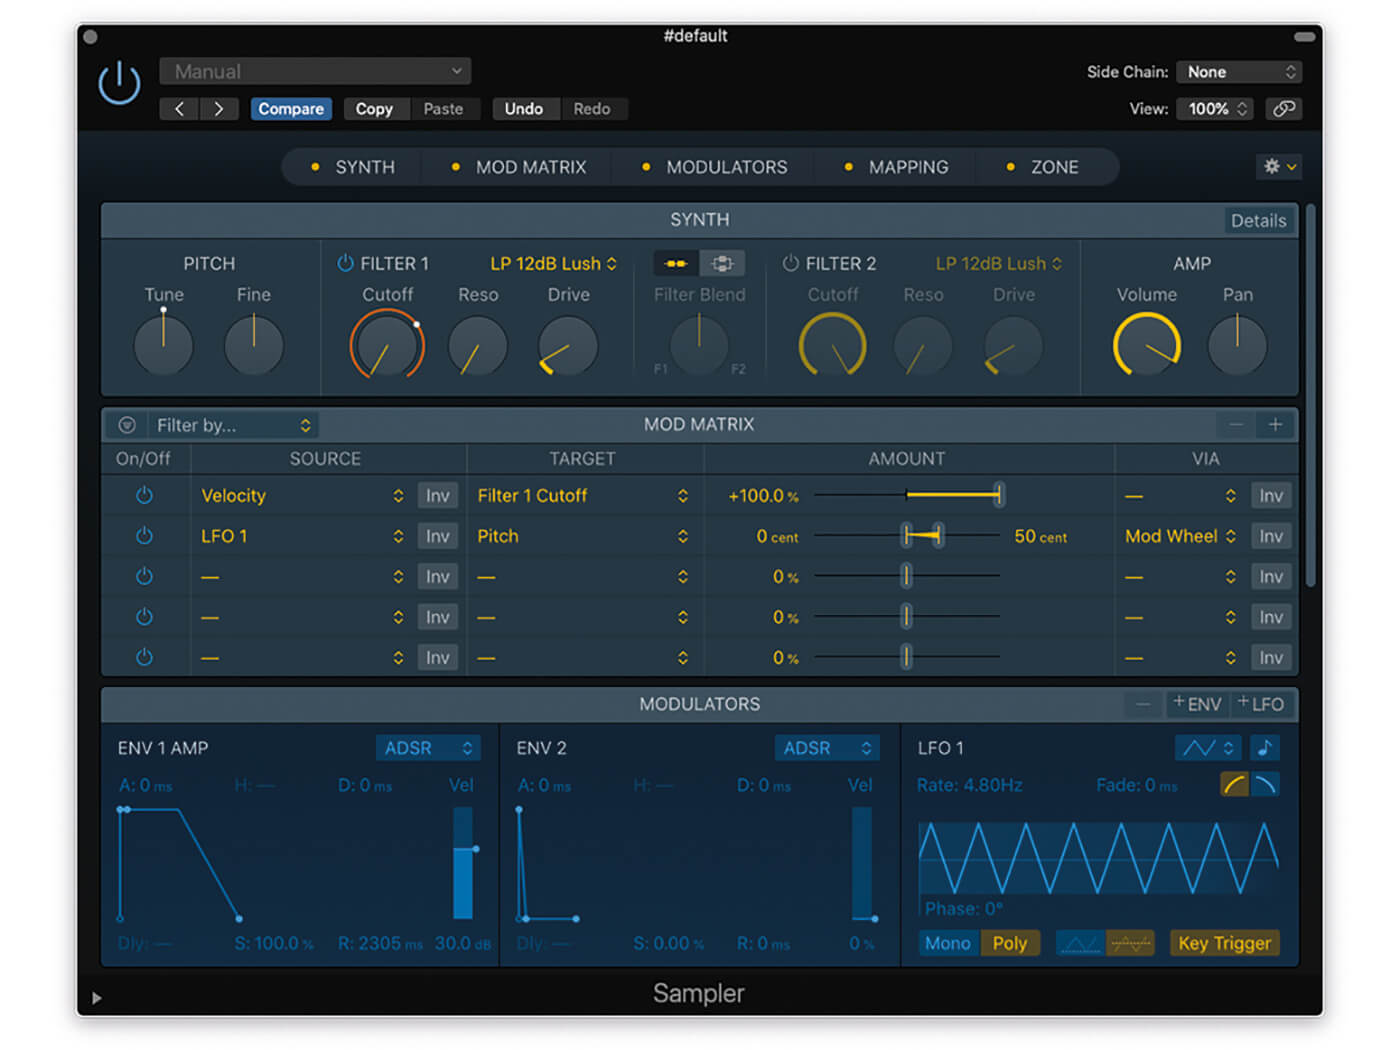
18. The Synth, Mod Matrix and Modulators sections can add further interest to the basic mapping. Here, we’ve lengthened the release time on ENV 1 AMP, and used Velocity to fully modulate Filter Cutoff.
For more Logic tutorials and workshops, check here.