Logic Pro X Tutorial: Become a Power User Tutorial Part 10 – Advanced MIDI Editing
Logic’s heritage as a MIDI sequencer really shines when it comes to adopting a speedier and more creative approach to editing MIDI data. Mark Cousins takes note… One of the key skills of producing music in the virtual domain is MIDI editing: refining the all-important musical data used to drive the virtual instruments in your […]
Logic’s heritage as a MIDI sequencer really shines when it comes to adopting a speedier and more creative approach to editing MIDI data. Mark Cousins takes note…

One of the key skills of producing music in the virtual domain is MIDI editing: refining the all-important musical data used to drive the virtual instruments in your Logic project. All too often, though, it’s easy to overlook the ability to edit and refine MIDI data – to be distracted by an all-together more alluring world of instrument plug-ins and effects – but in truth, the way that you handle and manipulate MIDI data can be as creative as any part of the production process. Handling MIDI data in a fluid way, and understanding the myriad of creative possibilities that can be applied to it, can transform your music in a profound way.

Rather than exploring Logic’s MIDI editing features in a laboured way, we’ve decided to take a look at a variety of techniques and possibilities with MIDI editing that might suggest new ways of working, or a more balanced use of all Logic’s features. At first, we explore the link between the Inspector and the Piano Roll editor, two of the primary means of editing MIDI data in Logic, as well as seeing the potential importance of ‘normalizing’ some of your edits along the way.
One of the key overarching themes in this workshop is the idea of ‘intelligent’ selection – selecting multiple MIDI notes using a few simple keyboard shortcuts rather than highlighting them on a note-by-note basis. With many MIDI performances often containing tens, or even hundreds of notes, it’s often the speed and efficiency that you select notes that can make a real difference to how quickly your MIDI edits are applied.
Beyond note selection, we also look some unique menu-driven ways that Logic can transform your MIDI data, often applying a process that could take an eternity to carry out by hand. Ultimately, the combination of improved note selection, along with some handy menu-driven transformations gives you more freedom to be creative with your MIDI data, whether you’re editing a complex drum pattern, moving different musical lines around a virtual orchestra or using controller data to make your music more dynamic. Enjoy the tutorial!
This tutorial is endorsed by Point Blank Music School which specialises in courses on production, sound engineering, the music business, singing, radio production, DJ skills and film production, all run by top British music producers and media professionals, with regular visits from legends in music and media. www.pointblanklondon.com

Improved Drum Editing

In this first example we’re going to explore some possibilities with editing drums, starting with the hi-hat pattern. The Inspector is often the first port of call with many MIDI edits – in this case, applying a straight 1/16th quantize and fixing the dynamics – using the extended region parameters as part of the floating region inspector, alt + R – so that the velocity is flat.

Editing between the Inspector and the Piano Roll editor can get a bit complicated when you’re moving between the two layers of editing, so it’s often useful to normalize the region parameters, making the region edits permanent. Ctrl click on the region and from the MIDI sub menu select Normalize Region Parameters. The quantize and dynamics changes are now hard-written.

One of the key ideas behind more efficient MIDI editing is the idea of intelligent selection. One of the best examples is arguably the menu option Select > Same Subposition, or Shift + P. In the case of the hi-hat we can select the accents for one bar, then initiate the Same Subposition command to have Logic select the remaining bars.

With the notes selected, we can now use the Velocity slider as part of the Piano Roll’s local inspector to increase or decrease their relative level. If we want to adjust the level of the other notes in the pattern we can use the Invert Selection function – Shift + I – to shift our current selection accordingly.

If you’re working between multiple regions, it’s worth remembering the Set Note Color function as part of the Piano Roll editor. In this example, try selecting all the drum-based regions and then open the Piano Roll editor. Now switch the colour setting using the menu option View > Set Note Color > By Region Color.

Another useful tool for MIDI drum editing is the Nudge feature, which enables you incrementally shift the position of one or more notes using the left and right arrow keys in conjunction with the Alt modifier. You’ll need to set the nudge value (Move > Set Nudge Value to > Division) to ensure it’s set to a division for 1/16th movements.
Dealing With MIDI Chords

The next few examples explore some interesting techniques in relation to working with chords. One really useful tool in this context is the Force Legato feature, found under Trim > Note End to Following Notes (Shift + \). Try this on the Cinematic Strings region and see how the note length is changed to make a smooth transition.

One useful skill with chord sequences is the ability to split-out the notes to different instruments – in this case, doubling the bottom two notes on clarinet and the top note on flute. To start, copy the strings to the clarinet, open the region and use the menu option Select > Highest Notes (Shift + Up Arrow).

With the top notes selected, press mute (Ctrl + M) to silence them. Copy the region over to the flute, selected the muted notes (Shift + M), un-mute, Invert the selection (Shift + I) and then mute. While this seems complicated, it actually illustrates how a few simple key presses can transform your MIDI Data.

An interesting alternative to the technique described here is the menu option Functions > Set MIDI Channel to Voice Number, which divides a chord between a series of MIDI channels. This is well worth doing with the View > Set Note Color > By MIDI Channel enabled, so that you can see the MIDI assignment by colour.

Try applying the Set MIDI Channel to Voice Number function on the Hammond track. In this case, the notes end up being divided among the three different organ manuals (Upper, Pedals and Lower). You can achieve some interesting effects changing the drawbar setting between the three manuals, colouring each part of the chord in a different way.

If you’re intending you use your separated note data with other virtual instruments, it might be worth using the contextual menu item MIDI > Separate by MIDI Channel. Once applied, your original sequence data will be split into three regions, one for each voice of the chord, each of which can be mapped to a separate virtual instrument.
Getting Creative – Controller Data And Beyond…

The MIDI Draw area at the bottom of the Piano Roll editor is where you can access the MIDI controller data and, of course, MIDI velocity settings. This view is particularly useful if you use the note data by Region Colour view, although it’s also handy in that you get a detailed overview of the respective velocity level between notes.

Using the drop-down menu in the local inspector, you move between any one of the 127 assignable MIDI controllers. Working with the synth bass track, for example, we can use the modulation to controller the filter cutoff. Use either the pointer tool to add new nodes or the pencil tool to draw freehand.

One of the key points to note about the MIDI Draw area is that you can access the same information at arrange-level. From the Tracks Area, use the local menu item View > MIDI Draw > Modulation. You should now see controller data directly from the arrangement, although you’ll need to make sure the vertical scaling is suitably ‘large’.

When it comes to modifying MIDI data, there’s a host of possibilities to be found under the Functions menu in the Piano Roll editor, especially under the MIDI Transform sub-menu. Whenever you apply a transform, Logic will take you through to MIDI Transform dialogue. Click on Select and Operate to initiate the transform.

Working with the Synth Bass part, there’s a number of interesting transforms we can apply. Fixed Note Length adds a more machine-like feel to the sequence, especially if we then reduce the note length by half (effectively creating notes 1/32nd in duration). Also try Random Velocity as this is mapped through to the Filter.
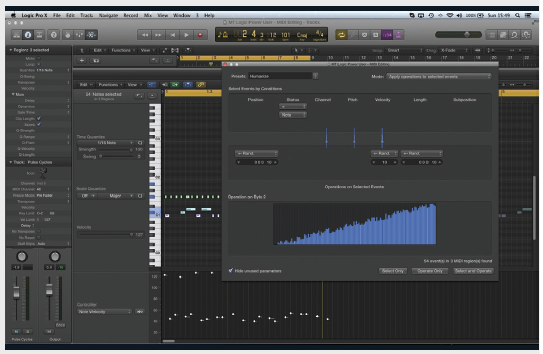
Going back to the drums, one of my favourite MIDI transforms is the Humanize option, which adds small amounts time drift and velocity randomisation to mimic the style of a ‘human’ performance. The great thing here is that you can add Humanize progressively – making the performance looser each time.