Logic Pro X Tutorial: Become a Power User Part 7 – Using Retro Synth
Beneath the appealing immediacy of Retro Synth’s interface lies a surprisingly powerful and versatile machine. Mark Cousins gets twiddling. Although the mighty ES2 remains Logic Pro X’s most powerful and complex subtractive synthesizer, there’s no denying that the Retro Synth is a considerably more immediate and enjoyable tool to use on a daily basis. You […]
Beneath the appealing immediacy of Retro Synth’s interface lies a surprisingly powerful and versatile machine. Mark Cousins gets twiddling.
Although the mighty ES2 remains Logic Pro X’s most powerful and complex subtractive synthesizer, there’s no denying that the Retro Synth is a considerably more immediate and enjoyable tool to use on a daily basis. You need only look to the success of synthesizers such as the Mini Moog to realise that a few simple controls is all you actually need to produce great sounds. It might look impressive to have an endlessly complex modulation matrix or multiple filter-routing options, but when you want a powerful bass line or searing lead, it’s often the simplicity and directness of Retro Synth that yields the best results.
Technically speaking, Retro Synth works as ‘three synths in one’, combining elements of subtractive, wavetable and FM synthesis. For this tutorial, though, we’re going to focus on Retro Synth’s subtractive qualities – also referred to as its Analog mode – although you’ll find that a large number of the techniques outlined are equally applicable to its other modes.

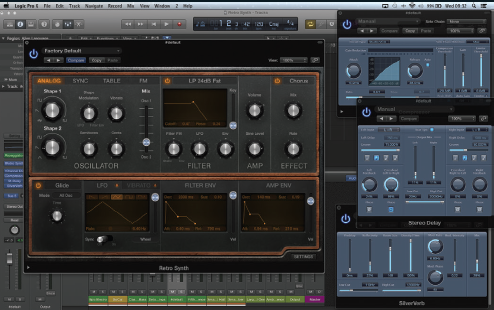
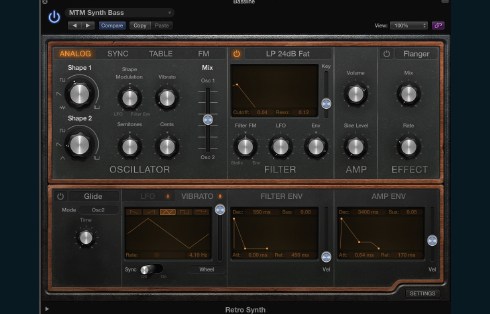
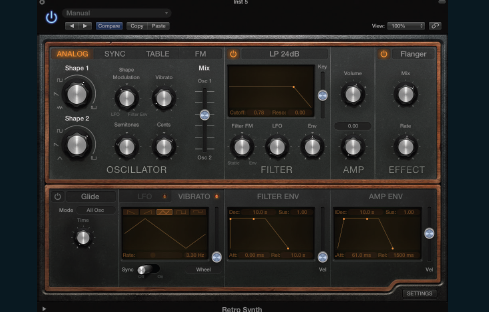
Thanks to its chunky GUI, Retro Synth is easy for even a novice to understand. Along the top you’ll find the principal signal path of the synth running from left to right, making it easy to visualise the ‘flow’ of a sound. We start with the oscillators where we can shape the sound’s basic harmonic properties. Next: the Filter section, used to gouge-out large parts of the sound spectrum before it hits the amplifier and, finally, a Chorus/Flanger used to fatten Retro Synth�’s output.
Towards the bottom of the interface you’ll find a collection of modulation sources – vibrato, an LFO and two envelopes – that are used to shape the sound over time. The modulators contribute an important part of a sound’s identity: adding a small amount of dubstep wobble using the LFO patched across the filter, or softening the attack on an amplifier envelope to make a synth pad. Best of all, everything you need is accessible and easy to work with.
Synth Bass
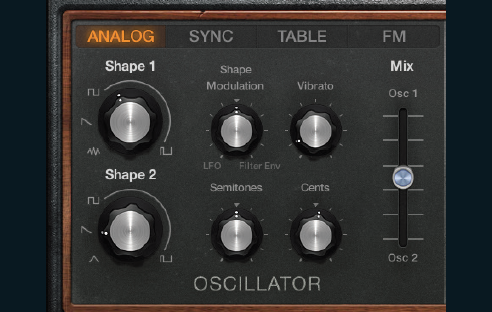
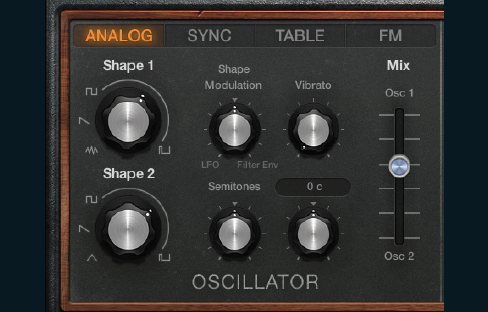
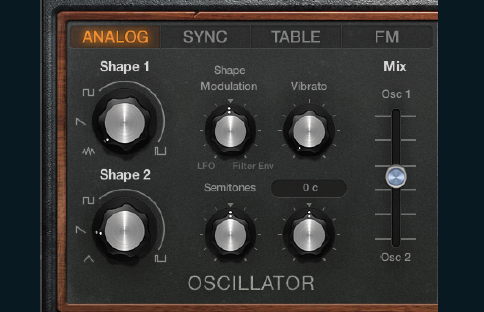
1: A synth bass is an excellent demonstration of the key features and workflow of Retro Synth, and makes good use of the Analog mode. Start by defining the waveshape, using a combination of a square wave on oscillator 1 and sawtooth on oscillator 2. Add some detune via the Cents control to lend the sound some warmth.
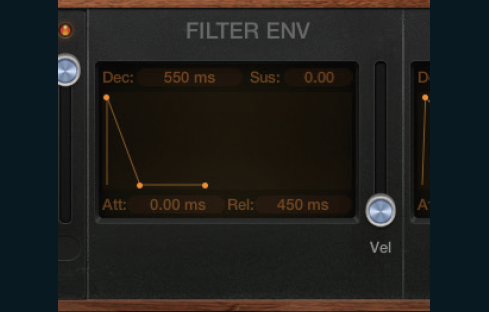
2: The key to a large number of bass sounds is the filter, often with the envelope to create a defined attack to the sound. Move over to the Filter Envelope, therefore, and set up an envelope using a fast attack, 550ms decay, no sustain and a release of around 450ms. The resulting envelope should have a distinct ‘spike’ to it.
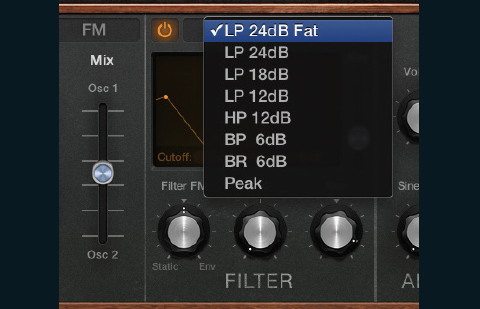
3: For the envelope to have an effect, we need to establish some key settings in the Filter section. For Filter mode, select the Moog-like LP 24dB Fat mode. Reduce Cutoff to 0.04 and add a small amount of Resonance (0.12). The Env control adds modulation – set it around 0.79 so that the envelope modulates over almost the full range.
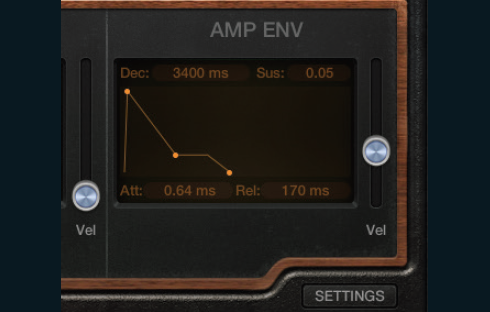
4: Use the Amp Envelope to shape the dynamic of the sound. Although the broad shape is similar to the Filter Env, there’s a slower decay (around 3,400ms) and a small amount of sustain so that the sound has a degree of body (0.05). Release is also kept relatively quick (170ms) so that the sound retains a percussive edge to it.
5: Finishing touches to our bass sound include the addition of some vibrato and some further forms of modulation. Vibrato can be applied directly from the oscillator – in this case, setting the Vibrato parameter to around 0.10. The speed and waveshape can be established in the dedicated Vibrato section beneath the oscillator controls. Use the triangle waveshape at a Rate of 4.10Hz.
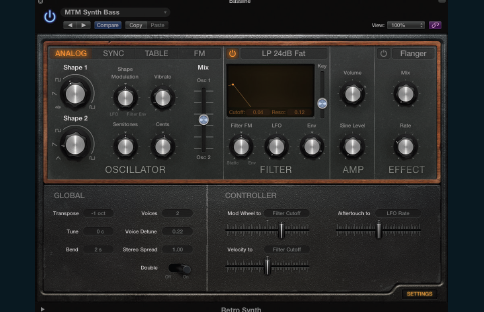
6: The original sequence data for the bass part includes some modulation wheel movements, originally intended as a means of tweaking the filter cutoff. Click on the Settings button to see the modulation routing for Retro Synth. Map the mod wheel through to Filter Cutoff using its associated dropdown menu. An Amount of 0.37 should provide enough movement.
PWM Pads
1: Pad sounds can be created in a number of ways, but in this example we’re going to use Shape Modulation to create a typical PWM pad, much like an old string machine synthesizer from the 70s or 80s. Create the basic timbre using two oscillators positioned somewhere midway between square and pulse waveshapes.
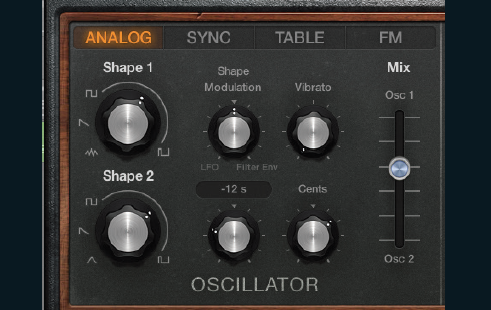
2: The tuning of the oscillators forms a big part of the warmth and symphonic width of the pad. Start by creating an octave-shift between the oscillators, setting a -12s shift using the Semitones control. Adding plenty of detune – positioning the Cents controls around 17c – helps thicken the output and adds body to the sound.
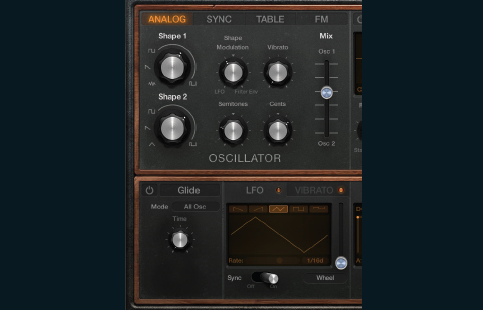
3: Shape Modulation enables us to modulate the pulse width using either the LFO or envelope, with the resulting sound appearing similar to a chorusing effect. Move the Shape Modulation control towards 0.124, therefore, which should bring the LFO into action. In this case, we’re using a tempo-sync’ed LFO running at 1/16d, which creates a fast-moving PWM effect.
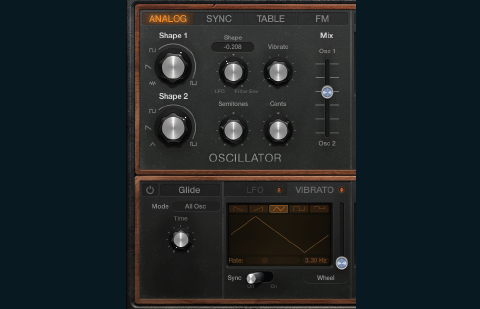
4: As well as the PWM, it’s also worth adding some Vibrato to provide another layer of movement. Set the Vibrato control in the oscillator section to around 0.09 semitones and its Rate to be slightly different from that of the LFO – in this case, 3.30Hz. The chaotic movement between the LFO and Vibrato adds interest to the sound.
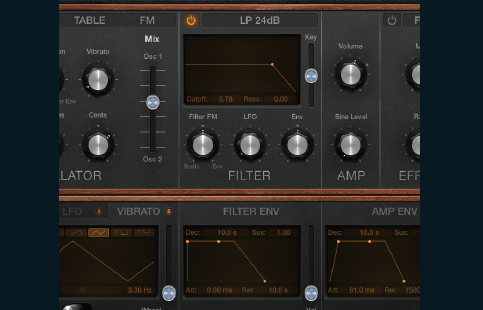
5: The filter settings are relatively straightforward for our pad sound. Reducing Cutoff to around 0.78 darkens the timbre, using a small amount of Keytrack (Key) so that the filter follows the keyboard. No envelope is being used, but a subtle movement is being added by the LFO (around 0.08) to heighten the PWM effect.
6: In keeping with the classic string machine sound, the last step is the addition of a Flanger using Retro Synth’s Effects section. Set the Rate of the Flanger to either a slow setting, so that it ‘swoops’ over the duration of a bar, or the fast movement that we’ve selected here so as to mimic the speed and movement of the PWM effect.
Esoteric Applications
1: Our last example is a sound that takes a more imaginative approach to Retro Synth’s features, combining unusual tunings and unconventional waveshapes. The starting point is a combination of a sawtooth waveshape in oscillator 2 and a Noise waveshape in oscillator 1. Noise is a great way of adding ‘dirt’ to a sound, although we still need to tame the effect.
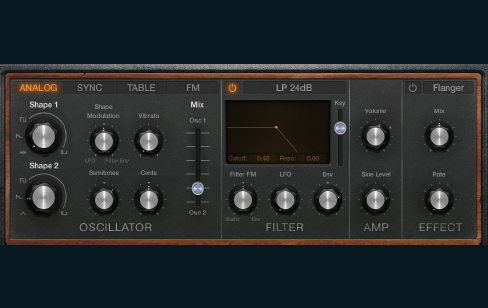
2: Change the mix between the two oscillators so that you favour the sawtooth waveshape (around 0.82). The interesting shift comes when you increase the pitch of the oscillator by +7 semitones, and add the additional sine wave oscillator that’s available in the Amplifier. The effect is like a chord, with the sawtooth sitting a fifth above the sine wave.
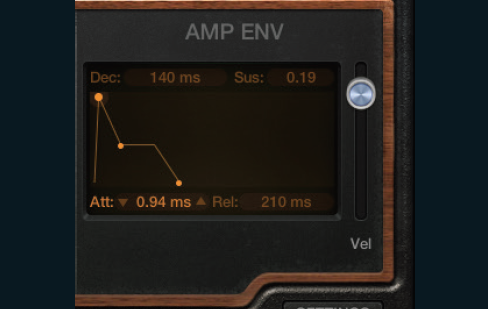
3: Now move over to the Amplifier Envelope to shape the sound’s dynamic. The envelope is relatively straightforward: a fast attack of 0.94ms, fast decay of 140ms, medium sustain at 0.19 and release around 210ms. Ensure that you bring up the Velocity (Vel) slider, though, as the output of the arpeggiator being used to drive Retro Synth has embedded velocity data.

4: The Filter Envelope follows a similar approach to that of the Amplifier Envelope, with the Vel slider set to its maximum. Add a small amount of resonance to an LP 24dB Fat filter and ensure that the Envelope is modulating to the tune of around 0.47 – enough to add some timbral movement, but not dominate the sound.
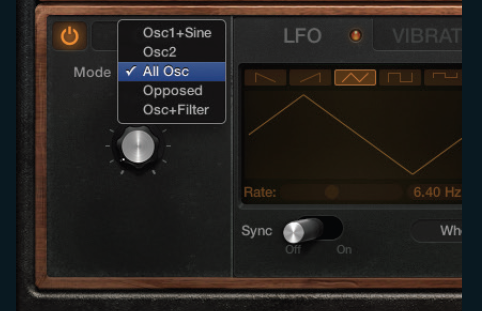
5: Although the sound is beginning to work at this stage, it’s interesting to explore the Glide option, especially given the note movement generated by the arpeggiator. Use a fast Glide time (around 1.80ms) and try experimenting with the different modes. The All Osc option glides all the components, but you can also get some interesting results from Osc1+Sine and Opposed.
6: Although you want to avoid ladening the sound with effects, it’s worth exploring some additional signal processing. In this example we’ve added some chorus (from the Retro Synth itself), followed by compression, stereo delay and reverb. The added effects help the notes to bounce around, as well as adding extra space and dimension to the sound.