Logic Tutorial: Good Automation Practice In Logic
The effective use of automation can transform an average mix into a song that lives and breathes. Mark Cousins takes control of the faders… When it comes to the craft of creating a finely-tuned mix, most mix engineers will turn to automation as a means of creating the perfect balance of sound. Unless you are […]
The effective use of automation can transform an average mix into a song that lives and breathes. Mark Cousins takes control of the faders…
When it comes to the craft of creating a finely-tuned mix, most mix engineers will turn to automation as a means of creating the perfect balance of sound.
Unless you are working with deliberately static generes, all music works best when there’s a dynamic interplay between instruments with some parts ‘singing out’ at key points while others sit back and form the ‘body’ of the track.
Once you’ve established a broad balance of instruments, therefore, automation lets you ride the faders and shape the mix over time, whether it’s something a simple a few rides on a lead vocal, or a more creative mix where multiple instruments dip in and out of the texture.
While most of us should be familiar with the basics of automation in Logic Pro X, it’s interesting to note how a range of existing features – like the Marquee Tool and Fader Groups – take on a new lease of life when it comes to automating a mix. In this workshop, therefore, we’re going to take a broad look at automation that pulls in a number of the concepts, illustrating just how conducive Logic Pro X is to the task of mixing.
The Perfect Mix
On the whole, automation data is written in one of two ways: either on-the-fly moves where you grab a fader, or control on a plug-in, and record moves as you make them, or manually, where you take a more precise approach where you draw a series of nodes to adjust one or more tracks.
Use the Read, Write, Touch and Latch automation modes for recording moves on-the-fly, assuming that you’ve got the broad balance of instruments to a satisfactory level. With a good mix established, Touch mode is the quickest and easiest way of tweaking the balance, as moves are only written whenever you grab hold of a fader. To avoid writing further moves by mistake, place the track back into Read mode.
For precision mixing, drawing nodes in by hand tends to deliver the best results, letting you fine-tune the mix down to 0.1dB. Given that hand-drawn automation is a slightly more laborious approach, though, it’s well worth utilizing some extra features to make your workflow slightly speedier.
One essential tool that I use is fader grouping, which lets you draw moves across multiple channels, rather than having to repeat them. Usefully, Logic keeps the balance between instruments within the group, as well as the integrity of any moves that are already in-place.
Once you’ve written various moves into the track, things can get difficult if you need to fine-tune the results further, maybe lifting a series of vocal rides by 1dB for example, or turning down a carefully automated bass line.
Using the Trim mode (found as part of the track header) is a quick way of lifting an instrument throughout the track, even with a series of moves in place. Where you need the modification applied in a specific part of the track, consider using the Marque tool as means of defining the area to modify. Once set, simply use the Pointer Tool to lift or attenuate the section, keeping the moves either side of it untouched.
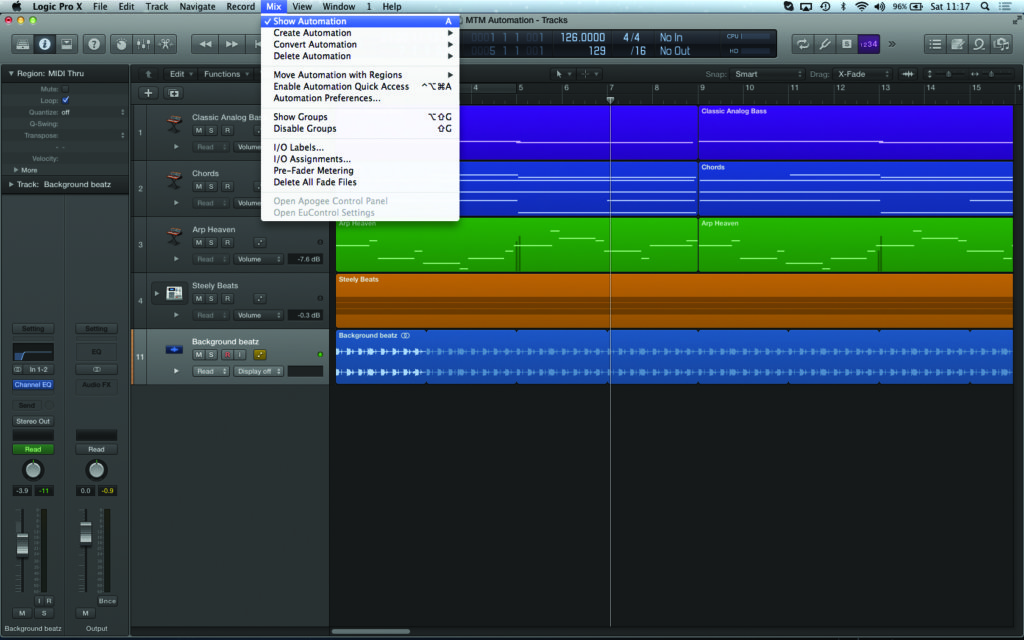
As well as automating virtual instruments and audio tracks, it’s also the case that you’ll want to automate auxiliary channels used either as reverb returns, or for submixing. By default, these channels won’t appear in the Tracks area, but by using the mixer’s local menu item Options > Create Tracks for Selected Channel Strips you can create empty track lanes ready for automation data.
As there are no regions on these tracks, be careful if you move or duplicate part of your project, as the moves won’t be copied across. As a quick fix, insert empty regions on these auxiliary tracks so that the moves are brought across appropriately.
Using the broad palette of techniques and tools we’ve outlined here it’s interesting how much you can transform even the most basic of mixes. When a mix isn’t quite working, most of us turn to quick-fix tools, usually some kind of ‘must have’ plug-in, like a compressor or some other sonic gimmick.
In many cases, though, the musical problems that we’re presented with are often best solved by some strategic automation – making the mix more dynamic and letting the instrumentation sing! Letting yourself be guided by the music, and in turn, responding to the music you’re presented, always produces the best results, and automation represents the perfect opportunity to explore this relationship.
Focus On Deleting Automation
Not every move turns out perfect, so it’s good that Logic Pro X includes an array of options for deleting automation data, found under Mix > Delete Automation.

Usefully, the deletion options are directed, so, for example, you can choose to only delete the visible automation on the current selected track – erasing one parameter, while other hidden parameters are kept safe.
Before you initiate this command, ensure you’ve closed down any additional automation track lanes, and left the current view on the parameter you want to delete. If everything goes wrong, of course, you always have the option to Delete All Automation, which will delete automation whether it’s visible or not.
Logic Automation Guide
1: To view or edit Automation you’ll want to have the Automation view enabled using the menu option Mix > Show Automation of the keyboard shortcut A. Each track has its own Enable Automation icon found to the left of the Input Monitor switch.
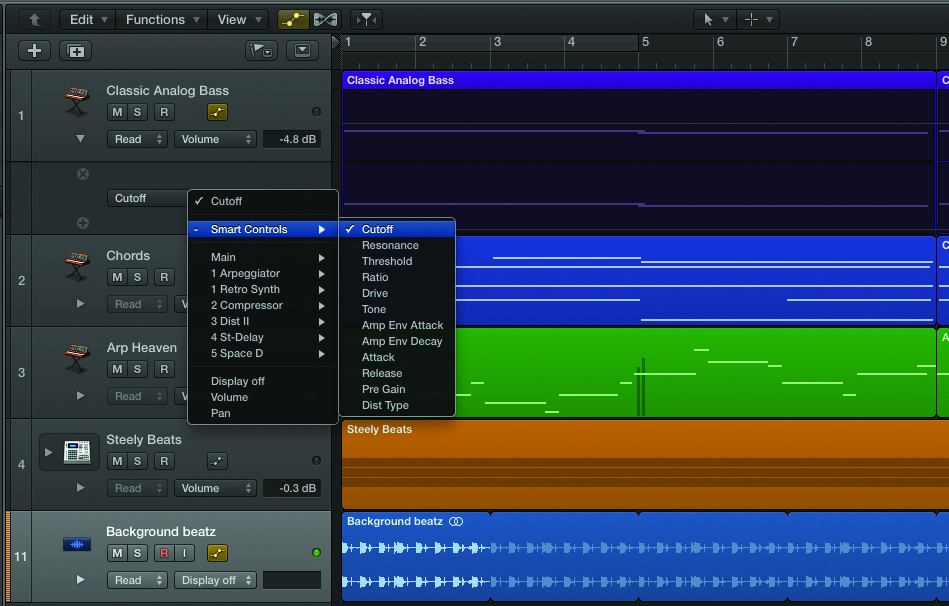
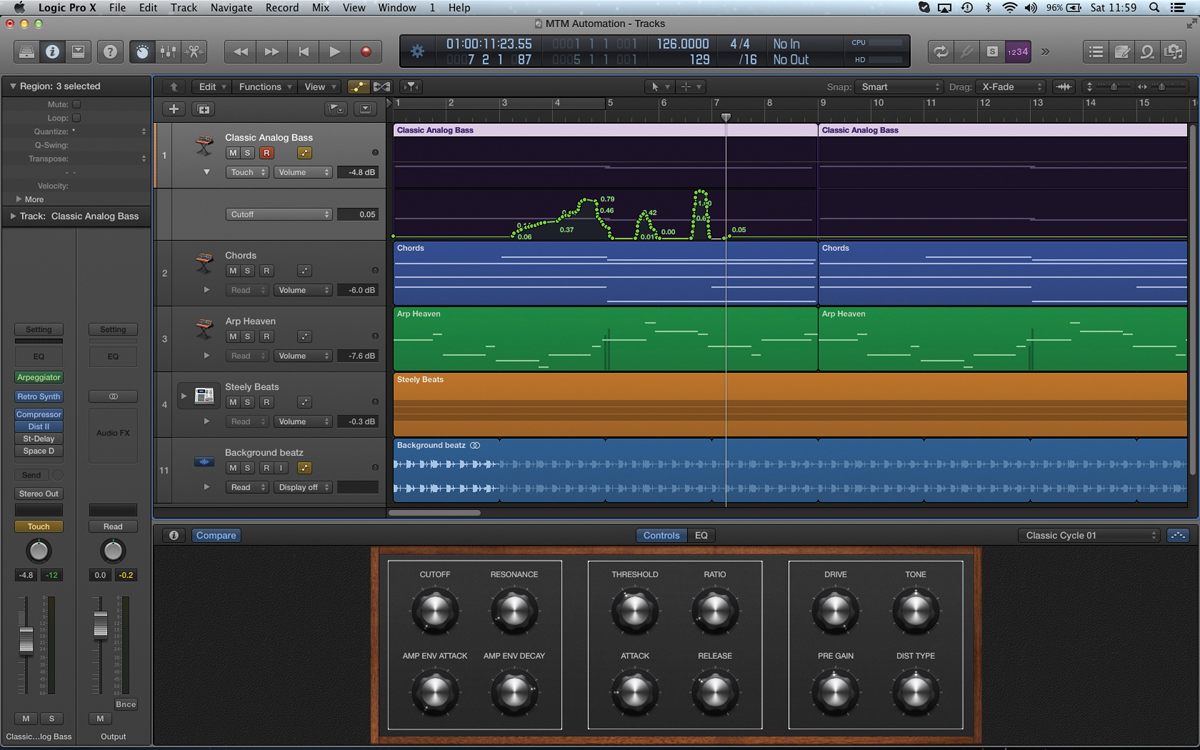
2: All mixer controls and plug-in settings can be controlled by automation. Use the small arrow at the bottom of the track to extend the display to include further lanes of automation. In this case, we’re working with the cutoff for Retro Synth.
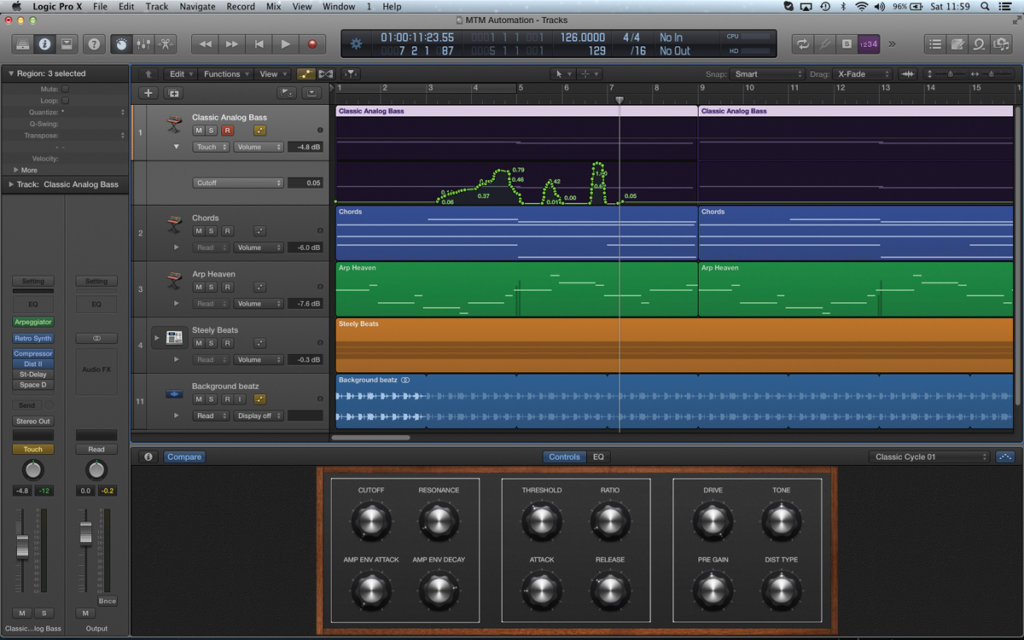
3: Using the Touch automation mode you can write automation moves in on-the-fly. When the control is ‘grabbed’, automation data is written to the track. Release the control, and Logic will return the parameter to its original state.

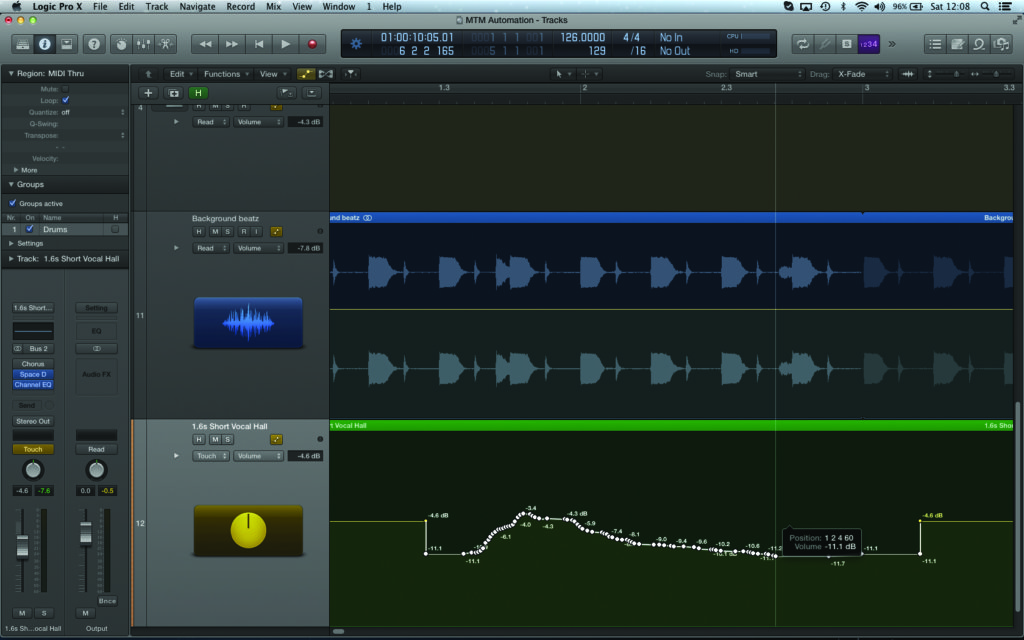
4: Drawing nodes directly into the track lane can achieve a more precise form of automation. In this example, the chords have been faded in using two nodes – one at the start of the track and another where the chords hit -6.0dB.

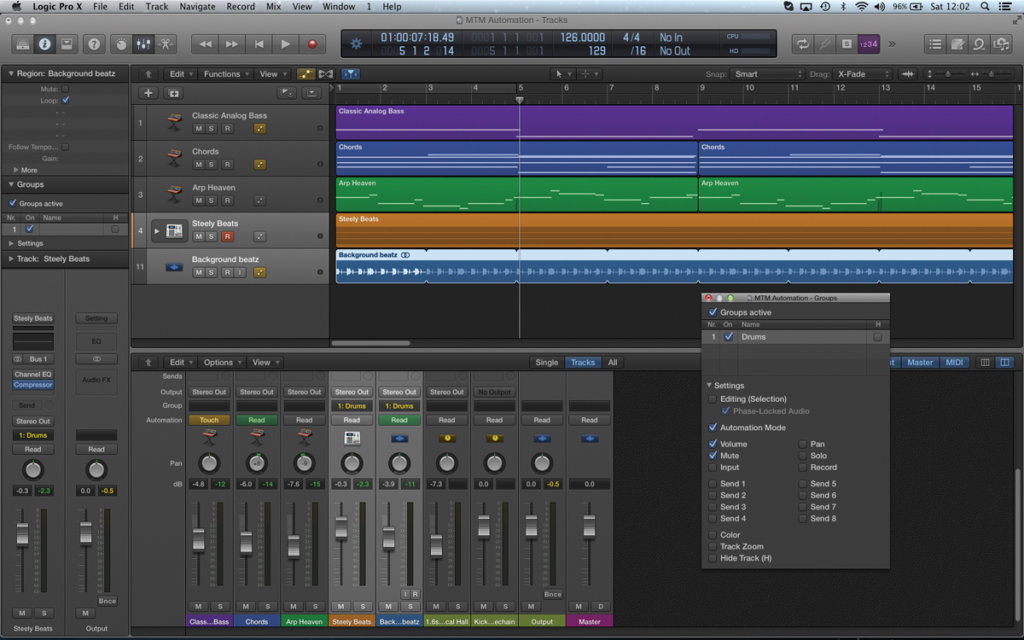
5: Where automation moves need to be placed across several tracks at once, consider using Logic’s Group function. Start by placing the required tracks (in this case, the drums) into their own group via the mixer. The Automation Mode should be on by default.
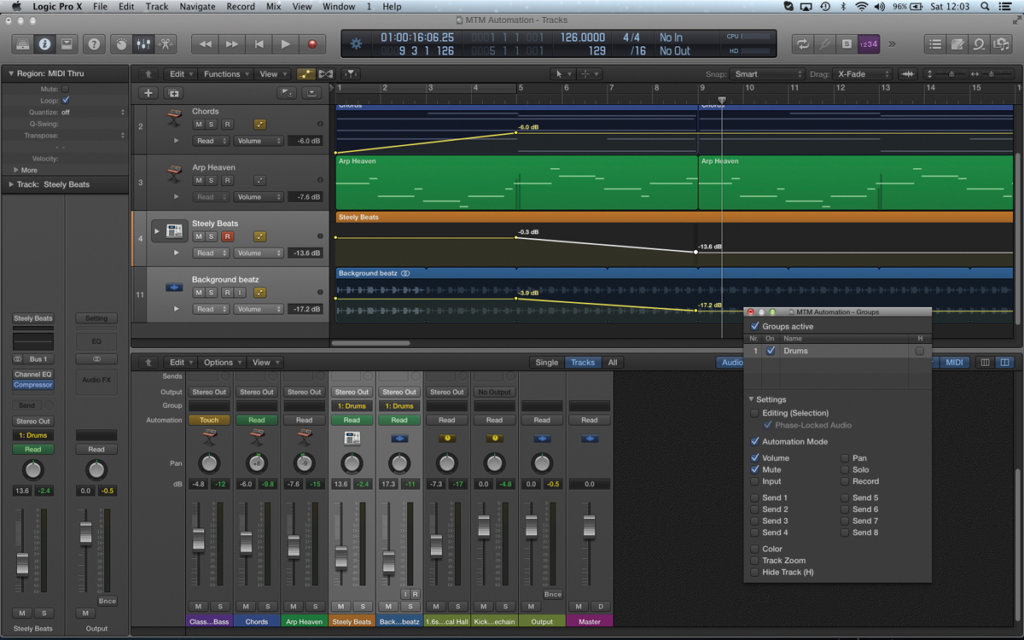
6: With the tracks assigned to a group, any automation nodes written into one track will be written in the other. Note that Logic keeps the proportional balance between the tracks, so that instruments still sound balanced as part of the group.
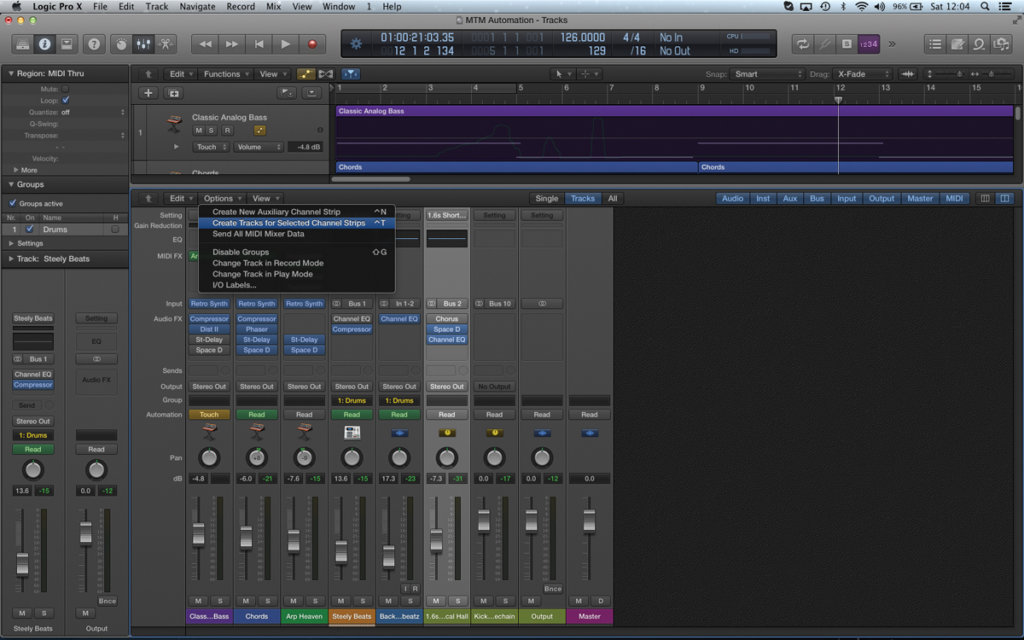
7: Automating FX returns or auxiliary faders used for instrument grouping can be an important part of the mix. Do to this, start by highlighting the required auxiliary channel in the mix and select Options > Create Tracks for Selected Channel Strips.
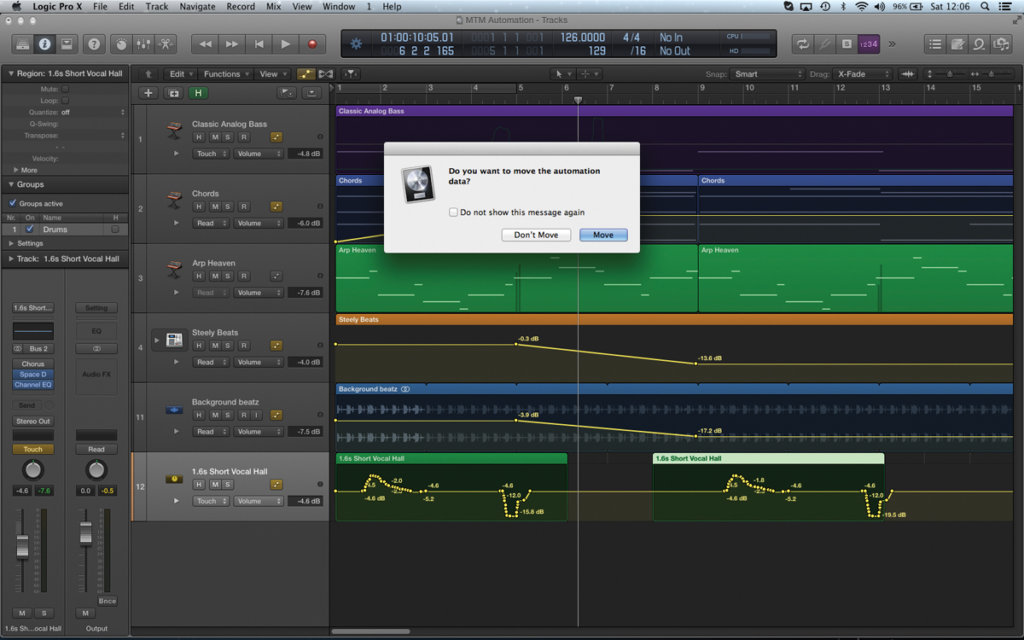
8: With the channels placed in the Tracks area you can apply automation as before (here we’ve pumped the level of the snare reverb). Note though, you might want to create empty regions so that you can move or duplicate the automation data.
9: Tweaking a mix often requires lifting just a small segment of automation data. Try using the Marquee tool as a means of selecting the area you need to modify, which you can then attenuate or lift accordingly using the Pointer Tool.
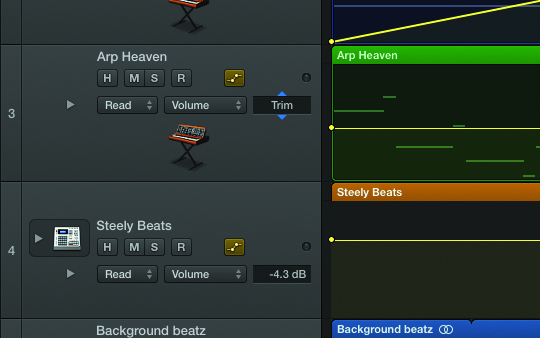
10: If you need to modify the track as a whole, use the Trim function found as part of the track header. Using Trim will raise or lower all of the automation moves, letting you change the broad mix after automation moves have been recorded.
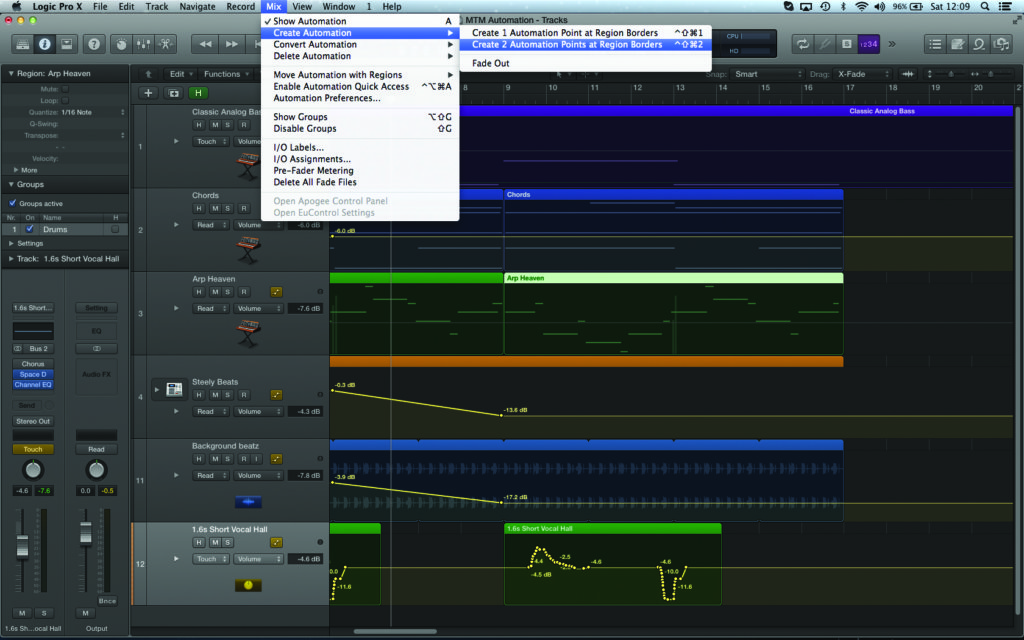
11: Another interesting option is to change automation on a region-by-region basis. Select the region you want to associate the automation data with, then pick the menu option Mix > Create Automation > Create 2 Automation Points at Region Borders.
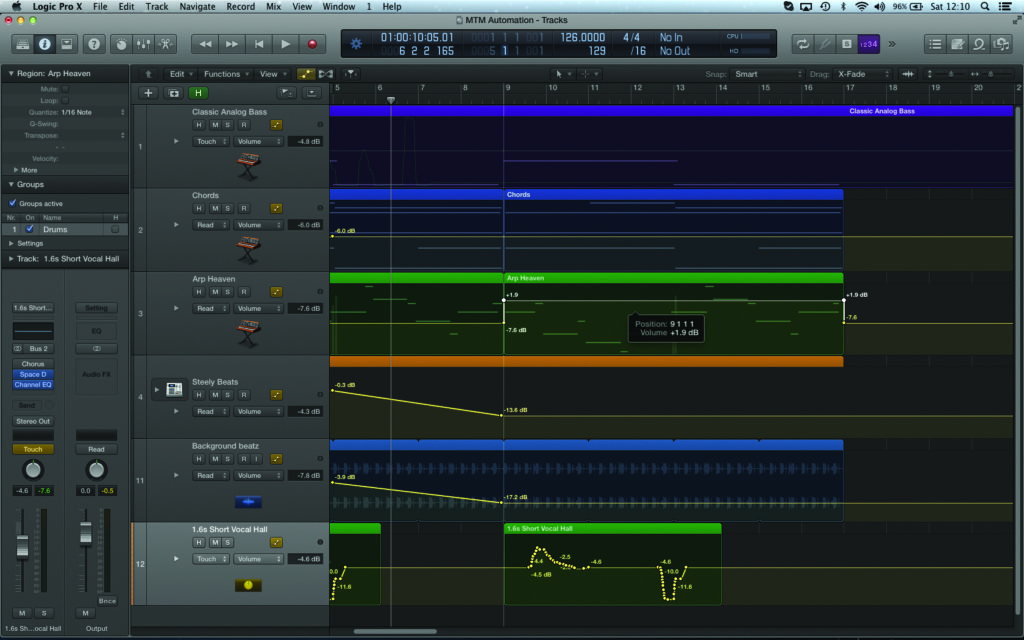
12: With the four nodes placed (two at either end of the region) you’ll be able change the automation data specifically for that region, arguably making it possible to radically change levels between different regions in a way that would be impossible by hand.

