Logic Tutorial: Convolution Tricks With Space Designer
More than just a reverb plug-in, Space Designer can perform some intriguing convolution-based sound-design tricks. Mark Cousins gets experimental in this Logic Tutorial Given that Space Designer resides in Logic’s Reverb folder, you’d be forgiven for thinking that this plug-in’s main purpose in life is the creation of spacious reverb effects. In truth, […]
More than just a reverb plug-in, Space Designer can perform some intriguing convolution-based sound-design tricks. Mark Cousins gets experimental in this Logic Tutorial
Given that Space Designer resides in Logic’s Reverb folder, you’d be forgiven for thinking that this plug-in’s main purpose in life is the creation of spacious reverb effects. In truth, Space Designer is Logic’s premier reverb plug-in, but there’s a lot more potential behind its convolution-powered engine than first meets the eye.
As many innovative samples libraries have illustrated (Native Instruments’ The Giant being a good example), convolution is a creative sound-design tool worthy of its own merit, and as we’ll see in this tutorial, Space Designer is more than on a par with a range of dedicated convolution plug-ins now available.
To illustrate the creative potential of Space Designer, we’ve got a series of techniques to explore, contrasting pitched ‘resonating’ treatments and more textural and rhythmic effects.
Designer Lifestyle
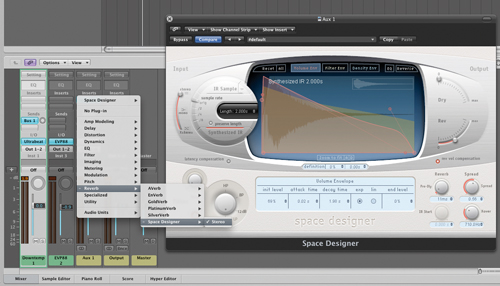
To start the exercise, create a buss send with an instance of Ultrabeat, setting its send level to 0dB. On the newly formed aux channel, create an instance of Space Designer, checking that its Dry control is set to 0. Put simply, the process of convolution is a mathematical merging of two sounds – folding one sound over the other to create a new hybrid. For conventional reverb applications we use an impulse response file that is nothing more than a ‘spiked’ recording of the reverb tail in a real acoustic space. Once the two sounds are folded over one another, it appears as if the dry signal has been placed inside the real acoustic space. (See Main Image)
Instead of using a traditional impulse response file, though, Space Designer can use any audio file for the purposes of convolution. To hear an unconventional application in use, try clicking on the small triangle next to the IR Sample legend and select Load IR from the dropdown menu. Navigate your way to the Audio Files folder of the current Logic project and load the Piano Bounce audio file, which is just a simple recording of a chord played on an acoustic piano. Playing back the file should now produce an intriguing effect whereby the drums seem to resonate like a piano – an effect created from the marrying of the two sounds. In particular, notice how the different drum sounds pick out different resonances in the original recording.

Space Exploration
Although the basic resonating treatment sounds good, it’s worth noting a few key features of Space Designer in respect to enhancing the basic effect. First of these is Equalisation, found under the EQ tab in Space Designer’s main window. Equalisation is important given the occasionally erratic timbral output convolution treatments can bring. In truth, the precise nature varies given the input material you use and the IR file, but all too often I find the bass slightly heavy, and some of the midrange lacking detail. Using a low shelving cut, therefore, as well as a gentle boost in the midrange can significantly help the articulation of the effect.

Given that the original piano recording has a natural envelope to it (starting loud and fading out, in other words), it’s also worth experimenting with the Reverse button, found in the top right-hand corner of Space Designer’s main window. As you’d expect, the treatment takes on a form of ‘reversed piano’ sound, which is worth using without the original drums in the mix as an effect in itself. Another useful technique, given the ‘ambient’ qualities of the resonation effect, is to apply a traditional reverb over Space Designer’s output, pushing the resonating sound further towards the back of the soundstage.

Exploring Texture
Much like oil and water never mixing, it’s worth making a distinction between the two sound sources (input source and IR file, in other words) used for convolution. In our first example we used a rhythmic element for the input source and a pitched element as the IR file. If we wanted to process a track that has a tuned quality, therefore, it’s best to use an unpitched source as the IR file.

Rather than using a combination of wet and dry as we did in the last example, we now want to use Space Designer to wholly modify our source input – in this case, the EVP88. Instantiate Space Designer across the EVP88’s insert path and ensure that the Dry parameter is set to 0 and Reverb is set to Max. Now load the Water Drops audio file as the IR and try playing on the EVP88 to hear the effect in action. If you haven’t already done so, it’s also worth listening to the IR file in the project’s Media Bin to hear the file in its unmodified form.

Listening to the results of this ‘textural’ Space Designer application, it’s interesting to note how the water droplet almost appears to pick out resonances in the original source, creating a sound that is both ambient and textural at the same time. You can even try experimenting with different source files (try the Night Camp file as an alternative), with different textures offering variations on the texture and timbre of the final result. In examples where you use texture as the IR source, it’s worth experimenting with Space Designer’s enveloping feature. Importantly, this envelope forms the final dynamic shape of the end result – indeed, more so than the envelope of the source file.

Impulsive Behaviour
So far, all of the examples we’ve explored have used existing sounds as IR files, but it’s also possible to build your IR files for some interesting hybrid reverb/delay effects. In the Bin you should find a single Spike file, which can be used to create your own IR files from scratch. Import the Spike onto a new track and start experimenting with a variety of effects, including reverbs, delays, amp simulators and EQ. You could, for example, simply create timed repeats of the Spike by copying the region onto a new track and time-shifting it slightly – maybe adding some amp simulation or EQ to colour the repeat differently. Routing it through reverb and delay plug-ins also enables you to capture the sound of these effects as part of the equation.

As an example of what you can achieve, try listening to the Reso Delay and Drone Delay files left in the Audio Bin. Reso Delay uses a combination of spring reverb, tape echo and digital delay, some of which is fed back into the resonating piano effect created earlier. The Drone Delay file uses the same basic ingredients, but adds an additional drone patch created in Omnisphere. In a minute, we’ll hear how these can be applied to the drums to create some unique ambience treatments.
To render the IR file, you’ll need to remove the output assignment from the original Spike, as this shouldn’t be present in the final file (in effect, this first ‘spike’ is the dry source). Use the Bounce button on the main output fader to create the IR file, ensuring that cycle markers are set for the full duration of the reverb/delay tail.

Convoluted Sound
Once you’ve rendered your custom IR file, try importing this into the instance of Space Designer used to process the drums. Notice how the spikes have become discrete delays of the original signal, and, if you’ve added EQ or amp simulation, how their colour contrasts with the dry input. The two files that we’ve supplied are interesting, with the Reso Delay containing a combination of traditional delay effects and a touch of the resonation heard in the first example. The Drone Delay is particularly interesting when solo’ed, creating a drone-type sound that also appears to contain strange echoes of the original drums. With a little imagination, it’s easy to see how you can create some interesting and unusual effects that blur traditional ambience-creation with abstract sound design.

Good Transformations
All of the examples we’ve explored in this tutorial have illustrated the transformative effect of Space Designer on a range of sounds. From experience, the key to its success seems to be in the use of contrasting sound sources – creating a distinction between pitched and non-pitched sources. Beyond what we’ve looked at here, there’s an infinite combination of variables to explore. Try using melodic elements as IR files (a simple piano arpeggio can be found in the example project, if you want to have a go) or drum loops applied across chordal instruments – the possibilities are practically endless! Logic itself includes a ‘Warped’ collection of Space Designer presets to get you inspired, although I find the most rewarding applications always come from convolving your own material, especially if it all resides in the same song.
Here’s an interesting Space Designer tutorial: