Logic Tutorial: Become a Power User Part 1 – Logic Pro X In-Depth
Logic Pro X’s range of new features opens up a world of creative potential. Mark Cousins gets you up and running with some essential new tools… Logic Pro X is easily one of the most feature-packed updates we’ve seen for any DAW in recent years. As well as a completely refreshed user interface, […]

Logic Pro X’s range of new features opens up a world of creative potential. Mark Cousins gets you up and running with some essential new tools…
Logic Pro X is easily one of the most feature-packed updates we’ve seen for any DAW in recent years. As well as a completely refreshed user interface, Logic Pro users have a host of new features to play with, covering everything from virtual bass guitar amplifiers, to whole new form of pitch ‘elasticity’. With so many new elements to explore, though, it can take some time to fully understand what you can achieve in Logic Pro X, so we’ve rounded up what we consider to be the most exciting additions – Drummer, Retro Synth, the Arpeggiator and Flex Pitch – to give you the all-important lowdown on how these elements work.
Although it would easy to dismiss Drummer as a GarageBand-like loop engine, it’s actually a surprisingly powerful and complex addition to the Logic Pro universe. Initial encounters with Drummer give the impression of a tool that’s almost foolishly simple – pick a genre, choose a drummer, and then tweak a few controls on a XY pad to get an instant rhythm track! However, once you start swapping components of the kit, as well as changing some of the finer point of the performance, you realize just how complex and interactive the Drummer engine really is.
Once you’ve assembled your basic rhythm track, it’s well worth swapping the default stereo kit for one of the Producer Kits. The Producer Kits are made from Track Stacks (another new feature), which allows you to expand the basic kit and gain access to each and every channel used to record and mix the real kit, even down to the room mics.
For producers of electronic music, the combination of Retro Synth and the new Arpeggiator is well worth closer exploration. In particular, the Arpeggiator is part of a suite of new MIDI plug-ins that can be instantiated directly into the signal path of your mixer. The plug-ins work as ‘live’ transformers of MIDI data, so that performances you play on a MIDI keyboard, or MIDI data recorded into a region, are transformed as it’s routed to your chosen virtual instrument. With its immediate control set, Retro Synth is an ideal pairing with the Arpeggiator; especially once you start to unlock the modulation routings and the Arpeggiator’s intriguing Grid mode.
Since its introduction in Logic Pro 9, Flex Time has proved itself to be a real life-save in the studio. Flex Pitch is the logical extension to the Flex Time functionality, this time allowing you to adjust qualities of a performance in respect to pitch, intonation and formants. One analyzed, an audio region can be seen with a unique piano-roll editor overlaid onto the waveform. Using Flex Pitch, poor intonation can be rectified at the push of a button, or you can explore more creative applications where you completely re-pitch a melody.
With so much to look at, this workshop is only an introduction to the new features contained in Logic, although there’s enough detail to get you up and running. Do keep an eye on future workshops, though, as we’ll be exploring these elements in much greater detail.
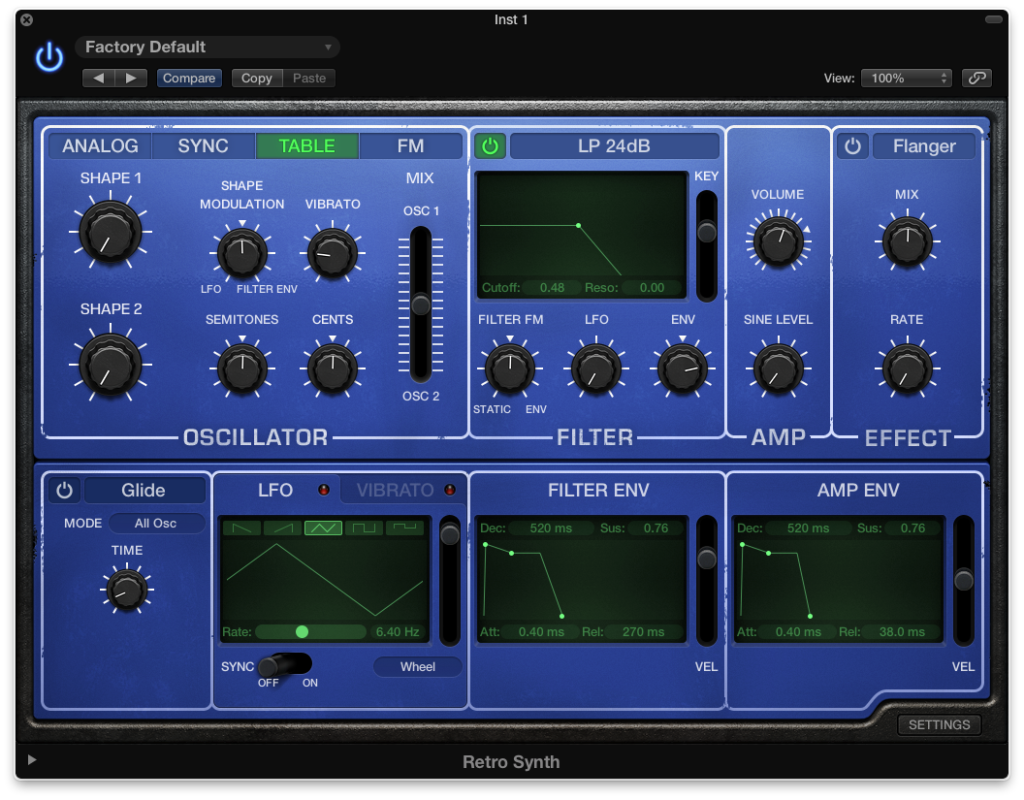
Retro Synth Flavours
One of Retro Synth’s most intriguing features is its ability to switch between four different modes of vintage synthesis: Analog, Sync, Table and FM. In truth, the first two types are actually variants of subtractive synthesis (the Sync mode adding a hard oscillator sync between the two oscillators), but the Table and FM are both unique – covering PPG-like Wavetable synthesis and primitive recreation of the FM synthesis used on Yamaha DX7.
What’s interesting with the three modes is that the majority of the parameters – filter settings, envelope generators and so on – are carried across whenever you move from one mode to another. This approach can lead to some interesting moments of serendipity – a patch might start off in a subtractive mode, only to be moved over to FM, thereby creating a completely different timbre. This is a great trick to try with the presets, often creating radically different sounds with just a push of a button. As you get more experienced, you’ll start to note the subtle sonic and technical differences between the modes, allowing you to exploit the unique sonic qualities the different models offer.