Mastering – The Complete Guide
Whether you are new to mastering or an experienced engineer, the following feature could change your life. Here is THE complete guide to a process that will transform your sound. Who better than MusicTech’s mastering expert Mike Hillier to guide you through… Any feature that claims to be ‘The Complete Guide…’ is worth starting with […]
Whether you are new to mastering or an experienced engineer, the following feature could change your life. Here is THE complete guide to a process that will transform your sound. Who better than MusicTech’s mastering expert Mike Hillier to guide you through…
Any feature that claims to be ‘The Complete Guide…’ is worth starting with a bit of a history lesson, so let’s look back at the early days of this ‘dark art’. Mastering began as a means of transferring recordings from magnetic tape to various media, such as vinyl, while maintaining as much of the audio fidelity as possible. Vinyl, for example, cannot handle much bass without the risk of skipping, while the high end is susceptible to hiss. Mastering engineers would use an RIAA pre-emphasis EQ curve when cutting lacquers, which reduces the bass on the vinyl and boosts the highs. The bass-light vinyl would then be compensated for on the playback system with an RIAA de-emphasis EQ curve which would boost the lows and cut the highs. The final effect would be a linear frequency response, but with no skipping because of excess bass and less hiss.
Cutting the lacquer itself required further attention and skill on the part of the mastering engineer. The running time played an important part in what could be achieved, as longer playing times meant that the grooves had to be closer together. Even with the RIAA pre-emphasis, the mastering engineer still had to pay close attention to the amount of low-end information, using elliptical filters if necessary to mono the bass below certain frequencies. Further limitations of the medium relating to overall signal level, phase correlation and sibilance all limited what was achievable, but the overall goal was simply to overcome these technical limitations and create a master as close to the original mix as possible. Thankfully, the process would soon become more creative…
It all changed in the late 70s when mastering engineers such as Bernie Grundman, Bob Ludwig and Doug Sax made a name for themselves by ‘improving’ the quality of mixes that came through their studios. To these engineers mastering became a creative process. Instead of focusing on making a mix translate to whichever format it was being released on, mastering became about the process of polishing a mix, to bring about louder, wider mixes, and subtly shaping the tone of the mixes, putting more power in the bass and more gloss in the top end.
Into the Groove
Even back in the 70s, artists and their labels wanted their mixes to stand out. Mastering engineers were being pushed to produce louder and louder masters, but this was again limited by the physical medium. The grooves on a vinyl record risk overlapping and creating skips if the signal is too loud. This can be compensated for by spacing the grooves wider apart, but this, in turn, reduces the amount of playing time on a record. And if the signal is too loud the energy can burn out the voice-coil in the cutting head, even with liquid or helium cooling mechanisms in place.
To overcome these problems, limiters can be employed, which reduce the peak levels of the audio, enabling the overall level to come up without risking any overly loud sections from causing skips or cutting heads to overheat. When used with care, limiters can be extremely transparent, having far less sonic impact than compressors. However, when pushed hard the distortion introduced by a limiter can become audible and this balance prevented signal levels from getting out of hand.
With the switch to digital audio and the rise of the CD, a new world of mastering – and further technical restrictions – came into play. The RIAA curves were no longer necessary as neither bass energy nor hiss was a problem. Also, bass could have all the stereo information you wanted, the high end was freed of hiss and mixes would even be wider. And since the data on a CD is burnt by a laser, there is no risk of it burning out like a cutting head.

CDs overcame many of the physical limitations imposed by vinyl, opening the door to more creative mastering opportunities.
Instead, CD created strict restrictions on the level by imposing a ceiling at 0dBFS which could not be exceeded under any circumstance, and any attempt to do so would simply create digital clipping distortion. Initially, CDs were treated as an inferior medium. Only a few people had the means to play them, so CD masters were often made from the same signal as the vinyl masters, but it didn’t take long for engineers to realise the potential of the CD format, and growing interest among consumers ensured its rise. Even so, the processing done to CD masters was generally kept in the analogue domain, with engineers preferring to use their now highly specialised mastering consoles to fine-tune the audio for the CD pressing.
It wasn’t until the advent of digital brickwall limiters that things really started to change. Analogue limiters had long been used to increase the average level of program material, reducing fast transients in order to create more headroom. However, digital brickwall limiters took this to a new level. Even the fastest analogue limiter takes some time to respond to a transient, so the gain reduction kicks in after the signal has passed the threshold. This means that some of the transients will have been missed by the gain reduction, even at the fastest attack settings.
Digital limiters are able to look ahead in order to see transients coming and anticipate what gain reduction will be needed, and with an ∞:1 gain reduction ratio they ensure absolutely no signal passes the threshold level. The result of this isn’t simply to chop off the tops of the curves but to lower the gain of the entire wave until it fits within the threshold. This means that brickwall limiters can be incredibly transparent while increasing the overall program loudness.
This all enabled mastering engineers to make even louder masters, utilising tools such as the Waves L1 Ultramaximizer to achieve this loudness without running the risk of incurring audible distortion.
Mastering Today
Mastering has come a long way from its very technical beginnings. The process no longer simply involves creating a copy of the mix that can be transferred to vinyl, but instead is a creative process aimed at getting more energy into a mix and creating consistency across tracks. It should ensure that, irrespective of the listening environment the music is played back in, the experience remains as good as it can be. In short, the mastering engineer’s role is to ensure that the final product is the best possible release it can be.
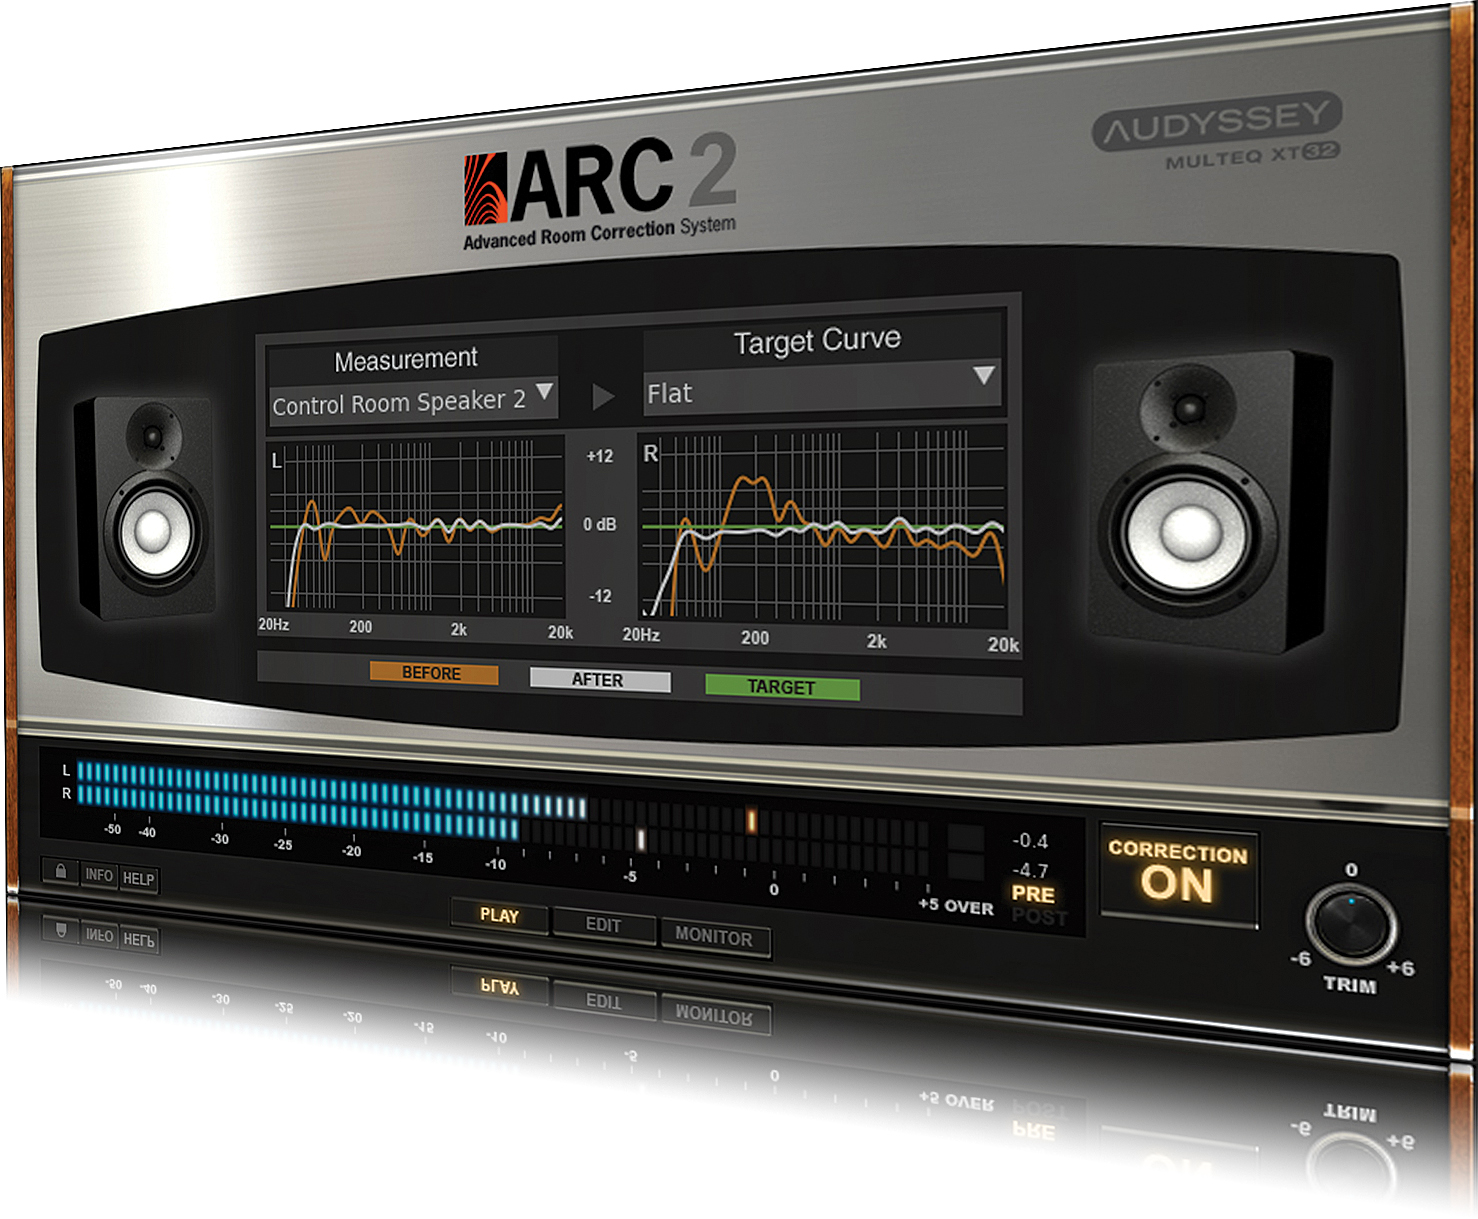
IK Multimedia’s ARC system provides corrective room EQ in software using a measurement microphone and white noise playback in your studio. The plug-in is then placed across the master buss for monitoring.
The tonal balance, loudness, punch, width, even subtle colouring and sometimes even reverb can all come into the realm of mastering, so a range of tools are needed. All-in-one mastering suites such as iZotope’s Ozone or IK Multimedia’s T-RackS can provide many of these tools, and if you’re looking to master your own music they can be excellent starting points. However, if you are looking to get deeper into the world of mastering it is a good idea to have a wider selection of tools to choose from. Mix and match some of your EQs, compressors and limiters, and if you’ve got the budget, don’t be afraid of sprinkling some analogue hardware in with the plug-ins. Breaking out of the box can be very inspiring and lead to a wider understanding of the tools you’re using and their impact on the music.
Monitor Issues
Before we look at what sound-processing tools you need it is important to consider the monitoring chain itself. Before you can go making 0.5dB or less changes to the EQ curve or millisecond changes to the attack or release envelope of a compressor, you have to know that the environment you are listening in is going to provide you with an opportunity to hear those changes. This is important in the mix stage, but even more so in mastering.
Room-correction systems such as IK Multimedia’s ARC or KRK’s Ergo will help to balance the sound of your monitors in the room, but they cannot correct for reverb tails, so it’s a good idea to invest in some acoustic treatment for your room if possible. A good mixture of absorption and diffusion can transform a room, and is well worth the investment for both mixing and mastering. We’ve covered acoustic treatment several times in the past, even going into detail on how to build your own acoustic treatment here. In this same issue we also looked at a selection of the best studio monitors available for your budget, which is the next most important thing to consider after your room acoustics.
When considering monitors, bear in mind that you want a very neutral-sounding pair with as much low-end extension as possible. A subwoofer can help to bring up the low end, but they can also create as many problems as they fix. Getting the sub positioned correctly, in-phase, is hard enough, but you must then also set the crossover frequency and the level of the sub such that you get a linear frequency response between your mains and the subwoofer. There are tools to help with this, and room-correction tools will also help a great deal, especially if they manage the crossover (as KRK’s Ergo system does).
A good pair of headphones can be a great alternative to monitors in imperfect rooms as they remove the potential for reflections, directing the sound straight into the ear canal. Again, however, it is important to find a neutral-sounding set with as much low-end extension as possible. As good as some headphones may look, hyped bass response is the last thing you want when mastering. Open-backed headphones such as the Beyerdynamic DT 990 Pro or Sennheiser HD650 are preferable to closed-back or in-ear styles.
The final link in the chain is the audio interface itself. It can be easy to overlook, but a high-quality I/O can make a surprising difference to what you are able to hear inside the mix. Entry-level interfaces have improved dramatically over the past few years, but better clocking and more transparent circuitry can open up the mix, enabling you to hear details that might otherwise be overlooked. Thankfully, unless you’re using outboard equipment to master you won’t need more than two channels of outputs, and even if you are using outboard, four-channels of I/O is probably enough, so you can invest in quality without having to also invest in quantity.
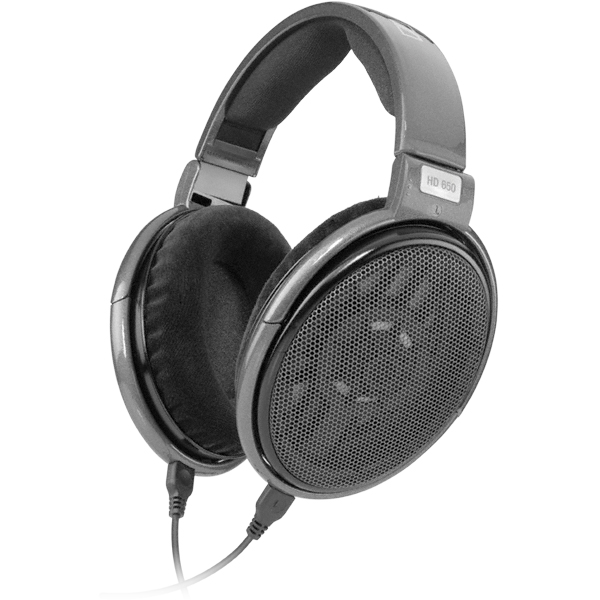
Monitoring with headphones negates the detrimental impact of room reflections
Tone Quest
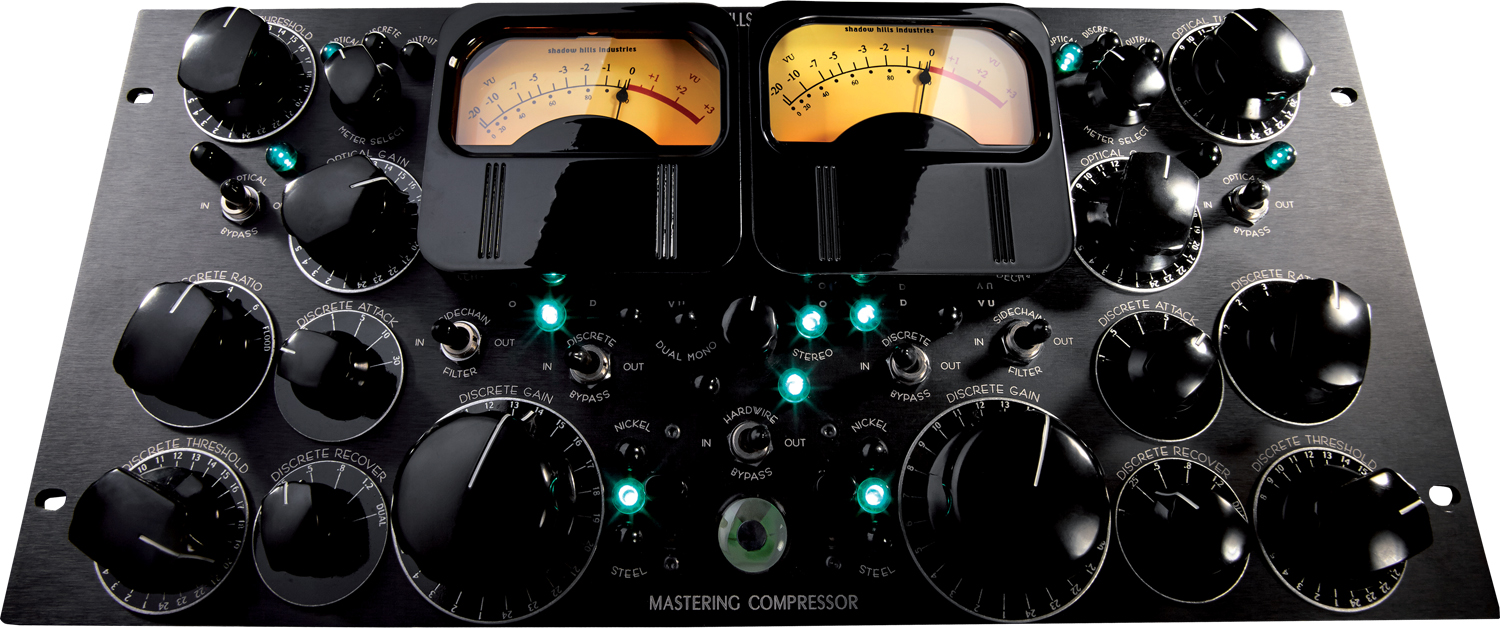
The mastering chain itself can comprise any number of processors, but the most common are EQ, compression and limiting. The brickwall limiter will always come last in the chain. However, the order of the EQ and compressor can vary depending on the needs of the track. Often, mastering engineers will use a variety of different EQs in different places in the signal chain to achieve the desired curve they want rather than simply relying on one EQ in a fixed position.
The reasons for using one EQ over another for any given frequency band are largely down to taste. An engineer may prefer the sound of a Pultec-style EQ for the top end but prefer a more flexible digital EQ for fine-tuning the bass frequencies. Similarly, some engineers will prefer a linear-phase EQ for certain tasks. Linear-phase EQ is incredibly transparent, which allows you to get away with bigger cuts or boosts without sounding unnatural. The disadvantage of linear-phase EQ is that it introduces latency into the signal processing, which is why it isn’t very common in mixing. However, latency is rarely a problem in mastering, so it can be used quite freely.
Unlike the choice of EQ, the reasons for boosting or cutting at any given frequency before or after the compressor are subject to more basic rules. With the caveat that all rules are there to be broken, a quick rule of thumb is that subtractive EQ should be applied before the compressor, with boosts kept until after the compressor. This will prevent the compressor from responding to any frequencies you are cutting out of the mix. Boosts to the very top end can often be placed before the compressor, as this region usually carries far less energy than the bass and midrange and therefore can be boosted without the risk of these frequencies triggering the compressor. In fact, as some compression will reduce the high-end energy a boost at the top is often useful, and placing it before a compressor will mean that any noise introduced by the compressor isn’t boosted by an EQ placed after it.
The exact approach to the EQ is going to change with every mix that you work on, and while one track may need more energy at 40Hz to bring out the sub frequencies of the kick, another may require the opposite. Some tracks may require a huge amount of low end alongside glossy, bright highs, while others may have little to no sub frequencies at all and a steep roll-off in the highs, and there is little point approaching a scratchy folk guitar recording in the same way as you would a dancefloor smash. However, while the approach may change, the goal is almost always the same: you want to most accurately represent the content of the music; tuck away any frequencies that might be poking through the mix; bring separation to any elements that seem to be overlapping; and ensuring that the low end isn’t going to completely disappear over smaller systems.
The best judge is your ears, so compare the song with other, similar-sounding songs. Spectrum analysers can be useful and provide a visual aid, but don’t lean too heavily on them. Assuming that the mix has arrived for mastering close to how the artist wants it to sound, there shouldn’t be need for any heavy EQ changes, and it’s hard to see where small boosts or cuts are needed on a frequency graph. It is extremely important to A/B any changes you make to the EQ curve, preferably while also adjusting for any gain, so that you aren’t simply hearing the louder version and opting for that. We usually find it useful to go away and come back once we’ve finished EQ’ing, giving our ears an opportunity to relax before coming back and hearing the changes we’ve made. A quick cup of tea or a flick through MusicTech should be enough to give your ears a break. Upon returning we often find that we end up reducing the gain on any EQ decisions we may have made, especially in the top end.
Another important equalisation tool that is often forgotten about during mastering by less experienced engineers is the filter. High- and low-pass filters can be incredibly useful tools in a mastering context, just as they can be in a mix. A high-pass filter set below the fundamental frequency of the kick drum or the lowest bass note will do two things. First, it will clean up any redundant energy that may have crept into the mix. Low-energy rumble might be almost inaudible, but it can still eat into your headroom, taking up valuable clean loudness. Secondly, the filter will almost certainly exhibit a slight frequency boost just before the cut. If you’ve set the filter just below the fundamental, this bump can help to give a little extra energy just in the right place.
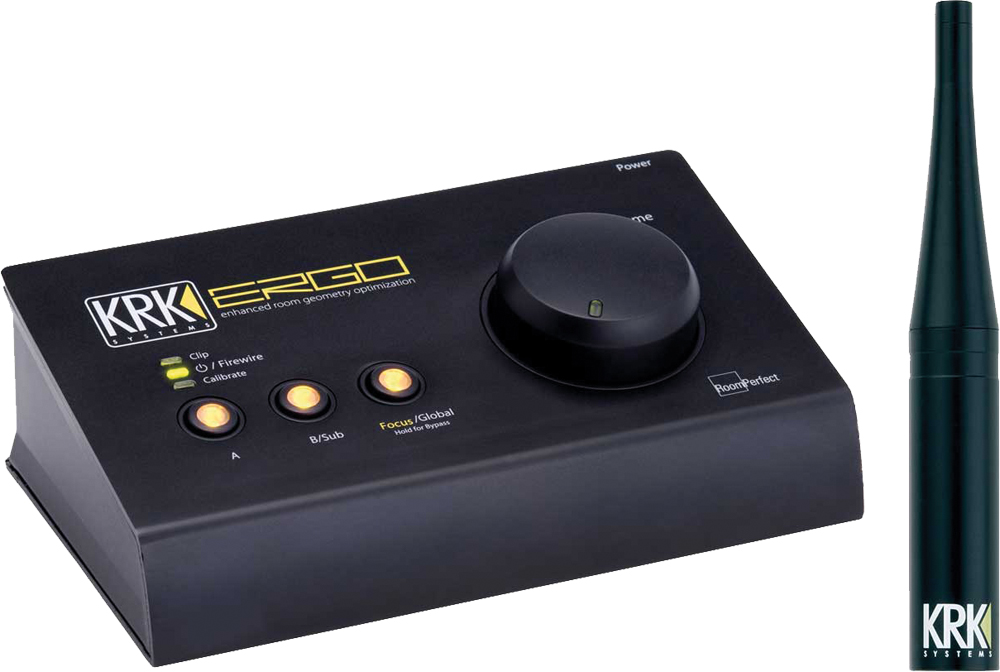
In addition to providing corrective room EQ, the KRK Ergo also acts as a monitor controller, so you can switch between two different sets of monitors and a subwoofer.
Similarly, a low-pass filter can be used to create a bump in the high frequencies, just before you filter them out. Set at around 18kHz, therefore, there will be a slight lift below 18kHz and then a roll-off above 18kHz. Some mastering engineers will exploit this feature at even higher frequencies – the Manley Massive Passive Mastering Version, for example, has low-pass filter settings at 15kHz, 20kHz, 27kHz, 40kHz and 52kHz.
Some may argue that setting the filter as high as 52kHz is somewhat pointless given that even 96kHz digital audio can carry information only up to around 48kHz. Anything above this is therefore already going to be sharply filtered out by the Nyquist filters in the digital converters. However, the correct use of these filters lies not only in what they remove but also in what they boost in the signal, as well as any phase colouration they impart on the signal.