Get Perfect Beats: Part 3 – Drum Production
Huw Price concludes our series on getting perfect beats with a look at the last stages of the process: mixing and mastering… Actually recording your drum track is only half the battle. Once they’re in-the-box – or maybe even laid down on tape – the challenge is to take those raw sounds and shape them […]
Huw Price concludes our series on getting perfect beats with a look at the last stages of the process: mixing and mastering…
Actually recording your drum track is only half the battle. Once they’re in-the-box – or maybe even laid down on tape – the challenge is to take those raw sounds and shape them so they blend into a track. In this instalment, therefore, we’ll be examining the techniques used by mix engineers. Many of these processes can be applied during recording, too, but we’d advise going easy on the compression and limiting and avoiding noise gates altogether until it’s time to start mixing.
Phase Check
Every competent engineer should carry out phase-checking when recording drums, but if you’re mixing drum tracks that were recorded by someone else you should carry out a phase check before making any subsequent balance or equalisation decisions. If you’re mixing ‘in-the-box’, you should be able to find phase-flip functions in your DAW. In Logic, for example, you’ll find a Phase Invert button in the Gain plug-in under Utilities. Just follow the same procedure we outlined in the recording section.
Time Alignment
For those who want to get really picky about phasing, you can try lining up multitracked audio regions. For example, when spaced overhead microphones have been used, the snare sound often reaches one microphone fractionally before it reaches the other. If you zoom in close on the waveforms this is easy to see. In this case, you would simply move the overhead audio regions forward in time to line up with the snare.

You will also be able to spot whether the polarity of the tracks matches up. If the bass drum hit goes above the centre line on one track and below on another track, they are in opposite polarity. Time-aligning tracks can be a time-consuming task, but doing so can bring an extra degree of clarity and focus to poorly recorded drums as well as taking the guesswork out of phase-matching.
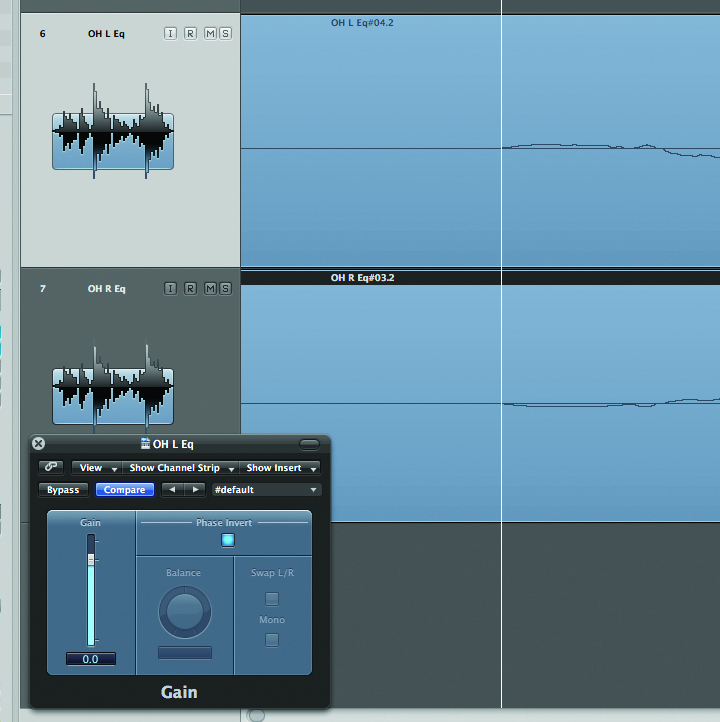
These overhead regions are time-aligned but you can see from the waveforms that they are out-of-phase. The polarity has been flipped using the Gain plug-in from Logic’s Utility menu.
Tools of the Trade
The basic signal-processing tools that engineers use for drum mixing include noise gates, compressor/limiters and equalisers. This article is not intended to provide an in-depth user’s guide, though; instead we’ll be focusing on ways they can be used and abused to create special effects, but it’s worth having a basic understanding of each.
Click here to read our guide to White Noise With Snares
Noise Gates
Noise gates are like auto-mute devices and have similar controls to compressors. While the signal level remains below the threshold, the gate stays shut and you hear nothing. Once it rises above the threshold the gate opens and you hear the drum. You can set the speed at which the gate opens, the length of time it stays open, and the speed it closes.
Trigger frequencies can be filtered to zone in on the desired sound. For instance, rolling off the high frequencies of the trigger may prevent cymbals and hats from opening the kick and tom gates. Similarly, a high-pass filter can prevent the kick drum from opening the snare gate. An external trigger can be used to open a noise gate: for example, you may gate your room ambience tracks and trigger them from the kick and/or snare drum.
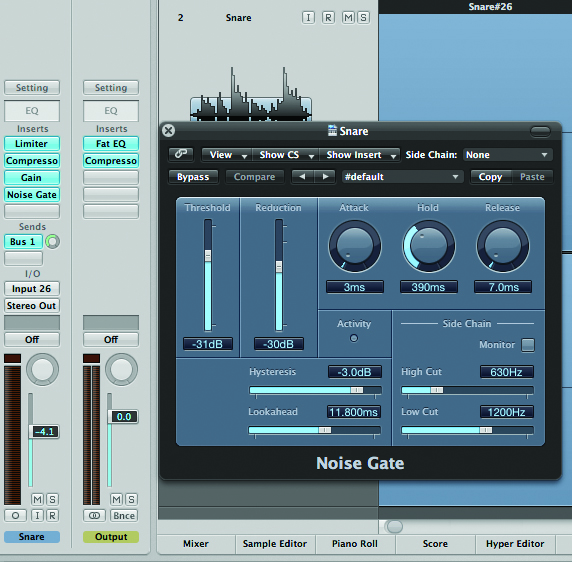
A typical DAW noise gate plug-in found in Logic Pro
Compression and Limiting
Drums always have sharp transient peaks at the front of the envelope. This presents problems when mixing because the overall level of the track is dictated by its maximum peak – usually a snare or bass drum. If a couple of peaks are 3dB above all of the others, the overall level of the music ends up 3dB lower than it could be.
You can dramatically reduce drum transient peaks by applying a limiter with very fast attack and release. Most of the time you will want any limiting to be sonically transparent, but compression is a different thing. As the louder drum parts are attenuated, the quieter parts become more audible, which increases the apparent loudness and punchiness of the drums. Compressors can bring out fine details and lock a groove together, or they can create more radical effects, as we’ll discover later.
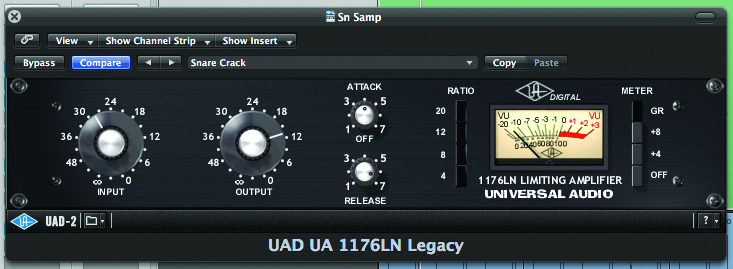
The Universal Audio 1176 Compressor plug-in with all the radio buttons pressed in for crunchy-sounding, heavy compression effects
Equalisation
If you feel the need to apply copious amounts of EQ during recording, it suggests that you may be better off spending more time tuning the kit and positioning your microphones. But when it comes to mixing, anything goes.
Starting simply, try applying a bass roll-off (high-pass filter) to every drum track except the kick and floor tom. This can help to clean up low-frequency mush and tighten up your drums.
Parametric equalisers allow you to zone in on specific frequencies that you can boost or cut. They are powerful tools and it’s easy to get carried away boosting frequencies when in fact frequency cuts may be more effective. Typical boosts include adding high frequencies to drum overheads to provide air, lifting the 2–6kHz region of a kick drum to add click, and cranking the 4–8kHz region of snare drums to give then more crack.
Getting kick drums and bass lines to gel is usually a challenge. Cutting out some of the bass drum’s low mids can sometimes create a nice frequency hole for a bass sound. Try 400Hz as a starting point and sweep through the frequencies above and below this point while listening to the kick and bass together. The cut frequency will depend on the sound of the bass and the kick drum itself.
Click Here to read our guide to Sine Waves with Kicks
Audio to MIDI
Achieving adequate separation between the various components of a typical drum kit presents a challenge for any recording engineer. Noise gates can help in this regard, but there will inevitably be occasions when the spill is so obtrusive that it’s nigh-on impossible to set a gate without the spill triggering it every so often.
When recording drums, therefore, this correspondent makes a point of recording individual drum hits as soon as a usable drum take has been achieved. I always go for several hits, at various levels of intensity, on the kick, snare and any toms that were used on the take. These hits can be edited into samples and triggered to enhance – or even replace –the drums that were recorded live.
A DAW has the tools to ‘examine’ an audio region and convert transient peaks into MIDI notes. Set the threshold to ignore spillage; if that proves a bit too crude, you can simply erase unwanted MIDI notes. Then simply load your single-hit samples into your virtual sampler and they should trigger perfectly in time with the track.

Since you’ll be using the actual drums from the recorded kit, the samples will blend seamlessly. Equalisation and compression can be applied to the sounds without experiencing any weirdness through processing spillage. Copious amounts of reverb or delay can also be added to the samples without sending hats and cymbals to the effects by default.
This procedure provides more scope for processing acoustic drum sounds and it can give your drum tracks a very crisp, precise and clean feel. Even if you don’t want to get into MIDI triggers, try aligning the tom samples with the audio events. You can eyeball this by zooming in on the regions and dragging the tom regions into position. Clean tom samples can be placed high up in the mix without ride cymbals and snares sounding weird as the toms naturally decay.
The velocity of the MIDI notes should follow the dynamics of the drummer by default, so you can preserve the player’s natural feel. If you’re really serious about this, you can trigger samples of varying power to maintain even more of the feel. However, depending on the style of music, drum dynamics aren’t always desirable. It’s common for the drums to vary considerably in volume and tone depending on where and how hard the skin was hit.
Triggering samples gives the mixer control over dynamics and tone, so if you need consistent snare hits and the drummer isn’t willing or capable of providing them, then all is not lost. Of course, there are no restrictions on what you can trigger, so if you want pristine Bob Clearmountain samples or electronic sounds with a ‘real drummer’ feel, audio-to-MIDI triggers are an effective solution.
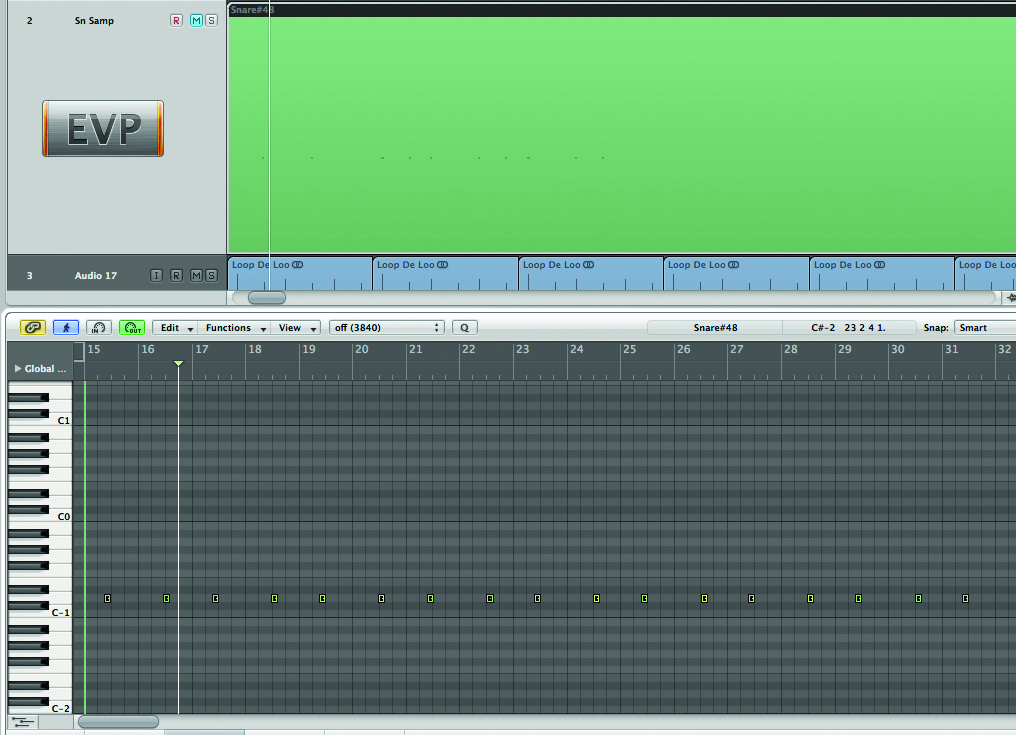
Logic’s audio-to-MIDI function has been used to generate MIDI notes that will trigger a snare sample to enhance or replace the recorded snare drum.
Compression Tricks
The original purpose of compression was to control dynamic range as transparently as possible, but engineers soon discovered that they could also be used to make drums sound bigger, harder, clearer and generally more exciting.
Our expectations of recorded drum sounds have changed. Led Zeppelin’s much-sampled When The Levee Breaks once epitomised rock power drumming. It’s still incredible, of course, but it sounds nowhere near as loud, aggressive or up-front as a modern rock drum recording.
Many old-school funk and soul drum parts are similarly gentle on the ear. They worked fine in their original context, but once looped and layered with contemporary electronic bass and synth sounds, the kick and snare sounds can become overpowered and might not provide sufficient energy and drive.
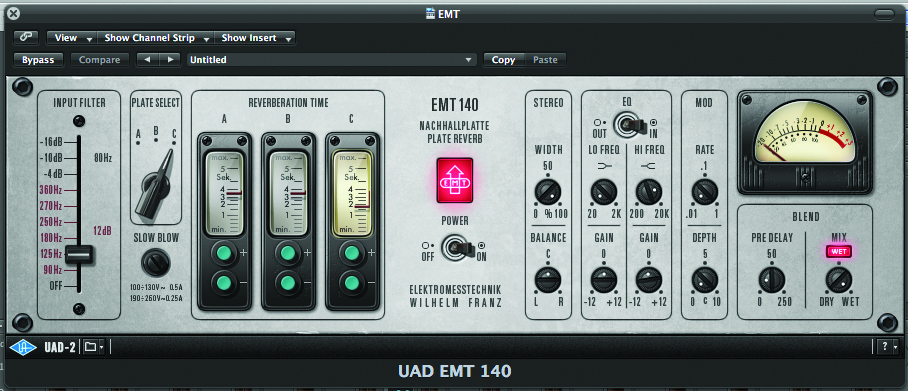
For 60’s and 70’s style snare reverb, you can’t go wrong with a decent plate reverb plug-in. This is the Universal Audio EMT 140
Processing drum loops through a stereo compressor can radically transform the sound. Even relatively dry drum loops can be made to sound like they were recorded in big, lively rooms if you squish them really hard. The release begins to act a bit like a reverb-time control
Piling on even more compression can cause a pumping effect that many people like. There are no hard-and-fast rules about setting attack times, but it can sound cool if you get the compressor pumping in tempo with the track. Use slower attack times if you want to retain some of the natural dynamic attack of the drums. Most plug-in effects provide presets with self-explanatory names. Selecting these should not be regarded as cheating, and they often provide an excellent starting point for further tweaking.
Of course, you can compress and limit individual drums as well. Controlling the transient peaks of kicks and snares with limiter plug-ins patched across the individual tracks can tighten the low end and add punch to the snare. Catching the transients also means that the compressor won’t have to work so hard if you decide to compress the drum mix.

Some mixers like to send a submix of the drums to a stereo subgroup. Very heavy compression is applied to the subgroup and it’s mixed back in with the uncompressed drums. This is known as parallel compression and it beefs-up tracks and greatly increases perceived loudness without destroying dynamics. It’s a trick that works on lead vocals, too.
Alternatively, you could try removing the drums from the stereo mix and routing them all through a subgroup. The drum mix can then be equalised and compressed globally – much like mastering a track.
As with noise gates, some compressors can be controlled via sidechain signals. Try sending the snare to the drum group compressor’s sidechain so that the drum mix is squished on the snare hits but the drums retain low- and high-frequency dynamics.
Another method you could try is controlling the compressor with the kick drum or cymbals, or simply apply equalisation to the compressor’s sidechain to change the way in which the compressor responds to specific frequencies. For instance, some judicious notch filtering applied to the sidechain can do wonders for taming over-exuberant open hi-hats or over-cooked toms. You can also use drums to trigger compressors that have been applied to instruments such as bass and synths.
Adding Reverb
If you listen to James Brown drum breaks, artificial reverb is applied almost exclusively to the snare. Much of the time the snare is fairly dry, but when reverb is added it sounds like a deliberate effect rather than an attempt to create a natural room ambience. Most likely they were using a spring or plate reverb. The UA EMT 140 Plate plug-in sounds tremendous and you’ll have no trouble getting your drum sounds into the sonic ballpark.
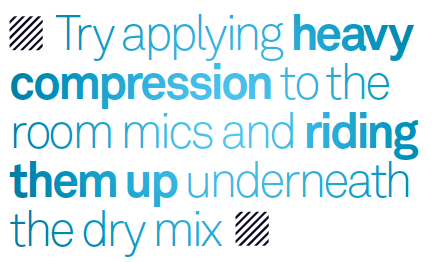
By contrast, the Amen break sounds like a drum kit in a room. If there is added reverb, it’s subtle, and there’s plenty of air around the kit, which seems to be the case with most old-school breaks. If there is roominess in the sound or you’re mixing drums with one or more room mics on the multitrack, roominess can be accentuated via heavy compression and may produce more authentic results than a reverb effect.
Try applying very heavy compression to the room mics and riding them up underneath the dry mix. This can dramatically change the vibe of the drums and the room mics’ function becomes something like a short reverb effect that should blend really well with the drums.
The ‘exploding snare’ sound of the 80s was often produced using gated reverb. Reverb would come in strongly then stop abruptly as the gate closed. The snare on David Bowie’s hit Let’s Dance was probably the most famous and heavily sampled of the era. A noise gate on the drum overhead track was triggered by the snare and sent into the Ambience preset of an AMS RMX-16 digital reverb.
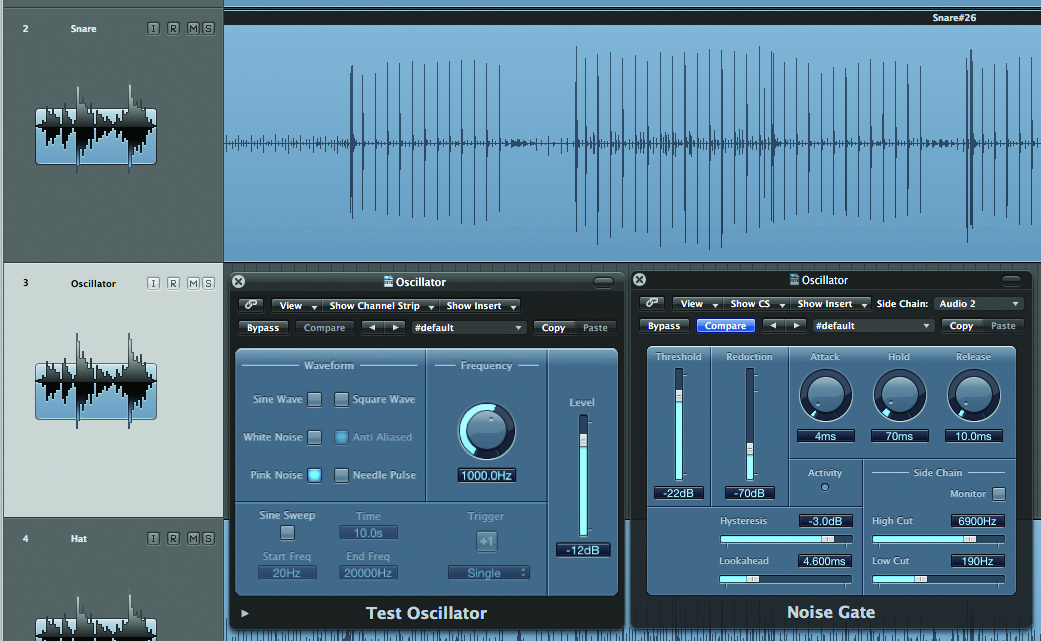
A new audio track has been created just below the snare track and the Test Oscillator plug-in has been selected from Logic’s Utility menu. A noise gate is then added and the Side Chain function is used to trigger the noise from the snare track. Fast attack and release times with a short hold time are preferred.
Adding reverb to cymbals – especially open hats – can make things messy. Unless you want a specific effect, excessive reverb on kick drums can make a kit sound loose. If there is hat spill over the snare, or ride cymbal over the kick, you will be adding reverb to the spillage as well unless you gate the drums. Remember that it’s possible to gate the aux send to the reverb and leave the snare ungated in the stereo mix.
Real Reverb
If you find yourself working in a studio with a decent-sounding live room or the building has a reverberant space like a hallway, stair well or tiled bathroom, try setting up a speaker in the room then route the drums through the speaker via an auxiliary send. You can use powered PA speakers, active monitors or even clean guitar and bass amps, just be careful with the bass drum.
Set up a microphone (or perhaps a stereo pair) and bring the returns up on one or two channels of your mixer. Many old studios, like Abbey Road, still have dedicated reverb rooms with speakers and microphones permanently set up.
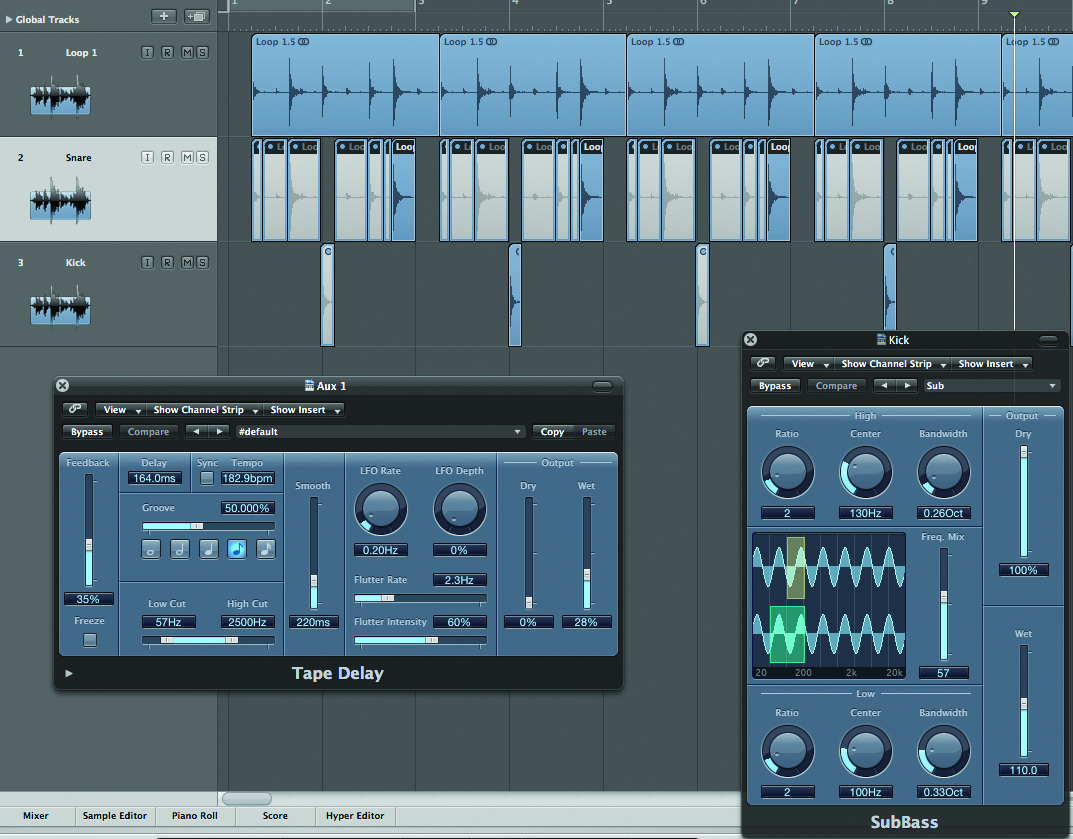
This loop has been chopped up to isolate kicks and snares on separate tracks. Different tape delay effects have been added to selected kick and snare hits and the stereo output has been processed with a UA 1176 compressor and Logic’s Sub Bass plug-in.
Pitch Shifts
The tempos used in dubstep, drum&bass, jungle and so forth tend to be way faster than the tracks many of the drum loops are sourced from. Going back to samplers, the speed of a loop has to be altered to fit the required tempo, and this results in pitch-shift, which in turn alters the timbre of the drum loop.
When a medium-tempo drum loop is speeded up to around 160BPM, many of the drums take on a ringing quality with distinct notes. Previously thuddy kick drums may become more percussive, rounded and jazzy, plus they lose some of their low-frequency content. This works out well if you plan to lay down a very low-frequency bass line because the higher-pitched kick helps to define the beats and it opens up frequency space in the low end of the track.
At the other end of the spectrum, slowed-down drum loops contributed enormously to the spooky atmosphere of trip hop and its offshoots. Slowing down drums lowers the pitch, turning ride cymbals into moody whooshes of noise, elongating snare drums (along with any applied reverb), and deepening kick drums into chest-thumping thuds. It also messes with your head – in a good way, because the drums will sound slower than they really are.
If you want to experiment with pitch-shifting drums, it’s only really practical to work on stereo loops rather than drum multitracks. As well as using plug-ins to alter the pitch, a lot of fun can be had with harmonisers – Eventide’s H Series units are particularly effective.
Delays
Echoes can be used to introduce atmosphere and alter grooves. Try sending the kick or snare into a delay plug-in and ensure that it’s sync’ed up with the tempo of the track. A DAW should have features to do this automatically, but if you’re using a hardware delay unit, simply find a tempo-to-delay timechart online.
If you’re working with multitracks it’s easy to route individual drums to delays using auxiliary sends. When working with loops, make a copy of the audio region and line it up on an adjacent track. It should be easy to chop-up the copied region into kicks and snares and you can mute any in-between stuff you don’t want.

Take the copied region out of the stereo mix but use the aux send to route the hits to the delay. You can mute hits that you don’t want going to the delay or spread them over two or more regions and route them to different delays with independent settings. Tape delays can work well with drum loops because the repeats take on a character that differentiates them from the dry hits. Try experimenting with the number of repeats: single repeats can give a skip feel; multiple repeats a shuffle flavour. As with everything else here, it’s all about experimentation.
Finally, Click Here to read our guide to Mastering DAWs
If you missed the first two installments of our guide to Perfect Beats then be sure to click on the links below: