Pro Tools Tutorial: Processing with Distortion
Part 2 of a new series of features looking at cutting-edge studio techniques in Pro Tools. This month Mike Hillier uses Pro Tools to show how a little distortion can bring a lot of life… Distortion is an important tool in the producer’s arsenal of effects, and it comes in a huge variety of flavours: […]
Part 2 of a new series of features looking at cutting-edge studio techniques in Pro Tools. This month Mike Hillier uses Pro Tools to show how a little distortion can bring a lot of life…

Distortion is an important tool in the producer’s arsenal of effects, and it comes in a huge variety of flavours: from subtle saturation effects, through to out and out fuzz. DAWs offer a completely clean platform, worlds away from the olden days where grit and funk would build up on a track being mixed from hardware multi-track tape on a large-format console. This would then go through boxes and boxes of outboard and then get bounced back onto 2-track tape, and each stage of the process would impart its own very subtle colouration to the signal. So while a modern DAW’s ability to remain completely clean has its advantages, the mixes we end up making can often sound a little clinical as a result. Thankfully there are plenty of ways we can add dirt to our digital recordings, and because of all the tools available to us, we now have more control over the distortion than ever before.
While placing a distortion effect straight on a track can be perfect in many examples, one of the most interesting ways we’ve found to use the effect is by processing it in parallel to the original signal. This enables us to not only blend the amount of distorted signal we want with the dry signal, but also to process the distortion in different ways. An EQ placed before the distortion can help you to focus on the frequency range that is processed, enabling you to add grit where it works best, while leaving other frequency ranges clean. This is particularly useful on bass sounds, where distorting the whole signal can often muddy up the tone, as too many low-mid overtones take over the mix. By filtering out the low-end before the distortion effect, the process will only affect the higher frequencies and the low-end will be kept, clean and punchy.

When it comes to delays and reverbs many top-engineers will have plenty of different makes and models, each with their own unique flavour, ready to be dialled in. But by applying different distortions to these effects we can get a huge variety of sounds from a single unit. Many of the simplest and cheapest plug-in delays – the Short, Medium and Long delays in Pro Tools for example, or the Waves SuperTap – are very clean and are therefore perfect for combining with a variety of distortion techniques. Instead of using the feedback on these simple delays, you can often get better results by adding a Send from the channel back into itself. This way the fully-processed and distorted signal will go back through the whole chain, and each successive delay will be more distorted than the last. Be careful with your send level though, as it can quickly result in an infinite feedback loop.

The different subtle distortions are one of the great reasons to use hardware in your mix setup, and it doesn’t have to be just the expensive top-end stuff, like the Thermionic Culture Vulture, summing mixers or vintage reel-to-reel tape-machines, either. One of our favourite ways of getting a dirty reverb sound is simply to use an old 80s digital reverb unit. Many of these, such as the Alesis MIDIverb or Yamaha SPX90, have some great sounds built in and can usually be picked up fairly inexpensively.
Guitar pedals too are a great way to enhance a signal, however be careful with the level going into these if you’re not using a re-amping box to match the impedances, as a full line-level signal will likely drive them way beyond the interesting distortions. We’ve even been known to run our signals out of the box and back in through a preamp set to unity gain, simply to add a little something extra. Whatever you use, remember a little can go a long way, especially when it’s being added in multiple places throughout your mix. Don’t let this stop you getting carried away, though. Some of the best sounds have come about through abuse of tools, and you never know when you too could find a breakthrough and cutting-edge sound.
Using Distortion

1: Amp sims are a great way of colouring your sound. Start by adding an instance of Sansamp PSA-1 to the bass. Experiment with combinations of Buzz, Punch, Crunch and Drive.

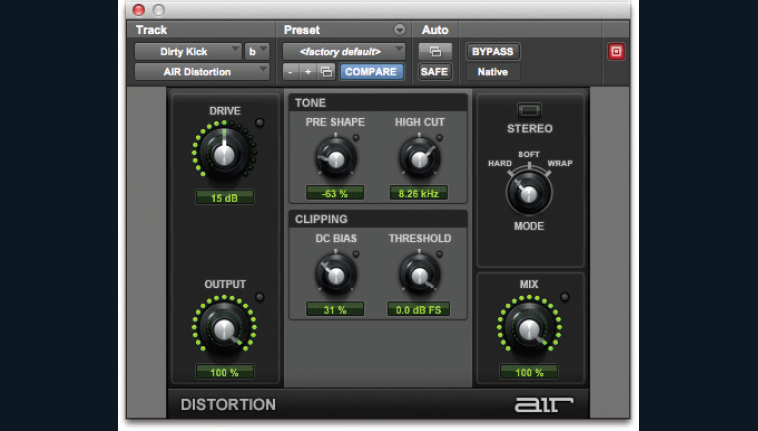
2: Try using distortion as a parallel signal path to the clean/dry path. Add a mono aux. channel fed from the kick – or duplicate the channel. Add an EQ III 1 Band and AIR Distortion to this new channel.

3: Use the EQ to shape the signal going into the distortion. For the kick we want to enhance the mid and top, so filter out any low-end which will leave it clean and clear in the mix.
4: We’ve shaped the AIR Distortion plug-in to add emphasis to the top-end of the kick using the Drive and Pre-Shape. Finally blend this back in with the original kick, by adjusting the fader.

5: We’ve repeated the same procedure on the snare too, fine-tuning the filter cut-off and distortion parameters to bring out more of a crack in the snare’s tone.

6: Adding distortion to sounds is one way of adding colour, but colour can also be added to effects. Create a stereo Aux channel fed from the snare noise (we’ve also sent some signal from the snare noise and two hat channels), and add an AIR Reverb and Lo-Fi.
Distortion and Effects

1: With the AIR Reverb create a small room sound with width to help give dimension to mono signals feeding it. A short pre delay, and controlled reverb tail will add space. We’ve also filtered the low-end.

2: Lo-Fi is a distortion plug-in that reduces bit-depth and samplerate of the signal. At 12-bits and with a sample-rate of 33kHz we can hear a substantial effect. Add saturation for some more colour.

3: To place each sound in the room we can use the pan control on the Sends. This will enable you to send the left hat to the left side of the reverb input. Use the Follow Main Panner button (in orange).

4: On the Synth 2 track add an AIR Fuzz-Wah to help bring the track to life and add energy to the lead. We’re going to use both the fuzz and wah portions of the effect to make it scream.

5: By automating we can add more or less of the Fuzz-Wah as we see fit. To enable Automation hold Ctrl+Alt+Start (PC) or Ctrl+Alt+Cmd (Mac) and click on the mix knob. Select Enable Automation from the pop-up menu.

6: In the edit window, expand the Synth 2 lane to include automation lanes and show the AIR Fuzz-Wah Mix parameter. You can now draw in automation points with the pencil tool to increase the blend from dry to wet as you wish.
