Pro Tools Tutorial: Audio Suite Processing
If you’re looking for a new way of working or simply want to delve deeper into Pro Tools, the AudioSuite format offers many possibilities. Mike Hillier explains in this Pro Tools Tutorial Offline AudioSuite processing is an often overlooked part of the Pro Tools arsenal – after all, rendering effects to a file […]

If you’re looking for a new way of working or simply want to delve deeper into Pro Tools, the AudioSuite format offers many possibilities. Mike Hillier explains in this Pro Tools Tutorial

Offline AudioSuite processing is an often overlooked part of the Pro Tools arsenal – after all, rendering effects to a file seems like a dated processing mechanism by comparison to the real-time processing options available with RTAS plug-ins. For many, AudioSuite is left for those processes that would alter the clip size (such as time-expansion), introduce too much latency, or use too many CPU cycles (such as pitch-correction or noise-reduction/removal processing).
However, offline AudioSuite processing can be a useful workflow improvement for many standard mixing tasks, especially those which you want applied only to sections of audio. Instead of automating parameters around the section, we often prefer to render the processing directly to the clip.
Suite Dreams
Pro Tools 10 brought new functionality to AudioSuite processing with the option of opening multiple AudioSuite plug-ins simultaneously, new render handles, and the ability to save AudioSuite chains and presets as Window Configurations. These new features make working with AudioSuite easier and faster, significantly improving the workflow options over previous versions of Pro Tools.
A common task that we use AudioSuite for is removing plosives from vocal recordings. This involves filtering out the low-frequency energy in a vocal performance with a high-pass filter. Most of the plosives in a recording can be removed with a pop filter and with good microphone positioning and technique during recording. However, one or two will often sneak through and they are especially common in live gig recordings. We will always use a high-pass filter set at around 80–120Hz depending on the vocal as part of the EQ chain and this may be enough to remove all of the plosives, but if any remain you may need to set the filter at a higher frequency, which if left there can take away some of the energy from the rest of the vocal part. You could, of course, automate the filter at this point, bringing the frequency up over any plosives and then quickly back down for the rest of the vocal. However, we find this a tedious task better suited to AudioSuite processing.
Start by finding a plosive in your vocal track – they’re usually at the start of words beginning with a P or B sound, although also occasionally in the middle of words. Plosives are caused by the rush of air that escapes the lips while making these sounds; the energy from this rush of air hits the capsule and causes a hump in the low end, much like blowing into a microphone. Once you’ve found the plosive, highlight the plosive in the edit window

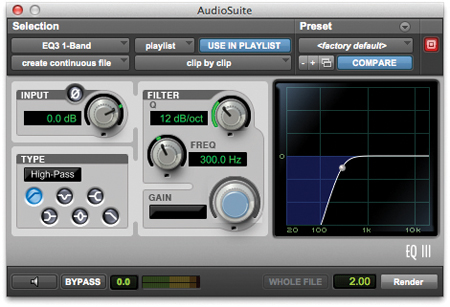
Then bring up the one-band version of EQ III. Set it to high-pass.

Because we’re processing only a small region of the audio we can afford to be relatively heavy-handed with the high-pass filter. Set the filter to 12dB/oct or higher and the frequency to 300Hz – this should be enough to remove the excess energy without becoming noticeable within the mix given that it’s for such a short period of time. In many cases you’ll find that 200Hz is sufficient, and if the plosive is part of a low sung note then you might want to experiment down to this frequency to leave more of the low-frequency information in the note, but we find that we can usually get away with setting this quite high.
Finally, before rendering the new clip, Pro Tools 10 includes processing handles that will also process before and after the highlighted section of the clip.
![]()
This gives you a little flexibility to either side of the highlighted region to drag out if you need more of the audio processed, or for creating crossfades if the newly processed clip doesn’t blend so easily into the rest of the track. By default, Pro Tools sets this to two seconds, but it can be dragged out to the full length of the file if you wish. You can change the default handle length in the Pro Tools Processing Preferences pane.

AudioSuite processes are independent of any real-time fades and clip-based gain. In older versions of Pro Tools, fades would be rendered into the new clip, but in Pro Tools 10 the clip is rendered before the fade and if after rendering your AudioSuite process you want to change the fade or clip-based gain you can edit it just as if the clip hadn’t been rendered. However, be careful with crossfades at the beginning and ending of clips as the boundaries of these can be pushed so they no longer overlap your new clip and may need to be drawn back in.
More Than One
In previous versions of Pro Tools, if you wanted to apply two or more AudioSuite plug-ins consecutively you would have to bring up the first, apply your settings, render the audio and then bring up the second plug-in to process the newly rendered clip. In Pro Tools 10 Avid has introduced the option of opening multiple AudioSuite plug-ins simultaneously. Unfortunately, it is still not possible to chain these multiple plug-ins into a single signal process, so if, for example, you want to EQ a reverse reverb return (Pro Tools 10 includes a Reverse Render button on some AudioSuite plug-ins to make this task easier) you can bring up the reverb and the EQ plug-ins simultaneously but you still have to render one then the other, and you can’t audition the effect any parameter changes on the first plug-in might have on the second. We know some engineers who will use RTAS plug-ins to audition effects before then copying the parameters to the AudioSuite equivalent.
To add additional AudioSuite plug-ins to the signal chain hold down [Shift] while selecting a new AudioSuite plug-in from the AudioSuite menu.
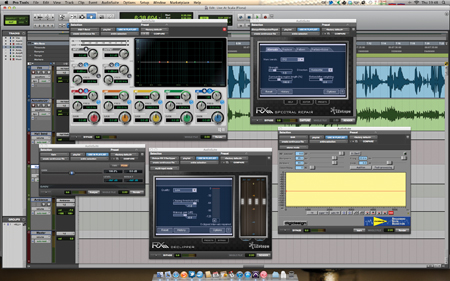
While we’d like to see proper AudioSuite plug-in chains implemented in a future version of Pro Tools, the ability to open multiple plug-ins simultaneously is still useful in some circumstances. Post-production engineers will commonly have to perform several types of noise-reduction processes on a track, using different plug-ins for each task. Previously, each time a new plug-in was needed the engineer would have to close the current one and open the next. This would in turn mean any settings were lost (unless saved as a preset) each time you switch from one plug-in to the next. With multiple AudioSuite processes open it is possible to keep noise-reduction, de-clip, de-ess, EQ and spectral repair tools all open, ready to fix whatever problem the post-production engineer may come across.
To open multiple AudioSuite plug-ins simultaneously simply hold down [Shift] while selecting a new plug-in from the AudioSuite menu.

Once you have opened all the plug-ins you need you can go through your track selecting any parts that need processing and go straight to the plug-in that’s needed. You could even open two or three similar processes to audition the difference between different plug-ins of the same type.
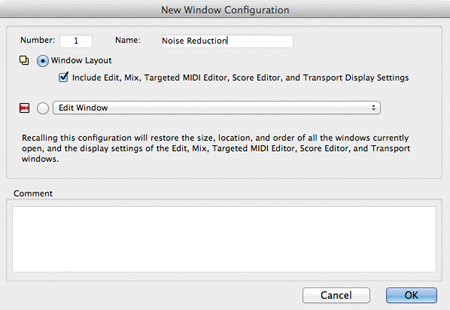
If you have a number of AudioSuite plug-ins that you use simultaneously frequently it is now possible to save the plug-in selection as a Window Configuration. This will also save any settings you might use with these plug-ins, saving you the time of going through them all and selecting a preset. To save your AudioSuite setup as a new Window Configuration you’ll want to make sure you’re on the Edit window with your AudioSuite plug-ins open, then go to Window>Configurations>New Configuration. In the New Window Configuration window

Give your configuration a name and click OK. You can now come back to this configuration at any time by selecting it from the Window>Configurations menu.

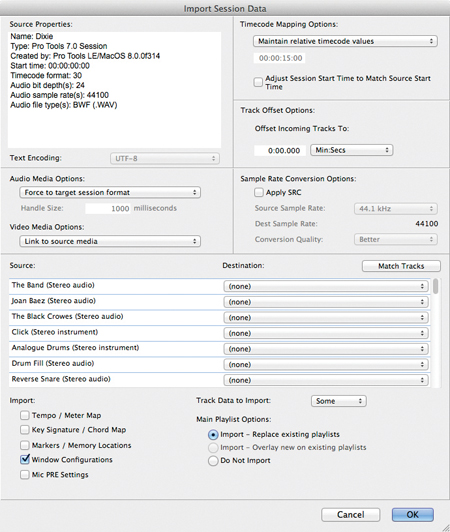
Window Configurations are saved with the Session file, so you won’t be able to see your newly created Window Configuration in any other sessions. However, you can import Window Configurations as Session Data.

If there is a specific Window Configuration that you keep coming back to it’s worth saving it to a Template session alongside any other Session Data that you find yourself continually importing.
Here’s a handy demo from Soundpurestudios: