Reason Tutorial: Designing Perfect Dubstep Bass
Designing your own dubstep basses can be fun and it’s easier than you might have thought. Hollin Jones reveals how it’s done… With modern genres of music splintering and morphing into countless sub-genres faster than at any time in history, it’s quite rare to encounter a completely new take on an electronic style. And although […]

Designing your own dubstep basses can be fun and it’s easier than you might have thought. Hollin Jones reveals how it’s done…

With modern genres of music splintering and morphing into countless sub-genres faster than at any time in history, it’s quite rare to encounter a completely new take on an electronic style. And although it’s been around for a while at this point, dubstep genuinely represented a different direction for EDM, actually slowing the tempo down rather than speeding it up for once. And nowhere was the individuality of dubstep more evident than in the bass: this was bass as a lead instrument: a pulsating, terrifying sound that was at the same time thunderously deep and searingly high pitched.
This was made possible by the fact that dubstep bass is synthesized. You can make it do things that just aren’t possible with a bass guitar, at least not without running it through a vast array of pedals. And while there are some great dedicated dubstep bass synths around, the principle behind the sound itself is less complicated than you might think.
In fact it can be replicated with most software synths as long as they have a few basic parameters and sections. So it can be done in Reason’s Subtractor or Thor, Logic’s ES2, NI’s Massive and many more. And the arsenal of processing tools available to you in your DAW mean that adding effects to bring the sound to life is easy too.
Sound Effects
You might ask why you’d want to design your own dubstep bass sounds. Well, of course you’re free to load up and tweak any presets that may have come with your synth, but getting down to the bones of what makes up the sound has several benefits.
For a start you’ll learn about synthesis and the relationship between the various sections, how sound is generated and how modulators can affect the signal. You’ll also be able to apply the same theory, not just to dubstep basses but to any synth sound you like. As a very simple example you might pitch up the oscillators a few octaves and get a screaming lead patch with the same pulsating character. Or apply the same kind of LFO modulation to an audio effect that you would use on the synth bass, perhaps to create a special vocal effect.
Getting Started
At the heart of any bass sound is at least one oscillator which will have its octave setting turned down low. You might also want to use a second oscillator set at an octave or two above the lower one, depending on how you like your sounds.
Although it’s possible to set both oscillators to any key and tuning you like, it makes sense to stick to some kind of a plan since mismatched tunings can sound pretty awful. Of course you might want to use one tuned a fifth or an octave plus a fifth above the other, which will still sound ‘in tune’ but give a very specific effect that will make the bass more a kind of lead sound because it won’t be fulfilling the traditional role of the bass sound.
You can also mix and match waveforms to give the sound a different character. Sine waves for example sound big and round, whereas saw waves have a more buzzy quality to them so you can blend any waves you like to create unique sounds.
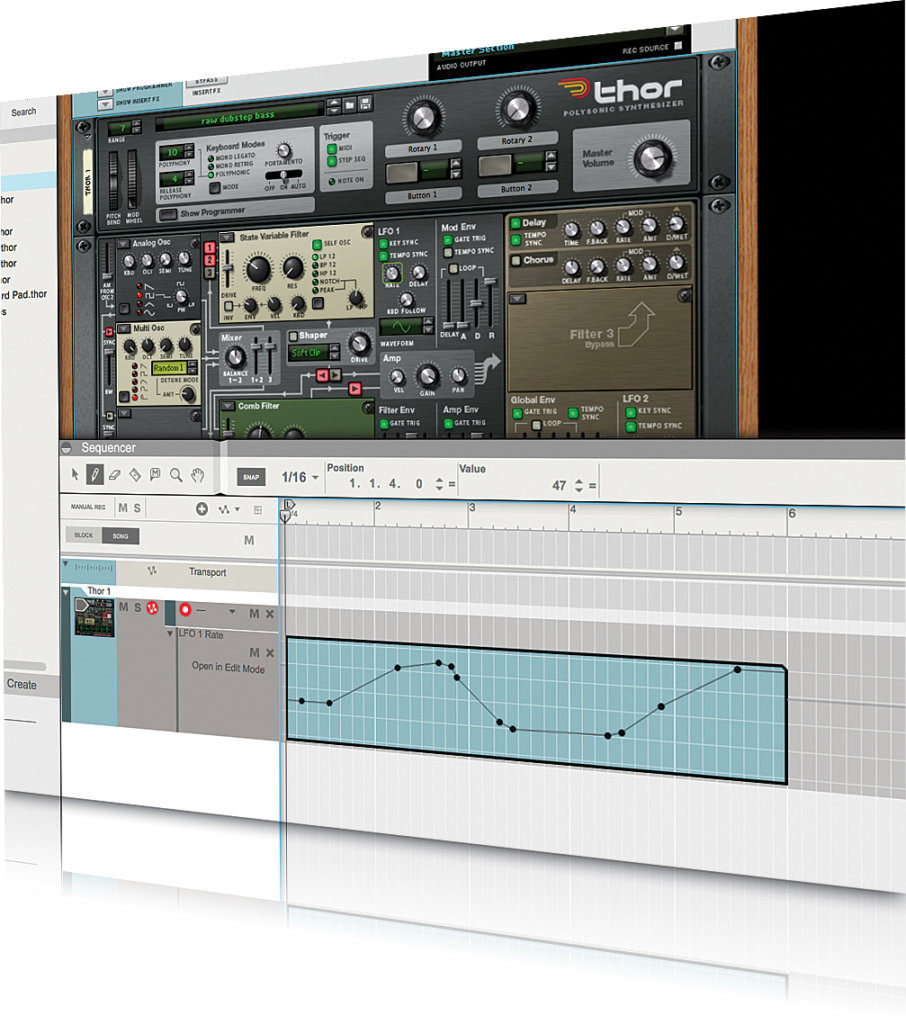
How you then process your bass sound will depend on your aims and your software but the key to getting that classic ‘wobble’ effect is to apply a cutoff filter, set it to the desired point and then assign an LFO to modulate its opening and closing. You can finetune the behaviour and speed of the LFO and also usually the minimum and maximum values of the filter, and in doing so create a wobble effect that works for you. LFOs almost always have the ability to sync to project tempo – indeed most do this by default – so you don’t have to worry about staying in sync.
By altering the resolution of the LFO you can change the speed and feel of the wobble effect on your composition. Automating LFO speed is how dubstep producers quickly change the wobble effect from one speed to another, sometimes extremely frequently from bar to bar.
This is best achieved by automating the LFO settings in your DAW since it can be fiddly to do by hand. In fact it’s often quicker to simply draw it straight into an automation lane rather than trying to do it by hand as it’s much more accurate. Some DAWs even let you copy and paste automation data or move it about independently of note clips, so it can be simple to apply one lot of automation data to another clip or track without having to recreate it all again by hand.
After you have your sound you’ll want to apply some effects, and it’s usually distortion that really does the job here – plus of course some compression. Delay too, provided that there’s a decent mid range or top end to the sound you’re working with.
Applying delay to very low end sounds usually just creates a kind of confusing mud and sounds a bit weird – but there’s nothing to stop you if that sounds up your street. If you’re feeling really creative you could even duplicate the part and then EQ or filter out the top end on one copy, and the bottom end on the other copy, and apply delay just to the higher part.
Focus On Automatic VS Manual
Automating LFO rates and speeds is key to getting that ‘quick change’ dubstep bass effect. This is easy in the vast majority of DAWs and involves either changing the LFO rate or speed parameter in realtime while the track is set to automation record mode (most do this automatically), or opening up an automation subtrack and actually manually entering automation data with the pen tool.
Both are good methods: entering it manually is more precise, while playing it in live by hand can produce some pleasing and unexpected results for a more live feel. You can always play it by hand and then go in and make edits afterwards which is the best of both worlds.
Programming a Dubstep Bass
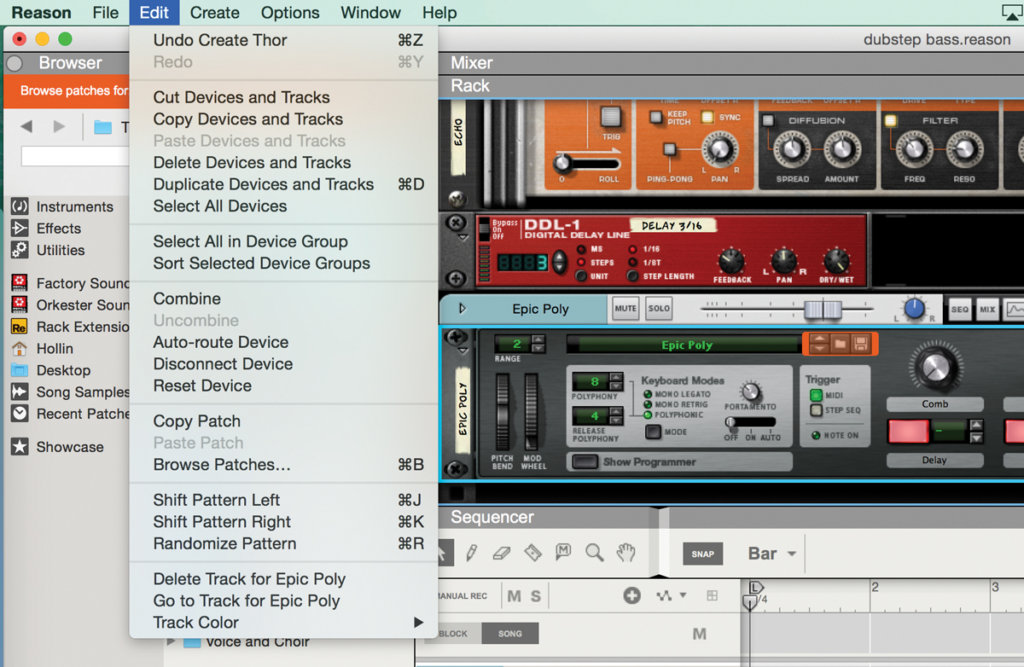
1: Start by loading up a synth. Here we’re using the Thor synth because it has exactly the controls we need to create a dubstep bass. Go to the Edit menu and choose Reset Device, which clears out all its settings.
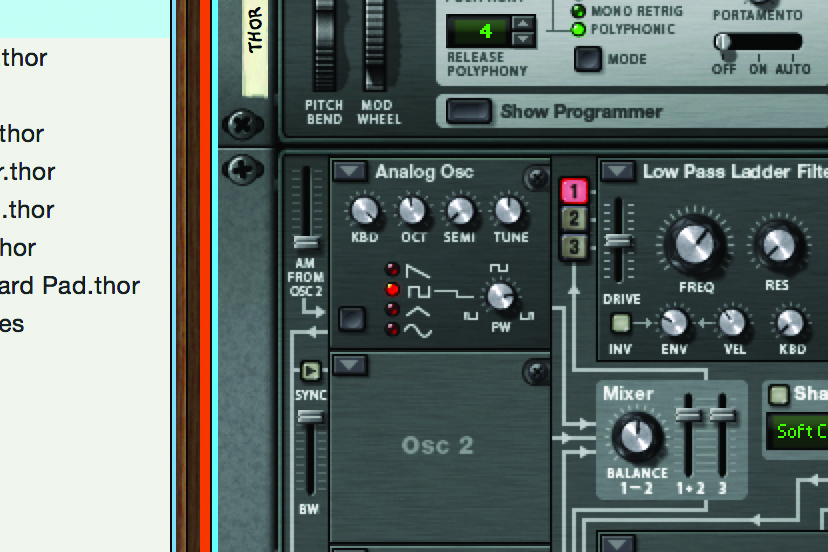
2: Now go to the oscillator section by expanding the Programmer and locate the OSC 1 section. There are multiple waveforms available so try a few to see what sounds good. Here we’ve gone for an Analog Osc with a square wave.
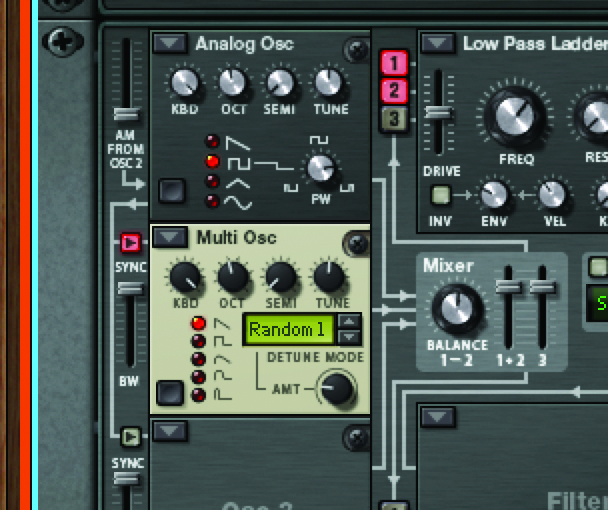
3: At the moment it’ll sound pretty lifeless but don’t worry. Go to the second Osc section and select another wave – here it’s a Multi Osc. You’ll also need to turn on the To Filter button and activate the sync osc 1 to 2 button.
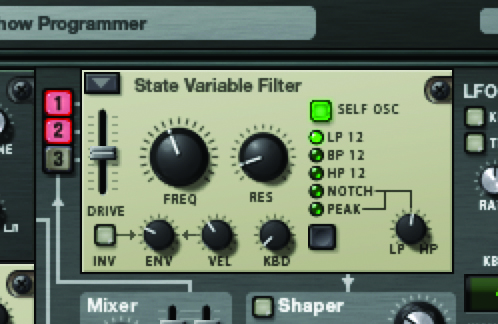
4: Go to the first filter section and switch to a State Variable filter then choose a LP filter type. You can try other filter types as several will work. Turn the filter frequency and resolution knobs until you get a nice fat sound.
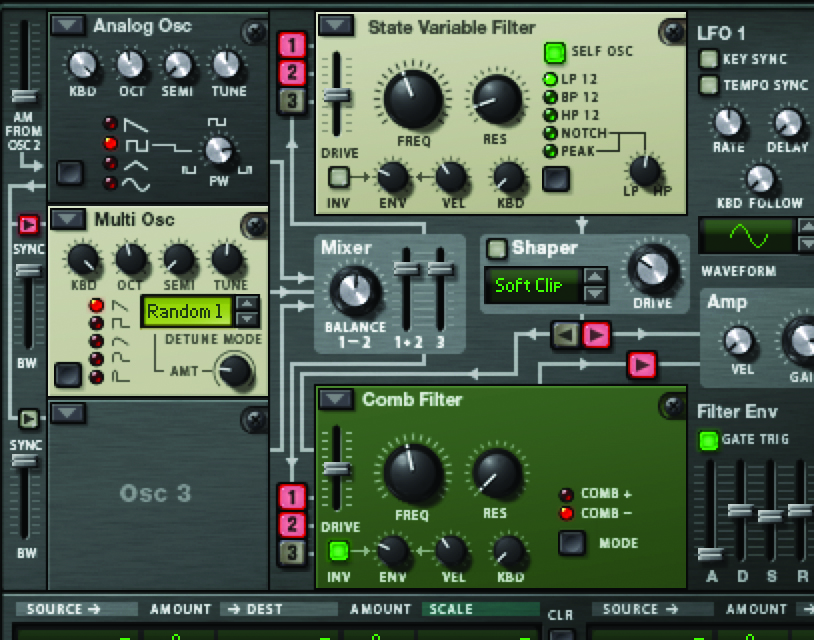
5: Now add a second filter using the lower filter slot. Again this can be whatever you like but here it’s a Comb Filter. We have also set Filter 2 to send its signal on to the Amplifier section which boosts the sound a lot.
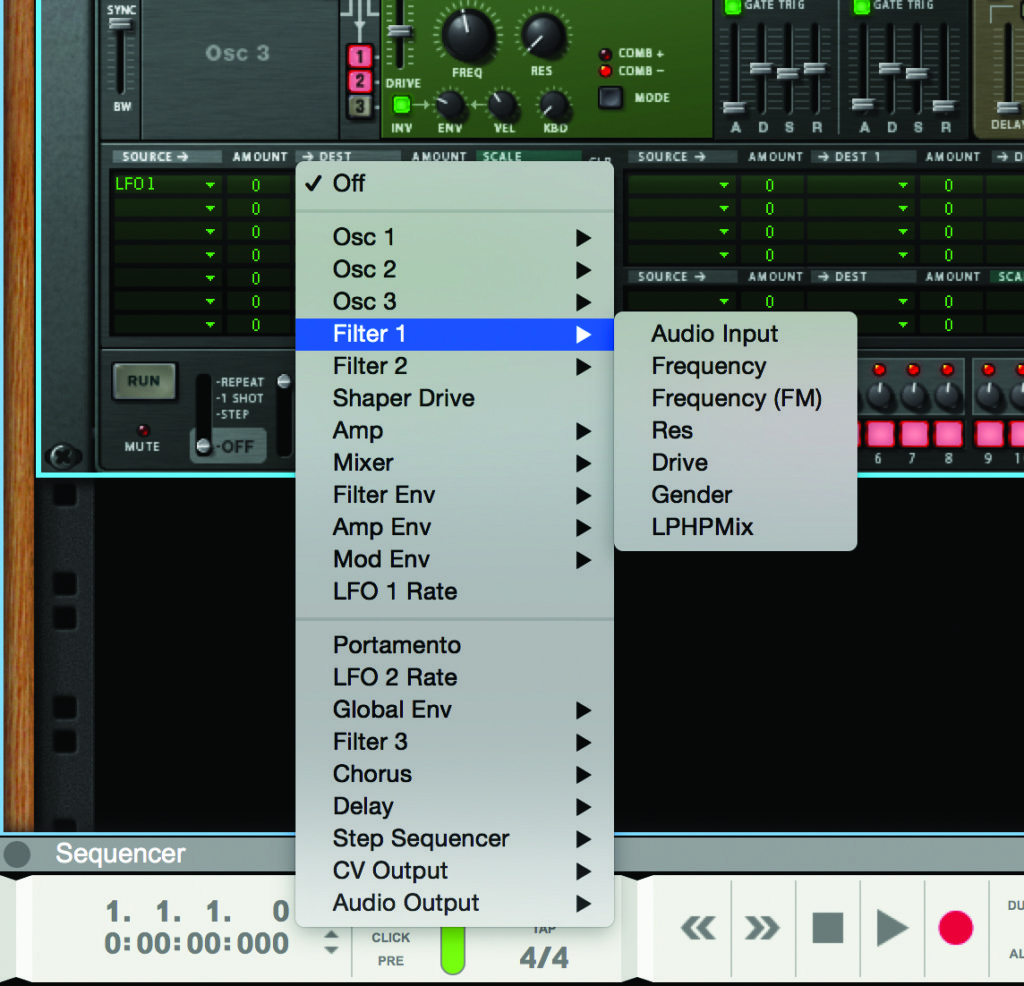
6: At this point you can start to add some modulation before you get too much further into the sound character. Go to the Mod Matrix at the base of Thor and in the Source column, choose LFO 1 and in the Destination column, Filt1 Frequency.
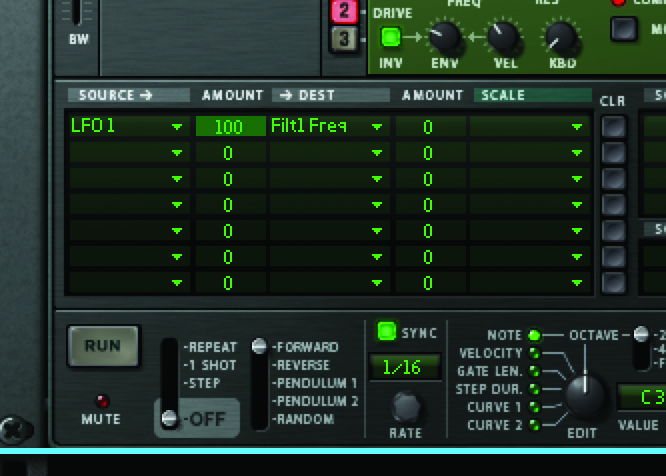
7: To hear anything you’ll need to dial in an amount in this row so that LFO gets applied to the filter frequency. Whack this up to 100 and press a note and you’ll hear some wobble effect.
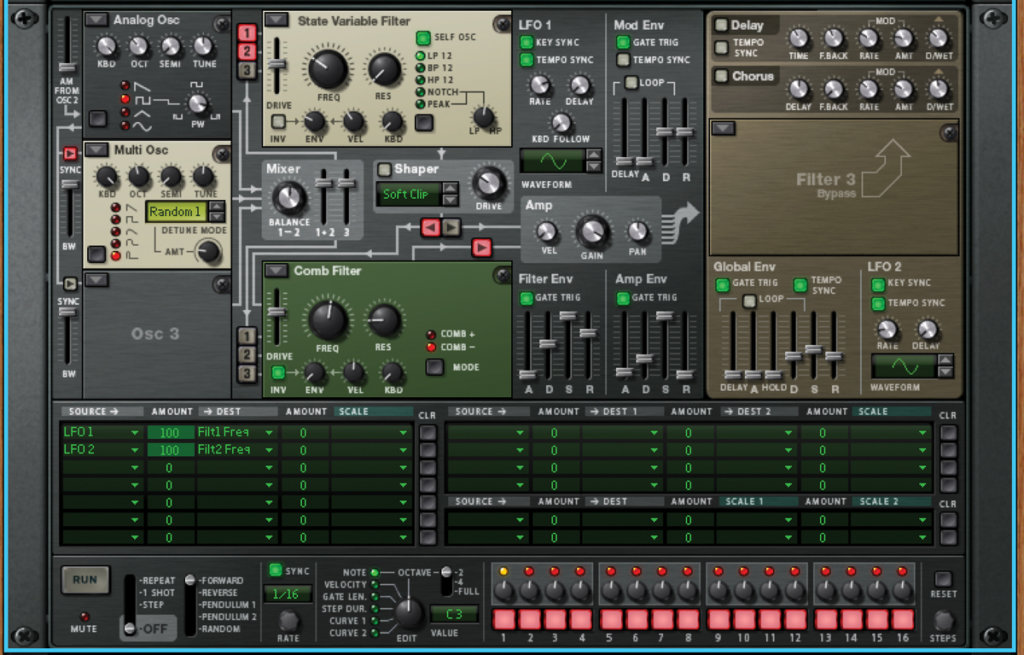
8: You should now have a modulating bass sound with a couple of elements to it – one high and one low. You can alter the filter controls and the oscillator octave and wave settings to customise the sound at any point.

9: To alter the character of the wobble you need to go to the LFO sections. Start with section 1 and choose a waveform and a rate setting to alter the speed and intensity of the wobble. Moving these controls should make pretty clear changes.
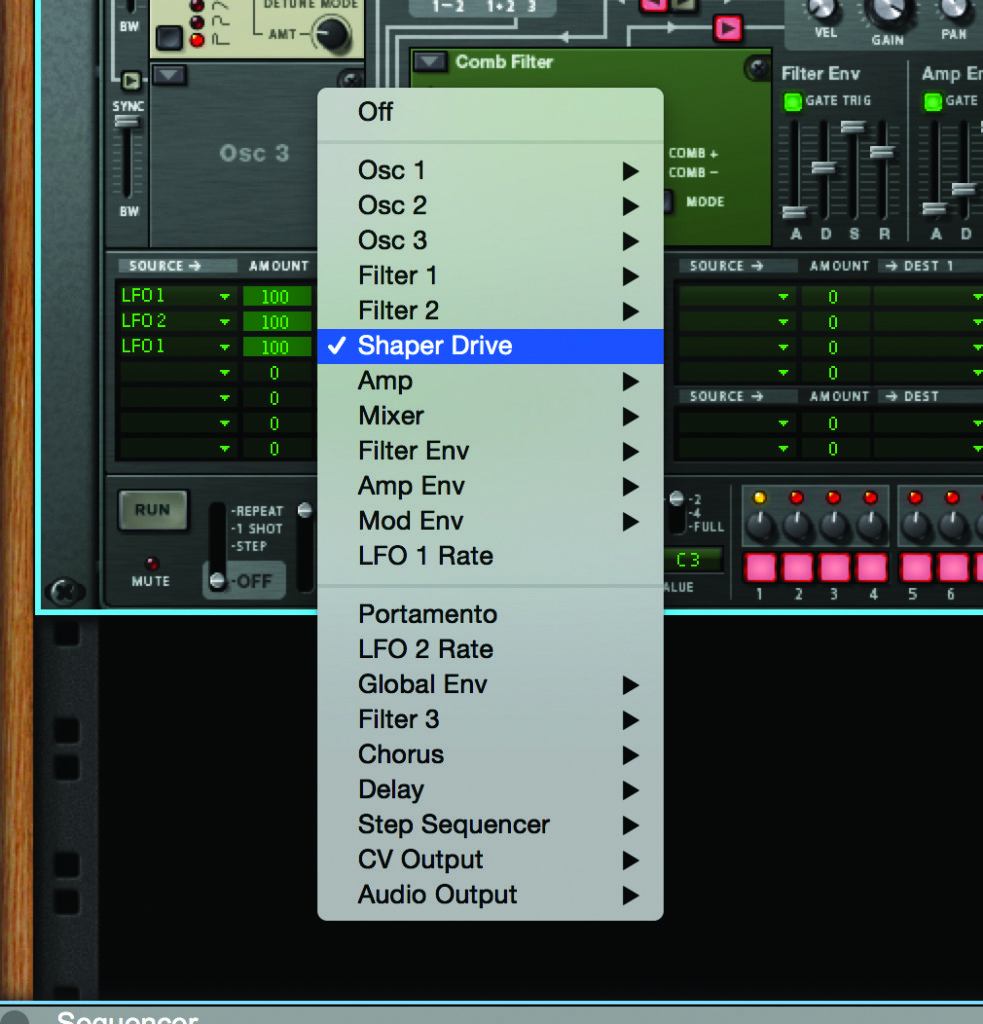
10: Repeat the same trick with LFO2, remembering that you can go back to the Mod Matrix and alter both the amount of LFO being applied and its target. For example, try assigning LFO1 to any number of other parameters to create a more dynamic patch
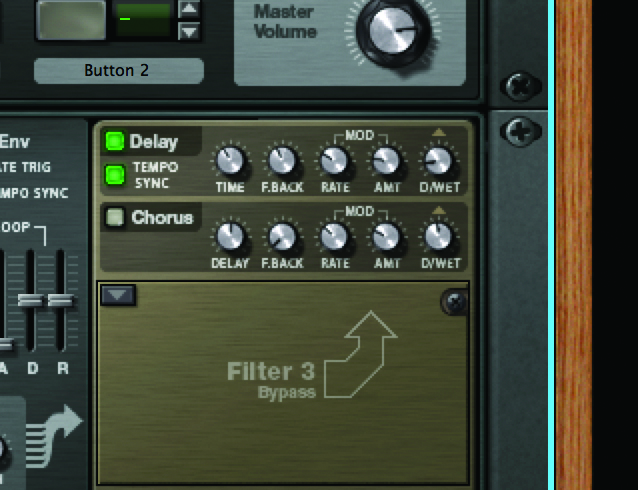
11: Since this sound has plenty of top end it’s safe to add some tempo synced delay, though it’s sensible to keep the dry/wet level quite low so it only really hits the top end of the signal and doesn’t swamp the mix.
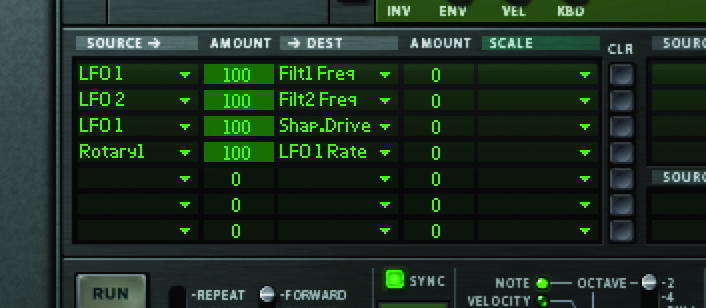
12: For even more flexibility, assign one or more of the rotary controls on Thor’s front panel to control the LFO rates. This will give you a nice hands-on way to quickly blast through wobble speeds, which is perfect for live performance.

